An elegant DIY glass table? How to make and assemble a table with a glass top yourself Making a glass table.
Glass table IR will be an excellent addition to any interior. However, its cost is quite high, especially for designer models. Therefore, it is much cheaper to make a glass table yourself. We'll look at how to do this further.
Glass table in the interior of an apartment or private house
Glass - environmentally friendly pure material, which harmonizes with almost all objects and adds chic to any room. Among the advantages of glass we note:
- combination with any materials such as wood, glass, metal, leather, plastic;
- stylish appearance;
- Fire safety;
- variety of shapes and colors;
- duration of operation;
- ability to transmit light;
- high level of strength when using special glass.

A glass table fits quite well into the living room or kitchen, as well as into the bedroom or children's room. This table makes the room more sophisticated, original and aesthetically attractive.
IN small room, a glass table will help to increase and expand the space. In addition, glass makes the atmosphere lighter and more relaxed.
For the manufacture of glass tables, for safety reasons, it is recommended to use durable strained glass, which is resistant to mechanical damage and scratches.
In addition, there is the option of making glass tables using unusual glass that is tinted, matte or glossy. In relation to the shape, the imagination is also limitless; tables come in ordinary square, round and oval shapes or asymmetrical - wavy. Thus, it is possible to install the table in a room with any interior style.
To make table legs, metal, wood, stone or beautiful forging are used. We invite you to familiarize yourself with the features of combining a glass table in the interior:
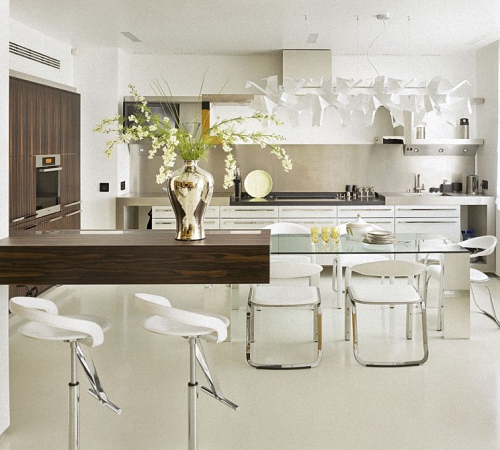
- An excellent solution would be to use a glass table in a room that combines a dining room with a kitchen and a place for receiving guests;
- glass tables or small tables are most appropriate for modern style interior - modern or high-tech;
- in order to make the accent in the room on a glass table, it is enough to use glass in bright, saturated colors or colored mosaics;
- A table with a dark glass top is distinguished by its high cost and special luxury;
- Coating the glass with special compounds will prevent the formation of stains on its surface.

DIY table with glass: a variety of shapes and configurations
Making a glass transfrer table will be excellent option for a small room. Models of sliding or folding type. It is also possible to build a table whose legs vary in height. If you install a table on small legs, it will function as coffee table, otherwise, it turns out to be a table for eating.
Coffee tables that have a glass top and legs made of wood or steel are quite popular and easy to manufacture. Such models have simple form, so in order to build them you don’t need any special glass cutting skills.
Chairs with bright upholstery will be an excellent addition to the dining table. It is possible to purchase chairs based on thermoplastic. In addition, the use of wicker chairs will also be quite relevant.

If you plan to install a table in the kitchen, we recommend choosing tiles, a refrigerator hood, and other equipment for this room. household appliances chrome color. You can place a basket on the table containing fruits or a vase of flowers.
A DIY kitchen table with glass can be an excellent decoration for any kitchen or dining room. Its installation in a small room is especially relevant. Transparent glass can expand and enlarge the space. To ensure that there are no streaks left on the glass after it is made, it is recommended to apply a special solution to the surface of the tabletop, which is sold in a hardware or furniture store.

Glass furniture made using the frame method
When making your own glass table and other furniture based on glass, this method is the most successful. To do this, you will need to have furniture board, in which a hole of any configuration is cut.
Next, the previously cut glass is fixed in it using a bead. Among the disadvantages of this method are the not particularly attractive appearance and the inability to install sufficiently thick glass.
With the help of mechanical fasteners, after a certain time it is possible to change the furniture and install different glass. The presence of a facet is mandatory.
Doors, windows, and some models are made in the same way. desks made of glass. Fixing the glass in the frame does not require additional processing, so the entire process is based only on the installation of the glass sheet.

Glass table photo and glass cutting features
Before the beginning this process You should decide on the thickness of the glass and the size of the glass cutter. There are different types of glass cutters:
- roller type;
- diamond type.
The first option is designed for thinner glass, up to four centimeters thick. Such tools have from one to six rollers. Each glass cutter has a cutting line. There are models that have an oil reservoir; for beginners, we recommend using them.
The cost of a diamond glass cutter is higher than that of a roller glass cutter. These glass cutters are capable of cutting glass that is more than one centimeter thick. In order to cut glass, you will need a flat, hard surface on which a thick film or fabric is laid. To ensure smooth cutting, it is necessary to have wooden ruler, if you need to cut glass of a certain shape, you should make a pattern in advance. For these purposes, we recommend using plywood.
Next comes the process of preparing the glass for cutting. To do this, the glass is washed and degreased. If the glass has a corrugated surface, then a diamond glass cutter will not be suitable for cutting it. In addition, such glass is cut exclusively with smooth side. Before starting work, we recommend taking a small piece of glass and trying to cut it in the right direction to get used to the tool and practice a little. When cutting glass using a roller glass cutter, the line along which the cutting is carried out is covered with turpentine solution.
The entire sheet of glass must fit on the surface without protruding beyond it. A thick ruler or pattern is placed directly on the cutting line. The glass cutter is held in the hand like a pencil and placed on a ruler. To prevent it from sliding on the surface, we recommend gluing it with fabric-based tape. The diamond glass cutter practically does not press on the surface, while in the process of moving it along it a strip is formed. If the pressure was too weak and the glass does not separate, then re-cutting is not carried out in the same place. This rule is relevant for both diamond and roller type glass cutters.
The roller glass cutter is placed in the hand in such a way that the ring and middle finger pressed on it. After cutting, a white stripe is obtained. Next, the glass is moved to the edge of the table and tapped from below using a glass cutter. Holding the main part of the glass, gradually break off the areas that are not on the table. For these purposes, you can use pliers or do it manually.
If you plan to perform shaped cutting of glass, then for this, a pattern is applied to the glass according to which the cutting will be performed. Next, this fragment is outlined with a rectangle, which is cut out with a glass cutter. Gradually, unnecessary parts are cut out with a glass cutter.
To ensure that the end sections of the glass are not sharp and uneven, sandpaper is used to polish them.
DIY glass coffee table
We offer an option self-made coffee table with chrome legs. In this case, the legs are fixed special glue, without the use of clamping mechanisms.
To purchase additional fittings, contact a hardware or furniture store. In order to build such a table, you will need chrome legs, the length of which depends on your personal preferences.
You will also need to purchase a special glue, after application of which no traces remain, and the glass adheres to the surface very firmly. This composition is capable of polymerizing only if there is ultraviolet radiation, which is produced by a special lamp. With this device, the entire process of making a glass coffee table takes no more than two hours.
Please note that using regular superglue or silicone sealant- unacceptable. Firstly, after using them, cloudiness and stains are visible on the surface of the table. Secondly, during the operation of such a table, after a maximum of a month, the legs will begin to move away from the surface.
Therefore, having decided to make such a table, you need to spend money on special glue with a lamp necessary for its hardening. At the same time, this glue, after hardening, will not allow you to detach the table leg from the glass roof; if you try to do this, the glass will simply break.

When constructing a glass coffee table, use glass that is at least 1 cm thick. To cut it, you will only need a diamond glass cutter.
To build a glass coffee table you will need:
- glass;
- glass cutter;
- rulers;
- pencil;
- mittens;
- glass glue;
- ultraviolet lamp;
- drills;
- file;
- sandpaper.
First, determine optimal sizes and the shape of the coffee table. Depending on this, it is recommended to make markings directly on the glass. The shape of the table can be either strict oval or rectangular, or arbitrary. To make the second option, you will need experience working with a glass cutter.
After marking the surface of the cover, begin the cutting process. We recommend checking the markings several times to avoid mistakes when cutting.

Before cutting begins, the glass cutter is dipped in vegetable oil, if necessary. The cutting process is described in detail above, we will not dwell on it.
After this, the process of grinding the ends of the glass surface follows; if this is not done, then there is a risk of injury when using the coffee table. To begin, put on gloves made from thick fabric, take a file and polish the surface. The following is the process of using a diamond-coated grinder, if available. The work is carried out at low speeds, the result is a slightly rounded, not sharp edge. Next comes the process of sanding the coffee table cover using sandpaper. The processing of the ends is completed with felt, which is sold in roll form. It is wound onto the surface, providing reliable protection glass In its absence, special paste-like compositions are used, which are applied to a pre-degreased coating. Their cost is much higher than that of felt.
The main step in constructing a coffee table is fixing the legs to the lid. To do this, the tabletop must be turned over and laid on a flat surface. First, markings are made according to which the legs will be fixed on the table. Next, glue is applied to the glass and the leg is attached to it. The work should be carried out by at least two people. To polymerize the glue, use a special lamp with ultraviolet radiation.
If it is not possible to purchase glue, we recommend using special suction cups. They are attached to the leg and then to the glass. For additional fixation of the legs on the suction cups, a small drop of wood glue is applied to the surface of the glass before installing the legs; it will ensure reliable fastening.
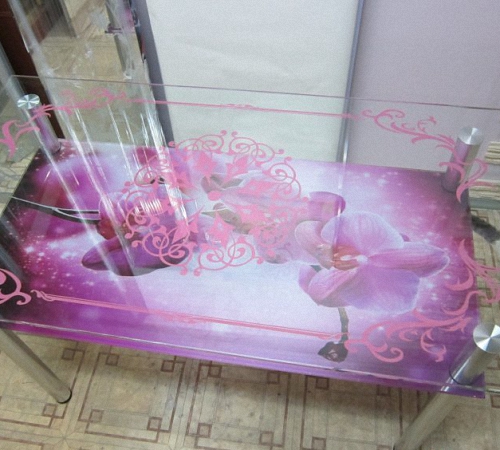
Install the table, and place books where the legs are fixed to improve the adhesion of the glass and the legs. After 48 hours, remove the books, wash the glass with special solutions and install it in the living room. It is possible to cover the glass with a special decorative film with different patterns imitating a matte surface, ornaments, flowers or mosaics.
Various glass cutting devices are designed for cutting a single sheet into fragments required size and shapes without chips, cracks or destruction. Such tools are indispensable for those who work with glass, and can also be useful for home use, for example, if you want to cut out a mirror or glass shelf.
Glass cutting tool
Glass cutting tools include the following:
- Diamond glass cutter. This instrument is the first instrument ever invented cutting glass. It is equally successfully used for professional glass cutting and for domestic purposes. It is designed as follows: a medium-sized natural diamond is mounted in a special holder with a handle. The holes in it make it easy to align the glass along the edges. This tool allows you to cut glass with a thickness within 10 mm. There are some models whose design allows you to rotate the diamond if one of the sides is dull.

- Glass cutter with artificial crystal. This tool differs from the one described above only in that it cuts using an artificial crystal - corundum. This crystal is similar in quality and hardness to natural diamond, but is less effective. The thickest glass that can be cut with it is 5 mm in thickness.
- Roller glass cutter. It is also common and effective device for cutting, which is carried out using a special roller consisting of a very hard alloy. It is mounted on a holder with a handle. Various models can have from 1 to 6 rollers. They cut glass up to 4 mm thick. This type The glass cutter is convenient because it is possible to replace or sharpen the rollers and continue to use the tool.

- Oil glass cutter. His distinctive feature is a special lubricant supplied from a container built into the handle. It is needed in order to reduce friction during operation of the tool. The design of such glass cutters provides the possibility complete replacement heads in case of failure of the cutting unit. An oil glass cutter is capable of cutting glass up to 20 mm thick. Some of its models have movable heads, which are indispensable if necessary figure cutting glass They are used to trace patterns along smooth lines.

- Glass cutter compass. This glass cutter comes to the rescue when a regular oil cutter is powerless, namely, in cases where it is necessary to cut a piece of glass in the form of a circle or oval. The most simple model This type is a suction cup, a rod equipped with a scale, and an oil glass cutter. It is designed for cutting circles. To cut ovals, there is a more complex model equipped with several rods. There are also universal models that have an even more complex design.

- Quick cutter This tool is used to quickly cut glass in straight lines. It is equipped with an oil head that lubricates the cutting lines with a special liquid. The quick cutter also has a scale on which the cutting width is set, and thanks to this, cutting is carried out at high speed. The tool makes it possible to cut glass several times faster and more conveniently. It also minimizes the risk of making errors when cutting.

Rules for working with glass cutters
When working with glass using special tools, haste and carelessness are unacceptable. You need to be careful and focused on your work, do not forget about safety precautions and follow a number of simple rules:
- Work must be carried out on a table that has an absolutely flat surface, without bulges or roughness. The glass itself must first be cleaned of dirt and dust, because even the smallest particles falling under a glass cutter can very quickly damage it;
- cuts are made by lightly pressing the tool, using a pre-prepared pattern of parts;
- the scratch left by the tool should not be crooked or deep;

- in case of using a roller glass cutter, it is necessary to attach more effort than in the case of using diamond. But with its help, a deeper cut remains;
- cutting the glass should be done in one motion. If the first cut is unsuccessful, running the instrument over it a second time is unacceptable;
- glass that has a cut is broken off along the edge of the table or along a ruler;
- To make breaking easier, the cut is lightly tapped with the head of the tool reverse side leaf;
- narrow strips of glass are broken off along the cut line using the side holes in the glass cutter head;
- To prevent the glass cutter from jumping off the glass surface during cutting and damaging the cutting element on its edge, a few millimeters before the end of the cut line, you should reduce the force with which you apply pressure on the tool.
Glass cutting equipment
In addition to glass cutters, there is also equipment designed for the same purposes, but making it possible to cut a much larger amount of material during the day. It is intended for industrial production. This includes tables for cutting glass, as well as laser, sandblasting, and waterjet machines. Let's take a closer look at each of these types of equipment:
- Laser machine. One of the main advantages of cutting sheets of glass using a laser is the speed with which the master can work. It is many times higher than the maximum speed possible with manual cutting. Another use of laser is more in an economical way, due to the fact that practically no waste remains during the work. After cutting the sheets, the parts do not need further processing of the edges, as with the manual version. They are melted with a laser and become more rounded.

A laser installation is capable of converting electrical and light energy into powerful radiation with a narrow focus. Its main advantage is that a beam of enormous temperature is focused into a point having a micron in diameter. Using a laser machine, cutting is carried out with perfect accuracy, because... All her actions are controlled by a computer, reducing the risk of errors to a minimum.
The laser machine cuts out the most complex contours, and the thickness of the glass can be any.
- Sandblasting installation. In this case, cutting is performed using a powerful jet of air containing abrasive grains. A sandblasting machine is a device that includes a chamber for laying abrasive material and a chamber for mixing it with compressed air. Next, high pressure is created in it, under which air with abrasive particles moves through the hoses and is thrown through the sandblasting gun into the surface being cut.

- Waterjet installation. This method It is very similar to sandblasting, only it uses water instead of air. A waterjet machine supplies water containing abrasive particles to the cutting line under high pressure. As in the previous case, they mix with each other in the installation chambers and gain enormous speed, making high-precision cutting possible. The operation of the device is controlled by a computer, which monitors the parameters and sets the trajectory. This method is used to cut out the most complex and unusual shapes, for example having broken lines, and internal cavities. Some types of products can be manufactured exclusively on this equipment.

- Glass cutting tables. They are divided into several types:
- tables without bridge. They are usually used by small window production enterprises, which produce from 50 to 100 double-glazed windows during the day. Such tables are equipped with lifting tabletops, along which the glass moves using rollers. Glass is cut manually using glass cutters and quick cutters. The design of the tables provides for the presence of longitudinal and transverse glass break bars;
- semi-automatic tables with manual bridge. This option is acceptable for larger organizations with a production volume of up to 200 units per shift. Such tables can be equipped with special rulers for measuring along the X and Y axes; they can move the glass along their surface using a pneumatic cushion or pneumatic rollers. They are also equipped with levers for lifting the tabletop, which have gas shock absorbers, strips for breaking glass on cuts, digital devices, controlling dimensions. In addition, the glass cutter is automatically lubricated, and its pressure on the glass surface is also regulated;

- automatic tables. During a working day, 400 double-glazed windows and more are produced. Cutting parameters are loaded into them, after which cutting is carried out in a fully automatic mode, by moving the bridge. In this case, breaking along the lines of cuts in some models occurs on the same surface, while in others it moves to a separate table. Most of automatic tables are equipped with special sensors that react to foreign objects entering the cutting zone. In this case, the process stops immediately;
- automatic lines. They are capable of producing more than 500 units per shift. The lines consist of automatically operating mechanisms that load, cut and break off glass. This happens as follows: the device responsible for loading the glass uses special suction cups to take the glass from the pyramids in which it is stored and places it on the table. The bridge precisely places the glass on the table, guided by the previously loaded parameters, and makes the cut. At the same time, the loading device is already taking the next sheet. The cut glass is transferred to the breaking surface, which frees up space for manipulation of the next sheet.

Advantages and disadvantages of different glass cutting methods
Advantages of manual cutting:
- simple equipment, the ability to work at home;
- low cost and availability: glass cutting tools can be easily purchased at any hardware store or market;
- ability to cut quite complex parts.

Disadvantages of manual cutting:
- any mistake can result in material damage or defects;
- quite a labor-intensive method.
Advantages of laser cutting:
- high speed and perfect cutting accuracy of material;
- no waste;
- perfectly smooth, blunt cuts that do not require any processing;
- Thanks to high-precision technology, it is possible to join cut parts without an optical gap.
Disadvantages of laser cutting:
- If foreign particles or substances get into the cutting zone, unwanted cracks may occur. To eliminate this possibility, the glass is annealed before cutting;
- Only a professional with special skills and knowledge can perform work using a laser system. It is not suitable for home use.

Advantages of sandblasting:
- This method not only cuts, but also decorates glass;
- high-precision and high-quality cutting;
- the ability to create products of complex, asymmetrical shape.
Disadvantages of sandblasting:
- high cost of equipment;
- cannot be used at home.
Advantages of waterjet cutting:
- no damage or defective material;
- processing capability large quantity glass;
- minimal pressure on the surface being processed and, therefore, no risk of destruction of the workpiece;

- in the cutting zone the temperature does not exceed 100°C, so the edges of the product do not melt;
- Only this method is used to make, for example, openwork and some other products;
- This method of cutting glass makes it possible to combine parts different shapes and colors, while receiving exclusive products;
Disadvantages of waterjet cutting:
- expensive equipment requires a specially designated room for operation;
- cannot be used without knowledge and experience in operation.
Almost every person who has done something for his home at least once in his life with his own hands begins over time to feel the desire to put in his efforts again. It’s so nice to see the result of your work every day, especially if this craft becomes a noticeable accent in the interior of the house. A new glass table can become such an accent. Some people wonder how to make a glass table with their own hands.
The glass table does not absorb moisture and grease, and is also very easy to clean.
The process of making it requires care and precision, but the end result is worth it. A little time, and you can proudly show it to your friends and relatives new item interior, made independently. Let's look at how to make a glass table.
Pros and cons of a glass table
Advantages of a glass table:
- suitable for any interior;
- hygienic;
- easy to care for;
- relatively light;
- does not absorb fat;
- glass can be treated with any cleaning agents.
These tables also have quite noticeable disadvantages. Glass tabletops do not dampen sound, so the operation of the table is accompanied by characteristic sounds. In bright light, stains and fingerprints become noticeable on the glass.
Return to contents
How to make a glass table with your own hands

First you need to choose the shape, style and size of the table. It can be an ordinary rectangular glass table in a high-tech style or in the style of an oriental fairy tale. You need to decide what role it will play in the already established interior. After all the tasks have been determined, all that remains is to prepare necessary tool, materials and go!
To make a glass table you will need:
- glass cutter (it can be diamond or roller);
- pliers with rubber gaskets;
- metal ruler;
- rubber hammer;
- the material itself for making the table (it is better if its thickness is at least 6 mm).
You can choose any glass for making the table. It can be transparent and matte, colorless and colored, smooth or textured and many more options.
But if you take ordinary transparent glass and then decorate it using any method, you can end up with a unique piece of furniture.
The choice of material for making a table can only be limited by the imagination of the craftsman. For these purposes, you can use wood, metal, plastic and glass. In addition to the main tabletop, the table design may also include an additional shelf.
Return to contents
Cut glass

In order to cut the tabletop into the desired shape, you need to apply its future contours to the glass. It is better to carry out this work on a special table, so as not to carry the workpiece from place to place and not expose it to the risk of being broken. First, you need to practice on scraps of glass, then cutting out the tabletop itself will be a little easier. The cut must be made using a metal ruler. The pressure applied to the glass cutter is determined by its sharpness. So, you don’t need to press as hard on a diamond glass cutter as on a roller cutter.
It is necessary to observe safety precautions when working with glass! Be sure to wear gloves to avoid hand injury.
After making the cut, you need to separate the edges of the glass. This can be done by hand or using pliers. In addition, the glass cutter has a special device necessary to break off a thin edge. As a result, we get a glass tabletop of the required size and shape.
The next stage of manufacturing is processing the edge of the glass. This can be done either manually or using a special machine. To process glass manually, you will need a file or emery block. When using a file, you will need some soaking fluid. It can be turpentine or kerosene. You need to work especially carefully. Movements should be uniform and smooth. After rough processing The edges of the glass must be ground and polished. This can be done with a drill or grinder using a special attachment. To sand the edges, gradually reduce the grit of the sanding wheel. Polish the surface using a special paste and felt.

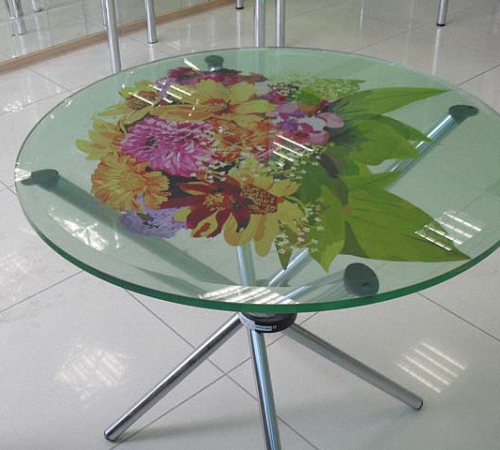
Figure 1. To prevent the design on the glass table from being damaged, it must be applied from the reverse side.
So, the base of the tabletop is ready. Now you need to make the underframe. There can be many options here. All that remains is to attach the tabletop to the base.
Fastening is carried out using special suction cups and glue. In order to fix the suction cups on the legs, you need to drill or cut holes in them. The glass is fixed to the suction cups with a special glue, which dries under the influence of ultraviolet rays.
The glass table is ready. All that remains is to decorate it. Here are the most common options.
Return to contents
Glass painting using stained glass technique
Materials:
- palette (it is better to use a piece of the same glass);
- stained glass paints;
- drawing stencil;
- contour paints;
- White paper;
- solvent;
- stationery knife;
- cotton wool;
- ammonia;
- water.
First you need to thoroughly degrease the glass surface. Then you need to fix a sample of the design and carefully transfer it onto the glass using contour paint. If it doesn’t turn out very neatly, you can remove the excess with cotton wool. If the outline is thin, you can correct it using a cotton swab or toothpick.

Figure 2. After painting, the drawing must be covered with a layer of varnish.
After the outline is completely transferred, remove the pattern sample and attach the glass to a sheet of white paper. We mix stained glass paints on the palette to obtain the required shades and apply them to the prepared sketch (Fig. 1).
You can get rid of any bubbles that appear with a toothpick. The finished drawing needs to dry completely. To decorate a tabletop, this technique is best used on the underside of the glass (Fig. 2). For greater durability, the surface should be coated with a layer of varnish.
Almost every item in the interior made with my own hands, is able to bring something completely new and refresh the existing environment. One of these options could be a wonderful glass table or countertop, which you can easily make yourself, even at home.
A glass table can fit into any interior style.
But before you start carrying out work, you first of all need to very carefully read the advice of experienced and qualified specialists. They clearly and step by step tell you how to make a glass table with your own hands, what features it has and what kind of tool you will need for this, as well as what you should pay special attention to.
Features of the glass product

You should immediately decide what shape, as well as the type of glass table you want to get in the end - these could be the following options:
- with a single solid tabletop;
- transformable tables;
- with or without frame.
In addition, they may differ in the shape and size of the tabletop, the type of glass used (frosted, transparent, colored, multi-colored, and so on). Thanks to all these features, the glass table not only fits harmoniously into various styles interior, but also emphasizes them favorably. And in some cases it is one of its central objects. In addition, it is worth paying attention to other design features, for example, on the shape of the legs, the presence of a shelf under the tabletop, etc.
Return to contents
Design characteristics
- The glass table has a very stylish and interesting appearance - it fits perfectly into absolutely any modern interior, and at the same time creates a special feeling of weightlessness.
- Relatively light weight.
- Practicality and versatility. This can be achieved thanks to the most modern innovative technologies, which make it possible to use reliable, durable and high-quality glass.
- Safety.
- Hygiene.
- High resistance to aggressive chemicals(washing and cleaning), as well as high temperatures and humidity.
- The products are easy to maintain. They are easy to clean, and such a surface does not absorb grease.
Despite all the above features, making a glass table also has a number of negative aspects:
- Grease stains are clearly visible on the surface (especially with sufficient lighting). This is why you should think carefully before placing a glass table near a window.
- Such tables are quite noisy - this manifests itself when the dishes come into contact with the surface of the tabletop. You can, of course, cover them with a tablecloth, but in this case the main meaning and main idea of a glass table is lost. It's best to use special stands instead.
- Constant external prints also quite irritate the owners of glass tables.
Return to contents
Preparatory work

To make a glass table, you need to prepare tools for working with this material.
Before you begin the process of making a reliable and attractive glass table, you need to decide exactly where you intend to place your new element, what task it will perform - the main or secondary one. Immediately after you have completely decided on the main purpose of this device, you will need to draw a sketch in full accordance with your entire room interior. You should definitely indicate on the drawing the exact location of the legs and the size of the glass tabletop itself. To get started, you will need the following tools:
- diamond or roller glass cutter;
- metal long ruler;
- an ordinary rubber mallet;
- pliers that have rubber linings so as not to break the glass itself.
You also need to take care of the characteristics of the glass itself. It can be tinted, transparent, colored, textured, mirrored, etc. When selecting a canvas the best option Tempered material will be used; the thickness of the glass used for the table should be from 6 to 12 mm.
The glass must be extremely clean, dry and wiped.
To completely clean the surface from spraying, you can use a solution of regular baking soda and rags. This is extremely important, since during work with various dirty materials, entire splits can occur, and the glass cutter will begin to wear out faster. The glass prepared for cutting must be placed on a special table with a flat surface or on a massive sheet of plywood or chipboard. The material must fit tightly with its entire plane to the table. You should also put a special rod under the line of the intended cut, thanks to which you can easily draw the contours, lines and much more you need. The most ordinary thick wire can also act as a rod - the most important thing is that it is visible under any covering of the table surface.
Return to contents
Glass cutting technology

It is better to cut glass using special device, consisting of a wide stand and a fastening ruler.
Cutting table glass must be done exclusively using a metal ruler - directly, and it is preferable to use the thinnest one here. Highly qualified, experienced specialists can carry out full cutting of any glass, even “by eye” - to do this, you need to measure the length you need with a regular tape measure, then move the glass itself to the edge of the table and use a glass cutter. You can also mark the line of the cut itself with an ordinary felt-tip pen, and then, without using a ruler, you will need to run the glass cutter along the surface of the glass. This is not such a difficult job, and training can add confidence to you and increase the chance of making a correct cut without chipping. Tip: for work, you should prepare all the tools in advance, then you need to moisten the glass cutter with regular vegetable or any other oil. It is advisable to cut the glass at once.
Glass tables are always distinguished by their attractiveness and sophistication. They are able to give any interior, regardless of the style in which it was decorated, freshness and presentability. If your plans do not include purchasing additional furniture in the near future, do not be upset. Making a glass table with your own hands is not too difficult, and therefore even a novice master will be able to cope with the task. If you follow the instructions below, you can create your own table with a neat glass plate top.
The variety of models is quite large, and therefore, even before starting work, you need to decide which option you need. If we consider functional purpose, then we can select the following types tables:
- magazine;
- writing;
- kitchen;
- computer.
Desk Dinner table
Computer desk Coffee table
Determine not only the purpose, but also other parameters of the furniture before assembling the glass table. The products also differ in shape. The model can have a round, square, rectangular or non-standard shape.
Of course, if you are considered a novice craftsman, then it would be better to choose a simpler option so that the manufacture of a glass table is successful. Use finished drawing to simplify the task and avoid making mistakes.
1
2
3
What will you need for work?
To create a glass table with your own hands to be successful, you need to purchase or prepare the following materials:
- sheet of glass Both regular and special glass are suitable, the main thing is that the thickness of the plate is at least 6 mm;
- legs. Masters believe that in this situation the best way chrome-plated metal blanks are suitable;
- devices for securing legs;
- glue for special work. This substance is suitable for joining glass surfaces and metal element. It is important that after complete hardening it remains transparent;
- sandpaper, instead of which it is allowed to use special remedy for grinding glass surfaces;
- gasoline (as an option - acetone);
- chipboard or plywood sheet, which will then be needed to ensure the glass plate is level.
It is impossible to complete the job without having the following tools at hand:
- ruler for taking measurements;
- marker (or simple pencil);
- glass cutting device;
- glasses and gloves that can provide protection when performing work;
- hammer with rubber nozzle;
- drill;
- grinding machine;
- file;
- felt wheel intended for polishing.
How to make a glass table with your own hands?
1
2
3
4
5
If you are interested in how to make a table, follow the instructions provided:
- Cut out the tabletop and finish its edges. To ensure that the result pleases you, make sure that the glass is located on a flat surface; you can use a table for cutting glass, if possible. Before working with glass, wash it, removing foreign particles, and polish it. The fact is that even the smallest pieces of dirt can make cutting work difficult. If you do not prepare the surface properly, you risk making an uneven cut. Use a pencil or marker to mark the bottom. Place a ruler over the line. Use a glass cutter to cut the material along the marks you made. Please note that glass cutting equipment is not very easy to operate, so it is better to practice a little on unnecessary glass elements. Gently tap the cut line and separate the cut area. Wear gloves when performing this work to avoid injury.
- Carefully process the outer parts of the glass workpiece, using for this purpose special tools. First, remove the largest ones. uneven areas, using a file, and then take grinder And sandpaper to get the job done efficiently. Do not neglect safety precautions and wear glasses that can protect your vision from foreign particles. Remove sharp edges, starting with the largest imperfections and ending with the smallest imperfections. Shape the glass plate into the desired shape. Polish the edges of the workpiece using a special paste and a felt wheel. This will make the countertop look more aesthetically pleasing.
- The assembly process requires special attention. First, turn the product over, and then mark it, determining the places where the legs will be located. In the upper part of the product, drill holes to fix the suction cups, apply a little adhesive and assemble the individual structural elements. Repeat the procedure using the next 3 legs. As a rule, this is enough to firmly attach one part to another. However, to make the connection more reliable, experts use a special adhesive. To ready product it looked presentable and neat, you need to choose the right thing to glue it with. It is important that after hardening it remains completely transparent and does not spoil the appearance of the leg. Fully assembled tables should look neat even upon close examination.
- If you wish, you can make the furniture more mobile. A table on wheels is always easy to use and practical. When cleaning, you will be able to move it from place to place without much difficulty. To make your own table on casters, follow the instructions above. Having made the product according to this scheme, work on its legs. Choose suitable accessories (if desired, you can take rollers from an old skateboard that is no longer in use). Make sure that they are located at a distance of 100 mm from the edge and are fixed strictly parallel to the slats.