How to build comfortable cages for rabbits. What types of cages are there for rabbits and how to make them yourself? make cages for rabbits of different breeds
Even in our global and technocratic society, where everything can be purchased in a store, subsistence farming remains relevant to this day. The most profitable and low-cost method of domestic animal husbandry is rabbit breeding. But, like any Living being, the rabbit should have its own comfortable corner of residence. These animals are kept in special cages located in the barn. Every novice rabbit breeder should know how to make a rabbit cage.
Such a process will not seem laborious if all the conditions for rabbit breeding premises are met. One of the main requirements is compliance with the scale of such buildings. Therefore, you first need to determine the size of the cages for rabbits. Even with a small number of animals, one cage for all will not be enough. You need to plan at least three pieces. First you need to prepare drawings of cages for rabbits.
Required space for 1 head
A detailed drawing showing even the smallest design details will ensure you have a reliable construction.
There are many known design methods for how to build a rabbitry. Some provide comfort to animals, others are convenient for the owner due to financial costs. Each rabbit breeder chooses himself best option, based on your capabilities. But, nevertheless, more often they make cages for rabbits with their own hands. According to reviews, simple rabbit mesh cages are popular. Such material can be found in any construction supermarket, or you can rummage through your old supplies. Let's look at the process of creating a cage for rabbits from a mesh with your own hands.

Mesh rabbitry
There are many varieties of such cages; the following structures have proven themselves best:
- a cage without a supporting structure with supporting supports;
- frame cells.

Homemade galvanized checkered weaving with strong wire will serve for the production of such structures. For the tops and side sections of the cells, a mesh with links of 25x50 mm will be sufficient. The lower part involves the use of small cells to prevent the paws of furry animals from slipping. Once you have determined the dimensions, construction can begin.
In our case, the cage will be an externally mesh structure surrounded by a base with legs.
Step-by-step production
The construction of such a structure consists of several stages. Before you make a rabbit cage with your own hands, you need to cut out certain parts of the sides based on the size.

A template made in advance will help create the front and back parts of the same size, which are carefully cut out from the mesh roll fabric. Then the side parts are cut, completely matching their perimeter.
- The constructed rectangle is covered with a roof, and a fine-mesh mesh will serve as the base of the floor.
- Initially, fastening elements form the walls.
- Next, the base of the cage is installed. At the same time, the mesh weaves of the front part of the very first cell are removed. A tray for animal waste will be located here.
- Having outlined the doorway, we form a slot. There may be several of them.
- The doors are also made using mesh and secured with fasteners.
- A mesh ceiling is laid on top of the resulting box.
- The frame is made separately using wooden blocks. If the drawings with dimensions are drawn out accurately and exceed the cage itself, our structure will easily fit into its supporting base.
Step-by-step photo instructions


The main work is done, now you need to attach ready-made designs to Wall metal parts and install limiters to prevent the cage from swaying when the animals move. The sides and back are covered with plywood sheets, which are cut relative to the dimensions of the frame, and not the size of the mesh formations. Now all that remains is to fill the holding area with the accessories necessary for the life of rabbits: feeders, drinking bowls, a tray, and you can populate the rabbitry with animals. This is the most common way to build a rabbit cage using the mesh method.
Mikhailova's rabbitry
The production of cages for rabbits must be thoughtful and serve as a guarantee that the animals will actively develop and gain weight. A popular scheme for such development belongs to I. N. Mikhailov, a famous rabbit breeder. Mikhailov's rabbit cages have accessible and understandable instructions for the stages of construction yourself at home.

Mikhailov's cage is manufactured according to already developed drawing projects.
The essence of his technique is to divide the cell into three parts: top, bottom and support section, each of which has its own functional affiliation. So, the upper part has one or two tiers, the lower base contains a tray for collecting feces, as well as a compartment where they are stored and stored until removal. The stand frame also serves as a fixing base. And the compartments of the Mikhailov cage for rabbits, intended for drinking and feeding, move out slightly.

Thanks to this scheme of housing, Mikhailov’s rabbitry requires minimal care– about an hour a week, and the animals are kept outside all year round.
The housings are mainly made of metal, and wood is used for insulation. There are simplified versions of similar premises for rabbits, differing in appearance, therefore, let us highlight the main features of the cell size ratio according to the Mikhailovsky method:
- the total area of one section accommodating a pair of animals ranges from 1.4 square meters. m.;
- the height of the cage is 2.1 m, width 2.4 m;
- each section of the cage is constructed with a width of 0.6 m and a height of 0.7 m;
- The queen cells are 0.4 m long and 0.35 m wide; the cone for collecting waste products can have any size.

The base in the form of legs on a frame stand reaches a height of 1.4 m. Needs to be fixed load-bearing structure fixing elements. This ensures the necessary stability of even the most simplified design.
Rabbit farm Zolotukhina
One of the most popular cages today are cages for rabbits by N. I. Zolotukhin, a man who put forward a number of necessary transformations that bring the conditions for keeping animals at home closer to natural features their life activities. This is how Zolotukhin’s cell, economical and quite simple to create, appeared.

This design saves space and does not require daily cleaning, making it easier for rabbit breeders to maintain.
Let us highlight the main features of N. Zolotukhin’s design option:
- By using flat slate or a sheet of plywood is used to make the floor. The mesh is attached only to the floor of the rear covering. There is no tray provided at all. The developer states that rabbits almost always urinate from the back of the cage. This is where most of the feces are collected. The rest of the feces are scattered by the rabbits on the floor.
- The building has complex design, including six compartments located on floors. Each higher floor is shifted relative to the floor next to it, equal to the width of the grid in the floor. And the front side, connecting the floors, represents a kind of slope.
- The queen cell is completely absent. In cold weather, there is additionally a special shelter for the mother rabbit and baby rabbits.
Cleaning is carried out using a goose fan as a sweeping device.
Cage for rabbits in 2 tiers
Usage multi-storey structures for rabbits at home and to this day is the most compact and convenient option rabbit breeding. There is nothing easier than building rabbit cages with your own hands in 2 tiers.

Assembly diagram
Experienced owners have developed special instructions, the manual of which contains the following provisions:
- wooden blocks are connected to form four rectangular bases;
- using a mesh with small cells, they make the floor, then install the side walls;
- since the first floor contains trays for feces, the floor is made pitched for ease of removal;
- Trays for domestic rabbits are prepared using timber. The second floor must have a strong plywood sheet under its base to prevent contamination from reaching the first floor;
- the ceiling is made at the last moment using waterproof materials.

To support two floors, it is designed reliable frame. To correctly carry out such a cage design for rabbits, the drawings must always be kept at hand. Two-tier cages for rabbits have a structure layout in the shape of the letter “U”, represented by standard blocks attached to each other with self-tapping screws.

With these simple techniques you can make cages for rabbits with your own hands, which in their reliability and comfort will not be inferior to factory designs.

Depending on the age and size of the pet, the cage parameters may vary. For example, for rabbits of the "" breed, special cages will be required. Certain breeds will also need their own special cages.
The length of the cage for females with hatching should be 175-185cm, width – 1m, height – 60-70cm. During the hatching period, it is important that the female feels comfortable. Rabbits are incredibly afraid of dampness and drafts. Place the cages so that they are not constantly exposed to the sun. The façade of the cage should be placed to the east or west. Dig the pillar into the ground (to a depth of 0.6-0.8m), place stationary cells. Portable cages can be placed on stands or wooden trestles. Single-tier cages can be installed at a level of 70-80cm from the ground. In order for rabbits to move easily in cages, the structures must be free. For rabbits weighing over five kilograms, cages with a length of 130-150 cm, a depth of 70 cm, a back wall height of 40-45 cm, and a front wall height of 55-60 cm will be required.
Group cages are used for transplanted young animals. In such cages you can simultaneously keep from eight to twenty rabbits.
From three to five animals under three months of age or two to three rabbits over 3 months of age are kept in individual cages.
For one rabbit, the cage area should be at least 0.5 square meters. m, at least 35cm – wall height.

When making group cages, take into account the number of individuals, because each animal will need at least 0.15-0.20 square meters. m.
External cages for keeping rabbits can be one-, two-, or three-tiered. There should be 35 cm from the surface of the ground to the cells of the lower tier.
IN winter period When you need to care for suckling rabbits, you should cover the floor in the nesting compartment with straw. The layer of straw is up to twenty centimeters.
Choose non-artificial materials for making the cage. Synthetic materials have a bad effect on the development of rabbits - this rule is important for all breeds of rabbits.
Cage for adult rabbits

Since large cages are needed for a female with a hatch, a cage with the following parameters will be sufficient for an ordinary rabbit: width 60-70cm, height - 60cm, length -100cm. These are the minimum cage sizes for one adult.
The rabbits are growing, and they will need larger cages. For adult rabbits, cages with the following parameters are suitable: width – 60-80cm, height – 50cm, length – 120-150cm. Farmers say that in such a cage an adult will feel free and have personal space. Experts agreed that the floor of the cage should be made of mesh or slats. In appearance, the cage should resemble a block consisting of two cells, each of which can contain an adult.
You can fence off the feeding and nesting compartments of the cage with a wall, although the pet will not get lost and will find food.
When choosing cells, you need to take into account gender. A cage for a female rabbit will not suit a rabbit, although they will be of the same type. Consider the size of the cage and external conditions when creating a cell.

A two-tier shed is a row of cages placed in one or several tiers. Details about. Suitable choice there will be a two-tier shed - it reduces the working area, does not complicate the control and care of pets. This design is used in the southern regions or on the street. But such an enclosure can be organized in a barn or for the use of summer keeping rabbits. The shad should not stand on the ground. It is preferable to place it at a height of 50-60cm. Considering the size of the pet, the width of the shad should be up to 2m, depth – up to 1m. You can also make a two-tier shed yourself. You will need boards, slate and a durable steel mesh. The shed is built on a one-sided principle. A concrete foundation will increase the stability of the structure. Improved design includes manure channel and drip trays. Sheds – The best way for keeping rabbits. Arranging a shed allows you to keep several pets and makes caring for rabbits easier.
It is important to make a drawing of the cage and in the future add additional houses or even rows of houses for new pets. In the sheds, all the cells are the same in size, the houses are covered with a canopy, placed close to adjacent structures and placed one above the other. The convenience of this design is that the rabbits will spend spring and summer outside.
In winter, rabbits in sheds are given specially heated water. Typically, a nursery for grass or hay is set up between two houses. The cages have waste-free hopper feeders - they need to be loaded for 3 - 8 days. The bunker feeder can be made from steel sheets. In spring and summer they use automatic feeding drinking water for rabbits. The passage in the shed is located at a slight slope from the center to the exit. The rear walls of the cage form the walls of the shad. The sheds have small windows with bars. In winter, the windows with bars are closed with folding doors. Doors are made with inside cells. Be sure to hang drinking bowls and feeders. An overhead road for trolleys (for transporting feed) is equipped along the middle passage.
You will need a double cage with a queen cell. The queen cell is a removable compartment where babies up to a month old will be kept. It is also called the aft compartment. Most of such a cell is called a feed cell. There should be a hole between the cells, measuring 17x20cm. A similar design is suitable for a male and a female, two rabbits with babies. Solid wooden partition or mesh will separate the compartments. It is best to make the floor from wooden slats(1.5cm step), then the manure will fall into the lower pan.

Rabbits do not live long and should be comfortable in the house. You should not save too much on materials, because healthy pets will fully pay for the costs. A double cage with a queen cell includes a nursery, a door to the nesting compartment, a mesh door, a folding drinker and feeder, a stand post, and a feeder axis.
The designs should be such that there is no need to constantly open the doors to fill them. Sawdust or small shavings are not suitable for bedding - the dust from them will cause the rabbit to sneeze.
Double cages with mesh aviary
To build a double, single-tier cage with a mesh enclosure, you will need 0.6 sq. m mesh (cells 35x35mm); lumber - 0.2 cubic meters. m, 1.3 sq. m metal mesh(cells 18x18mm) - if this is not available, then an all-welded mesh (cells 16x48mm) will do. Similar designs are needed for non-pregnant rabbits of reproductive age. They can also house adult rabbits and young animals separated from their queens.
Cages for rabbits with devices for storing food for 1-2 weeks
These are advanced cages, they are made from various building materials. Features: in the center there are structures for breeding stock, and along the walls there are enclosures for young individuals. The structures can be two- or three-tiered. But make it so that feces and urine do not fall from the upper cells.
For the uterine compartment: 40x70x60cm, for the light compartment: 60x70x60cm. Auto-drinkers, feeders, nurseries for grass and hay are located in a bright compartment. Install a mesh or slatted grille at a height of 5-10cm in the uterine compartment and at a height of 10-15cm from the floor in the light compartment. In summer you need to clean the cages more often because worms form in the manure.
Cage sizes for Zolotukhin rabbits
Nikolai Ivanovich Zolotukhin, a famous rabbit breeder, developed his own concept for keeping rabbits.
In such cages there are no pallets, the floor is made of boards or slate, the rear walls are mounted at an angle, there are no special queen cells, grain feeders are fixed to the doors, only there is a narrow strip of mesh floor along the rear walls of the structure. Cell dimensions: 70x100cm, cells are placed one above the other in several tiers, queen cells are also placed. To prevent baby rabbits from falling out open door– place a board in front of the queen cell. Queen cells are placed one above the other. A separate opaque door, common to all structures, is installed. The queen cell is located in the cage itself, only part of the removable board is fenced off.
Dimensions of cages for giant rabbits
The breed of large meat-and-skin rabbits is called the “gray giant.” Required dimensions of the structure: width 35cm, length – 60cm, height – 40cm. More can be done spacious cage: height – 61cm, length – 96cm, width – 68cm. The “gray giant” rabbit lives in areas with different climatic conditions.
Dimensions of cages for fattening rabbits
The following design is suitable: width 50cm, length 70cm, height 30cm. To make a rabbitry, you will need a soldered mesh, the cells must be square. You will need rolled wire, diameter 6mm. Thinner wire should be wrapped around the joints on the structure. In such designs, water is supplied through nipple drinkers, and there are also small feeders with a supply of food. The animals are fed for about a week. During this period they should be carefully looked after.
Cage sizes for California rabbits

California rabbits are easy to care for. This is a hybrid of Russian ermine, Soviet chinchilla and New Zealand breed. The dimensions of the structure can be 1.5 times smaller than for “gray giant” rabbits. These rabbits can tolerate the cold well even without bedding. For a cell with a queen cell, 0.4 square meters will be enough. m, for one individual – 0.3 sq. m. They are easy to maintain. California rabbits have coarse fur on their feet. When placing individuals in mesh blocks, place pets of the same age - this will make it easier to care for, feed, and conduct veterinary examinations.
To raise California rabbits solely for meat, keep them in a pit. Setting up a pit is very easy, and the living conditions of these rabbits in the pit will be as close as possible to natural conditions their habitat.
To set up a rabbit pit, you need to dig a hole with approximate dimensions of 2x2x1 m, strengthen the walls with slate or concrete, lay a mesh or plank floor, enclose the hole with a fence, and make a roof. California rabbits will burrow, mate, breed, and raise young.
To avoid degeneration of rabbits, do not allow inbreeding. The rabbit breeder is obliged to supply water, feed, and periodically carry out selective selection. To avoid inbreeding, the first generation to reach sexual maturity, obtained from a particular male, must be captured and replaced with other rabbits.
California rabbits eat dairy products, fish or meat meal, and various protein supplements well. In winter, pets should have warm liquid to drink. Constant access to water is required for rabbits.
IN last years It is very popular among farmers to breed California rabbits. This breed is easy to breed on specialized farms. European rabbits are the ancestors of this individual. Initially, breeders set themselves the task of developing a meat breed of rabbits with good skins. This breed is one of the most famous meat rabbit breeds. 7-8 rabbits is the average fertility of rabbits. When breeding, female rabbits can produce 11-12 rabbits. Rabbits are white (grayish) at birth, and by 3.5-4 months of age they become similar in color to adult rabbits. In two months, newborn rabbits gain two kilograms of weight. Adult female rabbits weigh 4.7-5.2 kg, rabbits - 4.5-5 kg. If you cross New Zealand white rabbits with California rabbits, you can achieve excellent breeding results. Rabbits of this breed have drooping legs. California rabbits have been successfully bred on slatted floors. The tail of Californian rabbits lies close to the body, the chin is symmetrical, the head is set on a short neck, a wide back and shoulders, and a cylindrical body of medium length.

This breed may also be called the “California White Rabbit” because it is pure white. However, the tips of the ears, tail and paws may be brown or black. Usually such a rabbit weighs no more than 5 kg. If you weigh more, you are obese. The rabbit's legs are thick and short, its eyes are pink, its skeleton is strong and light. The length of the ears does not exceed 10cm. Experienced breeders advise novice rabbit breeders to pay attention to breeding California rabbits, because they are easy to keep.
The length of the fur is approximately 3cm, the length of the body is 50cm. The head is round, medium-sized. The rabbit's fur is shiny and thick. California rabbits can also be bought for entertainment, because they have a peaceful disposition and cheerful character. With proper care, California rabbits can live up to ten years. However, due to their large size it will be difficult to keep such individuals as decorative animals. Rooms with moderate, constant temperature air, with lighting. You can feed them hay, grass, cereals, flour, vegetables, and cereals.
Optimal cage sizes for rabbits
Suitable cages will have the following dimensions: length - 120-150cm, width - 60-80cm, front wall height - 45-50cm, the door should be mesh, dimensions 65x70x50cm, slatted or mesh floor.
Dimensions of industrial cages for rabbits
Industrial cage designs are modular, which, taking into account the stages of the process cycle, allows new designs to be added to existing ones. Dimensions: 2x2x1x7m, there are ten uterine compartments, measuring 40x92cm. To facilitate access to the boxes, there are spring-loaded lids. Using the lifting covers of the partitions, the operator can clean the rabbit sections without any obstacles, carry out weaning, individual therapy, palpation, insemination. To remove litter, all cages have removable corner panels.
This article is addressed to beginning rabbit breeders. I collected 7 detailed instructions how to make rabbit cages with your own hands. You can breed both ordinary and decorative ones - the first for meat and skin, the second for mood.
Cages are most often made of plywood or chipboard, from which the walls and roof are made. The frame is made of boards or timber, which also serve as “legs” or supports. If the cages are located in the open air, then a roof is made of roofing material, for example, from a metal profile.
Video - building a cage for rabbits step by step
The first guide I want to put is this video material, which shows the stages of building a three-tier cage for rabbits in an accessible, understandable and without unnecessary movements and words. The design is comfortable and practical. The waste is discharged through inclined trays and the cages are always dry.
Rabbit cage drawing and general information
Knowing the required space for the life of one rabbit, you can calculate the future volume of the cage or enclosure. It should also be taken into account that for better development The rabbit also needs space to move.

The figure shows general information about rabbits, their average height, length, minimal space for their living and walking area. The minimum width of the cage is the size of the rabbit when stretched, the minimum length of the cage is 3-4 rabbit jumps, the minimum height is so that the rabbit can stand on its hind legs and not touch the ceiling.

First, I will show you a drawing of a simple cage for rabbits for a small family. This cage can be made in order to raise several animals for food by the fall.


Another interesting drawing of a rabbit cage with a walking area right on the ground. This structure is mobile and can be moved around the site so that rabbits always have access to greenery.

There is information for summer residents on how to build a cage for keeping domestic rabbits in just half a day. The cages are built from three to four layers of plywood and galvanized mesh.
The design of a cage with bunker feeders and nurseries for roughage is well described. The floor in the cage is made of mesh, the roof is made of plywood. On this site you can see detailed photographs, as well as find out the optimal dimensions of the structure.
Schemes and drawings of cages for rabbits


Here are the sketches different options“houses” for rabbits: cages, barrels and cages themselves. A diagram of a cage for 2 adult rabbits is shown. The drawing of a simple cage for young animals shows the dimensions that will be useful to you when making it yourself.
Video - cages for rabbits Zolotukhin
You can watch a video with the participation of Nikolai Ivanovich Zolotukhin. He talks about the design of his redesigned rabbit hutches. In these cages, the floor is made of flat slate, and the mesh (5 cm wide) is fixed only at the rear edge of the cage.
This allows you to make multi-story cages and makes cleaning easier. Very useful experience! The master also talks about some important elements cages, for example, about an overturning feeder, which is convenient to fill and clean.
Mikhailov mini-farm - drawing


You can see Mikhailov’s legendary mini-farm here:
In such mini-farms, professional breeders breed rabbits. You will see in the photo a detailed analysis of the mini-farm design. Drawings of cages for rabbits with dimensions are given.
Such cages are equipped with automatic drinking bowls and feeders for animals, which allows them to be fed without rationing. And as a result, such mini-farms are simply created for the reproduction of animals. And this will increase the profits of farmers using Mikhailov’s mini-farms!

This “apartment” house for rabbits from the portal “Ya-Fermer.ru”
made according to the drawings of Mikhailov’s mini-farm. The master writes about the advantages and disadvantages of these cells. He gained this experience after using and caring for rabbits in these cages for one winter.
You will see unique photos of the author. Next, the author provides photos of the phased development own project cages for rabbits. You can watch a video of making a drinking bowl, feeder and manger for roughage. Very interesting unique material!

If you are a non-professional rabbit breeder and are just starting to breed rabbits, then this article is for you. Here is another author's model of a simple one-story rabbit cage with a drawing. This is more of a one-story residential complex for furry animals. The floor in the cage can be made of mesh or slats.
Video on making a cage using this drawing
Discussion of a rabbitry with queen cells made of clapboard

the master posted a photo of a rabbitry with queen cells for 6 females. Very beautiful outdoor cages made of clapboard! Forum participants criticized the master. An interesting argument even arose between them.
We encourage you to read the criticisms and take them into account when building cages for your rabbits! Moreover, the author put the rabbitry up for public discussion, which means he wanted to ask experts what needs to be corrected. Consider the advice of experienced rabbit breeders!
Experienced rabbit breeders know very well how important it is for rabbit cages to have correct design, and were made of high-quality and safe material. Since their ability to reproduce depends on these factors. The cage can be purchased ready-made or made with your own hands. The latter option is preferable, since during construction the breed and the number of animals placed in it are taken into account.
Required materials and cage design
 Regardless of what type of nursery will be built, they all have the same basis:
- frame;
- walls;
- ceiling;
- doors.
A rabbit cage is made from wooden material or mesh, but in no case made of iron. In hot weather it will become very hot, and in cold weather animals can freeze to it.
The frame is built from thick beams, and the length of the legs must be at least 35 cm. If the nursery will be located outdoors, then it is better to make them even higher - from 70 to 100 cm. In addition, a cage of such a height is much more convenient to maintain, and the animals will be protected from predators. The walls are made of plywood, boards or mesh. For the floor in the feeders, slats or mesh are used, since waste spills through them well. The roof is made from the same materials as the walls. If the industrial rabbit cage will be located outside the premises, then an additional roof will be required to protect it from precipitation.
Every detail in the nursery must be smooth and safe, without splinters or sharp ends on the mesh, so that the animals cannot get hurt.
Types of cages for rabbits
Nurseries differ from each other according to the type of construction:
- regular with or without queen cell;
- I.N. Mikhailova;
- N.I. Zolotukhina;
- with an aviary for walking.
 In the first version, the cage has high legs and two separate places for feeding and nesting. They are separated from each other solid partition with a hole. The door to the nest is made of solid wood, and the door to the feeding area is made of a frame with mesh. If there is free space, then an enclosure for walking is added to the cage. The entrance to it can be made through the back wall, or it can be arranged from below under the housing, as in the photo below.
Often, nurseries with an enclosure are used for mating, since active movement not only has a positive effect on the health of rabbits, but also improves their reproductive abilities.
 Mikhailov's industrial cells are considered the most complex and advanced; they look like small farms. They provide ventilation, shelves, heating of the queen cell and drinkers, as well as a unique waste removal system - everything is poured into one container.
Below is a photo of a drawing of a Mikhailov cage for rabbits, according to which you can make it yourself. 
Cell N.I. Zolotukhina
The main difference between this author’s nurseries and others is that instead of mesh or slats for the floor, they use plywood or flat slate, and there is no pallet. The floor is installed with a slight slope. A mesh is installed along the back wall, 10-20 cm wide. Feces and urine are removed through it, especially since in most cases rabbits relieve themselves against the back wall. 
The feeders used are tilting, to clean them, just tilt it towards you, and not remove it completely from the cage. It is imperative to divide it in half with a net so that the rabbits cannot crawl through. 
Zolotukhin also suggests not setting up a queen cell for the summer. It is enough just to fence off the required area with a board up to 20 cm wide and put hay in the corner. The rabbit will make a nest for herself. Thanks to this method of cultivation, the living conditions in a rabbit cage are as close to natural as possible. As a result, baby rabbits are born less susceptible to infectious diseases. As soon as they grow up, the board is removed, resulting in more space for walking. In winter, instead of a board, it is necessary to install a house for a female rabbit with offspring.
In the video below, Zolotukhin talks about the principle of operation of cages for rabbits, made with his own hands using the method he invented.
To build cells using the Zolotukhin method, you do not need to have specific skills or expensive building materials. Mesh, boards, flat slate or plywood, and sheet metal are sufficient. The frame, nest doors and partitions are made of wood. The floor is made of slate or plywood and mesh. Mesh is also used for doors in feeders. Sheet metal beat bars and other protruding wooden places so that rabbits do not chew them. There should not be much light or drafts entering the nest, so the door is made solid and not made of mesh. A threshold at least 10 cm high is nailed to the edge of the floor in the queen cell so that the rabbits cannot fall out when the door opens.
 The back wall of the upper tier is made straight, and the lower ones inclined, so that waste from the upper does not fall into other cells, but rolls down the wall outward.
Stages of creating a cage for rabbits
Step-by-step instructions on how to make your own rabbit cage with a built-in queen cell and feed bins:

- A cage roof and a sliding door with a handle for feeders are installed.
- Doors with mesh and solid doors for nests, as well as latches for them, are attached to the frame.
- If the nursery will be located on the street, then an additional waterproof roof should be made. To do this, a frame made of slats is nailed to the existing roof, and a roofing material, for example, slate. Don’t forget about the slope, so if the height of the nursery at the front is 70 cm, then at the back wall it should be 60 cm. This is necessary to drain precipitation from the roof.
Before you start making a rabbit cage, you need to make detailed drawings with dimensions.
The proposed option is convenient in that it has a large-capacity feeding hopper. It holds at least 6 kg of feed. Also, this design allows you to install additional tiers. The main thing is to put a waste collection tray between them or inclined surface along which they will roll into the container. But you shouldn’t make too many tiers, as the food is poured on top.
The mesh size for rabbit cages should not be larger than 2x2 cm, otherwise they may fall through and get stuck.
Before you start making a rabbit cage with your own hands, you should decide on a place to install the nursery. It must be protected from strong winds. It is not advisable to install a nursery on the south side, since in the summer the animals will be exposed to the heat of the sun all day. The size of the cage is also affected by the breed of rabbits, some of them are noticeably larger than others. Optimal size cages for rabbits of different colors - 150x70x70 cm. It varies depending on the number of animals. It is better to make the roof removable, this will make it much more convenient to disinfect the cage.
 If the rabbits will live in the nursery in winter, then it is better to make the floor from wood. The lower part is made solid in the form of a pallet, so it must extend. And on top of it is installed a floor of slats, packed in increments of 1.5 cm. It is better to make feeders and drinking bowls removable to make them easier to clean. In order to prevent the offspring from freezing in winter, the walls should be additionally insulated with any thermal insulation, for example, polystyrene foam. The insulation must be hermetically sealed in film so that it does not absorb water. In the uterine section, you can lay a heating system with a warm floor or a heating pad.
For dwarf and decorative rabbits, other nurseries are made, and always with an aviary. A cage for such rabbits is most often built with your own hands in the form of a house, with many ladders and shelves. If the pet will live in the house, then it is best to purchase ready-made option because they have an attractive appearance.
Step-by-step instructions for building a cage for rabbits - video
Breeding rabbits in households can be profitable, as well as result in complete losses. Rabbits actively breed, grow quickly, and eat green food, and their meat and skins are expensive - and this brings considerable profit to the breeder. However, they are capricious in maintenance and subject to high mortality. Therefore, the construction of a rabbitry should be given the closest attention. We will tell you how to create a rabbitry with your own hands in this article.
The word "rabbit" has a double meaning. This is the name given to the room where rabbit enclosures are located, as well as cages placed together and mini-farms located on the street.
Most often, rabbit farms are heated and lit rooms with good ventilation, where cages are located in tiers. In regions with a mild climate, open rabbitries are more often used, which are a structure of two or three walls covered with a canopy.

Rabbit farm - inside view
A good rabbitry must meet the following requirements:
- create comfortable conditions for living and breeding of animals;
- be easy to use for a person of average height and build;
- have a well-thought-out system for removing waste from cells and their subsequent disposal.
Buildings for rabbitry are made one-story and rectangular. They are built in accordance with GOST 23838.
In practice, cages with these animals can be placed in a frame-type barn.

Common designs and their features
A standard indoor rabbitry is an enclosed room equipped with lighting, ventilation and heating systems, and, less commonly, a water supply system. There are cages in long rows, usually in three tiers. There are passages between them, optimal width which is equal to 1.5 m. Often part of the rabbitry is separated for technical rooms and feed storage.
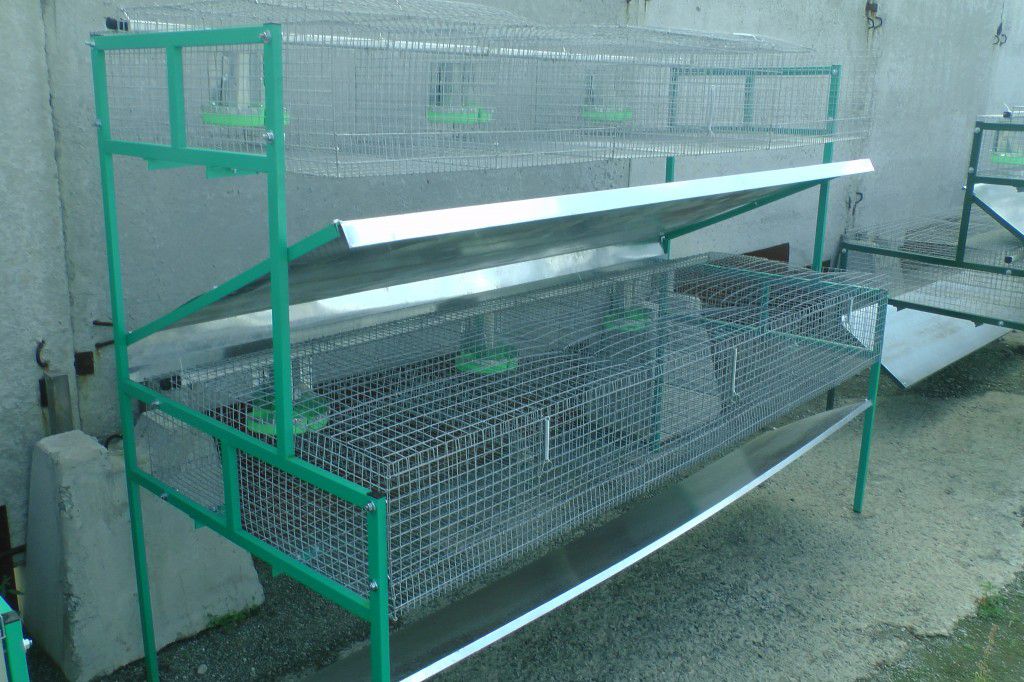
Multi-tiered mini-farms

Rabbit hutch in a hole
This is one of the most controversial decisions; there are approximately equal numbers of supporters and opponents of this design.

An example of “pit” rabbit keeping
Pros of “pit” content:
- life in burrows is natural for rabbits;
- in the pits a microclimate, humidity and temperature that is normal for rabbits is naturally formed;
- animals breed all year round;
- good litter survival;
- animals get sick less often and gain weight better;
- feed is given to all animals at once, this saves time and effort.
Disadvantages of “pit” content:
- it is impossible to regulate mating;
- it is difficult to monitor the condition of individual individuals;
- difficult to catch animals;
- there is a possibility that the rabbits will dig under the walls and escape.
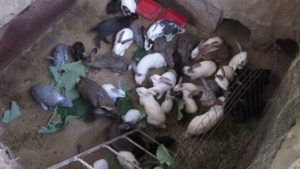 Example No. 1 of keeping rabbits in pits
  Example No. 2 of keeping rabbits in pits
  Example No. 3 of keeping rabbits in pits
For pit-keeping in a rabbitry, a hole with a depth of 1 to 2 meters is dug around the entire perimeter. The floor and walls are concreted to prevent escapes. The resulting hole is filled with sand approximately 20 cm thick, on which a net is laid for easy cleaning. Feeders and drinking bowls are placed inside, and you can let rabbits in.
According to a number of farmers, pit farming is the best option, since it is as close as possible to natural conditions residence of rabbits. It is believed that the characteristics of meat from rabbits living underground are much better. However, despite all the advantages, organizing such housing is associated with a number of difficulties. dealing with rabbits in pits in .

All-season option with insulated compartments
The climate of Russia is such that in most of its territory the winter is too cold for keeping rodents outdoors or in uninsulated rooms. Therefore, to successfully keep rabbits, you need to think about insulation. There are two options here, and to achieve best result they need to be combined. Either heat the rabbitry or insulate the compartments themselves in which the animals are kept.

The temperature in the place where they are kept should not fall below -5. The ideal range for this time of year is considered to be from +5 to +15-20 degrees. Approaching the upper threshold of the specified range is most desirable; in warm conditions, rabbits reproduce well and gain weight. This will help prevent seasonal “breaks” in this type of business.
In the queen cell, the temperature should not fall below 10 degrees, otherwise the rabbits may die, or, under the best circumstances, they will lag significantly behind in development, and the farmer will spend more on maintaining the young than he will ultimately make a profit. It must be taken into account that rabbits are born naked and are very sensitive to cold. Although the female herself takes care of heating the cubs and insulating the nest, both mole rats, and rabbits that have already grown up and have grown fur - low temperatures, everything is exactly harmful. Systematic freezing leads to slow growth and poor weight gain, as well as decreased immunity.
Russian rabbit breeders came up with an original way to insulate compartments. A “pocket” made of thick plywood is attached to the bottom of the compartment, into which an EG-1 (or other) electric heating pad is placed. Using a transformer, if necessary, the heating pad is switched to a reduced mode, thereby heating the floor of the cage.

Basic principles to follow when setting up a rabbitry
Regardless of the chosen design of the rabbitry and cages, there are certain sanitary and hygienic standards that must be observed. In particular, there are certain standards for lighting, temperature and ventilation of cells. When creating a rabbitry, they must be adhered to.

Types and sizes of cells
From description large structures Let's move on to small ones, that is, to cells. They can be used either autonomously, to keep one or two animals separately from the rest, or stand in a barn-type rabbitry or be part of a collapsible mini-farm complex.
There are a lot of options for rabbit cages. But they can all be divided into three conditional groups, depending on their purpose.

Queen cells
These are specially designed cages where female rabbits are placed for lambing. There she gives birth and lives with the cubs until they reach twenty days of age.
A distinctive feature is the presence of a nest. It is a box made from scrap materials, such as plywood, and has dimensions of 40 cm x 40 cm x 30 cm.

Rules for building a nest:
- it is necessary to cut a hole in the nest at a height of at least 10 cm. This is done so that rabbits that are too small cannot get out of the nest;
- the floor in the queen cell should only be solid;
- the plywood from which the nest is made rots from the secretions of the animals, so it is necessary to lay a piece of waterproof material on the bottom, for example, a sheet of stainless steel, and on top - a thick layer of straw;
- the lid is made so that it can be raised and lowered (it is best to place it on furniture hinges);
- if the queen cell will be standing outside or in a cold room in winter, you need to take care of heating (you can use a cheap and proven heating method: infrared lamp, placed in a special compartment).

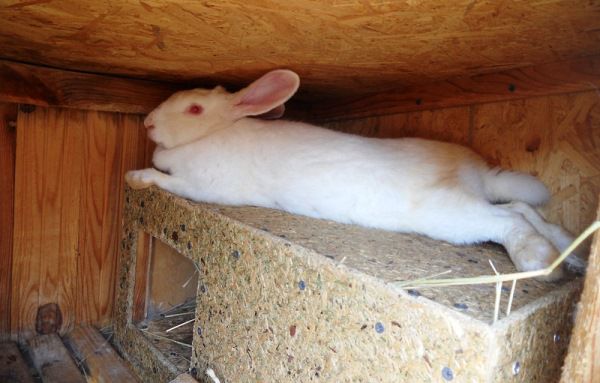
Two-section cage with hay for adults
This type of design is good for housing two adult animals. At positive temperatures it is permissible to display it outdoors; at sub-zero temperatures it is recommended to use it indoors, including heated ones.

A two-section cage is a wooden box 1.4 - 2 m long, 0.5 to 0.7 m high and 0.5-0.7 m wide. The top, bottom, side and rear walls are made solid. It is best to use structures made of sanded, unpainted boards knocked down without cracks for this purpose, but other solutions are also possible, for example, from fine mesh or tin. In the last two cases, it is worth taking care of a rigid, strong frame that will support the entire structure.

Drinkers and feeders are placed along the edges, so that animals cannot climb into them with their paws.
Two-section cages can also be made multi-tiered. This will help to use the rabbitry area more efficiently.
Video - DIY two-section cage
Cage with nest
This option is a little more complicated to make, but allows the rabbit to lead a more natural lifestyle. In this case, the cell is divided into two compartments with a hole between them. The smaller compartment is insulated with hay and serves as a nest.
Group cells
Enclosures for young animals 3-6 months old, also called group cages. Animals can be either different-sex or same-sex. Please note that uncastrated males may begin to show aggression towards each other early, in which case they must be placed in individual compartments. The typical dimensions of this cage are 120 by 50 by 40 cm.
How to create a blueprint for a rabbitry
Of course, you can make a drawing of an individual cage or a whole rabbitry yourself, or simply adjust any of the above options to your size. Main parameter What you need to know is the number of rabbits that you plan to keep in the cage.
- One young animal requires a minimum of 0.1-0.2 m2. For a comfortable stay, this norm should be increased to 0.5 m2. Males that are planned to be allowed to breed need 2 times more space.
- An adult animal needs at least half a meter of free space. Ideally, a meter to be able to move fully.
- For large breed rabbits, these standards need to be increased. The dimensions should be such that the animal can freely stretch out to its full length along the cage without resting its body against the walls, and can sit without touching the lid with its ears.
- The queen cell must have a separate nest. His standard sizes- 40 cm x 40 cm x 30 cm.
When the dimensions are determined, you can begin the drawing. You should start by drawing out the top view: draw a rectangle of the required dimensions, if necessary, divide it into sections. Then, all elements are indicated on the drawing: partitions, doors, manholes, feeders, etc. Dimensions are indicated everywhere. Based on the top view, a side view is drawn. The imaginary cut should pass through the most technologically complex section, for example, along the nest of the queen cell. The sizes must match. You can draw the view from below, paying particular attention to the legs and support structure.
Nuances in making a rabbitry
If this is your first time building a cage, here are a few tips that will come in handy. They are not obvious to new farmers and will help to avoid mistakes.
Watching a video, where you can personally observe the construction process by professionals, also helps to avoid mistakes.
Video - Step-by-step construction of a cage for rabbits
Tools and materials
To build a rabbitry you don’t need anything particularly rare or expensive. As for the tools, a regular construction kit is sufficient. Having a welding machine will be a plus.
Prices for popular models of jigsaws
Jigsaw
Usually for construction they take clapboard, timber or regular boards. It’s just not recommended to use them, rabbits chew through the wood. Therefore, it is combined with the following materials:
Let's look at what materials the parts for creating cells are made from.
- Frame. It is made from wooden blocks.
- Side and back walls. They are made from thick boards. There are recommendations to make walls from plywood, but this should not be done. Plywood is less durable, it warps from moisture, delaminates and bubbles, and, most importantly, rabbits quickly chew through it.
- Front wall. Made from fine mesh. Iron mesh can only be used if it is painted or coated, otherwise it will rust.
- Floor. It is made of fine mesh or boards stuffed in parallel.
- Roof. Made from wood, roofing felt, slate. But corrugated sheeting can be used exclusively for covering cages standing under a canopy or indoors - it gets very hot in the sun.
How to choose a place
Regardless of whether you want to build a building, a mini-farm, or just put a few cages under a canopy, you need to start by choosing a suitable location.
Accepted in Russian Federation building codes allowed to build on personal plot outbuilding with an area of 15 sq. m. and a building for keeping farm animals or poultry with an area of 40 square meters. m. The residential building must be located at a distance of at least 15 m from the two above-mentioned buildings.
Additionally, you need to take care of the following:
Even if there is no place on your personal plot that fully satisfies all these conditions, try to get as close to the ideal as possible. Minor discrepancies are not critical.
Prices for various types of timber
Step-by-step instructions for creating a rabbitry for beginners
At first glance, it seems that such a structure is very difficult to build on your own, but this is just an illusion. Even for a delitant it is quite possible to make a rabbitry on your own, spending from several hours to several days on it.
If you decide to build a rabbitry with your own hands, the algorithm of actions should be as follows.
Step 1. Using the tips above, choose a place for the future rabbitry, decide on its size, layout, and material for construction.
Step 2. Build the cage frame according to the dimensions in the drawing. It can be wooden or metal. If several cells stand side by side, the frame should be solid.
Step 3. Using a carpenter's square and level, attach the shelf and upper frame to the frame;
Step 4. The bottom and lid are assembled on a frame made of wooden beam or cut them separately from thick plywood. In the latter case, it is necessary to cut holes for the legs at the corners.
Step 5. The bottom and lid are attached to the frame.
Step 6. A mesh is nailed to the door. Attach it to the frame with furniture dowels.
We nail the frame, which will later contain the mesh.
Shchag 7. Cover the sides of the cage with mesh or boards. The mesh is cut with metal scissors and placed on the screws with a screwdriver.
Prices for popular models of screwdrivers
Screwdrivers
Watching a video of the manufacturing process will also help with construction.
Video - Do-it-yourself rabbit cage from professionals
This video shows in detail all stages of construction, gives useful tips for beginners.
As you can see from the article, making a rabbitry with your own hands is quite possible even for a beginner. You just need to strictly follow the advice, and everything will work out.