How to make your own wardrobe. How to make a cabinet with your own hands? Room measurements and calculations
Having understood our drawings and understanding which part belongs to what, we begin the assembly.
Having selected the diameter of the drill for the holes for the comformats, take the drill in your hands and begin drilling the holes. Drill holes symmetrically to avoid damaging appearance closet
- Using a screwdriver, assemble the cabinet frame onto the comformats.


- Next, you need to strengthen the doors with canopies (if the door system is ordinary) or screw in guides (if you have sliding doors).


- Then, in the places where there will be shelves and drawers, make markings for shelf supports and drawer guides. The markings must be precise so that the shelves and drawers are not awry, but run parallel.

- After marking, drill the corresponding holes and screw the shelf supports and drawer guides.

- Having assembled the closet, finish it appearance to the ideal. As you can see, there is a missing edge at the chipboard seams. Take an iron and a towel. Carefully place the edge on the chipboard and iron it through the towel.

- After gluing the edge, take a sharp knife in your hands and carefully, slowly, begin to cut off the excess edge.

- Finally, put the plugs on the comformats.

Now we can congratulate you! You have become the owner of a beautiful handmade wardrobe.
Using these instructions and your imagination, you can make your own wardrobe with lighting inside, with built-in lamps, or with a regular mirror on the doors. Once you have the courage, you can create a cabinet of any design and complexity. As you can see, there is nothing difficult about this!
Comments12
- anonymous anonymous
- anonymous anonymous
- anonymous anonymous
- anonymous anonymous
- anonymous anonymous
- anonymous anonymous
- anonymous anonymous
- anonymous anonymous
- anonymous anonymous
- anonymous anonymous

More on the topic
- February 27, 2009 at 4:05 pm
- February 10, 2017 at 06:00
- April 19, 2010 at 08:59
The wardrobe is extremely useful and convenient thing in the apartment. With its help, the space of an apartment or house is saved; it can contain different kinds clothes and shoes. Therefore, sliding wardrobes have found widespread use. Very often specialized companies and enterprises are engaged in its production. But many people take the creation of a wardrobe into their own hands and they turn out just as good. But before we touch upon the issue of assembling a sliding wardrobe, let’s consider the types of sliding wardrobes. Yes, wardrobes located in different rooms, carry different functional loads, although in appearance they may not differ from each other in any way. So what goal will you pursue if you decide to make a wardrobe in one or another room of your apartment (house)?
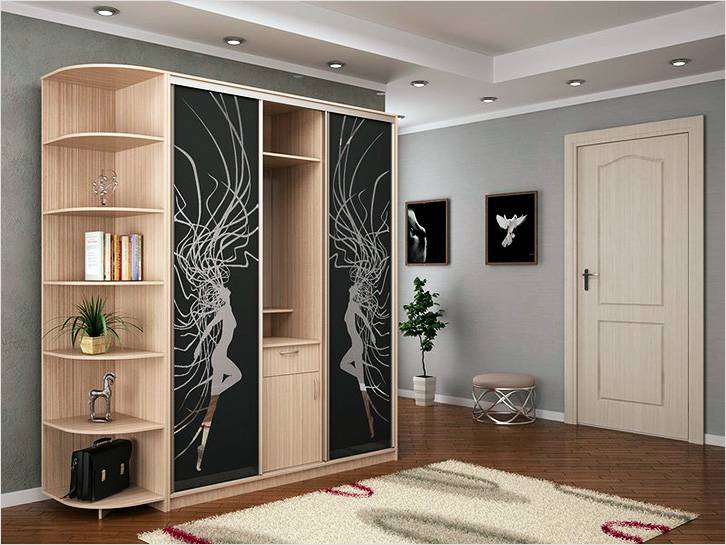
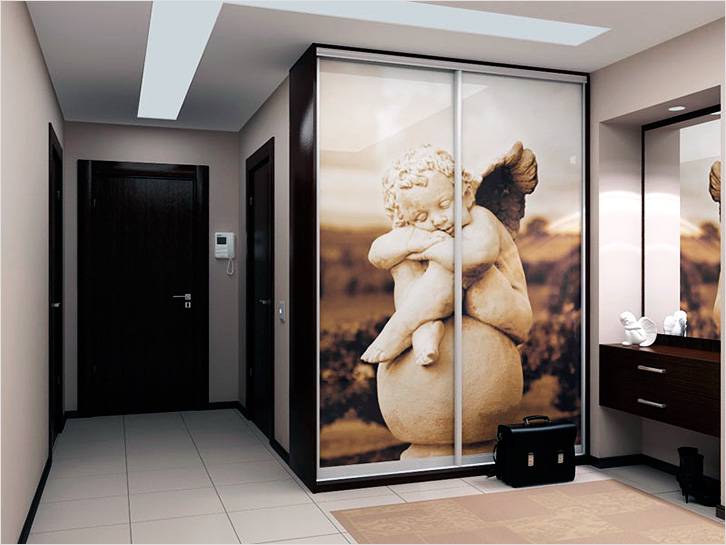
Sliding wardrobe located in the hallway
The compartment, located in the hallway, is intended for storing outerwear and shoes used in given time of the year. This immediately determines that the compartment should have sections for outerwear. In this case, there should be two sections. One section stores the clothes you are currently using, and the second section stores clothes from other seasons that you are not currently using.
Also in this closet it is necessary to provide shelves on which various small things will be stored - umbrellas, bags and handbags and other things.
Since you will be leaving the house from the hallway, it never hurts to take a look at yourself in the mirror. Well, since we have three sections in the closet, we need to make three doors, one of which will be mirrored.
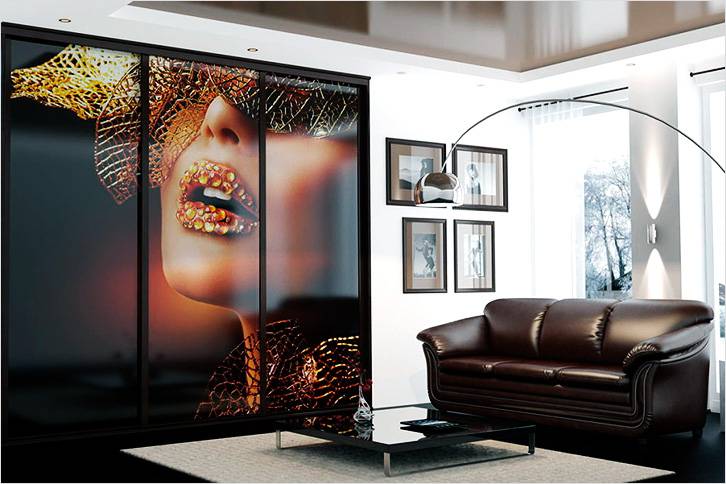
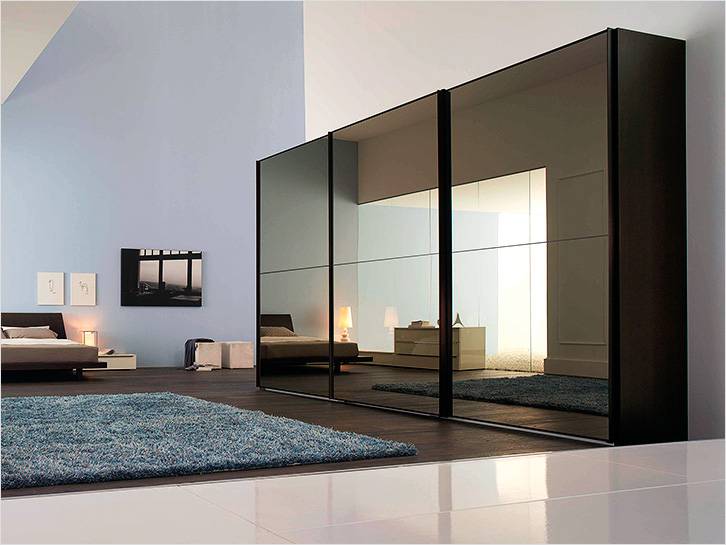
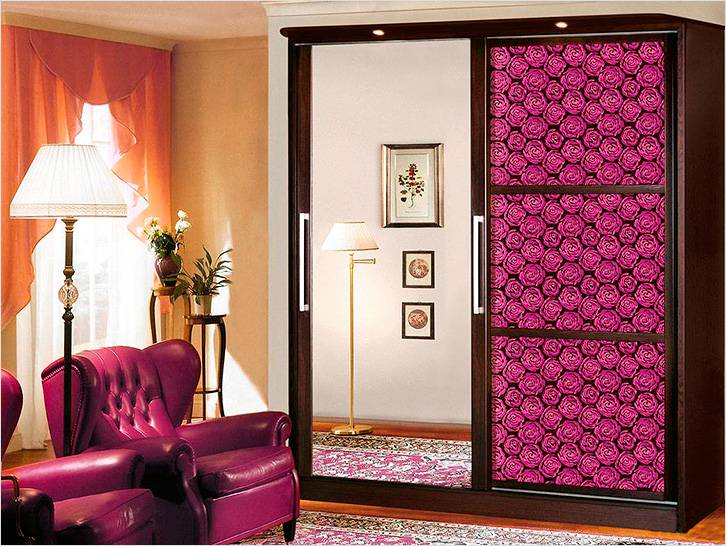
Wardrobe located in the living room
The main purpose of this compartment is to store light clothing, household appliances, dishes, and personal items. One of the cabinet sections can be made open and a TV, stereo, or DVD player can be placed there. As a rule, an open section is made in the middle of the wardrobe, thereby breaking the wardrobe into two halves. The side sections are decorated with rounded open shelves. Wardrobe located in the bedroom
Bed linen and underwear are stored in this wardrobe. The presence of an open section is not implied. Doors can also be made with mirror inserts.
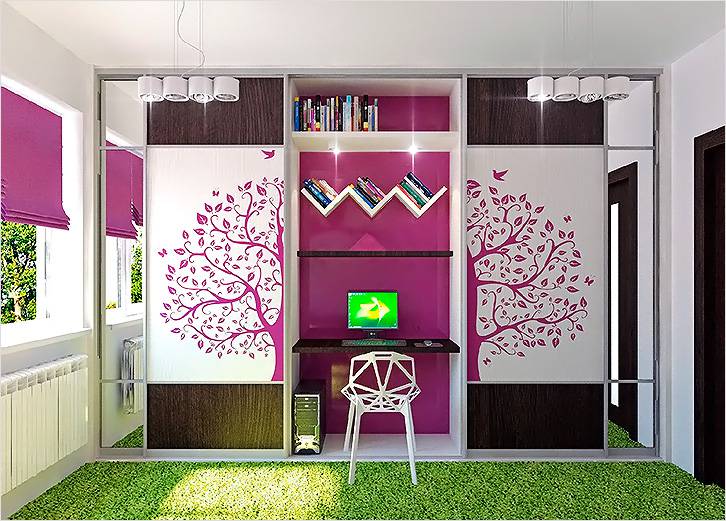
Sliding wardrobe located in the children's room
Children's supplies and clothes are stored here. The open section is used to store books and toys. In some cases, a sliding wardrobe can replace a furniture wall or a wall can combine a sliding wardrobe. In this case, you can also install a TV with a player in the closet for watching children's programs and cartoons.
Tools for making a wardrobe
Well, what is furniture making without tools? If you want your corners to be straight where necessary, the gaps to be minimal, and the holes to be perpendicular to the surfaces being drilled, then purchase the following tool.
Kiyanka
- confirmat drill
- wood drill
- euroscrews (confirmed)
- plugs for screws
- square
- level 400 mm
- 2 corner clamps
- dowels
- roller guides for drawers
- wood saw
- metal furniture corners
- decorative furniture corners
- jig for perpendicular drilling
If you save on something so necessary, the quality of your cabinet will definitely suffer.
Calculation of wardrobe dimensions
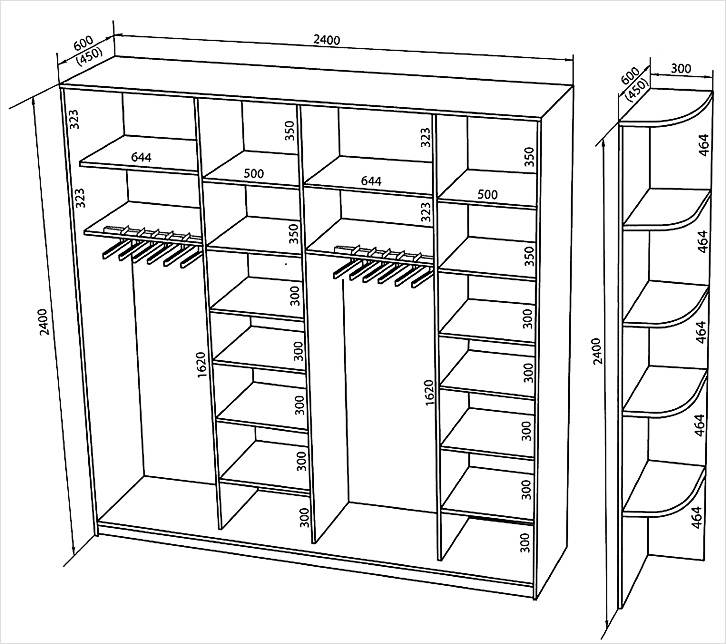
The most difficult thing when creating a wardrobe is to correctly take the dimensions of the cabinet and use them to cut chipboard sheets and edge them. The cutting and edging of wardrobe parts is usually carried out by companies that sell chipboard and other similar materials. We will consider an example of creating a wardrobe with parameters 2020x625x2320 mm.

The cabinet consists of the following parts: - vertically standing parts – 1,2,3,4,5; - upper part of the cabinet – 6; - bottom of the cabinet – 7; - shelves – 8, 9 10.
The size of the outer racks (1.4) is 2288mm = 2320mm - 32mm (32mm is the thickness of the chipboard sheets at the bottom and top of the cabinet). This is the height of the racks. And the depth is 625 mm. Total 2288x625 mm. The size of the upper and lower parts of the wardrobe, these are positions 6 and 7 – 2020x625 mm. Positions 2 and 3 represent the central pillars. Their size depends on the height at which the outerwear bar will be installed. Typically it is located at a height of 1900 mm. That's how we'll count it. The height of the racks is 1900 mm, width 525 mm. We give 100 mm to the door opening system.

A small counter at position 5, measuring 372 mm (from the total height of the cabinet we subtract the height of the central posts), by 525 mm (we also subtract 100 for the door opening system.). Mezzanine shelf, this is position 9, size 1988x525 mm (cabinet length minus the total thickness of the chipboard sheets, and cabinet depth minus space for sliding system. Side shelves, position 8: 450 mm x 525 mm.
Shelf number 10: 1056 mm. The back wall is made of fiberboard and its size is the same as the parameters of the cabinet - 2020x2320 mm. Note. The back wall can be made from more than one fiberboard sheet, and divided into two parts, according to the size of the central pillars. For example, one sheet is 466x2320 mm and one is 1088x2320 mm.
Selecting a sliding door system
Systems are made either from aluminum or steel. Whichever one you like best, buy that one, both are worthy options. The system size for our cabinet is 1988 mm by 2288 mm. This size is obtained as follows. From the total length and depth of the cabinet we subtract 32 mm of the total thickness of the chipboard sheets. In general, there are chipboard sheets with other thicknesses, but, from our point of view, chipboard sheets with a thickness of 16 mm are quite suitable for making a sliding wardrobe.
DIY wardrobe installation
We prepare all the elements of the cabinet and begin its installation. It is assumed that you constantly use a level and an angle to accurately install the parts of the wardrobe. Very often, cabinet parts are connected using confirmations (in the picture) and closed with plastic plugs.

But, sometimes fastenings on furniture corners are used. Assembly on confirmations is somewhat more difficult process, but when installed on the corners, they will interfere with your further use of the wardrobe.

Then the installation process itself begins. Carefully, with a pencil, mark the location of the shelves on the side and central racks, drill mounting holes, both in the racks and in the shelves (from the end) part. We secure the fiberboard using a stapler or nails, and do not forget about the corner, especially when securing the fiberboard sheet. Sliding wardrobes can be installed on legs. Then we take their height into account when calculating the height of the cabinet. The legs are attached from inside the cabinet and adjusted with a hexagon. Then the legs are covered with a false chipboard panel.
Installation of a sliding door system
The upper guide rails are installed flush with the rack (top).

The bottom rail is attached to the bottom of the cabinet, 10-15 mm away from the edge.

Having strengthened the guides, we begin to install the doors. As a rule, with a support roller at the bottom of the door and a groove for its movement in the guide.

The doors are inserted with their maximum upward motion, and the installation of the lower roller and guide groove.

The smoothness of the doors is regulated by adjusting screws and a hexagon. The doors are installed in guides. In our case there are two doors. One overlaps the other. The total width of each door is 1200 mm. The wardrobe is installed and you can use it.
This was just a special case of one of the options for the sliding wardrobe that we showed you possible options installation of individual parts. And now I would like to bring specific example.
Do-it-yourself wardrobe (a specific example of installation)
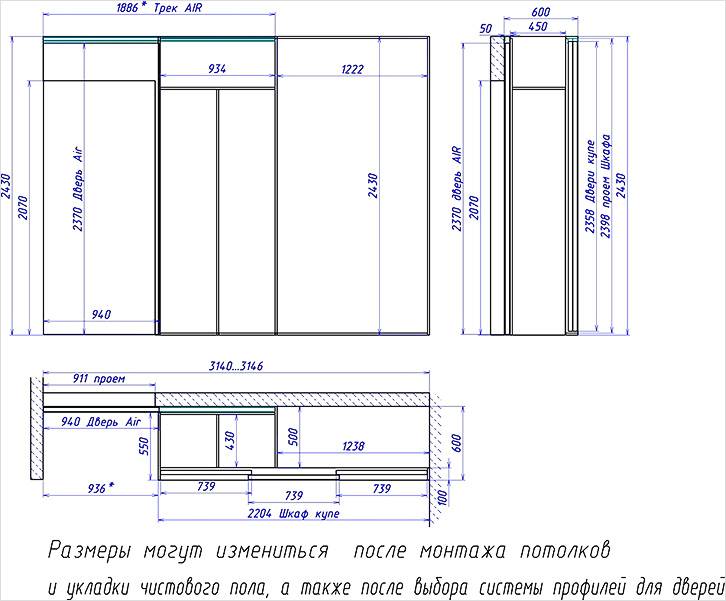
So, first of all, a drawing of the future cabinet.

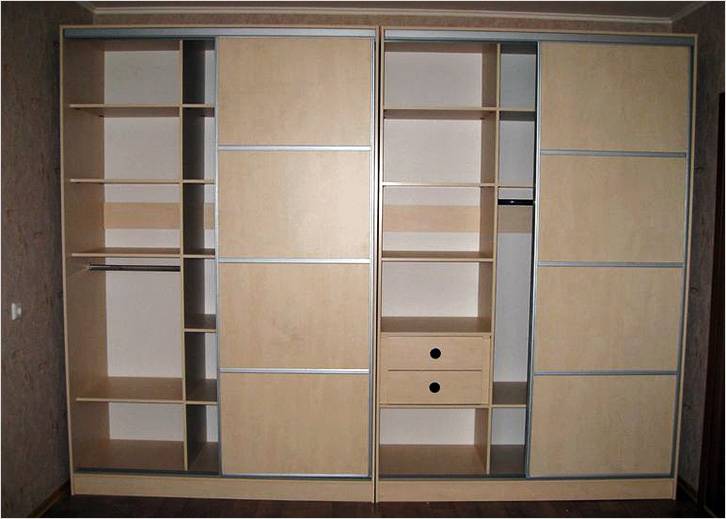
The drawing is actually only for interior decoration cabinet, since there will be sliding doors on top (on top).
Total length of the cabinet (from wall to wall) - 3420 mm
Cabinet depth: - 500 mm
Height from floor to ceiling - 2500 mm
The thickness of the chipboard is 16 mm.
The material is calculated and ordered. In laminate, it is better to order edges at all ends of the boards, since the sawdust and resins from which the “boards” are made will highlight harmful substances, through open ends. The surcharge is minimal, but the benefits are real.

We carefully measure and check the holes for drilling. It was decided to fasten the elements not only with confirmations, but also with dowels for strength.

We begin assembling future shelves.

The shelves are growing as the cabinet is being built, but they are still lying on the floor, and not in their rightful place against the wall...

Now that they have two "legs", you can place the shelves against the wall. We try them on on the spot.

We attach the top shelf.

In order to attach it evenly, we attach it to corner clamps.

We again place the shelves against the wall.

We mark the third post and insert dowels.

We install it in place against the wall.

We continue assembling the outer stand with the shelf.

Let's drill into the ends of the shelf.

We attach the outer drain with the shelf to the central structure.

We install a pipe with flanges for hangers.

Add a shelf below the pipe.

Shakaf, although not yet a coupe, has already begun to fulfill its direct functions.

Add a rack on the left.

The leftmost shelves are attached directly to the wall. The pipes for the hangers also go from the rack to the wall.

One more photo.

We begin assembling the boxes. We mark their elements and fasten them together using dowels, glue, and clamps.

Attaching the bottom plywood...

Using self-tapping screws.

9 boxes produced. All outer shelves and racks are fixed to the walls, floor and ceiling. Now you can check how the cabinet can handle the entire load. All that remains is to modify it to a coupe.

We order a group sliding doors and guides under them.

We cut the guides to the size of the ceiling and floor.

Drill holes in ceiling slab under the dowels.

We attach the guides to the ceiling.

We install doors. They are installed in the same way as in a glass sideboard.

There are still some minor improvements. We glue the seal on the ends of the doors.

Here is the appearance of the newly-minted wardrobe - a compartment. Now it is not only functional, but also beautiful, since all the clothes are hidden behind its doors.

This is exactly the option here - the eyes are afraid, but the hands do the work. As a result, from a set of sawn planks, a handful of screws and dowels, we assemble a complete and functional wardrobe coupe. At the same time, saving significantly on its production and installation, for which everything was actually started.
Currently, furniture stores surprise their visitors with exorbitant prices. This especially applies to cabinets. For the simplest, most unimpressive one, you will have to pay an impressive amount. Not everyone can afford it. But what should young families do, or those whose money is spent on needs, and old furniture lost its look? There is a way out - you need to make a cabinet with your own hands.
How to make a cabinet with your own hands, without spending a large amount of money? Before you start designing the furniture of your dreams, you need to consider some nuances and prepare everything you need.
First you need to decide on the color and material from which the structure will be made and select a tool. As for the material, you can make a cabinet from plywood with your own hands, from lining, OSB, from chipboard, furniture board, laminated chipboard, etc. some manage to make cabinets from pallets with their own hands.
To work you will need various tools:
- screwdrivers;
- screwdriver;
- drill;
- bolts, nuts, nails;
- hammer;
- keys;
- jigsaw;
- saw;
- Sander;
- wire cutters;
- paper, pencil, ruler;
- roulette;
- iron;
- glue or double-sided tape.

It is important to correctly calculate the dimensions and make a diagram of the cabinet, according to which it will be created. Decor matters too. Take care of purchasing beautiful handles; if you want to draw any pattern on the furniture you have made, then you will also need paint. To make the furniture look aesthetically attractive, do not forget to buy the varnish that you will use to cover the surfaces.
Self-created design
For novice carpenters, you can make a cabinet out of wood with your own hands. This material is malleable, strong, durable and aesthetic. Furniture can be made from solid boards, hard and soft wood. Then you can think about how to make a cabinet from lining or a cabinet from laminated chipboard.
If you have confidence in your abilities, then you can complement your work of art with plywood inserts or make a cabinet entirely out of plywood. Wood chips are often used in their production.
Measurements and drawing
First, take correct measurements of the place where you will place the cabinet. You need to accurately measure the height, width and length.
Draw a sketch of it, drawings and diagrams will help you make the necessary components for the cabinet. Immediately think about what the closet will contain:
- how many shelves, how they will be located, what shape;
- will there be a mirror - make an exact drawing with dimensions for ordering;
- will there be hooks, and in what quantity;
- drawers, their shape, quantity;
- how many doors and their size.

Cabinet and its drawing. General form.
Depending on where the cabinet will be placed and what will be in it, draw a layout. You can do it yourself in the living room, on the balcony, in the bedroom, in the kitchen or in the closet in your hallway without any problems.
Preparation of material and accessories
The material is selected in advance and the dimensions are calculated. It doesn’t matter whether the cabinet is made from lining with your own hands, from OSB or other materials, the task of the master is to cut the sheets according to the required measurements.
If you use laminated chipboard, then their edges need to be edged. To do this, take PVC tapes. They should be suitable color and textures. They are ironed and any excess is cut off. You can do this yourself, but it is better to find help, since some parts will need to be held by someone.

We prepare the accessories right there. This is not left to the last minute. Select handles, hangers, mirrors, nails, and bolts according to color and shape.

After the work has been done, check everything again and take control measurements.
Assembly
How to assemble it yourself? The cabinet diagram will help you put all the parts together yourself.
First you need to build a frame: wall, side parts, bottom and top, fasten with high-quality self-tapping screws or bolts.
We do everything carefully so that the material does not burst. It is advisable to make the back part from plywood or fiberboard; it will cover the wall and will look aesthetically pleasing. It will be convenient to cut them with a jigsaw. When doing this, do not put pressure on the material, as they may break.
To install shelves in a closet, you must make marks so that all the components are level. Profiles are strengthened and evaluated. If there are errors, they need to be corrected or, if possible, hidden. In the future, no one will have a question about how to make shelves in a closet.

You don't need any special skills to make drawers. Initially, you need to take clear measurements, down to the millimeter, transfer them to paper, and create a drawing. Their bottom can be made from furniture panels or plywood. The parts are held together with glue, small nails, dowels and bolts.
If your closet included a mirror, then it’s time to install it. It is attached using mastic or double sided tape. Then the doors are hung.
At the very end, the time comes for cladding. Decor is an important part of the work. Anyone can create an instance that is unlike any other. If the screws are bulky and spoil the whole look, they can be hidden under special plastic covers. You can glue or draw any patterns on the door. At the top and bottom, neat cornices or overlays will add beauty. The final stage- This is a varnish coating.
A homemade wardrobe can decorate any home. Similar storage systems are provided for different rooms and all this can be done with your own hands from scrap materials, from timber, plywood, lining, chipboard, OSB at home or in the country.
Provence style wardrobe
Sometimes you get tired of everyday life and want to update your interior. In this case, a Provence style wardrobe is what you need. It is the French who are its founders. Distinctive feature- This bright hues and laconic forms. There are no modern forms - this is an old grandmother's design.

Such furniture should be made from natural materials. The decor is distinguished by its carved handles, sides, legs and other parts. It also decorates with ornaments and modeling. This furniture should give the impression that it is from antiquity. Made swing wardrobe in Provence style with your own hands will impress many.
Peculiarities
How to do wooden cabinet in this style? If there is no old furniture at home, then you will have to start all over from scratch.
- You need to choose the best natural wood, think over the decor, the basis of which will be an extraordinary ornament or elegant painting.
- Next, measurements are taken, the structure is drawn on paper, and its drawing is drawn.
- All the necessary parts are cut out, taking into account the height, width and length.
- Fittings and decorative components, if any, are selected.
- Assembly is in progress. The frame is installed first, then the shelves, drawers, mirrors and doors.
- The last stage is registration. All fittings are installed, patterns are applied, aging is done and everything is varnished.
You can make a wardrobe in a similar style with your own hands or for the kitchen. And remember that such models are suitable not only for the home, but also for the garden. A country house can have not only furniture in a similar style, but it is advisable to decorate the entire room in this way.
If the apartment has old furniture that looks ugly, then it can be processed, decorated and then there is no need to make anything. It can be a wardrobe, a three-door wardrobe or a cabinet made of furniture board; to make it pleasing to the eye, you need to work hard.
The entire scope of work depends on the appearance of the product. Of course, it must be in good order. If this is not the case, then the first thing you should do is fix everything and only then proceed with registration.
To make the cabinet look in Provence style, you need to do:
- cleaning the coating using sandpaper or a wire brush;
- painting with acrylic paint (two or three times);
- applying a pattern or gluing a pattern;
- application of acrylic varnish.
Some people end up giving the product an aged look; for this they use sandpaper, but this is at everyone's discretion.
Making an exclusive cabinet with your own hands is a labor-intensive, but affordable and financially economical process. Particular attention should be paid to the drawings of the cabinets, because the result depends on them. Anyone can make a cabinet from chipboard or other materials with their own hands, if they strictly adhere to the plan, prepare necessary tool, material and accessories.
Create a wardrobe for your home, cottage, balcony or summer kitchen do it yourself and spend the money you save on your family.
Video instruction: making a cabinet with your own hands.
Furnishing the home is the final step that combines all renovation and design stages. IN modern furniture several must be combined the most important qualities: operational functionality, appearance as such, compliance with the general design idea.
Coupe systems or their elements are present in almost every home. The convenience and functionality of this furniture are undeniable, and for such designer styles, like minimalism, urban, hi-tech and completely irreplaceable. The article provides comprehensive recommendations for making your own wardrobe.
Advantages
Having considered the pros and cons of this class of furniture, we will get a complete understanding of the modern concept of a wardrobe with a compartment door opening system.
| Advantages | |
| Ergonomics | Standard designs require “blind” areas for opening. In coupe systems, doors move in one plane along guides when opening and closing. Significantly saved space. |
| Capacity | The ability to arbitrarily configure the internal space (filling), which determines the capacity. The only requirement is ergonomic feasibility. |
| Versatility | Fits into any interior. Various ways design and finishing allow you to install a wardrobe in the bedroom, kitchen, living room, etc. |
| Functionality | Inside, unlike conventional cabinets, you can store large items, household appliances. Embed various devices- ironing board, workbench, tabletop, etc. |
| Ideal solution for narrow spaces | For narrow aisles and corridors, a sliding wardrobe is often only decision. Only it can be placed in such places and used comfortably. |
| Zoning | Double functional purpose. Using such furniture, you can easily zone a room, that is, it can also serve as a partition. |
| Variety of designs | No restrictions on internal content. A large number of materials for the manufacture of facades, which allows you to realize any design idea. |
| Using a mirror | You can install a mirror on the facade. This will improve the functionality of the room and visually expand the space. |
| Reliability during operation | Doors that move along guides will last much longer than doors that open on hinges. |
There are significantly fewer disadvantages, but they are there:
| Flaws | |
| Failure of the sliding system | This only happens if you purchase a low-quality sliding system. |
| Need for additional lighting | If the dimensions are large, additional lighting will be required; it significantly increases operational comfort. |
| The need to clean the guides | Over time, the lower guides become clogged, which can interfere with the movement of the roller. Therefore, sometimes you have to clean the grooves of the guides. |
| The mirror gets dirty quickly | If a mirror is used in the decoration, then it will have to be washed frequently to remove stains and hand marks. |
| No possibility of rearrangement | When designing, dimensions are related to the specific location of the cabinet. Not suitable for those who like frequent rearrangements. |
Varieties by shape
There are several varieties, they have structural and external differences:
- built-in;
- free-standing;
- corner;
- diagonal-angular.
Let's consider each of them separately.
Built-in
When constructing such a cabinet, there is no top, back wall and base. Only partitions are manufactured. The entire structure is screwed directly to the ceiling, walls and floor. Metal corners are used for fixation.
This stationary design, and it is an invariable part of the created interior.
Standing separately

Has sides, top, bottom, back and sliding doors. This is a complete separate piece of furniture. It can be moved and is not tied to any design elements.
Angular

Great solution for small apartments, where every meter is precious. Repeats the shape of the corner and allows you to rationally use the space of the room.
Diagonal corner

This is a type of corner, but the facade does not follow the shape of the corner, but is made diagonal. The increased capacity of this design determines its frequent use as a dressing room.
Material used
Furniture with sliding door systems is made from a variety of materials. The table shows the main ones:
|
Material |
|
|
|
The most common and frequently used. Chipboard board, having a low price, is characterized by sufficient strength. A huge selection of textures, colors, patterns allows you to produce a façade for any design solutions. There is one, but significant, drawback - it is difficult to finely process. For this reason, mostly simple structures are made from chipboard or laminated chipboard. |
|
|
Eco-friendly material, easy to process. The variety of facade coatings is no less than that of chipboard. Practical and affordable material. |
|
|
An expensive option, but natural wood will last a long time. A magnificent decoration in any interior. |


Types by design
Classification by design differences next:
- built-in;
- case.
Built-in . There is no need for top, bottom or sides. Their function is performed by the walls, floor and ceiling of the niche. For manufacturing, you can use plasterboard, which will reduce total costs on the product.
Corpus . The main difference from a regular cabinet is the method of opening the doors. If necessary, you can move it. Transportation (moving) without disassembly is possible. The downside is the increased consumption of materials, since the side, bottom and top walls, and the rear part are made.
Now let's take a closer look at the organization of the internal volume of the cabinet.
Design features

When designing, ergonomic and operational specifics should be taken into account.
Let's look at the main structural elements wardrobe
Door width
The choice of door size depends on factors:
- Manufacturers of sliding systems are limited to certain sizes. Some systems make it possible to produce a sash up to 120 cm wide;
- The width is affected by the number of internal sections. Each section must be freely accessible;
- The choice is influenced by personal preferences. There are no special rules, unless it goes beyond the restrictions listed above.
The optimal width, worked out in practice, is from 600 to 900 mm. This size provides the most comfortable conditions use.
Sliding systems

Sliding systems are classified according to two main criteria:
- profile material;
- principle of extension.
To manufacture the profile of the moving system, aluminum or steel is used. The material of the sliding system is selected, as a rule, the same as that used for the door frame. Steel structures cheaper, but in most cases preference is given to aluminum.
Structurally, two types of systems are produced - bottom-mounted and top-hung. In the lower-support type, the door with rollers moves along a rail. In the top-hung system, its rollers move along the upper guides.
Height

The height is arbitrary. The only restrictions may be ceilings or short stature owners of the apartment/house. Designs are made from ceiling to floor, as well as smaller heights.
The standard length of the wall material used is 270 cm. Standard apartment has a ceiling height of 260–270 cm. Almost identical dimensions make it possible not to cut or build up structural elements.
For ceilings higher than 270 mm (if you want to have a floor-to-ceiling closet) there are two solutions. First, the sheets of material are joined to the required length. Secondly, the mezzanine is assembled. Sheets can be joined using high-precision equipment from companies specializing in such services.
Shelf depth

The depth of the shelves determines the everyday usability of the cabinet. The optimal and recommended figure is 60–70 cm. Usually in the closet there is a rod for hangers, the width of which is about 48 cm. A depth of 60 cm will completely eliminate contact between the inner surface of the door and clothes hung on hangers. Most furniture accessories (boxes, trays, etc.) have a width of 50 cm. The shelves should not be made deeper, since it will be inconvenient to get “under the wall” when placing things.
The dimensions of the premises do not always allow the installation of furniture with the maximum recommended shelf depth. But there are also restrictions on the minimum depth. The best option the depth may be 40 cm. Considering that 10 cm goes under the sliding door mechanism, you can purchase small hangers 30 cm wide. Alternatively, install a hanging rod(s) perpendicular to the doors and the rear wall, in this case, the width of the hangers placed is not limited .
This solution is much better than completely abandoning the installation of a cabinet, especially since even such a “narrow” design for small apartments- the ideal solution.
Length
When designing, the length of the cabinet is selected in accordance with the location of its further installation.
Height of shelves and rods
![]()
The height between shelves is 250–350 mm. The selection rule is simple: greater depth of shelves means greater distance between them, less depth means less distance. This dependence is associated with ease of access to stacks of linen located deep in the shelf (near the back wall).
When designing a mezzanine, you should take into account the size of the things intended to be stored on it. If these are suitcases, then the height of the mezzanine should be equal height suitcases, plus a small supply.
The mounting height of the hanger bar is determined by the length of the clothing placed on it. The maximum height will be equal to the longest item. Average length of typical wardrobe items:
- shirts - up to 100 cm;
- jackets - up to 110 cm;
- long clothes - up to 130 cm;
- raincoats and fur coats - up to 150 cm.
These calculations are approximate, since the length of clothing depends on height, style and other parameters.
Video:
Schemes and drawings
The diagrams show various options furniture assembly projects and technologies:


Device inside
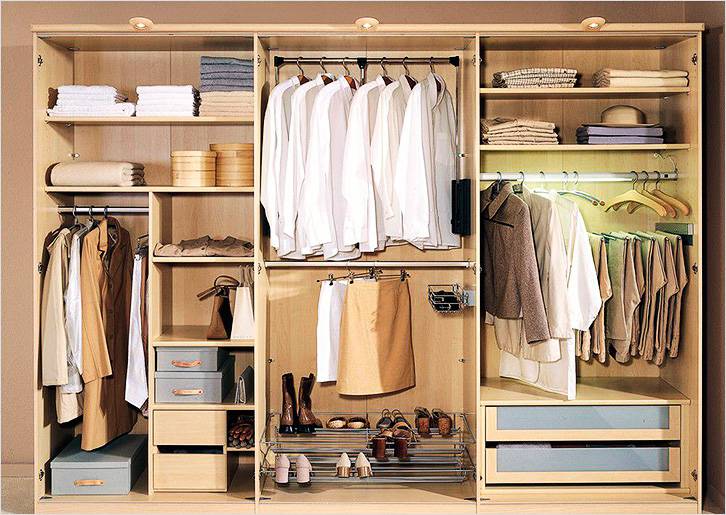
When designing the filling of a sliding wardrobe, first of all, zoning of the internal space is done. The figure shows a universal diagram of the breakdown into storage areas for various things:
![]()
When purchasing a finished product, you will have to agree with the filling configuration proposed by the manufacturer. Self-production will allow maximum consideration of size, functionality, location different zones and much more, which will ultimately ensure maximum operational comfort.
Below is a table with examples of frequently used elements of internal filling and zoning of a sliding wardrobe with their help.
| Zoning | |
|
|
Shelves are one of the main filling elements. They can be stationary and retractable, solid and ventilated, half and full depth, etc. |
|
|
Drawers are the second most important element of the cabinet. |
|
|
Hanging rod - necessary for clothes on hangers. The material used varies, most often metal. |
|
|
Convenient storage baskets. All things are clearly visible in them, which creates a certain convenience. |
|
|
This device is called a trouser. Pants are always ironed and ready to wear. |
|
|
A bar (hanger) for storing ties is convenient to choose, does not wrinkle, and proper suspension prevents them from changing shape. |
|
|
Convenient placement of belts, as an alternative - storage on a shelf in rolls. |
|
|
Compact and convenient storage of underwear. |
|
|
Placing bed linen, towels, and some clothes in piles on shelves. |
|
|
For storing blouses, light blazers, short sundresses stands out Substantial part internal volume. A pipe with hangers is installed in the opening. You can make several such sections - for short and long things. |
|
|
Department for accessories - bracelets, watches, glasses, etc. It is recommended to store these items in drawers. Inside, the space can be divided into separate cells. |
|
|
Shelves for storing shoes. In the upper (mezzanine) part you can place shoes in boxes. |
|
|
Hooks, hangers, carabiners, rings and other accessories for bags. |
| Travel suitcases | Place rarely used (once a year during vacation) suitcases on the far (top) shelves or mezzanine. |
|
|
One of the options for bed linen. Shelf width up to 80 cm, height up to 60 cm. |


Characteristics of the main filling elements:
- retractable and stationary shelves. For convenient use, the distance between them is from 350 to 450 mm;
- drawers. Two types - fully retractable (100%), partially retractable (80%). They can be equipped with closers that provide smooth semi-automatic closing of the drawer;
- mezzanines, known as hard-to-reach shelves. Located at the top. Rarely used and bulky items are stored on them;
- Barbells are needed for hangers. Mounted along the width of the cabinet;
- pantographs or special “furniture elevators”. Thanks to them, clothes are stored at the required level and can be easily pulled out using a special rod. They can be electrical or mechanical;
- Baskets are convenient for storing small items. Equipped with rollers and guides.
Facades
The interior content, thought out to the smallest detail, will be in sharp dissonance with poorly chosen facades. It is the facades that give the entire cabinet a special finished look. Let's consider several options for their implementation.
Mirror

A mirror visually enlarges the space and makes the room brighter. Can be whole or divided into several parts. The large weight of the mirror determines the need to select high-quality and reliable rollers. Such a facade creates additional maintenance troubles - the mirror quickly gets dirty. It will have to be wiped and washed regularly, especially if the family has small children.
A variety of finishes are used for facade mirrors - sandblasting patterns and designs, spraying of various shades (silver, emerald, gold, etc.) for glass, printing color images and much more. For safety reasons, a mirror with inside covered with shockproof (armor) film. If the mirror breaks, the pieces will not fly away.
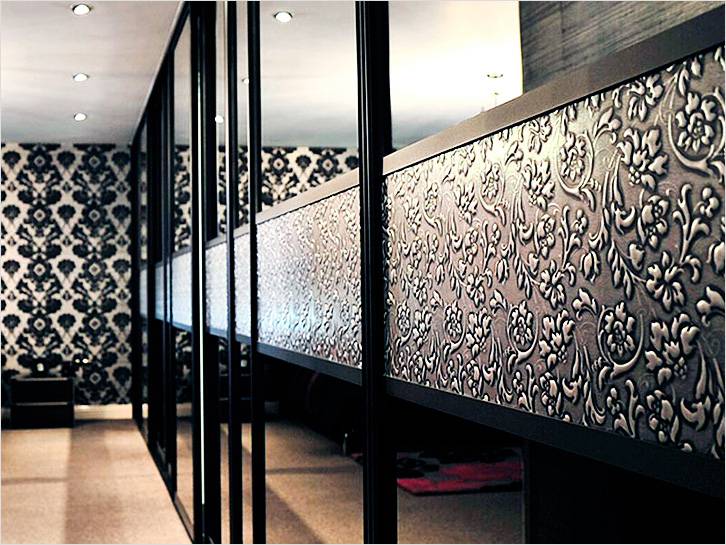
Glass

Glass is no less popular than mirror; facades are equipped with unbreakable ones. Mainly used frosted glass with an image. Vertical and horizontal stripes that divide the canvas into separate squares look original.
MDF and chipboard

These materials are laminated with film. The facades look massive and heavy. To install them you will need reliable roller systems. One of the advantages is a huge selection of colors, shades and patterns, texture - from matte to bright glossy.
Photo printing can be applied to MDF and chipboard facades.
These are the main types of facades used in the manufacture of sliding wardrobes. You can combine them with each other. This article contains photographs with a considerable number of original ideas for the production of facades.
Step-by-step manufacturing instructions
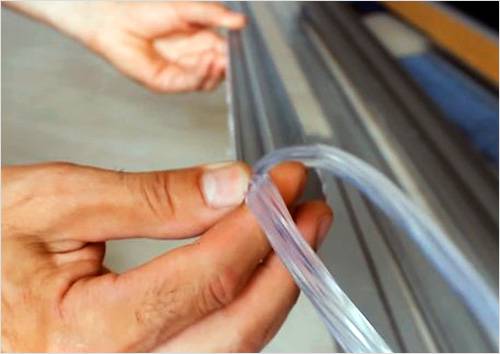
Gluing the edge tape
After cutting all the elements, the edge tape is glued to the ends of the slab. Sequence of operations performed:
| Instructions for gluing the edge to the end of the workpieces | |
|
|
If you don’t have an assistant, you can use a simple trick. You will need a small box and a quick-release clamp. The clamp presses the board to the box, ensuring the stability of the workpiece and the convenience of gluing the edge tape. |
|
|
One side of the edge tape has an adhesive surface. Warm up to high temperature it is easy to glue to the workpiece. |
|
|
Cut the edge to the required length. Leave a margin of 1 cm at the edges. After gluing, you can cut it with ordinary scissors. |
|
|
For gluing, set the position of the iron temperature sensor to “2”. |
|
|
For safety reasons, wear left hand two gloves. There should be no pellets on the palm. |
|
|
Use the iron to move along the edge tape, and hold it with your left hand (flat). |
|
|
We move the iron in the opposite direction, at the same time using a gloved hand we firmly press (smooth) the edge tape. |
|
|
Use your hand to smooth the edge a few more times. |
|
|
Using a special roller. Iron on the edge tape and then roll it with a roller. Very comfortably. |
|
|
Once the tape has cooled down, carefully cut off the remainder from the end with a sharp knife. |
|
|
We get a cut like this. |
|
|
We repeat the procedure for all ends of the workpiece. We measure the tape with a margin of 1 centimeter, from each edge. |
|
|
Glue it with an iron and smooth it out. |
|
|
Cut off the cooled edge. The edge on the adjacent edge has already been glued; we make the cut very carefully. |
|
|
We cut off the longitudinal remains of the protruding edge on all sides. |
|
|
Result. Gluing edge tape the ends of the remaining blanks. |
|
|
All cuts are sanded with a special whetstone. Interior It is filled with foam rubber, and the outside is filled with fine-grained abrasive. |
|
|
Grinding of cuts is done only with longitudinal movements. |


The processing of the main elements is carried out similarly.
Assembly
According to the project, the details are cut out. It is better to do this operation in a workshop on a special formatting machine. After cutting and gluing the edges, we assemble the cabinet:
| Frame assembly instructions | |
|
|
To work, you will need to assemble an additional device consisting of a metal strip and two pieces of board connected at an angle. It turns out a corner with a metal guide. You will also need two quick-release clamps. Using this device it is very convenient to connect workpieces at right angles. |
|
|
We check with a square - it should be 90˚. |
|
|
Set aside 70 mm from the top edge. |
|
|
In the example, a 16 mm slab is used, therefore, it is necessary to retreat 9 mm from the edge. Why not 8 mm? Because the plate protrudes 1 mm beyond the edge, forming a small side. The middle of the end of the adjacent plate is at a distance of 9 mm. |
|
|
Drilling mark. |
|
|
A similar mark is placed below. |
|
|
Using a drill, we make holes for the fasteners. |
|
|
A special drill replaces three at once. It allows you to make the main hole, the collar and chamfer in one operation. |
|
|
Drilling. |
|
|
We tighten the confirmation with a screwdriver. |
|
|
Having secured the sidewall, we mark the installation locations for the shelves according to the design. |
|
|
Next, using a square, place marks on both sides under the holes for attaching the shelves. |
|
|
Markings along which holes for confirmations will be drilled. |
|
|
The device assembled at the beginning of work is convenient to use for fastening shelves. Using a tape measure, measure 1/2 the thickness of the slab. The thickness of the plate is 16 mm, so we retreat 8 mm from the mark. |
|
|
At this level we install the shelf using quick-release clamps. |
|
|
Here you can clearly see that the mark is in the middle of the end of the workpiece. Everything is ready for drilling. |
|
|
Let's drill. |
|
|
We tighten the confirmations. |
|
|
We install the remaining shelves in the same way. |
|
|
We install the cross member. And we fasten each shelf with confirmations. |
|
|
Having secured the crossbar with a quick-release clamp, we twist it with confirmations at the top and bottom, then secure each shelf. |
|
|
This is how the lower part of the wardrobe is assembled. We clamp the strip from the slab with a clamp and secure it at the end with a confirmat. |
|
|
We drill shallow holes from below for installing furniture legs. |
|
|
We tighten the metal sleeve with external and internal threads. |
|
|
Using a hexagon, tighten (recess) to the required position. |
|
|
We screw the leg with the plastic support into the sleeve. Thanks to this, the furniture can be moved and leveled. |
|
|
Two parts support leg assembly. |
|
|
After assembling the cabinet on it back side The fiberboard sheet is fastened with ordinary nails. |
|
|
We start fixing the fiberboard from the top. By tilting the cabinet from side to side, we achieve a 90˚ angle between the side panel and the top bar. We nail the sides and bottom of the fiberboard sheet. |
|
|
During assembly, no such plastic furniture corners were used. Why? The use of confirmat is much more practical, since it is screwed into the slab a few centimeters and reliably connects the structure, giving it additional rigidity. |
|
|
We close the confirmation hats with a decorative cap. |


Using the same operating sequence, you can assemble a wardrobe of any configuration.
Video:
Making doors
The door consists of a frame, metal guides and a roller system. You should order it from a company that professionally deals with such systems. Specialized software will calculate all elements based on given dimensions and issue a complete specification for assembly. Mirrors or slabs from other materials are cut to the size of the doors for mounting in frames.
| Elements for sliding system | |
|
|
|
|
|
|
|
|
|
|
|
|
|
|
Vertical posts/handles for the side parts of the door. |
|
|
Sealing rubber for the mirror. |
|
|
Self-adhesive brush to soften the impact of doors when opening/closing. |
|
|
|
|
|
|
|
|
Brackets for fixing doors in extreme positions. |


The main parts for assembling the doors are made of aluminum. All metal components must be coated protective film, protecting them from scratches during transportation.
Assembling the sliding system
Let's consider step by step assembly door leaf. In our example there will be two mirror doors.
| Door assembly instructions | ||
|
|
The door is located in a horizontal position and provides free access from all sides. | |
|
|
At the top vertical stand, which also serves as a door handle, drill two mounting holes. | |
|
|
The lower one has a diameter of 6.5 mm. | |
|
|
The top hole is 10 mm. The upper door profile and the roller will be attached through it. | |
|
|
The lower part of the same vertical profile. The upper hole is 10 mm, the lower one is 6.5 mm. The distance from the edge of the first hole is 7 mm, the second is 43 mm. The lower roller will be attached closer to the edge. The second hole is for the screw connecting to the profile. | |
| Profile installation | We fix the rubber seal on top with a profile, carefully inserting it. | |
|
|
We perform the procedure sequentially on all faces. We do not cut off the rubber seal at the corner, but continuously lay it along the entire perimeter. | |
|
|
This screw does not tighten completely. Later the upper rollers will be installed into it. | |
|
|
Install the upper rollers and tighten the screw until it stops. | |
|
|
Rubber seal installed at the bottom of the door. | |
| The screw with the top roller is also tightened | At the top we attach the second pair of rollers. | |
|
|
Install the lower roller. We press the spring on the roller and carefully insert it into the hole, securing it with a screw. | |
|
|
The screw is tightened with a hexagon. | Ready wardrobeWardrobe with first door installed. |
|
|
We assemble and install the second door in the same sequence. | |


Additionally, we install auxiliary elements - a pipe for hangers, etc.
Video:
 In the end it should look like this
We invite you to familiarize yourself with the diagrams and drawings. They will help you create your own project.
Video:
Video:
Photo


The problem of lack of free space is familiar to everyone. A lot of things, all of which are important and necessary from the point of view of the owners, are usually found in closets that take up a lot of space in small apartments.
Where can we find a way out of this situation? The solution is simple - install a wardrobe, and the appearance of your home will completely change. How to make, build and assemble a built-in wardrobe with your own hands? Do you want a built-in dressing room, hallway or bedroom? This article will help you do it yourself.

The problem of lack of free space is familiar to everyone. Where can we find a way out of this situation? The solution is simple - install a wardrobe, and the appearance of your home will completely change.
What are the benefits of built-in wardrobes (in the hallway or bedroom)?
- most often it is installed in a niche of the room, thus saving precious centimeters of living space (this is very important, especially if the apartment is small);
- due to its design, it accommodates a large number of of things. It is much more spacious than ordinary bulky cabinets;
- The main component of such a closet is sliding doors. Thanks to them, the wardrobe can stand very close to the sofa and there will never be any discomfort when opening and closing the doors;
- has a wonderful appearance. Depending on personal preference, this type furniture can be made truly unique: it is decorated with mirrors, drawings, etc.;
- often performs by zoning the area of the room;
- there is no empty space between it and the wall, which is usually an additional dust collector;
- Safes, sockets and switches are often placed inside it, without spoiling the appearance of the walls of the apartment.
When deciding to have such a miracle at home, it is better to make a wardrobe yourself, because the cost of it in the store will not be affordable for everyone (from 13,000 to 300,000 rubles).
What type of wardrobe is better to choose?

Depending on the presence or absence of cabinet walls, this type of furniture has several types. Complete absence of side walls, top and bottom. They are completely replaced by the walls, floor and ceiling of the room (read how to properly plaster a ceiling). The shelves in such a cabinet are attached directly to the walls.
Let's consider features of this model:
- the costs of manufacturing such furniture are minimal, because you only need to purchase chipboard for shelves;
- have a large internal volume.
Among the disadvantages, it should only be noted that such a built-in wardrobe model is considered absolutely non-transportable. It will not be possible to move her to any other apartment.
- Partial or complete presence of walls. The total cost of such a cabinet will be slightly higher than that of the previously reviewed models. However, they have one significant advantage - the ability to transport and install in another place (sometimes used as ordinary cabinets).
All types of built-in wardrobes can have doors or be without them. It depends on the personal preferences of each individual person.
Secrets to choosing the right height and width
Width of built-in wardrobe depends on the size of the niche in which it will be located. Determining how many doors are needed (their maximum width is 90 cm), Special attention you need to pay attention to the guides along which the wheels will move. Their size does not exceed 4 m or 5 m (this depends on the manufacturer).
If the width of the recess in the wall is greater, then a chipboard partition will have to be installed between the guides. This must be done because metal joints will quickly deteriorate the condition of the door wheels.
Visually, it will never be noticeable that the cabinet consists of several parts. Everyone will close the sliding doors.
The smallest width of such furniture should not be less than 100 cm. This is explained by the fact that it is too narrow doors do not have good stability. If you still can’t do without small size wardrobe, you need to think about replacing the wheels in the guides with swing mechanisms.

The height of the built-in wardrobe depends on whether there is a suspended ceiling in the room or not. Depending on this condition, this type of furniture has some varieties.
Height depends on the height of the niche:
- if it is small (up to 200 cm), then it will not be possible to make the furniture different;
- in the case when the height of the room is within 280 cm, then the cabinet is made up to the ceiling, because the traditional size of chipboard sheets is 278 cm;
- if you need to make the cabinet tall, then place a mezzanine on its upper part or extend the side walls of the entire structure. The mezzanine has its own doors with individual guides.
- The maximum height should not exceed 4 m.
In addition, the height of the built-in wardrobe depends on whether or not there is a suspended ceiling in the room (read how to wash a stretch ceiling without streaks). Depending on this condition, this type of furniture has several varieties:
- if the cabinet has a top wooden cover, not screwed to the ceiling, and the distance between them is within a few centimeters, the product is made up to the ceiling;
- in some cases, the top furniture rail can be mounted directly to the ceiling. This can be done if before installation stretch ceiling on concrete base screw wooden beam. The cabinet guide is screwed directly to it with self-tapping screws. In this case, there will not be the slightest gap between the furniture and the ceiling;
- the furniture does not reach the ceiling, but the intermediate distance is covered with a decorative wooden or plastic strip;
- built-in wardrobe below the ceiling 50 cm or more. In this case, the gap is not closed by a mezzanine.
Step-by-step guide: making a built-in wardrobe
Preparatory stage
First of all, you need to take care of the condition of the niche in which the future structure will be located. To do this, it is cleaned of old finishing materials and the surface is well leveled (find out about this).
If the wardrobe does not have walls at all, then the surface of the recess in the wall can be painted in any color or covered with new wallpaper.
In the case where the furniture is mounted with side, top, bottom and rear walls, the niche must be absolutely flat. You can check this using plumb lines and levels. It is also necessary to measure the diagonals of the recess: from the upper right corner to the lower left and vice versa.
They must be absolutely the same. Will help correct all errors cement mortar or plaster. This is done in order to avoid distortions in the wardrobe.
After completing all preparatory work, must be done drawing of the future cabinet. In this case, be sure to take into account the number, size and location of shelves. Only in this case will it be possible to make it truly convenient for all family members.
Having determined the width of the built-in wardrobe, you need to mark the places where the guides will be attached along which the sliding doors will move.
Then the materials are selected. It is necessary to think about what the doors will be made of. If they are of poor quality, there is a possibility that they will be difficult to open. Preference should be given laminated chipboard thickness from 0.8 cm.
Its average cost is 190 rubles. for 1 m2. When calculating the width of the required canvas, remember that one part must overlap the other by at least 50 mm.
Can also be used glass doors, but their cost starts from 20,000 rubles. They are really durable because they are made from very strong, thick glass.
Prevent cracking similar material succeeds by covering it with a special reinforcing film. It will not be possible to install rollers on this type of sliding door without the help of a professional.
The assembly process can only begin when all visible parts of the chipboard have a beautiful edge.
Required Tools for assembly:
- drill;
- roulette;
- screwdriver;
- hammer;
- construction corner;
- hex wrench;
- pencil.
Preparing the walls

Assemble the entire structure. If there are shelves, make sure that they do not extend beyond the cabinet.
- Using a tape measure and a pencil, make markings along which the cabinet will be assembled;
- put marks for shelves;
- on all planes make holes through with an 8 mm drill, at the ends with a 5 mm drill (the depth should not exceed 0.6 cm);
- assemble the entire structure. If there are shelves, make sure that they do not extend beyond the cabinet (this will interfere with the doors);
- insert stoppers for canvases into the lower guide;
- screw the upper and lower guides to the niche with self-tapping screws (parallel to each other);
- for the stability of the canvases, screw at least two rollers on top and bottom;
- insert the doors into the guides.
If there is no additional wardrobe, it is inserted into a recess in the wall and leveled using a level. You can screw furniture to the walls using dowels and screws.
Installation of a built-in wardrobe

For reliability, the structure is attached to the niche with dowels and screws.
- make markings on the wall (location of shelves);
- screw the metal corners to the walls with self-tapping screws (this is the base for the shelves);
- secure the shelves to the corners;
- connect the lower, upper and side parts to each other;
- for reliability, the structure is attached to the niche with dowels and screws;
- install guides to the lid and bottom of the cabinet;
- Attach the rollers to the doors and insert them into the guides.
Sometimes after installing the doors, a small gap appears between her and the wall. A hexagon will help fix this. They need to tighten the bolt that secures the lower rollers.
How can you tell if a wardrobe is assembled correctly?
The following indicators will help determine this:
- Complete absence of gaps between the doors and the wall.
- The door leaves move freely along the guides.
- All drawers (if any) open freely.
- The canvases have an overlap.
- The gap between the rod for hanging things on it (if there is one) and the back wall of the cabinet (or niche) should be at least 23 cm.
Having made a drawing and diagram of the cabinet and ordered materials, you can, of course, entrust the assembly work to a professional. However, you need to take into account that the cost of his services will cost approximately 3500-9000 rubles.
That is why, if you invite an assistant home, you can install the entire structure, the frame for the built-in wardrobe, yourself. The main thing is, already at initial stages maintain all verticals and horizontals, which will ensure the correct position of the entire built-in wardrobe and excellent operation of its doors.
Video instruction