How to make your own glass table for the kitchen. DIY table with glass top
Glass table – excellent design solution. Light and graceful, it impressive looks, fits perfectly into any interior, does not scratch or break.
Care behind such a piece of furniture simple: quite timely rub with a damp cloth or special solution.
But perhaps the most important thing advantage glass table is that it is completely doesn't overload interior, but, on the contrary, seems to add to it air and space.
Glass table options
From glass do kitchen and even
Tables can be completely glass And combined with other materials (wood, plastic, stone, metal, rattan, etc.), with framed and frameless tabletop and under the table
In addition, glass tables vary according to the following signs:
1. Tabletop geometry:
- oval;
- round;
- square;
- rectangular;
- triangular;
- irregular shape.


2. Glass used:
- triplex;
- strained glass;
- tinted glass;
- frosted glass;
- plain (raw) glass.

3. Design:
- sliding table;
- mobile table;
- table with shelf under the tabletop;
- table with a monolithic tabletop and others.


Pros and cons of glass tables
 The glass table has a row advantages:
- Aesthetics appearance. This table will decorate any interior.
- Hygiene. They do not absorb odors and dirt, and do not emit harmful substances.
- Practicality. Just wipe the table top special means or water.
- Safety. The strength of some types of glass can be compared to wood. And if the glass does break, it remains in the same shape thanks to a special film.
- Persistence. Some types of glass are resistant to increased temperatures, humidity and various chemical influences.
Flaws glass tables:
- By wiping the countertop poorly, you can get divorces on a surface.
- Loudly objects are placed.
- Plain glass gets dirty quickly fingerprints.
- Surface made of plain glass scratches, may appear chips.
- A table made of plain glass can crash.
- High price on finished goods from glass.
Materials and tools
 Materials, necessary for making a glass table:
- sheet glass thickness 6-12 mm;
- cleaning glass cleaner;
- glue for glass and other materials;
- gasoline or acetone;
- emery coarse and fine grain paper;
- legs for the table (4 metal tubes);
- suckers for table legs;
- vegetable oil(for wetting the glass cutter wheel);
- chipboard sheet or plywood, on which glass will be cut;
- paste for polishing glass.
 Tools:
- pencil, bright marker;
- long ruler roulette;
- diamond glass cutter;
- rubber hammer for beating edges (you can use a glass cutter instead);
- clean rag – 2 pcs.;
- drill or Bulgarian;
- felt circle.
Attention: When working with glass, be sure to use eye protection, protective gloves and mittens.
Hi-tech table
 Form your future table can be anything. Do additional shelves or limiting yourself to one tabletop also depends on the author’s intention.
Let's consider the general manufacturing principle glass table with metal legs.
Choose glass necessary due to its properties. Best fit triplex or tempered glass.
The thickness of the tabletop should not be less than 6 mm and more than 12 mm. Optimal Thick glass would be an option 8 mm.
Manufacturing stages
Step 1. To start preparing all the tools and carefully my glass on both sides.
Step 2. If edge The glass is uneven - we trim it. For long sides, we use a ruler and a marker, with which we mark the desired trajectory glass cutter

When cutting with a roller glass cutter pre-wet the roller in oil The pressure should be about 2 kilograms. If it didn't work out incision the first time, you can move the glass cutter back and forth several times. After making the cut, you need to tap on the front side of the trim rubber with a hammer (or any heavy rubber thing).

At cutting using a diamond glass cutter, you need to remember that strong pressure is inappropriate. You need to run a glass cutter across the glass once. After making the incision diamond glass cutter is necessary combine the edge of the table or sheet with the edge of the tabletop we need (so that the scrap hangs down) and carefully knock By inside glass
Then, holding the edge of the trim, sharp pull it away from you. The remaining narrow parts or not fallen away The remaining glass is broken off using a glass cutter. It must have a special slot, which captures small glass particles.
For cutting glass with uneven a sample is pre-drawn on paper with the edge. Using a glass cutter we trace the drawn pattern - the uneven edge is ready.

For cutting glass round the center is marked (two crossed crosses). IN middle a piece of glass is attached with a thread or rope, to the opposite part of which a glass cutter is attached. Held circle. Then, from the edges of the circle, the remaining lines of both crosses are drawn to edges piece of glass. The result is sunshine.

Carefully, one segment of the sun is removed trimmings glass

Step 3. Using a drill, sole on the drill and sandpaper, pasted on Double-sided tape, polishing the edges of our table. We grind the edges of the glass on all sides (bottom, middle and top).
Important: Grinding should be done at low speed (no more than 1700 rpm) to avoid overheating of the glass.
Step 4. Change the sandpaper circle to felt circle, greased with a special paste, and perform the same manipulations. At low speed let's pass along the edges of the glass on all sides. Polishing produced.
 Connection diagram of a glass table top and a stand.
Almost every person who has done something for his home at least once in his life with his own hands begins over time to feel the desire to put in his efforts again. It’s so nice to see the result of your work every day, especially if this craft becomes a noticeable accent in the interior of the house. Such an emphasis could be new table from glass. Some people wonder how to make a glass table with their own hands.
The glass table does not absorb moisture and grease, and is also very easy to clean.
The process of making it requires care and precision, but the end result is worth it. In a little time, you can proudly show off to your friends and relatives a new piece of furniture you made yourself. Let's look at how to make a glass table.
Pros and cons of a glass table
Advantages of a glass table:
- suitable for any interior;
- hygienic;
- easy to care for;
- relatively light;
- does not absorb fat;
- glass can be treated with any cleaning agents.
These tables also have quite noticeable disadvantages. Glass tabletops do not dampen sound, so the operation of the table is accompanied by characteristic sounds. In bright light, stains and fingerprints become noticeable on the glass.
How to make a glass table with your own hands
Connection diagram of a glass table top and a stand.
First you need to choose the shape, style and size of the table. It can be an ordinary rectangular glass table in a high-tech style or in the style of an oriental fairy tale. You need to decide what role it will play in the already established interior. After all the tasks have been determined, all that remains is to prepare necessary tool, materials and go!
To make a glass table you will need:
- glass cutter (it can be diamond or roller);
- pliers with rubber gaskets;
- metal ruler;
- rubber hammer;
- the material itself for making the table (it is better if its thickness is at least 6 mm).
You can choose any glass for making a table. It can be transparent and matte, colorless and colored, smooth or textured and many more options.
But if you take ordinary transparent glass and then decorate it using any method, you can end up with a unique piece of furniture.
The choice of material for making a table can only be limited by the imagination of the craftsman. For these purposes, you can use wood, metal, plastic and glass. In addition to the main tabletop, the table design may also include an additional shelf.
Cut glass
Cut out the glass table top.
In order to cut the tabletop into the desired shape, you need to apply its future contours to the glass. It is better to carry out this work on a special table, so as not to carry the workpiece from place to place and not expose it to the risk of being broken. First, you need to practice on scraps of glass, then cutting out the tabletop itself will be a little easier. The cut must be made using a metal ruler. The pressure applied to the glass cutter is determined by its sharpness. So, you don’t need to press as hard on a diamond glass cutter as on a roller cutter.
It is necessary to observe safety precautions when working with glass! Be sure to wear gloves to avoid hand injury.
After making the cut, you need to separate the edges of the glass. This can be done by hand or using pliers. In addition, the glass cutter has special device necessary to chip off a thin edge. As a result, we get a glass tabletop required size and shapes.
The next manufacturing stage is processing the glass edge. This can be done either manually or using a special machine. To process glass manually, you will need a file or emery block. When using a file, you will need some soaking fluid. It can be turpentine or kerosene. You need to work especially carefully. Movements should be uniform and smooth. After rough processing The edges of the glass must be ground and polished. This can be done with a drill or grinder using a special attachment. To sand the edges, gradually reduce the grit of the sanding wheel. Polish the surface using a special paste and felt.

Figure 1. To prevent the design on the glass table from being damaged, it must be applied from the reverse side.
So, the base of the tabletop is ready. Now you need to make the underframe. There can be many options here. All that remains is to attach the tabletop to the base.
Fastening is carried out using special suction cups and glue. In order to fix the suction cups on the legs, you need to drill or cut holes in them. The glass is fixed to the suction cups special glue, which dries under the influence of ultraviolet rays.
The glass table is ready. All that remains is to decorate it. Here are the most common options.
Glass painting using stained glass technique
Materials:
- palette (it is better to use a piece of the same glass);
- stained glass paints;
- drawing stencil;
- contour paints;
- White paper;
- solvent;
- stationery knife;
- cotton wool;
- ammonia;
- water.
First you need to thoroughly degrease the glass surface. Then you need to fix a sample of the design and carefully transfer it onto the glass using contour paint. If it doesn’t turn out very neatly, you can remove the excess with cotton wool. If the outline is thin, you can correct it using a cotton swab or toothpick.

Figure 2. After painting, the drawing must be covered with a layer of varnish.
After the outline is completely transferred, remove the pattern sample and attach the glass to a sheet of white paper. We mix stained glass paints on the palette to obtain the required shades and apply them to the prepared sketch (Fig. 1).
You can get rid of any bubbles that appear with a toothpick. The finished drawing needs to dry completely. To decorate a tabletop, this technique is best used on the underside of the glass (Fig. 2). For greater durability, the surface should be coated with a layer of varnish.
Decorating table tops using sandblasting glass
The most important thing in this technology is the selection of the appropriate general style interior
Tools and materials:
- quartz sand, sifted and dried;
- sandblasting gun;
- stencils.
We thoroughly clean the glass surface and degrease it. We fix the stencil on the surface of the glass. Fill the capacity of the sandblasting gun 1/3 with sand. We connect to a compressor equipped with a gearbox. We begin processing the surface, which, depending on the size of the sand particles, can be granular or velvety. After finishing processing, remove the stencil. The tabletop is ready.
Glass etching technology
This technology is somewhat similar to the one described above. Only to create a matte surface, not mechanical, but chemical treatment is used here.
Materials and tools:
- brush;
- stationery knife;
- pickling paste;
- copy paper;
- polyethylene film;
- latex gloves.
You can purchase a stencil for decoration ready-made, or you can make it yourself. It is best to make a stencil from self-adhesive film. It is necessary to firmly fix the stencil on the tabletop. Apply with a brush to vacant plots thick layer etching pastes. Important: be sure to wear rubber gloves! Do not allow paste to come into contact with skin. In case of contact, immediately rinse the area with plenty of cold water. The exposure time for the paste is indicated on the packaging and averages from 6 to 10 minutes.
After this time has passed, the glass must be rinsed with plenty of water. Now you need to dry the glass using a lint-free cloth. When the glass is completely dry, you can remove the stencil.
Glass tables look appropriate in any interior. Their graceful and airy appearance does not overload the space, visually leaving the room spacious and uncluttered. From a material such as glass, you can make a serving, coffee, computer or even dining table, and it is quite possible to make the structure yourself.
Such interior items vary in shape, design and materials. As for the geometry of the tabletop, a glass table can be:
- round;
- rectangular;
- triangular;
- square;
- oval;
- have an unusual curly shape.
Depending on the design features, there are the following types of tables:
- transformer;
- table with lower shelf;
- sliding table;
- mobile structure;
- monolithic table and others.
Such furniture can also be made from various types glass For example, a coffee table can be made of black, tempered, tinted, frosted, transparent glass or triplex.
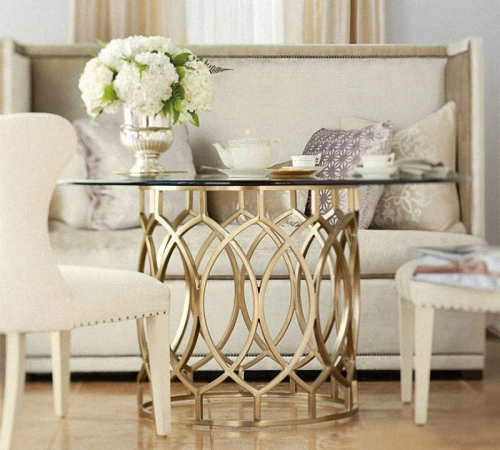
Not only the tabletops, but also the underframe and legs of the structures are distinguished by a variety of designs. The most common options are materials such as wood or chrome-plated metal. Forged tables with glass look very rich and elegant, which are chosen for interiors in classic style. A rattan table with glass looks simpler, but fits well into most designs.
Pros and cons of glass structures
TO positive qualities glass tables include the following:
- beauty, neatness, lightness of appearance;
- possibility to enter similar element furniture in almost any design;
- ease of care, hygiene, environmental friendliness;
- sufficient strength;
- resistance to chemical environments, moisture and temperature conditions environment.
Among the disadvantages of glass tables are the following features:
- There are often stains on the glass from water or incorrectly chosen care products;
- poor quality or cheap material scratches quickly;
- fingerprints often remain on the glass;
- if handled carelessly, you can get cracks and chips, or even break the table;
- ready-made structures are not cheap.

Making a glass table with your own hands
Preparatory stage
When you decide to make a glass table yourself, you probably decided in advance on its location and role. Depending on where this piece of furniture will be placed and what function it will perform, you should make a preliminary sketch on paper, taking into account the characteristics of the room in which you will place the table. On the sketch you need to indicate the area of the tabletop and the location of the legs.
To make a glass table, prepare the following materials and tools:
- glass thickness from 6 to 12 mm;
- special glue for glass;
- cleaning agent;
- acetone;
- file or emery block;
- legs for the structure;
- suction cups for legs;
- sunflower oil;
- plywood or chipboard on which you will cut glass;
- material polishing paste;
- marker or felt-tip pen;
- ruler and tape measure;
- glass cutter;
- hammer with rubber head;
- rags;
- safety glasses and gloves;
- grinder with a grinding wheel.
When working, you should use only clean and dry glass that is free of dust and other, even the smallest, contaminants. You can clean the material with a simple solution baking soda using a soft cloth. If the glass remains dirty, it may break away from the cut line.
It is most convenient to cut glass on a large sheet of plywood or chipboard, and the material should be in contact with the table with virtually no gaps and pressed as tightly as possible.
Coffee table made of glass and metal, photo:


Features of glass cutting
It is most convenient to cut glass using a thin and long metal ruler, or you can draw a line with a felt-tip pen in advance, so that you can then follow it with a glass cutter. If you are new to this business, then it is better to practice on an unnecessary piece of glass, and only then start creating a table.
Please note that it is advisable to complete the line you will draw with a glass cutter in one go, and to make the tool work easier and glide better, its wheel must be lubricated with vegetable oil. When working with a diamond glass cutter, a very thin and almost invisible line remains on the material. Placing the glass to the edge of the table so that this line coincides with it, the material is broken along the cut line. The pressing force should be approximately 2 kg. When breaking glass, be sure to wear protective gloves so as not to cut your hands, and your eyes must be protected with goggles.
After you break off the main part of the glass, there may be sharp protrusions or extra pieces left on the cut. You can remove them with pliers and wear special rubber pads. If there are no such linings, use paper folded in several layers.
Glass is cut from the far edge, applying quite strong pressure on the glass cutter. If you are working with a sharp tool but cannot make a cut, lubricate the disc with kerosene and draw along the same line several times. If you are not sure that the cut is correct required depth, turn the glass over reverse side and do the procedure again.
If you are making a round coffee table with glass or working with any other complex curved shapes, it is easiest to use a stencil for convenience. Having cut out the circle according to the stencil, draw rays from it with a glass cutter and break off the glass piece by piece.
Wired glass is cut in a special way. First, a glass cutter is used along the smooth side, and then, using a sharp tool, a deep hollow is scratched to the mesh. After this, the glass is turned over and broken off along the cut line. The mesh is bitten or cut off.
Tabletop processing
Cutting along a fracture line often leaves sharp edges on the glass that need to be removed. In production, end processing is carried out on special machines, but at home, improvised tools can be used for a similar purpose. Please note that for this type of work you will also need to protect your hands with thick cotton gloves or mittens.
You can clean the cut areas with a file or emery block. During manipulations, the file should be periodically moistened in turpentine or kerosene. When working with thin glass you need to be very careful.
The next step is polishing the ends, for which a grinder with a grinding wheel is used. The speed of the grinder should be low and be 1200-1700 rpm so that the glass does not overheat. The first step should be to use coarse-grained paper, then change it to a finer one, and as a final step you can sand the ends with the finest-grained paper. During operation, the glass can be moistened with water. You can achieve extra smoothness using a felt wheel or a special glass polishing paste.
To make the tabletop more attractive and unusual, there are several ways to decorate glass. The following methods are often used:
- decoupage;
- glass etching;
- sandblasting;
- toning;
- printing images;
- applying a stained glass pattern;
- the use of double glass with a decorative layer of flowers, stones, shells, coffee beans and other elements.
Decoupage and stained glass painting are done from the “wrong side” of the tabletop so that the design is not damaged during use. In addition to the methods described above, a glass table can be decorated with decorative lighting, which looks very impressive, especially in dark time days.

Fixation of legs
Before installing the legs, it is necessary to make a hole in each of them end side. These holes are needed to fix special suction cups in them. For greater strength, the suction cups are placed on glue.
While the glue dries, mark on the tabletop with a marker the places where the legs will be attached. In these areas, it is necessary to degrease the surface using acetone or gasoline.
As for glue, when making a glass table, it is not recommended to use the composition used for mirrors, since it takes a long time to dry and is visible through the transparent surface. For a glass table, it is better to purchase special high-quality glue. On Russian market you can find 2 popular varieties similar materials: compositions “glass-glass” and “glass-metal”. To polymerize such glue, it must be exposed to an ultraviolet lamp.
The legs are glued to the table one at a time. First, lubricate the element, place it at a pre-marked place, wait about 30-60 seconds, then direct it ultraviolet lamp on this area and leave it until the composition is completely polymerized.
Since it will be impossible to dismantle the legs after the glue has completely hardened, the places where they are attached should be marked very carefully.

Glass coffee table requires special conditions operation. First of all, we note that you need to handle it carefully, trying not to break the tabletop. Caring for such a table is not difficult; the glass just needs to be wiped from time to time with a soft rag or a piece of microfiber using window cleaner.
Scratches sometimes appear on the glass table. A special GOI paste will help correct such a defect. It is crushed to the state of very fine crumbs, applied to a piece of cotton wool, a stick or a swab, and then the damaged surface is polished. There is no need to apply strong pressure. The scratch is treated for 15 seconds, then the paste is washed off and the procedure is repeated again. In some cases, the number of approaches may be large.
There are other ways to remove or disguise scratches on glass. You can purchase Polarit or any of its analogues in the store, you can use a simple toothpaste, although its efficiency is much lower. You can also disguise the damage using ordinary transparent nail polish.
To prevent scratches, it is better to place napkins or small bamboo mats on the glass table.
Glass coffee tables, photo:


DIY glass table. Video
Almost every person who has done something for his home at least once in his life with his own hands begins over time to feel the desire to put in his efforts again. It’s so nice to see the result of your work every day, especially if this craft becomes a noticeable accent in the interior of the house. A new glass table can become such an accent. Some people wonder how to make a glass table with their own hands.
The glass table does not absorb moisture and grease, and is also very easy to clean.
The process of making it requires care and precision, but the end result is worth it. In a little time, you can proudly show off to your friends and relatives a new piece of furniture you made yourself. Let's look at how to make a glass table.
Pros and cons of a glass table
Advantages of a glass table:
- suitable for any interior;
- hygienic;
- easy to care for;
- relatively light;
- does not absorb fat;
- glass can be treated with any cleaning agents.
These tables also have quite noticeable disadvantages. Glass tabletops do not dampen sound, so the operation of the table is accompanied by characteristic sounds. In bright light, stains and fingerprints become noticeable on the glass.
Return to contents
How to make a glass table with your own hands

First you need to choose the shape, style and size of the table. It can be an ordinary rectangular glass table in a high-tech style or in the style of an oriental fairy tale. You need to decide what role it will play in the already established interior. After all the tasks have been determined, all that remains is to prepare the necessary tools, materials and go!
To make a glass table you will need:
- glass cutter (it can be diamond or roller);
- pliers with rubber gaskets;
- metal ruler;
- rubber hammer;
- the material itself for making the table (it is better if its thickness is at least 6 mm).
You can choose any glass for making a table. It can be transparent and matte, colorless and colored, smooth or textured and many more options.
But if you take ordinary transparent glass and then decorate it using any method, you can end up with a unique piece of furniture.
The choice of material for making a table can only be limited by the imagination of the craftsman. For these purposes, you can use wood, metal, plastic and glass. In addition to the main tabletop, the table design may also include an additional shelf.
Return to contents
Cut glass

In order to cut the tabletop into the desired shape, you need to apply its future contours to the glass. It is better to carry out this work on a special table, so as not to carry the workpiece from place to place and not expose it to the risk of being broken. First, you need to practice on scraps of glass, then cutting out the tabletop itself will be a little easier. The cut must be made using a metal ruler. The pressure applied to the glass cutter is determined by its sharpness. So, you don’t need to press as hard on a diamond glass cutter as on a roller cutter.
It is necessary to observe safety precautions when working with glass! Be sure to wear gloves to avoid hand injury.
After making the cut, you need to separate the edges of the glass. This can be done by hand or using pliers. In addition, the glass cutter has a special device necessary to break off a thin edge. As a result, we get a glass tabletop of the required size and shape.
The next stage of manufacturing is processing the edge of the glass. This can be done either manually or using a special machine. To process glass manually, you will need a file or emery block. When using a file, you will need some soaking fluid. It can be turpentine or kerosene. You need to work especially carefully. Movements should be uniform and smooth. After rough processing the edge of the glass, it must be ground and polished. This can be done with a drill or grinder using a special attachment. To sand the edges, gradually reduce the grit of the sanding wheel. Polish the surface using a special paste and felt.

Figure 1. To prevent the design on the glass table from being damaged, it must be applied from the reverse side.
So, the base of the tabletop is ready. Now you need to make the underframe. There can be many options here. All that remains is to attach the tabletop to the base.
Fastening is carried out using special suction cups and glue. In order to fix the suction cups on the legs, you need to drill or cut holes in them. The glass is fixed to the suction cups with a special glue, which dries under the influence of ultraviolet rays.
The glass table is ready. All that remains is to decorate it. Here are the most common options.
Return to contents
Glass painting using stained glass technique
Materials:
- palette (it is better to use a piece of the same glass);
- stained glass paints;
- drawing stencil;
- contour paints;
- White paper;
- solvent;
- stationery knife;
- cotton wool;
- ammonia;
- water.
First you need to thoroughly degrease the glass surface. Then you need to fix a sample of the design and carefully transfer it onto the glass using contour paint. If it doesn’t turn out very neatly, you can remove the excess with cotton wool. If the outline is thin, you can correct it using a cotton swab or toothpick.

Figure 2. After painting, the drawing must be covered with a layer of varnish.
After the outline is completely transferred, remove the pattern sample and attach the glass to a sheet of white paper. We mix stained glass paints on the palette to obtain the required shades and apply them to the prepared sketch (Fig. 1).
You can get rid of any bubbles that appear with a toothpick. The finished drawing needs to dry completely. To decorate a tabletop, this technique is best used on the underside of the glass (Fig. 2). For greater durability, the surface should be coated with a layer of varnish.
A glass table will be an excellent addition to any interior. However, its cost is quite high, especially for designer models. Therefore, it is much cheaper to make a glass table yourself. We'll look at how to do this further.
Glass table in the interior of an apartment or private house
Glass - environmentally friendly pure material, which harmonizes with almost all objects and adds chic to any room. Among the advantages of glass we note:
- combination with any materials such as wood, glass, metal, leather, plastic;
- stylish appearance;
- Fire safety;
- variety of shapes and colors;
- duration of operation;
- ability to transmit light;
- high level of strength when using special glass.

A glass table fits quite well into the living room or kitchen, as well as into the bedroom or children's room. This table makes the room more sophisticated, original and aesthetically attractive.
IN small room, a glass table will help to increase and expand the space. In addition, glass makes the atmosphere lighter and more relaxed.
For the manufacture of glass tables, for safety reasons, it is recommended to use durable tempered glass, which is resistant to mechanical damage and scratches.
In addition, there is the option of making glass tables using unusual glass that is tinted, matte or glossy. In relation to the shape, the imagination is also limitless; tables come in ordinary square, round and oval shapes or asymmetrical - wavy. Thus, it is possible to install the table in a room with any interior style.

To make table legs, metal, wood, stone or beautiful forging are used. We invite you to familiarize yourself with the features of combining a glass table in the interior:
- An excellent solution would be to use a glass table in a room that combines a dining room with a kitchen and a place for receiving guests;
- glass tables or small tables are most appropriate for modern style interior - modern or high-tech;
- in order to make the accent in the room on a glass table, it is enough to use glass in bright, saturated colors or colored mosaics;
- A table with a dark glass top is distinguished by its high cost and special luxury;
- Coating the glass with special compounds will prevent the formation of stains on its surface.

DIY table with glass: a variety of shapes and configurations
Making a glass transfrer table will be excellent option for a small room. Models of sliding or folding type. It is also possible to build a table whose legs vary in height. If you install a table on small legs, it will function as coffee table, otherwise, it turns out to be a table for eating.
Coffee tables that have a glass top and legs made of wood or steel are quite popular and easy to manufacture. Such models have simple form, so in order to build them you don’t need any special glass cutting skills.
A great addition to dining table there will be chairs with bright upholstery. It is possible to purchase chairs based on thermoplastic. In addition, the use of wicker chairs will also be quite relevant.
If you plan to install a table in the kitchen, we recommend choosing tiles, a refrigerator hood, and other equipment for this room. household appliances chrome color. You can place a basket on the table containing fruits or a vase of flowers.
A DIY kitchen table with glass can be an excellent decoration for any kitchen or dining room. Its installation in a small room is especially relevant. Transparent glass can expand and enlarge the space. To ensure that there are no streaks left on the glass after it is made, it is recommended to apply a special solution to the surface of the tabletop, which is sold in a hardware or furniture store.

Glass furniture made using the frame method
When making your own glass table and other furniture based on glass, this method is the most successful. To do this, you will need to have furniture board, in which a hole of any configuration is cut.
Next, the previously cut glass is fixed in it using a bead. Among the disadvantages this method They note the not particularly attractive appearance and the inability to install sufficiently thick glass.
With the help of mechanical fasteners, after a certain time it is possible to change the furniture and install different glass. The presence of a facet is mandatory.
Doors, windows, and some models are made in the same way. desks made of glass. Fixing the glass in the frame does not require additional processing, so the entire process is based only on the installation of the glass sheet.

Glass table photo and glass cutting features
Before the beginning this process You should decide on the thickness of the glass and the size of the glass cutter. There are different types of glass cutters:
- roller type;
- diamond type.
The first option is designed for thinner glass, up to four centimeters thick. Such tools have from one to six rollers. Each glass cutter has a cutting line. There are models that have an oil reservoir; for beginners, we recommend using them.
The cost of a diamond glass cutter is higher than that of a roller glass cutter. These glass cutters are capable of cutting glass that is more than one centimeter thick. In order to cut glass, you will need a flat, hard surface on which a thick film or fabric is laid. To ensure smooth cutting, it is necessary to have wooden ruler, if you need to cut glass of a certain shape, you should make a pattern in advance. For these purposes, we recommend using plywood.
Next comes the process of preparing the glass for cutting. To do this, the glass is washed and degreased. If the glass has a corrugated surface, then a diamond glass cutter will not be suitable for cutting it. In addition, such glass is cut exclusively with smooth side. Before starting work, we recommend taking a small piece of glass and trying to cut it in the right direction to get used to the tool and practice a little. When cutting glass using a roller glass cutter, the line along which the cutting is carried out is covered with turpentine solution.
The entire sheet of glass must fit on the surface without protruding beyond it. A thick ruler or pattern is placed directly on the cutting line. The glass cutter is held in the hand like a pencil and placed on a ruler. To prevent it from sliding on the surface, we recommend gluing it with fabric-based tape. The diamond glass cutter practically does not press on the surface, while in the process of moving it along it a strip is formed. If the pressure was too weak and the glass does not separate, then re-cutting is not carried out in the same place. This rule is relevant for both diamond and roller type glass cutters.

The roller glass cutter is placed in the hand in such a way that the ring and middle finger pressed on it. After cutting, a white stripe is obtained. Next, the glass is moved to the edge of the table and tapped from below using a glass cutter. Holding the main part of the glass, gradually break off the areas that are not on the table. For these purposes, you can use pliers or do it manually.
If you plan to execute figure cutting glass, then for this, a pattern is applied to the glass, according to which cutting will be performed. Next, this fragment is outlined with a rectangle, which is cut out with a glass cutter. Gradually, unnecessary parts are cut out with a glass cutter.
To ensure that the end sections of the glass are not sharp and uneven, sandpaper is used to polish them.
DIY glass coffee table
We offer an option self-made coffee table with chrome legs. The legs are fixed with special glue, without the use of clamping mechanisms.
To purchase additional fittings, contact a hardware or furniture store. In order to build such a table, you will need chrome legs, the length of which depends on your personal preferences.
You will also need to purchase a special glue, after application of which no traces remain, and the glass adheres to the surface very firmly. This composition is capable of polymerizing only if there is ultraviolet radiation, which is produced by a special lamp. With this device, the entire process of making a glass coffee table takes no more than two hours.
Please note that using regular superglue or silicone sealant- unacceptable. Firstly, after using them, cloudiness and stains are visible on the surface of the table. Secondly, during the operation of such a table, after a maximum of a month, the legs will begin to move away from the surface.
Therefore, having decided to make such a table, you need to spend money on special glue with a lamp necessary for its hardening. At the same time, this glue, after hardening, will not allow you to detach the table leg from the glass roof; if you try to do this, the glass will simply break.

When constructing a glass coffee table, use glass that is at least 1 cm thick. To cut it, you will only need a diamond glass cutter.
To build a glass coffee table you will need:
- glass;
- glass cutter;
- rulers;
- pencil;
- mittens;
- glass glue;
- ultraviolet lamp;
- drills;
- file;
- sandpaper.
First, determine optimal sizes and the shape of the coffee table. Depending on this, it is recommended to mark directly on the glass. The shape of the table can be either strict oval or rectangular, or arbitrary. To make the second option, you will need experience working with a glass cutter.
After marking the surface of the cover, begin the cutting process. We recommend checking the markings several times to avoid mistakes when cutting.

Before cutting begins, the glass cutter is dipped in vegetable oil, if necessary. The cutting process is described in detail above, we will not dwell on it.
After this, the process of grinding the ends of the glass surface follows; if this is not done, then there is a risk of injury when using the coffee table. To begin, put on gloves made from thick fabric, take a file and polish the surface. The following is the process of using a diamond-coated grinder, if available. The work is carried out at low speeds, the result is a slightly rounded, not sharp edge. Next comes the process of sanding the coffee table cover using sandpaper. The processing of the ends is completed with felt, which is sold in roll form. It is wound onto the surface, providing reliable protection glass In its absence, special paste-like compositions are used, which are applied to a pre-degreased coating. Their cost is much higher than that of felt.
The main step in constructing a coffee table is fixing the legs to the lid. To do this, the tabletop must be turned over and laid on a flat surface. First, markings are made according to which the legs will be fixed on the table. Next, glue is applied to the glass and the leg is attached to it. The work should be carried out by at least two people. To polymerize the glue, use a special lamp with ultraviolet radiation.
If it is not possible to purchase glue, we recommend using special suction cups. They are attached to the leg and then to the glass. For additional fixation of the legs on the suction cups, a small drop of wood glue is applied to the surface of the glass before installing the legs; it will ensure reliable fastening.

Install the table, and place books where the legs are fixed to improve the adhesion of the glass and the legs. After 48 hours, remove the books, wash the glass with special solutions and install it in the living room. It is possible to cover the glass with a special decorative film with different patterns imitating a matte surface, ornaments, flowers or mosaics.