How to make a beautiful house in Minecraft. How to build a beautiful house in Minecraft
The principle of the Minecraft game is simple - it is about life in the virtual world, as well as survival. And the first rule of such an existence is to find a place where you can spend the night or hide in bad weather. This rule works for this game, but you better not go looking for shelter. Of course, for the first few days you will have to spend the night in extreme conditions, but this is until you have enough materials for construction own home. You shouldn’t aim for something grandiose right away - for starters, four walls and a ceiling will do. And then you can more freely extract resources, and this will give you the opportunity to build a much more impressive structure in which you will live and escape from all the hardships of the Minecraft game. How to build beautiful house? To do this you will have to take several steps.
Laying the foundation
In many ways, building a house in the game overlaps with real life, so some stages will not seem new to many. First stage Even beginners and inexperienced Minecraft players will be able to overcome it. How to build without a foundation? This is where you need to start, so arm yourself with stone blocks and decorate the lower part of your building. If you wish, you can easily make not just a foundation, but a basement, so that the house is as realistic as possible, but this is not a necessary condition, so you can simply lay out the shape of your future building with stones, and your foundation will be ready. So you have taken the first step towards building a luxurious building in Minecraft. How to build a beautiful house based on the existing foundation? From this point on, the task begins to become more difficult.
Walling

At the second stage, you will need to carry out the largest amount of work, since you will create the skeleton of the house itself. Make sure that you have as many bricks in your inventory as possible, since this is the best way to make the body of your building. Brick is quite durable and looks very aesthetically pleasing, but this is a matter of taste - you can use stone, wood, and even gold. Everyone has their own taste, and there is no point in imposing any specific solutions. After all, this is the whole essence of Minecraft. How to build a beautiful house? There is no single answer to this question, you can only find tips, manuals, advice, but you will have to do the main work yourself. However, rest assured that the result will be simply wonderful.
Creating a roof

Not the most pleasant process for this game is creating the roof. There are no special realistic materials in Minecraft that would be suitable for such a task, so you will have to improvise. It's time to experiment quickly if you don't have necessary information? This means you need to get them - you can find out on the Internet what people most often make a roof out of, so you can take their advice and follow their example. It is worth noting that very often players use original or painted sheep wool to make a beautiful, albeit not the most durable, roof. However, this is not the only way out - you can use various elements, experiment with blocks - for this you are given almost unlimited freedom of action in Minecraft. How to make a beautiful house? This is a question that does not imply instructions for building houses, according to which you can repeat one to one what is shown in the figure, but a kind of manual that sets the base of your knowledge, forming the steps that you need to go through. And the next step is to insert windows and doors.
Closing window and door openings

Many may think that windows and doors are just decorative elements, but in fact they are not. The door is used to allow the character to enter and exit the house, and the window is intended to allow entry inside sunlight. What's stopping you from leaving empty holes? In fact, this is a real threat - you build a house to protect yourself from dangerous mobs that roam at night, so if you leave even one crack, they can sneak in, and all your efforts will be pointless. And at the same time, the aesthetic aspect also plays here important role, because a beautiful house with holes instead of windows and doors is unlikely to remain that way - it will be unfinished and unattractive. Therefore, windows and doors are something that will definitely need to be taken care of.
Home decorations
Naturally, if you want to make your home original, you will need to decorate it. Here you can already give free rein to your imagination - use various blocks, sheep's wool, leaves, paints and much more to make your building attractive. The most beautiful houses in Minecraft were created by those who are not afraid to experiment - they try, select colors, combinations, combinations, and in the end they get a masterpiece. Don’t be afraid to try new things, and then perhaps your home will also be among the best.
Where to start building a house in Minecraft? How to lay the foundation and build the walls correctly? How to raise the roof? Decorations and scenery to build!
The house is one of the main buildings in Minecraft. In it you can hide from scary mobs, or do crafts without fear of being blown up from behind. let's consider phased construction simple beautiful home.
Where to start building a simple house in Minecraft yourself
The process will consist of several stages, and we will begin to build from those resources that available to every player after an hour of survival. We chose the main materials for construction cobblestone and wood. Our final structure will look like a small, cozy and beautiful simple village house.

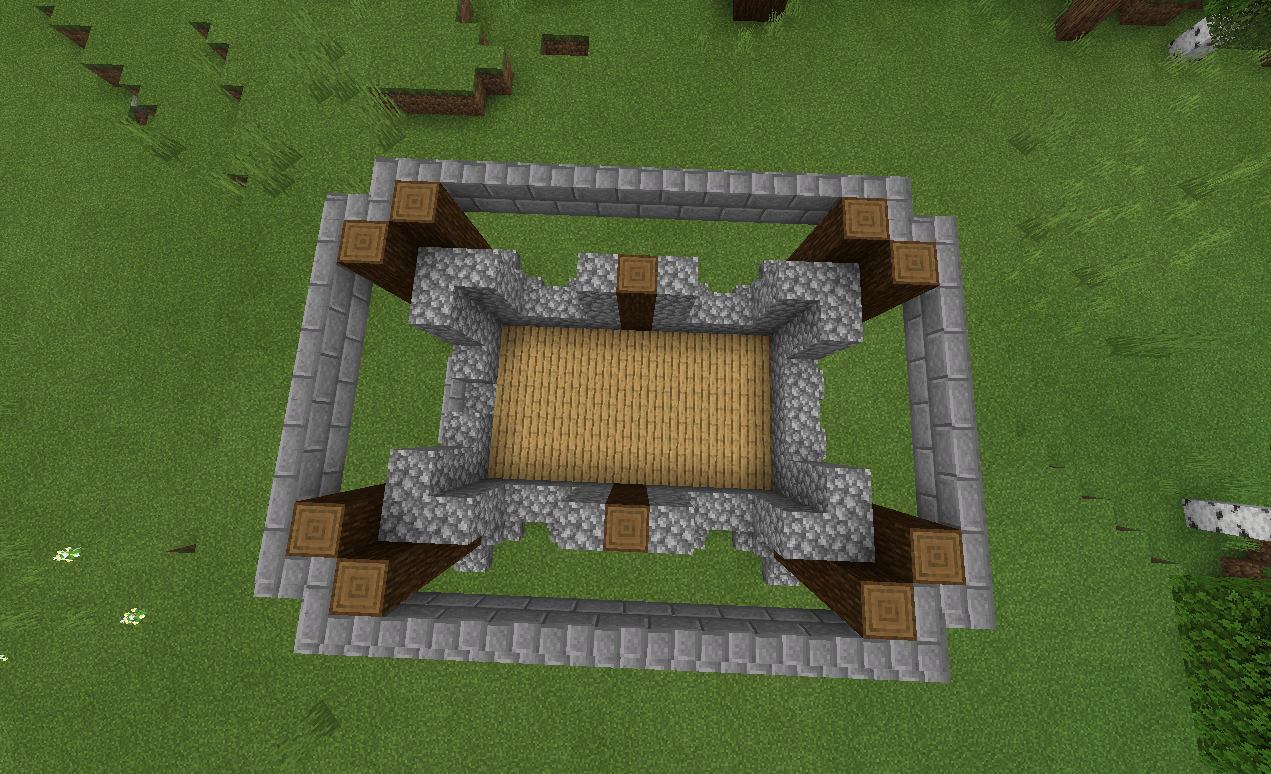
The first stage of independent construction.
- Cobblestones will be used as the foundation.
- We arranged it in a ratio of 11x7 blocks.
- Afterwards we take the logs. In our case, it is spruce. We place it in the corners, as shown in the screenshot, and raise it by 5 blocks.
- This will give the structure reliability. To prevent the logs from looking bare, you can place cobblestone steps underneath them.


The second stage of independent construction.
- Proper construction of walls affects beauty and comfort.
- It is very important to arrange the walls symmetrically and leave cutouts for windows.
- When adding windows, you should remember that the windows are not adjacent to the outermost blocks, otherwise it will be very ugly.
- During the construction process we added 2 wooden beams so that the wall does not look too gray. Take this into account too and think about what the final result of the building in Minecraft will look like.

Roof in a building
The third stage of independent construction.
- The roof plays a very important role in the construction.
- It should not be too flat, or, conversely, too massive.
- It is necessary to make an edging or otherwise frame the roof to make it look beautiful.
- The roof must be adjusted to the structure of the walls.
- It is important to use a different type of block for the roof; if the walls and roof are made from the same block, it will look terrible.
- Then we need to raise the roof. This is the most difficult part of a house in Minecraft and you need to be careful when constructing it. We raised it relative to the lower part, and raised it several blocks.

Decorations and decorations in construction
- After you have made the walls and roof, you can start decorating.
- First you need to register the entrance to the building being created. We installed a single door and decorated the sides with homemade bushes.
- The side parts were decorated with roses, which alternated with cobblestone steps. They also scattered grass chaotically and called out bone meal around. We made a path in front of the house by simply pressing on the grass with a shovel.
- The inside of the building has also undergone major changes. We added a partition and divided it into 2 small rooms. In the back room there are:
- Bed.
- Bake.
- Chest and ender chest.
- During the construction of the roof, an empty space was created there. We equipped it as a warehouse and a charming room. The lighting was placed directly into the ceiling and it looks very beautiful.


If you are starting new game in Minecraft, the first thing you need to take care of is building a house. It is in it that you can wait out the dark night, hide from aggressive mobs that you cannot defeat yet, and also store all your things that you do not consider necessary to carry with you. The entire game revolves around a house, so once you have some basic tools and a few resources, you need to build your first home. But it’s worth remembering that it will serve you exclusively as protection, so you don’t need to build a palace right away - even a dugout will do for the first time. The fewer resources you spend on your first home, the more resources you will have at your disposal later when you think about how to build a beautiful house in Minecraft.
Collecting materials
Each player must understand that to build a house you will have to spend a lot of time searching for the appropriate resources. And if you are faced with the task: “in Minecraft,” then everything becomes even more difficult. After all, for an ordinary average house you will only need basic blocks - stones, bricks, wood, glass. This will be enough to create more or less suitable housing. But to build a real mansion, palace, villa - or whatever you plan to build for yourself - you will need much more Supplies. Among them there will be those that are not so easy to get, so be prepared for serious adventures. How else? How to build a beautiful house in Minecraft without serious effort? So, equip yourself to the maximum and go hunting for resources.

Creating the Foundation
Once you have a sufficient variety of materials, you can begin construction. You don’t have to immediately tackle the issue of how to build a beautiful house in Minecraft - you can start by laying the foundation. Build a simple stone or brick foundation, strong enough to support the weight of the entire structure, then lay the floor, build the walls and make the ceiling - this can be done using bricks or boards. After this, lay the roof - and the initial layout of the house is ready. You can live in it comfortably - just remember to install windows and doors so you can get in and out. For lovers of minimalism, such a house will already be beautiful, but it is still worth taking into account the fact that most players prefer to build something more impressive. Therefore, let's move on to consider how to build a very beautiful house in Minecraft.

Exterior finishing
From the very beginning, you created a primitive house from basic materials, and now it's time to transform it. Tackle the walls first - they can be colored using blocks of dyed wool, and they can also be decorated with foliage and other materials - all at your discretion. Then you can move on to the windows, as they also provide quite ample opportunities for improvement. Glass in the game can be painted in almost any color, and installing additional mods will allow you to become a real master glazier, so you can decorate your home without any problems. Don't forget about the roof, because there is also the possibility of painting the blocks in various colors, and you can also give it a variety of shapes to make your home look more attractive and unusual. If you play on a network server, then all over the world you will find small beautiful houses. This is a very popular thing in Minecraft - people decorate their homes so that others can admire their craftsmanship. And they themselves enjoy the results of their work.
Interior arrangement
Once you're done with the outside, you can move on to decorating the interior, which can be a lot of fun too. Minecraft has enough recipes for creating various furniture, so you can decorate the interior without any problems. Comfort indoors is also a very important component, so you shouldn’t ignore it. Give it enough attention so that you can return to a decent and aesthetically valuable home. In addition, you can bring guests here, and they will be happy to see the results of your labors.

The area around the house
But building and arranging a house doesn’t end with all of Minecraft. How to build big house- this is just one of many questions that you have to solve. For example, do appearance What will be around it will also help make your home more attractive. You, of course, can be guided solely by functionality, and randomly scatter farms and wheat fields around your site, leaving them unkempt, but functional. Or you can decorate everything beautifully and attractively, without compromising the functionality of these objects. Here everything depends on you - you can even grow a full-fledged garden, make an ordinary fence or green fence. Minecraft doesn't limit your possibilities, so use your imagination to the fullest.
Minecraft is the most popular indie computer game, which has continued to gain popularity since its release in 2011. The most interesting thing about it is that there are no levels or story tasks that we are required to complete. The cubic world is free and spacious. Build, fight, hunt, raise pets - complete freedom of action. And yet there is one need for it - this own house. It is both a refuge from enemies and a source of pride for the player. In this article you can find out how you can build your own beautiful house in the world of Minecraft.
What kind of house can you build in Minecraft?
The Minecraft game has no restrictions. Therefore, there are no categories in it. But conditionally, we can still distinguish 3 groups of houses:
Players usually create a simple shelter in the first minutes of the game. To have somewhere to escape in case of attack by skeletons, spiders, creepers and other enemies. Their construction comes down to digging several layers of earth or piling up several cubes building material and doors.
The average house and castles can be built in different ways. Some people appreciate the scale of construction and build large houses without being interested in its beauty. If you want to learn how to do magnificent houses in Minecraft, start with medium ones. They are the best suited for this. Firstly, you can quickly change any of its details if you don't like her. Secondly, you won’t need to bother with a lot of resources and materials for your home. When will you know how average houses are built? beautiful elements, you can begin to create a magnificent castle.
We build a beautiful home in Minecraft
There will be one more detail in our new house - this is a fence to keep out monsters. It will be located at some distance from the house so that we have the opportunity to move around our yard. And mock the powerless enemies who crowd near the fence. The basis for the house will be ordinary oak cubes.
So, let's begin:
- Place 4 cubes in a row on a flat surface;
 Place 4 dice
 - Starting from the outermost block, place 5 cubes upward to create a window opening;
 Up build 5 cubes
 - Again, from the outermost block near the ground, place 13 blocks on the ground, which will be one of the walls. Fill it out completely wooden blocks;
 Building a second wall
 - We build a third wall at the other end of the second wall. Place 6 blocks from the edge and cover it completely with blocks;
 Building the third wall
 - Next, we retreat one block from the bottom from the last built wall and continue the wall, as shown in the screenshot. A total of 5 of them need to be installed;
 Back off 1 block and continue the wall
 - Immediately on the fifth, start stacking the cubes up.
 Put 5 cubes up
 Thus, round it to make a window;
 Make a window on the 3rd wall
 - From the edge of the window, start laying 12 blocks horizontally towards the first window.
 Start making another wall
 We also make a wall from it;
 Continue the 4th wall to the first window and fill it
 - Also make a window from the resulting wall, measuring 5x5 cubes;
 Making another window on an elevated part of the house
 - We also make a wall from the edge of the last window;
 Making a wall inside the house
 - Diagonally from the first window wall We're putting up another wall.
 Let's put another one interior wall, retreating 1 block
 Then we wrap the wall and make a closed room;
 We make another room by covering the first window opening with a wall
 - IN new room remove 2 blocks to make doorway;
 Door inside the first room
 - Remove the soil to place some nice material in the opening. You can choose any, for example, birch boards in Minecraft. Place the door into the opening;
 Birch floor
 - Make a floor between the windows in 2 rows and make an entrance door.
 Floor for the front entrance to the house
  Steps for home
 Also make steps from any material so that you can enter the house;
- The second part of the beautiful house, which we got without a floor, is 1 block higher, it needs to be laid with a slab instead of blocks (half blocks);
 We lay the floor in the second part of the house with birch slabs
 - On the side in which we have a cavity, we need to put wooden supports;
 Put wooden piles under the second side of the house
 - Now we are making a second room in the part where we have the second window.
 Make a second room near the second window
The base of the house in Minecraft is ready. You can customize its elements: windows, decor, floors, interior to your own taste. And it’s time for you and me to finish the roof.
How to make a roof for a house
Of course, in order for us to be able to create the most beautiful house in Minecraft, we need a roof.
Let's find out how to do it:
- Roof material - steps. You can choose the tree yourself. We will take for construction " Spruce steps
»;
 We will make the roof from spruce steps
 - They are attached to the top edge of the house. And the corner between the levels of the house (in the corner) must be made with spruce boards (or those that you have chosen);
 Fastening steps as a roof for a house
 - Using the principle of steps, continue to build blocks up, laying them out in a row higher;
 Make several roof spans from the steps
 - After the first 2-3 rows of steps, make a ceiling while you can;
 Ceiling for home
 - On an elevated part of the house, make a canopy over the window so that it meets at the top;
 Canopy over the second window of the house
 - And continue to surround the elevated part of our beautiful house with stepped blanks;
 Make the first row of the roof with steps
 - Opposite the first canopy, you need to make exactly the same one so that the roof arch is even;
 The second canopy is opposite the first
 - Complete your home necessary elements- glass, doors, etc.
 Roof made of steps. Make the flat part from ordinary spruce boards (cubes)
Our house turned out to be quite cool and unusual. But not everything is ready in it yet. Since we need a fence that will serve as protection from monsters and enemies.
Building a fence around the house
The fence will begin with an unusual mechanism that protects from enemies.
 Moat as a mechanism for protecting the yard from enemies
 This is a pit 3x4 wide And 3 cubes deep.
How to do it:

Our beautiful house is almost ready. It is also necessary to complete it from the inside. Having built such a dwelling, you can try to create a large, amazing castle. It can exceed the size of what you and I built several times. Or even adjacent to the rock, like real huge castles. You can make the yard larger and place a swimming pool here. Or other objects: garden, vegetable garden, barn, small guardhouse, etc..
Where to get material for construction in Minecraft
When creating our house, we use only 1 unusual material - End rods or Edge rods. These are special elements that can be obtained in Minecraft with any tool.
| Options | Peculiarities |
|---|---|
| How to get a? | Rods can be obtained from a fire rod. Which in turn drops when killing efreets (flying hostile mobs). To obtain the rod, you also need a Chorus fruit (purple block). |
| What are they used for? | The Edge Rod is often used to illuminate rooms or outdoors. Attaches to any block and from any side. It cannot even be destroyed if the block it is attached to is broken. |
| What can they do? | The rods are capable of melting snow and ice in the area of two blocks. Easily moved by pistons. The light level is equal to a torch. They do not harm the main character. Therefore, they can be used inside houses, as well as as elements adjacent to the house. For example, as steps. |
| Vulnerability | The rods can be washed away by water and or lava. |
The remaining resources are very easy to obtain. Find the appropriate type of tree and cut it down. The stone is mined in quarries. Many resources can be found in bonus chests. And trees still grow from seeds. So try planting a few seedlings nearby. To use trees as building material to build your own beautiful house in the world of Minecraft.
It has long outgrown its status as a “game for geeks”, turning into a true classic of the world game library. But before you rush towards adventure and danger, it would be nice to take care of a permanent camp. Yes, at first a dugout or a cave will be enough for you. But after a while, you will need something more reliable. For example, a hunting lodge.
Before starting construction, you need to decide on the materials. They will dictate the appearance and capabilities of your shelter. Many give it to cold, mossy stones. They are stern, pathetic, but very cold. In addition, the extraction and construction of facilities from stone bricks– this is by no means for beginners.
That is why, at first, it is better to focus on wood. And to make your virtual life easier, we will tell you how to build your first house in Minecraft.
Wood is our everything
Since we're building wooden house, we need wood. A lot of wood. Fortunately, you can get it by cutting down trees in the nearest forest.
There are 6 types of trees in Minecraft: oak, dark oak, spruce, birch, acacia and tropical tree. Each of them has its own coloring of boards and sticks. So, keep that in mind. After all, the combination of wood various colors can both ennoble and vulgarize your home.
The main purpose of wood is to make boards, one of the most versatile resources in Minecraft.

In addition, you can burn wood in a fire and get coal, the purpose of which we will tell you a little later. In the meantime, let's see what your boards can do.
1. Stairs

Saves you from unplanned mountaineering sessions. Made from 6 blocks of boards.
2. Wooden sticks

The basis for many items, including weapons. To get 4 wooden sticks, you will need 2 blocks of planks.
3. Wooden fence

Often the only thing that prevents your mobs from scattering around the area. Requires 4 blocks of wood and 2 blocks of sticks. Generated in quantities of 3 pieces.
4. Wooden slabs

Floor, ceiling, path and whatever you want. For 6 slabs you will need only 3 blocks of boards.
5. Door
The last obstacle on the way to your refuge. Costs 6 blocks of wood.
Glass questions
One more important element buildings are windows. What could be better than well-glazed frames? Yes, they are fragile, but they look simply amazing.

To get a block of glass you will need to burn a block of sand on coal. You can get coal in a mine, knock it out of mobs, or get it from wood.

The next step is making glass panels for the windows. One pack of windows requires 6 glass blocks. However, the pack contains as many as 16 panels. So, you don’t have to deny yourself anything.
Construction is a delicate matter
Well then. The materials have been prepared. It's time to start construction. For your convenience, the construction process is presented in a step-by-step manner.
1. Porch
Clear space for future construction. Install the staircase blocks at the selected location.

Then place 7 blocks of boards on either side of the top step. Please note that since the boards are laid out on upper level, the whole structure seems to float in the air. Then, at each end, lay out 4 boards, perpendicular to the previous line.


Finally, cover the entire fenced-off space with wooden slabs.


After this, we move on to stage 2.
2. Finishing the porch
The simplest way to fence a porch is wooden fence. We also use it to support the porch blocks. This way it will no longer hang in the air.

To do this, place fence blocks above and below each block of boards. It may be a good idea to install blocks of wood on either side of the stairs. However, if this does not appeal to you, you can use other material.

The porch is ready. We begin to build walls.
3. House facade
The façade of the building is constructed from pure wood blocks. To do this, lay out the first line of your favorite logs, as shown in the screenshot.

When erecting a wall, do not forget to leave room for observation windows, which will be filled with glass and a couple of barred windows. A fence can be used as a lattice.

The doorway is located in the middle. It is fenced with plank blocks, and the area in front of it is laid out with a second layer wooden slabs. The door opens at the very last moment.
4. First floor. Laying floors
Like the porch, the entire building will rise above the surface. Therefore, use a familiar fence as a foundation. Lay out a rectangle 16 fence blocks long and then place the wood blocks on top of it.


Are you done? Great! Now fill the entire space with boards. They will become the floor of the first floor.

The floors are laid, it's time to think about the walls.
5. We build walls
The floors have been laid, which means the first floor is almost ready. All that remains is to add three walls. A height of 3 blocks is just right.

We leave the selection of materials at your discretion. You can alternate boards of different colors and windows of the most incredible configurations. Or simply build a log house. In our case, we raised the walls from boards (light), diluting them with blocks of wood (dark) and large windows 2x2.

The pictures show the construction of the first side wall. The rest are built by analogy. When you're done, go to next stage. Or a floor, if you like.
6. Floor, take two
Yes, many of you are wondering: “Why do we need a second floor?!” We answer: “ Two-storey house looks more impressive, more pathetic and nobler than the one-story one.” And from the balcony on the second floor it is very convenient to shoot mobs who want to feast on adventurers.
The construction of the second floor also begins with the floor. Just take the boards and line the space above the first floor.


As you can see, the floor of the second floor hangs over the first, without any support. To achieve this, install two blocks of boards in one of the corners, one above the other. In this case, the lower one, which touches the walls of the first floor, can be removed upon completion of the work.

Important point. Don't repeat our mistake by filling the entire space with plank blocks. Leave empty space and install a ladder. Otherwise, you can only get to the second level using a teleport.

The floors are ready. Let's start with the base of the new walls.
7. New basics - old rules
To enliven the appearance of our house, we decided to delimit the floors with a kind of belt going around the house. This is quite simple to do if you remember how we worked with the floor of the second floor.

First, let's place two wood blocks, one on top of the other, in one of the corners of the wall.

Then we’ll remove the bottom one and start attaching it to top block behind the block until the resulting “edge” surrounds the new floor of the second floor.


Are you done? It's time to tackle the walls. And there it’s not far from the roof.
8. Walls are high
As with the first floor, the easiest place to start is with the windows. And here a wide scope for creativity opens up for you. You can make a tracing paper from the first floor or build something completely new. And we're not just talking about windows.

In our case, we simply moved the windows a little, giving the second floor a slight asymmetry.

A separate nuance concerns façade wall. There will be a balcony there. Therefore, do not forget to cut and fence off the doorway, as on the first floor. And to make it easier to climb, place a step next to it.

Well, since we’re talking about a balcony, let’s build it.
9. Balcony for ball and war
The balcony needs supports. At least for the first time. To do this, build two wooden supports directly on the blocks installed on either side of the porch stairs. Then install one block on each side of the new trunks in order to expand the balcony.
Now that you've sorted that out, start laying the floors. Perfect for that wood boards. A good idea would be to surround the balcony with railings, the role of which will be perfectly fulfilled by our familiar fence.

At the end, you can remove massive wooden supports and replace them with thin racks of sticks in the corners of the balcony area. They should be lifted from the nearest sections of the porch fence.
Everything seems to be fine with the balcony. Now it's up to the roof.
10. Roof, but not the same
The construction of the roof leaves two impressions. On the one hand, there is nothing complicated about this. On the other hand, a wagon with a trolley will be required for resources. Or even two.
First, stock up on as much as you can. wooden stairs. They are the raw materials for a strong and reliable roof.


The first circle borders top part walls of the second floor. In our case, they are made of wood, clearly distinguished by its dark color.


The next one will stand directly on the walls. And so, until victory.

As you already understand, each next circle will build on the previous one. This is a long and tedious task, but your work will be rewarded with a beautiful and durable roof.

We're almost at the finish line. Only light touches remain.
11. Final
In principle, your house is ready. All you have to do is place furniture, trophies and other nice things there.
In addition, you can properly improve the area. Surround it with a fence, dig pit traps, install sensors and load crossbows. In a word, do everything so that no one leaves offended.

And when you get bored, treat yourself to a stone mansion. The construction technology is the same. Unless it will become even more difficult to get there without asking.
That's all. We hope you enjoyed it. And see you in the pixel spaces of MineCraft PE.