How to tie a beautiful bow on a dress. How to tie a bow on a dress beautifully
Bows are not just hairstyles for girls. Charming bows decorate clothes and accessories; they are used in handicrafts, for gift wrapping and other various purposes.
It would seem that tying a bow from a ribbon is as easy as shelling pears. But when it comes to practice, it turns out that it would be nice to know the technology of this process. We offer several ways to tie beautiful ribbon bows.

The most beautiful bows are made from satin ribbon, but for beginners it may be too slippery. Try tying the ribbon of your choice into a knot and tighten it - if the knot does not come undone, then this ribbon is suitable for your first experiments.

The purpose for which you need the bow also plays a role. If you are going to decorate a dress or blouse, it is advisable to make a bow from the same material as the product itself, or at least similar in texture.
The same can be said about the color of the ribbon - it should be harmoniously combined with the gift wrapping, clothing or handbag that it will decorate.
Classic bow
This type of ribbon tying is usually chosen if fairly small decorative elements are needed. Classic bows made of thin ribbon can be used to decorate a handmade card, hairpin or soft toy.
You can take a wide ribbon and make a larger bow; in this case, make sure that the material is thick enough, otherwise the bow will not hold its shape.

To calculate the required length of the ribbon, you will have to practice; in any case, cut a little more to make it easier to tie the ribbon. Later you can trim off the long edges.

Take a piece of ribbon and fold it in the shape of the letter “M” - at the top you will get two rings of the future bow. Cross the rings by turning one of the rings half a turn. A third ring has formed at the bottom in the middle.
Thread one of the first rings into the third and tighten the bow. Try not to wrinkle the ribbon and work carefully so that the bow turns out smooth and symmetrical. If necessary, trim the ends of the bow to the desired length.
Strict bow
To make such a bow you will need textile glue. Take a piece of tape, lay it along the table and fold the edges towards the center, securing the structure with glue. You will get something similar to the letter “B”.

Now take a small piece of tape - the same color or in a contrasting shade and wrap it around the joint, securing it with glue on the back side. All that remains is to glue the bow to the product.
Based on a strict bow, you can make a two-color bow, which looks much more impressive. Take two ribbons of different widths and place them on top of each other so that the narrow ribbon is on the bottom. Next we proceed according to the above scheme.
Openwork bow
To create such a bow, you need to make several B-shaped blanks of different sizes. We fasten the blanks, placing the narrower ones above the wider ones. We place a ring of ribbon in the center, and thread a masking piece of ribbon into the ring, fixing it on the wrong side of the bow.

The design turns out to be tall, but rather flat, especially if the tape is narrow. If your lace bow doesn't hold its shape, increase the number of B-pieces or choose a thicker ribbon.
Multi-tiered bow
For such a bow, you will need at least three pieces of ribbon, each of which will be a couple of centimeters longer than the previous one and a couple of millimeters wider. You can use ribbon of the same color or different shades.
Cut triangles at the ends of each ribbon with the apex toward the center. Lay the ribbons one on top of the other so that the longest and widest is on the bottom.

We take the ribbon and tie the resulting stack strictly in the middle so that the knot is under the bottom ribbon, that is, on the wrong side. The ends of the connecting ribbon can be left long and used to tie a bow to a gift or to the neck of your beloved pet.
Lush floral bow
This bow resembles a flower bud; it can be used to decorate gift boxes, hair accessories; such a bow looks impressive on a bracelet made of the same ribbon or a wide elastic band.
Take an impressive length of ribbon and begin to form loops, holding the center of the future bow with your thumb and forefinger. Alternate the loops, directing them in one direction or the other.

When you decide the bow is big enough, secure what you're holding with your fingers with wire. If you are going to make a bracelet, sew the middle of the bow with thread and then remove the wire. Attach the bow to the product and straighten the loops.
Experiment with the color, texture and width of the ribbons, creating incredible designs using the simplest schemes proposed, and for clarity, we recommend watching the video. Add color and fun to any holiday or casual outfit.
Watch the video on how to make a bow from a ribbon of any size
A universal selection of gift ideas for any occasion and occasion. Surprise your friends and loved ones! ;)
Good day, my dear friends! When the time for the holidays approaches (especially last bells and September 1), an item such as a ribbon bow becomes especially relevant. This accessory is so popular among schoolchildren, mothers and just needlewomen that I couldn’t ignore it and decided to devote an entire post to bows.
Various kinds of bows are actually found in our lives so often that we don’t even notice it - in jewelry, clothes, even used as an element of a school uniform... In general, if you want to learn how to make bows from a variety of types of ribbons, then Welcome!
Beautiful DIY ribbon bows: master classes
In fact, learning how to tie even the most complex bows yourself is not that difficult. Instructions with a large number of photos, which I have prepared for you today in abundance, will help with this. There will be both selections from the Internet and unique master classes specially prepared for you.
How to make satin ribbon bows: step-by-step instructions
Satin ribbons are the most popular material for creating small masterpieces. Smooth, shiny, relatively inexpensive ribbons have always attracted the attention of needlewomen from all over the world. The material has found application in a variety of creative fields, not with the exception of steel and decorations based on various types of bows.
To create accessories, you can use ribbons of different widths, but it all depends on the chosen design and execution technique. Let's start with the simplest types.
The simplest classic bow
The basic bow that any beginner should learn to make is presented below. For it, you can take either a narrow or a very wide ribbon - it will work from any one.
Work process:
- Fold the ribbon by placing the two halves over the index fingers of both hands.
- Cross the halves and insert one into the other.
- Tighten the product. Ready!

You can make a chic decoration based on such a bow. It will be enough just to fill it with waterproof glue or shiny acrylic varnish, then attach the rings to which the chain will be fastened.

The same bow will not be difficult to tie on a fork; with its help it will turn out more neat and even (although you can create a very beautiful accessory on your fingers). There is also a limitation for such an “assistant” - it is useful only when creating very small bows; for larger products you will have to resort to the traditional method.

Double tape
The double bow is made in a slightly different way from the previous one. For it, two rings made of tape and a separately created center, obtained by sealing the edges, are useful.
Fold the two rings in the middle and sew or glue them so that their sides touch. After this, the middle is closed with a pre-made part. The design can be attached to a hairpin or elastic band.
Note!
For this accessory, you need to take a medium or wide ribbon; such beauty will not come out of a thin, narrow material. If your choice goes to a width of 2.5-5 cm, then this will be the ideal solution.

A variation of such a bow of two ribbons can be this analogue: in this case, two rings are superimposed with their centers on top of each other. You can also experiment with colors - for example, create a red or green bow, or even combine one or more shades in one product.
Try to make more than two layers, take ribbons of different widths and textures. Thus, from one pattern for creating a bow, you can create a wide variety of accessories.

Multi-layered puffy bow
A great option for schoolgirls and more. This bow can easily be placed on a hairpin or comb to attach to your hair. It is based on the two simple bows discussed earlier.
To fold one, you'll need to make a base of two overlapping layers. The ribbons folded in this way will form the back part. The front one is similar to the simplest first bow. At the end they need to be connected using glue or thread. Everything is held together by a central piece.

This way you can get more voluminous accessories, like the white bow shown below. There is one difference here - the basis is not two layers, but three.
Romantic and sophisticated, this addition to the image will delight any graduate who wants to indulge in nostalgia. But this option, unlike jewelry for girls, is more mature and feminine, which is exactly what is needed in such cases.

Twisted bow of 3-4 ribbons
A very beautiful bow that is well suited for head decoration. To do this, three or four (or even more) pieces of ribbon of the same width but different lengths need to be sewn together with an infinity sign and placed one inside the other. Design the middle as in a few microns earlier.

Kanzashi
Many beautiful bows are made using the kanzashi technique. This type of creativity came, as you might guess, from distant Japan. In this way, they create magnificent details to complement not only everyday, but also festive outfits.
Bow flower
Making such a flower is not difficult, but painstaking. You will need at least 12 petals, which will need to be pre-cut from a ribbon 2 and 4 cm wide (you can take a different width, but not less than 1.5 cm).
First make the first layer by stringing six wide petals and pulling them together. Place some decoration between the layers and attach the second layer made in the same way. Don't forget the bead in the middle.

Another variation of simple but beautiful petals is located below. Here the flowers come out more pointed.

A more graceful white flower is created below. In the step-by-step photos you can see that the petals for the flower are made by twisting the ends into the middle. Such a bow can consist of either a pair or five or six layers, gradually increasing in the number of elements.

Bow for discharge from the hospital
Newborns (and children in general) deserve the best! That's why I found for you a beautiful bow that will suit both girls and boys. For this you will need a fairly long ribbon (at least three meters).
In the middle, make a winding of several layers and then a knot as in the photo. After this, you will need to pull out several petals formed by the previously folded rings.
Why leave such long ends around the edges? The fact is that you will need to tie them around the long-awaited package, leaving a beautiful middle in front. At one time, I actually bought a five-meter ribbon - the nurse tied it into such beauty that we still remember it with a smile with the whole family.

How to tie a bow from grosgrain ribbon
The good thing about grosgrain ribbon is that, unlike satin, it is less susceptible to various types of damage. The satin one only needs to be hooked once and that’s it – the appearance of the bow is ruined. This trick won’t work with reps, but it also costs more.
Baby bows
The combination of several types of ribbons looks very interesting. In this case, colors are also combined, which, nevertheless, look very organic. The polka dot ribbon is just perfect! Such a bow will decorate a girl’s head for a holiday and in everyday life. For it you will need to connect two folded parts, as was seen earlier in master classes. The top will be decorated with a classic variation.

With elastic band
Assembling a lush bow with an elastic band is not difficult. To do this you will need several layers of bows, decorated as we did earlier. The number of layers is limited only by your imagination and common sense. The difference between this accessory is that underneath it there is a kind of cross with serifs at the ends.
You can connect all this splendor with ribbons 1 cm wide, tying the middle. You can attach the bow to the elastic using a glue gun or something similar.

A bright bow with a school theme explodes early ideas about what a school accessory should be. It's just a bomb!

Butterfly bow
You can even make something like a tie using grosgrain ribbons! Yes, the butterfly will be small, but very impressive. To create it, fold the ribbon, tucking the edges under each other, as in the photo below. You will need three such layers. Attach a longer ribbon underneath so that you can tie it at the back. In MK it is quite short, in this form it can be left for a simple accessory.

Here's another fun variation of the bow tie. Here we use nothing less than bird feathers, connected with a ribbon in the middle. Interesting interpretation of the standard butterfly, isn't it?

By the way, a butterfly bow can also be made from fabric; a master class on this is below.


Bows for gift boxes
To tie a bow on a gift box you will need not only ribbon, but also different types of wrapping paper.
Big bow
A very large accessory for a very large gift. Such a bow can be made from ribbon, but it is better to use wrapping paper, which will take a lot to make such a creation.
Place a small box at the base of the decorative element. There may be a surprise in it or it may just be the basis for such an accessory. Place it in the center of the square, which is covered with its edges at the top and bottom. Fold the free edges as in the photo below (as if you were wrapping an envelope). Press the middle and wrap it with a small piece of paper of sufficient length. Spread the edges to make them as fluffy as possible.
This bow can be used as an independent package or as a decorative part for a huge surprise.


Beautiful for a gift
This next puffy bow has an incredible Christmas feel to it. He literally reeks of them! For this you will need to fold the ribbon as shown below, overlapping and tying several layers together.
Place several bows on top of the design, folded as shown below. Decorate the middle with a beautiful bear in a cap or any other decorative element.

Paper bows: simple, cheap, original. All master classes describe their creation in great detail.


Do you want even more bows for a gift? Read about this in another article.
Nylon bows
Nylon ribbon is traditionally used for graduation and hair decoration. But such bows can also be used for other purposes.
A simple bow on a fork is created in just a couple of minutes. To do this, you take a fork, thread a thin ribbon in the middle, and a thicker one on top. Wrap the thicker tape around the tines of the fork many times, forming a braid. A thinner ribbon becomes the central part of such a flower.

A semicircular metal template will help you “cut” the petals using a small resemblance to a soldering iron. To do this, two ribbons - nylon and satin - must be folded as shown below. After this, the middle is bent inward and you will need a lot of such petals. They merge into one layer, then into another, etc., until you get a lush multi-layered bow that can be used to decorate your hair.

In the next accessory, nylon tape is used only as an additional accessory, decorating a base made of fabric. You can create such beauty in a few minutes, and decorated with nylon ribbon it will look even richer.

The next bow belongs to the gift category, but I decided to put it in this section because it is made of nylon ribbon. For it, you will need to fold the tape in many layers, and make a cut in the middle, which will need to be tied with a thin fishing line, around which the ends will be tied. Now comes the most important stage: you need to pull out all the ends of the folded ribbon to get a very fluffy structure.
This bow will decorate a Christmas tree or simply decorate your apartment.

A similar accessory can be made from thicker tape and even burlap. It will be more difficult to pull out the ends, but the effect will be more unexpected and extraordinary.

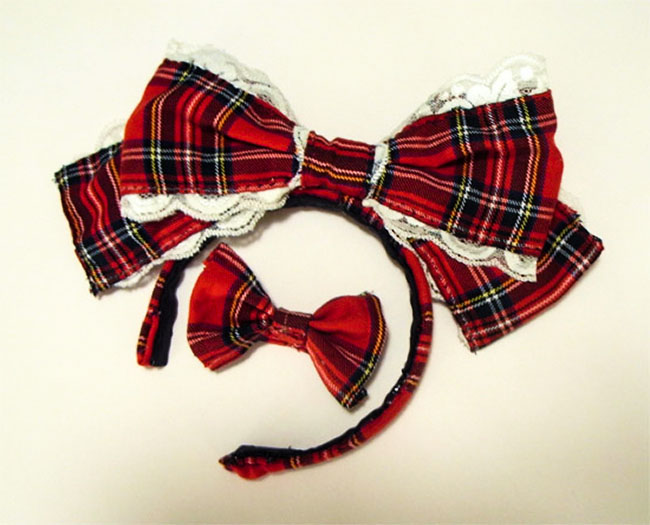
Photos of other beautiful bows
How can they not register them! In the form of elegant brooches, bracelets and much more. For example, the accessory below will be an interesting addition to a holiday outfit.
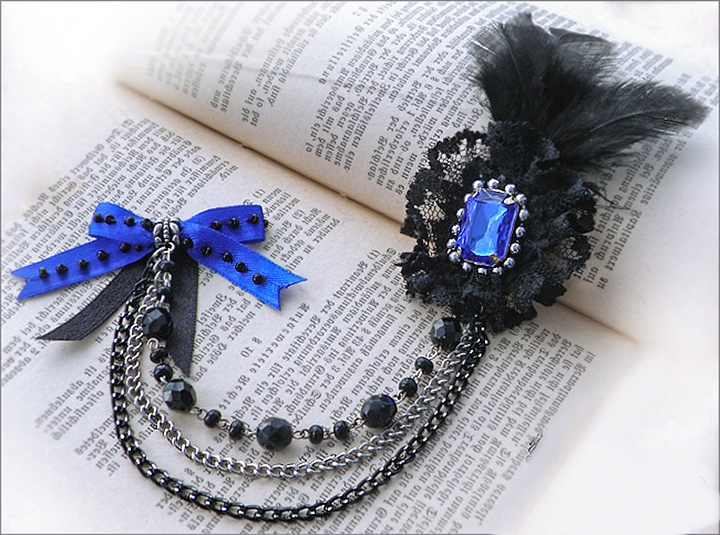

Another lace bow with a bead inside.

In general, thanks to lace, even the simplest design begins to look more original and festive.


Just look how you can decorate your handle by adding several layers of lace and satin ribbons.

A bow on the headband will turn an ordinary girl into a doll hurrying to the ball.


Roses as bows. Wonderful, isn't it?

The bow on the dress looks very impressive and original.


MK in video format
Several master classes in video format will be an excellent help in creating bows of various kinds. The ideas will be especially good for schoolgirls and graduates for the last bell, graduation and September 1st.
That's all, dear friends. Tell us how you like the master classes and photo ideas for bows and visit the resource more often. See you again!
Sincerely, Anastasia Skoracheva
In our lives, almost every day is a holiday. Before you have time to celebrate the New Year, Valentine’s Day is already approaching, and after it is March 8, and even friends are celebrating their name days. All these dates have something in common - gifts. Choosing the perfect gift is only half the battle, but packaging it is a whole art. It is important not only to find suitable paper and ribbon, but also to wrap the box beautifully with them. Let's figure it out
Preparatory work
We use bows not only during the holidays, but also in everyday life. They can be used to decorate the house (for example, hang on curtains), decorate hairpins, clothes, or use in handicrafts. There are a lot of options for their use, as well as ways to do it. First, you need to choose the most suitable material for your craft.
Selecting a feed
First of all, you must clearly decide what you are going to make the bow for and approximately what color it should be. If you are packing a gift, the width of the ribbon must be chosen depending on the size of the box: wide ones are better for large gifts, and narrow ones are better for small ones. Although, if you decide to go against the rules and tie a huge wide bow on a small package, it can look very good.
Remember the golden rules

If you are planning to make a beautiful ribbon bow for a dress, pay attention to
its texture. It should go well with the fabric from which the clothes are made.
To determine the length of the ribbon for a gift box, you can use the following method: wrap the gift twice and add about 60 cm to the resulting length for the bow itself.
Most often, satin fabric is used to tie a beautiful ribbon bow. But if you do not have experience in this matter, this material may seem too slippery and inconvenient for creativity. In this case, it is better to objectively assess your abilities and give preference to rougher material.
A very convenient option for bows for gifts and bouquets is a ribbon with a thin wire attached to the edges. It allows you to give the product any shape and preserve it for a long time.
Always remember the most important rule when choosing a ribbon: if you can tie it into a tight knot that doesn't fall apart, then it's perfect for your creation.
Collecting the rest of the materials
To make a bow you will also need:
- glue (test it in advance for its ability to fix the fabric);
- sharp scissors that will clearly cut the tape and not chew its edges;
- floral wire (this material is not always necessary, but when making some models you can’t do without it);
- additional decorative elements - beads, flowers, stars and any other trinkets with which you want to decorate your product.
So, we selected the materials to make a ribbon bow. A master class on how to create one can be mastered by anyone, regardless of their experience in needlework.
Classics of the genre
First, let's try to make a very ordinary bow, without extra layers and details. But do not think that if it is simple in execution, it will look less advantageous than its curvy counterparts.

So, how to tie a beautiful ribbon bow? You must follow these steps:
- Measure the required length and cut the desired piece. It is better to take extra material so that there is certainly enough of it, and the tails of the bow are long and graceful, and not microscopic and sticking out in different directions.
- Remove everything unnecessary from the table and lay the tape on it (you can do this on the floor or bed - it doesn’t matter, the main thing is that you have a flat surface in front of you, not cluttered with foreign objects).
- Straighten it out and lay it out in front of you. If necessary, iron it with an iron.
- Cross the ends of the ribbon in the center to properly tie the satin ribbon bow. If you did this correctly, you should have two even teardrop loops of the same size. These will be the ears.
- Before taking the next step, carefully check the dimensions of the parts so that one half does not end up larger than the other. Take the same measurements with the tails - they should also be perfectly the same (unless, of course, you have conceived the concept of a bow with ends of different lengths).
- Now we cross the droplets, placing them on top of each other.
- Wrap the left ear around the right one and pass it through the loop that appears in the central part.
Tighten the resulting knot tightly so that it does not come undone at the most inopportune moment. Correct every part of it - and that’s it, our decoration is ready!
Fork to the rescue!
If you want to make a small beautiful bow from a thin ribbon, it is very convenient to use auxiliary objects when creating it. Since tying it by hand is quite difficult, you will need a very ordinary fork for this purpose.

This cutlery, which is found in any home, will help you make even the smallest beautiful ribbon bow. You can independently adjust the size of the future product by increasing the width of the teeth with cardboard. To make a beautiful bow using a fork, you need to follow these steps:
- Straighten the tape and wrap it around the device.
- Twist one end and pull it under the ribbon between the middle tines of the fork.
- Lift this end from the opposite side. This way you will wrap the entire fork.
- Pass the same part of the ribbon in the upper zone, stretch it to the front of the cutlery.
- On one side you have a loop that you don’t need to touch yet.
- Continue working with the same tip. Wrap it around the right side and insert it through the bottom into the loop.
Now tighten the resulting composition, carefully remove it from the fork - and that’s it, the miniature bow is ready.
Wire won't hurt either
Another useful assistant when creating bows is floral wire. With its help you can make both classic single-tier and lush crafts.
For gifts, bouquets, hair decorations, clothing and interior decor - you can use this ribbon bow anywhere. The master class on how to create it is extremely simple:
- Cut the length of ribbon you need.
- Lay it out on a flat surface and smooth it out.
- Bend the material on both sides and cross the ends in the central part. Place them on top of each other. This way you will form the ears of the future bow. Don't forget that their ends should hang freely in the form of ponytails.
- Hold the resulting composition in the central part so that all its elements remain in place.
- In the middle, tightly wrap the workpiece with wire.
- Cover the joint with a piece of tape of the same color or one that goes well with the main one. Secure with glue or sew with thread.
- Tidy up the ears and tails by straightening them and arranging them symmetrically.
This is how we make a beautiful ribbon bow. You can safely use it for any decorative purposes.
Two in one
If you want to make a simple bow, but not with two ears, but with four, folded in two layers, you do not need to cut out each element separately. To create this craft, as in the case of a regular bow, you also need one complete ribbon.
This decoration is perfect for decorating gifts, as well as for decorating hairstyles and any other type of decor. So let's get down to business.

- Cut a large piece of tape and lay it out in front of you.
- Bend the first loop, then the second. Do not let go of the central part so that the composition does not fall apart. If you have difficulty holding the tape and working with it at the same time, have someone help you until you can do it yourself. When you get the hang of working with ribbon, you can make multi-level decorations this way, but for now it’s better to limit yourself to a two-layer craft.
- Cut off the excess parts of the ribbon, and pull the remaining part in the center with wire or sew with thread.
- Wrap a ribbon of a matching color around the central part so that the fixation point is not visible. Secure it with glue or sew it too.
You've made a beautiful two-layer bow. Now you can hook it wherever your heart desires!
Making a curvy bow
To make a beautiful bow from a wide ribbon, it is best to use a material with wire stretched along the edges. In this case, it will be much more convenient for you to give the decoration shape and volume. This craft is ideal for gift boxes.
For a medium-sized gift you will need the following materials:
- approximately 2 meters of tape;
- glue gun;
- double sided tape.
So, your steps to make a beautiful ribbon bow:
- Wrap the box in gift paper;
- Cut the required amount of ribbon and wrap it around the gift.
- Secure the future bow to the box with glue. In this case, you cannot cut the ends of the tape, since you will need them for further creativity.
- Bend one end of the material to make a loop. Glue the resulting droplet to the box in the central part.
- Fold the loop several times to create pleats. Each of them is a separate ear of the future bow.
- Fasten the loops together and glue them to the package.
- In the same way, you can make even more of these droplets and fix them on the box.
- Follow the same steps to create the second half of the bow.
- Use scissors to tidy up the drooping ponytails.
To hide the place where all the elements are fixed in the center of the craft, cover it with a separate piece of fabric.
We refine the ends of the ribbon
When creating any bow, each element plays a very important role. Not only the ears of the craft, but also its tails should look neat and symmetrical.
When we tie a bow from a satin ribbon (or any other), we need to make sure that its hanging ends are as long as possible. You can shorten them at any time, but increasing them without untying the loops is extremely difficult and virtually impossible.
To make the bow look neat, you need to trim the ends of the ribbon correctly. Thanks to this, the material will not fray, you will remove excess threads sticking out from the edges, and the entire appearance of the product will become much more presentable.
For best results, use sharp scissors that won't chew on the fabric. To trim the ends, you can choose one of the two most common methods:
- Diagonally: run scissors across the tape at any angle you like.
- V-shape: Find a point in the center of the ribbon near its end, mark it with a pencil or pen, cut two lines towards it from the corners of the ponytail. If the triangle you cut does not separate from the fabric on its own, carefully peel it away from the area where it is still attached.
Choosing additional decorations

Finishing the ends may be the last step in tying a beautiful ribbon bow, unless you want to decorate it with additional baubles. Depending on the occasion, your tastes and the content of the gift, these can be a variety of elements.
For example, a bow for a New Year's gift can be decorated with a small decorative snowflake, a bell, or Santa Claus. Rhinestones, beads, flowers, stars, hearts, etc. are suitable for making a hairpin or clothing.
Decorate wisely!
In any craft store you can find a lot of suitable parts. They can be attached not only to the ribbon itself, but also to the wrapper next to it, if we are talking about gifts.
When choosing additional elements for the bow, it is very important not to overdo it. It’s better to just tie a pretty bow from a ribbon and decorate it with one cute trinket than to cover it with a bunch of all kinds of decorations, which together will look cheap and tasteless. Create with intelligence and inspiration. And you will definitely succeed!
The importance of a bow as an outfit decoration is difficult to overestimate, because it turns even the most ordinary thing into an extraordinary art object and sets you up for a romantic wave.

How to tie a beautiful bow on a dress? A pressing question that interests every fashionista, because a bow is always a good solution to diversify an outfit!
Fashion is unpredictable, but not without cyclicality, and proof of this is the usual bow, which can be called a timeless trend. Sometimes the fashion for it subsided, and sometimes it became widespread and was used in various wardrobe items, as well as in accessories and shoes. For example, Yves Saint Laurent, using discreet colors and classic style, created exclusive evening bags.


For many couturiers, the bow is an integral part of a woman’s look, and when it comes to evening wear, it is found everywhere. However, even in everyday looks, the bow looks very good, adding glamor and chic to them. Thus, we can say that a bow is an ideal option, appropriate for both a formal and business event.
Spectacular bows are found in almost every Christian Dior collection, and they can rightfully be called works of art. Judge for yourself, in the late 40s of the 20th century, Dior presented magnificent outfits with bows on the chest to fashionistas.


It is noteworthy that to create this beauty, a huge amount of fabric was required - more than 20 meters of lye and organza! The popularity of bows reached its peak in the 90s, when Christian Dior opened a boutique in New York. Black dresses, the highlight of which were luxurious satin bows, sold out on the first day. Valentino, Nina Ricci, Armani risked repeating the success of Dior and were right.


Many celebrities use a bow as a way to highlight the elegance of their look. Thus, Jacqueline Kennedy, a recognized style icon, used this accessory almost always. Her Majesty Elegance cleverly combined a bow with elongated gloves and pearl jewelry, creating unique looks filled with sophistication and chic.
Today, the bow is a trendy trend that stylists recommend using in their looks.
How could it be otherwise, because the theme of romance prevails in seasonal collections. It’s very easy to get into the trend; just tie a spectacular bow on your dress in some area. So, with a slight movement of your hand, you transform your outfit into an elegant thing that literally emanates femininity and romance.
Where to tie a bow?
So, don’t give up on a cute twist that transforms any thing. Feel free to decorate with it both prom dresses and summer sundresses, dilute a strict one with this accessory, repeat the color of your clothes or skillfully play with contrast.


This accessory should be in harmony with the outfit, look organic and not stray from the overall style concept.
Behind
Using a bow at the back adds a romantic, bohemian touch to the look. This option is suitable for tall, slender women who love dresses with a seductive look.


The front of the dress should be as closed as possible. An open neckline combined with a cutout on the back is bad manners; a bow will only aggravate the situation.
On the chest
This is an excellent solution for girls who want to emphasize their décolleté and draw attention to their full bust. There is no need to use a massive bow, otherwise the impression will be, to put it mildly, ambiguous.


If you need to visually add fullness to your chest, then a large bow in a duet with a neat neckline is just what you need.
At the waist
A bow, skillfully tied at the waist, always makes a pleasant impression and speaks of a woman’s excellent taste. An accessory located at the back or front of the clothing looks unusually positive and elegant, giving the look a little childishness and audacity at the same time.


A girl in a princess-style outfit with a bow skillfully attached to her waist will undoubtedly become the star of the prom. By the way, it wouldn’t hurt to take note of this idea for mothers who dress up their daughters for a matinee in kindergarten.
There is also a limitation, it applies to overweight women of small stature. A lush bow focuses attention on figure flaws. If you still want to introduce this element into the image, a small bow will be enough.
Above waist
A bow above the waist can look beautiful on dresses in the styles, midi length dresses, which is also called French. The accessory adds a few centimeters to petite young ladies, lengthens the legs and places emphasis on the chest - the most advantageous part of the body.


On the hips


This option will not be very successful for short women. It should not be considered by those with a figure that visually resembles an “apple.”
On the neck
A bow attached to the neck looks unusual and feminine. It is advisable if the outfit has a high neckline. This option may be of interest to ladies when there are wrinkles on the skin of the neck.


On the shoulder
Decorating an outfit with a large bow for a special event is the choice of brave people who follow fashion trends. This toilet looks quite extravagant and always attracts attention. By the way, many celebrities choose this option.


Side
A dress with a bow on the side looks extremely stylish and original. It can be worn in any part of the outfit, adding a charming twist.


How to tie a half bow beautifully
For fashionistas who find a classic bow too pretentious, stylists recommend making a half-bow. Its advantage is that less time is spent on tying, and it looks just as fashionable as a full-fledged bow. You will need a long ribbon (belt).


You can make a spectacular half-bow by following these steps::
- Take a narrow belt and attach it to your waist.
- Bring it back, crossing the ends. Bring them forward, holding them in front of you.
- Place the right end over the left and bring it inward, performing a bottom-up motion. Twist, but try not to deform the product.
- Bend the tip that you brought up down and place it under the other tip that hangs freely.
- To get the eyelet of the half bow, make a fold. To do this, measure a distance of at least 10 centimeters from the crossing point on part of the belt.
- Thread the eye of the bow through the resulting loop.
Please note that to create an asymmetrical half-bow, you should not pull the ribbon equally from both ends.


With a little experimentation, you can transform the bow into a luxurious flower that will look amazing with retro dresses. To do this, you will need a wider belt (from 15 centimeters). The eye of the half bow is taken from the inside with your fingers and carefully pulled under the knot. The loop produces two neat semicircles, the folds of which evoke associations with a delicate flower. To prevent the middle from falling apart, it is advisable to fasten the creation of your own hands with a pin.
Corrugated bow
Your bow will be perfect if you use a soft, slippery fabric to tie it. The belt should be of medium width and length.


Tying it is not as difficult as it seems at first glance:
- Lay out the entire length of the belt and form neat, uniform folds. To create a stylish corrugated effect, four folds will be enough.
- Wrap the fabric around your waist, holding the folds so they don't fall apart.
- Place the right tip of the accessory over the left one, and move it inward from bottom to top. Twist, trying not to deform your future masterpiece.
- Bend the end that comes out from above downwards (along the outside), and place it under the second tip, which hangs freely.
- Form a knot.
- Pull the held tip under the top tissue of the knot.


The shorter the free ends, the more pronounced the shape of the corrugated bow will be.
On a wedding dress
Of course, wedding fashion stylists did not ignore this wonderful accessory. Every bride dreams of looking great on her wedding day, and a bow, as a charming element of a wedding dress, fits perfectly into the concept of a festive atmosphere. The shape of the bow varies depending on the format of the celebration, the type of figure of the newlywed, and the style in which the dress is made.


A large bow automatically becomes the most noticeable detail of the outfit, highlighting the most seductive parts of the body and hiding imperfections.
A bow attached to the belt emphasizes the touching and softness of the image, adding fragility and slenderness to the silhouette. It does not matter in which part it is tied - front, side or back.


An accessory tied at the hips in a low-waisted outfit also looks impressive. In a dress where the bodice fits tightly to the body and falls freely, a lush bow, decorated like a flower, will come in very handy.
For example, ultra-fashionable baby dollars look unusually stylish and playful. As a rule, a fluffy multi-layered skirt is always decorated with a spectacular bow, adding a touching touch to the image.


Elegant brides often choose laconic dresses with a fitted silhouette, the key detail of which is a vertical bow at the waist.
Among the brightest fashion trends for newlyweds are contrasting bows on a wedding dress. A scarlet accessory will look great on a dazzling white outfit. The color of the bow can match bright embroidery, shoes, jewelry, and flowers. Creative brides are not afraid to include even black in their look. A black bow made of long ribbons, freely falling down the skirt, looks aesthetically pleasing and unusual.


If the bow was not originally attached to the wedding dress, you can tie it yourself. The easiest option is to use silk ribbon. Wherever the bow is placed, it will be a worthy completion of the bow.
So, let's learn how to tie a bow on a wedding dress:
- Take a silk ribbon that is not wide and not too long.
- Tie the belt in a knot.
- Form two loops from the remaining ends, pull them through each other (size is at your discretion).
- Carefully straighten the structure.


Terry bow(in foreign sources called the ambiguous playful Pom-pom) will look more impressive and elegant if you take a ribbon made of hard material that can hold its shape.


We roll it into several rings, the diameter of which is equal to the diameter of the future bow. Smooth out the loops and make diagonal cuts as shown in the figure. We fold the loops again so that the cut out triangles are in the center of the folded strips of fabric lying in front of us.
Then you should tightly tighten the slits with tape or wire and alternately straighten all the loops on each side of the bow, starting with the inner ones: one to the right, the other to the left, etc. Let's fluff up the bow and mentally admire the beauty that we have just created playfully.
 Classic bow outside of time, fashion, space and circumstances. The main thing in this method of tying a bow is that the ribbon does not wrinkle when tying.


 Strict bow. Fold the ribbon in half as shown in the picture. We fix the junction of the ends of the tape with glue and smooth it by hand. Take a small piece of tape (or a different color) to wrap around the unsightly joint. Glue the ends of the second ribbon to the back of the product - and the bow is ready.


 Tiered bow. To tie such a bow beautifully, you should take three pieces of ribbon of different width and color. Trim them so that the widest piece is the longest and the narrowest is the shortest. Form the ends of the bow. Now tie the folded pieces together with another ribbon, leaving long ends to secure the tiered bow on the gift bag.


 Two-color bow. After such manipulations, dealing with a two-color bow will be as easy as shelling pears. We take narrow and wide ribbons of different colors. First, we form a loop from a wide satin ribbon, fastening its ends with glue, and then do the same with a narrow ribbon placed on it. We smooth the resulting “sandwich” tightly with our hands and fix it from the inside in the center with glue or a paper clip. The final bow is formed using a third ribbon, long enough to be tied to the gift bag or box.


Bow "Dior". Some say that the Dior bow is a more complicated version of the “strict” bow. We glue together “rings” from pieces of tape of different lengths, which we then connect together using glue or a stapler. The half-finished bow is placed on a base - a ribbon with cut out ends. And with a third - small - piece of tape, you should disguise the paper clip, gluing its ends to the back of the bow.


Bow flower. The first step in creating this fantastic flower will be an ordinary ring, which you will make from a ribbon, holding it with your thumb and forefinger. This movement should be repeated until there are more than ten such rings in your hand - depending on the desired size of the bow. We tie the rings in the middle with a long narrow ribbon, straighten the loops one by one, and secure them to the gift.


 Chrysanthemum bow. Tying a beautiful chrysanthemum bow is much easier than it seems at first glance. To do this you will need strong tape, wire, scissors and a little more patience than in previous versions. The beginning of making “Chrysanthemum” is reminiscent of working on a terry bow. But after fastening the ribbons with wire at the cut site, the time comes to give them the appearance of curly chrysanthemum petals. To do this, uniform cuts are made on the loops folded together. After this, we begin to straighten the “petals”, turning the loops first to the right, then to the left, starting from the inner ones, first on one and then on the other side of the bow.

 And finally, another - simplified - version of the bow decoration with curly petals made of plastic braid. We take about a dozen thin, rigid ribbons and tie the gift crosswise with them, fastening the intersection of the ribbons with a tight double knot. Then we will tie the most ordinary classic bow. Let's cut its loops in half, iron each one between the blades of the scissors - and before us is another magnificent, spectacular decoration.
Small matter: choose a beautiful gift for your bow - go visit!