DIY fireplace chair. Do-it-yourself children's soft chair - what is required to make it? Making a chair with ears with your own hands step by step
Every person wants to make the environment of their home or apartment as cozy and comfortable as possible, but at the same time unlike any others.
You can achieve a unique interior with the help of hanging chairs. They can be purchased at furniture stores or made yourself.

Today on the Internet and in specialized magazines you can find drawings of the chairs of the different designs and shapes.
In our article we will look at how to make such a chair with your own hands.

Types of hanging chairs
Today, manufacturers offer a huge range of hanging chairs, including those that you can make yourself.

Such furnishings can become an unusual accent in the design of a room. Below we will look at several options for chairs that you can create yourself.

Chair in the form of a swing
In the manufacture of original hanging swing chairs, the most different materials. Such models are characterized by elegant appearance, fairly simple design, hard or soft frame. They will perfectly decorate the cottage.

They can also be used as an original piece of furniture for a bedroom or children's room, or terrace.
Chair in the shape of a cocoon
This is one of the most common models of hanging chairs. The difference between such a chair is the presence of hiding inner part wall chairs.

This product was created to enjoy solitude; children also really like it, as it looks like a hanging house. To make a cocoon, only natural materials are used.

Chair in the form of a nest with a frame made of hoop
These chairs are the most popular. They can be equipped with a large amount of decor and perfectly complement modern interiors. For such models, a variety of weaving techniques are used.

What are the chairs made of?
When choosing materials for a chair, it is necessary to take into account its specifics.
If you decided on the swing chair option, then you will need thick fabric, different types artificial ropes and blocks of wood.

To make a chair in the shape of a cocoon you will need rattan, willow twigs, bast, bird cherry or willow branches.

For a chair in the form of a nest, a hoop made of plastic or steel, durable fabric resistant to wear, synthetic filling, special cords for weaving, and various pieces of wood are suitable.

For the seat itself, the following techniques are used:
- Macrame;
- Patchwork technique;
- Knitting;
- Tatting.

Do not forget about the compliance of the selected materials and fasteners with the planned load.
Note!


Master class on creating a chair
This is the simplest type hanging chair of all the things you can do yourself. To make it you will need:

- dense material – 2 m;
- wooden beam - length 1 m, radius 3 cm;
- several carbines (0.11 m), designed for a weight of up to 0.16 tons;
- cable with a diameter of 1-1.15 cm with a tensile load of up to 3200 kgf;
- paints, brushes, nylon threads.
The tools you will need are a drill, sewing machine, iron, scissors, ruler.

Step by step we create miracles
Step 1. Fold the material in half, measure 0.18 m from the top and cut off the resulting triangle.

Step 2. Fold the edges of the fabric by approximately 1 - 1.5 cm and carefully hem them.

Step 3. Make pockets for the cable. To do this, you need to bend the edges on the long part by 4 cm and stitch them on a typewriter.
Note!


Step 4. On each side wooden beam make 2 holes. There should be a gap of 5 cm between two adjacent holes, and approximately 0.8 m between pairs of holes.

Step 5. We insert the rope into the central holes and secure it with knots. First, we make a knot for the carabiner in the middle of the rope.

Step 6. Pass the ends of the cable through the prepared fabric, insert them into the free holes and secure with knots.

Step 7. We attach a pair of carabiners, which are connected to each other, to the hook previously attached to the ceiling. This will add reliability to the design. We insert the rope into the last carabiner.

You can decorate the swing chair with bright pillows.
Note!

Hanging chairs are a fairly popular piece of furniture. They can easily become the highlight of your interior.

We hope that this article has convinced you that sewing a stylish bean bag chair or a fashionable hammock chair with your own hands is not at all difficult.

Such self-made products have a unique charm. They will definitely amaze your guests with their uniqueness.

DIY chair photo


Using a chair-bed instead of full-fledged separate items furniture relevant for small rooms. Successful combination places for sitting and sleeping allows you to ergonomically organize the space of the room.
Search for space arrangement options small apartment often leads to the idea of buying a folding chair.
Buying such an item may not be profitable. But you can make furniture yourself if you have the skill. How to make a chair bed , many people know who equip their apartments and houses with handmade items.
Advantages of self-production furniture - a bunch of. First, the basics, which are used, can be found at home or in the country, and can also be bought in specialized stores at a price incomparably lower than the finished item.

Blanks made of wood or its derivatives, filler and fabric - this is what you will need, in addition to various types fastenings.
To make a chair bed with your own hands , you will spend 2-3 times less funds. In addition, you can choose your own design designs , coating material and color scheme.

All this allows you to create an original model that is convenient for your home.
Deciding on design and construction
Chair-beds are divided into two main types:
- Frame;
- Frameless.
Intraspecific differences furniture vary based on the choice of shapes and transformation mechanism.

Traditional materials make it a reliable support for many years.
It is more difficult to make a frame model. Furniture with a rigid base is complemented by a layout mechanism, which must be done correctly so that the “liner” can be easily removed and straightened without distortion. A design with two folding legs is easier to make than one with four.

Can be selected as wooden base supports, and metal.
Determine this or that suitable design necessary not only based on the complexity of the creation, but also on its style, safety and convenience for relaxation. For folding chair you can choose theselike chipboard, plywood, textile of a certain density, foam rubber for upholstery, if a frame option is envisaged.

This furniture is compact and ergonomic, noticeably smaller in size standard bed, but is not inferior to it in terms of ease of relaxation.
A product without a rigid base can have a streamlined shape, and it is also lighter in weight.

Whatever designs you choose, they must be durable and safe.
Don’t forget about comfort - the body should be comfortable during sleep or daytime rest.Remember that the base must be wide enough - at least 60 cm, otherwise the sleeper will not be able to turn around on the bed.

Today there are many varieties of this furniture. All of them find their place in the interior of the apartment.
Necessary materials
To make a frame model you will need the following:
- chipboard;
- Fiberboard;
- Wooden blocks;
- Plywood;
- Foam rubber;
- Self-tapping screws;
- Loops;
- PVA glue;
- Sandpaper;
- Upholstery fabric.

We will make a simple but convenient thing in everyday life that will be strong and reliable to withstand any unexpected guest.
In creating the design Others can also be used. For upholstery it is better to choose a special one textile , characterized by density and easy to clean.
For frameless furniture are used:
- Material for covers;
- Foam rubber;
- Strong threads.

For upholstery you will need high-quality foam rubber.
Required Tools
So that the intended subject furniture to do it correctly and firmly, you will need:
- Long ruler or tape measure;
- Simple pencil;
- Staples and construction stapler;
- Scissors;
- Hacksaw;
- Screwdriver;
- Sewing machine (for making a frameless chair).

Tools for work.
If in design decor is provided (for example, in the form of appliqués), then a stencil cut from a thick file folder will be useful.
Manufacturing process: step-by-step instructions
Before starting work, it is imperative to complete a drawing of the product, where the exact dimensions will be indicated and parts of the model will be drawn in detail.

Product drawing.
For the manufacture of folding chair frame type you will need plenty of space. Choose a spacious room.
First we make the body:

Then we start creating the folding part. Make 2 frames from beams the width and length of the seat. Attach sheets of plywood to them.
Connect the frames using long loops.
To ensure that the chair reclines evenly, use a metal transformation mechanism - attach steel contours with through hinges to the sides.

The main thing is how to make a chair bed yourself, so that the parts folded together form a beautiful and even square.

This cute chair bed that we made with our own hands can be painted, varnished, or upholstered with foam rubber and stylish, beautiful fabric.
The next step will be plating:
- Glue pieces of foam rubber cut to size, 2-3 cm high, to the top of the frame.
- Place the fabric evenly and use a stapler to attach it to the beams at the bottom.
- The sides can also be upholstered using a thin layer of foam rubber.

For folding design you will need legs.
They are made in the middle and front part of the frame, level with the bottom point of the bottom or slightly higher. For armrests, use stripped sandpaper wide bars.

The seat easily unfolds without clinging to the sides, and just as quickly turns into a chair.
The frameless model is much easier to manufacture. It requires foam rubber, which can be used in 2-3 layers, and dense fabric like a “raincoat” (or less slippery). The cut material is sewn on several sides. the remaining opening is intended to be placed inside the foam.

In order to prepare the chair-bed for sleeping, you should unfasten the straps, then pull the top pillow towards you.
Equip the unsewn section with a zipper. For more practical use Using a frameless sample, make an outer cover.

Since it does not have a rigid base, the backrest should be placed against the wall
Decorating a chair-bed
In order to give finished product stylish and original look, use your imagination.

The design of the created item can be improved through the use of interesting prints and appliqués.
Tapestries look good from the fabrics used for decoration. If you want to make the upholstery softer to the touch, choosewith a pile like artificial velvet.

This material is also more durable and durable.
It is better to sew appliqués before the upholstery process. To keep them neat, prepare stencils and scraps in advance different color, matched to or contrasting with the main range.

For a frame-type folding chair, the front legs, which are not retractable in all models, can be made carved or metal.
To prevent the surface from collecting dust and rubbing, use a cape or sew a special cover. Carpeting of the appropriate size will also work, and artificial fur– this will make sitting in the chair more comfortable and cozy. Another option is to sew replaceable covers from lightweight fabric.

This will make caring for the upholstery easier.
VIDEO: DIY chair bed.
All children deserve a cozy place that they can call “their own,” whether it’s for lounging around, watching cartoons or reading. Even something as small as a comfortable seat can go a long way.
And while you can choose absolutely any chair in the store, wouldn't you want to make it unique, just like your child? Try making a baby one easy chair on one's own.
By building something with your own hands, you will get exactly what you want, and you will also save money.
 The most simple option there will be a pear chair or a bean bag chair. The simplicity, perhaps, lies in the fact that this model is frameless.
Some online training videos can be intimidating in their complexity. But no need to worry. Two pieces of fabric, a zipper, some straight stitching and you have an adorable bean bag chair.
Necessary materials:
- two pieces of fabric (fabric for upholstery is preferred - it is more durable);
- zipper 60 cm long;
- filler (the amount will depend on the type of material).
For seam allowances, leave 1.5-2 cm.
 Progress:
- Cut two pieces of fabric 107 x 82 cm each. The cuts can be identical or in different colors.
- Fold the fabric right sides together. Sew the long raw edges using a zigzag stitch. This will prevent wear and tear. Then sew the same edges with a straight seam. It is advisable to use a short stitch length, which will also add density to the product.
- Fold the fabric in half (horizontally).
- Starting at the folded side, round the ends, cutting about 15 centimeters from the corner.
- Turn the fabric right side out. The result is a symmetrical rounded bend on one side. You've got a rough edge again. Finish it with a zigzag stitch and then straight stitch it.
- Open up the raw edge. Place right sides together, but now with the seam between the two pieces of fabric facing up.
- Sew the zipper into the hole created. You can use an invisible zipper, it will be almost invisible.
- Close the edge of the clasp with straight stitches on both sides.
- Turn the finished case right side out and fill it with filler.
Frame chair
What it consists of:
- particle boards;
- plywood;
- foam;
- special glue;
- fabric for covering.
Tools:
- self-tapping screws
 Progress:
- Cut the chipboard sheets into a semicircle - this is your base. Using self-tapping screws, attach three bars (40 cm each) at an angle of 90°.
- Cut out the front pillars from plywood. Their width should be half the length of the semicircular part. The length is equal to the length of the bars.
- Attach all parts to the beams with a drill and self-tapping screws.
- Attach foam rubber to the frame.
- Cover the finished fittings with fabric.
You can also use a leather substitute for upholstery, which is very convenient for children's furniture. This upholstery is easy to care for.
Wheel made from tires
A great idea on how to reuse scraps of plywood and worn-out tires left after renovation.
What you will need:
- 2 tires;
- plywood;
- foam;
- upholstery fabric.
Tools:
- self-tapping screws;
- furniture stapler.
Progress:
- Place the tires side by side.
- Fasten together using large self-tapping screws.
- Be sure to cover the bottom tire with felt to avoid damaging the floor in the future.
- Make the back from plywood. Give it the desired shape. Also attach it with self-tapping screws.
- Choose thicker foam for the inside of the seat. Cut out a circle and fill the tire with it. Then cut out the circle larger diameter, in order to cover the seat from above. You can use thinner foam rubber.
- Cover the back with foam rubber using a furniture stapler.
- Cover the chair with upholstery fabric.
Instead of upholstery, you can sew a cute quilted cover. The child will appreciate it!
Unfortunately, sometimes it is difficult to navigate the sizes and quantities of materials if you use leftovers. Try to create your own unique model.
 First, evaluate your resources: what materials and tools do you have at your disposal? Is everything enough? Sit down for the drawings! Don't worry if the materials available to you are a little unconventional. Using imagination and enthusiasm, a child's chair can be made from anything.
What is upholstered children's furniture made from? Yes of all:
- Styrofoam;
- thick cardboard;
- old furniture cushions;
- foam rubber without using a frame;
- remnants of laminate or parquet;
- polyurethane foam;
- plastic bottles and much more.
Involve your child - he will give you a thousand ideas. Make the chair soft and cozy. Find fun prints that you think fit with your favorite little person's personality. This will be an unforgettable gift not only for a holiday, but also just because.
There are no similar entries.
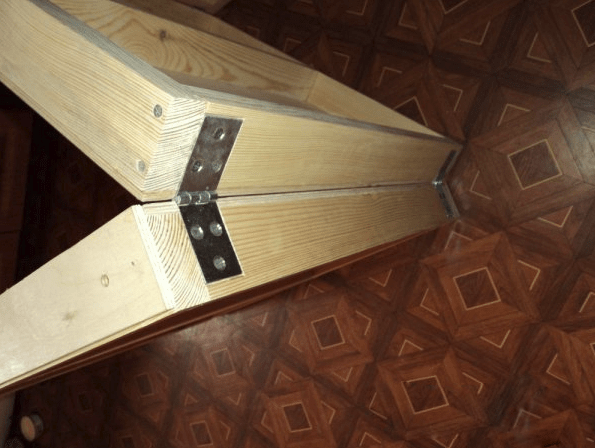
In this article we will consider the topic of manufacturing classic furniture Almost all apartments and houses - a chair with your own hands. This solid wood chair with armrests will not be bulky and best use such products are tableware. Following these instructions, you can make it at home.
The production of the chair will take place in several stages. All of them will be presented below and you can easily make it in a few evenings if you have the tools and materials, because all the schemes will be presented below. There will be no ready-made drawings in this article, since everything is done from improvised means: from boards, plywood bars, which are available.

Frame
Let's call this stage the chair frame.

Of course, almost the entire skeleton will be covered with foam rubber and fabric. Only part of the legs will remain visible.
The back legs are the most important parts of a wooden chair because you need to make them at some angle.
Without thinking for a long time, to make the back part of the chair structure, we took an ordinary dining chair that was available, although it did not have a seat. But he was well suited for the role of template. You can take some old grandma's chair.
Markings were made on a 50x150 board.

Be sure to mark the level of the seat of the chair, make it the same as for the chair. In this case it was approximately 410 mm from the floor.
For sawing out homemade legs fireplace chair use a jigsaw.

Then we used the finished part as a template to make three more legs, because we are making two chairs at once with our own hands from scrap materials.
The front legs will be straight and square section- 55x55 mm. To obtain such a cross-section, you can glue the boards together, and then saw them down to required size. We glued 2 pairs of 2 boards, 120 mm wide and 30 mm thick.

There is no glue between boards 2 and 3
Note. A chair with a solid structure is called a frame chair.
While the front legs were drying, we finished assembling the back frame - we made the upper part, the upper part of which has a slight rounding. Then we made the rear seat support bar.
What if you try to make something out of furniture with your own hands? Interesting? Let's start by making furniture that doesn't require a frame, for example: from a bean bag chair (or, as it is also called, a pear chair).How to make a beanbag chair with your own hands at home? The key to an excellent result of your work is to do it right from the start make patterns and find good filler. You select the fabric (color, texture) to your liking, not forgetting the harmony of the future pear-shaped product with the rest of the furniture in the house.
The most important advantage such bean bags self made
the fact that it itself is light and freely takes the shape of the body of a person who wishes to rest on it. Therefore, it is very comfortable. You can even lie down on it, fluffing it up like a pillow. People who spend a lot of time “on their feet”, or sitting for hours in the office, perfectly relax and rest their back muscles when they sit in bean bag chairs. And what delight this furniture causes in children! Be sure to take your child as an assistant when you start making a bean bag chair with your own hands.
Next important point – filler. The most popular of them now is polystyrene chips, the granules of which are 1.5-5 mm. If you use it as a filler, then you will never sit in a “cold” chair. This applies specifically to crumbs, and not to foam plates.
As an option, order crumbs from an online store (cheap and fast). And with the rest you can fill decorative pillows and soft children's toys.
It will be great fill chair bags not with traditional polystyrene foam, but, for example, with hay soaked in the aroma of hot summer or some fragrant grass. You just need to keep in mind that such fillers love rooms without high humidity. This filling is changed every 6-12 months if products made from it are used a lot and often. Therefore, the bag itself should be easily removable to replace the filler.
One of the covers that makes up a bean bag chair (or pear chair), should be made of raincoat fabric or thick mattress fabric, the second cover should be made from beautiful furniture fabric or jeans, suede, faux leather and even velvet. You should not take expensive fabric for the outer cover, since with cheaper fabric the cover can be changed as much as you like, and each time you will have a “new” chair. So it’s worth thinking about whether we need to pay in online stores for the super abrasion-resistant fabric they advertise, if we have the option of inexpensive, but different and always “fresh” covers?
A strong metal zipper 50-60 cm long is usually placed on the outer cover of the bean bag chair. The best place its location is at the bottom of the chair, otherwise it may break if there is excessive load on the chair. If you don't like the zipper, sew on a few buttons.
By turning on your imagination, you can vary bag chair from a very large pillow to a comfortable mattress; it can be like a chair with a back, if you arrange the pillow in a triangle, and a comfortable mattress.
Before you begin directly working on the manufacture of the product ( upholstered furniture), we recommend doing small pattern on paper to scale to check if everything fits. 
The seams on the covers must be strong, the same as on jeans, using reinforced threads in order to withstand heavy loads.
We sew a chair bag (pear chair, cushion chair) with your own hands . Master class with step by step photo instructions and pattern.
Comfortable frameless upholstered furniture, made by yourself. Master class on making a beanbag chair.
Next article.