Covering walls with MDF panels - a detailed guide. We decorate the walls with MDF panels Do-it-yourself installation of MDF panels
IN modern world When it is necessary to quickly finish walls, MDF panels are widely used. This is primarily due to affordable price, as well as environmental friendliness. To perform installation wall panels Do it yourself MDF, you don’t need much experience. You just need to be careful and be precise in your calculations.
MDF panels are produced from wood processing waste. Do not confuse this material with similar ones: fiberboard and chipboard. MDF panels are made by dry hot pressing, where the wood is pressed without taking into account the binder component. The essence of the method is as follows: wood consists of fibers (lignin), which, under the influence of high temperature and pressure, become pliable and connect with each other. Structure MDF material outwardly it is somewhat reminiscent of felt cloth, only it consists of wood fiber.
MDF panels are absolutely environmentally friendly material, therefore they are widely used for interior decoration. The principles of working with panels are similar to wood.
MDF wall panels are significantly inferior in price to lining, but if you compare this material with similar “brothers” - chipboard panels and fiberboard, then MDF will be more expensive.
Installation of MDF wall panels is attached to the frame or with glue for wooden products. Also, the “Liquid Nails” adhesive mass has been developed specifically for working with MDF panels. This is an adhesive containing sawdust filler. This glue is convenient for working both with MDF panels and for filling cracks. When working with " liquid nails“You need to take into account that MDF wall panels have color, so when purchasing glue you need to ask your consultant to provide a sample of a frozen drop (usually available on the lid).
Tools for working with panels
Every man has a home standard set tools, you need to add to them:
- plumb line (made independently from nylon thread and nut);
- roulette;
- building level;
- electric drill with an attachment for self-tapping screws (as a replacement for a screwdriver);
- metal square;
- hand saw or jigsaw.

Installation features
Fastening MDF wall panels is carried out in two ways:
- Frame.
- Glue.
Both methods are equally practical. For example, if you need to hide any communications, then use a frame method of fastening. If it is necessary to finish a flat surface, then the installation of MDF wall panels is carried out using the adhesive method.
When attaching MDF wall panels, two frame methods are used:
- Mounting on a wooden sheathing.
- Mounting on a frame made of metal profiles.
The easiest way is to make a wooden sheathing, since for its assembly you will not need to install a large number of hardware. But wood sheathing is an expensive material. In addition, the wood must be pre-treated with agents that prevent the formation of fungus and mold.
You can attach the wooden sheathing to the wall using self-tapping screws or mounting nails (dowels).
It is undesirable to use such lathing in brick house and a damp room, because through the pores of the brick, fungal spores and moisture can penetrate inside. In such a “cushion” between the wall and the MDF cladding, pests will rapidly develop.
to install metal carcass, you need to purchase a profile, special fasteners (“ears”) and connecting elements. It is advisable to purchase them if you plan to complete a large amount of work in a short time. If you plan to cover one or two rooms with wall panels, then you can completely do without them.
The metal sheathing is attached to the wall only with self-tapping screws. To attach a metal profile to concrete base, a self-tapping screw with a diameter of 4-6 millimeters is used. If the wall is strong, then the diameter of the fastener decreases. In addition, you need to know that each fastener (screw or dowel) is attached together with a plastic “socket”. Therefore, a hole in the wall is drilled according to the diameter of the “socket body”, and the protrusions are not taken into account.
The plastic base is hammered into the wall, and the fastener itself should go 30-40 millimeters into the wall. For example, if the layer of plaster is 12 millimeters, then for the lathing you need to use an MDF wall panel measuring 16 millimeters, and the length of the hardware should be about 68 millimeters. This figure is calculated by the formula: the thickness of the plaster plus the length of the fasteners plus the thickness of the MDF. Accordingly, fasteners can be purchased in lengths from 70 to 80 millimeters. The depth of the hole should be another plus 15-20 millimeters, which are allocated “to the dust”. The final figure is 100 millimeters.
If you are working with a long drill, then you must first put a restrictive tube on it. Try to drill shallowly into the wall, as its thickness may be slightly less than 200 millimeters.
Wall insulation
Before finishing a room with wall panels, it is advisable to first insulate the walls. The sheathing cells are filled with sheet foam. It is very convenient to work with such material, especially to cut sheets to the required size. Additionally, foam insulation will protect voids from condensation and the appearance of wood pests. In the summer, when the building heats up, foam plastic will protect the room from overheating. In addition, the heat flow into winter time will be significantly reduced.
How to install wood sheathing
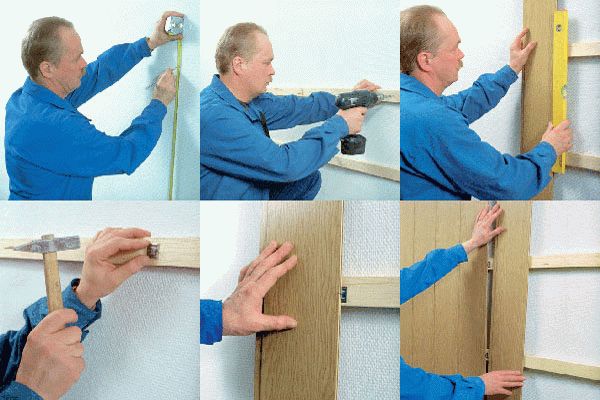
Wooden sheathing begins to be installed from vertical stand. Each rack is placed in a corner of the room so that it forms a corner. Then the racks are placed along the edge of the window and door opening, starting from the floor to the ceiling. Check the verticality of the racks with a plumb line.
Next, apply the stand and mark it on one side with a marker or pencil directly on the wall. Using the marks, drill holes in the concrete wall for fastening. The hole spacing ranges from 500 to 700 millimeters. Then “sockets” for fasteners are inserted into the holes and their position is again marked with a pencil. The holes are drilled to two-thirds the diameter of the fastener and then it is inserted back. Experienced craftsmen They do it differently: they drill holes in the racks in advance, and make markings directly through the racks.
The remaining logs are installed using the same principle. Along the top of the opening, as well as under the window sill, it is necessary to install logs, regardless of the “step”. In addition, the slopes window openings also “decorated” with slats: inside and outside.
When wooden sheathing ready, the ledges on the slats (their joints) are removed with a plane.

How to install metal sheathing
Lathing for MDF wall panels is installed according to the same principle as wooden lathing. First, the corner posts are attached to the wall, then the posts in the openings and the cross posts. The pitch of the metal sheathing is 500-700 millimeters. The racks are assembled from two types of profiles: “UD” (narrow) and “CD” (wide). The racks have a narrow profile, and wide profiles are inserted or pushed into them. Then, using a building level or tape measure, check the horizontalness and pitch. After that metal slats They are attached first to the racks and then to the wall. The sheathing parts are connected to each other and the wall with self-tapping screws. Remember! Dowel nails cannot be used, because the profile may “lead.”
If you are connecting pieces of metal profile to each other, do it in advance.

How to attach MDF wall panels
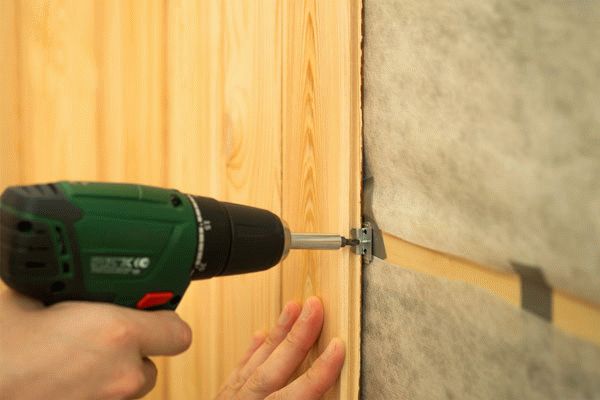
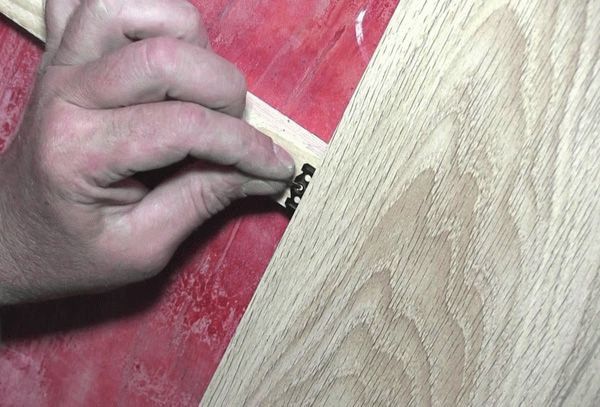
Installation of wall panels is very simple. After constructing the frame, they begin to install MDF panels. They are attached to the base using a special clamp - “kleimer”. It is inserted into the hole on the panel (groove). Working with such a fastening element is a pleasure, because the clamp ensures reliable fixation of the panel to the frame. In addition, they are designed so that the next panel can be easily inserted into the groove.

Attaching MDF wall panels with glue is much easier. Firstly, it saves time, since you do not need to pre-install the frame.
Which glue is best to work with? Ordinary glue will not work, so tips on choosing an adhesive will be useful for beginners:
- the glue must have plasticity;
- must smooth out small irregularities on the walls in order to glue the panel even in a curved place;
- the texture of the glue should be thick, but at the same time, lay down in a thin layer.
Wall panels must be attached to glue according to the following rules:
- First, clean the surface from dirt and dust;
- Be sure to prime the walls with a primer mixture;
- Allow the primer to absorb well.
When the wall dries, you can prepare the panels: cut them according to size. Then apply glue to the panel “dotwise” or in a “checkerboard pattern”. Try to keep the drops not scanty, but rather large. After applying the glue, press the panel against the wall, “tap” it well and tear it off. This is the gluing technology. Thus, when the panel is torn off from the wall, the glue is exposed. The glued panel under the pressure of its own weight will not peel off from the wall.
To save time, you can immediately apply glue to five to seven panels, glue them and, one by one, tear them off the wall. While the glue is weathering, you can take a short break, and after three to five minutes return to work and hook each panel. Now you need to tap thoroughly.

MDF wall panels sheet, as well as MDF wall panels laminated and standard panels It’s easy to glue, but cutting them evenly and neatly is much more difficult. In this case, due attention must be paid to any obstacles, such as slopes.
When working with glue, you must remember that the final result will depend on the accuracy of the work.
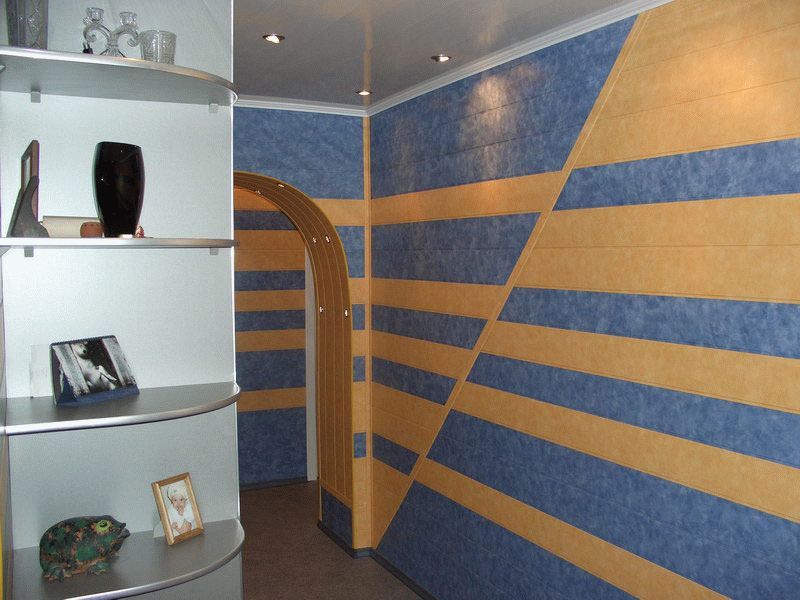
You can see what MDF wall panels look like in the interior in the photo:


How to install MDF wall panels, watch the video:
The option of surface cladding using MDF panels is currently gaining popularity. The reason is that with their help you can quickly carry out facing work on large area. An additional plus is that when working with them, the wall will not require additional finishing in the future. It is also worth noting that decorating walls with panels yourself is doubly economical.
An important advantage of the panels is that their installation is simple and understandable to everyone, and anyone can install them.
The easiest way to have a beautiful front lawn
Of course you saw perfect lawn in the cinema, on the alley, and perhaps on the neighbor’s lawn. Those who have ever tried to grow a green area on their site will no doubt say that it is great work. The lawn requires careful planting, care, fertilization, and watering. However, only inexperienced gardeners think this way; professionals have long known about the innovative product - liquid lawn AquaGrazz.
MDF - what is it?
MDF - fine faction From this faction are being manufactured wall panels for interior decoration. The manufacturing stages are as follows: wood shavings, fine in composition granules, are sent under a dry press. An important point is processing using high temperature and high pressure.
In order to bind the particles together and make the panel monolithic, special resins (usually urea) are added to it, which are modified with melamine.

An undoubted advantage in choosing MDF panels is that they belong to the class of highly environmentally friendly materials. According to the principle of installation and installation, use in home interior finishing using MDF panels is reminiscent of the process of working with lining. However, such panels are cheaper in price.
Installation is usually carried out in two ways - by mounting on a lathing, which acts as a frame, or by mounting on a wall using various adhesives or “liquid” nails.
Such compositions are used when installing wooden materials, as well as when sealing various holes and cracks, because their structure contains filler in the form of sawdust.
The main thing is to choose an adhesive composition that matches the color, since otherwise the areas of “grease” will stand out inharmoniously against the general background.
It should also be noted that MDF plates are made in a huge range of colors and tones, and can have patterns of different relief structures. You can find imitation stone. All this suggests that such panels can be suitable for almost any interior. Their undeniable advantage is that during installation the panels can be combined in both vertical and horizontal positions.

It is worth noting that often, when the room seems not high enough, the vertical arrangement of the panels on the wall will help to visually “grow” the finished wall. For tall but narrow rooms, all recommendations are exactly the opposite.
It is important to take into account when choosing that such panels are produced in different formats (length and width), so first of all we need to decide what result we want to see in the end.
Required Tools
For convenience and ease of implementation finishing works It is recommended to prepare in advance and collect the tools necessary for the work. They will speed up the installation of panels and make it quite easy. So, we need:
- A jigsaw or a special saw that will allow you to cut vertically.
- Ordinary bubble level.
- Measuring tools – rulers, angles, pencils and markers.
- Drill or ordinary screwdriver.
- Stapler (preferably a construction one).
- Hammer.
- Pliers.

Main rules for installing panels
Installation of MDF panels on any surface is carried out in two ways - using adhesives and installing a frame.
Both installation options can easily be used for finishing private houses and simple residential apartments with MDF panels. When working with adhesive compositions, it is important to take into account one important nuance - the surface of the wall for cladding must be perfectly flat and smooth. In this case, it is recommended to first carry out the work using plasterboard or using plasters or putties.
When installing panels using adhesive compounds as additional materials Only adhesives or “liquid” nails and some elements of fittings will come out.
For cases where it is necessary to hide communications under MDF panels or insulation, it is better to use the option of installing lamellas on a frame base. In addition, such a frame will turn any, even the most uneven surface into an ideal plane, which will become an important foundation for the reliable installation of MDF panels.
The frame itself can be assembled from bars (wooden) or profiles (metal). It should be noted that attaching panels to a wooden frame is much easier than to a metal one. In the case of wood, regular nails or staples will do. construction stapler. A metal frame will require self-tapping screws, which necessitates the use of an additional tool - a screwdriver.

When a frame is used, a gap is formed between the wall and the cladding; wires, pipes can be removed into it, or insulation materials can be laid. However, it should be understood that such gaps, dark and sometimes damp, are attractive to fungal colonies such as mold. So it is very important to dry the wall before the installation process, if it is wet, and additionally treat it with special protective compounds, in order to avoid the formation of fungi.
So, to build the frame we will need:

Preparing the surface
You can start preparing the surface only when it has been previously dried (of course, if such a measure is required and the wall in the room is damp). We have already emphasized earlier why this is important. The main thing is to never carry out facing work on top of a damp wall.
The process of preparing the walls itself consists of the following simple steps:
- Cleaning the wall. When the surface is covered with wallpaper, it is important to remove it, because in a confined space old wallpaper will become a very attractive environment for the appearance and proliferation of fungi and mold, and sometimes insect pests. If the wallpaper is glued well enough, you will first have to wet it or steam it using the same clothes iron; then removing it will not be difficult if you use an ordinary spatula. In rare cases, it may be necessary to use a special composition that will help get rid of the wallpaper layer. In case the wall is plastered or well painted water-based paints, cleaning work can be skipped.

- Surface treatment. In cases where your wall has already been attacked by mold or other types of fungi, or perhaps insects, it is recommended to thoroughly treat it. It is advisable to use compositions such as “anti-mold” or “whiteness”. Before the processing process, you can scrape the surface with a spatula. After applying antiseptics and healing compounds to the wall, it is recommended to go over the wall again with a spatula, and then repeat the treatment process. Ideal option will be like this when the affected surface is cleaned to the ground: all traces of fungi or insect activity are completely removed.
It is important to understand that it is better to carry out such work when using means personal protection such as respirators or masks. Indeed, in case of unintentional inhalation of plaster particles or suspensions affected by fungus, unpleasant health consequences can occur.
- Treatment of cracks. If, after removing the wallpaper layer or poorly applied plaster, cracks are found on the surfaces, it is recommended to carry out work to eliminate them. This procedure is especially important if it is planned to place heat-insulating or sound-proofing materials under the MDF panels. It is important to understand that unsealed cracks can become “bridges” for the entry of cold into the room, creating factors favorable for the formation of mold, such as dampness and darkness. In order for the layer of plaster or putty to adhere well, it is recommended to widen the crack a little and, if possible, deepen it. Next, you should get rid of traces of old plaster and treat the crack using a deep penetration primer. After the primer has dried, the cracks are sealed with putty or plaster. It is important to fill the crack to its full depth.

- Application of primer. When the first three steps are completed, you should start priming the entire surface. It is important to choose soil compositions so that they contain antiseptics. This choice will help prevent the formation of mold and fungi and protect against insects settling under the panels. When covering wooden walls, it is necessary to select a primer that also includes special fire retardants. They are designed to increase resistance to fire influences. It is important to remember that the primer is applied in two or three layers, each previous one must dry thoroughly before applying the next.
- Installation of insulation. We pass this stage if MDF installation carried out on the crate. Penofol is ideal for this purpose; it is usually glued to a primed surface.
Frame installation process
It is important to install the frame correctly and correctly. First you need to decide how the frame elements will be installed - vertically or horizontally. For horizontal orientation the guides are installed vertically, and vice versa for vertical.
The frame is attached to a layer of insulation. You should choose a step between the guides of 5-6 centimeters. It is important to observe and control the evenness of the installation.
In order to determine the vertical (ideal), a plumb line is used. An ordinary level is suitable for determining horizontal lines. After marking it, it is not difficult to install our guides for future sheathing. It is important to consider that it is better to install the first guide in the corner of the room or along the floor area.

Installing MDF panels on a frame
When the frame is ready, and the communications are installed and hidden properly, we begin the most important process - installation of the panels.
This work begins with the preparation of the panels themselves. Using measuring instruments, markings are made, along which a cut is made using a jigsaw or an ordinary hacksaw.
It is important to remember that:
- The first MDF panel must be mounted at a level for ideal horizontal or vertical, otherwise the cladding and installation of other subsequent elements will be crooked and uneven.
- The starting panels are installed with tenons in the corners and secured with self-tapping screws. When using a metal frame, the clamps are secured with small self-tapping screws with a small head.
- The tenon of each new panel fits closely to the groove of the already installed one. Next, it is important to adjust the position of the panel using a level.
- Thus, the paneling is carried out to the end of the surface. It is recommended to fix the final panel using self-tapping screws. We will hide them in the future with the help of decorative corners.

Installation with adhesive solution
It is worth immediately noting that this option for installing panels is much simpler and lighter than the first, frame fastening method.
Particular attention should be paid to adhesive compositions. They must meet certain requirements. Among them:
- The plasticity of the glue must be maintained even after its initial drying, otherwise deformation of the MDF panels is likely. It is important to choose a composition that is not afraid of moisture and temperature changes.
- The consistency of the composition should be thick in order to be able to apply it in a thin layer or a thicker layer.
“Liquid” nails, which can easily be found in any hardware store, ideally meet these requirements.
So, let's begin. Apply glue to the inner surface of the panel in a thin layer or in waves. After this, the panel is pressed tightly against the wall, torn off, left to stand for 5 minutes, and then pressed again to the required location. It will take half a minute to hold it in this position for secure fixation.

The finishing panel, if necessary, is measured and cut to fit right size. The last panel is fixed with a self-tapping screw.
At the end of the work, we install the fittings. We attach pre-prepared corners and baseboards at the joints of planes and at doorways.
Advantages and disadvantages
Decorating walls with MDF panels yourself is good, but you should take into account the nuances.
Pros: ease of installation, variety of colors and textures, the ability to install communications when choosing a frame installation method, no additional finishing in the future, ease of maintenance, accessibility.

Minuses: the presence of protrusions and gaps; when choosing a frame, the formation of gaps between the wall and the lamella, which reduces the area of the room, and also provides the opportunity for the development of fungus and mold - if the wall is not carefully treated, insufficient mechanical strength, minimal moisture resistance.
Bottom line
Now that you are so familiar with the features of MDF panels and the intricacies of their installation, all that remains is to make your choice of the most suitable lamellas for the design. Wall decoration with MDF panels is a good choice for your home. Good luck! And let your home be beautiful and cozy.
Decorating walls with MDF panels is a method that has many advantages over other types construction work. The fact is that the technology allows installation in a fairly short time. A significant advantage is that there is no need to carry out additional processing of the coating. Cladding is carried out different ways: glue and frame. It is the latter method that is considered the most labor-intensive.
This material has numerous advantages that make it indispensable. These include the following indicators:
- Simplicity of installation work. Even if you use the longest frame method, the work will be much less than when laying drywall.
- Large selection of shades and textures. MDF wall panels allow you to choose an option that will appeal to any person and can create a completely unique interior.
- Possibility to get several results at once. Namely, to build a sheathing that will hide numerous communications and serve as the basis for insulation, as well as create a smooth decorative surface.
- Durability and reliability. Density MDF boards superior to some breeds natural wood, A decorative surface It is made in such a way that it is very difficult to damage it.
- Easy to care for. Indeed, cleaning is done with a damp cloth. Any stain can be removed with alcohol solutions (except cosmetics).
 MDF panels allow you to create unique design interior, in addition, they are easy to care for
 On a note! The wood-fiber material is covered with a decorative layer by lamination or veneering. And the problem often arises that after removing stains with alcohol mixtures, numerous stains remain on the surface. Get rid of them by reapplying the solution. The main thing is to continue mashing until the liquid has completely evaporated.
Naturally, such positive properties they say that MDF panels on the wall are great option. But we must not forget about some disadvantages:
- It is simply impossible to get a perfect smooth coating. There will always be a small joint between adjacent elements. If desired, it can serve as an excellent decorative component.
- An improperly constructed frame is a threat to human health. The resulting gap is an excellent place for mold and mildew to grow. The glue method has the same disadvantage.
- A damp room poses a threat to the covering material and frame. The risk of warping is quite high.
Thus, we can conclude that finishing MDF panels is advisable when it is planned to follow the installation technology.
 Despite the ease of installation, MDF panels have their drawbacks
 Preparation of tools and material
For quick and comfortable work, you need to prepare tools and purchase materials in advance. The event is carried out using the following devices:
- An electric jigsaw with a set of files that must be selected specifically for wood.
- Plumb and level. The laser tool has proven itself well.
- Pencil and tape measure. It is better to have an even strip or profile for accurate marking.
- Screwdriver. A drill that can switch to low speed is suitable.
- Stapler. A simple option is used for home work.
- Hammer.
 Installation of MDF panels requires special tools
 The frame method of attaching panels to walls requires more materials than the adhesive method, which requires only a special mixture and self-tapping screws (for mounting the first MDF element).
For cladding using the frame method you will need:
- Wooden beam, pre-impregnated with antiseptic. It is better to choose options with a section of 20*40 and 20*50. If possible, a metal profile is used - the same one is selected as for laying gypsum board slabs.
- Insulation that is glued directly to the wall. You can use options that fit into cells. They must be secured first.
- Metal hangers.
- Clamps – for fixing panels.
- Dowels. The condition of the base must be taken into account.
- Panels and additional elements, which are used to create beautiful angles and transitions.
- Consumables.
In principle, a limited amount of money will be required to install MDF panels Money. Of course, if you don’t pay attention to products that are covered with veneer valuable species wood

Surface preparation steps
Before covering the walls, you need to prepare the surface. It consists of several stages, each of which begins only after the previous one has been completed. The most important rule, the observance of which makes it possible to obtain the desired result, is a completely dry wall.
Work cannot be carried out in the following cases:
- Even minor damp areas are observed.
- The surface is covered with frost.
- There are traces of mold and mildew.
- The top layer is destroyed.
If there are no such troubles, then you can start preliminary preparation. It is completely identical for all methods of installing MDF wall panels.
Complete cleaning
One serious mistake is often made - wallpaper pasted on the walls remains. This absolutely cannot be allowed. They serve as an excellent breeding ground for bacterial growth. And when glue method– will not allow the elements to be securely fastened.
 You should completely get rid of old wallpaper and whitewash
 The whitewash layer is also removed, although many craftsmen claim that such a procedure is not necessary. In fact, when the need arises to apply primer, it is the old layer that will interfere with its absorption. Therefore, it is better to clean the wall completely.
Fighting mold and mildew
Unfortunately, this problem occurs everywhere, especially in new buildings and old ones. wooden houses. It's quite difficult to fight her. There are recommendations that indicate that it is enough to treat the damaged areas with special solutions. Many manufacturers even produce them in spray form.
 After removing the old coating, it is necessary to remove fungus and mold
 It’s worth mentioning right away that you can defeat the fungus only by destroying its entire mycelium. Therefore, there is only one way out - removing the plaster to the base, thoroughly impregnating it with special solutions. Of course, the amount of work increases, but there is a possibility of completely eliminating the threat to health.
On a note! Fighting mold (fungus) is a very long undertaking. It is necessary to eliminate sources of constant moisture penetration, and also to treat all contaminated apartments in apartment building. This will allow you to produce high-quality cladding with MDF panels.
This procedure is necessary even if you plan to install a frame. The fact is that any cracks can reduce the thermal insulation effect. The work is carried out using the following technology:
- The putty mixture is being prepared. It is better to choose gypsum or acrylic compositions.
- Seams and cracks must first be widened. They are thoroughly cleaned of the remnants of the old solution.
- The area is well saturated with primer compounds.
- Next, when the soil dries, the mixture is applied. All voids must be filled.
 Installation of MDF panels requires complete sealing of the wall
 Primer coating
This event allows you to increase the adhesion of materials, as well as to carry out the installation yourself more efficiently. For work, compositions are selected that have deep penetration. To further protect the surface, the mixture must contain antiseptics. The primer is applied in two layers, each of which is well dried. The walls are especially carefully impregnated before installing MDF panels with glue.
On a note! Treatment wooden surfaces should be carried out using similar technology. But the mixture must contain fire retardants, which will give the lumber fire resistance.
 Surface priming is a mandatory stage of preparatory work.
 Construction of the frame
It is impossible to sheathe walls with MDF panels without a well-built frame. Need to create reliable design which will withstand the load. Installation is carried out in several stages.
Marking
Before you start marking, you need to decide on the layout of the elements. They can be mounted: horizontally, vertically and diagonally. All positions can be combined, but this requires the installation of dividing decorative elements. For horizontal arrangement of fragments, the lathing is laid vertically on the wall with your own hands. Accordingly, for vertical cladding- vice versa.
Marking is carried out according to this principle:
- To obtain vertical markings, a plumb line is used. According to its location, points are marked between which lines are drawn.
- If horizontal marking is required, a level is used.
 To apply vertical markings you will need a plumb line
 Fastening the guides
Covering walls with MDF panels on lathing is done using two methods. The choice of a specific method depends on the condition of the base.
- The guides are laid directly on the wall:
- This option is suitable for wooden beam, in which holes are drilled in increments of 30-40 cm.
- The guides are applied to the marking lines and the holes made are marked.
- Drilling and installation of dowels is carried out.
- The racks are securely fixed with screws. Next, you can install MDF panels.
- The frame is erected using additional suspensions:
- The technology is used in cases where the surface has significant unevenness and differences.
- Suspensions are installed according to the existing markings. The fastening pitch is 40-50 cm.
- The upper and lower guides are fixed around the perimeter.
- Racks are installed and secured.
Installation of panels on the frame
Wall cladding with MDF panels begins after full preparation. The sheathing is once again checked for strength, and the joints are pulled. If necessary, communications are carried out, and the locations of sockets and switches are immediately marked. The cable is laid in cable channels, which are corrugated hollow tubes. They are fixed to the walls with their own hands.
Cladding work begins with cutting the products. But if there is significant curvature of the ceiling and floor covering, which has not been previously corrected, then each element is cut off after careful measurement.
On a note! Facing material has a decorative front side, which can be significantly damaged when cutting off excess. Therefore, it is necessary to take into account the location of the teeth on the jigsaw file.
Installation of MDF panels on walls has the following technology:
- A ridge is cut from the first fragment, which is used for installation in the groove.
- The element is installed in a corner and screwed with self-tapping screws along the edge, which is located directly in the corner.
- Further, installation of MDF is quick and easy. Clamps are installed in the groove of the first part, which are fixed to the sheathing using a stapler or self-tapping screws (nails).
- The next fragment is installed exactly in the groove. If required, the location of the clamp is trimmed (on one or both sides), this is necessary so that the fixation is reliable.
- The last element is trimmed with a small gap to the wall. If you do not do this, it will be difficult to insert it. It is secured with self-tapping screws.
- Decorative elements are glued to cover the corners and screw locations.
- Cladding walls with MDF elements requires preparing holes for sockets and switches. This drilling is carried out before installing each part. Drill bits are used for this.
From the above we can conclude that laying MDF material is not a labor-intensive procedure, but requires compliance with certain rules.
MDF panels for walls are boards made from wood fiber by dry pressing of wood chips. The construction material is different medium density, and to give it high degree For strength, sawdust is mixed with urea resins and processed using high temperature and significant pressure. Finally, the MDF panel is further processed to obtain aesthetic appeal.
Features and Benefits
MDF for walls is prepared using the same technology, but the finish of their surface is always different, in this regard, several types of these panels for walls can be distinguished:
- created using as decorative finishing coverings from natural veneer. The products are distinguished not only by their excellent strength and reliability, but also by their high price.
- panels are the most popular and in demand of all types of material. To create these panels, pasting with melamine film is used. This allows you to imitate the structure of natural wood, which is so popular when decorating the walls of a room. For improvement appearance The slabs are covered with a high-gloss film.
- Technical and office premises, workshops and garages are finished using painted MDF panels. In this case decorative coating is a layer of paint. On such models there is no imitation of the tree structure.
MDF panels have improved technical characteristics. When creating them, the manufacturer does not use harmful resins rich in phenol.
After grinding and processing the wood chips, the resulting dust is treated under high temperature in special ovens. The process lasts until lignin is released, which ensures the gluing of the raw material.

The main advantages of the MDF panel are:
- attractive price;
- possibility of use both for leveling the surface of walls and for decoration;
- ease of installation without the help of a qualified specialist;
- strength;
- reliability;
- resistance to mechanical damage;
- ease of care.
There are several ways to attach MDF wall panels during work related to decorating the surface of walls indoors. One of them requires the assembly of a frame and sheathing, while the other requires a special adhesive for wall panels.
Frame mounting
To assemble a high-quality frame and sheathing, wooden blocks or metal profiles are used. Both structures are required for fastening decorative material when registering residential and office premises. The methods of attaching panels to the frame allow not only to visually change the internal space, but also to hide certain defects found on the surface of the walls. When choosing how to mount, you need to take into account the degree of unevenness of the base. Significant flaws in the form of voids, dips or bumps can be corrected with the help of a high-quality frame and sheathing.
Fastening the wall panels to the frame is necessary during work related to leveling the surface. In rooms with high humidity For the construction of the frame, only a metal profile is used. The construction of the sheathing allows for installation additional insulation. Frame for fastening panels with your own hands in dry and warm room assembled from wooden beams: prepared wood (bars with a section of 30x40) must be installed and secured strictly vertically along the entire perimeter of the room.
The very first (starting) profile is attached directly to the floor, the second - to the ceiling. Having installed horizontal profiles along the entire perimeter of the room, proceed to attaching vertical guides. The distance between the bars does not exceed 60 cm. This is due to the fact that the dimensions of the MDF panels are as follows:
- width ranges from 153 to 200 mm;
- the length depends on which company is the manufacturer; this parameter reaches from 2 to 2.6 m;
- thickness from 5 to 14 mm.

Installation Features
Installation of MDF panels, metal profiles or bars begins from any corner of the room by laying individual elements vertically or horizontally. If it is necessary to create additional noise or heat insulation, insulation boards are placed between the lathing slats.
The distance between the slats in this case depends on the parameters of the thermal insulation material used. It is 2-3 cm smaller than the width of the insulation, which allows the mineral wool slabs to be tightly laid.
Each MDF panel is equipped with a special groove for installing clamps and fastening to the frame. The frame itself is fixed using “crabs” and brackets. Fastening MDF panels to the wall cannot be called complex process, if the structure frame is assembled correctly and strictly according to the level.
When creating the sheathing, it is important to remember that the fastening elements (screws), or rather their length, are selected taking into account the thickness and height of the bar or profile. The self-tapping screw must be embedded into the wall to a depth of at least 40 mm.
Before constructing the frame, you need to determine the highest point on the wall surface and set the vertical and horizontal from this value. All work is carried out under the constant supervision of a building level equipped with a spirit level. It is necessary to check not only the horizontal and vertical, but also both diagonals on each wall being sheathed.
The dimensions of MDF panels are of great importance when it is decided to attach them to the wall using a frame, and when performing work using a special adhesive composition, certain types of panels are chosen.
It is more difficult than covering a correctly assembled frame with such panels.
Glue mounting
Before attaching MDF panels to the wall, you must:
- Clean the surface from any dirt, dust, remnants of old coating in the form of paint, wallpaper or cracked plaster.
- All areas to be restored must be plastered again.
- After the solution has completely dried, prime the wall for maximum adhesion.
Knowing how to attach MDF panels to the wall, you can complete all the work in the most short term. It is necessary that the surface is not only carefully prepared, but also absolutely flat. MDF panels must be glued to the wall in such a way as to ensure complete adhesion and avoid air getting under the components of the structure.

If tiled or ceramic tile glued to the walls in one motion and cannot be dismantled and re-glued, the peculiarity of the process of gluing MDF panels is that the future cladding cannot be glued immediately. It must be pressed against the wall, held for a few seconds and torn off. After this, let the glue dry slightly and re-attach the panel to the wall surface. You can glue MDF only by applying significant force when pressing the panel.
If the wall surface is prepared incorrectly or poorly for gluing MDF panels, the fixation will not be strong and durable.
Panels with applied to their surface adhesive composition must be laid on a clean, dry, absolutely flat and smooth wall. The quality of the cladding also depends on how correctly the first panel was glued. It must be secured in strict accordance with the vertical mark made using a plumb line or laser level level.
The final stage is the installation of plugs and other decorative elements. The inner corners are fixed with glue. Its color is selected exactly to match the finishing material and applied with a thin snake, trying to avoid the appearance of excess on the panels after pressing the corner.
You can study all stages of the work in detail by watching the video.
Interior decoration using MDF wall panels is very popular due to the many positive qualities which this finishing material has. This is not only an opportunity to perform all manipulations without involving qualified specialists, but also increase the strength and reliability of the structure. MDF wall panels allow you to change the interior space of a room, giving it attractiveness and increasing its aesthetics.
MDF panels are widely popular in the field of interior design. Consumer interest in this finishing material is explained by its low cost, excellent decorative qualities and environmental friendliness. Another important advantage is that wall cladding with MDF panels does not require any special construction knowledge and skills, therefore, it is possible to save on services professional craftsmen. All work can be easily done with your own hands, you just need to show basic care and prepare necessary set tools.
Purchase of finishing materials and additional elements
Before purchasing panels, it is necessary to take measurements of the room that will be finished. When selecting material, you should focus not only on the squaring of the surfaces, but also on the dimensions of the panels themselves, taking into account possible waste. Also count the number of external and internal corners indoors to purchase special finishing corners that match the color of the selected panels.
The finishing corners are thin MDF strips pressed with protective and decorative film. Folding lengthwise, they form an internal or outside corner any radius. Finishing with applied laminated corners allows you to hide corner connections panels and give a finished look to the room.
Besides finishing materials it is also necessary to acquire wooden slats or special metal profiles for installation of sheathing. The choice of these materials will depend on the layout of the room itself.
Sheathing internal partition walls is carried out without additional insulation, so wooden blocks of 50x40 mm are quite suitable for lathing. If you plan to finish the external walls, then it is more advisable to purchase metal CD and UD profiles or 40x40 timber, which will create space for placing heat-insulating material in the gap between the wall and the panels. If profiles are used, special U-shaped brackets will also be needed.
The number of elements for the sheathing is calculated based on the fact that the distance between them should be on average 0.4-0.5 m. In addition, you need to stock up on self-tapping screws of the appropriate length for installing the sheathing, as well as self-tapping screws, clamps or staples (if the sheathing is wooden) for fastening panel strips. You will also need socket boxes ( mounting boxes for drywall), if there is a need to install a switch or socket, and glue for decorative corners (for example, liquid nails).
However, all these additional elements may not be needed if interior walls have a perfectly flat surface and are not expected to dismantle the panels after a short period of time. In this case, their installation can be done simply by gluing. Liquid mounting nails are perfect for this purpose.
A set of tools for covering walls with MDF panels with your own hands
- screwdriver or Phillips screwdriver (for self-tapping screws);
- perforator (for making holes in concrete walls) or drill (for plaster, wood, brick and other walls);
- bench square (for precise marking of corners);
- sawing tool for MDF panels and slats: a jigsaw (with a fine wood file), a hand-held electric circular saw or a regular hand saw with fine teeth (you can use a hacksaw for metal);
- grinder or metal scissors (for cutting metal profiles);
- any type of building level or homemade plumb line for correct vertical installation panels;
- furniture stapler (if necessary).
Installation technology
MDF panels are rigid strips of a certain thickness, width and length, having locking connections. Using of this material It is impossible to make radius bends. They can only cover flat surfaces (walls, ceilings, slopes).
If you install the panels yourself on the lathing, no special preparation of the walls is required, i.e. clear them of old paint, no plaster or wallpaper needed.
Manufacturing of sheathing
Initially, you need to determine the so-called control point. To do this, you need to examine the wall for protruding areas. The most prominent place will play a role starting point, focusing on which, the sheathing elements are fixed to the level.
Depending on the design idea, panel strips can be positioned vertically, horizontally or diagonally, and the installation of slats or profiles is carried out in a direction perpendicular to the panels.

The slats or beams are attached in increments of 40-50 cm. It is not recommended to increase the distance between them, because the structure will lose rigidity and may bend. If there are differences in height on the surface, use pads required thickness to level out depressions.
 Properly made metal frame
 The technology for arranging lathing from profiles is somewhat different from the “wooden” version. In this case, a frame of UD profiles is initially installed along the perimeter of each wall. The distance from the wall surface should correspond to the thickness of the insulation. Then the locations of the transverse CD profiles are marked. U-shaped brackets are attached along the marking line with a pitch of approximately 40 cm. CD profiles are inserted into the starting UD profiles, after which they are fixed with brackets using metal screws.
Paneling
If the project provided for thermal insulation of the wall, then immediately between the sheathing elements, strips of insulation are laid and secured. Along the way, electrical cables are laid inside the structure and taken out beyond the sheathing, so that after installing the panels, their length allows for connecting sockets or switches.
Installation of panels starts from the corner and continues along the surface of the wall. Each previous strip is carefully attached to the sheathing pieces through the tongue groove, after which the next panel is inserted into the lock. If the last strip does not fit entirely in width, it will have to be cut. Fastening is done along the edge, so that later the fastening elements can hide the decorative corner.

In the places where sockets and switches will be located, as the work progresses, holes are made using a special attachment on a drill, into which the wires are routed.
Several methods are used to attach panels to the sheathing:

Finishing the room with MDF panels using glue method carried out by dotted or zigzag application of special glue over the entire area of the strip. Before gluing the panels, the walls must be treated with a deep-penetrating primer and allowed to dry. A few seconds after applying the glue, the strip is carefully pressed and fixed to the wall.

All the technologies described above are also applicable for the construction of slopes. If the slopes are small, then it will be enough to build a sheathing frame around the perimeter, without transverse elements.
On last stage the external and internal corners of the room are finished with finishing decorative corners, for the fixation of which glue is used. Corners can also be placed around the perimeter of the ceiling instead of a ceiling frieze.
At the locations of electrical points, special boxes are installed and sockets or switches are installed.