Finishing a bath: choice of material and principle of operation. Finishing a bathhouse: choosing the best materials for the steam room, washing room and changing room How to decorate a bathhouse inside and out
Construction of a bathhouse is a rather complex undertaking, since the owner has to solve many issues. Among them - how to line a bathhouse from the inside. Its solution must be approached with all seriousness, since there are many various materials for plating. Moreover, attention should be paid not only to the appearance of the material, but also to its quality characteristics.
Don’t forget about cost - the material you choose must have the optimal price-quality ratio. Most owners believe that it is almost impossible to find such material, however, this is not so. There are certain nuances, knowing which you can easily solve this problem.
It should be said that for finishing the steam room Almost any material is suitable. However, it must meet certain requirements - be moisture resistant, have a low level of thermal conductivity, be resistant to rotting and be easy to restore. To date, everyone necessary characteristics have wood products. Among them, the most famous are lining, panels, boards, planks and slats. And the buyer only needs to select the type of material. To make the right decision, you need to take into account, in addition to cost, the water-repellent characteristics and service life of the material.
Which tree to choose for a bathhouse?
Oak
The best option finishing material The steam room is made of oak wood. It has all the characteristics that allow you to create optimal conditions for long-term and high-quality operation of the bath. Oak panels not only look attractive, but also have many other useful qualities:

The last moment takes on special meaning in light of the fact that this helps maintain fresh air in the steam room.
To a person who is used to accept bath procedures at high temperatures, it is worth choosing oak, because under such operating conditions this tree releases useful phytoncides that have antiseptic properties. This will save the owner from the need to buy special fragrances for the room. But we should not forget about the naturalness of the wood, thanks to which it is possible to maintain the national style without additional processing. Although this finishing option is not available to all owners due to its high cost.
Linden
You can also choose linden to decorate the steam room. According to experts, this is an excellent option. This is due to the ability of wood to emit a wonderful aroma that no person can remain indifferent to. It is impossible not to mention the appearance of linden boards, the use of which to decorate a steam room will make the room more elegant.
Among other advantages that this type of wood has, the low level of thermal conductivity should be highlighted. This means that in a steam room trimmed with linden wood, the surface heats up very little, so even if you have been heating the bathhouse for several hours, you can touch the walls without fear and will not get burned. Linden also attracts attention with its natural texture, and it does not lose its original color even in extreme conditions operation.
Aspen
Our ancestors also used aspen to decorate the bathhouse. There was a belief that this tree has magical properties , giving a person protection from the negative effects of otherworldly forces. At the same time, it has many positive qualitative characteristics, which makes it excellent option for the steam room. If you initially decided to build a bathhouse on your own, then you should not give up aspen. After all, this is one of the few materials that does not create processing problems.
 If you wish, you can make wide boards from it rough work or wooden slats, from which you can create a pattern of any complexity. Aspen wood has low level thermal conductivity. This is also an additional reason to use it to decorate the bath. One cannot help but mention the soft, pleasant aroma emitted by this tree, which allows you to maintain a fragrant atmosphere in the room.
Experienced builders value aspen for its ability to resist drying out and cracking. But the material does not have a long service life, and quite soon it loses its original color and begins to turn black. However, according to experts, this problem can be easily solved if you treat the inside of the walls with a special compound.
Alder
For finishing the steam room inside you can use alder boards. It can be recommended due to the presence of tannins in the composition. The steam room can be sheathed with wide boards, having first removed upper layer. This will help them look more aesthetically pleasing. This material is worth paying attention to if your financial capabilities are limited and you cannot purchase oak wood.
In this situation, alder will help you out, because this the material is impervious to mold and other unpleasant formations. Therefore, even many years after finishing the bath, you can be sure that no foreign stains will appear on the walls of the bath. Fever alder benefits - it begins to secrete special substances that help improve hemostatic processes and fight inflammation.
Important advantage of alder wood is its ease of processing. Therefore, it should be chosen primarily by those owners who plan to build a bathhouse on their own.
Cedar
As a finishing material for cladding interior walls You can use cedar for steam rooms. From time immemorial it has been used for these purposes, and this choice is determined not only by its quality characteristics but also attractive appearance. Although it should not be used specifically for a steam room.
Experts recommend use cedar wood for finishing a washing room or rest room. For this you will need smooth boards standard sizes. Then the room will look strict, but at the same time will delight you with its elegance. With the help of cedar you can get walls with a smooth and beautiful surface, which, among other things, will emit a pleasant aroma. In such conditions, you can quickly achieve the effect of relaxation and have a wonderful rest. But, like oak, cedar wood is quite expensive. And most often it is chosen for covering premium steam rooms.
Larch

In the case when finishing the steam room and other premises requirements for increased strength are required, most often choose larch. This type of wood is in demand not only because of its optimal thermal conductivity, but also because of its beautiful and noble appearance. It successfully withstands any humidity, in conditions not high temperatures begins to emit a pleasant smell.
Among the shortcomings It is worth noting the difficulty in processing, therefore, it is not recommended to use it for finishing without the skills. But if you want to see larch in the design of your bathhouse, then panels made from this species are perfect for you. After all, you can make them even without special skills.
Pine
Pine also is a popular material, which is used for lining the steam room. Given its natural appearance, it can easily decorate the walls of a steam room. In addition to this, with her presence she will create a pleasant atmosphere, releasing an amazing aroma. Although it is not recommended to use it for a steam room, since over time it releases resins that have high degree viscosity This can create a hazardous situation as the surfaces heat up quickly.
Therefore, if you accidentally touch the walls of the steam room, trimmed with pine, you will most likely get burned. This also explains the recommendation of experts to refrain from using spruce wood for cladding the steam room. It is best used for washing area cladding. Considering the ease of processing, you can make a wide variety of products from it.
Other materials for bath lining
Most often, owners use clapboard to cover the walls of a bathhouse, although there are other options besides it. It can be:
- planks;
- boards;
- planks;
- synthetic materials.
 Sometimes, when for some reason the owner is unwilling or unwilling use the most popular materials, he can line the interior walls of the bathhouse with foil. But if it is important to you that such important stage If the cladding of the internal walls was carried out according to all the rules, then you should follow the recommendations of professionals.
Actually foil used for bath lining for more than a decade now. Owners who are supporters of this material say that they chose foil for a reason, because with its help you can reduce heat loss, and this is a serious cost savings. If you decide to simply cover the room with foil before installing the lining or other material, then desired effect you won't achieve it. Therefore, even if there is a layer of foil on the walls, you will not achieve a heat-saving effect.
Other owners who choosing foil for lining the bath, explain their choice by the material’s ability to perfectly isolate steam. It is impossible to argue with this, but here a serious drawback of foil appears - it blocks access to air molecules. This situation becomes dangerous for people in the steam room, who may suffocate. As a result, they deprive themselves of the opportunity to fully enjoy bath procedures.
As additional reason, which explains why you should not use foil to decorate the interior walls of a bathhouse, it is worth mentioning the presence of harmful substances in the composition:

If you wish, you can skip the foil and use synthetic substitutes, having such a perfect execution that in terms of their properties they can compete on equal terms with wood.
But you should take into account that their cost may be higher than foil, and you cannot be 100% sure of their safety.
Conclusion
Covering the interior walls of a bathhouse is no less important a process than construction. Correct choice of material for wall decoration- guarantee that most of The heat will remain in the room and will not escape outside. Although there are plenty of options for lining the inside of a bathhouse, most often owners choose wood, and, above all, lining. However, many owners are trying in every possible way to save money and find more affordable and no less efficient materials for plating, so foil is often used. However, here you need to remember that price should not come at the expense of quality. You can even use synthetic materials, as long as they are not harmful to health.
The story of something so simple, but the required invention, like a bathhouse, goes back to the distant, distant years, but even today, this building practically does not lose its relevance. A shower and bath cannot completely replace a bathhouse, because in it you can not only get rid of dirt, but also improve your health. Usually a bathhouse consists of a dressing room, a sink and a steam room, but the last two points are often combined.
When building each of these rooms, it is necessary to decide how best to line the bathhouse from the inside, because the air temperature in the room will depend on this, as well as the amount of fuel needed to heat it. In this article we will talk about all the most popular and reliable options lining the bathhouse from the inside.
Briefly about the purpose of the cladding
Having built a bathhouse from cheaper materials, you will have to think about choosing a cladding material.

First of all, you need to mention the main characteristics that the selected material should have:
- It must withstand high temperatures and be non-flammable;
- Steam and moisture resistance are also necessary indicators;
- It is advisable to choose natural materials without harmful chemical treatments, so as not to harm your health with harmful fumes.
Speaking specifically about what can be used to line the inside of a bathhouse, it is worth mentioning lining, block house and magnolite. Of the three options presented, choosing one can also be difficult, so below we will talk in detail about each of them.
Bath lining
Lining is the most popular material for lining a bathhouse, because it combines all the most necessary qualities: reliability, beauty and reasonable price.

The lining also has a number of useful properties:
- Lining allows you to save a large number of fuel, reducing heat consumption;
- Behind it you can hide various communications, increasing the level of comfort indoors;
- The lining is resistant to moisture and steam; in addition, it is able to regulate the level of moisture in the steam room and allows the walls of the bath to “breathe”.
- Longevity and resistance to the formation of fungus and mold are also important properties that this material.

It is also worth paying attention to the wood from which the lining is made:
- Most best option for the steam room it’s linden, because when heated it releases essential oils, which have a disinfectant and anti-inflammatory effect. Another advantage of this wood is its low thermal conductivity, which helps protect the skin and Airways from burns, while increasing sweating.
- Aspen is a worthy alternative lipa. The price of aspen lining is quite low, and the material itself is resistant to moisture and rotting processes. Warming up, aspen promotes health person.
- It is recommended to use larch in the shower, because it has high strength and resistance to water. Larch lining has a positive effect on well-being and helps improve immunity.
- The steam room can also be finished with white acacia lining. Acacia - very durable wood, so products made from it last a very long time. The only disadvantage of this wood is the high price.
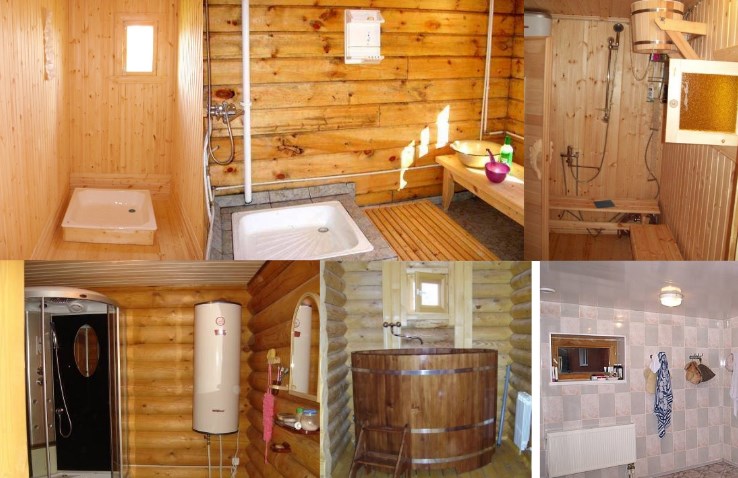
You can see an example of such cladding in the photo.
Block house for a bathhouse
If you cannot decide what to cover the inside of the steam room with besides the lining, then think about the block house, because it has similar qualities, but a different appearance. The block house has a semi-oval shape, so walls made of this material look like a log house, which gives “historical naturalness” to your bathhouse. Durability and resistance to various influences near a block house are quite high, but it is recommended to carry out bactericidal treatment once a year.

Block houses are classified by quality:
- Class "C" material undergoes only surface treatment; various defects may be present on its surface, for example, cracks or chips. This material is not recommended for installation in a bathhouse;
- Block house class "B" It is of average quality and is extremely rarely used for finishing baths. On its surface there may be small cracks and knots no more than 3 cm;
- On the surface of class "A" material you will not find any flaws, with the exception of small knots. This option is great for a bath.
- « Extra" class has perfect processing, and its surface is free of any imperfections. Ideal for finishing baths, but also has a fairly high price.
The block house is made from various types of wood, but only hardwood and coniferous materials are suitable for the bathhouse. Remember that using spruce and pine is highly discouraged, because you can burn your skin on their heated surface.
Magelan
This is modern, however, not the best material for lining a bathhouse on the construction market.

If you are thinking about how to cover the inside of the dressing room other than lining, then you can undoubtedly resort to this option; in addition, it is perfect for other rooms due to its qualities:
- It is completely unaffected by moisture and rotting processes;
- High temperature, as well as temperature changes, do not harm this material;
- Magnelite sheets are quite easy to install.
This covering is made from the following materials: fine wood shavings, magnesium and other non-natural components, which are reinforced with glass mesh. By making the lining of a bathhouse from such material, you reduce the environmental component of the room.
Conclusion
Now you are familiar with all the options internal lining baths and you can decide for yourself how to line the inside of the sauna, starting from own desires and financial situation.
Log, concrete, frame or brick bath in any case, it requires hydro-, heat- and vapor barrier, as well as internal lining. Traditionally selected wooden lining. It has an aesthetic appearance, is safe for health, and is easy to install and operate. But the modern construction market offers other solutions.
As a rule, if the budget is sufficient, the steam room is sheathed solid wood– aspen, linden, oak or cedar lining. To save money, you can use pine materials, but in this case you need to check the boards for the absence of “resin pockets”.
What to use besides lining? More cheap option– cladding with edged or unedged linden, aspen and birch boards. The tree must be prepared for installation: remove the bark, sand the surface and open it with water-based varnish or special biocides.
How to inexpensively cover the inside of a bathhouse? For brick building can be used planed board, it is more affordable, does not require lengthy preparation for installation and provides greater thermal insulation. The thickness of the material is 1.5 times greater than standard lining.
Foil, parchment, jute, cotton wool, and foamed foil polypropylene are used as thermal insulation materials. The area near the stove is tiled.

The ceiling, in addition to the lining, can be finished with hardened frosted glass. A backlight is installed in it. The result is a rather non-standard, but modern steam room.

Heat-resistant tiles are laid on the floor. Clinker perfectly withstands high temperatures, has anti-slip coating and completely safe. But if you want maximum comfort, it's better to choose wood flooring, alder, ash, birch or poplar are quite suitable.

If the bathhouse was built from logs, the ceiling and walls inside do not require any cladding. It is enough to treat the log house with a fire-retardant, moisture-repellent and antimicrobial agent.
What material you should not choose for cladding is plastic, plywood, OSB, chipboard and any sawdust-based derivatives. Even with moisture-resistant coatings, when heated, the resin and synthetics that form the basis of the binder will begin to evaporate. And this is already potentially dangerous for the body. The same applies to pine and spruce boards; they cannot be used in the steam room.
Bathroom trim
Which the material is suitable for lining a bathroom or washing area - tiles or porcelain tiles. Unlike wood, ceramics will not require constant treatment with moisture-protective and bactericidal agents.
Glass-magnesite boards are no less popular. This is a durable, moisture-resistant, non-flammable, non-toxic material that is not susceptible to the development of fungus or mold.
You can also use decorative moisture-resistant plaster for walls and ceilings, plastic panels, drywall and glass magnesite followed by the application of waterproof solutions. PVC, slatted pebbles and fiberboard are also allowed. However, it is necessary to take care of complete thermal insulation of the steam room.
In addition to tiles, you can lay moisture-resistant laminate or panels based on composite plastic on the floor. But tiles will be more practical and durable. Wooden shields are placed on top of it to prevent slipping. What interior to create in the washing room in the photo below.
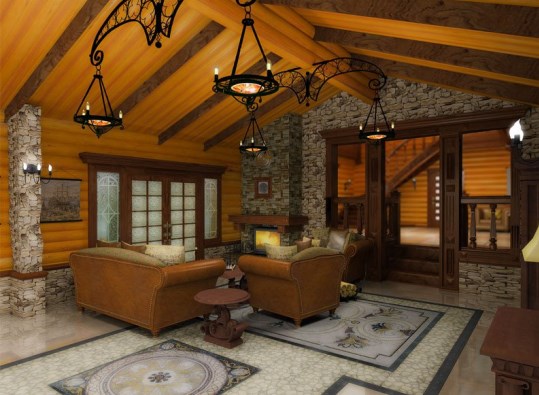
Arrangement of the rest room
The main thing here is not practicality, but comfort, a relaxing atmosphere, and ergonomic design. Most affordable way– cover the room with pine boards. They do not rot, dry quickly, have beautiful view. Based on the durability of the material, it is better to choose boards made from Scandinavian pine. A pleasant light pink shade will eventually become covered with an original patina and will give the room even more coziness.

Spruce lining can also be classified as an inexpensive and high-quality finishing material. Thanks to the Swedish and Finnish technologies treatment with hot air, the boards acquire the necessary strength and moisture resistance. There is less resin in spruce than in pine, it is more fragrant, and small knots (which are inevitable) easily turn into the individuality of the interior.
From budget materials For a relaxation room, laminated, polyvinyl chloride MDF panels, quartz vinyl tiles, fiberglass wallpaper, decorative plaster, tiles with a stone, brick or wood pattern. In general, everything will depend on the imagination of the owners and the style in which the room is intended to be decorated.
There are also compositions (two-component paints) that completely imitate wood on any surface (mineral, old wood). The inside of a brick or concrete-block bathhouse is finished with OSB or gypsum board panels, primed and puttied. Then paint is applied.
Since there is no increased temperature and humidity in the recreation room, linoleum flooring, tiles, edged boards or chipboard followed by varnishing can be used for the floors.


It is cheaper to stick fiberglass wallpaper on the ceiling or simply cover it with paintable panels.
But, if you still want to make a bathhouse not only a place of relaxation, but also a place of healing, the use of wood cannot be avoided. You simply select varieties of inexpensive wood: birch, alder, poplar, aspen, pine. And for areas with increased workload you can use oak, cedar and linden.
If the bathhouse will be in use all year round, it is better to install heated floors in the relaxation room, and the walls should be well thermally insulated before covering.
The market for finishing materials today is truly huge, but for the interior of a bathhouse, where humidity is always high and temperatures are high, there are restrictions on the use of cladding. It is quite natural that you cannot use materials here that, when exposed to high temperatures, will release substances harmful to health: plastics, chipboards and others. That's probably why for interior decoration people's favorite wood is widely and widely used in baths different breeds– a natural, affordable and easy-to-work finishing material.
Although, if the bathhouse is built from timber or logs that look great interior spaces appropriate and natural, the bathhouse does not need to be lined with anything from the inside at all. After all, with proper adherence to all construction technologies, one can rack their brains about additional insulation the owner won't have to. Although in this case, it is quite possible to line the inside of the bathhouse with clapboard - this is the most common and beloved cladding. Lining is the name given to carefully dried and planed boards made from wood of different species.
Let's take a closer look at the features of different types of wood so that you can choose and buy the most suitable lining option for finishing your bathhouse.
In this video, a professional team is covering a sauna with clapboard:
Which tree is better to choose?
When choosing what to cover the inside of a bathhouse with, consider the conditions under which the lining will be used: for finishing a steam room, some species will be the best, for a relaxation room - others, and for a washing room - still others.
The clear leader is linden, especially when used for steam rooms. Charging human body positive energy, when heated, it releases various essential oils with anti-inflammatory and bactericidal effects, helping to improve health and enhance the diaphoretic effect. And it smells just wonderful. In addition, linden does not burn the skin and does not heat up much due to its low thermal conductivity.
Aspen, also, is very pleasant to the touch, and is useful for health, drawing out negative emotions and various ailments from the body. It does not rot, even in constant contact with water, and is quite soft, so it is easy to cut without breaking. The price of aspen lining is much lower than linden.

Larch is a conifer that produces many phytoncides and has a positive effect on a person’s well-being and the body’s resistance to various infectious diseases. This material would be great for decorating shower walls. And larch floors are reliable and durable material, only become stronger over time. In addition, no wood beetles or rodents are afraid of this wood.
Hard, very hot wood species - oak and ash - are resistant to rotting, moisture and temperature. Due to the fact that this wood does not deform, barrels, fonts and doors are made from it. Oak wood darkens over time, which only decorates products made from it. Ash, lighter than oak, can still rot under conditions of high temperatures and humidity, so it is subjected to special treatment and used in finishing the interiors of bathhouses, in the manufacture of doors, furniture, stairs, railings or parquet.
The most durable of the hardwoods discussed here tree species– white acacia. It surpasses even oak in strength and is resistant to rotting, so products made from it are not deformed and almost do not break. These products are distinguished by their particular durability and wear resistance, which allows the use of acacia in bathhouse areas with the highest humidity - for doors and steam room floors. Acacia boards darken under the influence of temperature and time, acquiring deep, beautiful shades.
This beautiful, reliable and natural material Baths and saunas, loggias and balconies, walls and facades of houses are now covered with wood. In appearance, a block house is similar to a log, surpassing it in strength many times over. After undergoing special drying, this material reaches a humidity of no more than 12%, so when installing this board, you don’t have to worry that it will dry out or become deformed.

The internal lining of the walls of the bathhouse is made with a block house of deciduous or coniferous species. Since denser conifers have greater heat transfer, it is not recommended to decorate the steam room with spruce or pine materials, because leaning against a pine wall in high temperatures can cause a burn. But lovers of specific pine aroma in a steam room, a block house made of cedar is often chosen for its cladding - over time, its resin ceases to stand out from this material.
Glass-magnesium sheet (VMS) MAGELAN
Market under the MAGELAN brand building materials Since 2007, innovative, highly functional and reliable glass-magnesium sheet - SML - also called “magnelite” has been rapidly gaining ground.
LSU is made on the basis of magnesium chloride and oxide, finely dispersed wood shavings and other binding components, reinforced on both sides with a fiberglass mesh with a cell diameter depending on the purpose and class of the material.

This material has many advantages:
- Magnelite – environmentally friendly pure material, which lacks such harmful substances, such as resins, asbestos, adhesives and phenols. Odorless, it does not emit toxic substances even at high temperatures.
- LSU has high fire resistance, withstanding open fire And significant differences temperatures and preventing fires.
- The high moisture-resistant characteristics of magnetite make it possible to successfully use this material in areas of high humidity - swimming pools, saunas, showers. With prolonged exposure to water, LSU does not soften or deform.
- The antiseptic properties of LSU prevent the formation of fungi and mold, which again allows it to be used in rooms with high humidity.
- This material is light and easy to process; it can be installed quite quickly and does not require any special devices or tools.
- On the front side of the LSU it is possible to use any decorative and finishing materials, which gives unlimited possibilities in interior decoration.
- MAGELAN is also distinguished by its high soundproofing properties, its surface is not electrified, excluding the formation of sparks - these qualities of the material allow it to be used in the production of structures for various special purposes.
The best way to decorate the inside of a bathhouse is for everyone to decide for themselves. But the accessories, shelves and loungers in the steam room are, of course, made of traditional wood.
We told you about the most preferred materials in finishing the bath, starting from traditional wood and ending with modern MAGELAN material, and we hope that we were able to greatly facilitate the process of choosing a material for the interior decoration of the bath.
What kind of materials are used for the construction of baths - bricks, foam concrete and gas silicate blocks and much more. But only a tree can create that unique microclimate that will have a beneficial effect on the well-being of visitors to the steam room. And it’s much more pleasant and familiar to the eye wooden panels. And even if the bathhouse is built of wood concrete, stone or other similar material, nothing will stop you from covering the inner surfaces of the walls and ceilings with wooden clapboard yourself.
Lining as a product was first used for covering the walls of carriages. This is where its name comes from. Difference from simple edged boards consisted of the presence of grooves along the long sides of the lining, due to which maximum contact between adjacent panels was ensured. The sheathed wall was without cracks or gaps, smooth and quite beautiful in appearance.


Along with technological progress, production has also stepped forward. different types linings. Today it is produced in several versions of the profiles themselves, which differ in size, quality, and material of manufacture.
Note! You can find plastic lining on sale, but such panels are only suitable for lining the dressing room and dressing room in a bathhouse. Plastic does not withstand high temperatures and is not suitable for finishing a steam room. Wooden products, in turn, regulate the level of humidity by absorbing or evaporating water from their surfaces, and some types of wood additionally release aromatic components that have a beneficial effect on respiratory system person.
Choosing lining for cladding

Wood paneling can be regular or euro. The first has roughness and lint on its surface, the second is perfectly smooth. On the back side of the eurolining there is ventilation ducts, which prevent the accumulation of moisture (condensation) and relieve stress in the material. According to , humidity wooden products allowed within 12±3%, however, ordinary lining can be made from wood with a moisture content of up to 25%, which can lead to deformation during operation of the bathhouse. Based on this, we will choose a suitable wooden eurolining for lining the bathhouse.
Prices for wooden lining
wooden lining
Marking and technical requirements
The lining is made from coniferous and deciduous wood. Best options for the steam room - aspen, linden, cedar, spruce, alder, oak, pine.
| Wood | Color | Properties | Photo |
|---|---|---|---|
| Aspen | White, acquires a silvery tint. The yellow growth rings are barely visible. | Lightweight, withstands high humidity and temperature well. Over time, it hardens so much that it is difficult to even hammer a nail into an aspen panel. Does not emit resin, does not heat up. |
|
| Linden | Light, brown, less often reddish shades. There is a matte shine. | The fibers are homogeneous, the surface heats up little, and in the steam room it releases aromatic components that are beneficial to health. When in contact with linden wood in a humid environment, the iron oxidizes and rusts, and streaks appear. |
|
| Linden Canadian or Siberian cedar | Brown with a pink tint. | One of the most expensive and healthy wood species. Does not rot, withstands mechanical loads well, does not crack. |
|
| Beige, brown with red shades. It gets darker with time. Expressed drawing tree rings and resin channels. | Good mechanical properties, viscosity, warping is moderate. Does not cause difficulties during processing. It releases resin when heated, so it is not used for covering those surfaces in the steam room with which tactile contact is possible. It is not suitable for covering the ceiling of a steam room or it requires repeated heating of the steam room followed by removal of the resin that has emerged (repeat the procedure until all the resin comes out of the lining). For a bathhouse, it is better to choose Extra-class pine lining. |
|


The following table shows the classes and their descriptions. It is worth knowing that wood with a large number of knots heats up faster and can burn. The markings are the same for all types of wooden lining.
| Class or grade | Description |
|---|---|
| Extra | Free from cracks, knots and other defects. The surface is perfectly smooth and even. |
| A or 1 | The surface is smooth or slightly rough. There is 1 healthy knot per 1 linear meter (knot diameter no more than 1.5 cm). There may be cracks: hairline - no more than ½ panel long, non-through cracks - less than 9.5 cm long (the crack exit is directed towards the end of the panel) that appear when drying - no more than the width of the panel. There may be tars and resin pockets of 2 pcs. by 1 m.p. |
| B or 2 | There are many knots, of which no more than 2 can fall out. by 1 m.p. There may be through cracks up to 1 mm wide and up to 15-30 cm long; hairline cracks are allowed along the entire length of the board. The presence of wormholes (3 pieces per 1 m.p.) and rot (no more than 1/10 of the panel) is allowed. Grade B lining is suitable for painting. |
| C or 3 | The quality is low. A lot of various defects. This lining is suitable for upholstery of technical rooms or rough work. |


The standards for defects according to GOST are shown in the table below.


All that remains is to choose the profile of the lining, because... each has its own installation nuances.
| Profile | Description | Scheme |
|---|---|---|
| Standard | Similar to classic lining"a quarter of the board." It has a tongue-and-groove connection, with the tongue being shorter than the groove to prevent deformation. |
|
| Calm or Kolkhoz Woman | It differs from the previous one in its rounded edges and the presence of back side channels to prevent condensation accumulation. |
|
| Manufactured according to DIN 68126 standard. Has an extended tenon. After installing the lining, the wall surface is ribbed. |
|
|
| Soft-line or soft line is a symbiosis of Euro and Shtil lining. Soft rounded corners, elongated tenon, relief texture of the wall after assembling the panels. |
|
|
| Used for finishing external walls and premises. Stylized as a rounded log. There is a tongue-and-groove connection, the front side is usually rounded, and the back side is flat or with channels for ventilation. |
|


Video - How to choose lining
Calculate the area of the internal lining
For example, let’s take a 3x3 meter bathhouse with a ceiling height of 2.5 meters. Sheathing will be done on all walls and ceiling; the floor is not taken into account in the calculations.
Suppose there are two rooms in the bathhouse - a 2x3 meter steam room and a 1x3 meter hallway. We calculate the area of the steam room lining.
- Ceiling area: 2x3=6 m2.
- Area of the long wall: 3x2.5=7.5 m2.
- Short wall area: 2x2.5=5 m2.
- Total area of the room: 6 (ceiling) + 7.5 (first long wall) + 7.5 (second long wall) +5 (first short wall) +5 (second short wall) = 31 m 2.
We calculate the area of the hallway paneling.
- Ceiling area: 1x3=3 m2.
- Area two long walls: 3x2.5=7.5 m2. 7.5x2=15 m2.
- Area of two short walls: 1x2.5 = 2.5 m2. 2.5x2=5 m2.
- Total area: 3+15+5=23 m2.
The total cladding area will be 31+23=54 square meters. From this figure you should subtract the area of the window and doorways, then add a 15% supply of material for trimming.
The price of lining is indicated for square or linear meters, less often - cubic meters.


You can calculate the difference in price if you find out how many lining strips are needed to cover the inner surface of the bathhouse.
The most popular profile size is as follows:
- panel thickness 12.5 mm;
- panel width 96 mm;
- panel lengths from 2000 to 6000 mm.
The following tables will help you find out how much square meters material in one cubic meter, count the number of packages (1 package = 10 lining panels) and determine the cost of covering the room.


Advice! You should not purchase a lining without packaging (shrink film) - this is a low-quality product that will quickly lose its properties and the sauna lining will have to be completely or partially replaced.

Choosing the method of installing the lining
The lining in the baths is fixed vertically and horizontally. But more rational option for a bath it is horizontal.

Let's consider a number of advantages of this type of fastening:

When constructing and finishing turnkey baths, builders often install the lining vertically, choosing panels that are suitable in height and installing them without trimming. With vertical mounting it is easier to arrange the corners, the work takes a little less time. But saving time often backfires, because if an accidental blow, fallen coal or high humidity If the vertical board is damaged, the entire wall will have to be dismantled.

Installation of lining
Before finishing The walls and ceiling of the bathhouse are insulated. It is best to use mineral (stone) wool or other insulation materials that do not deform when heated and do not emit harmful chemical fumes into the air. A layer of foil vapor barrier must be fixed on top of the insulation. Ruberoid and glassine are not used in the bathhouse. The stove and ventilation system are installed before installing the lining.
Prices for PVC lining
pvc lining
Video - Insulation of bath walls
Video - Ventilation in the steam room
Even if the ceiling is made of wood, you cannot simply nail the lining to it with nails. Let's consider step by step process ceiling trim.
Step 1. Assembling the sheathing on the ceiling
The sheathing will consist of slats with a cross-section from 2x5 cm to 5x5 cm. The slats should be fairly even and dry.

The slats will be fixed on top of the foil, under which there is already a sheathing for insulation. Optimal distance between adjacent slats - from 40 to 60 cm.
Note! It is understood that the sheathing for the insulation was attached using a level and plumb lines, and the result was a horizontal ceiling surface without distortions.
The slats will be located perpendicular to the direction of the lining strips. We attach the first rail at a distance of 10 cm from the wall, using yellow-passivated stainless steel wood screws 7-10 cm long. We screw in the screws every half meter. It is recommended to pre-drill holes in the slats for self-tapping screws to prevent the wood from cracking.
We fasten the second rail strictly parallel to the first at a distance of 45-60 cm. The ends of the slats should be 10 cm from the nearest walls. We continue to work until the last lath of the sheathing is installed. We constantly check the correct fastening of the slats using a stretched fishing line/cord or laser level. If a horizontal deviation is detected, small wooden wedges are placed between the foil and the lath.

In some cases, when you need to do more low ceiling in the bathhouse, metal hangers are used to fasten the lathing.

In this case, first, hangers are fixed to the ceiling using long self-tapping screws (dowels with a diameter of 8 mm and a length of 80 mm are used only for ceilings made of concrete and other dense materials), after which the sheathing beams are horizontally attached to them (self-tapping screws with large threads are used, length 3 .5 cm). It is more convenient to do the work together, so that an assistant holds the other end of the batten and ensures that the sheathing is in the correct position.
It is advisable to impregnate the wooden sheathing with an antiseptic to make it last longer.
Note! You can first assemble the sheathing of the ceiling and walls, and then proceed to install the lining or completely sheathe the ceiling, and then attach slats and wooden panels to the walls.
Step 2. Installation of lining on the ceiling
There is no need to make through holes in the lining and hammer nails into it. This is not only unsightly, but will also lead to corrosion of hardware and the appearance of rust spots on the ceiling.
To fix the lining, you can use either a set of clamps with nails, or staples 38 or 40 mm long. Staples 25 mm long are not used.


Before attaching the first plank, you should cut off the tenon from it. To do this, draw a straight line with a pencil, cut the board lengthwise with an electrocut, and apply it to the future location so that the panel is 1-2 cm away from the walls.

On a note! If you work alone, use supports under the panel. This will make it much easier to hold her.
We fasten the first panel of the lining with self-tapping screws to the sheathing. We maintain a pitch of 50-80 cm, we use only stainless steel screws. If you want to recess the heads of the screws into the thickness of the lining, drill holes for the screws, and then countersink each of them (holes).
Let's consider the method of fastening with clamps. Metal clamps are inserted into the groove of the first board.


Each of them has three holes, into which either the 2 nails included in the kit are driven in, or the bracket is adjusted. The clamps are inserted with a step corresponding to the step of the sheathing, so that the lining is attached to the slats, and not to the foil and insulation.

If instead of clamps they are used staples, then they are aimed at the groove of the lining board at an angle.
When the first board is fixed, the next panel is inserted into its groove with a tenon. To seal the joint, take a wooden “chock”, apply it to the end of the panel and lightly tap along the entire length.


There is another way to seal the connection. You will need a wedge, a clamp and a hammer. We fix the bracket on the batten, insert a wedge between the bracket and the end of the lining, and hit the wide end of the wedge with a hammer.

We continue to sheathe the ceiling, if necessary, cutting out holes for lamps, ceiling ventilation grilles, and other decorative elements.
The last board of the lining may have to be cut lengthwise. We measure the distance from the wall to the last inserted plank, make markings, cut the panel, and insert the part of the board with the tenon into the groove.
To seal the connection, a bracket is useful. We insert it into the gap between the wall and the paneling and tap it with a mallet.

Note! Periodically you need to check the parallelism of the lining boards. It is convenient to use a tape measure for this. We insert the “tab” of the tape measure into the gap between the first panel and the wall, measure the distance to the end of the last panel attached to the ceiling. We repeat the operation on the opposite side of the ceiling, the distance should be the same. That is, if on one side 5 panels nailed to the ceiling have a width of 60 cm, then on the opposite side it should also be 60 cm.

The last board, like the first, is fixed with self-tapping screws.


Video - Installation of lining on the ceiling
Installation of lining on the wall
Step 1. Installation of lathing on the walls
We screw the first rail with self-tapping screws to the very bottom of the wall, at a distance of 1-2 cm from the floor.
We nail the following slats in the corners of the room.

The slats will also run near windows and doors. To make the work go faster (or in the absence of a screwdriver), you can nail the slats with a nailer (suitable for nails up to 65-160 mm long) or a staple gun (staple length for a 20 mm thick slats from 38 to 51 mm), but it is important to drive in nails and staples not perpendicular to the wall, but at an angle (from top to bottom), so that the hardware tightly holds the wood even with its thermal expansion.


After all the vertical slats have been installed, nail the sheathing around the door and window openings, you can proceed to the installation of horizontal slats, the first of which is attached at a distance of 10 cm from the ceiling. The danger of sharp edges breaking through the foil is minimal, so the chamfer can no longer be ground off. Be sure to check the correct position of the installed slats.


For convenience, the distance between the top rail and the floor is divided into equal sections of 40-50 cm, with the resulting step the horizontal bars of the sheathing are attached using 90 or 100 mm self-tapping screws (holes are drilled under them with a drill) or nails.


Note! The lathing described above is suitable for fastening the lining vertically. For horizontal arrangement of strips, the linings are first fastened horizontal slats on the wall, and vertical ones on top of them.
It is worth noting that if the walls of a log house are covered with clapboard, and there are no layers of insulation and foil (for example, in a dressing room), then the sheathing is assembled on aluminum hangers. They are fixed to the logs with self-tapping screws, after which the slats are attached, leaving a gap of 5-10 cm for ventilation.

Step 2. Installation of lining on the walls
If lining boards will be positioned vertically, then we attach the first plank from any of the corners of the room.


It is worth carefully measuring the length of the panels, because between the floor and the wood, as well as between the already sheathed ceiling and the wall wooden planks a gap of 2 cm must be left.
To beautifully decorate the corner, we cut off a tenon from the board. We attach the lining to the sheathing, check the verticality, and screw in the screws.
We insert the second board into the groove of the first panel. We seal the connection with a mallet. Next, we fix it with clamps or staples (the installation method is identical on walls and ceilings, detailed instructions are described above).
If the lining will be located horizontally, installation begins from the ceiling.

We drill holes for the self-tapping screws, place the board on the sheathing (always with the groove down) at a distance of 2 cm from the floor, check that it is horizontal. Screw it into drilled holes self-tapping screws We leave a small gap between the ceiling and the first panel, which will be covered with a plinth. We insert clamps into the groove of the first panel or shoot the staples.

We insert the second board with a tenon into the groove of the one above. We check their parallelism, after which we fix them again with clamps or staples.
Video - Steam room lathing
When all the walls are sheathed, all that remains is to install baseboards (on the floor or additionally in the corners and under the ceiling), lampshades and sockets, and make shelves. At this point, the lining of the bathhouse inside with clapboard is completed.
