DIY bedside table for the bedroom. DIY bedside table: detailed instructions from the master Option No2
A bedside table in the bedroom or a cabinet next to an armchair in the living room is an integral attribute of the interior of many apartments. Of course, now you can buy any cabinet in stores, but will it be unique? We present to your attention 10 unusual ideas how to make an original bedside table with your own hands from different objects and materials.
1. DIY nightstand made from drawers
Wooden box for vegetables, fruits or postal parcel Place on legs or wheels. Attach a shelf inside the box. The box can be placed both horizontally and vertically, and you can also make a tall cabinet from two or more drawers.

The box can be decorated, for example, with branches. Read how to make such a bedside table with your own hands.

2. DIY nightstand with rope shelves
From the ordinary wooden box or boxes, as well as ropes, you can make a bedside table with a flexible design. You can customize your own shelves and different rope holders depending on the items and things that will be stored in the cabinet. To do this, you need to drill rows of holes in the side walls of the cabinet and even on top. Pull strong natural or synthetic rope through the holes and make different shelves and compartments for things.


3. DIY bedside table made from books
Unusual and original project bedside tables for the bedroom or living room. Secure stacks of books with straps, ties, or tie them with thick ribbons. In this case, place wooden modules, square or rectangular boxes between the stacks. It could even be thick cardboard boxes from shoes or small items. household appliances. Old books, vintage leather belts and wooden elements will give the bedside table a unique charm and style.

4. Nightstand from a chest
The chest has long been the main piece of furniture in huts and huts. Now vintage or modern chests- a rare phenomenon in the interior. However, if you are the owner of your grandmother's old chest, then you can make a vintage nightstand out of it with your own hands. The spacious space under the lid of the chest will allow you to store many things, including bedding or toys in the children's room. In addition, designers offer exclusive options cabinets in the form of expensive leather chests. These ideas can be used as a basis and inspiration. Turning a chest into a nightstand lies only in the decor of the chest itself. It can be either updated or aged, left in natural form or color it.


5. Nightstands made from suitcases
Unlike antique chests, old suitcases are much easier to find. A DIY bedside table made from a vintage suitcase will decorate the interior of the room and also provide additional closed storage space. You can even hang a small combination lock on a suitcase bedside table and store intimate items there. To make a cabinet, you can either stack several suitcases on top of each other, or put one suitcase on legs, for example, on a stool or table.


6. DIY cabinet made from a barrel
A DIY bedside table made from a barrel will look very unusual in a bedroom or living room. Round wooden barrel- a ready-made cabinet. The main condition is that the barrel must be clean and free of foreign odors, such as wine. You can also cut a door into a barrel, put it on hinges, and attach a shelf inside. Another option is to make two bedside tables with your own hands from one barrel, simply by sawing the barrel into two even parts.


It can also be useful as a cabinet metal barrel, especially if it is old.

7. DIY bedside table made from a chair
Very often a chair serves as a bedside table. We propose to improve it by turning it into a real bedside table with a drawer. For this it is advisable to choose wooden chair without soft upholstery. Purchase special accessories for drawers and the box itself is the size of a chair. Attach the entire system under the seat. You can also nail another shelf under the box from a square sheet of chipboard.


8. Bedside table made of mirror and stool
If you have a stool as a bedside table, we suggest improving and decorating it. In the same way as with a chair, you can attach a drawer or shelf between the legs of the stool, and you can use a framed mirror as a tabletop.

9. Stepladder bedside table
A small ladder - a stepladder or ladder for cabinets - an excellent solution for a bedside table. There is no need to do anything additional; if desired, paint or age the staircase.


10. DIY hanging bedside table
A nightstand, or rather a bedside table, can float in the air! How to make one like this unusual project for the bedroom - read.
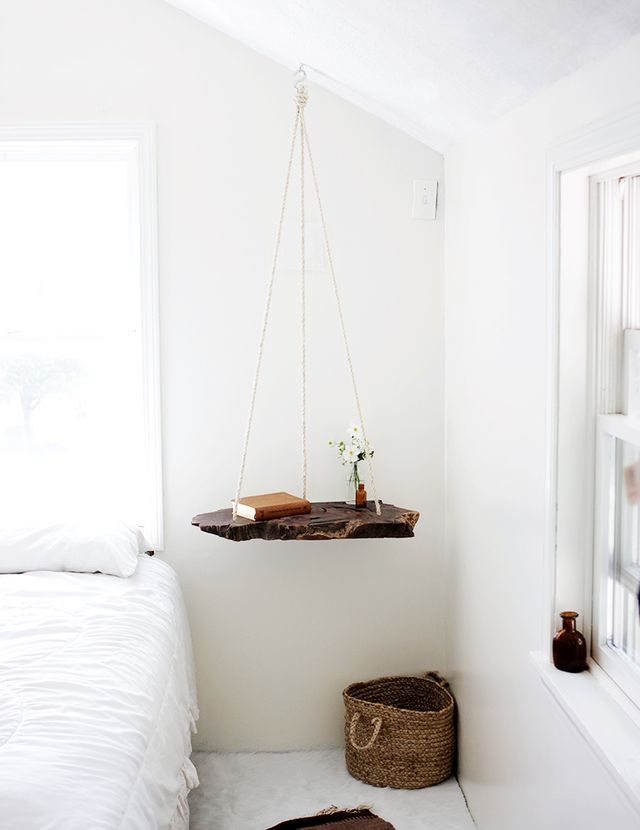
A nightstand near the bed is an indispensable piece of furniture where you can store various things that you may always need. can be easily made as its design is simple.
Despite small sizes, the importance of a bedside table is difficult to overestimate, because... This is not only a practical piece of furniture, but also a significant element of the interior of the room.
Variety of bedside tables
The bedside table can be very different. Picking up suitable model, you need to consider your bedroom decor, carpentry skills, and your financial reality. There are the following types of cabinets:
- Cabinets with drawers. This is the most famous and simplest option.
- The cabinets are open. They don't have drawers, so everything is visible. Such cabinets are suitable for those who do not have small children in the house and do not need to hide anything from them.
- Cabinets with a retractable table. This model is indispensable if there are sick or disabled people in the house who need to be looked after.
- Hanging cabinets. This option will do, if the bedroom area is small. They are attached to the wall, freeing up space on the floor.
- Original cabinets. It all depends on the imagination and skill of the worker.
All of these cabinets can be made with your own hands. The cost of the product will depend on the building material, the quality of the metal fittings, the dimensions of the product and the number of drawers. Let's take the most common and cheap model.
Return to contents
Tool for the job

To work you will need:
- drill with different attachments;
- electric drills for wood;
- Screwdriver Set;
- electric milling cutter for wood (diameter 35 mm);
- pencil;
- measuring tape;
- electric iron;
- rectangle with ruler;
- sandpaper;
- rags.
The electric iron was not on the list by mistake. You will need it for gluing the edges. The adhesive side is applied to the part and ironed with a heated iron. For high-quality gluing, you need to take a rag and, without waiting for the edge to cool, press it and iron it again.
Return to contents
Choosing material for the cabinet
It can be made from chipboard, this will be the cheapest option.

Wide range of colors laminated chipboard, used for the facade of the future bedside table, allows you to choose the tone in which the rest of the furniture in the room is made.
This material has gained recognition due to its low cost. And the most expensive type is a bedside table made of solid solid solid wood. But let’s focus on a simple, cheap product made from inexpensive materials:
- Plate made of shavings and sawdust (chipboard), covered with laminate. Suitable for the front of a bedside table. This material is easy to process and has multi-colored palette paints But not everyone knows that it is impossible to cut parts from chipboard yourself using ordinary tools. When cut out with a conventional tool, the edges of parts break off and crumble, so it is better to order cutting in a workshop that has special equipment.
- Another fiberboard material is a board made of wood fibers. It is more flexible and thinner than chipboard, suitable for making the bottom of the drawer and the back of the cabinet to save money, since chipboard is more expensive than fiberboard.
When working with chipboard, you need to know the following subtleties:
- The slabs range in thickness from 1 to 3.8 cm;
- Their sizes are also different. Therefore, you need to draw all the details on paper and calculate what size sheets to buy in order to minimize waste.
- When purchasing, the sheet must be carefully inspected to ensure that there is no damage to the surface.
- Note the moisture level of the building material. If there is some moisture, the sheet may become warped as it dries, making it difficult to process.
- When transporting finished parts, you must ensure that they are neatly stacked and not damaged. It would be best to tie all the parts together and lay them on foam rubber or any other soft material.
Now some data about fiberboard:
- Thickness fiberboard sheets ranges from 3 to 5 mm. The strength of the product depends on it. This material They are used mainly for the manufacture of hidden parts, and a three-millimeter sheet is considered optimal for this.
- There are no strict standards for fiberboard quality. Any sheet is suitable for such purposes. Just not with a wavy surface - this means that the sheet is wet and bent, and such material will not be easy to work with.
Bedside tables in the interior are mainly used for convenience and practicality. But how can you make sure that this piece of furniture not only fits into general interior, and transformed?
If you are one of those who especially do not like to spend money on various creative furniture, we offer you 12 interesting ideas bedside tables that you can make yourself, at no extra cost!
Idea No. 1. Bedside table made from old suitcases
A couple of suitcases can be found in every house on the mezzanine or in the closet. From them you can make not only a spectacular, but also a spacious bedside table with your own hands.
Idea No. 2. Nightstand with a masculine character

A bedside table made of concrete will ideally fit into the interior of a loft-style bedroom. building block. If a porous surface does not seem attractive enough, it can be coated acrylic varnish with your own hands.
Idea No. 3. Interesting console table

Any old furniture on legs, from which half has been sawn off, can become an unusual bedside console. For a truly impressive effect, paint it a vibrant shade. Then the bedside table will surprise not only with its shape, but also with its color.
Idea No. 4. Laconic nightstand made from a drawer
An ordinary drawer from an old table, painted with your own hands in a color that matches the interior, can become an original bedside table. You just need to cover it with a board of a suitable size.
Idea No. 5. Stairs instead of a bedside table
An ordinary staircase can serve as a place to place various necessary little things - from books and clothes to a lamp with a clamp. If desired, paint the stairs yourself in an unusual color.
Idea No. 6. Barrel bedside table
An upside-down metal barrel will make an extravagant bedside table. To ensure that the barrel-bedside table lasts a long time, treat it with an anti-corrosion compound yourself.
Idea No. 7. For the smartest
We are all accustomed to having books or magazines on the bedside table. So why not make a bedside table out of books? To make it stable, their covers can be glued together or tied with a belt.
Idea No. 8. Chairs instead of a bedside table
An ordinary chair will replace the bedside table. We recommend choosing wooden models unusual design or use several chairs of different sizes.
Idea No. 9. Wooden collection
Many wooden logs, fastened together by hand, create a spectacular nightstand. To ensure the furniture lasts a long time, do not forget about special wood impregnations.
Idea No. 10. Simple but effective bedside table made from a drawer
The easiest way to make a nightstand out of drawers with your own hands is to hang it on the wall. For those who like more sophisticated solutions, we recommend screwing the legs to the drawer.
Idea No. 11. old cage
A large pet cage can also replace a bedside table. All that remains is to make wooden table top suitable size.
Idea No. 12. Musical bedside table

A gramophone record serves as a tabletop for the bedside table. The legs are made of thick wire or ready-made ones are used, which can be purchased at a furniture store.
Detailed instructions on how to make a bedside table with your own hands in this video:
A do-it-yourself bedside table is quite often made, but this concept is very diverse. This piece of furniture can be a product that will stand by the bed, another possible variant- This is a place for a tea mug and newspapers in the living room. However, making this design yourself is quite simple. To do this, you should first prepare certain tools and materials, as well as become familiar with the process technology. This is the only way you can successfully complete the work, and the product will please the eyes of your household and be easy to use. The only thing that you may not have to do yourself is cutting the material.
Preparatory work
If you are making a bedside table with your own hands, then you need to prepare the following tools: drill-driver, set of bits, milling cutter, tape measure, iron, pencil, sandpaper, carpenter's tool, set of drills. The optimal solution will be used cordless screwdriver, which is true if the farm also has a hammer drill. Drills should be selected according to the wood, but as for the set of bits, it should have a hexagon for confirmation. Be sure to prepare a right angle with a measuring ruler. There should also be a dry cloth at hand. Due to the fact that sawing of laminated chipboard will be carried out in a workshop, you should expect that you will outside help you will have to transport sheets whose dimensions are 1830x2448 mm. These dimensions are the smallest. This is why experts recommend saving on gluing edges.

Today a melamine version is sold, the thickness of which is 0.5 mm. Due to the fact that this element has an adhesive base, it will be quite easy to install. To do this, attach it to the required end and iron it with a heated iron. A dry rag will help firm up the hot edge more firmly for maximum grip. The excess should be removed using a dull knife and the edges treated with sandpaper.
Detailing

When making a bedside table with your own hands, it is important to familiarize yourself with the details. However, the internal content may vary. Everything will depend on what you want appearance and functionality, as well as the budget you plan to spend on fittings. Below we will describe the details of the simplest and cheapest piece of furniture, but the runners and facades will be made of laminated chipboard. As for the side parts, you will need two of them. In the first case, the size of the element will be 772x500 mm, while the bottom and shelf should have dimensions equal to 368x502 m. There should be two upper strips, but only one base, the dimensions of these components are equal to 368x100 mm. It is important not to forget about the side parts of the drawer; there should be two of these elements, and their dimensions are 480x110. It will not be possible to create a structure without back and front walls; there must also be two of them, and the dimensions are 334x110 mm. The front is limited to 150x395 mm, and the cabinet door has dimensions equal to 515x395 mm. The above dimensions are for chipboard with a thickness of 16 mm. The worktop should be kitchen and its thickness is 28 mm, while the length and width are 525x400 mm. When making a bedside table with your own hands, it is important to know not only how to glue the edge, but also how to prepare the parts for assembly.
Preparing consumables

The fastener can be confirmed, for which you will need to drill holes. Their diameter should be 8 mm, whereas when the holes are located at the end, the diameter should be reduced to 5 mm.
Preparation of accessories

Even if you are planning to purchase inexpensive option fasteners, then this should be taken seriously. Confirmats must be purchased in the amount of 22 pieces, their dimensions are 5x70 mm. The plinth and tie strips will be installed on one confirmat, each of which should be located on one side. Self-tapping screws must be purchased in one package, dimensions - 4x30 mm. They will be needed later for other work around the house, but in the case of a cabinet they are used to screw the tabletop to the slats. As for the facade, in this case the self-tapping screw is installed to the front wall of the box. In this case, the fastener should be located inside so that it is not visible. You will also need self-tapping screws with dimensions of 4x16 mm; they must also be purchased in the amount of 1 package. With their help you will strengthen the hardboard and hinges; it is important to purchase fasteners with a countersunk head. Find the right ones furniture hinges in the amount of 2 pieces. The cutter has a diameter of 35 mm; the hinges, accordingly, must be suitable. If desired, you should purchase decorative furniture handles that are installed on the facade. Additionally, you can get screws for handles, the length of which is 35 mm.
The process of making a cabinet

When creating a bedside table with your own hands, the photo of which is presented in the article, you can use one sheet of chipboard, which will make 2.5 products. Assembly is very simple, in addition to the sidewalls from below you can screw them, which are simply called “hooves”. They help install the cabinet on uneven floor. If it is made by you, you can purchase adjustable legs, which can be found in the store furniture fittings. First, the master makes a selection for the loops. It should be remembered that the step from the edge of the facade to the central part of the hole should be 22 mm. For hinges with seat dimensions of 35 mm, markings should be made on the top and bottom of the door. This is usually done at the level of 80 mm, but this parameter cannot be called critical. The next step is to install the facade with twisted hinges, then everything is strengthened to the body. When making a TV stand with your own hands, you can use the same dimensions, since they fit perfectly, but it is important to remember that when assembling the box and drawer, you need to check the geometry of the resulting parallelepiped. Otherwise, the product will turn out crooked, and the facades will be impossible to open or close.
Making a bedside table or shoe cabinet

In order to make the structure for a bed or for shoes more stable, you can make it in the shape of a trapezoid, and the product is assembled with dowels. One of the side ends of the bottom must be sawed down, this applies to lids and sticks. In this case, you need to use an angle of 10°. Perfect for this electric saw and guides. At the next stage, you need to select grooves for the keys on the cut ends, while placing a flat board under the cutter. The latter, including the workpiece and the workbench, should be compressed with a clamp. Before you begin assembling the cabinet, all fittings should be temporarily secured, this will allow you to determine its exact location.
Sequence of work
When making a bedside table, you first need to attach the top cover to the left side wall using dowels. At the next stage, the right side panel is strengthened, and the structure should be in a lying position. Once the glue has set, you can attach the back wall to the body. The surface must be sanded and the edges are varnished before painting. After the cabinet is turned upside down, you can screw rollers to the corners; each of them should be secured with two washers and nuts. When making it yourself, you can be guided by the same technology, while on the door you will have to mark places for 50 mm should be measured from the lower and upper ends. As for the side edge, it is necessary to retreat 22 mm from it. To install the hinges, you need to drill holes at the intersections of the lines. The master steps back approximately 3 mm from the top cover, this will allow for easy closing and opening of the door in the future.
Final works
If you are thinking about how to make a bedside table with your own hands, then at the next stage you need to assemble grooves in the lower part of the three sides. The ends of the rear and front walls are cut at an angle of 10°. It is important to remember that the sides of the box must be butt-joined to each other. Mechanisms for rolling out should be installed at the same stage; it is best to use roller guides, as they are easy to install and durable in operation.
Compact and almost invisible, the bedside table plays quite well important role. It is convenient to place a lamp on it for reading or knitting before bed, put your phone and set an alarm clock. Inside small drawers and open niches it is convenient to store all the little things for comfortable rest: favorite books and glasses, charging device for laptop and tablet, care and hygiene items. Making a bedside table with your own hands is not difficult. As a rule, such furnishings are endowed simplest design and not difficult to assemble.
Ideas on how and from what you can make a bedside table yourself
Purchasing separate materials to make a bedside table with your own hands is unlikely to be a good idea. The cost for it is small. Therefore, they usually “figure out” from the leftovers.
There are incredibly many design options for bedside tables:
- It may be an open cantilever design, a light shelving unit and a full-fledged chest of drawers.
- Be made from leftover laminate, plywood, pallets, timber, MDF, solid wood and, of course, laminated chipboard.
Sort through models and photos different ideas it is possible indefinitely. How to modular bedroom collections famous manufacturers, and just search using Google and Yandex images.
But in the end, execution will depend only on the desire to do something and the remaining materials available.
An example of how you can make a bedside table with your own hands, drawings and diagrams
Let's look at a typical model of do-it-yourself bedside furniture. Drawing and diagram with instructions overall dimensions will look like this.

Making a bedside table from laminated chipboard of this type is not profitable separately. It’s more economical to make two of them at once or, for example, together with . It will cost much less than if you buy it ready-made.
The model is easy to assemble and can easily be made by a beginner. In fact, you will need to assemble the cabinet body itself and the drawer frame. After pre-drilling several holes for confirmations.

DIY bedside table, calculation of details and cutting map
The details indicating the sides for edging are most clearly written out in an Excel table. In fact, three types will be used sheet materials– laminated chipboard, fiberboard and MDF for the drawer facade. However, in order to save money, it can also be made from laminated chipboard.

If you lay out the details of the bedside table on a whole sheet, you can see that not much material will be left.

That is why I wrote above that making one copy is extremely unprofitable if there are no leftovers. After all, you will have to buy a whole sheet of chipboard.
Drilling parts and assembling the bedside table
After the parts have been sawed, all visible ends are covered with an edge, you can proceed to next stage. Drill the blanks for assembly onto the confirmations.

I wrote in more detail about the nuances of drilling and subsequent assembly in the article on manufacturing. In fact, the products are similar in design. Therefore, I will not repeat myself. I will give only an additional drawing of a bedside table in three dimensions.

What you need to make your own bedside table
In fact, it all depends on which stages of work you do yourself and which you delegate to the relevant companies.
For example, cutting and edging of parts can be ordered in the same place where laminated chipboard is purchased. Or you can do it yourself. In this case, you will need a jigsaw for cutting, Sander for aligning the ends for gluing edges and ironing. As well as small improvised items:
- tape measure, pencil/marker square for measuring workpieces and drawing parts;
- sandpaper, shoe polish and stationery knife for cutting and sanding edges after gluing melamine edges with an iron.
For assembly you will need Phillips and hex screwdrivers (it’s convenient to use a ratchet) and a screwdriver.
In addition to the tools and improvised means, which in principle any craftsman has in stock, you will need to purchase fittings and components for assembly. All this is presented in tabular form of the estimate.

Just create a similar Excel form for yourself, enter formulas and prices to calculate the final figure for upcoming expenses. I am sure that if you make a bedside table complete with more essential subject and spend the details on the remainder, the savings will be significant and will completely satisfy you. Good luck!