The most budget option for garden paths. DIY garden paths
Landscaping a personal plot is not as difficult as it seems at first glance. The least expensive idea would be to lay garden paths. This design will not only give an attractive appearance local area, but will also become a very functional addition. In rainy weather, you won’t have to walk on soggy ground; having a garden path will eliminate such inconveniences. Modern market offers a variety of materials for arranging a personal plot. You just need to make a choice based on your taste preferences and financial capabilities. To save significant money, it is not necessary to seek help from landscape designers, there is no need to look for a team of tilers. It is quite possible to lay garden paths yourself; you just need to know a few subtleties that you may encounter in the process of arranging your local area.
Garden paths you can lay it yourself

Garden paths are the most budget-friendly option for landscaping

Garden paths can harmoniously decorate a site
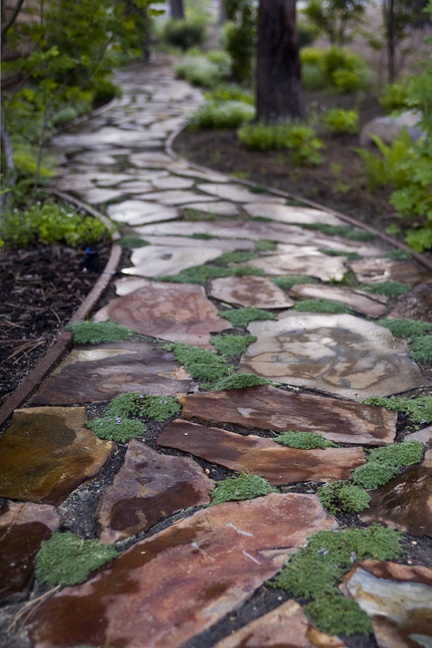
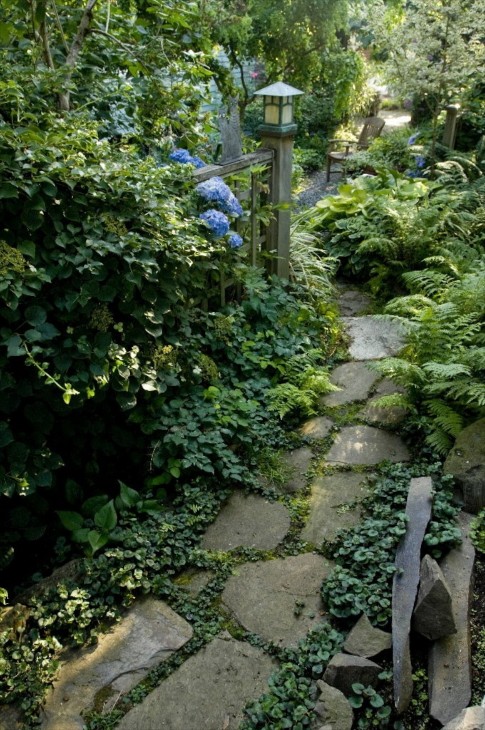
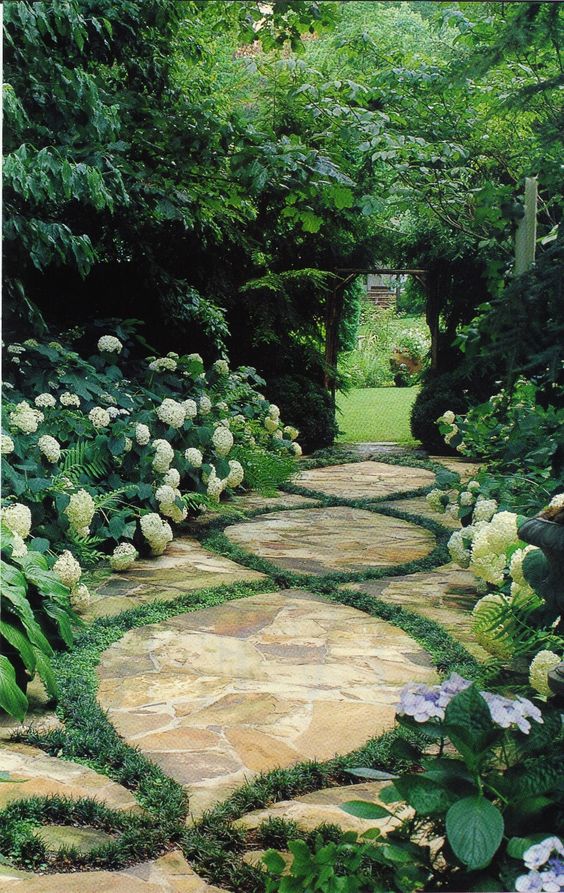
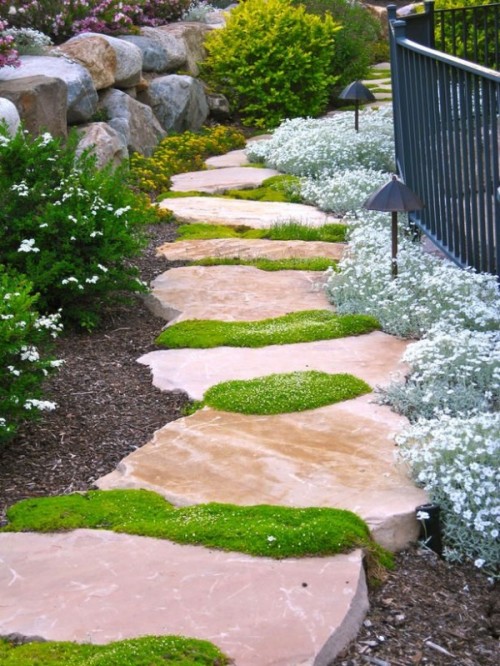
Garden paths made of natural stone
Paths decorated with natural stone always look impressive and original. The main advantages of natural material are ease of installation, heat resistance and long service life. The disadvantage is the high price of the coating, massiveness and the need to draw up a sketch before starting work. Natural stone is considered an elite material, and many developers prefer to practically not use it due to its high price. But in this case, the price fully justifies the quality. Stone garden paths will last for decades.
Natural stone is mined in quarries and then processed. This means that the material is environmentally friendly and comes in a variety of colors and sizes. Among the methods of paving paths, there are two main methods: by applying a coating to a sand cushion or by distributing the coating directly on concrete mixture.

These tracks can last a very long time.

Paths made of natural stone look very beautiful
Laying on a sand bed
- It is necessary to dig a trench, the depth of which is determined by the characteristics of the soil. If the soil is light enough, the trench should be no more than half a meter, otherwise no more than 30 cm.
- A layer of prepared crushed stone is distributed on the ground, no more than 12 cm.
- A sand cushion must be laid on top of the crushed stone.
- An ornament made of natural stone is formed on the sand.
- If necessary, the seams are sealed with sand.
- At the last stage, the entire surface is treated with water. You need to monitor the amount of moisture, this will help avoid sand being washed out of the joints.
- Laying using concrete
- As in the first case, a trench is dug and several layers of crushed stone and sand are laid.
- The required amount of concrete is poured into the formwork.
- You should wait until the solution dries and carefully remove the formwork.
- Sand is poured and natural stone is laid on its surface.
- The joints are rubbed with sand, after which the garden path is treated with water.

You can also lay tiles on a concrete base.

When treating with water, make sure that the sand is not washed away

The surface on which the tiles will be laid must be leveled
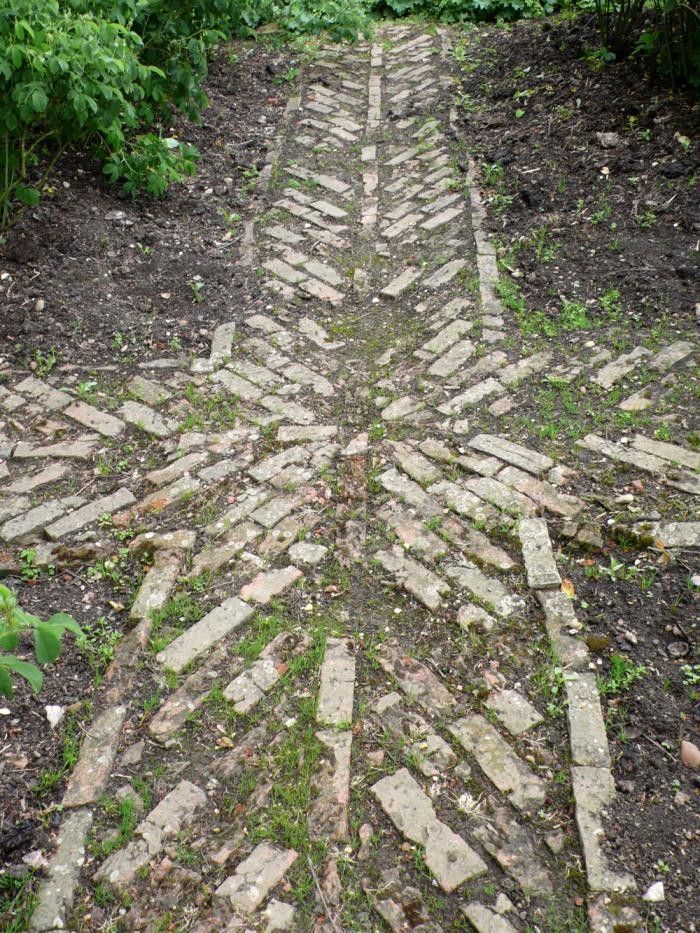
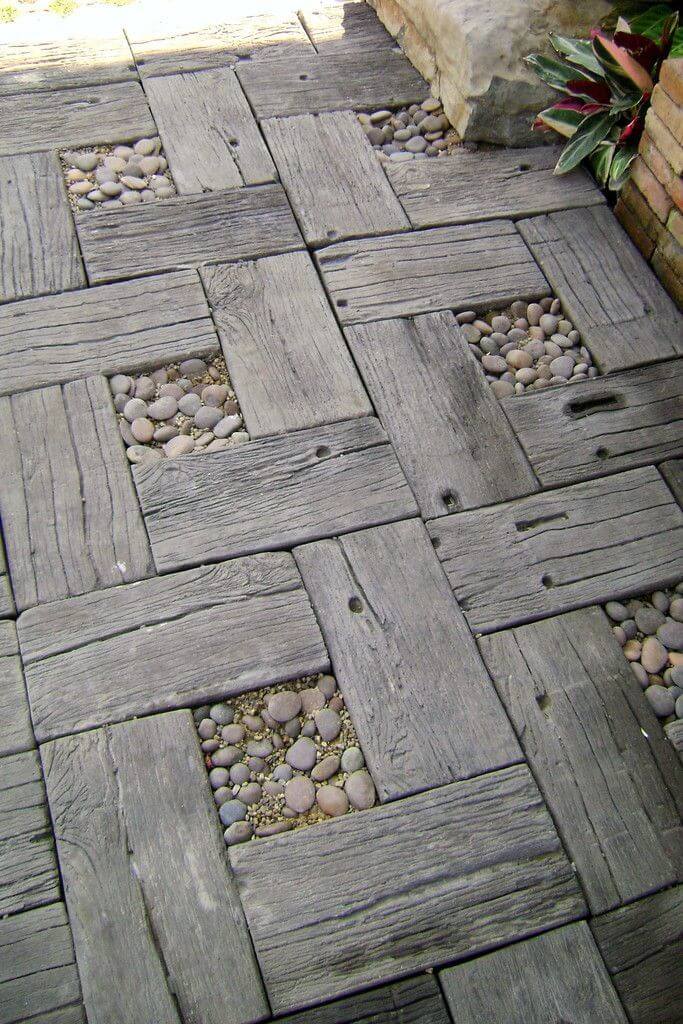
Clinker brick paving
Limitless fantasy, set necessary equipment and a little patience - that's what you need when working with clinker. Material happens different forms, but the most common are rectangular and wedge-shaped. Clinker bricks began to be used two centuries ago and were used for paving roads and sidewalks. Later it began to be used to decorate gardens and summer cottages.
The hallmark of the material is not only its aesthetically attractive appearance, but also a number of functional advantages. Clinker bricks are made from clay using the full sintering method. This means that such paving will last for many years due to its resistance to extreme low temperatures and moisture. It does not crack, can withstand heavy weight, and can be cleaned with a brush, detergent and water. In addition, the material does not deteriorate from exposure to salts, alkaline agents and other abrasive substances.

The material is very resistant and is not subject to bad influences

A path made from such material can serve you for many years.
How to work with clinker bricks
If you decide to decorate your garden in a country style, the material will fit perfectly into the overall picture. It is necessary to pay close attention to the paving method. A garden path with smooth curves will look impressive. At the same time, pay attention that the path does not consist of sharp turns, this will prevent material from being trampled along inner corner. The process of working with coating is not complicated, but it has several nuances:
- the site is marked to determine the zero line, the slope is made in the direction of convenient removal of excess moisture;
- Pegs are placed in the corners of the site and a rope is stretched along them;
- a second rope is fixed to one of the pegs and retracted 90 degrees;
- boards are dug into the ground, a little away from the pegs, if necessary, an additional layer of soil is poured and compacted;
- a solution consisting of cement and sand is prepared;
- clinker brick is laid using a rubber hammer;
- If necessary, fill the seams with additional mortar.
Consider the presence of a border. The border will look great from an aesthetic point of view and will help maintain the contours of the path, blocking the path of flowing moisture. It can be formed using bricks, carefully placing the material on the edges of the path or burying it in pre-dug small trenches.

Smooth curves will further decorate the overall picture.

The border will further decorate the path

This material fits perfectly into country style
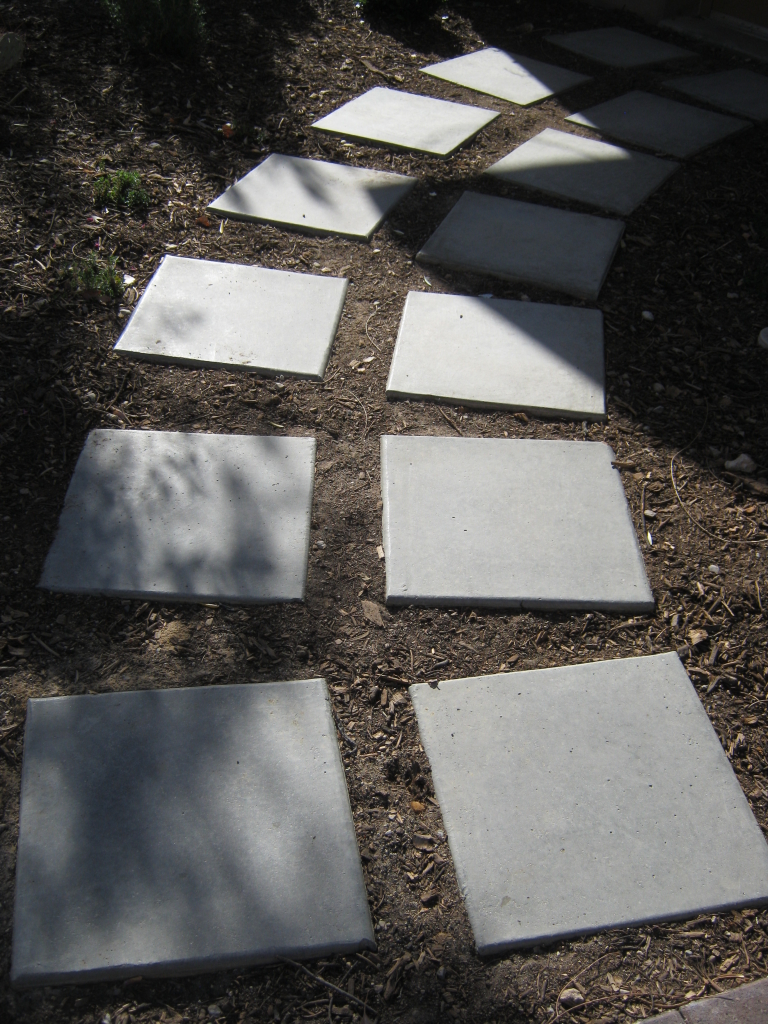
Paving slabs
Paving slabs will last for many years, as long as they are laid correctly. Choosing a tile will not be difficult; there are many types of coatings on the construction market, ranging from color to size and pattern applied to the surface. You can easily install the material yourself, without the help of professionals. To save money, it makes sense to use the cheapest and simple techniques laying paving slabs. To work, you will need tools that every owner will probably have: a bayonet and shovel, a peg, a level, a rubber hammer, a rake, a device for leveling the soil, a brush with hard bristles.

To lay the tiles yourself, you will need standard set tools

So that the tiles last for a long time, you need to lay it out correctly
How to lay paving slabs
Before starting work, it is necessary to remove everything unnecessary from the territory and remove excess grass. Then go to the site markings and think about the width of the paths and their directions. It is irrational to make wide garden paths. This is quite expensive and takes up a lot of space, which can be used for other needs.
To mark the boundary of the future surface, pegs are placed and a rope is pulled over them. This is done to give a smooth surface to the path. Depressions are dug in the ground. To determine the depth of the trench, you need to measure the thickness of the tiles. For example, if the material is 7 cm thick, then it is advisable to make a hole 10 cm in size in the ground. Next, according to the boundaries of the rope, the side is knocked out using a shovel. The tool must be held strictly vertically. After work on the sides is completed, you can begin to remove excess layers of soil inside. The next step will be to distribute the sand inside the resulting space, while ensuring the uniformity of the surface. You can correct flaws using a shovel. Now you can begin the most important task: laying paving slabs. It is necessary to check the quality of work using a level. The slope per 1 m of the path should be 1 cm. The resulting seams are rubbed with sand, treating the tiles with water.

Before installation, the area must be cleared of debris.


When laying tiles, you need to check the surface with a level.
Use of wood
The purpose of any garden path is purely utilitarian, but what if you show a little imagination and approach creatively the issue of arranging the territory. Wood - environmentally friendly pure material with an aesthetically attractive appearance. Wooden paths will decorate any area and will look non-trivial and interesting. The material can be timber, boards, garden parquet or boards. But increasingly, cut wood is used to decorate a personal plot.
Before starting work, you need to make a choice between numerous types of wood. It all depends on how long you plan to use the track. Oak will last about ten years, pine will not lose its properties for 7 years. Larch can be considered the most durable species; it is the most durable and will last about 25 years. The more load will be placed on the path, the larger the wood blanks should be in diameter. It is advisable to make them at least 15 cm in height. With such dimensions, the wood cut is firmly fixed in pre-prepared holes and will not fall out during operation.
IMPORTANT! It is necessary to discard saw cuts that have cracks. Before laying, it is recommended to clear the tree of bark, this will extend its service life.
The marking of the site is carried out as in the cases described above. For comfortable movement of one person, 60 cm of the path width will be quite enough. The bottom of the trench is laid waterproofing film. If you don’t have it at hand, you can stop at the usual one. plastic film. The next step is distribution required quantity crushed stone on the prepared surface. Crushed stone acts as drainage and protects the wood from unwanted moisture. The sand is distributed in an even layer, after which you can begin laying the cut. The distance should be minimal. The gaps between the workpieces are filled with sand, and the material is watered with a small amount of water to compact it. You can decorate the path in different ways. For example, paint the cut, sow the gaps with grass or decorate with pebbles. Remember, wood is susceptible negative influence environment, therefore, before laying it, it is better to cover it with special compounds that prevent it from rotting.

You can make a wooden path yourself

Wooden paths will decorate any area and will look non-trivial and interesting
Concrete path in the garden
Each method of laying a garden path has pros and cons. Concrete path is no exception. Thousands of owners of individual housing choose this method of decorating their local area. Concrete is a durable material that can last for decades. correct operation. The design is quite easy to create without the help of professionals. And besides, the concrete path - great way save money, the material is relatively inexpensive. Concrete can withstand significant mechanical loads without any problems, and installation does not take much time. But, like everywhere else, it also has its downsides. During the off-season, the material often cracks. This is due to ground movement in rainy weather. It is unlikely that it will be possible to change the location of the path in the future; the structure is capital. Therefore, it is better to take your time and think carefully about the directions of the paths and their width.
The process of laying a concrete path with your own hands must begin with the installation of formwork. It is better to use boards for this. If you plan to add some bends to the structure, use any plastic materials. Plywood – great option. Please note that concrete must be poured in parts in any case. This is done to compensate for expansion or contraction of the material due to temperature changes. Therefore, there is no point in making continuous formwork for the entire area. You can lay it partially, thus significantly saving materials for the structure. Professionals recommend forming the pillow from a mixture of compacted crushed stone and sand. It makes sense to think about waterproofing. Geotextiles or roofing felt will serve for these purposes. Next stage- This is pouring concrete. The solution is mixed from cement and sand in a ratio of 1 to 3. The preferred concrete thickness should be at least 5 cm. The resulting layer is leveled using a spatula. After moisture appears on the surface, all surface irregularities can be removed and the concrete is wetted with water.

A concrete path is the cheapest and easiest option.

You can create such a track without the help of professionals.

Concrete is a very durable material and can last for decades
Plastic modules
The use of plastic modules in laying garden paths is a new technology that has managed to win thousands of fans all over the world. Plastic is a material that is quite light, cheap, durable and strong. The advantage is that the plastic modules can be dismantled at any time. They are not exposed to negative environmental influences and do not enter into chemical reactions. It is in this case that you can choose any option, because there are great amount plastic of various shapes and colors. The tile includes a backing and outer part. The substrate is designed for air ventilation and drainage of excess moisture. Before installation, it is necessary to level the surface on which you plan to lay the material. It is better to lay additional drainage on the soil. Crushed stone can be used as drainage. The installation itself is quite simple and is carried out using a locking fastening. This is how the parts of the tiles are connected to each other.

Plastic modules are not very expensive and easy to install

The lawn lattice does not require special preparatory work
Using the form
Today you can make paths with your own hands without special effort. There are dozens of technologies in the world that make life easier for private home owners. One of the fastest technologies can rightfully be considered the use of special plastic molds. Everything is quite simple: cement is poured into the mold and left until it dries completely. For comfortable work you need to acquire several samples; 2 or 3 forms will be quite enough.
Before laying the tiles, it is necessary to excavate the soil. The first layer is filled with sand to a depth of about 10-15 cm, then crushed stone (7-10 cm) is distributed; the preparatory work must be completed by distributing another layer of sand. After this, the sand is compacted and you can begin laying the tiles made using molds. It is recommended to fill the resulting cracks with sand, and then moisten the entire structure with a small amount of water.
Video: DIY garden path
50 photos of ideas for creating garden paths with your own hands:


Garden paths, elegantly winding among the trees, add to the area well-groomed and complete. And it is not at all necessary to buy paving slabs or hire a designer and builders for their arrangement. You can improve the paths in the garden yourself, putting your soul into their creation, and in return you will receive a durable, well-maintained coating that can delight you for many years. We’ll tell you in more detail how to make a garden path from a variety of materials with your own hands.
Types of garden paths
Garden paths can be classified according to many criteria, ranging from the material of manufacture, size and method of arrangement, to design and compliance with a certain style. Let's consider which garden paths can be arranged on your site with low costs for their production.
Garden path made using a plastic mold
Improving garden paths with plastic molds- a relatively new method, which, due to its simplicity, has found many fans among owners of summer cottages.
Proof of this are numerous photos from specialized forums where you can see just such garden paths.
Advantages This method is not only simple, but also low cost and speed of production, because making garden paths using molds is essentially ordinary concreting.
The cheapness of this method is due to the use of one form, which is sufficient for uninterrupted operation. Of course, the strength of tiles made in this way is inferior to products made by vibration casting in a factory, but for a path in the country they are one of the best options.
Garden path made of paving slabs
The same applies for garden paths. tile, which is laid on sidewalks. The undeniable advantage of this material is strength. Tiles laid in the form of a path in the country will serve you for many years without loss of appearance, and if some elements of the path are damaged under the influence external factors, they can be easily replaced. IN flaws tile covering we write down labor intensity And high cost. And what do you want? Durability doesn't come for free.
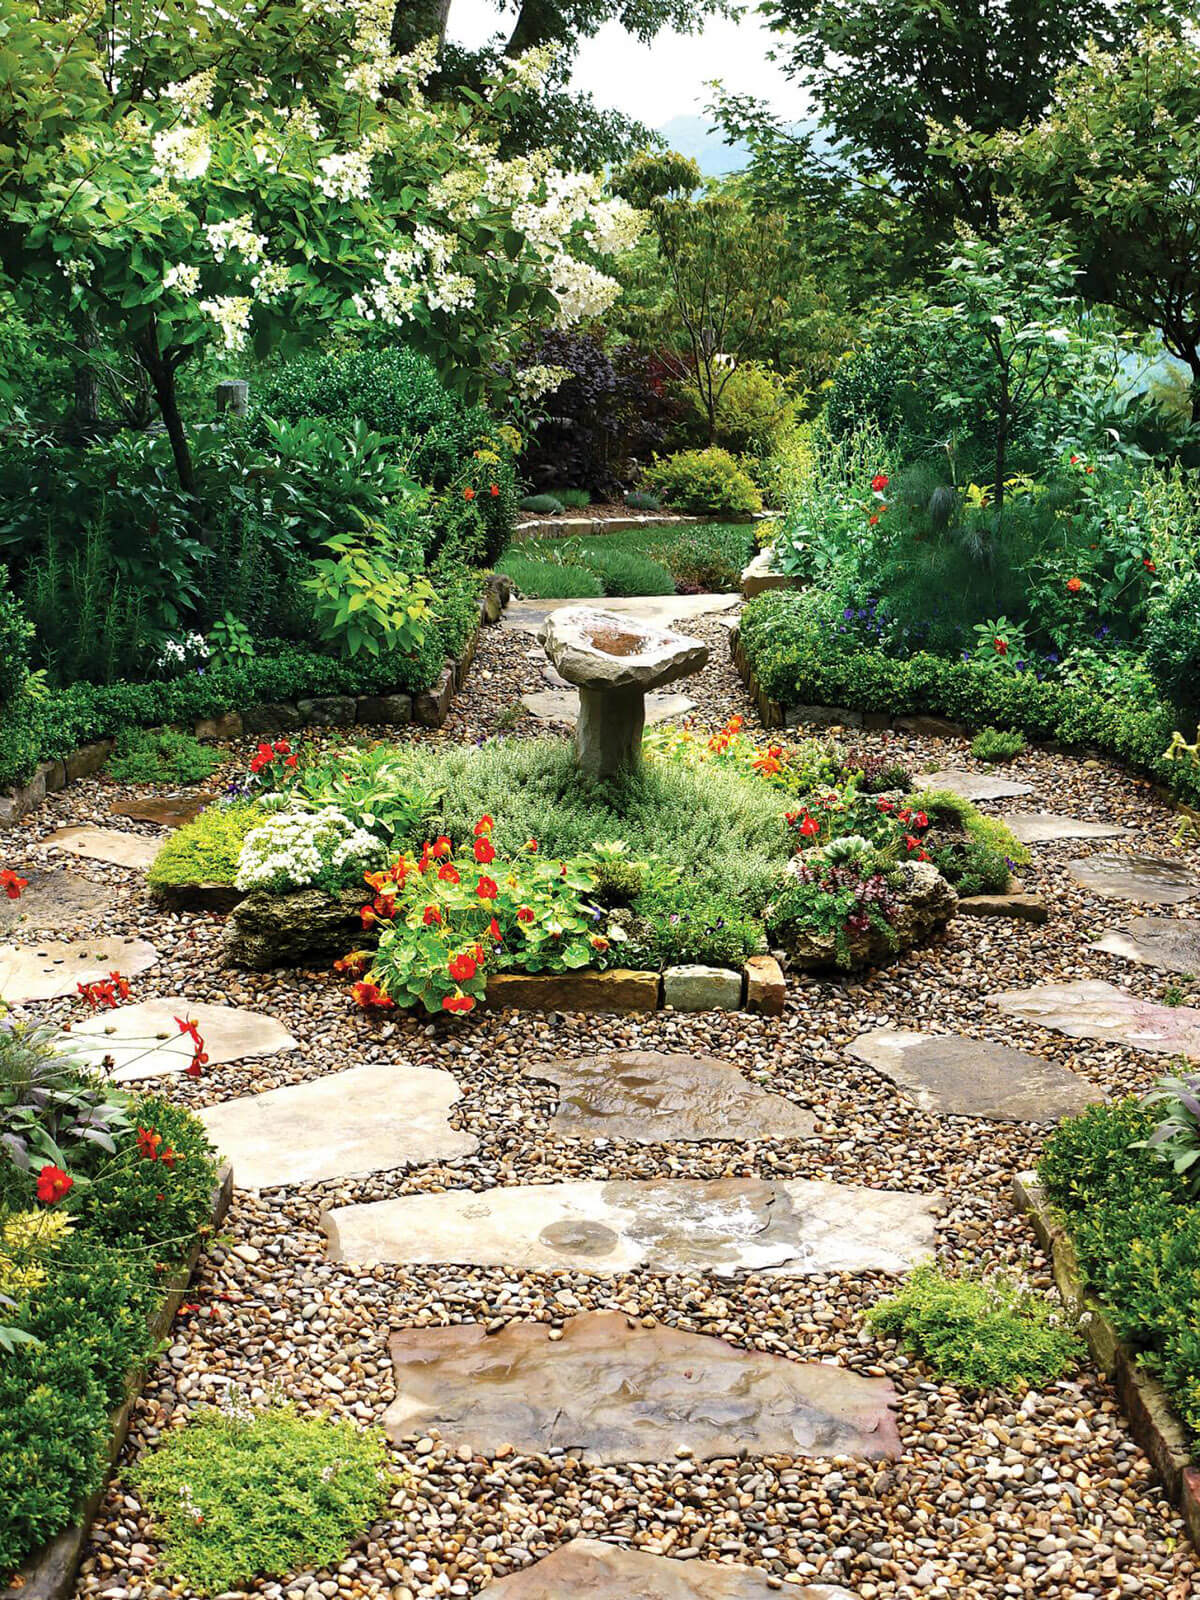
Stone garden path
Very often, the stone left over from the construction of a house is used to improve the paths. In this case, we can assume that the price of such a garden path is equal to the cost of your own labor. We won’t talk about the durability of the stone; paths of this type have been known since ancient times. The disadvantages, as in the case of tiles, are labor intensity.

Laying a stone correctly is not a task for the weak, but it will more than pay off in the result. Do-it-yourself stone paths will give the appearance of your garden real nobility and the appearance of unshakable durability, and they will remain in their original form for your descendants.
Garden path made of chocks and wood
If the country house is built of logs, then your choice is a path made by yourself from wood. This is one of the cheapest options, very easy to repeat, but, nevertheless, one of the most impressive against the backdrop of trees in the garden. Unfortunately, the service life of such paths is limited due to the fragility of the material, so only the hardest types of wood will have to be used.

Garden path made of bulk materials
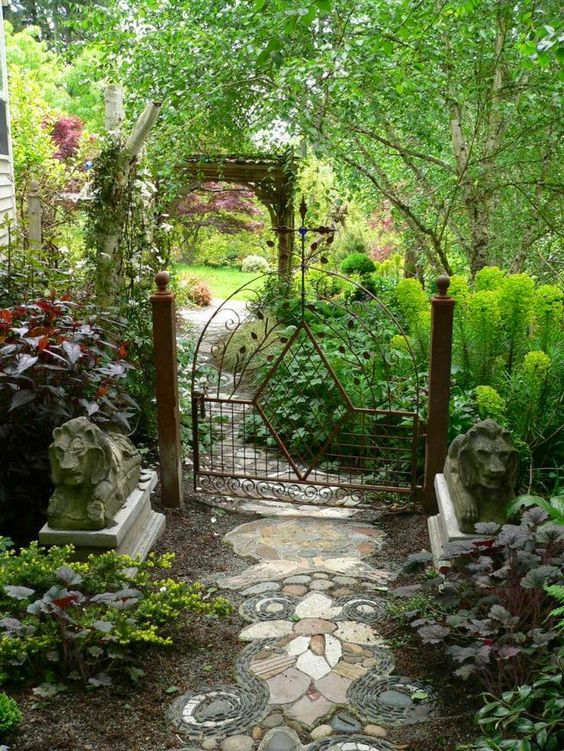
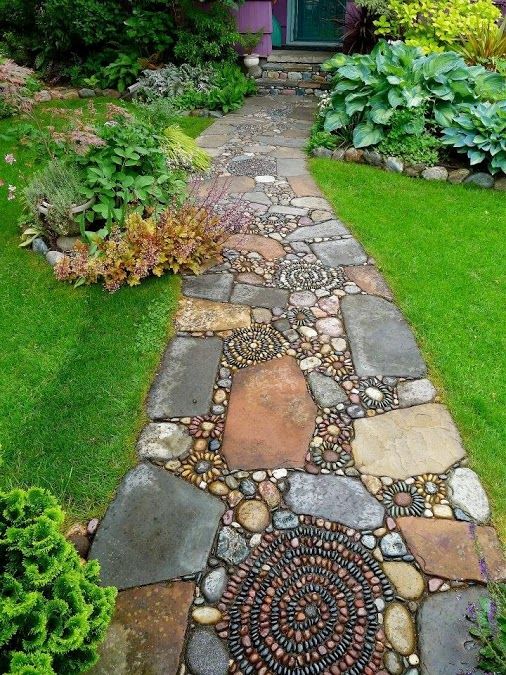
If you want to build garden paths with your own hands at low cost, then this method is what you need. It is enough to dig a trench of the required width and fill it up suitable material, ranging from pebbles and screenings to crushed stone or marble chips. You can even lay pieces of marble or concrete slabs in a chaotic order, the main thing is to align their upper surface level and fill the gaps between them. Such garden paths are not suitable for heavy loads, but they can provide the necessary cleanliness and excellent appearance of your garden.
Instructions for creating garden paths in photographs
Garden path using a DIY mold. Step-by-step instruction
To start arranging garden paths using plastic mold do it yourself, look at photos of such stencils and buy the one you like the most.
Pay attention to the height of the forms and “stones” - they can vary widely.
A lot has been written about how to make paths in your dacha with your own hands. We suggest using the following instructions.
Choosing a place for a garden path and mark it out with our own hands. To do this, we hammer in pegs at all the bends of the path, and then tie them with cord around the entire perimeter. The cord is immediately leveled, taking into account the required height of the path above the ground. A water level can make this task a lot easier.


If the soil on your site is soft, then you need to dig a trench 10-12 cm deep, fill it halfway with sand, after which you need to spill everything with water and compact it. If the soil is sufficiently strong, you can do without a trench, but it is necessary to make a sand backfill followed by compaction.
If you plan to use the paths in your dacha for car passage, you should dig a trench with your own hands, fill it with a sand-gravel mixture, and then lay a reinforcing mesh of steel rod on top of it.


Preparing the solution . To do this, mix grade 400 cement, sand and crushed stone in a ratio of 1:3:4. If you plan to use coloring and plasticizing additives, then add them at the rate of 1-3% dye and plasticizer. You can take 4 parts of sand, but make sure that the cement is as fresh as possible and its grade is not lower than 400 .
We begin the production of garden paths by mixing all the components in dry form, after which we add water (if a concrete mixer is used, then half the volume of water is first poured in, and the rest is added during the mixing process).
We begin to prepare the solution Add concrete dye and liquid plasticizer Mix dry Add water with plasticizer and mix again
Let us immediately note that excess water negatively affects the strength of concrete after setting, so the amount of liquid should be no more than that required for high-quality filling of the form. Application plasticizer will significantly facilitate this process, add strength to concrete and reduce cement consumption by up to 15-20%. Fiber fiber can also be added to the solution, which will prevent shrinkage cracks on the surface and increase the abrasion strength of concrete by 100%.
For ease of use of the stencil, we attach handles to it , using special technological holes in the housing. For those who plan to make garden paths at low cost, let us tell you that the mold can be lubricated with automotive “ working out».
Of course, this is not the most ideal option, because the greasy surface of the tiles can only be painted after some time. No less budget-friendly is the use soap solution, however, even such an environmentally friendly method also has the disadvantage described above.
We lubricate the molds for the garden path with a special lubricant. Lubricating the mold will allow you to easily remove it from the finished product.
Here's the application special lubricant for forms though it will entail additional expenses, but will save you from the need to constantly lubricate the mold for making a garden path with your own hands. A form greased immediately before work will not leave greasy marks, so you can paint such a path immediately after setting.
If the soil you compacted has dried out , then you must definitely spill it with water. Next, guided by the previously stretched cord, and also controlling the level, we install a form for pouring garden paths, which must be slightly pressed into the sand.
Fill the stencil with the prepared solution , avoiding voids in its corners. Using a small tamper, which we use as a vibrating plate, we try to compact the concrete as much as possible, and then level its surface with a spatula. After the 30-50 minutes required for the concrete to pre-set, the form is carefully removed and placed side by side, repeating the process until the finish line.
We begin to gradually fill the form, do not forget that the concrete should not be very liquid Special attention Pay attention to the corners, you need to fill them as much as possible with concrete mortar. Since we used a plasticizer and made the solution thick, after 15-20 minutes you can remove the mold. Here the first slab is ready! Let it harden for a day, after which we begin to actively use it.
To avoid animal prints hand-made garden paths cover plastic film and wait at least 3-4 days before taking a new path and taking a photo as a souvenir. The full load on the concrete product can be given no earlier than after 20 days.

The last stage in the construction of garden paths Do it yourself at low cost by painting and filling the tile joints with river sand.
There are several ways to paint a new path.
- The first is to add dye at the final stage of concrete preparation. . After this, you can lightly mix the concrete, achieving an uneven color, or thoroughly mix the components to obtain a uniform color.
- The second method requires dusting the wet concrete surface with dry dye each time the mold is removed. , however, in this case, only the very top layer will be painted, which will be erased over time. Garden paths with stains wiped off precisely after this type of painting can often be seen in photos on the Internet.

DIY paths video tutorial
Garden paths painted with your own hands look very interesting. dye dissolved in soil deep penetration , which allows you to achieve similarity with natural stone at low cost. Stone effect tiles, painted in various colors, will look especially impressive in your garden. AND last tip: after painting, do not forget to treat the surface of the path with a water repellent - it will not allow moisture to penetrate the pores of the concrete, destroying it from the inside.
Pouring a concrete path with your own hands
Monolithic concrete paths laid along a summer cottage are easy to manufacture, durable and visually attractive. Read on to learn how to make concrete garden paths.
Marking future path , driving pegs along its edges and pulling a cord between them at the required height. We take into account that optimal thickness filling is from 7 to 10 cm.

Preparing the sand bed . To do this, we dig a trench up to 20 cm deep, level its bottom, install beacons and lay geotextiles, also covering the slopes of the trench with this material. After this, we fill the hole with 2-3 layers of sand with intermediate pouring and compaction of each layer. You can add a layer of fine crushed stone between two adjacent layers of sand. This will enhance the drainage properties of the pillow.
Laying agrofibre Installation of a sand cushion Leveling the sand cushion
Preparing concrete . You can use the recipe from the instructions for filling the molds. If you need a pavement path of increased strength, for example, for driving or parking a car in a country house, then take 1 part of cement (not lower than grade 400), 1.5 parts of sand and 2.5-3 parts of crushed stone or gravel. The ideal volume ratio is 1 part water to 3 parts cement, but to increase the plasticity of the liquid, add a little more. Do not forget that the less water in the solution, the stronger the concrete coating will be.

Formwork is used for garden paths from wooden boards with a thickness of at least 20 mm. It is better if the width of the boards is equal to the thickness of the fill, otherwise you will have to dig them into the ground. The boards need to be nailed to inside pegs.

Install dividers at even intervals in order to create expansion joints. When making paths at the dacha, dividers can be used from available material. Smooth, narrow strips of drywall, glass, thin boards, scraps of laminate, siding, etc. are suitable for these purposes. In order to remove the spacers after the concrete has set, they must be lubricated with any suitable lubricant.

We carry out reinforcement of the structure to increase its strength. Chain-link mesh, scraps of reinforcement, pipes, etc. are used as reinforcing mesh. Of course, it is best to use a welded reinforcing belt made of rods with a diameter of up to 8 mm, with a cell of 100x100 mm. The reinforcement is placed at half the height of the path, using fragments of bricks or clamps made from the same rods.

Garden paths are poured up to the top edge of the formwork. . Next, using a tamper, we compact the surface until cement milk appears on the surface of the path, and then level it using the rule. Next, cover the path with plastic film and wait at least 5 days before removing the formwork. Full load on concrete can be given no earlier than after 3 weeks.
Decorate the path possible in several ways.
- Firstly, the surface can be painted or tiled with marble or ceramic tiles.
- Secondly, you can apply a design to it using a shaped spatula, screwdriver or coarse brush.
- Thirdly, you can paint the concrete itself at the preparation stage.
- Fourthly, gravel or pebbles can be pressed into the wet layer, laying out intricate patterns.
In a word, a garden path made of concrete can be original and attractive, as in numerous videos of popular Internet resources.

DIY garden path made of paving slabs
If you are planning to arrange garden paths with your own hands at low cost, then this method will not suit you. Paving slabs cannot be called a cheap material. On the other hand, such paths have a lot of advantages and are practically free of disadvantages. Watch a video in which you can lay such a garden path yourself. Not so difficult, right? At first glance, this is true. In fact, in order for the sidewalk path laid at the dacha to please the eye long time, careful preparation of the base and maximum care and precision in work are required. So, how to make a path from paving slabs with your own hands:
- Choosing a tile . At the same time, we focus not only on design, but also on its operational features. For example, for tiles on which you plan to drive a car, the ability to withstand increased loads is important.
- Stocking up on tools . For work we will need: a trowel, a rubber hammer, a tamper, a level, a cord, pegs, a pipe or I-beam, sand and cement.

- Marking future paths . To do this, we hammer in the pegs and pull the cord to the required height.

- Preparing the base . The successful operation of the track throughout its entire service life will depend on this work, so we approach this stage with the most responsibility. To do this, we level the base as accurately as possible, removing part of the soil on the hills and adding it in the lowlands. As we work, we constantly compact the soil, wetting its surface with water.
We calculate the depth of the base by calculating the height of the tiles plus the height of the sand layer. To the resulting value add a couple of centimeters for shrinkage. As a rule, the depth is 20-30cm. Do not forget to create the necessary slopes for water drainage from the surface.
- After leveling the base, we lay geotextiles . It will prevent weeds from growing into the tile joints.
- Pour a sand cushion , spill it with water and tamp it down. After this, we level its surface with a profile, relying on pipes or beams installed at the required distance from each other.

- Preparing the mixture from 1 part cement and 3 parts sand, which we lay on the base and screed using an I-beam or channel.
- We start laying the tiles from the curb in the direction “away from us” . We lay out the initial row clearly along the cord installed along the chamfer. In this case, you can use 1-2mm crosses to form seams of the same thickness. To ensure the required height, sand is added or removed with a trowel, compacting it as you work. At the same time, do not forget to constantly monitor the quality of installation using a level and a mallet. If you need to join the tiles to other buildings, then, if necessary, they can be trimmed with a grinder with a circle installed for working on stone.
- After the last row is laid, fill the seams sand-cement mixture and fill them with water.
A border installed along the edges of the sidewalk will prevent the tiles from moving and maintain the integrity of the structure. During operation, sand can be washed out of the seams with water, so it will be necessary to add it periodically.
Wooden garden path
Many summer residents think about how to make garden paths from wood, because this inexpensive and accessible material is always at hand. In addition, you can use not only classic version in the form of installed cuts, but also to install beautiful and functional paths in the country, for example, from such improvised material as Euro pallets.

The material for the cuts can be either a purchased log house or fallen trees from the grove located next to the site. A chainsaw will help you make wooden garden paths at low cost; you don’t have to buy it if you can ask a friend for help.
To arrange the path, follow the following instructions:
- We mark the place for the path and dig a trench 10-20 cm deep.
- We lay waterproofing taking into account covering not only the bottom, but also the slopes.
- For drainage, fill the bottom of the trench with crushed stone.
- Pour a 10 cm layer of sand as a cushion under the cuts.
- We install the cuts, alternating thick logs with thin branches to fill the space as much as possible.
- We fill the gaps between the cuts with sand.
You can install the saw cuts in such a way that they top part will rise 3-5 cm above the surface. A path of this type will be much less dirty in slush and rain.
In the video you can often see how great a garden path made of wooden boards looks. But material such as Euro pallets is excellent for our purposes, and the cost of such material only includes its delivery to the site. At the same time, pallets are made from durable wood, which, when treated with antiseptics, can last a long time.
To prepare the boards, they are cut into 50 cm pieces, sanded, processed protective agent and painted or varnished. The flooring itself is performed according to the following algorithm:
- Logs are made from wooden blocks, which are fastened together with the same bars, using “half-wood” knitting.
- Cover the structure with bitumen mastic, which will protect the frame from rotting. The same mastic is used to cover the bottom of the boards.
- Lay the boards, leaving a gap of 10-20 mm between them for water drainage.
- Additionally, the path is coated with varnish or paint.
When driving nails, try to bury their heads into the wood as deeply as possible. This will allow you to walk along the path barefoot without fear of getting hurt.
Prices for forms and materials
Everything you need for arranging garden paths can be found in the appropriate sections of the Leroy Merlin store. “Garden paths” and other sections of the catalog contain hundreds of items necessary tools and materials. At the same time, it should be noted that the prices are quite affordable.
Thus, the cost of a mold for a garden path in Leroy is 507 rubles, which, you see, is quite inexpensive, given its reusable use. A concrete mixer, of course, will cost you more - a 120 liter unit costs 5,690 rubles, but it will greatly facilitate concrete work.

Concrete dyes
Dyes for concrete start at 603 rubles. for a 700 g jar, while plasticizers can be purchased for a minimal price - 149 rubles. for a container weighing 600 g. The store’s consultants will be able to answer questions about how to make paths at the dacha with your own hands or tell you about the features of using certain materials. A form for a garden path, purchased from Leroy Merlin, will allow you to save quite a significant amount when arranging paths in your garden.
If you have not yet decided how to make a path in your dacha, look at the gallery of photos located on our website. Interesting solutions using in various ways arrangement of garden paths will help you choose the most best option, make the necessary changes to it and create your own unique design. And maybe soon a photo of your particular site will appear in the first lines of search results.

Garden paths - part landscape design. They make the dacha area well-groomed and attractive and make it easier to move around the area.
In our article we have collected detailed instructions, photographs and videos on how to make paths with your own hands.
Economy options for paths in the countryside with your own hands
Used for arranging garden paths different materials, but there is General requirements, to which they correspond:
- Aesthetics
- Safety
- Moisture resistance
- Maintainability
- All-season
- Strength
- Easy care
Gardeners and summer residents make paths from concrete, wood, natural stone, paving slabs and other materials. Look what they look like.
Concrete path using ready-made forms

Path paved with natural stone

Wooden garden path

Path made of concrete and paving slabs

Path made of concrete imitating natural stone

Gravel path

Combined garden path made of stone and crushed stone

Another option for combining crushed stone, stone and paving slabs

Path made of paving slabs

Clinker brick path

Path made of stone

Ideally, garden paths are combined with exterior decoration home and complement the landscape. The material for the paths is selected taking into account the expected load.
Decorative paths are rarely used for their intended purpose. Bulk materials are suitable for them: gravel, sand, crushed stone.
It is better to move along the paths from durable concrete, brick or paving slabs. It is recommended to pave the parking lot with concrete, paving stones or stone.
Do-it-yourself concrete paths at the dacha
Concrete garden paths are practical, durable, and can withstand heavy loads. Rough surface concrete coverings doesn't slip.
Such paths are arranged in two ways: using formwork or special forms.
Pouring with formwork
First prepare the base: remove the top layer of soil and compact it. Then proceed according to the scheme.

Gray concrete looks boring, but there are ways to elevate it.
On small areas build winding paths with smooth turns and bends. This will visually expand the space.

Add pigment to the concrete mixture to color your walkway. desired color. Add coloring pigments at the stage of preparing the filling mixture.

Show your imagination, and gray concrete will turn into an imitation of wild stone, as in the photo below. This requires a sharp knife and a steady hand to make stone-shaped grooves on the surface when the concrete has set but not completely hardened.

Pouring into special forms
Plastic forms for pouring concrete are sold in construction and gardening stores.
Prepare the base for the path. To do this, go 10 cm deep into the soil. Next, compact the soil and lay a cushion of sand and crushed stone. If you add crushed stone to the concrete mixture, make a sandy base.

Moisten the prepared base with water, and treat the filling molds with a special lubricant on the inside.
Then place the forms in a sand cushion, press them in so that the upper part protrudes 0.5 - 1 cm above the ground.

Prepare a concrete mixture, add a plasticizer to it to give the path strength, add a colored pigment (optional) and pour it into the molds so that the concrete is evenly distributed over the entire area. Level the top layer with a spatula or trowel.

After 30 - 40 minutes, when the concrete has set, carefully remove the forms and cover the path with film for 1-2 days. You can walk along the path after 5 days.
Video of a thematic master class will help you
Do-it-yourself tile paths in the country
Used for garden paths paving slabs different designs, color and size. It is laid on a prepared base with a sand base, as in the diagram below.

Tiles of 40x40 cm are often used for installation. Big size reduces the time for arranging garden paths. The tiles are laid so that the distance between its centers is no more than a step.

The gaps at the junction points are filled with sand, and the edges of the path on both sides are limited by curbs.

The advantage of paving slabs is that they are combined with country houses and dachas of any style, fits into simple and complex landscapes.

Do-it-yourself wooden paths in the country
Wooden paths in the countryside look natural, stylish and durable. Garden paths at the dacha are made from ordinary boards no less than 5 cm thick. You will have to tinker with them less than with laying individual cuts one by one.
The advantage of such wooden paths is quick installation and neat appearance. Manufacturing begins with the selection of materials and tools. Inexpensive and common lumber - boards from coniferous species tree. It is better to choose larch, but the cost in this case will be higher.

The wood is processed according to standard scheme: antiseptic, and then covered with varnish or paint - for further protection. Clear varnish highlights the wood grain, and colored paint adds accents. The boards are cut into pieces of equal length. For paths of complex shape, the length of each plank is selected individually.

The base of paths made of natural wood, as for a wooden path made from saw cuts, is made from a sand-crushed stone cushion. Preparatory work is carried out in the following sequence: marking, foundation pit, geotextiles, crushed stone layer, sand layer, compaction.

Then the boards are laid on the base or placed on a raised platform - a specially constructed frame. Boards laid in the ground look natural and relaxed, but this wooden path spoils faster. The structure on the frame will be stronger and more durable, in a word - capital. This idea requires more effort.
Watch the video on how to make garden paths from wood at minimal cost
The construction of a garden path from wooden saw cuts resembles paving stones. Instead of stones, flat wooden dies of the same height are laid. To create a dense path, large cuts are alternated with stumps of small diameter, and the free space is filled with large branches.
Ordinary stumps or tree slices make nice winding paths. Select the right material, understand the installation techniques, and you will be able to make a garden path from wood cuts with your own hands in the garden or at the dacha.

Pay attention to preparing the wood. Untreated wood will quickly become unusable, and the path made from tree rings will have to be redone. First, choose the type of wood. Suitable:
- pine
- larch
- birch
The difference between hardwood (larch, beech, oak) and other types is the service life. Larch will last 25 years, pine will be in use for 5 - 7 years.

Use dry, pest-free wood. Arrange the logs into dies of equal height. Optimal size— 15 cm. For convenience, use a template. If you do the workpiece yourself, make sure that the cut is made strictly perpendicular to the log. Sort the sliced “pancakes” by size and remove any cracked ones. Clean the rings from the bark.
Next, treat the wood cuts for the paths to protect them from rotting and destruction. An elementary method is treatment with drying oil. Bring the drying oil to a boil, then dip each stick into the hot oil. The boiling substance seals the pores of the wood and prevents moisture from entering, the first enemy of wooden products. Disadvantages of this method: long and dangerous. Hot drying oil can burn you.
Another option is special formulations. Arm yourself with a brush or spray bottle and treat the wood with an antifungal agent. After preventative treatment, allow the wood to dry.
After preparing the material, proceed to constructing the path. Take your time when laying a path from wood cuts. First, do the preparatory and excavation work:
- Mark the path in the garden
- Remove the top layer of soil
- Dig a trench
- Arrange waterproofing
- Prepare the base.
Now you can take up the shovels. Don't make the trench deep. Add 10 cm to the height of the dies - this depth will be optimal.
Place a waterproofing layer in the trench. Some people use film or roofing felt, but in such cases it is better to use geotextiles. This material does not allow water to stagnate and weeds to grow.
Place a 10 cm layer of gravel on the waterproofing - this is drainage to drain water. Compact and cover with 5 - 10 cm of sand.
Wet the sand to better compact and level the base of the stump garden path. When wet, sand is compacted by hand.

The wood is laid in accordance with the pattern or in a random order. The logs are placed on a sand cushion, then they are compacted and leveled. Sand or crushed stone is poured into the gaps. Mulch is suitable for seams on top, sawdust, pebbles, moss.

Garden paths at the dacha, personal plot or in the courtyard of a private household - this is not only an important element of landscape design, necessary for comfortable movement between objects of the territory, but also a method of zoning and decoration. The correct arrangement of garden paths will allow you to spend as little time and effort as possible moving between elements of landscape design, and a beautiful, practical and durable design will allow you to decorate your yard or summer cottage, create a creative design that will be the envy of your neighbors and the pride of guests of your urban or country house with an adjoining house territory. Even in a small private courtyard, paths are necessary for safe and comfortable movement between the main and secondary objects of the territory - a country or city house building, a garage, a gazebo, outbuildings, a children's corner or playground, a swing, a barbecue area, a swimming pool or a pond.

Requirements for garden paths
If we talk about physical parameters, then the main requirement for the paths of the local area and garden plot is the shortest distance from one object to another. But often this criterion runs counter to the aesthetics of landscape design - winding paths look beautiful, romantic and even mysterious, but at the same time they make up a longer path than their counterparts with clear straight lines and turns.


Conventionally, all the paths of the site are divided into main and secondary. The requirement for the width of the path also depends on the functionality of the path - the main ones are usually made with parameters of 1-1.5 m, and the secondary ones can have a width of at least half a meter. But a lot depends on the material used to make the garden path - if standard-sized pieces are used (bricks, concrete or stone slabs, “garden parquet” or any other products with non-variable sizes), then the width of the path is determined by their number.


If we talk about the aesthetic qualities of garden paths, then they must externally correspond to the general design concept of the yard or site. If natural stone is used in the design of the façade of a house or other buildings, cladding areas and patios, then it would be logical to use this material or its combination with other raw materials for laying out paths.


In addition to its main function - providing the opportunity to move freely between objects in the local area and dividing the site into segments, or otherwise - zoning, garden paths also play the role of decorative elements. By using original choice Using the material or method of making country paths, you can not only create an exclusive landscape design for your site, but also bring your creative abilities and design ideas to life.

Types of garden paths
According to the type of material used, all tracks can be divided into the following groups:
- concrete;
- stone (in turn divided into those made of flat stone, pebbles, paving stones and other types);
- brick;
- wooden;
- from waste material (plastic covers, parts glass bottles, traffic jams, etc.).
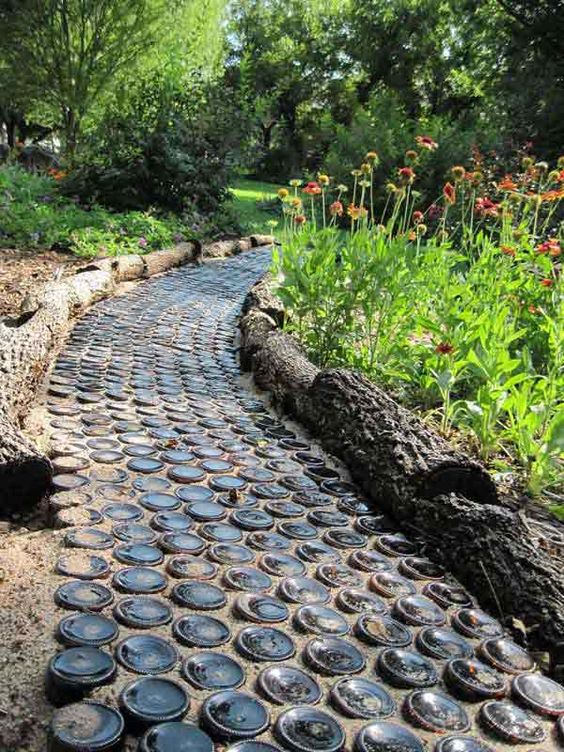

The material for the paths is selected based on the design of the main building (its facade), other large-scale buildings in the yard or on the site, the style of execution, the size of the paths themselves and the capabilities of the owners (a stone path will require financial investments, and a path made of bottle caps will only require time to collect them ).


In addition to the material, the criterion for dividing the tracks is the method of execution - they are divided into solid and non-solid. The name speaks for itself. The type of paths will depend on their length and purpose - whether the paths play an exclusively practical role or also carry a decorative function.

Also, all country and garden paths can be divided into two types - temporary and permanent. Most of the paths involved in landscape design are permanent. But in some cases there is a need to lay paths, for example, only during the summer season. Ready-made tracks are most often made of rubber or plastic and are sold by the meter or in blocks (sections, products) connected to each other like puzzles.

Preparatory work
Regardless of how long your paths will be, what material they will be made of and in what manner, any execution will require preparatory work. First of all, you need to draw up a plan for the location of the paths on the site. This can be done either on a regular sheet of paper or in a special program, which is not difficult to find on the Internet. Indicate on your plan all the elements of landscape design - not only the main buildings and sites, but also the location of flower beds, beds, and utility objects.


While laying the still drawn paths from the main objects to the secondary ones, you can optimize the location of flower beds, beds and temporary plantings, in order to reduce the distance between objects or connect some elements into zones. As you draw up the plan, it will become clear which segments can be united by a path leading to them, and for which areas of the yard you will have to use branches or pave areas. Only on paper it may seem that a rarely visited corner of the garden or yard can do without a path - imagine your reluctance to walk on the ground after rain, and you will find the resources to make even a very narrow path.

Next comes the markings on the ground. This stage should not be neglected, especially in cases where not only the length, but also the width of the paths will be clearly regulated by the parameters of the material - slabs, bricks or any other standard blanks. The easiest way to mark is using pegs with a stretched rope or cord. To make the outlines of future paths more obvious, the boundaries can be outlined with lime.
The ideal option can be obtained if, together with marking the paths, it is possible to place marks for planting trees and shrubs, plants that will frame these same paths. On the ground, everything looks a little different than in the program or on a piece of paper. You can lay out stones with inscriptions of the names of trees and shrubs or use them to indicate the layout of future flower beds.


The foundation pit for any path should be slightly wider than the path itself. In order for garden paths to last as long as possible, it is necessary to lay a border of stones or concrete along the edges.


Base for garden path
You should not neglect this stage of work if you want the path you have laid to last for many years, and not begin to crumble or sprout grass after the first season of use. When preparing the foundation for garden dredges, it is important to remember that they should have a slight slope to drain rainwater. The presence of a small drainage trench on the side of the slope of the paths will be an excellent help for the entire landscape design of the yard or area during rainy weather.


So, it is necessary to carry out the following manipulations to prepare the base for the garden path:
- remove the top fertile layer ranging from 2 to 20 cm (it all depends on the quality of the soil, length, tires and material for laying out the paths);
- along the entire length of the walls of the resulting pit are installed wooden boards, after adding a little sand underneath;
- if the width of the path is limited by concrete curbs, then they are leveled and fixed with reinforcing bars (to prevent shifts), which are driven inside the pit;
- if the soil on your site is very loose and the walls of the trench are uneven, you will have to drive reinforcing pins along the edges of the walls, and then install curbs;
- then fine gravel or crushed stone, previously mixed with cement or sand, is poured onto the bottom of the trench, leveled and compacted (layer thickness from 5 to 10 cm);
- For more thorough compaction of the gravel layer, it is necessary to wet it periodically.

An example of designing a beautiful and practical garden path
Let's consider the option of arranging garden paths made of brick, as the most affordable and easy-to-use material (if you have the opportunity to use used bricks rather than buy the material).


A brick garden path is a fairly durable, strong and aesthetic surface that even a homeowner without special skills and experience can make on their own. The brick path is laid out according to the same principle as paving slabs or paving stones. In order for the trail to last as long as possible, choose high-quality clinker bricks and carry out all work with high level accuracy.


So, you need to go through the following algorithm of actions:
- prepared base with compacted top layer the sand must be carefully leveled using a rule (a homemade device made from a board with a perfectly equal surface);
- Next comes the installation of side bricks (in relation to the width of the path), they are mounted edgewise and driven into the sand half their width using a rubber hammer;
- if your path does not have a border, then the side bricks must be fastened with mortar (use formwork, after removing which you need to add crushed stone and compact it at the end of this part of the work);
- Next, the brick path pattern is directly laid out (it can be placed edgewise or laid wide);
- Usually, to create the most rigid and durable masonry, one row of bricks is laid along the path, and the second - across. Also, to increase the strength of the masonry, cement-based street glue is used (it will help not only hold the bricks together, but also prevent grass from growing through the products).
- You will need a little solution, because... it is necessary that it does not protrude to the surface between the bricks, but is located inside the masonry;
- upon completion of the installation of bricks, the gaps between them are filled with sand using a large brush;
- in order to add brightness to the resulting brickwork and to extend its service life, the surface must be coated with a penetrating primer, and after it has completely dried, with a varnish for street stones.


And finally: some original ideas
In modern landscape design projects for areas of various shapes and sizes, design styles, you can often find garden paths laid out in the style of stepping stones. It is as if you are moving along the elements of the path in the form of individual slabs, flat stones or cuts of logs that arise directly from the lawn or loose material of the path base. It’s easy to make a beautiful, modern and at the same time functional path with your own hands if you use so-called “steps” made of concrete of various shapes.


In this case, the combination of materials looks original. For example, clear edges and sharp corners concrete square or rectangular slabs or flat stone against the background of rounded shapes of river stone - pebbles. Together, these two types of materials provide an organic and attractive alliance for creating creative, yet practical surfaces.


And the “steppes” from wooden slabs look luxurious on fine decorative gravel in snow-white shades. Against the backdrop of bright green lawns, such paths will look especially impressive...

Wooden garden paths are not that uncommon. Only in Lately For modern landscape design projects, so-called “garden parquet” is increasingly being used. The material is standard sizes blanks that are very easy to connect to each other to create not only durable and wear-resistant, but also incredibly beautiful coating. “Garden parquet” is used not only to create paths, but is also laid out on open verandas, platforms, terraces and patio or barbecue areas. The wood in such products is processed in a special way - it is not affected by the usual “natural irritants” - moisture, temperature changes, direct sunlight.


Laying out designs from round river stones (mainly Altai blue) allows you to create not only original paths, but also bring the beauty of the creative process into the design of your yard or summer cottage. Round river stones different sizes from very light gray-blue to dark, like anthracite, can be laid out in fancy abstract patterns or prints that are quite clear in geometry. Creating such a path will require not only financial, but also time, incredible accuracy and a lot of free time. But all efforts will be more than compensated by the incredible aesthetics of the paths and their uniqueness.


An equally original effect can be achieved by laying out a pattern from the remains of porcelain tiles (products for flooring, street use). The advantage of this method is not only the originality of the result and the freedom of your imagination, but also the saving of the family budget, because not only leftovers are used, but fragments from tiles of different shapes, sizes and colors.


A walkway created solely using loose gravel may not surprise your guests or neighbors, but it will help you save money. family budget. It is only important to install strong, solid borders that will hold small fractions of stone inside the trench.


The arrangement and layout of the site involves the creation of paths. Moreover, the requirements for them are quite serious: they must be reliable, comfortable, functional, beautiful and, very preferably, inexpensive. We’ll talk about how to make garden paths with your own hands at low cost in this article.
What to make paths from
The path surface can be hard or loose. To create a hard coating, the following materials are used:
- Concrete. Concrete walkways are more than just plain gray tape. In addition, there are dyes and you can decorate it if desired. There are also forms for filling immediately on site. It turns out homemade paving slabs. Another option is to pour small concrete slabs of the required size yourself, then lay them on the bedding. See photos for design examples.
And everyone in the household has forms for such a path - cut water bottles into cylinders, place them as needed and fill them with solution: beautiful and cheap

Large pebbles as backfill and colored concrete slabs

Another option for laying homemade concrete slabs on a garden path

And this is a concrete path with expansion joints. If you look closely, you can see that there are stripes across it. This is to ensure that the wet surface is non-slip.

Another ready-made form for homemade paving slabs

Looks attractive due to the border and non-linear shape

A simple concrete strip can be decorated to your liking

This is how they pave a path in a country house or near a house using ready-made forms into which concrete mortar is poured.
- Flagstone. This a natural stone, which was cut into plates. It is laid on a prepared base (more on this later), the gaps are filled with backfill. It turns out beautiful, reliable, non-slip. It’s not for nothing that landscape designers love flagstone paths so much.

Backfill is one of the important elements, shaping the appearance

In this form, the flagstone path does not break up the lawn, and it is comfortable to walk

The color of the stone can be any

Quite nice paths made of old brick. And if you do the backfill on the sides and in the seams, it will be absolutely beautiful

These are two types of bricks - ceramic and crushed granite

A clinker brick path is beautiful, to say the least... but maybe too beautiful for a garden?
- Tree. Such a seemingly unsuitable material, but correct processing it can serve for a long time. Moreover, many hand-made wooden paths can be classified as low-cost. For example, they came up with the idea of using stumps and tree cuts as borders or coverings. They also make flooring from well-treated boards - better than a terrace, but if not, an old floor will do.

Building a tree can become an excellent path

This type of wooden pavement for a summer residence

Properly treated wood can last for several years.

Combination with pebbles - comfortable to walk

Gorgeous path for a plot near the house

And this is how to make a path from boards
- Plastic. There are tiles for garden paths made of plastic - polyethylene or polypropylene. She has square shape and a system of locks that are attached to one another. It can be laid directly on top of the lawn or previously trodden paths in the country house or on a plot of land. This is an option - fast and cheap. It can definitely be called “Low Cost”. It is better, of course, to make the filling according to the rules from crushed stone and sand, and lay plastic elements on top. It's a little longer and more expensive. There is also an immodest, but very nice option plastic tiles for paths. There is also “garden parquet”. These are slabs or boards made of wood-polymer composite - WPC (they are in the photo, they look exactly like parquet). This material appeared relatively recently. It looks and feels like wood, but is essentially a mixture of wood flour and polymer. These are very beautiful coatings, but their cost is by no means modest. Although not fabulous.

The good thing about a plastic path in a country house or on a plot is that it can be made in a few minutes

Another type of plastic tiles for paths

This is garden parquet. Gorgeous, but overpriced

And another option for polymer tiles for garden droshky

This is a bunch of plastic garden tiles
- Pebbles. These are rounded natural stones that can be found on the banks of rivers or lakes. Flatter stones are more suitable for making paths. There are different shades of gray, black, white, and sometimes you can find burgundy. These stones, laid close to each other, create amazingly beautiful mosaic paths. But this is an activity for the diligent and persistent. Those who lack patience can find large flat boulders or large pebbles and place them in the sand. It's not as luxurious, but no less reliable. You can do the same with granite or other similar stones. It is important that at least one edge is relatively flat. You put this flat part up, and bury the rest. The work is not easy, but you can not only walk on the path, but also drive.

Different types of pebble paths

Large pebbles do not require as much time for installation

Beautiful pebble paths in the garden.

Large natural stones can be used to pave good corners
- Available materials. Country paths are made from old tires and bottles.