DIY corner shelves for the wall. DIY corner shelf
Often the corners in rooms are empty, although there is a way to use them rationally: arrange corner corners. Such designs compare favorably with standard ones appearance, and most importantly, they save free space in rooms with small footage.
They are sold in furniture stores and made to order, but building them yourself won’t cause any difficulties either. Today we will tell you how to properly place such furniture in the house, choose suitable materials for making and making corner shelves from wood, chipboard, glass and scraps metal-plastic pipes without the help of professionals.
Corner shelves on the wall
Hanging corner shelves are good because they allow you to free up space below for other furniture. Typically, such shelves are used to store books, souvenirs and other small items. It is also convenient to place flowers, icons, telephones, bathroom and kitchen accessories on them. We will look at the nuances of creating models suitable for each of the listed cases, and will start with a corner shelf for the living room.
Corner shelves save space in the room
Shelves for flowers, souvenirs and other small items are made of metal, plasterboard, glass, but the most popular material is still wood and its substitutes: they are practical, easy to care for and without extra effort can be processed at home. To save money, wood boards(MDF, laminated chipboard) you can not take full-size ones, but choose from leftovers on the market; there you often come across pieces of sizes suitable for shelves.
In addition to the material, you will need tools for wood processing - a drill, a jigsaw, sandpaper, a tape measure, a ruler and a marker for marking. You can’t do without fastening elements (screws, dowels) and trim tape for finishing the edges.
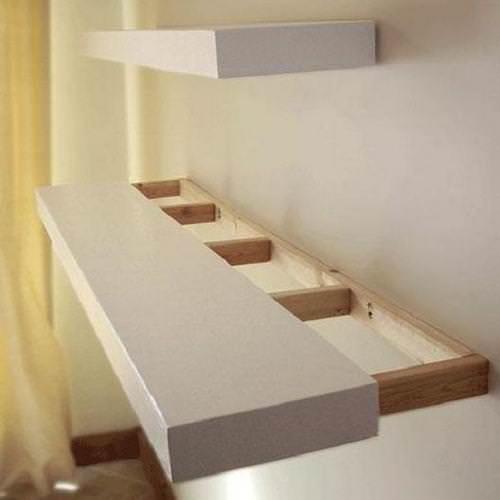
The decorative wall shelf in question consists of three tiers connected by sidewalls. First, we make a design drawing and indicate the dimensions of the components on it. Then we make individual parts from cardboard or paper and transfer them to the material, in this case - laminated chipboard, tracing the outline with a marker or the tip of a stationery knife.
 Construction drawing
 The parts are cut out using a jigsaw with fine teeth. After cutting, it is better to number the shelf fragments so as not to confuse them during assembly. In the finished parts, mark the places of fasteners (for fastening individual fragments of the structure and for hanging on the wall) and drill holes with a drill required diameter.
Before joining, the components of the structure are cleaned of dust and sawdust and equipped with a decorative edge. To do this, the trimming tape is applied to the cut areas and glued by running a heated iron over the surface covered with a rag. If the tape turns out to be longer than necessary, carefully cut off the excess stationery knife, and the resulting edge is cleaned sandpaper.
 Processing slices
 After completing the processing of the parts, we begin assembly, focusing on the diagram and numbering. Dowels are inserted into some of the holes and the parts are connected to each other with self-tapping screws, using a screwdriver or screwdriver. Upon completion of assembly, marks are made on the wall for the fasteners on which the shelf will be hung. In this case, you will need four of them - one for each jumper.
Drilling holes with a drill required depth(for concrete walls it is worth using drills with a Pobedit tip) dowels are placed in them and the shelf is fixed with self-tapping screws. The finishing touch is to decorate the heads of the wall fasteners with special caps to match the color of the shelf. The design is ready! Now all that remains is to arrange books, photos and other little things dear to the heart.
 Fastener caps can be disguised
 Corner shelves for the kitchen
The kitchen accumulates a considerable amount of all kinds of jars with spices and sauces, small utensils for cooking, serving, and the like. If the main cabinets are already full, they will come to help in the fight against kitchen chaos corner shelves on the wall. They are hung above the dining area, above the stove or in other suitable place. Of course, such a shelf must be durable and spacious, so we opted for a two-tier structure made of fiberboard.
 Kitchen shelf layout and diagram
 The tools needed are similar to those used for the living room shelf. The fittings and fasteners are also similar, but you will additionally need hinged hinges and confirmations (furniture screws). The first step is to measure the available free space and, focusing on it, draw up a drawing of the shelf, indicating on it the parameters of all parts. Take the sketches given in the article as a sample or find others on the Internet.
Work on the construction of a kitchen corner shelf is carried out in the following order:
- We make sidewalls. To do this, contours of parts are applied to sheets of material, which are then cut out with a jigsaw. It is more convenient to perform this work for two sidewalls at once, if it is possible to fasten 2 fiberboard sheet clamps.
- If chips occur when cutting parts, they are treated with sandpaper or a grinding machine.
- The cuts on the sidewalls are covered with trim tape, ironing it with an iron. In places of bends, the iron is applied to the tape with the nose part.
 Sidewalls and crossbars
 - After making all the sidewalls, cut out the rectangular crossbars with which they will be connected. To give the design originality, the edges of the crossbars are rounded. Pasting the sections is done in the same way as on the sidewalls.
- Let's start assembling. At the junction of the two inner sidewalls with the upper crossbars, slots are cut out in the side parts of such a length and thickness that the upper part of the shelf fits into them.
- In the remaining joints, two holes for confirmations are drilled on each side with a drill.
 Connecting parts
 - The shelf elements are joined and fastened by screwing in the confirms until a slight crack appears when tightened.
- The last crossbar of the shelf is inserted into the pre-cut grooves. At the point of contact with the outer sidewalls, it is fixed with confirmations.
- Finally, the fastener heads are masked with decorative plugs and the shelf is hung in the chosen location. Suitable hangers can be purchased at the market or at a hardware store.
 Assembled shelf
 Corner shelves for icons
Majority Orthodox people icons are kept in the house. A special place is required to place them; traditionally, icons are placed in the corner of the house facing east. A corner shelf, especially a wooden one, is perfect for these purposes.
 Simple single-tier shelf for icons
 Making a shelf for icons does not require special skills; difficulties arise only if you want to decorate it openwork carving or balusters. But you can do without such finishing or purchase the necessary parts from professional wood carvers. We will look at creating a simple single-tier shelf.
Natural wood looks more noble than substitutes, so it’s worth choosing it. From materials will suit solid wood and wide planed boards. The first step is to outline the outline and cut out a corner that will become the basis of the structure and a cornice - a narrow strip attached to the front of the shelf.
 Preparation and assembly of the structure
 If desired, the cornice is made curly - wavy at the bottom. The connection between the cornice and the shelf is made using dowels (protruding wooden pins). To do this, 2-3 cm recesses are drilled in a triangular fragment and dowels are placed inside them so that they protrude outward by 1 cm.
Then the places opposite the dowels are marked on the cornice and holes are drilled to allow the two parts to be tightly connected. Before assembling, it is recommended to sand the shelf components and varnish them. Ready product is equipped with four hangers (two on each side) and is attached to the wall. Interestingly, if you place the same structure lower, you will get an original shelf for a telephone on the wall.
Corner shelves in the bathroom
 Glass shelf for bathroom
 The bathroom is the place that needs saving space more than others, because the rooms for taking water procedures in most apartments cannot be called spacious. Therefore, it is more rational to use corner structures for storing things. It is clear that a corner shelf on a wall made of wood or chipboard is not The best decision for the bathroom, after all high humidity will quickly destroy material prone to rotting. In this situation, it is more appropriate to use products made of plastic or glass, which are resistant to moisture and can be easily treated with disinfectants.
Such shelves are available in abundance in any plumbing store, but if you like to make things with your own hands and want to get original item, adapted to your tastes and needs, you can make them yourself. Let's look at how to properly make a shelf for a bathroom using a glass structure as an example.
Tools you should prepare:
- drill;
- screwdriver;
- screws and dowels;
- tape measure and pencil;
- building level.
You will also need shelf holders (available at hardware stores) and strained glass no thinner than 5 mm. First you need to think about the design of the product, take measurements at the location where it will be placed and draw a template. Then the parts are cut out of the glass. It is recommended to order this procedure from a glass workshop, this way the shelf will look more aesthetically pleasing, and you will protect yourself from injuries and possible damage to the material.
The next stage of work is to attach the finished parts to the wall. To do this, the holders are put on and fixed on the shelf, it is brought to the wall and the places for the dowels are marked in the right place. Using a drill (with a special drill) according to the marks, checking the level, holes are drilled and fasteners are inserted into them. Then all that remains is to hang the structure and make sure that it is securely fastened.
 Holes for fasteners
 Corner shelves for books
Owners of a large library are familiar with the problem of convenience, when they want to place their favorite publications in immediate access without cluttering the room with cabinets and shelving. There is an exit. How to make classic ones wooden shelves We have already told you, but there is another option for a corner design that is ideal for storing books. Because of unusual design it will not take root in every home, but for lovers non-standard solutions you'll definitely like it.
 Spacious bookshelf made of pipes
 Corner shelf on a wall made from scraps water pipes will compactly place your books and will cost very little. You will need pipes, carbon fittings, dowels, self-tapping screws, paint and tools - an angle grinder, a gas wrench, a vice, a welding machine.
The shelf is assembled as follows - the pipes are cut into fragments (in this case 15 pieces), connected with fittings and welded. If welding machine no, you can get by with screws by screwing them in at the junctions of pipes and fittings. The structure is fixed to the wall at the top and bottom points using dowels previously driven into the wall.
It is advisable to paint the finished product ( paint will do from a can) to hide defects, welding marks and differences in the color of parts. The resulting octagonal shelf will easily fit into modern interior apartments and organize your library.
Every person wants to mount a shelf on the wall so that it fits perfectly into the overall design premises. This problem is not at all difficult to solve. Absolutely anyone who has available can nail a shelf to the wall. free time and a set of necessary tools.
As the main support for the shelf, you can choose an anchor bolt, thanks to which you can reliable fastening interior item.
Its dimensions are as follows:
- diameter up to 12 mm,
- length – 180 mm.
There must be a thread on one end of the anchor bolt in order to screw the anchor into wooden surface, and on the other hand, to screw it into a metal coupling.

As a base for the shelf, you can take a piece of board from a window sill with artificial turf.
The dimensions are as follows:
- thickness – 25 mm,
- width – up to 200 mm.
There are only two options for mounting:
- classic,
- hidden.
A hidden option for fastening shelves is needed in cases where decorative elements Absolutely incompatible with protruding fasteners. Attach shelves to this option just as easy as the traditional one.


Sequence of work
Before you attach the shelf to the wall, you need to know that the thicker the shelf, the thicker the support should be. A hole is drilled in the end part an average of 5 mm below the surface. All holes for shelves in the wall must match, otherwise attaching them will be quite problematic.


Attaching the shelf to the wall:
- A strip of the required length is considered a template. It is applied to the end of the shelf and a hole of the required diameter is made, after which it is applied to the wall.
- The next step will be drilling, which must be done with maximum precision.
To attach the shelf you will need:
- electric drill,
- threaded coupling,
- brackets,
- lath - template,
- carpentry glue,
- screws.
Installation of a corner shelf (video)
Store shelf mounts
A shelf that you bought at a hardware store can be very difficult to attach to the wall. Be sure to read the instructions that came with it. Most likely, everyone will be in it necessary recommendations about how to screw the product onto the wall.
Next you need to understand what type of fastening the shelf has. Usually, complete with a shelf and instructions, it also includes elements with which the product is fastened. It is also necessary to select brackets, thanks to which the shelf will be secured.

Bracket options may vary:
- fastenings that do not extend beyond the shelves;
- flat brackets with pear-shaped holes at the end.
To fasten a shelf from a store to the wall, first take careful measurements, which were given above.
Steps to attach the shelf to the wall:
- Based on the possible dimensions of the shelf, you will need to decide on the place where the fastening will be made. Choose the right place so that other furniture in the room does not interfere.
- Using a building level, you need to control the position of the product.
- Nests are first created in the walls so that after this procedure the shelves can be safely attached. These nests are made with a puncher or drill, and then dowels are driven into the resulting holes.
- After this, the shelf is mounted on the wall.
- The final stage is screwing the fastening elements into the holes.
How to hang shelves on the wall (video)
Thus, it was clearly shown how to attach any shelves to the wall. The fastening is carefully planned and only after the plan has been developed, work begins.
It's good when a house or apartment is tastefully furnished. You come home from work and plunge into cozy atmosphere. But there are feelings that something is missing, there are definitely places where you need to hang something. Maybe a cabinet, but it somehow doesn’t fit into the interior or isn’t the right size. Then the best option there will be a shelf. It will fit perfectly into the overall decor of the house and, importantly, will help save a lot of space.
Can be kept on shelves various items, literature.

After it has completely hardened, a shelf is put on the pins.
You can keep various items and literature on the shelves. They are attached to absolutely any room. How to properly fix a shelf on the wall so that it fits perfectly into the interior? It's not difficult as it may seem. This work Anyone can do it if they want.
When planning wall shelves the type of fixation is critical. Once you familiarize yourself with the mounting method, you can easily choose the option that suits you.
Using invisible fastening. By selecting this view, you will hide the fasteners and wall structure will look light and graceful no matter what room it is hung in. It is desirable that the wall be concrete or brick. Wall partitions made of plasterboard less than 10 cm are not recommended.

How to properly fix a shelf on the wall so that it fits perfectly into the interior?

You can use a variety of materials for wall shelves.
Using brackets. In this case, you cannot hide all the elements; they will always be visible. You can save money by purchasing metal or plastic corners. If you want to add beauty and originality to a piece of furniture, buy decorative fasteners, but always in pairs. It is necessary to take into account important point– the brackets are not suitable for every interior.

They are attached to absolutely any room.

Working with it is not difficult, and its mass is small.
For glass shelf holders. In such fasteners, rubber or silicone gaskets are used to protect the plane at the fastening site. Shelf holders can be of different sizes and shapes; there are options with suction cups. They are attached from below, and the upper surface remains open.

Anyone can do this work if they want to.

How to attach a shelf to a wall?
Using loops and corners. This is the most common method - easy, efficient, does not take much time, and will fit into any environment. The format of loops or corners allows for a decrease or increase in the load on the shelf. Attachment to guides or metal posts. Not all types can be put into practice on your own. In some cases, it is worth contacting specialists.

When planning wall shelves, the type of fixation is decisive.

To hang a shelf on a brick or concrete wall, you need to make markings using a level.
There are a number of points that you need to familiarize yourself with in order to hang a shelf in an invisible way.
- Wall thickness. The shelf should be mounted on an invisible mount if the thickness brick partition is 250 mm, and concrete - 105 mm. If the dimensions are smaller than the given data, then additional parts will be needed. When the wall is made of plasterboard or cinder blocks, and the thickness does not exceed 100 mm, then invisible fasteners are acceptable if the shelf will be used as decoration and light objects will be placed on it.
- Shelf thickness. It should not be massive or, conversely, thin. It is desirable that the material does not sag, is dry and has good finish. If there will be light items on the shelf, then the thickness of the shelf should be at least 30 mm; if you store literature or heavier utensils, it should not exceed 60 mm, but should not be less than 45 mm.
- Selection of fasteners. To choose the right mount, you need to take into account the second point, and also know what function is intended for the shelf. The invisible fastening consists of hanging loops and metal rods. The loops are attached to back side shelves, make markings. With help the necessary tool holes are made in the wall and a plug is inserted there. Then screws are screwed in to a sufficient depth and hinges are placed on them.
If you use metal rods, you need to remember that the diameter of the fastening element should be 10-12. The first thing you will find out is the length and width of the shelf. Mark this data on the wall and drill holes. The same holes will need to be made on the shelf. Depending on the load, the required number of pins will be required. They are inserted into the wall half the length of the hole and fixed with glue. After it has completely hardened, a shelf is put on the pins.

Once you familiarize yourself with the mounting method, you can easily choose the option that suits you.

Use a hammer drill to make the required holes.
Fastening for a shelf to a plasterboard wall
Exist different kinds fastenings to plasterboard walls. Here are some of them:
- Embedded beams are the optimal variation. Attached directly to the gypsum board when mounting to the wall. Bars required thickness are fixed in the place where you will attach shelves or equipment.
- Fastening is carried out to the gypsum board. This option is not difficult, since the fixing elements - butterfly dowels, umbrellas, Molly fasteners - easily pass through the plane and are screwed into the wall.
- Using profiles. In this case, you will need a magnet, preferably a powerful one, this will ensure fastening strength. In the place where it passes metallic profile, make holes all the way through. The self-tapping screw should be 5-6 mm longer than the thickness of the gypsum board sheet. Then we fix the shelf to the plasterboard wall.
- Anchor fittings. Used to attach shelves that can support significant weight. Their diameter should be from 6 mm to 1 cm.

Using the necessary tool, holes are made in the wall and a plug is inserted there.

We make sure that the drill and hardware are the same size.
Necessary materials
For wall shelves you can use a variety of materials:
- GKL. Designers often use plasterboard in interior design, especially if shelves made of this material are assigned one of the main places in the room.
- Tree. Most often used for balcony shelves. Working with it is not difficult, and its mass is small. At correct use Such shelves can last a very long time.
- Chipboard or chipboard. Moisture-resistant material, withstands temperature changes, wear-resistant.
- Glass. Very common in use. Glass shelves look very fashionable.
- Plastic. The publicly available material, since it is inexpensive, is not susceptible to mold.
- Metal. When working with it, you will definitely need a welding machine.

Then screws are screwed in to a sufficient depth and hinges are placed on them.

Required Tools
Tools you will need: a level, a drill, or better yet a hammer drill, a screwdriver, dowels, screws, a jigsaw, wood glue, a fastening set, a set of drills, a pencil, a hammer, anchor bolts- wrench.

If you use metal rods, you need to remember that the diameter of the fastening element should be 10-12.

Upon completion of all stages of work, we attach the shelf.
Fastening process: step-by-step instructions
How to attach a shelf to a wall? Before you start installing the shelf, you need to remember that the holes in the shelf on the back side are made 5 mm lower, and also make sure that the holes on the shelf and on the wall completely coincide.

The first thing you will find out is the length and width of the shelf.

When positioning the shelf, align it with the fasteners.
To hang a shelf on a brick or concrete wall, you need to make markings using a level. Use a hammer drill to make the required holes. We carry out the work carefully, avoiding chips on the wall. We make sure that the drill and hardware are the same size. Then we attach the fastening elements and check building level. If necessary, we make adjustments.

Depending on the load, the required number of pins will be required.

Using bolts and nuts, self-tapping screws or self-tapping screws, secure the shelf.
Upon completion of all stages of work, we attach the shelf. If you did not make it yourself, but purchased it in a store, then everything necessary elements fastenings are included. When positioning the shelf, align it with the fasteners. We make sure that there are no gaps between the shelf and the wall. Next, mark all the holes with a pencil. Using bolts and nuts, self-tapping screws or self-tapping screws, secure the shelf.

They are inserted into the wall half the length of the hole and fixed with glue.

If you did not make it yourself, but purchased it in a store, then all the necessary fastening elements are included.

If necessary, we make adjustments.
VIDEO: Attaching the shelf to the wall
Home improvement is not always a matter of several weeks, and quite often, additional elements such as shelves, racks and other decorations are hung on the wall after everything is finished renovation work in the house. Therefore, almost everyone faces the question of how to hang a shelf on the wall without damaging the finish.
Everyone, even those who have never encountered such a task, knows that attaching a shelf to a wall can only be done with the help of fasteners. In stores and along with shelves you can find dozens of types of fasteners, which may differ in both appearance and design. But they can be divided into two main types, with hidden fastening and external.

In addition, the shelf fastening itself can also decorative role, creating the desired design effect.
The shelves themselves are also very diverse both in their appearance and in the material from which they are made, and they also do not have a clear classification; they can be single-tiered or multi-tiered and intended for any room. The type and material of the shelf depends only on your needs or tastes. If you wish, you can even make a homemade shelf.

Where are shelves most often used?
The main place where you simply cannot do without a shelf is the bathroom. This is where shelves are a must-have attribute, as they allow you to conveniently store bathroom accessories. In most cases, even several shelves are used, but fixing a shelf in the bathroom is the most difficult, since wall covering here is ceramic tile, which must be handled very carefully.

You can’t do without a shelf in the kitchen, since it greatly increases practicality and you can place all the accessories that the housewife always needs at hand on it.
One of the ways to decorate a room is to use shelves. But they are not only an object for decoration. Much more often they are functional. Shelves are hung on the wall, placed on the floor, some are hung from the ceiling or beams. But the best thing is that they are easy to make yourself, with your own hands.
Types of shelves in the house
Depending on the installation location, shelves can be wall-mounted, floor-mounted or hanging. If the floor shelf has a large height - from a meter and above, it is often called a rack. A few words about pendants: usually this is decorative designs, which hang on a pipe or a specially driven bracket. This option is popular in rooms where heating pipes run under the ceiling: they just beg to have something hung on them. Shelves are hung on the pipe in the kitchen and bathroom: it’s convenient there.
They are made of wood, fiberboard, and have glass shelves. The same materials are used as stands, but they are also made from metal, plastic and other absolutely incredible things - for example, pipes or bottles.
IN living rooms It doesn’t really matter what material the shelf is made of. It is important that its design is in the same style as the interior. Even functionality is not always important: some play a purely decorative role. If they have anything on them, it’s only one or two items. Their role is to give the interior of the home special style and color.
A laconic style of apartment design and the same laconic shelves in a contrasting color. In this interior they are the main element. The free space above the sofa is organically filled with shelves to match the walls
If we talk about shelves in technical rooms - the kitchen and bathroom, in particular, then in addition to aesthetic considerations, practicality requirements are almost universally added. Even decorative shelves The kitchen must be cleaned well. For bathroom shelves, the requirements are generally high: from time to time there are very high humidity and materials are required that can carry it without any harm. There aren't many of them. It's plastic and stainless steel. They also make bathroom shelves from MDF, but they can be used normally if they are in good condition.
Shelves on the wall
In any room there are places on the wall where you just need to hang something. After all, the majority modern furniture occupies only the lower part - sofas, tables, couches. The upper part remains empty and dissonance arises: the lower part of the room is overloaded and the upper part is half empty or completely empty. These voids on the walls are organically filled with shelves.

The whole system, and the most “dead” space is used - the corner
Structurally, most shelves consist of the actual shelves and lintels. But these components are combined into so many options that it is impossible to count. A simple design is good: you can make any shelves with your own hands. Moreover, these products may be the first self-made things. It's really simple.
How and what to attach it to
It’s not for nothing that we start with fasteners. The design of a wall shelf largely depends on the type of mounting. Or maybe it’s the other way around. It depends on what to dance from...
Traditional hinges

Eat traditional way- on the hinges. It is suitable for wood and fiberboard, any other material that is thick enough to attach. Screwed onto the sides with self-tapping screws. Then the distance between the centers of the loop holes is measured and marked on the wall (make sure it is horizontal). At the marked points, holes are drilled for the dowel, the dowel is inserted and a dowel-nail with a small head is screwed into it, which fits into a loop or bracket (a pin slightly bent upward). Then a shelf is hung on them.
Not all materials can be drilled. For example, glass shelves. You definitely can't screw anything into them. Fastenings for glass shelves are special: they consist of two parts, between which glass is inserted. Often elastic pads are installed between the holders. The bottom mount usually has a small clamping screw to secure it in place.
Fasteners for glass shelves
The most popular mount for glass shelves is called “pelican” - for its unique shape. He looks good himself, there is different colors. The thickness of glass that it can hold is from 8 to 34 mm. You can insert not only glass into it, but also any other material of such thickness. It just looks stylish with glass.
It’s easy to make glass shelves on the wall with it: you buy a mount, order it from a glass workshop the right size and shape pieces of glass with processed edges (or cut them yourself if you know how). All that remains is the assembly itself:
- Attach the pelicans to the wall. Two dowels each. Collapsible body - decorative overlay comes off and there are two holes in the mounting plate. One is higher in the body, the second is lower. We secured it and put the decorative trim in place.
- Glass was installed.
- Tightened the screw. All.

There are other forms of similar fasteners. The photo below shows a few of them.

Decorative brackets
Another type of fastening is brackets. They are reliable, some are decorative, so much so that they themselves are decorations.

Concealed installation - shelves without support
And the most amazing device for hidden installation. It makes it possible to hide the fasteners. It is cut out at the end seat under the pin and body of the holder and the shelf is simply put on it.

As you can see, even simple board or a piece of glass on such mounts is already quite good. But there is still a sea of all sorts of ideas.
Bookshelves
There are strength requirements for bookshelves: they can hold significant weight. Therefore, the fastening, materials and design must be reliable. Traditionally, bookshelves are made of wood, laminated or veneered fiberboard. And then fiberboard with a long span (more than 90 cm) sag over the years.
Planning shelves on the walls for books own sizes, please note that the distance between the supports should not be more than 90 cm. Then even when fully loaded it will not bend. There are two types and varieties of shelves: wall-mounted and floor-mounted. Both of them can be angular.
In the very simple case This is a board secured in one of the following ways. Some options, especially when presented correctly, look very good.

And with imagination, several planks turn into very interesting thing, which can even be the main element of decor. Ideas for self-made collected in the photo gallery.
And this - serious way expand the space due to the angles between two windows Non-linearity - they are always interesting, and on such a shelf you can put books of different heights
Floor-standing bookshelves can be loaded more seriously. Here the forms are different: there are racks to which shelves are attached. The highlight can be a broken or unusual line of shelves, as well as interesting racks.
It’s more like a bookcase or even a cabinet, but the essence doesn’t change - original color and interesting small shelves in the central part and the structure looks interesting  A very interesting idea - non-linear shelves and lintels made of thick glass
On the manufacture of fountains (both small indoor ones and more substantial ones for country houses, gardens or garden plot) read.
Hanging
Not very numerous, but an original type. The most important thing is that it can be done easily: a few planks, four ropes or two belts and you can get to work.
This is a complex system of blocks...and the shelves can be located at any level. Two planks, four ropes and half an hour of time are all that is needed to make this shelf How to make hanging shelf— graphic step-by-step instructions
To the nursery
While the child is very small, I want functional shelves, but with children's drawings. But where can you get these? Do it yourself. Any shelf of the configuration you like can be covered with non-woven wallpaper or thick wrapping paper (glued with PVA). After drying, coat with varnish twice. water based. Such shelves can be washed, but what’s most interesting is that the shelf can change with the child. You tear it off old decor, glue a new one. The idea is simple, it works perfectly.

For children, the shelves are not very different in design. If we talk about floor or shelving, then they must be strong, taking into account the fact that older children will definitely want to climb on them. Therefore, often even those shelves that stand on the floor are additionally attached to the wall: so that they do not collapse and crush young climbers. Based on these considerations, they are not made tall: even if they fall, it’s not scary.
The shelves in the children's room also differ in color - they are brighter, can be made in the form of letters, and boxes for toys can be installed in them: this makes it easier to keep them in order. In general, functionality and security must be combined.
 System with drawers - cleaning will be quick Combination of open and closed shelves - convenient for preschoolers
Shelves and shelves for the kitchen
Say what you like, but in the kitchen the main thing is functionality. There is not much free space even on the walls: the cabinets take up a large area. Therefore, one of the tasks is to make the most of free space. There are interesting ideas for small or even very small gaps between the wall and the refrigerator or other household appliances. Strictly in size, you can make a pokka on wheels, which can be pulled out and completely hidden there. It is wide and narrow (see photo).

It’s easy to make such a retractable shelf-rack on wheels for different jars. Everything you need is at hand and out of the way
Is there some more interesting ideas about saving space. If the sink or station is located near the window, you can take the sides. There is an interesting hanging option - a grid on chains to which all sorts of utensils are attached. But such a shelf is possible if the desktop is not against the wall. Another option for saving space is if the kitchen-dining room is zoned with a counter, you can also make a shelf above it, which will be partially hanging. One part of it rests on the wall, the second on the counter or “hangs” on the ceiling.

Covering the entire wall above your desk with cabinets is not the best the best way out. They look heavy. The problem can be solved by using glass doors, but not everyone likes this. The solution is to do it between the cabinets open shelves. They will add more lightness to the interior and work zone will not put so much pressure on the rest of the space.
Glass and open shelves will “lighten” the interior The style is different - the idea is the same Closed and open shelves in one system - convenient and non-standard
Decorative and original
Often, shelves on the wall play a purely decorative role. They are designed to attract attention and this goal is achieved unusual shape, contrasting with the walls, color. You can’t bet much on it: one or two things, but how interesting they are.
Another option for “square” shelves. Two identical sets arranged differently If traditional square shelves are decorated around the edges with curly frames, the style turns out to be completely different
Another one interesting topic- glass shelves. Just one glass is not very interesting. Its combination with wood and steel is more attractive. The effects are sometimes unexpected. Glass is assembled on guides: the material is fragile and heavy, and it needs to be held. Steel can do this.

In fact, these systems are intended for creating store interiors, but also in apartments modern style or look stylish.

Also suitable for vintage style
What are shelves made of? Even from pipes. Metal and plastic. Do you have any samples left from the renovation? Use it and get it designer item, interestingly, collected from trash.
This is an interesting variation of a bookshelf made of pipes