What can be deepened when picking? Features of picking ornamental plants.
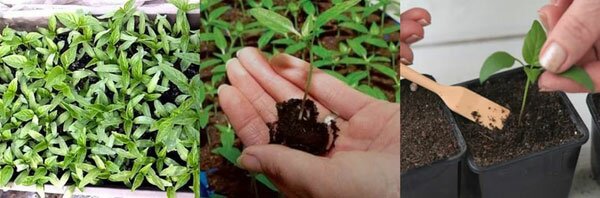
Every spring, summer residents begin growing seedlings. They prepare the soil, boxes, and sow seeds. After the first leaves appear, the seedlings are allowed to get stronger and grow a little. Then they start picking. In essence, planting seedlings means transferring plants to new growing conditions. During work, weak sprouts are discarded, strong ones are planted in separate containers. By the time they are planted in the beds, the seedlings will have become stronger and will take root well in the open ground.
Many gardeners argue whether it is necessary to plant seedlings in separate pots. Some sow seeds in a common container and grow them there until they are planted in the beds. When should this be done? agrotechnical technique? It is well known that picking seedlings means thinning, removing weak seedlings and transplanting strong ones into individual pots and cups.
Correct picking
Frequently asked question– why do they pick, what is the purpose?
- If the sown seeds sprouted thickly, you will still have to thin them out. Why lose seedlings if you can plant them in separate cups and get a full-fledged healthy bush?
- If the seeds of peppers, tomatoes or other crops were sown not in special cassettes or peat humus cups, but in a common box, then you will still have to replant. It is better to do this before the horse system is intertwined. At late transplant Tender roots are injured, seedlings do not take root well in a new place. When growing in dense crops, plants suffer from lack of nutrition.
- After the “relocation”, lateral roots begin to grow, and a strong fibrous root system develops, forming in the top layer of soil.
- Replanting may delay planting if the weather is unfavorable.

Picking technique
The answer to the question: why pick seedlings has been received. Now we need to figure out when to do it correctly.
When to pick seedlings
General rule for picking any crop, replant the plant no earlier than one or two true leaves appear. During this period, the main organs of the root system will have already developed so that the seedling can endure the “relocation” almost painlessly. Some species dive twice, for example, tomatoes.
When choosing the timing of picking, we always focus on the stage of development of the seedlings. If they are strong, they will confidently endure the transplant. As a rule, this period occurs a couple of weeks after germination. However, we must not forget about the diversity of plant species, so it is worth talking about the most popular crops in more detail.

It's time to dive
How to properly plant seedlings using the example of tomatoes and peppers
To plant any crop, you will need separate containers for each plant - cups, peat tablets, pots, a special sleeve for seedlings. If you use ready-made soil mixtures, then no processing is required.
If you have garden, forest or turf land, it is subjected to heat treatment to destroy pathogenic microflora. To compensate for the loss of beneficial microorganisms, humus is subsequently added to the root. This procedure is mandatory, because in the absence of beneficial microorganisms they will not break down minerals, and the root system will not be able to nourish the vegetative parts.
Picking tomatoes depending on variety
Every summer resident dreams of a good harvest. Picking tomato seedlings done correctly and on time will help him with this. How many times to replant seedlings depends on the variety. Tomatoes are divided by type:
- short;
- medium height;
- tall.

Properly picked tomato seedlings
You only need to replant several times tall tomatoes. For the rest, a single pick is enough. Tomatoes are transplanted for the first time on the tenth day after germination - the roots have become stronger and will endure the procedure painlessly. Don't let the seedlings outgrow. Root system gets mixed up, and when separated, the roots are injured. As a result, they will take root poorly, get sick, and the harvest will be delayed for long time.
Tomato planting technology
- Before starting work, everything is prepared - containers for planting, soil mixture, water for irrigation.
- Ready-made soil is purchased at the store. Many people prepare it themselves. To do this, take peat, humus, turf or forest soil in equal parts. 1/3 of river, washed, sifted sand is added here.
- Mix everything well. Be sure to add 200 g of ash and 15–20 g of complex fertilizer (nitroammophoska, nitrophoska). love tomatoes root dressings. In complex fertilizers, except for basic ones nutrients(nitrogen, phosphorus, potassium), contains a lot of other macro- and microelements.
- Small pebbles are placed at the bottom of the container for drainage.
- The containers are filled with the substrate and compacted tightly for better adhesion of the root system to the soil.
- Leave about 1 cm to the edge of the pot unfilled. Each glass is watered with a dark solution of potassium permanganate for disinfection.

Structure of a tomato seedling
All utensils for picking must have drainage holes to remove excess moisture. About 12 hours before starting work, the seedlings are watered abundantly. Once saturated with moisture, they will tolerate transplantation more calmly.
Algorithm for planting tomatoes
- Work begins early in the morning or evening. Following the picking technique, water the soil underneath right before transplanting.
- In the pots, make holes in the ground with a pencil or stick. Digging up the seedlings with a spatula, remove them from the soil and lower them into the prepared holes.
- Then press the soil tightly around the stem with your fingers.
It doesn’t matter if the main long root comes off. If this does not happen, you need to pinch off up to 1/3 of the length yourself. This procedure stimulates the development of the lateral root system, which will provide the vegetative parts of the seedling with the necessary substances and moisture.
Sometimes young tomato sprouts are planted not in individual cups, but in common containers bigger size. Here they ensure that the volume of soil for each seedling is sufficient. To do this, follow landing patterns.
Tall varieties of tomatoes are distributed according to a pattern of 10x10 cm, low-growing ones 8x8 cm. For better, uniform lighting, the distance between tomato seedlings when picking should be at least two centimeters. Seedlings are planted in a checkerboard pattern and buried almost to the cotyledons. Subsequently, adventitious roots branch off from the buried stem, increasing nutrition, and a powerful root system of the future bush develops.
The transplanted seedlings are watered, mulched, placed in the shade, and kept out of the sun for three to four days. Plants should recover from the stress of transplantation and take root.
Video: Nuances of working with tomato seedlings
Picking pepper and its timing
Pepper is one of the capricious crops. Therefore, mistakes in its cultivation lead to diseases and reduced yields. One of the main conditions for obtaining a rich harvest is proper picking. bell pepper in compliance with the requirements for nutrients, light, and moisture.
If the pepper was sown immediately in separate containers, then picking is not required. The peppers will grow until they are planted in the beds, developing in one place.

Picking peppers in the phase of two true leaves
When the seeds were sown in a common box and sprouted thickly and amicably, it would be correct to plant the pepper seedlings at the third or fourth true leaf. At this moment, the seedlings begin to fight for a place in the sun. The roots of the seedlings become tangled, and there is a risk of damaging them during transplantation.
If the seeds were sown in early February, then they should be planted in March. However, everything is relative. Observe the condition of the stems and leaves. Seedlings that have two true leaves are transplanted with care. Never pick peppers with only cotyledon leaves. Its root system is imperfect and weak and will not survive the “relocation”. Therefore, bell pepper seedlings are picked if there are three or four true leaves.
How to plant peppers correctly
- Before starting work on picking pepper seedlings, water the soil underneath them generously for several hours. This will make it easier to remove them from the ground without damaging the roots.
- After watering the peppers, prepare containers for planting. The most the best option are peat pots that are sold on store shelves for gardening and vegetable gardening.
- Grown seedlings are transferred to the beds directly with pots, which will become additional food for the growing peppers. Having prepared and filled them with soil, as indicated above, begin replanting.
- When preparing a place for planting, make a depression in the pot with a pencil or stick.
- Using a spatula, carefully pry up the seedling and remove it from the soil. Having found the main long root, pinch it to ¼ of its length. This procedure stimulates the growth of lateral adventitious roots. A branched, powerful root system is gradually developing, which will become the key to the future harvest.
- Having lowered the plant into the hole, gently press down the soil so that it holds firmly.

Grown pickled pepper seedlings in cassettes
Many people ask the question: is it possible to bury pepper seedlings when picking? This cannot be done! Pepper is not a tomato. It does not produce adventitious roots from the stem, but can rot, get sick, or die. Never bury the seedling up to the cotyledon leaves.
Transplanted peppers are watered and mulched upper layer soil with humus. They place the pots in the shade, because bright sun after transplantation is contraindicated for them.
Video: How to pick a pepper
Picking flowers using petunia as an example
Many gardeners believe that they should not pick flowers, as this harms the plant and makes it sick for a long time. However, experience shows that the transplantation procedure is necessary for many reasons.
Features of picking ornamental plants
Flower seeds are sown in small containers. As the seedlings grow, nutrients become less and less, each seedling gets little moisture, the roots become intertwined, and access to such an essential element for flowers as oxygen decreases. There comes a time when you need to pluck petunia seedlings to save the plants from starvation.
Many people say that you need to sow the seeds immediately in large containers, but here too a problem arises. In such conditions, the roots of young sprouts rot from excess moisture, which prevents the supply of oxygen.
What does seating lead to? ornamental plants? If you follow the rules for picking flower seedlings, you get:
- the ability to discard weak, non-viable shoots, leaving only strong ones;
- if there is a fear of petunia outgrowing, this method will delay growth;
- active development root system;
- lack of intertwining of roots. Seedlings are easily separated when transplanted.

Petunia seedlings before picking
When starting work on picking petunias, prepare peat, disposable plastic cups, you can just cut off boxes of dairy products. Prepare the soil for planting. For flowers, it is advisable to purchase it in specialized stores. Young petunias are demanding of nutrients, and ready-made mixtures contain everything you need.
- A few hours before transplanting, the seedlings are watered abundantly to better remove them from the soil.
- In pots filled with substrate, make a hole in the center and fill with water. Using a dull knife, spatula or picking stick, pry the seedlings out of the box with petunia and take it out along with a lump of earth.
- All this is transferred to the prepared pot, a lump of soil with roots is lowered into the hole.
- Having carefully spread all the roots in a circle, lightly press the soil around the stem with your fingers. This is for better adhesion of roots to soil.
- Soil voids need to be filled. Therefore, the petunias are watered again and the soil is mulched.
- After this, the leaves are sprayed with a spray bottle.
Further care boils down to placing the boxes with pots in the shade for three to five days. It would be correct if this is a room without straight lines sun rays, with a temperature not higher than +18 degrees. The air is humidified by spraying the space with water, but not directly above the plants. Humidity should be at least 70%.
Picking eggplants according to all the rules
Gardeners continue to debate whether it is worth plucking seedlings of such a delicate, capricious crop as eggplant.
Arguments for the need for seating
Proponents of sowing seeds directly into individual containers believe that picking eggplant seedlings injures young plants. The seedlings supposedly take root worse and do not begin to grow for a long time.
Opponents refute this opinion with arguments for picking eggplant seedlings in correct timing. Usually the seeds of this crop germinate densely and uniformly. Therefore, planting seedlings will prevent tangling of roots and make transplanting to permanent place. With the help of thinning, we achieve a better supply of nutrients to the roots of each seedling and more uniform lighting - the plants do not block each other’s light.

Eggplant seedlings after picking
If the soil under the seedlings is contaminated with pathogenic microorganisms, then by picking eggplant seedlings you can save the specimens that are not yet diseased. After transplanting into disinfected new soil, the seedlings quickly take root, become stronger, and more actively resist microbes.
When transplanting plants into larger pots, as a rule, part of the main tap root is torn off. Both when transplanting tomatoes and eggplants, you need to make sure that if the root does not come off, then pinch it 1/4 of the way yourself.
This technique gives impetus to the rapid development of lateral roots, forming a strong fibrous root system. Such roots will provide excellent nutrition to the above-ground part of the eggplant, active flowering and fruiting.
Replanting can be useful when weather conditions do not allow plants to be planted in open beds. In this situation, picking eggplant seedlings will save the situation by postponing the “relocation” process for 5–7 days.
Replanting young seedlings will be beneficial if done on time and in compliance with technological techniques. Cultivating eggplants is not very different from the agricultural practices of other vegetable crops. But it doesn’t hurt to look at the basic techniques again.

Plants before picking
Preparing for picking eggplant seedlings
The preparation of soil and containers for picking eggplant seedlings follows the same procedure as for tomatoes. The soil can be taken from the garden, from the forest, turf soil. The soil is mixed with peat, sand, and humus equally. Some summer residents mix such soil with a purchased special mixture in a 1:1 ratio. This makes sense, because the soil mixture from the store already contains a full set of nutrients and microelements necessary for young seedlings.
Eggplants need to be watered frequently and abundantly. Therefore, peat or peat humus pots are not suitable for this crop. From excess moisture they swell, break, and can damage delicate roots. Therefore, it is better to use special cassettes, plastic cups and simply cut-off dairy product boxes.

Eggplant seedlings in peat tablets do not need to be pricked
Step-by-step picking algorithm
Seedlings are “dispersed” after the appearance of three to four true leaves. By this time, the root system has become sufficiently strong and can safely undergo replanting.
- Before picking eggplant seedlings, water them with a large amount of water so that the entire lump of soil gets wet, and leave for several hours.
- At the same time, prepare cups and other containers. Be sure to make holes at the bottom of the container to remove excess moisture. This is necessary so that the roots do not rot without ventilation.
- The next step is filling containers with soil. Several pebbles are placed at the bottom, which are covered with prepared soil.
- The soil is compacted, and a hole for the seedling is made in the center of the container with a pencil or stick.
- Using a dull knife or spatula, pry the plant and push it out of the substrate with a small lump of earth.
- Then the seedling is lowered into the prepared glass, not forgetting to pinch the central root.
- Carefully squeeze the soil around the stem. The cotyledon leaves are left above the soil. After this, the eggplants are watered.

Grown up pickled eggplant seedlings in cassettes
Peat tablets have become very popular. In essence, it is pressed peat, which swells when heavily moistened. Many grow seedlings of vegetable and flower crops using this convenient, lightweight material. If the seeds were sown in this way, then pick the seedlings from peat tablets no need.
The tablet together with the seedling is immersed in a container of at least 750 ml, half filled with nutrient substrate. The edges are filled with the same soil. The soil is gently compacted and watered with warm, settled water at a temperature of no more than 25 degrees.
Caring for seedlings after picking
The seedlings experience stress after transplantation. This applies to any culture. Therefore, they take special care of her.
Requirements for the maintenance of seedlings and feeding
To begin with, place containers with seedlings in a cool place, protect them from direct sunlight. If they are placed on a windowsill, then the window is shaded with a thin fabric.
Watering is carried out once every 4-6 days when the top layer of soil dries. Eggplants are watered more often. But they make sure that the substrate does not become waterlogged and the roots do not rot. The same applies to flower crops.
The plants are carefully monitored and protected from drafts. If they notice that the seedlings are depressed, the leaves have withered, then they begin to feed the seedlings mineral fertilizers. Big choice chemicals makes even experienced gardeners confused. And inexperienced vegetable growers are wondering - how to fertilize seedlings after picking and is it necessary?

Hardening on the windowsill
Best choice– ready-made mixtures manufactured at the factory. If such a fertilizer is not at hand, feed it with a solution of nitrophoska or nitroammophoska - complex fertilizers that are always available.
The fertilizer package contains instructions for use. Having decided how to fertilize the seedlings after picking, they begin to prepare the nutrient mixture. Processing of young seedlings must be carried out correctly, in compliance with development cycles. It is better to do it early in the morning, when the roots are actively absorbing nutrients from the soil solution.

Desired result
Hardening of young plants
A necessary condition Getting a good harvest is hardening off the seedlings. To do this, take it outside or onto a balcony for several hours every day, protecting it from the wind. From time to time they are exposed to dim sun. After 10 - 15 days, the seedlings get used to the street conditions. In the phase of five to seven true leaves, the strengthened, hardened seedlings are planted in a permanent place. After planting, whenever possible, cover the plants from direct sunlight.
Timely picking of seedlings is an important agrotechnical technique that makes it possible to obtain a rich harvest. Proper and timely transplantation is the key to the health of seedlings, the development of the root system and, as a result, an excellent harvest of vegetables or wild bloom ornamental crops.
Garden balsam, or impatiens balsamina (Impatiens balsamina) - beautiful flowering annual plant native to the tropics of Asia. Garden balsam is very thermophilic; its thick and fleshy, translucent fragile stems and delicate jagged leaves are afraid of strong winds and do not tolerate cold weather. Numerous flowers of impatiens impatiens (4-7 cm in diameter) are located in the axils of the leaves and have a variety of bright colors - white, pink, salmon, lilac, red, purple-violet. The shape of the flowers is irregular, with spurs on the lower sepals. Very elegant varieties of garden balsam have been developed with simple and double flowers, shaped like roses (Rosy impatiens) and camellias (Impatiens camellias).
The height of balsam, depending on the variety, ranges from 20 to 70 cm. Dwarf terry impatiens is suitable for growing on the balcony and is good as a summer potted crop. It reproduces garden balsam seeds that are formed in large quantities in its fruit boxes. By the time the seeds ripen, the juicy green box turns yellow. Then the slightest breath of breeze or the touch of a hand is enough for the box to “explode” with a bang (this must be taken into account if you plan to collect balsam seeds). In this case, the capsule flaps quickly disintegrate into segments, which twist with force and scatter the seeds far to the sides. Garden balsam seeds are large, have a long shelf life (6-8 years) and good germination (usually they germinate 4-7 days after sowing).
For potted crops, when the seedlings are illuminated, balsam seeds are sown already in March (usually one seed is planted per pot). To grow impatiens impatiens in the garden, I sow its seeds for seedlings at the end of April. I sow balsam in a wide pot less often, do not overuse watering, provide the sprouts with a lot of light and a moderate temperature of 18-20 degrees - otherwise they will become very stretched and thin. When a real pair of leaves appears, I plant balsam seedlings in pots or boxes, while deepening the long stems of the sprouts into the soil. I plant seedlings in the garden after finishing spring frosts; the distance between plants is 25-30 cm.
Flowering of balsam grown from seedlings begins in June and continues until autumn frosts. With the seedless method of growing garden balsam, the seeds are sown in the ground in May (if it is possible to protect the seedlings from frost) or early June, but then the flowering of the plants will not be as long. Garden balsam grows successfully and blooms profusely in sheltered, sunny or semi-shaded place, in fertile, loose soil, with regular watering in the heat.
Garden balsam is very good as a border and decoration of a flower bed. Also in the garden they grow iron-bearing balsam, or impatiens glandulifera, which blooms all summer and until autumn frosts, with non-double pink flowers. This type of balsam actively grows in the form of a branched bush up to one and a half meters high.
Ziborova E.Yu.
All about balsam on the website website
Weekly Free Site Digest website
Every week, for 10 years, for our 100,000 subscribers, an excellent selection of relevant materials about flowers and gardens, as well as other useful information.
Subscribe and receive!
Ecology of life: Picking seedlings is one of the controversial issues, and discussions around it will probably never end
Picking seedlings is one of the controversial issues, and discussions around it will probably never end. Why? Yes, because both supporters and opponents of this procedure rely not only on theoretical knowledge, but also on my own practical experience. But what about those who are taking their first steps in gardening and gardening?
Let's try to evaluate the advantages and disadvantages of the method, look at it from the perspective different sides- perhaps then it will be easier to decide whether your plants need picking or whether it is better to do without it.
What is seedling picking?
This term comes from French word piquet, meaning “stake, peg.” As a rule, it refers to the transplantation of young plants (seedlings) from a common container into separate pots. Sometimes picking is also called pinching the tap root during transplantation - this is done to force the root system to branch.
Thus, the reason for the doubts becomes clear already from the definition: picking is a traumatic procedure, interference in the processes of growth and development of seedlings. Of course, this raises numerous questions to which we will try to find an answer.
What is the purpose of diving?
The main goal is to cull weakened and diseased plants, select the strongest ones for further cultivation. It is clear that for this we must have sufficient quantity seed material- otherwise, what to choose from? When there are few seeds, or we are talking about some valuable, rare crop (variety), gardeners and gardeners often choose a no-pick method of growing seedlings - so that an accidental mistake does not lead to the loss of precious seedlings.
Can all crops be picked?
Most plants (both vegetable and ornamental) tolerate picking well when done correctly. But there are crops that it is advisable not to disturb - their root system reacts painfully to any intervention, and even if the seedling does not die after the procedure, it will noticeably lag behind its peers in development.
Such “touch-me-nots” include, for example, cucumbers, zucchini, pumpkins - it is better to sow them immediately in a permanent place or, as a last resort, grow them in peat pots, with which they can then be “resettled” into the ground. Although someone is picking these plants too.
But tomatoes, beloved by summer residents, on the contrary, after properly carried out picking, become noticeably stronger, build up the root system and form strong, well-developed bushes. The following short video very clearly shows the differences in the development of tomatoes grown with and without picking:
There are conflicting opinions about picking eggplants and peppers. Some say that you can’t pick them, because the plants then get sick for a long time, others argue that the procedure only benefits these crops. From my own experience, I can say that pepper tolerates picking very well - cases of plant death or disease after transplantation are rare. At the same time, contrary to recommendations, I bury the seedlings when picking and carry out the procedure very early, without waiting, as all sources advise, for the first true leaves to appear.
And here is what Sergey Dubinin, founder and CEO Agrofirms "SeDek":
It turns out that you can dive almost all crops if you do it correctly and on time.
At what age should seedlings be picked?
It is recommended to pick when the plant has formed 1-3 true leaves (they must be distinguished from cotyledons, which appear immediately as soon as the sprout emerges from the soil). This usually happens 2-3 weeks after germination. It is possible to dive earlier, but later it is undesirable. The older the seedlings become, the more difficult it is to tolerate the procedure.
Here it is worth considering one more nuance: when the plants are sown in a common container, and there is little free space between them, as they grow, they begin to interfere with each other. The seedlings stretch out, the stems become thin, the roots intertwine underground, and it will be very difficult to avoid injury during transplantation. Therefore, the sooner we pick, the easier it is for the seedlings to take root in the new place.
Is it necessary to bury seedlings when picking?
To obtain stronger and stockier plants, when picking, seedlings are buried almost to the cotyledon leaves.
The exception is pepper. It is believed that he reacts painfully to deepening; Moreover, this culture does not form adventitious roots; the seedlings, even in cramped conditions, do not stretch particularly - there seems to be no need to bury them.
Picking is important for plants that are sown superficially (petunias, lobelias and others). If you nevertheless decide to grow these crops without picking, pour the soil for sowing into a container in such a way that you can later add soil, burying the seedlings with bedding.
The entire picking process is described in great detail in the following video:
What is the benefit of diving?
Let's summarize: what arguments can be given in favor of picking seedlings?
1. This method allows you to select the strongest and most viable plants, which in the future will give good harvest or will please you abundantly, beautiful flowering.
2. Picking helps save space: at the initial stage, seedlings fit in one small container. With the non-pick method of growing seedlings, we will be forced to use sparse sowing or thin out the seedlings.
3. Pinching the main root stimulates the formation of a powerful branched root system, which will help the plant receive more nutrition in the future.
4. After picking, the plant receives additional area nutrition. If suitable size planting containers and high-quality soil are used, this becomes a good incentive for the development of seedlings.
5. Some crops (for example, tomatoes) require picking: it helps to form strong, healthy and stocky seedlings.
How can diving harm plants?
What reasons encourage summer residents to refrain from picking? Most often - your own negative experience or fears. Indeed, an unsuccessful procedure can destroy plants. Let's see what serious mistakes can lead to similar consequences.
1. They forget to prepare the plants for the procedure. The main thing is to moisten the soil abundantly in order to injure the roots as little as possible. By pulling seedlings out of dense, dry soil, we are more likely to damage them.
2. Bend the roots when planting. If the root of a plant is too long, it is better to pinch it, stimulating the formation of additional lateral roots, than to “pack” it into the planting hole by folding or bending it. Incorrect root location will lead to problems in the growth and development of the seedling.
3. They forget about post-transplant care. In the first 2-3 days after the procedure, picked seedlings need special care. They need to be protected from the sun and watered properly (rarely, but abundantly). Sometimes it is recommended to use rooting stimulants to help plants take root faster.
4. Weakened, damaged, diseased, deformed plants dive. There is a high probability that they will not survive the transplant. It is advisable to discard such seedlings; if the number of seeds is too small, it is better to prefer the non-pick method of growing seedlings.
In addition, diving is a rather labor-intensive process that requires patience and accuracy. Of course, the temptation to save money is great own time, sowing the plants immediately into separate cups or other containers.
What is right? Through trial and error, each summer resident comes to his own answer to this difficult question. I hope our conversation today helped some of you make up your mind and find your solution.
There are certain parameters for planting vegetable crops that should definitely be taken into account in the process. Many amateur gardeners avoid technical process planting, citing a lack of time to study the nuances or the fact that the cucumbers are already sufficiently developed anyway, so one centimeter to the right, one to the left is not an obstacle to the development and formation of fruits. This is where they are deeply mistaken.
Why is it so important to know at what distance to plant cucumbers when moving seedlings into fertile soil? How deep should cucumbers be when transplanting? How to place beds and other nuances? Cucumbers love order, just like the rest of the garden. You need clearly defined boundaries beyond which no other representative of vegetables will go beyond and rightfully covet your territory. The root system of each vegetable crop has its own tendencies to develop, branch and deepen, so it may not be enough for one or another place that is allocated for it. Of course, one more important points for plants that are worth taking into account are the differences in their structure, so some advise to bury directly to the bottom bud, others to plant superficially (again, mainly due to the specifics of the root system), and still others to follow some other rituals.
An important question remains: is it possible to bury cucumbers when transplanting? The question is not easy, because there is no definite answer to it - you need to proceed from the situation that you have. When we examine cucumber seedlings, expecting that they can already be transplanted into open ground, we are faced with the following situation: for some reason, the cucumber seedlings have overgrown, so its stem has become very elongated, but the leaves have not yet formed. Such seedlings are not suitable for transplanting until the first leaves appear. Then an incomprehensible situation arises: is it worth replanting the seedlings or waiting for the leaves to form? Ultimately, it will still be necessary to replant it, but the peculiarity of such planting will be precisely that we bury the cucumber seedlings during this procedure. 
You need to deepen the cucumber seedlings down to the cotyledons, and then feed the cucumbers with fertilizers so that they intensively begin to increase the apical mass. If, on the contrary, cucumber seedlings have not grown much and remain small in height, then they cannot be buried, but planted just superficially, along the edges, without sprinkling soil mixture, waiting for the seedling to form and stretch, then to introduce mixed soil with fertilizers and close “thinned out” during the replanting process. You may be wondering what kind of fertilizers are needed and whether they are “special” for such situations? I hasten to reassure you right away that the criterion for choosing fertilizers does not change; you can use the usual fertilizers for cucumbers, which you can read about in detail in other articles on the topic of growing, feeding or caring for cucumbers and their seedlings before and after transplanting. Hope, this information will solve your problem and soon you will have new cucumbers, fully formed and tasty, according to the variety you have chosen.
(1
rated, rating: 10,00
out of 10)
READ ALSO:
Picking cucumbers at home
DIY hydroponics for cucumbers and tomatoes
Growing cucumbers in winter at home
How to grow a crop of cucumbers?
How to fertilize cucumbers to prevent the leaves from turning yellow?
Video: How to plant cucumbers in open ground with seeds?
Video: When to plant cucumber seeds in the ground?
Seedlings stretching upward is a fairly common occurrence when growing cucumbers. Overgrown sprouts are obtained if the light or temperature regime. To prevent the plants from dying, you need to follow some recommendations before planting.
You need to know what to do with overgrown seedlings and why they have become long before planting the seeds. The reason may be the distance of the pot with seedlings from the window, or the incorrect temperature in the greenhouse.
Overgrown seedlings manifest themselves as sprouts still stretching out. before the true leaves appear. For a number of reasons, the subcotyledonous stem is pulled upward.
It happens that the sprouts can stretch very much, up to 10 cm in height. The seedlings turn out weak; if they are transplanted incorrectly, the thin sprouts of cucumbers may die.
By following the recommendations of experienced gardeners, it is quite possible to correct the situation. Before planting on the beds, thin sprouts can be roll along the cup in the form of a spiral and sprinkle with soil to cotyledon leaves. The stem will take root after 5-7 days. During this period, the seedlings need to be provided with regular watering and they will stop stretching.
Taking it will slightly slow down the plant's growth. However, during this period it will strengthen and become stronger.
Proper preparation for transplanting into open ground
If you do not carry out the above-discussed option of deepening in cups, you need to plant the overgrown sprouts in a garden bed or transplant them into open ground. It is worth noting the fact that, contrary to the rules, the seedlings are “overgrown” takes root well and gives good yields.
Transplanting cucumbers to a permanent place consists of the following rules:
- You need to remove the cups carefully; you can leave the paper bottom. You cannot place the entire glass inside the hole, as the paper will soak for a long time.
- With leaves you need handle carefully, weak seedlings can be easily damaged. If everything is done correctly, the sprouts stored on the surface will quickly take root thanks to fresh soil.
- The soil must be prepared in advance, enriched with fertilizers and ash. The temperature should be warm and stable, and the soil should be well heated. So that the sprouts experience less stress, the soil can be pre-watered warm water.
- It's better to plant in the morning or evening. Water exclusively with heated water. From the tap cold water will negatively affect the growth of cucumbers.

If you place water in metal buckets in the sun in advance, it will warm up very quickly.
Is it possible to bury
The deepening method is considered effective if you lay and plant the sprout sideways or twist it in a spiral along the width of the hole. You should not bury or place the root too deeply.
To disembark to a depth of 5-7 cm. The roots that appear on the stem if it is deepened will begin to grow rapidly. The size of the bushes will gradually begin to recover, and lush foliage will appear.
Planting cucumbers in holes
The holes must be prepared in advance; the soil must be loose and fertile. You can put mole cricket repellent, sawdust and ash inside. Water the hole with warm water and place the cucumber bushes there using the deepening method. Sprinkle with soil so as to create a depression that looks like a hole.
If you do not leave a hole, it will be difficult to water and fertilize. To prevent moisture from evaporating quickly, the top of the hole must be covered with grass or straw. Some people use covering material with holes for this purpose. You need to lay it on top of the soil before planting the seedlings.

Post-planting care of stretched seedlings
- First of all, you need to make sure that the soil did not dry out. Moisture will promote the growth of new roots; drought is unacceptable.
- Weak, elongated sprouts can be tied up or placed on a net to prevent them from being swayed by the wind.
- Loosen and feed no earlier than 6-7 days. Loosening the bushes should be done very carefully - this will saturate the soil with oxygen.
Why do seedlings stretch out?
Overgrowth of cucumbers is more often observed due to the lack of experience among novice gardeners.
Gardeners who have gained experience from their own mistakes share their secrets with others. They identify three main reasons:
- violation of the deadlines for planting cucumbers for seedlings;
- incorrect light mode;
- non-compliance with temperature conditions.

If you sow cucumbers too early, the bushes will overgrow while waiting for steady warmth. Depending on the climatic features sowing cucumbers after April 20.
Lack of light has a detrimental effect on the sprouts and condition of the leaves; they acquire a pale green tint. Too much low temperature slows down plant growth, high - promotes abundant growth. Unsuitable temperature conditions drive the sprout upward.
If an ovary appears on the overgrown cucumbers, it is better to remove the flowers after replanting. This way, it will be easier for the bushes to adapt to the new location.
What to do if the seedlings have managed to stretch out
By studying the cause-and-effect relationships of pulling seedlings, you can prevent this process. If the cucumber sprouts are stretched out, they can be saved before transplanting to the main place.

Basic measures to solve the problem:
- Add additional lighting, if necessary, use artificial light.
- If the cups are too close to each other, or the planting is dense, they need to be thinned out.
- Helps prevent sprouts from being pulled out potash fertilizers, ash And special means, which affect plant growth if applied correctly.
- You can use the method of transplanting into larger cups. In order not to injure the root, you can extend the existing cups with strips of cardboard. Fill the voids with soil to the level of the first leaves.
- Overgrown cucumbers are carefully transported to land plot and transplanted using the deepening method.
- Damaged bushes with a broken stem cannot be saved; the remaining plants have a chance of successful replanting.
As a top dressing saltpeter cannot be used, as it stimulates the growth of the green part of the plant.
Overgrown cucumber seedlings are not a reason to refuse to plant them in the beds. Proper care can correct this situation. Subsequently, in order to avoid being pulled upward, it is necessary to pay close attention to the plants at all stages of cultivation.