Proper insulation of the ceiling in a private house. Ceiling insulation in a private house
Insulation ceiling structures in a private house - this is one of the stages of arranging the ceiling, and far from the most difficult. All that needs to be done to complete this work is to understand the structure of the thermal insulation layer, select the optimal insulation for a particular situation and install it correctly. This article will discuss how to properly insulate a ceiling in a private home.
Choice of insulation
There is no need to think long about whether it is necessary to insulate the ceiling, because the answer is obvious. Thermal insulation is intended not only to retain heat within the building, but also to reduce heating costs. The fact is that thermal energy tends to leave the house, and the largest leaks always occur through ceiling and floor structures. The insulation of interfloor ceilings can be mediocre, but the ceiling, behind which there is an unheated attic, must be protected very well - otherwise most of the heat will escape through the roof.
When choosing insulation for the ceiling in a private home, you need to take into account a whole range of parameters, including:
- Thermal conductivity level - the lower this indicator, the less heat loss will be;
- Moisture absorption coefficient - the decrease in this parameter is directly proportional to the volume of moisture that can be absorbed into the insulation;
- Weight and density - the lower, the more convenient it will be to install the material;
- Flammability class - it is advisable to select products of category G1;
- Environmental friendliness.

For the manufacture of floors in private houses, either concrete or wood is used. Insulation of concrete structures can be carried out using bulk and sprayed materials, as well as slab products. Any type of insulation is suitable for working with wooden floors, as long as they have minimal thermal conductivity. Methods for installing insulation may differ, so each case must be considered individually.
Methods of ceiling insulation
Ceiling insulation in a private house can be done in two ways:
- Internal;
- External.
The methods are quite different, and each of them has a number of characteristic features. Both insulation options can be used either separately or together (in the latter case the greatest efficiency is achieved). To insulate the ceiling in a private house with your own hands, it is worth considering both methods in more detail and understanding their inherent nuances.
Internal
When insulating the ceiling in a room, it is necessary to mount a frame on which the thermal insulation materials will be supported. This method not very profitable - firstly, the useful volume of the room after installing all the elements is reduced, and secondly, installing the system under the ceiling is quite inconvenient, so all the work will take more time and effort.

In order for the ceiling insulation inside the house to function normally, it is necessary to install a vapor barrier layer. The whole point is that steam inevitably moves upward and tries to go outside the room. If this does not happen, then moisture vapor will lead to rotting of the insulation, as a result of which it will lose its properties.
External
With external insulation the situation is much simpler. In this case, there is no need to mount the frame, and any materials with a low degree of thermal conductivity can be used as insulation - sawdust, slag, ecowool, expanded clay, etc. This method of insulation is especially relevant for attic spaces that are not planned to be used as residential premises.

When arranging an attic in the attic, external insulation will be one of the stages of floor installation. Of course, this increases the complexity of installation - you will have to assemble a frame for the floor structure, which will later (after laying the insulation) be sewn up from the outside. You can sheathe the floor with any materials that are used to cover the floor - boards, durable plywood or OSB boards.
Installation of internal insulation of a concrete ceiling
It is much easier to install thermal insulation for concrete floors from the attic side - it will be quite convenient to carry out each stage of the work. However, this is not always possible, so you have to insulate the ceiling in the house from the inside, forming a frame for thermal insulation materials under the ceiling.
For installation you need to prepare the following set of tools in advance:
- Hammer or drill (for drilling holes in the ceiling);
- Screwdriver and drill set;
- Building level;
- Cord and marker for marking.

Also, even before insulating the ceiling, you need to purchase all the building materials:
- A sufficient number of metal profiles for drywall (a good alternative would be wooden blocks of square section 40x40 mm);
- Hangers for profiles;
- Fastening elements (crabs are best suited for suspended ceilings);
- Thermal insulation material (foam boards or mineral wool, or roll insulation);
- Sheets for external cladding of the frame (plasterboard or plywood);
- Vapor barrier film.

Insulation of the ceiling from the inside in a private house is as follows:
- First you need to apply markings. In order for the structure to ultimately be in its place, the markings must take into account the characteristics of the frame and the room. The frame itself consists of transverse and longitudinal posts, which are attached to each other using “crabs” and held on the ceiling by suspensions.
- To simplify the work, it is worth mounting the longitudinal posts in such a way that the pitch between them coincides with the width of the selected insulation. However, an excessive increase in pitch (over 80 cm) will also not lead to anything good - as a result, the rigidity of the structure will be insufficient.
- The marking itself is applied to all the walls along which the frame will be installed. The markings are applied in accordance with the cord, which is pulled between the corners and checked for alignment with a level. Having marked the walls, you need to go to the ceiling and make all the necessary marks on it.
- Now you need to mount the profiles. First of all, a guide metal profile is installed, which must be positioned in accordance with the markings on the walls.
- The next step is to install the hangers. These elements are usually located on the ceiling in increments of about 80-90 cm. Having decided on the mounting points, you need to drill the required number of holes in the ceiling.
- Now it’s time to form the frame by installing the longitudinal and transverse posts. Of course, when installing these profiles you need to follow the markings.
- IN assembled frame the selected insulation is installed. To keep it in place, you need to bend the edges of the hangers - they will ensure the fixation of the material during installation.
- Next you need to install a vapor barrier layer. You need to work with the film very carefully - it has a fragile structure and is very easy to damage with anything sharp. The vapor barrier film is carefully stretched between the frame posts and secured with double-sided tape.
- The last stage is covering the frame. Sheathing sheets must be fastened in such a way that there is a minimum gap between them. The optimal location of the sheets is perpendicular to the guides. The sheets are connected to each other in the middle of the profile. For fixation, self-tapping screws are used, the heads of which need to be slightly recessed into the thickness of the material. The distance between the screws for reliable fastening should be about 30 cm, and about 3-4 cm should be retreated from the corners of the sheet.

When insulating the ceiling with your own hands from inside the house, you need to ensure that there is a gap of at least 1 cm thick between the sheathing and the heat insulator. This gap is necessary to ensure normal ventilation of the structure.
Installation of external thermal insulation
External insulation of floors can have either a single-layer or multi-layer structure. However, regardless of the design of the insulation, you need to try to reduce its total weight, and this is true for any type of floor. If we are talking about bulk materials, then you also need to correctly determine the required layer thickness. For example, sawdust will require about 25 cm, and expanded clay will require high-quality insulation a layer 15 cm thick is enough.
To move around the attic, you should assemble a simple frame and place boards or slabs on it. It is best to mount the frame from wooden boards or beams. The latter will be an ideal option if the final structure has a small thickness.

The installation algorithm includes the following steps:
- First you need to decide on the installation step of the frame elements. It is best to start from the width of the selected insulation so that it is convenient to install.
- Next you need to decide exactly how the transverse and longitudinal elements of the frame will be installed.
- Boards according to ready-made circuit are installed with their ends in place and fixed using metal corners and self-tapping screws.
External insulation can be performed using a variety of thermal insulation materials - mineral wool, polystyrene foam or bulk insulation. You have to choose the material individually, depending on your financial capabilities and requirements. It is worth considering several options in more detail.
Styrofoam
Insulation with foam plastic boards is the simplest option. The foam has fixed dimensions, which allows you to avoid trimming by pre-assembling the frame taking this parameter into account. There are no special requirements for the dimensions of the slabs themselves - standard sheets can be a meter or half a meter wide, and this difference will not affect the quality of insulation.

Another thing is the brand of foam. If we are talking about insulating the attic floor, then the best option would be C25. The density of this brand is quite high, due to which low thermal conductivity is achieved. If necessary, you can purchase more expensive C35 foam or polyurethane foam - these materials are considered the most reliable.
Minvata
Another good option is materials based on mineral fibers. All these materials have excellent performance qualities, but they also have a common drawback - mineral wool is very hygroscopic. This suggests that when moisture gets in, the material absorbs it and loses most of its properties.

It is because of this drawback that the possibilities for using mineral wool are limited. However, this limitation can be circumvented, for which you will have to take care of high-quality waterproofing of the attic and ceiling so that the material does not have the opportunity to come into contact even with moisture vapor, not to mention direct contact.
Sawdust
One of the answers to the question of how to fill the ceiling in a house is sawdust. Sawdust is the cheapest thermal insulation material that is suitable for external insulation. However, low cost can be called perhaps the only advantage of this material. Sawdust is an organic material that can rot, so it must be mixed with lime before use.

You can also mix a solution consisting of 10 parts water, one part water and one part sawdust. When the ceiling is insulated with sawdust, the mixing process looks exactly the same as when mixing concrete. The resulting composition is used to completely fill the space in the frame. Before covering, the material must be left for some time to dry.
Expanded clay
The most convenient bulk insulation is expanded clay. It is a granular material having particles of different sizes. To maximize the insulation efficiency, when backfilling you need to alternate small granules with large ones - as a result, there will be fewer voids in the layer, and this will improve the quality of thermal insulation.

The insulation technology when using expanded clay is no different from any other bulk materials. First you need to install the formwork (frame), and then fill it with an even layer of granules.
Ecowool
The raw materials for the production of ecowool are not environmentally friendly materials, as the name might suggest, but various waste - newspapers, bags or cardboard. The components are treated with acid, due to which the finished material has minimal flammability and is well protected from biological influences.

Among the advantages of ecowool, it is worth noting, first of all, its low thermal conductivity, which provides good insulation, and the ability to transmit steam, due to which the material is not susceptible to fungus and mold. In addition, this material is very easy to install and is quite suitable for do-it-yourself insulation.
Insulating the ceiling with ecowool in a private house can be done using dry, wet and adhesive methods. The first method is quite simple - the material is simply placed in a frame and compacted. For the second and third methods, you need special equipment that allows you to spray ecowool on the desired areas.
Polyurethane foam
IN modern construction Polyurethane foam is very popular, which, among other purposes, is also used for insulation. This material Available in the form of foam, which can be applied to any type of surface. Distinctive feature is that there is no need for any fastenings - this insulation for the ceiling inside a country house independently sticks to everything it comes into contact with.
Among the main advantages of polyurethane foam, the following qualities are worth noting:
- Low flammability;
- No toxic emissions;
- Good chemical resistance;
- Low hygroscopicity;
- Long service life.

Sprayed polyurethane foam forms a solid layer that has no cracks or gaps, resulting in low thermal conductivity. However, steam can easily pass through the pores of the material, so there is no need to install a vapor barrier. To apply this insulation to the coating, it must first be dried (for concrete floors the permissible moisture level is 4%, and for wooden floors - 12%).
Areas that should not be insulated must be well covered before work (plastic film or thick fabric is quite suitable). Polyurethane foam is applied in layers, subject to constant control of the spray thickness. The next layer can be applied only after the previous one has completely hardened. Being the most expensive insulation, polyurethane is very easy to apply and perfectly performs its functions.
Conclusion
Ceiling insulation in a private house can be done in several ways. In some cases you will have to put in more effort, in others it will be easier, but you will have to pay more. The main thing is that for any conditions you can choose best option, which will be quite profitable and effective.
Living in a fairly harsh climate imposes serious obligations on maintaining heat in the room. Especially if you have a spacious private house and at least a third of the heat loss occurs on the ceiling surface. Add to this the losses through window and door openings - and we get a completely bleak picture. Today we will tell you about how to insulate the ceiling from the attic side of a private house - as it turns out, this is a fairly simple procedure that anyone can handle. Please read our detailed instructions- and start saving heat in your home today.

Benefits of insulating outside
If in multi-apartment conditions panel houses Insulation is carried out directly in the room, then owners of private property have a choice: insulate the ceiling from the attic side, if it is present in a private house, or get by with the basic option from inside the room.


The first method has a number of undeniable advantages:
- additional insulation of the floor and a significant extension of its service life;
- the decision to insulate the ceiling from the attic side of a private house does not in any way affect the height of the room below;
- convenience of covering;
- reliable protection against the appearance of condensation in the ceiling pie;
- preservation of the interior decoration of the living space;
- quick replacement of floor sheathing;
- simpler, cheaper, more convenient.


Second option - insulation from the inside- is also common, but it is mainly used when the height of the ceilings allows you to sacrifice a dozen or so centimeters without any damage to your own comfort.
What material should I use?

The main criteria for choosing a suitable material are thermal conductivity, hardness, resistance to any kind of pressure and deformation.

Based on this, the optimal choice, if the work progresses correctly, will be any of the following materials:
- basalt slabs extreme degree of rigidity;
- extruded polystyrene foam;
- durable foam;
- polyurethane foam;
- vermiculite;
- foam glass;
- sawdust;
- expanded clay


Sawdust and expanded clay compare favorably with other materials in their low cost and full environmental safety. Therefore, you can note these two options for yourself in advance.


Preparation of tools and materials
Here's what you'll definitely need to carry out all your planned work efficiently:
- nails;
- screws;
- self-tapping screws;
- screwdriver;
- jigsaw;
- hacksaw;
- perforator;
- polyurethane foam;
- slats;
- boards.
Preparing the attic

Insulation of the ceiling in a private house from the attic side should begin with the preparation of the room where the direct cladding with heat-saving material will take place. For this:
- remove old furniture, who often lives her solitary life in such premises;
- clean the floor from dirt and dust;
- prepare an exceptionally clean and level base - otherwise the insulation will not lie tightly and all your work may go down the drain.


Determining the exact area
- if you know the area of the premises from the passport information of the object, it would be useful to check them personally: often the information from the passport is approximate and rounded up;
- Using measuring instruments, determine the length and width of the room, and based on the information received, calculate the exact amount of insulation material you need.


Base sheathing
If you choose as insulation mineral wool or basalt slabs and you don’t know how to insulate the ceiling from the attic side using them correctly, then pay attention to the following algorithm of actions:


- first create a layer of vapor barrier to prevent the selected material from getting wet - to do this, lay a layer of standard rolled vapor barrier on the side where warm air enters (glassine or foil are perfect);
- apply a layer of clay mortar, to determine the thickness of the layer, use the figure up to 2-3 centimeters; such a screed can be additionally reinforced with wire reinforcement, but this is not a mandatory procedure;
- lay the selected heat insulator between the floor joists - this will level the load transmitted to the floor, partially transferring the weight to the beams near the floor;
- stage of laying the waterproofing material: for this you can use ordinary polyethylene film, it will do an excellent job of protecting the insulation from moisture and allowing it to maintain its heat-insulating properties;
- stage of installation of the floor pie: such a rough flooring of boards will allow you to move freely around the attic and at the same time protect your insulating structure from mechanical damage.


If you choose some other material for insulating the ceiling from the attic side, creating a vapor barrier layer is not a mandatory installation item (read about vapor barrier for ceilings in wooden floors).

Visualization that gives a better idea of how to properly insulate the ceiling from the attic side:


- avoid using glass wool, cinder blocks and similar insulation materials - they do not belong to the class of environmentally friendly materials and can greatly harm your health;
- when using polystyrene foam to insulate the ceiling in a private house, do not forget to seal the joints with polyurethane foam - otherwise, severe heat losses and subsequent destruction of the structure you have installed are inevitable;
- sawdust is one of the cheapest and simple ways insulating the ceiling in a private house from the attic side, however, at the same time it poses a considerable threat due to the potential for fermentation: this can result in particularly dangerous fumes;
- It is best to insulate the ceiling with sawdust in the summer season, during extreme heat - and be sure to treat them with a solution of boron and borax.


Conclusion
If you have your own personal property in the suburbs, then it is your responsibility to know how to insulate the ceiling on the attic side of a private house. Heat loss is one of the reasons for the establishment of an unhealthy atmosphere in a private home, high humidity and rapid deformation of ceilings. The presence of an attic allows you to significantly simplify the insulation procedure - and thereby maintain the required height of the room below. Of course, you can always additionally insulate the room from the inside - such economic vigilance will become reliable and guaranteed protection from heat loss in the house. As a result, you can significantly save on heating the room. Proper execution sheathing with a heat-insulating layer is a guarantee that your home will always be cozy. Isn't that the main thing?

In winter, at least 25% of the heat is lost through the roof of an uninsulated building; the losses are compensated by increased heating. Of course, heating entails increased energy consumption. Budget method solution to the problem - insulating the ceiling in a private house, the attic remains cold. The overlap is smaller than the roof slopes in area, hence the savings. Our task is to tell you how to properly insulate a ceiling by first selecting the appropriate materials.
The age-old question - to insulate from the inside or outside
Any external fence separating a living space from the street should be sheathed with thermal insulation on the outside. Accordingly, the insulation of the ceiling on the top floor of a private house is done from the attic side. Causes:
- Installation is physically simplified, which is important when doing the work yourself. There is no need to make a suspended frame or attach insulation from below to the ceiling.
- A layer of insulation 10-20 cm thick (depending on the region of residence) will not reduce the height of the rooms. This is an important plus for old buildings and “Khrushchev” buildings with low ceilings.
- In a lived-in house or apartment, you won’t have to redo the renovations.
- If you do not follow the internal thermal insulation technology, the surface under the insulation will get wet and fungus will appear. Moisture condensation inside the “pie” is promoted by 2 factors: the penetration of water vapor and the formation of a dew point at the junction of dissimilar materials.
About the notorious dew point, which is used to frighten ordinary homeowners. To avoid condensation inside the structure, it is worth meeting 2 conditions: do not allow water vapor from the room to enter there and use an insulator of sufficient thickness. Then the dew point will be inside the insulation, where there is nothing to condense. The second way is to organize moisture removal using ventilation (read below).
Reference. Dew point is the phenomenon of condensation of water vapor from the air at a certain humidity and temperature. The lower the air temperature, the sooner the degree of extreme saturation with moisture is reached and condensation begins to form.
There are exceptions to the rules; not every room can be insulated from the outside. Examples:
- ceiling of the upper apartment of a multi-story building;
- attic;
- balcony, loggia;
- concrete garage floor above the basement, cellar;
- the need to save money, etc.
 For obvious reasons, it will not be possible to insulate a garage basement from above
 In these cases, internal thermal insulation of ceilings is arranged with strict adherence to technology. We will describe the work procedure in the form of step-by-step instructions, but first you need to find out...
The best way to insulate ceilings
To insulate ceiling structures, 4 groups of materials are used:
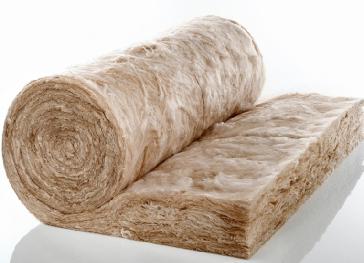
- Fibrous - mineral, stone (basalt) and glass wool.
- Bulk – sawdust, clay, expanded clay, vermiculite.
- Polymers made from expanded polystyrene and polyethylene.
- Sprayed - ecowool, polyurethane foam, liquid foam- penoizol.
We will not focus on the last group of insulation materials - liquid mixtures are applied by spraying or filling cavities under pressure, which requires appropriate technological equipment. This kind of ceiling insulation in a private house cannot be done with your own hands - you need to hire specialists from a specialized company and pay for the services.
 Application of cellulose ecowool (left) and polyurethane foam (right)
 Note. Sprayed materials are the most effective and at the same time expensive. Only insulating polyurethane foam Polynor with a low thermal conductivity coefficient λ = 0.04 W/(m °C) is applied manually. The price of an aerosol can is 8 USD. That is, the coverage area is 1 m² with a thickness of 50 mm. Thermal resistance of the layer: R = 0.05 / 0.04 = 1.25 m² °C/W - information will be useful to us for comparison.
Let's take a closer look at each group of building materials, then select suitable insulation for ceilings in various rooms.
Porous-fibrous materials
For thermal insulation of roofs and attics under cold roof 3 types of fibrous products are used:
- mineral wool on a synthetic binder, thermal conductivity λ = 0.055-0.06 W/(m °C);
- basalt non-flammable insulation λ = 0.05-0.053 W/(m °C);
- mineral wool based on glass fiber (otherwise known as glass wool) λ = 0.044 W/(m °C).

Clarification. We present the parameters of insulation for real operating conditions, taken from the standard construction documentation. To increase the characteristics of insulators, manufacturers indicate the λ coefficient for the material in a dry state. The lower the thermal conductivity, the better insulation resists cold.
Above we calculated the thermal resistance R of penoizol with a thickness of 5 cm (1.25 m² °C/W). Let's compare the indicator with the characteristics fibrous materials of similar thickness, performing a short calculation for each (using the methodology from SNiP):
- mineral wool - R = 0.05 / 0.055 = 0.9 m² °C/W;
- stone wool - R = 0.05 / 0.05 = 1 m² °C/W;
- glass wool - R = 0.05 / 0.044 = 1.14 m² °C/W.
Conclusion. In terms of thermal insulation properties, fiber insulation is inferior to liquid and foamed polymers. The best result is shown by glass wool, the worst – by ordinary mineral wool insulators. By the way, the values of thermal resistance R are interpreted the other way around: the higher the indicator, the more efficiently insulation of a certain thickness works.
 Externally basalt wool differs from mineral in color and corrugated fiber structure
 Let us list the other, no less important properties of fiber insulation:
- Cotton wool is produced in rolls, slabs and mats various densities– from 35 to 200 kg/m³.
- Structure with open pores promotes good vapor permeability of materials.
- Mineral wool absorbs moisture, but with proper ventilation it dries quickly.
- Basalt fiber is considered non-flammable because it can withstand temperatures of 600-700 °C. Ordinary mineral wool slabs also do not burn, but are destroyed by strong heat. Glass wool begins to melt at 250 degrees.
- Insulation materials do not have high strength; they are attached with glue or using a frame.
Fiberglass wool contains tiny glass particles and is therefore not suitable for indoor use. Well-known manufacturer roofing insulation, Izover recommends covering the outside of the attic floors with glass wool.
 The structure of glass wool - the fibers form many air layers
 In others mineral insulation a synthetic binder containing formaldehyde is used. Under certain conditions, these substances can be released and mixed with the air. For internal insulation, mineral wool must be well insulated from the living space using film, drywall, and so on.
Bulk insulation materials
All backfill materials are of natural origin and therefore environmentally friendly. The following insulation materials are used to insulate ceilings:
- expanded clay;
- small shavings, sawdust;
- clay;
- vermiculite gravel.
Reference. Vermiculite is much more expensive than expanded clay, so it is used quite rarely. Clay in its pure form is also not used - it is usually mixed with reeds or sawdust.
The main disadvantage of natural insulation is its low efficiency compared to mineral and polymer products. Example: the thermal conductivity of expanded clay gravel with a density of 200 kg/m³ is 0.11 W/(m °C). Thermal resistance R of a 50 mm layer will be only 0.05 / 0.11 = 0.45 m² °C/W. The indicators of high-density expanded clay, sawdust and clay are even lower.
 Vermiculite (left) and expanded clay gravel (right)
 Briefly about the properties of building materials:
- All bulk insulation materials allow water vapor to pass through well.
- The flammability of clay, expanded clay and vermiculite gravel is practically zero. Sawdust or reeds mixed with clay mortar also successfully resist fire.
- Long service life (excluding wood chips).
The low price of natural insulation is a relative concept. To create a thermal insulation layer comparable to 5 cm thick mineral wool, you need to fill expanded clay to a height of 100 mm, that is, spend twice as much.
Characteristics of polymer thermal insulation
To begin with, we will give a list of materials used with an indication of the thermal conductivity characteristics in operating mode:
- polystyrene foam with a density of 15...35 kg/m³, λ = 0.045-0.041 W/(m °C);
- extruded polystyrene foam EPS, density - 20...40 kg/m³, λ = 0.039-0.037 W/(m °C);
- foamed polyethylene 30…50 kg/m³, λ = 0.044-0.042 W/(m °C).
Reference. Extruded polystyrene foam is often called Penoplex after the popular brand. Products made from polyethylene foam are known by the names “Penofol”, “Izolon” and “Tepofol”.
 Thin polyethylene foam insulation with foil reflective layer
 For comparison with fiber insulators, we determine the thermal resistance of polymers 50 mm thick:
- polystyrene foam 25 kg/m³ - R = 0.05 / 0.043 = 1.16 m² °C/W;
- “Penoplex” - R = 0.05 / 0.038 = 1.32 m² °C/W;
- “Penofol” - R = 0.05 / 0.042 = 1.19 m² °C/W.
It is noticeable that the thermal insulation properties of polymer insulation exceed those of mineral and basalt wool. The leader is extruded polystyrene, whose results are comparable only to polyurethane foam applied by machine.
The rest of the properties look like this:
- Thanks to the closed air pores, insulation materials practically do not allow moisture to pass through. The exception is foam plastics, which have a meager vapor permeability of 0.05 mg/(m h Pa). Mineral wool indicators are 0.4...0.6 mg/(m h Pa).
- All polymers are flammable, no matter what sellers and manufacturers claim.
- Polystyrene-based materials are highly durable and are produced in slabs.
- Foamed polyethylene has a soft and flexible structure and is sold in rolls. To reflect the infrared heat flow, the surface of the insulation is covered with aluminum foil.

In terms of availability, foam plastic is the leader - its price is comparable to natural materials. The “extruder” is sold at the price of basalt non-combustible wool or even more expensive.
Useful fact. A polymer stretch ceiling, which forms an air gap under the ceiling, can be a good insulator. This cavity cannot be called airtight, but there are very few ways for warm air to penetrate.
Review and comparison of characteristics insulation materials showed that each group of insulators has strong and weak sides, limiting the scope of application. For example, flammable polymers cannot be used for insulation of interfloor ceilings wooden houses- fire regulations prohibit. You should not ignore the requirement - with the help of insulation, the fire will easily spread to the next floor.
Reference. When installing wooden ceilings, regulations require treating the load-bearing beams with a fire-resistant compound and using non-combustible insulators. If you follow these instructions, then in the event of a fire the ceiling will last 30-60 minutes until it completely collapses. Here is the answer to the question whether it is possible to insulate a wooden ceiling with foam plastic.
 Building codes It is recommended to treat wooden structures with a fire retardant compound
 Based on experience in construction and other regulatory requirements, we will give the following recommendations for choosing thermal insulation:
- It is better to insulate wooden floors from the attic side with basalt wool, expanded clay, vermiculite or a mixture of clay and sawdust.
- Ceilings in bathhouses (especially steam rooms) need to be insulated environmentally clean materials. Here the choice is small - the same expanded clay, sawdust, vermiculite gravel, natural moss. No polymers or mineral wool; strong heating will cause the release of harmful substances.
- The ceilings of attic rooms are lined from the inside with dense basalt fiber; glass wool is not applicable.
- Concrete monolithic coatings are usually insulated with foam plastic or expanded polystyrene. In a country house - from the roof, on the balcony of a high-rise building or in the basement of a garage - from the inside.
- It is more correct to insulate flat reinforced concrete roofs with polymers from the outside, before installing the overlay bitumen roofing. If this is not possible, Penoplex can be hemmed from below without any problems, but in compliance with the technology.
- It is advisable to use foiled polyethylene foam as an additional insulating layer. How to properly insulate a ceiling with Izolon and Penofol, from a separate manual.
Practice shows that it is better not to combine wood and vapor-tight building materials. The polymer, tightly adjacent to the beam, blocks the access of air, the wood does not “breathe”. If steam begins to condense at the joint and has nowhere to escape, the tree will turn black and rot.
The author of the video is clearly exaggerating and exaggerating the problem, but the situation shown is, of course, unacceptable. There is only one way out - when using polymers, you need to ensure contact of wood with air, which is not easy to implement technically.
How to calculate the thickness of thermal insulation
We will show the determination of the thickness of the insulating layer using examples. Let's take as a basis the formula for calculating thermal resistance (in previous sections we already used it to compare the efficiency of different materials):

- R – heat transfer resistance of the insulating “pie”, m² °C/W;
- δ – insulation thickness, m;
- λ – coefficient of thermal conductivity of the material, W/(m °C).
The essence of the calculation: using the standard thermal resistance specified for your region of residence, calculate the thickness of the insulation, knowing the characteristic λ. The R value is determined according to the scheme given in the regulatory documents; a map with indicators for the Russian Federation is shown in the photo.
 Similar maps can be found in regulatory documents of other CIS countries
 Example 1. It is necessary to calculate the insulation of a dacha with an attic located in the Moscow region. We find the characteristics R for Moscow, select the indicator 4.7 m² °C/W (for coatings), take the coefficient λ of basalt wool equal to 0.05 W/(m °C) and calculate the thickness: δ = 4.7 x 0.05 = 0.235 m ≈ 240 mm.
Example 2. We determine the thickness of the Penoplex insulating layer for the concrete floor, location - Cherepovets. The algorithm is like this:
- We find on the Internet or reference literature the thermal conductivity of reinforced concrete λ = 2.04 W/(m °C) and find out the thermal stability of a standard 220 mm floor slab: R = 0.22 / 2.04 = 0.1 m² °C/W.
- Using the schematic map we find normative meaning R for Cherepovets, we take the overlap indicator - 4.26 m² °C/W (the number is highlighted in green).
- We subtract the found plate resistance from the required heat transfer value: 4.26 - 0.1 = 4.16 m² °C/W.
- We calculate the thickness of polystyrene foam insulation λ = 0.037 W/(m °C): δ = 4.16 x 0.037 = 0.154 m ≈ 160 mm.

Comment. The algorithm does not take into account the heat resistance of interior finishing and attic floors, so it gives the result with a small margin. If we take away the resistance of the flooring boards and plasterboard ceiling lining, the thickness of the EPS will decrease to 135 mm.
We insulate the ceiling with mineral wool
As mentioned above, mineral wool is used to insulate wooden floors and ceilings of attic rooms. To prevent the material from becoming saturated with moisture and losing heat resistance, 3 conditions must be met:
- protect the cotton wool from the entry of water vapor from inside the premises;
- ensure ventilation of the outer surface so that the resulting moisture is evaporated from the thickness of the insulation;
- the vapor permeability of the materials used in the “pie” should increase towards a colder room or street, as shown in the diagram.

Slab or rolled mineral wool is located in the space between the ceiling beams, as shown in the insulation diagram. When laying thermal insulation with your own hands, follow the following procedure:
- Roll out from the bottom of the beams vapor barrier film, laying adjacent sheets with an overlap of 100 mm wide. Make an overlap on the walls 10-15 cm wide. Carefully tape the joints with tape.
 The right photo shows the option of moisture insulation with foamed polyethylene with a reflective layer of foil
 - Glue film overlaps to wall structures silicone sealant. The goal is to cut off room moisture from penetrating into attic space.

- Work is being carried out from the cold roof side. Therefore, first make a rough padding of the ceiling, where the cotton wool will subsequently lie.
- Lay mineral wool boards as shown in the photo. Roll material carefully trimmed and inserted between the joists; creasing the cotton wool is unacceptable.

- Lay waterproofing sheets on top of the insulation - a diffusion membrane that allows moisture to pass in only one direction - outward. Overlap 10 cm and glue the joints.
- Arbitrarily lay attic floors from edged boards across the joists. It is not necessary to make a continuous flooring.

Important point. A ventilation duct must be provided between the surface of the wool and the waterproofing. Thanks to the air gap, moisture is removed from the insulation.
Sometimes builders lay the first moisture-proofing film on top of the rough ceiling boards, going around each beam. We do not recommend using this approach - a vapor barrier will block the access of air to the log wood, and from below it will remain open for saturation with steam. Then it is clear - the tree will begin to rot.
How to lay mineral wool on the ceiling if the thickness of one layer is not enough. In such cases, a second tier is made thermal insulation boards, shifted by 30-50 cm relative to the first row. If the height of the load-bearing beams is not enough to organize ventilation, a frame of sheathing beams is built up, then a 2nd layer of insulation and waterproofing is installed.
 The device for additional sheathing is shown on the left when the height of the beams is not enough
 The insulation scheme for the attic floor is very similar to the thermal insulation of a wooden floor:
- A counter-lattice is provided on the roof, diffusion membrane rolls out from above along the rafters. If there is no external frame, waterproofing can be attached from the inside, bypassing each rafter leg and shooting the edges of the canvases with a stapler.
- The insulation is placed between the rafters at random. If the width allows, we lay the slabs in 2 layers with bandaging, otherwise we install a horizontal counter-lattice.
- We nail the vapor barrier to the rafters through the slats, where it is subsequently attached interior decoration from gypsum plasterboard or lining.

Reminder. When working with glass wool or basalt fiber, do not forget to wear a respirator and gloves, the material is very dusty and irritates the skin. How to insulate a wooden covering without mistakes, watch the video:
It is extremely undesirable to insulate concrete ceilings with cotton wool from the inside, especially in wet rooms - the kitchen and bathroom. The porous material will harden and lose its properties if not provided. Another thing is to attach mineral wool in the space behind the suspended ceiling, where water vapor almost does not penetrate.
Expanded polystyrene cladding technology
Polymers are usually used to insulate reinforced concrete floors and ceilings, on both sides. To insulate the structure from the inside, the surface needs to be prepared - seal the joints of the plates, level with mortar and carefully treat with a primer.
Second phase internal thermal insulation– installation of a subsystem made of wooden bars or metal profiles. The frame plays the role of a platform for the installation of finishing - plasterboard, suspended ceiling and so on. Polystyrene boards are attached to concrete surface directly using the adhesive mixture and umbrella dowels.

Reference. When performing thermal insulation of balconies and loggias with extruded polystyrene, craftsmen often do without a subsystem - they glue or screw the slabs to the ceiling in a continuous layer. The slats for the internal cladding are attached to the concrete floor through the insulation with special screws - dowels.
How to insulate a reinforced concrete ceiling in a private house from the inside:
- After preparing the surface and assembling the frame (or without it), prepare the adhesive mortar according to the instructions on the container.
- Apply glue to the foam board and press it to the surface, hold it for a while. Attach the next element end-to-end with the previous one, make the adjacent row with a shift relative to the first.

- When the mixture hardens, additionally secure the polymer boards with dowels in the form of umbrellas. It is advisable to blow out the joints with polyurethane foam.
 The right photo shows an option for installing EPS together with a suspended ceiling frame under gypsum plasterboard
 - Cover the ceiling with a vapor barrier, ensuring overlaps and taping joints. The film or “Penofol” is aimed at the subsystem with a stapler.

- Place the edges of the film on the walls and glue them with construction sealant. Install the sheathing slats and move on to finishing.
Advice. You should not screw Penoplex to the ceiling without glue. Firstly, there will be gaps under the insulation, and secondly, the surface needs to be perfectly leveled. Otherwise, differences of 1-3 mm will appear at the joints of the plates.
External insulation of reinforced concrete slabs with polymer materials is used in flat roofs and exploited attics. The “pie” on the roof is formed like this:

The technology for installing polystyrene insulators from below to the ceiling is demonstrated in detail in the video:
Of course, you can insulate reinforced concrete from the inside with mineral wool, and the ceiling of a log house with expanded polystyrene. Then take additional measures: very carefully isolate the mineral wool from the room, and blow it between the polymer and the wood polyurethane foam– it allows air to pass through and prevents rotting.
Finally, about backfilling the attic
The use of bulk materials is the simplest option for insulating the ceiling of a country house, although not the most effective. Thermal insulation is carried out on top of the ceiling in various ways:

If you have a concrete auger mixer at your disposal, you can prepare a more modern insulation for the ceiling - polystyrene concrete. The cement-sand mortar is mixed with polystyrene balls and laid on the ceiling in a layer of 200-300 mm. There is no need to lay the flooring - the monolith has sufficient strength.
Note. There is a mistake in the video - there is no need to place the film under bulk materials. Water vapor (especially in a bathhouse) should freely escape through the expanded clay or sawdust concrete to the outside, and the wood should dry thoroughly.
Most people try to insulate the walls of a private home as best as possible to avoid heat loss. In fact, 60% of thermal energy escapes through the ceiling, because warm air tends to rise upward and escape through the ceilings. In addition, there is always a high level of humidity in the ceiling area, hence mold and mildew in the corners. An insulated ceiling will not only make the house more comfortable, but also protect property from damage.
Methods for insulating the ceiling
In a private house, insulating the ceiling becomes task No. 1. To insulate the ceiling and reduce heat loss, you can use the following methods:
- Insulation of the ceiling from the inside. This is the case if there is a not an attic, but an attic. A frame is constructed from wooden beams, which is attached to the ceiling using a hammer drill and dowel nails. Inside the frame is filled various insulation materials, and a vapor barrier is placed between the ceiling and the insulation. Then the insulated ceiling is covered with plasterboard. The disadvantage of this method is the “hiding” of a significant part of the ceiling, as well as the complexity of the work.
- Insulating the ceiling from the outside. This method is good if there is an attic under the roof. There are also variations depending on the type of insulation.
Foam insulation
Before you begin the insulation process, you need to empty the attic of excess rubbish, sweep out all the garbage, and carry out wet cleaning down to clean concrete. Depending on the size of the area to be insulated, it is necessary to purchase the appropriate amount of polystyrene foam. thickness not less than 40 mm or styrofoam, but it will cost much more. Both materials have low thermal conductivity And high resistance to damage by microorganisms. The entire floor space is covered with sheets of foam plastic, the joints are glued together with polyurethane foam. A reinforcing mesh is placed on top of the foam and poured screed with a layer of at least 50 mm. This procedure is necessary if the attic will be used.
Disadvantages of polystyrene foam:
- questionable fire retardant properties, added fire retardants are short-lived
- emits formaldehyde
- there are rodents in it
- a “greenhouse effect” occurs, the room must be ventilated frequently
Technology for installing foam plastic and penoizol
The efficiency of thermal insulation when using penoizol is much higher than when installing ready-made foam boards. The slabs may not fit tightly to the supporting frame, forming cracks and “cold bridges.” Filling with foam insulation saves transportation costs and electricity. Penoizol adheres tightly to the wall thanks to the resins included in its composition. It dries within 15-20 minutes. The only drawback is that it is impossible to fill penoizol yourself. The whole procedure must be carried out by specialists.
To install foam plastic boards you will need:
- Styrofoam
- plasterboard sheets
- metal profile or wooden slats
- hammer
- polyurethane foam
- waterproofing material
- screwdriver
- waterproofing glassine, which is made of roofing cardboard and impregnated with bitumen. It prevents moisture from penetrating into the thermal insulation layers.
- fastening elements - screws and self-tapping screws, sometimes nails
- hacksaw
There are two ways to install foam boards: frame and glue. Preparatory process the same for both methods. The length and width of the area are carefully measured. These indicators are multiplied, and the area is obtained. Based on it, the appropriate number of foam plastic boards with a thickness of at least 5 cm is purchased. Then the surface is processed, to which the slabs will be glued. Old whitewash and plaster are removed, dust and dirt are washed off. You can even treat the surface antiseptic. Apply a coat of primer to make the surface smooth. If possible, the existing electrical system should be replaced with a newer one.
 At glue method there are some nuances. In order for the foam to adhere well to the ceiling surface, it is necessary observe the temperature regime not lower than 50C and not higher than 250C .
You can use regular tile adhesive as an adhesive. It can also be used to treat the surface to which the slabs will be attached. After it dries you can continue installation work. Glue is applied to the foam sheet and the wall, left for 2-3 minutes and the foam is pressed to the surface.
At glue method there are some nuances. In order for the foam to adhere well to the ceiling surface, it is necessary observe the temperature regime not lower than 50C and not higher than 250C .
You can use regular tile adhesive as an adhesive. It can also be used to treat the surface to which the slabs will be attached. After it dries you can continue installation work. Glue is applied to the foam sheet and the wall, left for 2-3 minutes and the foam is pressed to the surface.
You can also use dowels with large heads. The entire area of the insulated surface is covered in the same way. After insulating the entire ceiling, all joints and cracks are carefully coated with glue or foam to enhance the tightness. Once the glue or foam has dried, you can reinforce the ceiling. To do this, a special solution is applied to foam sheets, into which a fiberglass mesh is immersed. Another layer of solution is applied on top. You must wait until the solution has completely dried and only then continue installation work.
With the frame method of mounting foam plastic, wooden or metal slats so as to form cells. Cell size depends on the size of the foam boards. For example, if the slabs have dimensions of 1/1 m, then the cells must be made 50/50 cm. Accordingly, during installation, the foam sheet will need to be cut into 4 equal squares. In case of use aluminum profile, metal slats are attached to the ceiling using a hammer drill and self-tapping screws.
A sheet of foam plastic is inserted into the resulting grooves, coated on the side on all sides with “liquid nails” for reliable gluing of the slabs to the supporting structure. A whole sheet of foam plastic is inserted into the aluminum slats and secured with self-tapping screws. Further also reinforcement is being carried out: a special solution is applied, a reinforced mesh is placed and a layer of fill is applied again. That's it, the insulated ceiling is ready. If desired, you can sew plasterboard over entire foam boards.
Penoizol as insulation for ceilings
 Penoizol is foamed plastic in liquid form. To install penoizol, special equipment must be used. It is not very expensive and is easy to fill hard to reach places. Penoizol is fireproof, hygroscopic, and has low thermal conductivity. There are no rodents in it, and it is not susceptible to microorganisms. Penoizol can be operated at temperatures from -600C to +800C. The material has high soundproofing properties. The environmental friendliness and safety of penoizol has been confirmed by numerous experiments.
Penoizol installation technology
Done wooden or metal cellular frame, the cells of which are filled with penoizol. It spreads and fills the entire space. Gradually it polymerizes and becomes excellent insulation. When using it, you do not need to use either a steam or waterproofing agent.
Warm ceiling using mineral wool
This material is divided into glass wool, ceramic, slag and stone wool. The types of glass wool are modern materials for insulation Rocklight, Technoblock, Technovent, Technolight, Technoruf, Technofas, etc. The raw materials for the production of the material are basalt, limestone, diabase or dolomite. The highest quality mineral wool is obtained from rocks.
When using mineral wool, you must wear work clothing, safety glasses and a respirator, because particles of the material irritate the skin. After installation, mineral wool becomes safe for humans. Before using it, it is necessary to clean the surface of debris and dirt. to the state of pure concrete. The frame for the future floor is made from wooden beams. Measurements are taken, logs are installed, a vapor barrier is laid, preferably glassine. Sheets of mineral wool are placed on top of it, but this should not be done too tightly, cotton wool cannot be compressed. To make the floor even warmer, you can lay mineral wool in two layers, with the top layer covering the joints of the bottom one. Next, the flooring is laid, which is attached to the wooden frame.
Flaws:
- the material cannot be removed and compacted, because it may lose its thermal insulation properties
- mineral wool must be carefully protected from moisture
- even a small gap can reduce the thermal capacity of the ceiling
- Along with mineral wool, other moisture-proofing material is used, which increases the cost and complicates the process
- needs to be changed every 10-15 years
Mineral wool installation technology
 First, you need to accurately calculate how much insulation, waterproofing and vapor barrier materials you need to purchase. Remember that when working with glass wool, dust is released that irritates the skin and mucous membrane of the eyes. Therefore it is necessary purchase protective clothing and glasses, respirator, gloves. It is also necessary to turn it off while working with mineral wool. ventilation system so that dust does not penetrate there. For installation of mineral wool you will need the following:
- insulation
- wooden slats (width 150 mm, thickness 30 mm) or galvanized profile
- hammer drill
- self-tapping screws
- large scissors
- protective equipment
- vapor barrier
- metal staples
- roulette
If the house is wooden, then as load-bearing structure are selected wooden slats. A waterproofing layer with an overlap of 10 cm is placed on the wooden floor. A sheathing is attached to the top. The distance between the slats is 50−60 cm. Mineral wool is unpacked immediately before installation. The insulation is cut into pieces to a width corresponding to the distance between the slats plus 2 cm for a tight fit.
Between waterproofing and insulation is done a gap of 1−2 cm for natural circulation air. Mineral wool is placed tightly enough so that no folds or crevices form. Then a vapor barrier is attached on top perpendicular to the rafters with an overlap of 10 cm and attached to the wooden slats using a stapler. All seams are carefully secured with mounting film. This will strengthen the tightness of the structure.
It is a cellulose based material, absolutely harmless to humans. 81% ecowool consists of recycled cellulose, a product of paper processing, 12% antiseptic, 7% fire retardants. The fibers contain lingin, which gives the structure stickiness. The material is elastic and elastic enough to prevent shrinkage, and at the same time has a capillary structure, thanks to which the ceiling “breathes”. Ecowool protects the surface from the spread of fungus, and rodents do not live in it. Upon contact with metal structures no corrosion occurs, and in case of fire the material smolders, but does not burn.
- During installation, ecowool releases a lot of dust from boric acid
- installation can only be carried out by specialists using special equipment
- ecowool should not be used near a fire source or high temperatures (sauna), otherwise ecowool will begin to smolder
Ecowool installation technology
 Manual method ecowool installations complicated and tedious. Material installed by an unqualified specialist reduces its effectiveness by 20-30%. There are two methods of mechanical installation of ecowool: dry and wet. The dry method is convenient for insulating an attic. The use of special Tyvek-type membrane films makes it possible to pump ecowool not only into horizontal, but also inclined and vertical surfaces. To do this on special equipment fill the cavities of building frames with ecowool under air pressure.
The wet installation method arose due to the ability of ecowool, when wetted with water, to stick to any surface due to the special substance lignin included in its composition. The wetted ecowool groans viscous and sticky, and with the help of a pneumatic installation under air pressure, ecowool is sprayed and adheres tightly to the surface. After drying, a uniform and homogeneous layer is formed with soundproofing ability.
If it is not possible to cover the surface, then use wet-adhesive application method ecowool. With this method, ecowool is treated not with water, but with an adhesive solution, which significantly enhances the adhesive ability of the material.
Ecowool insulation should be carried out by specialists, then the material will 100% realize all its advantages.
How to insulate a ceiling with sawdust
This method obsolete, but is still used for insulating ceilings.
Flaws:
- they shrink, they need to be added
- fire hazardous
Technology for installing sawdust insulation
First you need to replace the electrical wiring, insulate it in metal pipes, and also insulate the chimney. To use sawdust as insulation you will need:
- sawdust
- lime
- cement
- copper sulfate
 Preparing sawdust for laying. It’s difficult for one person to cope; an assistant is needed. In a large spacious barrel, 10 buckets of sawdust, 12 buckets of lime and 1 bucket of cement are mixed. Everything is mixed well until a homogeneous mass is obtained.
Water is poured into a 10 liter watering can and poured a few tablespoons of copper sulfate as an antiseptic. Slowly the contents of the watering can are poured into the barrel with the sawdust mixture. If, with a clenched fist, the mixture ceases to release moisture, then it is ready for use.
Glassine is spread along the entire perimeter of the ceiling and secured with adhesive tape or galvanized clamps. On the surface of glassine The sawdust mixture is laid out in an even layer. There is no need to compact it too hard. Smooth the surface and allow it to dry for at least 2 weeks. That's it, the insulation is ready. It’s just not recommended to walk on it, so the room should not be used.
Thermal insulation of the ceiling with clay
Clay is considered environmentally friendly, fire resistant and inexpensive means of roof insulation. To use sawdust and clay as insulation you will need:
- sawdust
- lime
- cement
- copper sulfate
Technology for installing clay insulation
From beams, bars and boards, treated with antiseptic, a special covering is made (described earlier) into which the clay will be poured. The bottom of the ceiling is lined with polyethylene or PVC film, which is attached to the beams and boards using a stapler. In a concrete mixer or large barrel there are 5-6 buckets of clay (which you can dig up in your garden) dilute until completely dissolved with water. Then sawdust is added and mixed until the mixture is not too wet or too dense. The resulting mixture is laid out on the floors between the beams in a layer of 5-10 cm. It is necessary to wait until the clay dries completely. This may last more than a month. To speed up the process, you need to ensure good ventilation in the attic. On a clay surface small cracks may appear, but they are easily overwritten later.
Flaws:
- under clay the tree can become moldy and rot
- if the ratio of clay and sawdust is incorrect, thermal conductivity increases and heat is lost
Expanded clay for ceiling insulation
Expanded clay is a lightweight refractory material made from fired clay of low-melting grades. Glassine is placed on the floor and lined with reinforcing mesh, Expanded clay is poured on top of all this. It is heat and sound insulating, resistant to moisture, and does not harbor rodents. Expanded clay acts as a thermal cushion, which is poured on top with a screed. For installation of expanded clay insulation you will need the following:
- expanded clay
- waterproofing agent
- vapor barrier
- adhesive tape, aluminum tape
- stapler
- staples
Installation technology for expanded clay insulation
 This technology similar to the technology for laying other insulation materials such as clay or sawdust. First, the surface on which expanded clay will be poured is cleaned of dirt and old whitewash. A cellular structure is made from wooden beams over the entire surface. Then, with an overlap of 10 cm, they spread wide strips of waterproofing. The joints are glued together with tape. After fastening, a reinforcing mesh is placed on top of the waterproofing material and a layer of expanded clay is poured. Its surface is leveled. A vapor barrier sheet is spread over the expanded clay layer and attached to wooden slats stapler or metal staples. A vapor barrier is placed on top of the expanded clay layer and beams, which is also fixed to wooden structure stapler and staples.
Flaws:
- heavy material
- air “walks” between the granules
- requires subsequent filling or vapor barrier
- Special equipment is required for quality work
Foil insulation
Wood itself is a regulator of heat and humidity, so foil insulation is best used in a room with a concrete floor. When using it, you can eliminate the use of a vapor barrier. The foil itself good conductor of heat. Foil expanded polystyrene is produced in sheets of 60/120 cm and has a thickness of 2−10 cm.
The sheets have stepped locks to eliminate “cold bridges”. Foil polyethylene foam can be single-sided or double-sided. The material also has a thickness of 2−10 cm, and is produced in rolls 1−1.2 m wide and 25−30 m long and looks like a carpet. Sometimes foil polyethylene is covered with a layer of mineral wool on top. Thus, thermal insulation is enhanced, and the release of carcinogens from mineral wool is also reduced. Foil glass wool is produced in the form of mats, supplemented with reinforced mesh. Typically, foil insulation is used to insulate the ceiling and walls of a bathhouse or steam room.
Installation technology for foil insulation
Using the method described above, a cellular structure is made from wooden beams or metal strips. The required size of foil insulation is cut out with scissors according to the size of the cell and secured with construction stapler. The foil side should “look” at the room, and not at the floor. Sometimes manufacturers produce foil insulation with already applied to the surface layer of glue.
Sheets of foil insulation are placed end to end, and the joints are glued with special aluminum adhesive tape. This results in a surface that perfectly reflects heat rays. If you plan to use plasterboard or lining over foil insulation, then you need to create an air gap of 1-2.5 cm between the insulation and the final finish. Otherwise foil will heat up and warp the building material. That's it, the insulation is ready. Simply and easily!
Flaw- wood under foil insulation can collapse and rot if not laid tightly.
As you know, according to the laws of convection, heat always tends to rise to the top. And, if the roof in your house does not have a sufficient level of thermal insulation, then the heat simply goes outside. This is called heat loss. Therefore, in order to avoid heat loss and ensure maximum efficiency in heating any home, you need to know how to properly insulate the ceiling under a cold roof.
High-quality roof insulation is a very important task, which is best solved at the stage of building a house. Correctly performed insulation process:
- Forms the microclimate of the building;
- Protects the structure from damage;
- Retains about 30% heat!
We will tell you what roof insulation methods are available that will allow you to quickly, efficiently and inexpensively insulate the ceiling under a cold roof. We will also tell you in detail about how to insulate a ceiling quickly and cheaply.
Features of a “warm” roof
A warm roof is achieved by insulating the slope. Its arrangement is carried out if the attic space is used as a residential space. In this case, a heating system is organized on this floor, and a warm roof prevents heat loss.

Features of a “cold roof”
The roof was called a cold roof because it does not have the structure of the so-called “roofing pie” - when there are several layers of insulation, vapor barrier material and other layers. This is the simplest roofing design, and also the most affordable. It is very easy to install and maintain, and this roof is also extremely reliable. The construction of such a roof is elementary. She represents rafter system, on top of which a layer of insulation and roofing material is laid. The plank floor of the attic is laid on the ceilings.
This type of roofing is excellent for arranging residential or commercial premises underneath, and does not require expensive roofing materials. However, if there is a need to insulate such a structure, then you should take care of:
- High-quality waterproofing;
- Reliable basis;
- Condensate collection tanks.
Structural insulation can be done in two ways:
- It is easier to do the work from the attic side; this method of insulation does not affect the size of the room.
- Insulation from the side of the room.
How to insulate an attic: insulate it correctly
A cold roof is the simplest option for insulation. The simplest and most obvious solution is to use bulk insulation. The following may be suitable for these purposes:
- Expanded clay;
- Mineral wool;
- Simple sawdust;
- Ecowool;
- Expanded polystyrene;
- Polyurethane foam.
Comparative characteristics that will help you decide on the choice of material are given in the table.

To avoid shedding of this material, it is better to place a simple polyethylene film under it on the plank floor. It will also serve as a vapor barrier layer. Or use a simpler and more budget-friendly option - simple corrugated cardboard. It can be secured to the attic floor using staples.
After it has been laid, all cracks and gaps between the joints need to be sealed, for which simple construction foam is perfect. If wiring runs along the floor, it must be wrapped in a special corrugated hose, ensuring the maximum level of electrical and fire safety.
Interesting: previously, hay and straw were used as bulk insulation. There is no particular reason to neglect the old-fashioned methods even now - it is a very cheap, and, most importantly, environmentally friendly material.
It is generally accepted that the most effective thermal insulation can be ensured by a layer of bulk insulation of at least 12-15 centimeters. This is for winters of average “severity”. For regions with colder winters, the insulation layer can be from 20 to 30 centimeters.
Insulation with expanded clay
Expanded clay is a natural material. It is obtained from clay shale by firing. It consists of granules or grains of different fractions.
It has properties useful for insulating residential premises: light weight, environmentally friendly, not afraid of temperature changes and high humidity, when heated, does not emit toxic substances and is odorless, non-flammable, has high thermal insulation characteristics. The advantages include the absence of dust and a long service life.

Work technology:
- Remove all dirt and foreign objects.
- A vapor barrier film is laid on the attic covering. Secure it with a stapler or carpenter's tape. For reliable insulation, the pieces of film are laid out overlapping and overlapped by at least 40 cm onto the chimney pipe and the roof rafter system.
Depending on the fraction, the density and strength characteristics of the material change. For insulation, a grain size of 4-10 mm is most often used. Cover the attic with a layer of insulation 15 to 30 cm thick. If the surface of the attic floor is to be covered with a wooden covering, expanded clay is poured between the joists.
The table shows the dependence of the properties of the material on the size of the fraction.

The high insulating characteristics of expanded clay are used when it is necessary to insulate the chimney from wooden covering attic. To do this, a special metal box is made around the chimney.
Ecowool
Ecowool is not widely used as a heat-insulating material for residential premises. Nevertheless, it is used for insulation. Below are comparative characteristics ecowool and expanded clay, which allow you to evaluate the materials.

Ecowool contains small cellulose fibers. Installation is carried out using dry and wet methods.
- The dry application method involves laying ecowool between the attic joists and then compacting it. In this case, there is no need to lay plastic film.
- With the wet method, a cellulose mixture with glue is applied to the surface of the attic using special equipment under pressure. The result is a continuous coating of ecowool with air. The layer height can be from 15 to 30 cm depending on the region.
When applying, it is worth considering that the material decreases in volume over time; application should be done in a slightly larger layer. Wet method provides greater thermal insulation due to the formation of a hard crust after a few weeks.

Advantages of insulation using ecowool:
- The low weight allows installation to be carried out at any thickness; it does not create additional load on attic floor even in a compacted state.
- Thanks to the loose structure, air gaps acquire additional heat-insulating characteristics.
- Ecowool is environmentally friendly and tolerates temperature changes well.
- It has a long service life and does not lose its insulating properties over time.
- Covered with eco-wool surfaces do not grow mold and promote the proliferation of microflora.
- For insulation, ecowool is used, specially treated with fire retardants, which does not support combustion and has a tendency to self-extinguish. Does not produce smoke or hazardous products for breathing.
- The special structure of the insulation allows you to create a continuous breathable coating that does not retain moisture.
When using ecowool, the payback period for such insulation is 2 - 3 years.
We use mineral wool
The main disadvantage of mineral wool is the presence of formaldehyde resin in its composition. Over time, the material releases components harmful to health.
Depending on the material used for the manufacture of mineral wool, the following types are divided:
Slag
For the production of slag wool, waste from blast furnace production is used.

This material is unsuitable for insulating a residential building. This is explained by the following characteristics:
- Hygroscopicity - absorption of moisture during operation, which negatively affects the thermal insulation characteristics.
- Increased acidity under the influence of moisture, which has a destructive effect on construction nearby existing materials.
- The fibers of the material are very brittle and light; during operation they can fly in the air of the room, which negatively affects the health of residents.
The only advantage of the material is its low cost.
Glass wool
Glass wool consists of fibers that are obtained by stretching from molten glassy material. The fibers thus obtained are formed into rolls and mats.

Despite the high heat-insulating properties, the use is limited due to the irritating harmful effects on the human body.
Basalt wool
Gabbro-basalt rocks are used for production. This is the most common wool, which is explained by its high strength and plastic characteristics.
The material does not lose its properties in the presence of moisture. Supplied in the form of rolls, mats, slabs. To improve the thermal insulation properties, a foil layer can be applied on one side, which reflects heat and directs it inside the room.
The most commonly used mineral wool is from UPSA. The main component is fiberglass with mineral additives. Available in rigid slabs and rolls. Before insulation it is necessary to apply a film coating.

Basalt wool from the TechnoNIKOL company has become widespread.

To enhance waterproofing properties it is necessary to lay the film with overlapand an overlap on the walls up to 40 cm.
Mineral wool is also universal material for insulation of floors. To insulate a roof using it, you must:
- Remove all waste and bulky debris from the floors, as well as nails and other objects that could damage the vapor barrier layer;
- Place a special vapor barrier polyethylene or cellophane film on the attic floor. You can use glassine film - it is cheap and its structure resembles simple tracing paper;
- Install the mineral wool as tightly and without gaps as possible. The material is laid closely between the beams with little effort. To do this, cut the material 20 mm wider than the distance between the beams.
Tip: there is no need to crumple or crumple it for additional compaction. The denser the material, the more heat it conducts and, accordingly, its thermal insulation qualities are worse;
- Completely seal all cracks and joints in the coating;
- Lay a covering on top and insulate it. If you are going to walk on the floor a lot, it is better to lay additional boards or shields. The boards should not rest against the heat-insulating layer - the insulation should not be compressed.
When laying mineral wool, it is better to use a respirator.
Recommendation. Rodents love cotton wool and polystyrene foam. If you have the financial opportunity, it would be best to fill the attic with foam glass. This material has excellent thermal insulation characteristics, is absolutely safe and environmentally friendly. It is durable, does not shrink, is not afraid of heat or frost, does not burn and is very easy to install. The only drawback is its price. Foam glass can be replaced with foam plastic, which must be protected from rodents with a screed.
Insulation with polystyrene foam
Polyethylene, which has been used for more than half a century, despite its low price, is not one of the most popular materials. Its use is limited due to flammability and the release of toxic substances during melting. Among the positive characteristics, it is worth noting the high thermal insulation properties, which are created due to the presence of up to 95% air in its composition. The material is very light and can be cut to required sizes without any problems. Placed between joists. In conditions of high humidity it does not lose its performance characteristics.

Despite the fact that extruded polystyrene foam emits substances harmful to health at high temperatures, it is a self-extinguishing, low-flammable material and is more popular for insulation. It does not allow air to pass through, so if used on a wooden floor, it can contribute to the accumulation of moisture and the subsequent development of mold on its surface.
The insulation procedure is as follows:
- Leveling the surface for coating.
- Application of vapor barrier material.
- Laying polystyrene foam boards.
- Fastening the slabs with dowels with a mushroom-type cap.
- Thermal insulation of joints between slabs with foam, carefully filling the space. Align the joints with a carpenter's knife.
- Filling the attic floor with a cement-sand screed with a thickness of 50 mm.
Insulation with polyurethane foam
Polyurethane foam is applied by spraying; special equipment is required to complete the coating. For areas with severe winters, the coating is sprayed in two layers.

When performing thermal insulation with polyurethane foam, the following advantages are noted:
- High thermal insulation properties of the material.
- The material does not lose its performance characteristics under temperature changes and in conditions of high humidity.
- Using pressure spraying, the insulation penetrates into the slightest cracks, and upon expansion, a monolithic coating without seams is formed.
- The coating has high strength, does not deform under the weight of a person.
- No additional vapor or waterproofing is required.
The coating is applied directly to the previously cleaned attic floor between the joists. The polyurethane foam protruding from above the beams after hardening is removed with a sharp knife.
Insulation with natural materials
In order to insulate the attic and warmly insulate rooms, you can use natural materials that were previously widely used for insulation. Before choosing from the table below, please note that the lower the conductivity coefficient and the lower the weight, the better the material.

Reed insulation
For roof insulation reeds formed into mats are used. The peculiarity of the coating is that the mats overlap And each other, whileit is necessary to avoid the formation of gapsfor cold penetration. The mats are laid between the joists; it is advisable to use two layers of spacer.
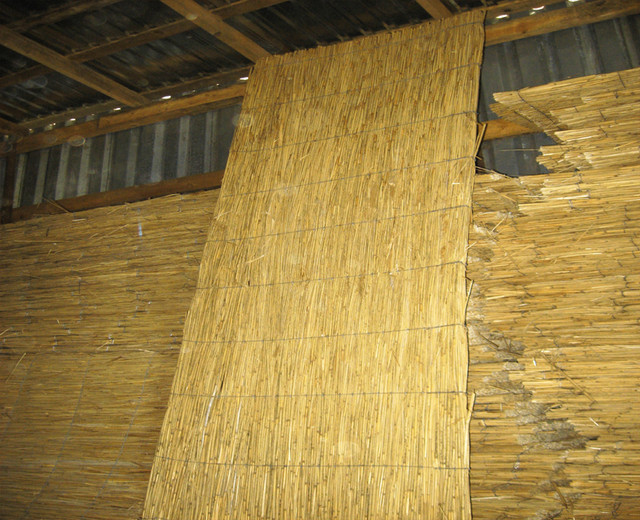
The advantage of using reeds for insulation:
- Rodents do not grow in reeds.
- Has excellent thermal insulation properties.
- Cheap material of natural origin.
Insulation with sea damask
Residents of coastal cities have long used sea damask as insulation. In these areas it has a low price. The material does not harbor rodents or mold. Damask tolerates temperature changes or high humidity well. Material e environmentally friendly, additional advantage in receiving iodine-rich atmosphere s.

Algae do not support burning, do not emit Yu tons of harmful impurities and smoke during a fire. For insulation attic specially manufactured ladders made of damask. For such a coatingThere is no need to perform a vapor barrier.
Reeds and algae are stackeddirectlyon the ceiling, lay flooring on top. Layer thickness from 20 cm.
Insulation with sawdust
In areas where wood processing enterprises are located, sawdust can be purchased cheaply, or even completely free. As a disadvantage, it is necessary to take into account the flammability of the material,which can be protected from during processing flame retardants.
The table shows data on which layer of sawdust should be laid depending on temperature regime terrain.

Thermal insulation with sawdust is performed in the following sequence:
D to seal cracks P The surface of the attic is first covered with liquid clay.
The clay surface develops cracks over time as it dries. Forsealing cracks andobtaining complete coverageA thin layer of sand is poured on top of the clay.
Before applicationlayer of sawdust, a layer of carbide and slaked lime is scattered to avoid the appearance of rodents in front.
Sawdust is applied in a layer of 15 cm. Depending on living conditionsthe layer of sawdust can reach up to 30 cm.

P a layer of waste slag crumbles on top of the sawdust, For in order to improve fire safety. This insulation is especially necessary in areas where cables are laid and where the chimney is located.
Insulation with sawdust and cement
A mixture of sawdust and cement at a ratio of 10/1 has good thermal insulation properties. The execution technology consists of the following steps:
- Attic covering A insulating coating.
- Between beams a mixture of sawdust and a binder with water is applied. Before applicationthe solution must be keptso that the wooden components are saturated with water.
- The work is carried out in the spring so that there is time for drying out . The mixture is applied with a thickness of at least 20 cm.
- You can make sure that the mixture is completely dry daring several times on the surface. In this case you can hear characteristic crunch of dry wood.
Clay insulation
Clay is one of the beautiful heat-insulating materials and is independently capable of protecting the house from the cold.

But for this it is necessary to yat insulation with a layer of 50 cm, such a weight for the ceiling will be critical. Therefore, insulation is performed with a mixture of sawdust and clay. Let's look at this option in more detail.

Coating preparation and application technology:
- To obtain a mixture of sawdust and clay, you need to prepare a special container, an old barrel will do.
- Water is poured into the barrel, several buckets of clay are loaded and everything is mixed until almost all of the clay is dissolved.
- The solution is loaded into a concrete mixer and sawdust is added to it. The result is a mixturemedium level of density.
- The mixture is applied to the attic covering only after laying the vapor barrier layer.
- A coating of 15-20 cm is applied to the ceiling. The cracks formed during drying are treated with wet clay.
- The laid layer is leveled.
An overview of thermal insulation materials is given in the video:
More details about sawdust insulation in the video:
Setting up a summer attic
A summer attic differs from an attic in which people live year-round in that it can also be insulated along the floor, and not over the entire roof area. The advantages of such insulation are obvious:
- the floor area is much smaller than that of a gable roof;
- there is no need to file insulation;
However, the following points need to be taken into account:
- it must be covered with hard coverings;
- the flooring must be laid on additional joists so as not to compress the insulation layer.
Therefore, most optimal insulation for this type of ceiling is foam plastic. Its structure is quite rigid and will provide the opportunity to create additional support for the floor.
Before laying the foam, it is also necessary to lay a vapor barrier layer. The timber from which the logs will be made must be the same thickness as the foam sheets. It is best to place the logs at a distance of 45-50 cm from each other. After laying the foam, you can put on top of it:
- plywood;
- cardboard;
The thickness of such a coating may well be no more than 15mm. This method will reliably insulate the attic floor, and, accordingly, the ceiling under a cold roof.
We insulate the ceiling directly
There are also situations when there is no access to a space that is located above the ceiling level. In order to carry out the highest quality and reliable thermal insulation, a whole range of work should be carried out. However, it should be taken into account that such insulation will “eat up” part of the height of your room.
This is due to the fact that the thermal insulation layer will be located inside the building itself. This is not entirely correct, but if there is no other choice, then there is nothing else left. General rules here will be the same as during the insulation of attics and attics:
- Vapor barrier layer;
- Insulation;
- Vapor barrier layer.
The insulation is located between two layers of vapor barrier. This is necessary in order to protect the rafters from dampness, ceiling materials, as well as insulation.
To insulate the ceiling indoors, you can use any of the following options:
- Direct fixation of insulation to the ceiling using glue and fasteners.
- Installation of lathing made of metal profiles or wooden slats on the ceiling, followed by fastening the insulation between the guides.
Insulation work is carried out only on a previously prepared ceiling.
Preparing the ceiling for insulation
Preparation wooden surface consists of the following steps:
- Careful treatment of the wooden ceiling with fire retardant, Special attention Care must be taken to coat cracks, gaps and crevices.
- Sealing cracks, gaps and cracks involves puttingty on the wooden surface. Large gaps between boards can be sealed using polyurethane foam. Excess hardened material must be removed with a sharp knife.
Concrete surface treatment:
- Inspect the ceiling. Peeling or weak decorative coatings and plaster must be removed, and the remaining surface must be cleaned of dust.
- Carefully expand the cracks and clean them from dirt. Apply primer coat. Seal with plaster mortar and sealant. Large cracks can be treated with foam and subsequently leveled flush with the surface with a sharp knife.
- General covering of a concrete ceiling with a primer coating.
Installing insulation directly on the ceiling
For this method of thermal insulation, insulation supplied in slabs is suitable: polystyrene foam and basalt wool.
The following materials can be used as glue:
Special cement glue, which is diluted strictly according to the instructions. It is necessary to pay attention to the hardening time indicated in the instructions. They are guided by it when choosing the required amount of solution. The mixture is applied to the surface of the insulation with a trowel or spatula along the entire contour and pointwise.

Fastening can be done using polyurethane foam, which is applied with a gun in smaller quantities.

Coating technology:
- Applying adhesive to insulation.
- Press the slab against the ceiling and hold it in this state for several seconds.
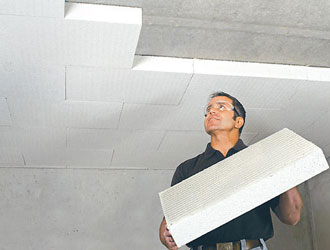
- After installing several slabs, holes are drilled in the insulation and fastened using construction fungus. It should be longer than 70 mm of insulation thickness. Fastening is carried out at 5 points of the sheet.

- The gaps between the insulation sheets are sealed with polyurethane foam.
This method of insulation is performed before installing a stretch ceiling.
After polystyrene foam, you can reinforce the ceiling with mesh and plaster.
Ceiling insulation with lathing
The insulation method is used in cases where it is subsequently planned to cover the ceiling with plasterboard or clapboard. Work order:
- Marking the ceiling for the sheathing using a level. The distance depends on the width of the insulation. If you plan to use expanded polystyrene, then the distance between the slats or profile is equal in size to the width of the insulation. When using mineral wool, the distance between the slats should be 30-40 mm less than the width of the slab so that the insulation is slightly compacted.
- The wooden sheathing is fastened with self-tapping screws or dowels, step 50 cm, the fastener heads must be flush with the wood.
- The metal profile is attached to the ceiling using hangers.
- Insulation is placed between the profile or sheathing.

When insulating with polystyrene foam, the distance between the insulation and the frame is filled with polyurethane foam.
The insulation is covered with a vapor barrier material, which is attached to a metal profile double-sided tape. On wooden sheathing can be securely stapled using a stapler.
After the film, the ceiling is covered with the selected material. Only after these steps can the ceiling be finished.
Choosing a vapor barrier
The vapor barrier layer is a very important element when insulating the ceiling. It protects the house from mold and mildew, which can literally destroy the house (especially if it is made of wood). Vapor barrier materials presented on modern market, can be produced in the form:
- Films;
- Membranes.
Films, in turn, can be:
- reinforced - they are used for insulating attics and attics;
- micro-perforated - most suitable for insulating “cold” roofs;
- anti-condensation – one of the layers of which is capable of retaining drops of moisture.
If you only have the opportunity to insulate the ceiling from the inside, then use our tips:
- If you are going to cover the ceiling with gypsum plaster boards, then you need to use special structures made of galvanized iron and secure them only with self-tapping screws. Otherwise, the entire structure risks falling on your head;
- If you live in an area with a fairly warm climate, then you can limit yourself to a thin layer of thermal insulation - such as isolon;
- Foam boards also serve as an excellent thermal insulation material;
- And most importantly, you should remember that the ceiling is not the only way for heat to escape. Door and window structures, especially poorly sealed ones, also allow heat to pass through with a bang. Therefore, thermal insulation must be comprehensive.
After all this reading, it is useful to familiarize yourself with the basic laws of physics in the upper part of the house:
Roof insulation, although at first glance it seems easy, is a rather important issue. Therefore, it must be approached with maximum attention, and all unfavorable factors that may appear during the operation of such insulation must be taken into account. After reading our tips, you already know the technique for insulating the ceiling under the roof. However, if you are not sure that you can do it yourself, then it is better to entrust it to professionals!
We also recommend: