Download window frames for rural houses. Wooden window frames - carved patterns for framing windows
The first platbands appeared back in the days wooden houses. Despite the simplicity of the design, to build such a house, you need to have experience and knowledge in the field of architecture. The casing is a painted fresco, which is located near window frame. The casing will not only original decoration, but will also perform a number of additional functions.
Thanks to their tight fit to the window frame, the platbands block access to drafts in the window slots, protect against dust and moisture getting into the gaps, and also have heat-insulating properties. After all, foam is used to install platbands, which is already an excellent thermal insulation material.

Heat from the house will not escape through the window openings in the frame, which means that cold will not enter the house. Also, the casing protects against damage to plastic windows under the influence of moisture and temperature. The only drawback is that the platbands become unusable over time and will need to be restored. But this is much more economical than restoring windows.

The next important factor is design. Platbands are mortise figures made of wood or plastic, which are selected individually to match the image of your home, so that the harmony and aesthetics of both the window frames and the house as a whole are maintained.


Types of platbands
The designs of the platbands are similar to each other, so it is difficult to characterize them in any way. Therefore, the types of platbands are divided into the material from which they are made:
- Plastic
- Tree

Now, in order, about each type, its advantages and disadvantages.

Plastic trims
Plastic platbands are more resistant to moisture on the surface, do not deteriorate under the influence of temperatures and have the longest service life. Modern technologies make it possible to produce plastic trims under the design of the tree.

Naturally, there will be noticeable differences in contrast between natural wood and artificial, but don’t forget about the rest positive characteristics plastic.

MDF trim
MDF is a dense board made of sawdust and glue. To increase their service life, such boards are varnished, which significantly increases the time of operation and use of MDF.

Wooden platbands
The most common are wooden frames. Therefore, the types of wooden platbands are divided into the following types:
- From natural wood
- Environmentally friendly

Natural platbands are made from 100% wood. To extend their service life, such platbands are subjected to treatment special materials, which protect the surface from influence environment.


Environmentally friendly platbands are made from safe materials that, in the event of a fire, will not release harmful combustion products into the atmosphere.

Wood itself is a soft and plastic material, so it is possible to make a platband of any shape and any size, which is a huge plus and significantly distinguishes wood from the background of platbands and other materials.

Installation of platbands
Beautiful wooden trims are installed in three ways:
- Overhead
- Telescopic
- Finnish

Installation of overhead platbands is done on outside house and window frame. Telescopic installation has a curved “L” shape and is inserted into the grooves of the window.

The Finnish installation of platbands can be immediately noticed by the presence of a canopy over the window and the simplicity of the form. The choice of platbands depends on your taste preferences.

Material for the manufacture of wooden platbands
Many frames are created to match the old design of the 18th century from natural wood, but what kind of wood is best to use, read below. Perfect option- use the type of wood from which the house is made, so as not to disturb the structure and design of the house.

In other cases, it is best to make platbands from oak or beech. Due to the density of the material, it will be expensive to make yourself designer model or simply apply threads without special material.

If you are planning to start making wooden frames yourself, then it is best to use cherry or sour cherry. These varieties are more susceptible to carving and are used more often than others for self-creation platbands.

Regardless of the type of wood, you need to remember the main rule - any wood must be varnished to protect the wood from environmental influences.

To emphasize the uniqueness and good taste of the owner of the house, wooden door frames will be an excellent addition to window frames. Thus, we can conclude that the use of platbands gives solidity to the house, and due to the universal component - wood, the platband can be made to order, taking into account your preferences.

Photos of wooden platbands


Platbands - important component for any window. They are often associated with beautiful carvings that serve purely decorative purposes. But they don’t always have a catchy look, and they have much more functions. This is a universal element that is necessary to protect windows and improve their insulating qualities. Therefore, their installation is recommended in almost any wooden house.
Why are platbands needed?
The platband decorates the window and makes it much more colorful. But initially its purpose was protective. Platbands are used as external element window frame, which not only protects it from damage, but also closes the mounting gap between the frame and the wall of the house.
This approach provides:
- Reduced heat loss;
- Elimination of through holes;
- Protection from dust and noise;
- Protection from moisture.
Interesting ! Previously, platbands were also used as amulets. Because of this, they were given a colorful and unusual look.
Although these advantages are not so significant in concrete and brick buildings, for wooden houses they are extremely important. Over time, wood can dry out and warp, causing gaps to appear between the frame and the rest of the structure. Platbands allow you to slow down this process, as well as reduce damage from existing holes.
Types of platbands
There are many types of platbands used for houses. They often differ in the material used, since their design is similar. The main classification of platbands is based on the method of installation and marks two types of platbands:
- Invoices;
- Telescopic.

The invoice option is considered the most common, being the old type. It is installed simple method over the window frame, thereby blocking access to the sun and precipitation to the joint. Installation of this type is very simple and does not require much effort.
The telescopic casing is more modern. It does not require fastening additional elements like screws or nails, because it is placed in the gap between the wall and the frame. Thanks to this, it is securely fixed around the entire perimeter.
It is a priority to use the telescopic installation method. It is more convenient, because it covers the gap more reliably and prevents its deformation. However, its installation is complicated by the fact that it requires completely removing the window, which is not always possible in wooden houses. In such cases, it is easier and more efficient to use an overhead platband.
Platband materials
Materials for platbands may be different. Wood is often used for these tasks, which is recommended for wooden structures. But here several options are allowed, including:
- Wood;
- Plastic;
Wood - practical and natural option, which is suitable for any structure. Due to its versatility, it can be given any ornament and style, and the use of the same type of material will allow it to perfectly complement.
Advice ! For better alignment, it is recommended to make platbands from the same wood as the structure. But if the texture is the same, then the color can be changed using special compounds.

It is often chosen precisely because of the diversity in decoration, because other materials require special processing on machines and rarely have similar decorative elements.
Although wood is reliable and durable, it does have its drawbacks. Among them are vulnerability to moisture and high temperatures. In addition, frost also has a negative effect on it, destroying and deforming the structure.
Plastic is much more convenient in this regard. It is practical and reliable, and ample opportunities during production they allow you to give it any texture, including wood. But at the same time, it does not deform from moisture and temperature changes, and its lifespan is much longer. Another advantage of plastic is that it has fastening elements in advance, which makes it possible not to spoil the appearance of the trim with nails or screws.

Perhaps the only drawback of plastic is its artificiality. Many owners do not want to add artificial materials to their home and reduce its environmental friendliness. This is where the third option can help.
MDF is boards made from wood waste. They are natural, but at the same time impregnated with special compounds, which significantly increases the lifespan of the material and protects it from exposure external factors. Often such platbands are laminated, which increases their lifespan and reliability. The only drawback of such elements is their relatively low strength compared to plastic and wood.
What material to use is a purely individual choice. Each of them has its own advantages, but there are also disadvantages.
Which wood is better
If the choice fell on wooden trims, then it is important to note the choice of wood species. In fact, almost all options are suitable for this task, because they do not need to carry any load. But there are some nuances here too.
The best option for platbands is oak or beech. This is a durable breed that can serve long term and not be deformed by moisture or heat. But the problem is that it is extremely difficult to work with. It is extremely difficult to cut patterns on such material on your own, and not every master will undertake it.
Advice ! The way out of this situation is special milling machines, the pattern on which is pre-loaded into the program.
If you need a softer and less expensive breed, then you can choose linden. It is easy to work with, but without careful processing it will quickly collapse. You need to use high-quality antiseptics and some kind of coating, which can worsen its appearance.
An intermediate option for this task is birch or pine. This is a fairly durable variety that requires only basic care. But at the same time it will be easy to work with.
Preparation for installation
You must first take all measurements from the window. It is important to choose the appropriate dimensions so that the outline of the frame does not peek out from behind the platband and is securely hidden. Next, preparatory stages are carried out with the material.
If wood is used in the work process, then you need to first cut out blanks for platbands, decorate them at your discretion and process them. Plastic and MDF do not require treatment, but wood requires impregnation protective compounds against moisture and also for protection against insects.
Important ! All work is carried out with dry lumber. If it is poorly dried, then deformation is possible after installation, which will ruin the whole job.
After measurements and processing, it is important to mark in advance the places of joints and fasteners on the platbands. All holes are pre-drilled. The platbands are carefully polished.

It is also important to prepare the work site itself. Window joints are carefully isolated, because in the future access to them will be limited. If any insulation or repair work is planned, then it must be done before installation.
You must first select a fastening method. It is not required for telescopic trims, but there are several options for overhead trims. Among them the most popular are:
- Nails;
- Dull thorn;
- Through tenon.
The first option is the simplest, but it spoils the overall picture and creates unnecessary stress on the material during installation. Therefore, the spikes are more comfortable. A blind tenon involves installing small tenons on the window frame, and small holes are made in the casing for them. A through tenon implies the same technology, but the hole in the platband is through.
If the house is built from a log house, then you need to make room for platbands. To do this, it is worth cutting off the protruding edges, which can be done at an angle.

Installation of platbands in a wooden house

After all preliminary procedures have been completed, the installation phase begins. To begin with, all the components of the platband are connected to each other. To do this, you can use the same tenon technology, nails or glue. But the latter is often used as an auxiliary component.
During the installation process when using spikes, you need to do the following:
- Mark the future location of the tenons on the frame and trim;
- Make or purchase spikes for this task;
- Drill appropriate holes in pre-marked locations;
- Place the trim onto the tenon and secure it.
The first stage includes preliminary marking of the perimeter where the fastening elements will be placed. It is important to evenly distribute the load, so they should be placed along the perimeter of the structure.
After purchasing or manufacturing the spikes, future holes are drilled for them. This is a simple step, after which the installation process itself begins. The casing is carefully positioned so that all the tenons fit into the holes.
The task is quite simple, it is only important to accurately mark the future location of the fasteners. It is recommended to use glue during work to securely fix the structure after installation. This will reduce the risk of it falling and improve the sealing of the holes.
You can simplify the process using ordinary self-tapping screws. Although they will detract from the appearance, their use greatly simplifies installation.

Upon completion of the work, it is worth treating the working holes with a compound so that they do not absorb moisture. Next, you just need to monitor the condition of the structure and care for it as necessary.
The whole process is quite simple, it is only important to combine all the elements qualitatively and not neglect preparatory stages installation Thanks to this, this design will last for a long time, decorating the house and protecting residents from drafts and moisture.
For many centuries, the windows of the house were framed by wooden carved frames. Their use is still relevant today, given modern technologies. But why do you need window frames in a wooden house and is it necessary to install them? What is needed to make protection and what types of wood are best to use? Is it possible to make wooden window frames with your own hands?
Why do we need trim on windows?
The construction of houses has always been improved throughout human history, and a wooden house has hundreds of small, but at the same time necessary elements. What functions do the platbands on the windows of a house perform?
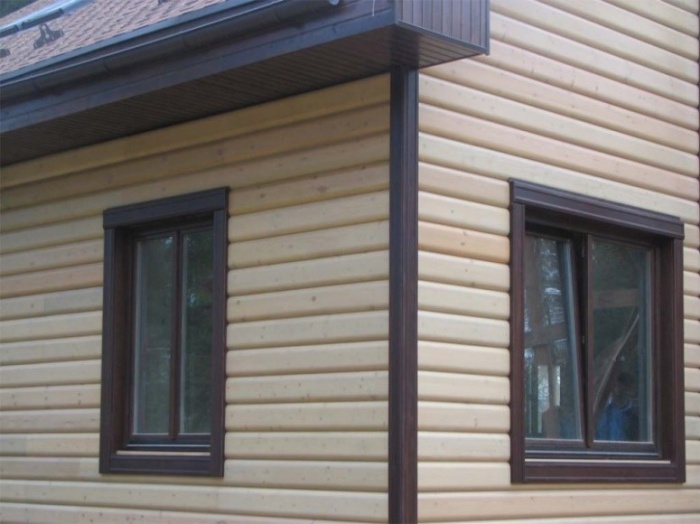
Firstly, this is protection. They close the gap between the window and the opening to prevent drafts, dust and moisture, and also as additional thermal insulation. Today, when installing modern window systems the gaps are filled with foam, which is already a good insulator and sealant. The only drawback of this material is its rapid destruction under the influence of temperatures and moisture. In this case, the platband will act as a good protection and finishing of plastic windows outside in a wooden house from the action of these harmful factors.
The design protects the plastic from the effects of temperature and precipitation
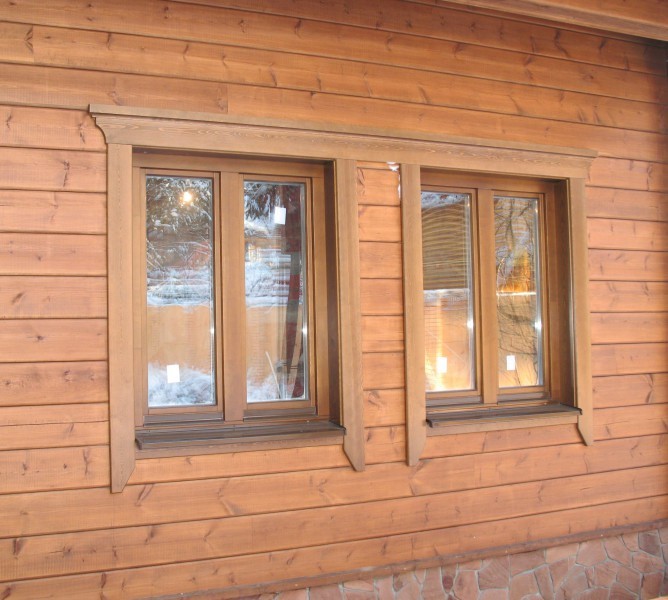
Secondly, the aesthetic function. Only in second place is decorating the gaps between the window and the opening. Smooth and straight or elaborately carved, they will embellish the home design.
What types of platbands are there?
Structurally, all types of platbands are similar to each other. They can be classified according to the material used:
- Plastic.
- Wooden.
Plastic trims have a lot of positive aspects: they are durable, and the influence of temperature and moisture on them is reduced to zero. Also, these products can replicate the texture of wood. The only negative is the unnatural look wooden building.
 Plastic products are not affected by temperature changes and moisture
 MDF is wood slab, which is made from sawdust and glue. As a rule, such platbands are laminated, which is excellent protection against external influence, and their service life is very long.
Wooden - natural and environmentally friendly. When properly processed, such platbands perfectly resist harmful environmental influences.. The use of wood allows you to create any shape and pattern, which will be a huge plus in the exterior decor of the building.
Depending on the installation method, platbands can be overhead or telescopic.
Invoices are mounted traditional way installations - on top of the facade and window frame.
 The overhead type is mounted in the traditional way
 Telescopic trims have the shape of the letter “L” and are installed in the window grooves. Their great advantage is that they do not require the use of additional fastening materials.
 The telescopic type is mounted without the use of additional fasteners
 A special type that can be distinguished is Finnish platbands for windows in wooden and other houses. Their main distinctive feature is a visor at the top and simple, laconic shapes.
Which type of trim to use depends on personal preference and the design plan, but wood trim is the most commonly used. They are easy to install and aesthetically match the material of the walls of the house.
Which wood species to choose
If the decision was made to make wooden platbands, then what species are best to use?
Typically the window casing is made from the same wood that you built your home from. Ease of processing, texture or strength must also be considered.
For self-made platbands with elaborate shapes are easier to choose soft rocks: alder, linden, aspen. They are easy to cut and finish. However, such wood must be carefully treated to protect it from moisture.
Types of wood such as pine or birch have excellent properties. Their processing is somewhat more difficult, but they are more durable and resistant to weather changes.
Oak or beech has the strongest and most durable properties, but it is quite difficult to make carved frames of complex shapes without special equipment.
Also for the production of additional decorative elements cashers, which can be placed on top, use fruit woods - sweet cherry or cherry.
The main rule when using any of listed types materials - the need for mandatory additional protection from moisture. Elementary paintwork will greatly extend the life of wooden platbands.
Templates for carved platbands
Of course, you don’t have to bother and make a simple cash card without a pattern. A striking example there will be Finnish ones - smooth and without intricate patterns.
 Simple Finnish window frame finishing
 Carved frames for windows in a wooden house will greatly embellish general form and will create individual design. The easiest way to make them is to use templates. How to make platbands of non-standard shapes?


Initially, choose a pattern, and follow some rules:
- The designs are geometric and floral. They do not need to be mixed in one design.
- You need to choose the right proportion. The geometry of the pattern should not be too wide or narrow.
- Use optimal combination colors in the design.
Ready-made patterns for the template can be found on the Internet and printed. Then use them to make stencils, with the help of which you can transfer the pattern to the surface of the material.
When marking wood for a template, the pattern is applied along the grain.
How to make wooden trims
Typically for framing window openings two technologies are used. More simple option considered a Finnish design. If the home owner prefers a more sophisticated window design, then a carved manufacturing technique is chosen. Let's consider each of the methods in more detail.
Making a simple Finnish window cashing
Make platbands for windows Finnish technology you can use wood coniferous species, pine or larch are excellent. Less commonly, birch, beech or oak are chosen for this.
The design is simple and concise, consisting of the following elements:
- Four trim boards around the perimeter of the window.
- Visor.
- Two supports for the casting board (canopy).
The width of the trim is from 90 to 145 millimeters, the casting board is 175 mm, the thickness is 20-30 millimeters.
 Finnish cashing device
 The manufacturing algorithm is as follows:
- They cut out supports for low tide. Complex materials are not used for their manufacture. geometric shapes. The cutting is done using a jigsaw.
- The harness is made like this. The side boards should be slightly longer than the window opening (approximately twice their width). Their lower part is beveled. The top board is made along the length of the ebb and also has figured edges (usually simple bevels).
- The visor is made beveled along the edges, and a chamfer is cut in front (to drain water).
- Installation of Finnish platbands is carried out on the casing board (with plastic windows) or on a window frame. In this case, they do not use self-tapping screws, but only wooden spikes in combination with an adhesive composition.
The glue itself installation work will not provide sufficient fastening.
Manufacturing of carved platbands
First, a stencil with a pattern is made. For a beginning carver, it is best to use a pattern with large elements - they are easier to implement. The main thing is to stick to the same type of pattern, which will create a unified design for the entire facade.
The carving of the platbands can be of two types:
- Proreznaya. Has very original look, the pattern gives the impression of wood lace. It is made by cutting through the board and further fastening it around the perimeter of the opening.
- Invoice. In this case, all elements of the drawings are made separately and then fixed to a single board as a base.
When making it you will need a set of woodworking tools. Elementary carved platbands can be made using manual and electric jigsaw, hacksaws, drills.
More complex patterns are made using milling machines and sets of wood cutters. Sandpaper is needed for sanding.
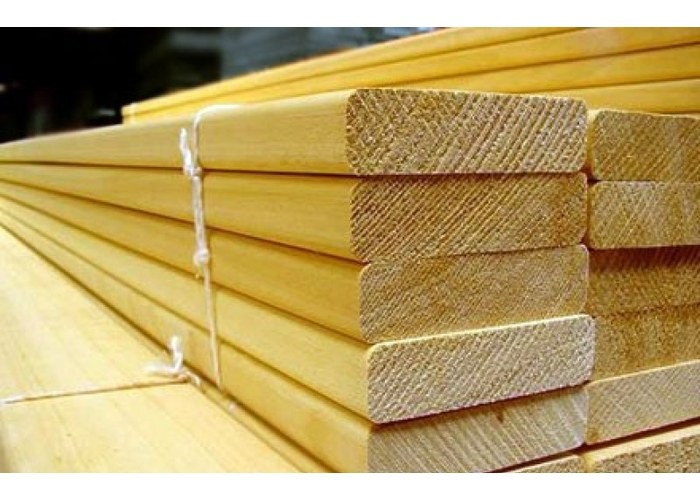
The thickness of the board of the selected material is at least 30 millimeters for the slotted pattern and 10 mm for the manufacture of the invoice. The wood must be perfectly dried, otherwise in the future such platbands will crack and change shape.
- The window opening of the house is measured and blanks are prepared according to it.
- The required pattern is applied to the surface of the board under a stencil. It is imperative to take into account the mirror opposite of the left and right trims, as well as the top and bottom (that is, there must be at least four stencils).
- Internal cuts begin by drilling holes for the jigsaw blade.
- All necessary drawings are cut along the lines.
- After cutting, all irregularities are carefully leveled and polished using sandpaper, rasps and even needle files.
- When the product is ready, it is finally finished using 600-grit sandpaper.
- Overlay elements are fixed to the base. Fasteners can be made using glue and nails without heads. Self-tapping screws can cause cracks.
Installation of platbands on openings
 Patterned window framing device
 Assembly
When all the elements are ready, they are assembled into a single structure. To do this, use tenon joints (dowels) or nails without heads; wood glue plays an additional role.
If an overhead thread is used, the base is assembled first. With this method, the ends of the base are connected with dowels on spikes.
The installation of platbands on windows in a wooden house is also carried out using studded fastenings.
Installation
Installation of platbands on a tenon can be of two types: blind and through.
- Deaf. The spikes are inserted into holes on the trim or frame, and similar sockets are made in accordance with them. The advantage is that the fastening points are not visible.
- Through. To do this, the cash is applied to the opening and drilled through holes, into which dowels are driven with glue.
Installation of window casing on a blind tenon fastening is done according to the following principle.
- The location of the tenons is marked on the surface of the frame and trim.
- Holes are made for them.
- The spikes are made from a harder type of wood and are 0.5 mm larger than the required diameter.
- The pins are inserted into the holes on the frame and the trim is placed on them.
First, before installing the element, you need to lubricate the joints with wood glue.
The installation itself is quite simple, but requires great precision; the slightest distortions and violation of compliance will not allow good fastening.
 Installation of the structure must be carried out with maximum accuracy
 Final finishing of platbands
In order for products to last a long time, they need to be treated against the destructive effects of the environment: temperature changes and moisture.
Finishing and protective material may be varnish, paint or stain.
There are also various special impregnations or good old drying oil. They must be applied before final painting.
Stains perfectly highlight the texture of wood, but their use is preferable in combination with colorless wood varnishes. This finish can perfectly imitate valuable species wood.
Varnishes have excellent protective properties and, like stains, can create rich colors, for example, of oak or pine.
It is best to use waterproof paints. They are selected according to the general color scheme houses and windows.
 Selection of colors for roofing
 To extend the service life, it is necessary to inspect the appearance of the platbands and update the coating.
If there are places with mold or rot, they are carefully scraped off or cut off. Damaged areas are restored using wood putty followed by a paint coating.
Wooden window frames - element decorative finishing facade of private houses, which is more common in rural areas. They embody the traditions of original Russian architecture and are true works of art.
It is difficult to find beautiful carved platbands on sale, since this type of facade decoration is gradually losing its popularity, and there are fewer and fewer craftsmen who know the intricacies of their creation, and their services are not cheap. But connoisseurs of traditional home decoration can decorate their home themselves by making the trim with their own hands. Of course, this work will require patience, training and preliminary study of the technology. You will find useful tips on making and installing wooden trims in this article.
What are window frames needed for?
Platbands will decorate the facade and keep the house warmPreviously, people believed that certain patterns on platbands were endowed with magical properties and are able to protect the inhabitants of the house from the evil eye. Now they are valued mainly for their decorative qualities: the ability to emphasize the style of the house, give it a complete look and enliven the facade. In the case of log houses, this type of window decoration is the only possible one, since plastic in combination with wood will look out of place, and the building will lose its flavor.
However, platbands also have functional purpose. This window element protects the room from heat loss, drafts, dust and noise by closing the gaps between the opening and the frame. The only drawback of wooden platbands is the need for them correct processing and careful selection of wood.
Types of wooden platbands
The production of platbands depends on their design features and installation method. By design, they are shaped, flat, figured and openwork. Flat ones do not have threads and are easy to manufacture; shaped and figured ones have a convex surface with a non-through pattern applied to it and are produced using milling machine. But the products self made are valued higher because the equipment cannot create an end-to-end openwork pattern.
Wooden frames are installed in two ways:
- Overhead – the structure is secured with metal or liquid (adhesive) nails and screws.
- Telescopic - the casing is supported by projections that connect to grooves window box. This method is more complicated than the previous one, but the appearance of the product is not spoiled by traces of fasteners.
 Design options
 There are also many varieties of visual design. We will look at specific patterns and the technology for creating them below.
Wood for making platbands
 The material must be easy to process
 To make wooden window frames that will last you a long time, you need to choose the right type of wood for them. Suitable for this purpose: larch, linden, oak, pine, beech, walnut and fruit trees(apple tree, cherry tree). You can decide on the option that is suitable for you by assessing the qualities of these breeds:
- Hardwoods such as beech and oak will last longer, but are more difficult to process. Cutting patterns from these materials will take a lot of time.
- Soft varieties (alder, linden) are easier to process, but require mandatory impregnation with moisture-repellent compounds.
- Larch is resistant to rotting, but very fragile.
- Coniferous species (pine, spruce) are considered the “golden mean”. They are durable and yet flexible.
- Fruit varieties are suitable for making small parts - overlays.
Advice! In an area with significant differences temperatures, high humidity or, conversely, excessive dry air, it is recommended to use platbands only made of hard wood.
Tools required for work
The production of carved frames will require the use of tools designed for woodworking, namely:
- chisels (semicircular, flat, curved at an angle);
- knives with ground and wedge-shaped blades;
- jigsaw;
- drills;
- milling machine.
You can’t do without a ruler, pencil or marker and a pattern with a pattern. You will also need a tool for filing spikes. To make it yourself, you need to take 3 slats, place 2 hacksaw blades between them and fix the structure. This tool allows you to simultaneously saw through the eyes and tenons of the platbands.
 Set of chisels
 Meaning and creation of patterns
The appearance and meaning of this decorative element depends on which pattern you choose. When the art of creating platbands arose, patterns were created not only for the sake of beauty, but also endowed with meaning. Here are interpretations of some of them:
- the sun is associated with energy and life, it is placed on the kokoshnik - the upper part of the casing;
- the snake is the embodiment of wisdom;
- the cross is designed to create harmony between spiritual and material values;
- the bird is a symbol that unites different times;
- wings represent strength;
- plants represent unity with nature;
- earrings placed at the bottom of the structure speak of the hospitality of the owners.
Having decided on the desired images, find the corresponding patterns on the Internet and print them out. Make slits in the diagram and transfer it from paper to plywood or thick cardboard, so you will get templates for carved platbands. You can read more about making templates (stencils) in.
 Platband templates
 The main methods of creating window decorations are slotted and applied carvings. In the first case, using platband templates, the pattern is transferred to wood, and then individual structural parts are cut out of it. In the second case, first the platband is made from a solid board, then overlay patterns are cut out using patterns and fastened with nails, creating a three-dimensional pattern. The ornaments of all parts must be harmoniously combined.
Upper part The structures are made in the form of a kokoshnik, the bottom is in the shape of a towel, and two sidewalls are placed between them. The parts are connected to each other with spikes. The upper part needs to be made 1 cm larger than the lower part and given a slope to prevent moisture stagnation.
 Kokoshnik made with slotted carvings
 When cutting out patterns, movements are made along the wood fibers, otherwise the material will quickly crack. It is more convenient to make round elements with an electric drill. The ornament is made up of repeating patterns, it is desirable that among them there are more rounded parts - they are easier to make.
Basic Rules
- The design should not interfere with opening the window. To achieve this, the dimensions of the internal frame of the platband are made a couple of centimeters larger than the window frame.
- It is necessary to eliminate uneven walls before installing platbands. To do this, nail them around the perimeter of the window. wooden slats, adjusted to each other.
- For work, use only well-dried wood.
- All windows are decorated in the same style.
Preparing for work
To make wooden window frames with your own hands, first of all measure all sides of the window and select durable boards the right size, at least 3-4 cm thick. This thickness ensures the strength of the structure without interfering with the opening of the window sashes. The width is chosen depending on the pattern; standardly it ranges from 15 to 30 cm in different parts clypeus.
It is better to compose a pattern from large elements, since too small details, when viewed from afar, lose out, merging into a single whole. In addition, creating a small pattern takes more time. Before cutting out the “finish” version, it is worth testing window trim templates on unnecessary pieces of wood. This will allow you to “get your teeth into” and check whether the patterns you have chosen look good on the material.
 Practice cutting out a pattern on a small sample.
 Installation of platbands on windows
The cut out parts of the structure are polished sandpaper and connect. Fastening is carried out using the tongue-and-groove method; both parts are coated with synthetic glue before joining.
The installation of platbands on windows differs depending on whether the structure is attached to a wooden or stone facade. To work with stone walls you will need:
- mounting syringe;
- liquid silicone to eliminate cracks;
- drill and drill bits with pobedite coating;
- self-tapping screws;
- wooden choppers for screws;
- a brush and paint to match the color of the casing for covering the fastener heads.
 Finished design before installation
 Window trims wooden house require another set of tools and materials, consisting of:
- nails 5 cm long;
- liquid silicone and a syringe for applying it;
- hammer;
- suitable paint and brush.
In addition to the above, in both cases you will need a stepladder.
The finished structure is mounted on the wall using self-tapping screws or nails, making sure that it fits tightly to the edges window slopes. All formed cracks and loose joints are coated with silicone, then the fastener heads are hidden, painting them with a thin brush. Do-it-yourself wooden platbands are ready.
Final finishing
Although the carved platbands themselves look original, correctly selected decor will make them more attractive. In addition, wood processing is needed to increase its service life. Ready product It is recommended to impregnate with a moisture-repellent composition, paint or varnish.
 Painted platbands
 Among the ways to diversify the design are: painting, firing and painting in contrasting colors. Painting can repeat patterns and focus attention on individual details, and contrasting coloring looks good when combining several types of carvings in a product. No less beautiful window trims are obtained by firing. Wood processing blowtorch or gas burner forms spectacular tan marks on its surface.
 Contrasting coloring of elements
 Whatever processing method you choose, remember that the structure needs careful care and periodic minor repairs, then the platbands will decorate the facade of the building and delight you for many years.
Reading time ≈ 4 minutes
Decoration of the facade of the house - important step. Since ancient times, people have tried to make the face of their home unique by covering the space near the door and windows with intricate carvings. Our ancestors attached sacred meaning to each turn they made and hoped that these golden laces would protect their home from the penetration of dark forces. The fashion for antiquity leads to the fact that today ancient traditions have become again in demand. In this article we will talk about how to make window frames with your own hands.
Project
Any business should start with a project. First, they draw the façade of the building, taking into account all the actual details. Then you need to make a drawing of carved window frames. You can also use the drawings and diagrams presented on the site.


Using a visualization program, if you have one, you can make a 3D project of the house. It will show everything in its entirety and will allow you to evaluate how appropriate the wooden trim you like on the windows is.

When project documentation ready, preparing a set of tools that will be useful for the upcoming work.
- screwdriver;
- feather drill for wood (12 mm);
- a jigsaw, preferably with a soft start, without it it will be difficult to cut out complex elements;
- Sander.
You should take care of the material for future platbands. Traditionally, pine boards are used High Quality, where minimal amount knots. If there are knots on the surface of the boards, then the cuts must be made in such a way as to prevent a knot from getting into place.
Sawing out platbands

The manufacture of window frames begins with cuts that need to be made from the inside. First, holes are drilled along the contour of the pattern, where it is planned to make openwork patterns in the future. The video shows that when working, the drill must be held perpendicular to the surface of the board.


When the end-to-end patterns are ready, cut out the outer contour.

The tool must be guided from one end to the other, the direction does not matter. Pre-cuts are made in the middle part.

The result is a finished part for window decoration. Next, a similar one is made in mirror image to use it on the opposite side.
Surface grinding

To give the wood optimal appearance The processing is carried out using a grinder, the sanding wheel of which should have a grit of 80. The result is smooth surface, ready for painting.
Primer and painting

Before painting works The wood is treated with an antiseptic that will protect it from rotting and bark beetles. This composition must be applied to the entire surface, without even missing hard to reach places. Scrupulousness in work will allow the platbands to last for many years.

When the composition is applied, you need to thoroughly dry the workpieces, and only then begin painting the parts. The best option- paint on water based, intended for woodworking. The window frames in a wooden house are painted in the color specified in the project. For this project we use paints of two colors: white and cherry.


The work is carried out using 2 brushes: wide (50 mm) and narrow (20 mm). The first is for painting external surfaces, the second is for internal ones.


It is necessary to carefully paint over the parts, leaving no uncovered areas. After the first layer has dried, apply the second.


One layer is enough. They are careful in their work. Smudges can completely ruin the overall picture. Products should dry under normal conditions - in the open air.
Assembly
It is better to assemble the blanks into a single composition on a horizontal surface. This is much more convenient than directly on the window.


