Detailed photo and video instructions for making a burner for working out from a blowtorch
Furnaces and boilers running on waste oil have long taken their rightful place among heating appliances. Mining is a cheap and sometimes free type of fuel, it is often used for this purpose in car services and garages. When choosing a design, many masters ask themselves the question: is it possible to convert a gasoline blowtorch into a burner for working out?
Is it possible to make a blowtorch work in practice?
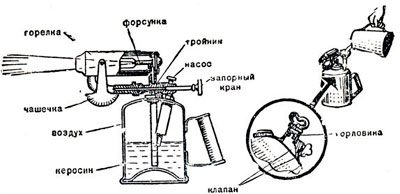
 The principle of operation of a conventional blowtorch is to ignite gasoline vapors pushed out under the action of compressed air. This effect is achieved by forcing air into the fuel tank of the burner.
What happens if you put used oil in a blowtorch?
The oil itself, even under pressure, does not evaporate well - it needs to be heated. Due to poor atomization, the flame will be uneven and it will be difficult to start the burner. The oil burns with the formation of a large amount of soot and soot, so the jet will quickly coke, its cross section will decrease, and the lamp will fail. An increase in the cross section of the jet will also not give the expected effect - the oil will be sprayed in large drops, which will not allow you to get a uniform flame of the torch.
In addition, used oil often contains impurities: diesel fuel, gasoline, antifreeze and even water, which can lead to flashes inside the lamp. To use mining as fuel for a blowtorch, you will have to arrange a filtration system, which will further complicate the task.
Given all the difficulties, it is difficult and unsafe to use a gasoline blowtorch as a burner for mining. Therefore, it is necessary to modify or completely change its design.
How to make a burner for testing yourself
For successful combustion of oil, you must either preheat it to an evaporation temperature of about 300 degrees Celsius, or finely spray and enrich the oil vapor with air. It is possible to heat the oil to such temperatures with the help of powerful heating elements, but this will increase the cost of electricity.
To achieve the creation of an oil aerosol, you can supply a jet of compressed air through a layer of oil. This effect is implemented in the Babington burner - a device, an analogue of which can be assembled with your own hands from improvised components.
Babington torch - an alternative to a blowtorch
The Babington burner was originally patented to run on diesel fuel. Later, having made minor changes to the design, the craftsmen changed the design with their own hands and adapted the burner for burning used machine and edible oils. The degree of contamination of the oil does not really matter, since the fuel channels of the unit are devoid of bottlenecks prone to blockages.
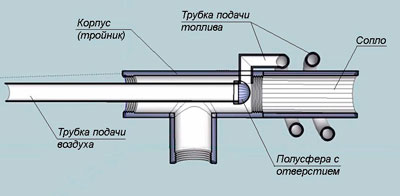
Unlike a blowtorch, where an air-fuel mixture is sprayed under pressure through nozzles, in a Babington burner, oil is forced from a reservoir using a low-power pump and flows in a thin film over an inclined or spherical surface, and the oil-air mixture is formed by blowing a thin jet of compressed air through this film.
The spray effect is clearly shown in the video:

- The Babington burner consists of several functional blocks:
- Fuel - tank, pump and pipes for fuel supply.
- Air, it consists of a compressor and an air tube.
- A hemisphere with a small diameter hole where the air jet is mixed with oil.
- Nozzle directing the flame in the desired direction.
 The standard design can be modified with your own hands, increasing its efficiency. To do this, the fuel tank is equipped with a heater that heats the oil before the burner starts, which makes it possible to increase its fluidity. In addition, the fuel channel, made of a metal tube, can be wrapped around the nozzle - in this way the oil will heat up during the operation of the burner.
Advantages of a do-it-yourself Babington burner:
- a wide range of fuels - used machine oils, lubricants of any viscosity, diesel fuel, fuel oil, any vegetable oils, including food production waste;
- the presence of impurities in the fuel;
- simplicity of design - you can do it yourself.
Flaws:
- the complexity of setting up the burner, which is especially often manifested when changing the type of fuel;
- smell and dirt - the burner cannot be installed in residential premises, a boiler room is required;
- the use of the burner is associated with an open flame, so fire prevention measures must be observed.
There must be a powder or salt chemical fire extinguisher in the boiler room!
DIY Babington burner
You can assemble the burner with your own hands from simple components, for this you will need:
- A hollow ball or hemisphere with a wall thickness such that a hole with a diameter of no more than 0.3 mm can be drilled. Any metal objects of a similar configuration can be used, for example, a spherical brass doorknob, nuts with plugs. The main condition is the possibility of reliable fastening of the duct.
- Metal tube for supplying compressed air from the compressor, diameter - 10-15 mm.
- Compressor, for example, from a refrigerator, with a working pressure of 2 atm, maximum - 4 atm.
- A fuel tank with a built-in heating element for 0.5-1 kW made of metal that is not subject to corrosion.
- Fuel sump and pipe for draining excess oil back into the tank.
- Copper tube, diameter - 10 mm, wall thickness - 1-1.5 mm for the fuel channel.
- An oil pump from a car or motorcycle with an electric motor to power the pump. It is advisable to equip the pump at the inlet with a coarse mesh filter.
- Nozzle - squeegee 200-400 mm long with an external thread of 2 inches.
- Cross for 2" metal pipe with female thread.
- 1" threaded spigot and 2/1" adapter to drain excess fuel into sump.
- Adapters and fittings for connecting the fuel path, air duct and nozzle.
Preparing burner assemblies for assembly

- The main and most important task is to make a hole of a given diameter in a spherical nozzle. The power of the burner depends on its size. For example, a boiler with a thermal power of 10-15 kW requires a burning torch obtained by operating a burner with a single hole with a diameter of 0.2-0.25 mm. To obtain more power, it is not necessary to expand the hole - this will lead to larger drops. It is better to make 2-4 holes with a diameter of 0.1-0.3 mm with a distance between them of 8-10 mm, otherwise the torches will be mutually extinguished. Fuel consumption can be calculated as follows: through one hole of 0.25 mm, 2 liters of mining are sprayed per hour.
Video on how to make small diameter holes in a metal hemisphere:
- The tank is made of corrosion-resistant metal. A heater is built into it with a thermostat set to turn off the heater at a temperature of 70 degrees Celsius.
- From the same material it is necessary to make a fuel sump equipped with a pipe with overflow. Through this pipe, the oil from the sump will flow back to the tank. To drain the dirt from the sump, you can provide a plug in its bottom.
- The burner body is assembled: a nozzle from the squeegee is connected to the 2-inch cross in the front, then adapters: from above for oil supply, from the back side for air. From below, a 2/1 inch adapter and a drive are connected to the cross, through which excess oil will drain into the sump. Adapters are made of plugs with drilled holes into which fuel and air channel tubes are inserted.
It is also possible to make a housing from a tee, while the air duct is brought into the upper part, having previously drilled a hole of the desired diameter.
- The fuel path is made of a copper tube, one end of which is wrapped around the nozzle three times, and then led out through the plug adapter into the housing in the upper part. The fuel pipe is connected to the pump, a coarse strainer is installed and the other end of the tract is led into the tank. The fuel path can be equipped with a valve. The pump is connected to an electric motor powered by a 220 V network.

- An air duct from a metal tube is attached at one end to a hemisphere with a hole, having previously installed a plug adapter at the desired distance. The hemisphere should be positioned so that the oil from the fuel pipe flows evenly onto the rounded part of the nozzle, and then into the lower part of the body and into the sump. The other part of the duct is connected to the compressor, which is also connected to the 220 V network.
- Since there will be as many as three consumers of electricity in the installation, which will not be turned on simultaneously, it is advisable to equip the burner with a control panel: install a separate toggle switch or button to turn on the heating element and a separate toggle switch to turn on the compressor and pump. If desired, you can equip the remote control with a light signaling of diode lamps.
- It is possible to equip the burner with a controller that automatically turns on the units in accordance with the selected mode. Electric ignition is implemented using spark plugs, and to extinguish the burner, it is enough to shut off the oil supply.
Video - burner assembly diagram:
Preparation of fuel for the burner
Almost any waste oil can be used in a Babington burner. Automotive mining with a large number of foreign inclusions is filtered before being poured into the tank through a mesh and mixed with cleaner oil. Oils with a small amount of impurities can be poured without preparation.
When using edible vegetable oils, for example, deep-frying, it is recommended to stand it for several hours and carefully drain off the residue. These oils are quite fluid at normal temperatures, so they can be heated in the tank only at the time of starting the burner. When using fuel oil and other thick materials, they must be heated to a temperature of 70 to 90 degrees, otherwise the pump will work with overload.
Security measures
- A burner for oils and other HSPs can be dangerous if improperly installed and operated, in order to avoid a fire, a number of measures must be observed:
- floors and walls made of combustible materials are sheathed with metal or asbestos sheets;
- the fuel supply is stored at a safe distance;
- oil leaks must be removed in a timely manner;
- the electrical components of the unit must be carefully insulated to avoid sparks in the oil spray area;
- The burner must be located out of reach of air currents and drafts.
A burner with an open nozzle must not be left unattended while it is running!
The Babington burner, unlike a blowtorch converted to work at mining, is a reliable and durable unit that does not require complex maintenance. It is enough to periodically clean the fuel system, tank and sump, blow out the air duct in idle mode, and also monitor the compressor and oil pump for proper operation. A serviceable burner is a reliable and economical unit with a long service life.