What to do if the apartment is cold. How to insulate a wall in an apartment from the inside - competent work with different materials Material for insulating walls from the inside of an apartment
Pay increases every year utilities, especially for heating and electricity, and the rooms are still cold, even when the radiators are hot. The best and effective solution The problem of heat preservation is the insulation of the walls of apartments from the outside or from the inside of the room.
Insulation from the outside can be difficult to implement in practice if:
Helpful information:
- the façade of the building has expensive finishing;
- the apartment is adjacent to unheated technical rooms;
- the building you live in is an architectural monument and it is not possible to obtain a work permit;
- the house is multi-storey, insulation of the wall of one apartment spoils the design of the facade of the entire building;
- insulation must be carried out on the entire riser, but this is not always realistic due to the financial capabilities of individual residents;
- attracting construction organizations requires significant cash injections.
To preserve heat, it is necessary to take care of the tightness of the doorway and. A simple way to create a comfortable microclimate in an apartment: the desired coolness in the summer heat, and warmth in the cold winter - is to insulate the walls of the apartment rooms from the inside. Let's find out how to choose the right insulation from the wide range of products offered.
Choosing insulation for an apartment
The work of thermal insulation of apartments from the inside is complex and time-consuming. Experts do not have a common opinion and recommendations on wall insulation, although there are many developments and proposals, but they are united in one thing - for good result must be purchased quality material and properly prepare the wall surface.
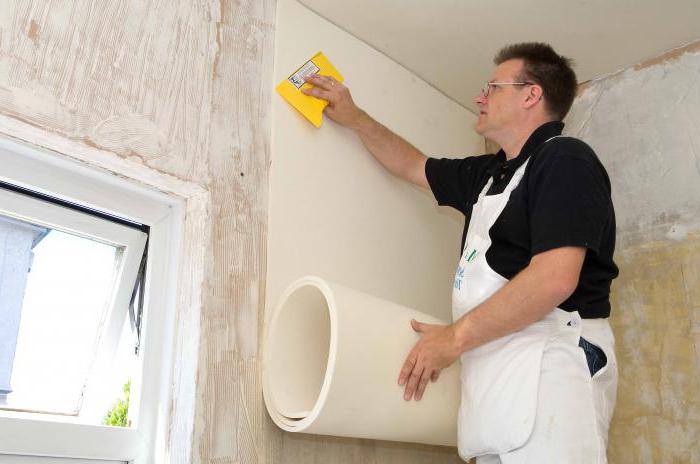
- Preparing the wall surface. The walls need to be leveled. If the building is new and the wall is brick, it is necessary; if it is concrete, it is enough to level it with putty. If we decide to insulate the walls of the apartment in which we live, we need to clean them of wallpaper, paint, remove nails and dowels from the surface, and cover chips and recesses with alabaster, if there are protruding irregularities, remove them. If there is fungus or mold, we clean it with emery cloth, wash and dry the walls, putty the surface, and if there are significant unevennesses, plaster it.
- Preparing the work site. When preparing the wall, remove the plinth and flooring, baguette, so that nothing interferes with the installation of foam boards. We prime the dry wall with a brush or spray; you can use an antifungal primer. Experts recommend laying PPS between the slabs and the wall. waterproofing material, then moisture will not get on the insulation.
- Laying foam. After completely leveling and drying the wall surface, we begin to lay the foam, starting from the corner, from the floor. We press the insulation tightly to the surface and drill a hole exactly in the center with a 5 cm recess into the wall, drive in fasteners - an umbrella, and then a dowel so that the cap does not protrude on the surface of the sheet. Carefully secure the foam board in 5-6 places. And so we carefully press each sheet against the wall and against each other, ensuring tight and monolithic mount. If gaps have formed, they can be removed with polyurethane foam.
Nowadays, glue is increasingly used to attach foam plastic, which is applied to the wall with a comb. - We seal the seams between the foam sheets tightly. We apply glue to all seams, and put reinforced tape on top so that it becomes one with the surface of the foam and does not protrude in the form of irregularities and folds. For getting desired effect we stretch it and press it against the foam with a spatula and press it into the adhesive mixture. We also coat the caps of the fastening elements with glue. Gaps cannot be left; they become “cold bridges” and negate all the work.
- Laying it down vapor barrier material. After the surface at the seams becomes dry, it is necessary to cover the insulation special material. To do this, we apply a mesh (film) over the foam, which protects it from moisture coming from inside the room. On top of the seams covered with reinforced mesh, apply glue along its width and apply a vapor barrier material, use a spatula to embed it in the glue and so on, each row with a slight overlap. After the wall is covered with a mesh, we smooth out the unevenness using sandpaper or a special grinding tool.
- Bottom line. Before us is a flat wall that can be decorated at your discretion.
Insulation of apartment walls with heated floor mats
This method of insulation is used extremely rarely and can easily be called experimental. If the walls freeze very much, this is great option maintain and increase heat in the room, although energy consumption increases.
The work is carried out in several stages:
- We attach a ready-to-use mat to the wall and turn it on in extreme cold;
- we warm up the wall until the condensation formed due to the temperature difference disappears;
- We insulate it with heat-insulating material to the required thickness.
- The wall is dry, you can start finishing.
Application of warm plaster
Modern construction is developing at lightning speed. It is difficult to follow new creative innovations in the technology of insulating rooms from the inside. What was progressive yesterday seems labor-intensive, complex and of lower quality today. This applies to insulating apartments using the method warm plaster, relatively recently this method was very popular. It is worth mentioning this option, maybe someone, due to certain circumstances, will be interested in it. The whole point is to apply a 100 mm layer so that it sticks, we do the work in three stages:
- Liquid plaster is “sprayed” onto the wall in a layer 10 mm thick, filling all the cracks, recesses, and surface cracks.
- After the first layer has dried, apply the main 60 mm and also dry thoroughly.
- The finishing layer is a 5 mm thick grout.
The process is labor-intensive; it takes a lot of effort and time to dry each layer; professional skills are required to complete the job.
We provide effective ventilation of the room insulated from the inside
Proper ventilation is essential for the health of both the home and its occupants. Insulating an apartment often leads to a violation of certain ventilation conditions in the apartment. That is, it is important to ensure temperature, humidity, and air flow speed. If the balance is disturbed, then on the walls, and due to lack of oxygen, residents will suffer from headaches and weakness.
Natural ventilation has a number of disadvantages: heat loss in winter, normal air conditioning is impossible in summer, noise, dust. For creating optimal microclimate forced ventilation using duct fans is required. Their launch can be blocked when the lights are turned on. Everything needs to be opened ventilation grates for better air exchange.
Ventilating the rooms daily won't hurt either.
Insulation of apartments is carried out in combination with insulation of the floor (especially the first floor), ceiling or roof (important if the room is located on top floor), doors, windows.
Tweet
Stammer
Like
If the windows are closed, the battery regulator is set to maximum, and the apartment is still cold - first of all, you need to deal with management company. They are required to provide a microclimate (temperature, humidity and other parameters) in accordance with sanitary and operational standards. If the parameters of the water in the batteries meet the standards, it means that there is too much heat loss in the apartment. However, such proceedings can last for weeks and months, and the rooms are already cold. Home master, who knows how to handle tools, is quite capable of solving the problem of cold in the apartment on his own.
What can be done outside and inside
Before you rush to buy materials and start destroying the finish, it would be nice to understand in what ways precious heat escapes from the rooms in a panel or brick house. There are several such ways:
- External walls – up to 50%.
- Walls of adjacent apartments – 5-10%.
- Gender – up to 10% (can reach up to 20%).
- Ceiling - up to 10% (especially on the top floor, it can reach up to 25%).
- Glazed balcony or loggia – up to 10%.
- Windows, doors, ventilation – 5-15%.
Heat leaves a home in two ways:
- Warm air escapes with drafts through leaks in doors, windows and walls.
- Heat leaves the apartment by heat transfer through building construction, which do not provide sufficient thermal insulation.
Is it possible to determine which ways heat escapes? folk ways? Yes, the most popular ways are:
- Light a candle and slowly move it near corners, windows, doors. Where the flame fluctuates is where the air flow is. By the deflection of the flame, its direction can be determined.
- Wet your fingertips (the most sensitive skin is there) and move them like a candle. The movement of air will feel like cold.
These methods are qualitative and very inaccurate. It is much safer to use devices that measure temperature remotely. The simplest of them is a pyrometer. It measures the temperature at a specific point on the surface. By taking several dozen measurements, for example, on an external wall, you can find the coldest point.
A thermal imager is even more convenient. It gives a picture of the entire surface and infrared range at once, zones high temperatures are marked on the screen in redder tones, and lower ones in blue. By pointing the thermal imager at the wall, you can immediately see where the heat is going. But such devices are very expensive; it is better to rent them for the duration of the apartment inspection.
Corner apartments on the top and first floors are deservedly considered the coldest. They have up to 3 planes in contact with cold space.
Features of apartment insulation
There are two fundamentally different ways insulation of the apartment:
- from the inside;
- outside.
Each of them has its own advantages and disadvantages.
How to insulate an apartment from the outside
In terms of overall efficiency external method significantly exceeds the internal one. Its main advantages are as follows:
- Higher quality of thermal insulation.
- The best microclimate after insulation (not only temperature, but also humidity).
- The area and volume of the apartment is not reduced.
- The condensation zone (dew point) is carried out from the living quarters to the facade or into the thickness of the external walls.
- The service life of wall structures increases.
Disadvantages external method are the following circumstances:
- Coordination with the operating organization and architectural supervision authorities is necessary.
- Carrying out such work on your own is very dangerous and is also prohibited by regulations.
For external insulation, it is necessary to involve an organization that has a license to work at height. Formally, the owner can carry out thermal insulation on the ground floor on his own; in practice, regulatory organizations try in every possible way to prevent this.
How to make an apartment warmer from the inside
There are not many advantages to this method. The main ones are the following:
- The cost of materials and labor is significantly less.
- The complexity of the work and the qualifications of the workers are also lower.
- You can do the work yourself without waiting for approvals. Sometimes, especially if in an apartment Small child, this is the deciding factor. Literally: we decided in the morning, we already insulated it in the evening.
 Insulation from the inside with basalt wool along metal guides
 Disadvantages and risks of internal method much more, it is much more difficult to properly carry out internal insulation and not harm your apartment and residents.
Installing insulation inside creates the following problems:
- The dew point moves indoors. It will be necessary to take special measures for waterproofing and condensate removal.
- If this is not done, high humidity in the rooms will lead to the formation of mold and mildew. This can make finding people impossible.
- The wall stops receiving heat from the living space and freezes through.
- The moisture contained in it freezes and thaws, which reduces the service life of the wall.
- At the joints of an insulated wall, floor and ceiling, so-called “cold bridges” are formed.
- Internal thermal insulation reduces the area and volume of rooms, thereby reducing the quality of housing.
- Many insulating materials are not recommended for use in residential premises. They can emit unpleasant or even harmful fumes. During combustion, toxic substances may be formed.
The thicker the layer of internal insulation, the more the wall freezes and the further the condensation zone moves inward
How to insulate a corner apartment
Unpleasant feature corner apartments lies in the fact that two wall surfaces are external at once. Installing additional radiator sections does not always help. The coldest place will be the corner between two external walls. If the seams between the panels are poorly made, it will definitely freeze, no matter how hot the radiators are. Conscientious developers pay attention to thermal insulation of corner apartments Special attention.
How to insulate a cold corner in an apartment from the inside? First you need to check the condition of the fillet weld. In inexpensive or older homes, the seams may be in poor condition. Heat leakage through the seams is detected by a thermal imager.
Repair it yourself interpanel seams impossible - it is necessary to force the operating organization to carry out this repair. It consists of dismantling the seams (in other words, they are opened from the outside with a hammer drill), laying (or spraying) new insulation and applying a new layer of plaster.
If repairing the seams did not give the desired effect and it is still cool in the corner rooms, you will have to insist on external insulation walls
 Insulation on wooden guides
 Selection of material and tools
On modern market There are many brands of insulation of several main types:
- Mineral wool. Basalt, glass and slag.
- Foam plastics.
- Polyurethane foam.
- Ecowool.
- Bulk materials. (They are practically not used when insulating apartments)
When choosing a material, you need to compare the available alternatives according to the following parameters:
- Thermal conductivity. The lower the better.
- Moisture absorption coefficient. Materials with lower values work more efficiently.
- Breathability. Lower values also mean better thermal insulation.
- Fire resistance class. Indicates the fire safety of the material.
- Life time.
- Compound. It is better to choose materials without harmful components.
- What is the price. The last but one of the most important characteristics.
The most popular materials have the following characteristics.
Basalt wool
Made from volcanic rocks, the structure consists of short fibers of high rigidity. Supplied in mat form. It has a high density; special attention must be paid to the strength of fastening the mats to the wall.
The material is completely non-flammable and slows down the spread of fire. Does not contain harmful substances. It does not form them either during operation or during a fire.
 Installation basalt wool
 Glass wool
Made from industrial waste and broken glass. Its structure is formed by long elastic fibers. Available in rectangular mats and rolls. It has lower density and greater elasticity than basalt wool.
It is also fireproof and does not form harmful substances.
A major disadvantage is the reduction in thermal insulation characteristics when wet.
 Cut glass wool
 Expanded polystyrene
Foamed polystyrene is often called polystyrene foam. The material has good thermal insulation properties, easy to install on rigid structures.
The main disadvantage of the material is that it burns well, and releases substances harmful to health. Polystyrene foam is also very fragile and not resistant to tensile and compressive loads; it chips easily. Extruded polystyrene foam does not have this disadvantage.
 Installation of foam plastic on adhesive composition
 Polyurethane foam
This foamed plastic, also called penoizol, has excellent thermal insulation properties. It is sprayed liquid, foams and hardens on the insulated surface in an even continuous layer without seams and without joints that cause heat loss.
It has excellent moisture resistance, zero hygroscopicity and vapor permeability. Significant disadvantage is the high cost of spraying equipment.
 Spraying polyurethane foam
 Ecowool
a new heat insulator on the Russian construction market is made of cellulose fiber impregnated boric acid and sodium triborate.
The material is the most environmentally friendly, does not burn and does not form any harmful substances. It is also sprayed onto vertical surfaces, wetted with a water-adhesive composition.
The equipment costs less than for spraying polyurethane foam, but also seems expensive.
Auxiliary materials and tools
In addition to the insulation itself, additional materials will be required:
- vapor barrier membrane and double sided tape for gluing its canvases.
- External cladding: plaster or ventilated facade made of plastic or porcelain stoneware.
- Internal lining – moisture-resistant gypsum board, wallpaper.
- Products that prevent the development of mold and mildew
- Lathing from wooden slats or metal profile
- Fasteners
The usual tools are needed for general construction work. You will need:
- hammer drill or impact drill;
- construction knife;
- hacksaw;
- Bulgarian;
- screwdriver;
- tape measure, level, square.
To apply protective compounds you will need a spray gun or roller.
Description of the insulation process with your own hands
The insulation process varies depending on the type of insulation and material.
How to insulate your apartment from the outside if the heating is bad
The most popular type of external insulation is polystyrene foam. The sequence of actions is as follows:
- Calculate the insulation area and material thickness. Buy it.
- Based on the amount of insulation, purchase glue, fiberglass mesh, mounting metal profile, disc dowels.
- Secure the metal profile while maintaining the level.
- Glue the insulation boards to the wall.
- Secure with disc dowels at the rate of 4-5 per panel.
- In cold regions, polystyrene foam is glued in two overlapping layers.
- Seal joints and cracks with polyurethane foam.
- Apply thin layer glue onto the foam, press and roll the mounting mesh with a rubber roller.
- After the glue has dried, prime and plaster the surface.
- Instead of plaster, you can use facade paint.
 External insulation scheme
 Such work can only be carried out independently on the first floor. Above that, you will have to involve a specialized construction organization.
How to insulate a cold room from inside the apartment with your own hands
The sequence of actions will be as follows:
- Calculate the amount of insulation.
- Purchase it and the corresponding quantities vapor barrier membrane, guides made of metal profiles, fasteners, primer, plaster or moisture-resistant gypsum board.
- Remove any remnants of old wallpaper or paint from the wall down to the concrete.
 Scheme internal insulation
 - Impregnate the wall and adjacent surfaces with an anti-mold compound
- Secure the upper and lower starting and finishing profiles. Attach vertical guides to them in increments of 60 cm.
- Place slabs between the wall and the profile mineral wool.
- Secure the slabs with disc dowels.
- Stretch the film of the vapor barrier membrane, securing it double-sided tape. The joints between the membrane sheets also need to be taped.
- Attach sheets of moisture-resistant gypsum board to the vertical guides.
- Putty it, prime it, then paint or wallpaper.
 Placing basalt wool slabs on metal profile guides
 All joints of the side walls, ceiling and floor with external wall definitely needs to be covered silicone sealant or foam glass.
Subsequent work after insulation
External insulation will not require any additional work. In the case of internal insulation, you will need to periodically check the condition of the insulation and vapor barrier to see if condensation has accumulated behind the gypsum board. If it is detected, you will have to take care of ventilation of the space between the gypsum board and the insulation. If mold is found behind the drywall, the insulation will have to be disassembled and re-treated with anti-mold reagents.
If you have even the slightest opportunity to insulate the walls from the outside, do it. This is the best option, because insulating walls from the inside is headache. There are only two correct and more or less acceptable options, and one takes up a lot of space, and the second requires significant costs during the winter. There is also a method suitable for insulating balconies and loggias. And that's all for now. All other options with polyurethane foam, liquid-ceramic thermal insulation, penofol and other materials only bring dampness and mold.
Insulating walls from the inside: what is the problem
Anyone who insulated the external walls of a house or apartment with inside- from the premises - they are faced with the problem of the appearance of fungi, mold and high humidity.These consequences are natural and appear regardless of the type of insulation that was used. You can get rid of moisture and fungi only by removing the internal insulation, making major renovation walls, treating them with antifungal compounds and plastering.
Let's look at the reasons. The so-called dew point is to blame. This is the line where warm and cold air meet and where condensation results.
The figure on the left shows the situation with the dew point if the wall is not insulated. It is located somewhere in the thickness of the wall, depending on the temperature and humidity, it shifts first to one side, then to the other, but is always located quite far from the inner surface. In this case, moisture accumulates in the wall and freezes. In the spring, as it thaws, it evaporates, and evaporates into the atmosphere. If dampness is observed in the room, it is for a short time and at the level of sensations.
The photo in the center shows a situation where the wall is insulated from the inside. In this case, condensation falls in the insulation, or, if this is not possible (expanded polystyrene is used, for example), at the boundary of the insulation and the wall. Even if the wall freezes and the condensation turns into ice, in the spring it will begin to melt, the insulation, wall material and finishing will become wet. Since there is a large distance to the outer surface facing the street, moisture dries very poorly in this case, which “comes out” in the form of dampness, mold and all the accompanying delights.

And the third option is to insulate the wall from the outside. In this case, the dew point is in the insulation. How to get it out of there is another story (make a ventilated facade or choose the right vapor permeability of materials), but for our topic it is important to understand that in this case the wall inside the room will definitely be dry and warm.
To summarize, we can say, if possible, insulate from the outside. Insulation of walls from inside premises has to be done only in a few cases:
- if they are not allowed to be insulated from the outside (the building is a historical monument or prohibited by local authorities);
- if the wall goes into the joint between two buildings;
- the wall opens into the elevator shaft.
But before you take on this work, thoroughly inspect the floor, ceiling, and windows. Sometimes most of heat does not escape through the walls, but through these surfaces, and it is easier to insulate them (in the sense of less hassle with the dew point).
Correct internal insulation of walls in a house or apartment
There are only two ways to insulate indoor walls from the inside and avoid problems with dampness:
- recreating multilayer wall(place a half-brick wall with insulation at some distance);
- Heat the wall and then insulate it.
These options work, but, as you can see, they “eat up” a significant amount of space and cost a lot of money. In each specific case, it is necessary to consider what kind of insulation and how much is needed, but the wall pie remains the same.
Second wall
At some distance from the main wall, a second wall 10-12 cm thick is installed. Between the two walls, a layer of insulation, which is required for these conditions, is attached to the inner one. At the same time, up to outer wall There should be a ventilation gap of at least 3 cm. In total, this entire structure will be 20-25 cm away from the main wall. It will “eat up” a considerable area.

As you can see, in this case the dew point can be located inside the insulation or on the inner surface of the wall facing the street. To be able to remove the formed moisture, you can do forced ventilation by installing one or two exhaust fans.
Since in this case the insulation will get wet, it is necessary to choose one that is not afraid of moisture. These are polyurethane foam, polystyrene foam, foam glass. You can also use some types stone wool, but only those that are not afraid of moisture (there are some).
Thermal insulation material must be fastened simultaneously with the construction of the walls. They laid it out to a certain height and secured the thermal insulation. It’s inconvenient to work, but there is no other choice.
Electrical heating
The idea of this method is to move the dew point inside the wall when insulating a concrete or brick wall internally. To do this, it must be heated. The easiest way is to attach an electric heated floor mat. At some distance from it, insulation is installed, on top of which there is a finishing layer.

In this case, there are no problems with moisture removal, and much less space is required to install the system: from 8 cm (with a ventilation gap of 3 cm and an insulation thickness of 5 cm).
With this method, the thermal insulation material can be of any kind. To install it, first a sheathing is made, then a counter-lattice, and then a suitable insulation is attached to it.
Option for insulating a balcony from the inside
In the case of a loggia and a balcony, the situation is often completely different. If the authorities do not allow the installation of a wall, they demand that the existing reinforced concrete screen be left, it is cut off from warm air thorough thermal insulation made of extruded polystyrene foam (EPS).

In this case, it is better to make the insulation excessive than at least slightly insufficient. The total thickness is divided into two layers. They are laid without a gap (preferably with locks), and so that the seams of the first layer overlap the sheet of the second. There should be no through access of warm air to the screen.
It is necessary to approach the issue of insulating the floor and ceiling of the loggia/balcony very carefully and ensure tightness at the junction of them with the walls. Also pay attention to how the glazing will be installed: there may also be problem areas: joint with the screen, walls, insulation of the part above the frames. All of them must be well finished, excluding the possibility of contact of warm/cold air. In this case there will be no problems. Even .
The question of whether it is worth insulating the walls of a house from the inside still does not have a clear answer. Some experts are ardent opponents of this option. Others, on the contrary, believe that such a solution will create the most comfortable conditions for people’s lives. It is worth noting that both are right. Everything depends on the specific situation, according to which this or that decision should be made. But even before starting work on insulating the walls of a house from the inside, it is important to study the features of the process and select a safe material.
Main advantages
Insulating the walls of a house from the inside is especially important in apartment buildings. Sometimes it is the only option for creating comfortable conditions in those rooms adjacent to unheated, cold technical rooms or staircase. You can also insulate walls from the inside in a private house. Such a solution will preserve the original appearance of the facade or increase the amount of heat that will be stored in the building.
Such work refers to non-traditional technologies. Most often, they are recommended in cases where it is simply impossible to arrange external insulation. These are, for example, the same high-rise buildings. After all, sometimes it is very often necessary to keep the rooms warm panel house. Insulating the walls in an apartment from the inside will be the only option when the work can be carried out independently, in the most short time and without obtaining the appropriate permits that are necessary when arranging the facade. As a result, the comfort of housing will increase, and the owners will forget about such troubles as fungus and mold.
Possible problems
Despite certain advantages, insulating the walls of a house from the inside also has a number of disadvantages. It was they who became the reason for the emergence of opponents of this decision. Thus, the presence of insulation on the internal walls of a building contributes to the emergence of such problems as:
-Walls exposed to cold. After all Basic structure at home does not get rid of contact with outside air. This leads to its rapid destruction. Cracks begin to appear on the surface of the walls, because their insulation from the inside takes away a certain part of the heat. And if before the activities the external structures of the building were heated from the inside, then upon completion of the work this process stops.
-Condensation. As you know, droplets of moisture form on a cold surface in contact with warm air. This phenomenon is called the “dew point”. The main goal of thermal insulation of a house is to move such a point beyond external structure. Insulating walls from the inside in a private house or in a high-rise apartment leads to the formation of condensation at the boundary between the insulation and its surface. In this regard, the process turns out to be hidden from the owners, and they simply do not notice it. Walls with high humidity become an excellent place for the growth of mold and fungi.
-Reducing the area of rooms. Today, the construction industry produces various types of the most modern materials, with fairly high efficiency. However, she has not yet come up with one that, while maintaining high technical characteristics would be quite small in thickness. Insulating a house from the inside will take away from the premises from 5 to 10 cm of their space, which will significantly reduce usable area. At first glance this is not too noticeable. But if you calculate it over the entire building, the figure will be quite impressive.
Based on all of the above, before starting work on insulating the walls of a house from the inside, it is advisable to carefully consider the negative aspects of such a decision. Get rid of possible problems necessary already at initial stage, because otherwise the negative result will become noticeable already in the first years of such operation.
Materials
What allows you to use technology that involves insulating the surface of walls from inside the building? These may be the most various materials, having their own characteristics, advantages and disadvantages. As a rule, the most popular insulation options for such work are mineral wool and foam plastic, penoplex, as well as slabs made from wood fiber. Let's take a closer look at their advantages and disadvantages.
Styrofoam
Very often, owners who decide to insulate a house from the inside opt for this material. After all, it is quite effective and, importantly, has a low cost. As a rule, 5 cm of such a protective layer is sufficient to ensure a comfortable microclimate in the premises.

Foam plastic is most often used to insulate walls in apartments multi-storey buildings. The use of this material allows installation to be carried out quickly, without additional tools and complex processing.
Among the disadvantages of polystyrene foam are the following:
Low strength;
Flammability;
Poor vapor permeability.
The latest forecast helps turn the house into a real greenhouse. In order to avoid this problem, you will need to install forced ventilation, which will require additional labor and financial costs.
Penoplex
The closest relative of foam plastic is extruded polystyrene foam, also known as penoplex. Externally, these two materials are very similar to each other. However, foam boards have Orange color, not white. In addition, it is more durable, which determines its durability.
However, the disadvantages of polystyrene foam in the form of flammability and poor vapor permeability of this material still remain. Insulating the internal surfaces of the walls when using it will not allow the house to “breathe”, which will require the installation of forced ventilation.
Is it possible to use polystyrene foam to create comfortable indoor conditions? Yes, but you will need to prepare in advance for possible problems and eliminate them in time.
This option is more acceptable for a house, as well as one built from lightweight concrete. As for wood, it is usually chosen for the construction of buildings for its ability to “breathe”. But polystyrene foam and penoplex block air flows. This negates all the benefits of wood.
Mineral wool
These insulation materials are also widely used for internal lining. What is attractive about this material is its inexpensive price. Experts recommend using mineral wool in hard slabs to insulate the inside of a house wall. This material is easy to install, non-flammable and highly durable.
Rolled products are produced under such brands as Rockwool, Knauf, and Izover. She has good:
1. Thermal conductivity. This allows the use of a thin layer of insulation.
2. Soundproofing. The use of glass wool provides excellent protection against street noise. Such properties of the material are facilitated by the presence between its fibers. air gap.
3. Vapor permeability.
4. Tensile strength.
5. Resistant to biological influences, for example, to rodents.
This insulation is also supported by its high service life. It has been successfully performing its functions for fifty years. In addition, mineral wool has low density and light weight.

However, it is worth keeping in mind that this material perfectly absorbs water, after which it ceases to function according to its intended purpose. To prevent this from happening, provide a vapor barrier and waterproofing in the form of a film or membrane. The first protects the insulation from the side of the incoming warm air, and the second - from the cold air.
Fiberboard
Insulation from the inside can be carried out using They have:
Good noise absorption and thermal insulation;
Unattractive to rodents and insects;
Good resistance to moisture and temperature changes;
Easy to process using any tools;
Easy installation;
Convenient for wiring.
However, it is worth keeping in mind that fiberboard boards subject to treatment with toxic substances. This poses a danger to humans. That is why this material most often used for exterior decoration.
Insulation of frame houses
Anyone who has decided to improve the comfort of their home will need to check its condition. If any defects are detected, they will need to be eliminated before work begins. Wall insulation frame house from the inside will require cleaning them and removing foreign objects. An important point It will also get rid of the gaps in the structural elements. To do this you will need to use polyurethane foam. If the wood of the walls is damp, then it is dried using a hair dryer.

When insulating the walls of a house from the inside with your own hands, you will need to go through two stages. The first of these is the installation of waterproofing. The second stage involves laying a layer of thermal insulation.
The waterproofing is pre-cut into strips corresponding to the size of the walls and attached to them. Next, the insulation is laid, placing it between the racks of the pre-arranged sheathing. The material selected to create a comfortable temperature in the room is pre-cut into strips corresponding to the area of the walls. At the same time, their size may exceed the required by 5 cm. This nuance allows you to lay the insulation more tightly. This will increase the effectiveness of its use.
Insulation of wooden houses
Work in such buildings begins with the installation of sheathing, which is installed on the load-bearing walls. In this case, it is recommended to use timber. Wall insulation wooden house from the inside using metal profile It makes sense in cases where in the future they will be covered with moisture-resistant plasterboard.
To create even and regular corners, corner posts are prepared from timber with a section of 50 x 100 mm. Their height should be equal to the height of the room. Along the edge of such a beam, a second one with a smaller cross-section (50 x 50 mm) is reinforced with self-tapping screws. Such a solution will allow you to secure the selected material inside the created structure.

Insulating the walls of a wooden house from the inside will require their pre-treatment with a special liquid. This will protect the surface from rotting and burning.
The next stage of insulating the walls of a wooden house from the inside with your own hands is the installation of bars, which are attached in increments of 50 cm. After completing the arrangement of the sheathing, you can begin the process of attaching the material, which is most often mineral wool. The insulation is pre-cut to the height of the walls with a width exceeding the distance between the vertical parts of the structure by 2 cm.
Mineral wool is fixed inside the sheathing anchor bolts. It can be laid in 2 layers, between which the film should be placed.
After fixing the heat insulator, bars measuring 30x40 mm are mounted. Next, the sheathing is carried out using the one chosen by the owners decorative material, which could be, for example, lining. By the way, it will allow you to additionally insulate the house. At the same time, the interior will look very attractive.
Insulation of panel houses
In order to create a comfortable temperature in such a building, mineral wool is usually used. In addition, wall insulation in panel house the inside can be made of penofol and fiberboard, foamed polyurethane and balsa wood.
How is such work carried out? Insulating walls in a panel house from the inside will require cleaning them of old coatings. You can use a vacuum cleaner to remove dirt. The surface should be treated with a primer and antiseptic. After applying the next layer, the wall should be allowed to dry thoroughly. On next stage the surface is leveled with plaster, with all joints covered with mastic, sealant or moisture-resistant solution. Only after this they begin to arrange the heat insulator. The work is completed by installation facing material, to which the final finishing is applied.
Insulation of brick houses
Buildings made from this material are distinguished by durability and strength. However, brick retains heat much worse than, for example, wood. To support indoors comfortable temperature, you will need to protect the walls from the cold.
Very often, owners insulate walls with isover from the inside in a brick house. is on the list of one of the most popular materials for performing such work. However, it is worth keeping in mind that you cannot leave it open. After all, over time, mineral wool will begin to emit dust, which negatively affects the health of residents. If brick house If this material is insulated correctly, then no problems will arise in the future. In this case, you will only need to waterproof the insulating layers, since they easily absorb moisture, get wet, and as a result lose their properties.
To install an insulating layer of mineral wool with your own hands, you will need to prepare the following materials and tools:
Wooden slats;
Mineral wool;
Film for waterproofing;
Vapor barrier film;
Plaster;
Primer;
Putty knife;
Plywood or drywall.
Installation of mineral wool is carried out after thorough preparation of the walls, which are plastered and primed. There is no need to level such a surface, because later the sheathing will be mounted on it.

After the walls have dried, a layer of waterproofing is attached to them. Next, they begin to form the sheathing, which is made from wooden slats, fastening them together with screws. At the next stage, insulation is installed. The sheathing is placed on top of it and the slats vapor barrier film. This structure is covered with sheets of plasterboard or plywood. The joints of the facing material are sealed with putty.