Do-it-yourself basement hatch: electric constructions, the usual version and products with a retractable mechanism. How to make a hatch in the ceiling to the attic Floor hatches with your own hands
When arranging his country house, the owner tries to equip a place for storing food, preservation or other things. A stone cellar in the garage, underground under a building with an entrance from the kitchen or corridor, a cellar on the street are just a few of the construction options. The room for household needs must be sealed. The hatch, designed to close the home cellar, will help protect food from debris and regulate the microclimate in the "underground".
Construction nuances: designing a door
At the stage of developing the location of the cellar cover, the following factors must be taken into account:
- The entrance should not be located next to the wall so that there is room for opening the sash.
- If it is planned to arrange the underground in the kitchen, then the hatch is placed where the kitchen set will not stand. It is important that in the open position the lid does not touch furniture and other decorative elements.
- The made basement under the house must be equipped with a reinforced door that could support the weight of a person.
- The optimal dimensions of the cellar and the entrance should correspond to the dimensions of the owners.
Preparatory work
Having found the ideal place for the underground room and the placement of the entrance to it, we proceed to the arrangement of the door. Before you make a hatch, comfortable and reliable, for the cellar with your own hands, you should choose the optimal parameters of the manhole. It is made of such a width and height as to make it possible to drain food and preservation into it without hindrance.
The size of the hatch directly depends on the proportions of the owner's body. To ensure that the person does not have difficulty in getting into the room, make a hole with an area of at least 75x75 cm. At this stage, it is necessary to take into account the future placement of the handle.
The entrance must be equipped with special supports on which the lada is placed on the cellar. It is best to install four main rods to ensure the strength of the structure.
Materials used for the burial entrance
When choosing the type of door, the location of the basement is taken into account. The lid for the cellar with your own hands can be made from the following materials: wood, metal, and in some cases tiles. The use of each of them has a number of features associated with their further operation. 
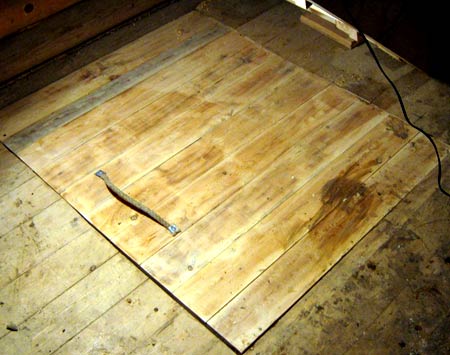
DIY wooden door
A wooden cellar cover is made if the floor in the house is covered with a wooden board. Natural materials visually mask the subfloor and lighten the weight of the structure. To make it, you need a set of tools - a hammer, a saw, a screwdriver, a brush. It is also necessary to prepare the following list of materials:
- flooring boards;
- slats for lathing;
- support bars;
- screws, nails;
- drying oil;
- plywood sheet;
- thermal insulation film;
- chalk, pencil;
- a pen;
- shock absorber, hatch hinges.
 A hole in the cellar with dimensions of 80x80 cm, it is necessary to equip a door with a slightly smaller area, which ensures a good fit to the floor and a small gap of 5 mm.
We carry out the following steps:
- To begin with, on the rough version of the underground flooring, we nail 4 beams for support.
- We saw the floorboard into pieces of 79 cm.
- Cut out a 79x79 cm square from a plywood sheet. 1 cm will be the gap between the floor and the door, preventing deformation due to high humidity or temperature changes.
- For the lathing of the inner part, we cut the slats into pieces of 79 cm.
- Before connecting all the elements of the hatch for the home cellar, we cover them with linseed oil, which provides protection from fungus and moisture.
The height of the structure must correspond to the dimensions of the floor covering, therefore it must be made multi-layer. The first layer is plywood with slatted crate, the second is thermal insulation (the insulated manhole prevents drafts and the passage of warm air from the house). A finishing layer is applied on top - the board is fixed. The surface coating must match the thickness of the flooring. So that the cellar lid does not stand out too much, the upper boards are nailed parallel to the floor. 
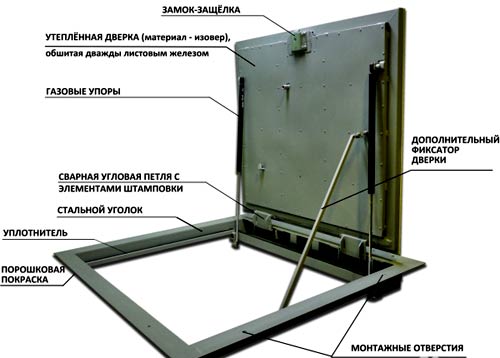
Self-production of a metal hatch
Metal structures are reliable and durable in comparison with the previous version. Steel sheet is most often used for arranging a cellar in a garage. For manufacturing you need:
- steel sheets, the thickness of which is 1 mm and 3 mm;
- metal corner about 3 or 4 mm;
- loops;
- anchor;
- gas closer;
- a sheet of foam or other material to insulate the entrance;
- primer;
- rubber seals;
- tape measure, knife, screwdriver, welding and angle device for disc grinding.
 Now the question arises - how to make a cover for the cellar from steel sheet in the garage with your own hands. We carry out the following manipulations:
- Cut out a sheet of 80x80 cm from a metal sheet.
- Along the perimeter of a steel square billet, from the inside, we weld a corner and stiffeners. Visually, the area can be divided into 4 sectors.
- We insulate the structure with foam or other material.
- On top of the insulating layer, we overlap sheet steel with a thickness of 1 mm. Its edges are bent and fixed with self-tapping screws.
At this stage, the creation for the cellar is completely ready. It remains only to carry out the installation work, which includes the following steps:
- the frame is being installed at the entrance. Fragments of the steel angle are welded together, forming a square corresponding to the parameters of the hatch hole.
- the frame is fixed with anchors to the concrete. One side of the frame will be the support of the structure.
- the protruding edges of the metal rim are sealed with gaskets to reduce heat loss and protect against mechanical damage.
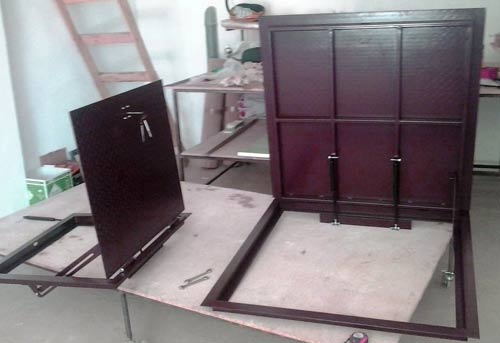
- the cover for the cellar is attached to the frame with reinforced hinges. For a comfortable opening, it is recommended to equip with a gas closer.
The steel hatch to the basement can also be used in the house. The topcoat should be covered with plywood or other wood-like material that resembles the floor in a room. 
Tile is a popular wall and floor covering for kitchens. The presence of an underground space under the house obliges to arrange the entrance in the same style. To make a hatch under the tiles you will need:
- steel corner:
- sheet steel 3 mm;
- solution;
- tile;
- fittings.
Unlike the production of a metal manhole, the entrance under the tile is made easier:
- A blank is cut out of a steel sheet, corresponding to the parameters of the hole in the basement. This will be the bottom of the structure.
- The corners are welded along the perimeter, forming the sides. Reinforcement in the form of cells is fixed inside them.
- The entrance frame of the cellar is made of corners and embedded in concrete.
- The structure is connected to the support with reinforced hinges.
- The solution is mixed and tiled elements are applied.
Decorate the lid with tiles laid out according to the scheme. When decorating the surface, adhere to the geometry of the flooring. 
Basement lid hinges
When equipping the hatch to the cellar with your own hands, use ordinary door hinges. They are suitable for a wooden lid, but when opened, it will not be able to lock in a certain position. For fixing, options from the domestic auto industry are suitable - hood hinges, which can ensure the door is fixed in any position.
To facilitate the lifting of a heavy hatch, use a special mechanism, which consists of a coil spring, a kosyachny mount, a steel bar, a hinge with a bracket and screws.
An expensive option, but a reliable option is a mechanism for raising the cellar hatch using a remote control. The device consists of an electric motor automation system installed on a structure, a toggle switch and a power source. 
Sealing the entrance to the basement
Insulation of the entrance to the cellar avoids the ingress of cold air from the underground room into the living room. Reliable sealing eliminates the penetration of moisture and odors.
To ensure the microclimate inside the basement, the following materials are used as insulation:
- polypropylene (suitable for the cover of outdoor cellars);
- Styrofoam;
- expanded polystyrene;
- glass wool.
To seal the entrance, felt tape and a door seal are used, which exclude air intake, mechanical damage to the frame when the lid is closed.
A properly equipped cellar lid is a guarantee of comfortable use of the basement. Before you make it yourself, you need to decide what kind of hatch will be, what to make it from and how it will open. Thinking over every detail of the design, you can rationalize the operation of the basement and the safety of the crop for a long time.
Everyone would like to have a basement under the floor in the house. You can talk about the pros for a long time. Firstly, this is an additional room, which has practically constant temperature and humidity throughout the year, regardless of the season. Allows you to use yourself as a vegetable store, as a warehouse, a workshop, etc.
And in this regard, it is important to equip the entrance to the basement with an aesthetic and reliable hatch.
1. Convenience of opening and closing;
2. Presentable look;
3. Reliability.
Ease of opening
It is very important that when opening it opens without excessive effort, and when closing the hatch cover does not fall with all its might trying to beat off any limb, but closes smoothly. Reliable fixation of the hatch cover is also equally important. The possibility of being closed, and even worse - getting a lid on the head, will not please anyone.
The advantages include the reliability and solidity of the design. Due to the mass, it does not dangle and does not creak when walking on it. A solid fastening in the opening is also required. The lid locking mechanism in this design is simply vital. The handle is usually made removable, you can use a regular eyebolt. Various sealing materials are used for sealing.
Making a basement hatch with your own hands
 A basement hatch can also be made with your own hands, for example, a wooden one. For the frame, use bars of 100 x 50 mm or thicker, depending on the load. The cover is made of boards of 30-40 mm from above on the boards, GVL is glued on the top of which the floor covering is laid. If it is necessary to install a hidden hatch, it must be lowered to the thickness of the floor covering. Hinges for this will require mortise. You can also make a hatch from metal with your own hands.
Of the materials you will need:

Necessary equipment:
- Welding machine
- Bulgarian
- or an electric drill
- Roulette
 First, a frame is assembled from corners or a square pipe, after which a cover is made. The lid can be made of either metal or wood. If the structure turns out to be heavy, then it is necessary to install gas shock absorbers. For those who want to restrict access to the basement for strangers, we recommend installing electric drive... The electric actuator is activated by giving a signal for opening and closing from the remote control.

It is no secret that the presence of a basement under the floor of the first floor significantly saves space in the main room of the house. Waterproofing, external wall insulation, ventilation system - all these works allow maintaining constant temperature and humidity in the basement. In such a room, you can not only store preservation. If you install an insulated hatch in the basement, then you can even equip a workshop or a billiard room in it. Or take a swing at the bodega.
Having arranged the basement, you can refuse to build some outbuildings in the yard. Even at the design stage of the house, you should decide whether yours will be. This space is not often used, as is the attic. The entrance to it must be equipped with a tightly closing hatch. Then cold, humidity, smells, noise will not penetrate from the room to the basement and vice versa. If you approach this correctly, then you can equip a hatch to the basement in any convenient place. The main thing is that the basement has a comfortable and safe entrance.
Important! When open, the hatch cover should open almost to a vertical position. The comfortable opening angle is 90 °.
Opened at this angle, the lid is easily held in place by spacers and clamps. And when going down to the basement, you can lean on it. In addition, it does not clutter up the space of the entrance itself and does not require additional space for itself around it.
All this applies to the hinged lid. Its advantages over removable, folding or folding options are obvious.
Advantages and features of various caps
As for the hinged lid, firstly, it does not require additional space for opening, like a hinged one. When opened, it does not lie on the floor and does not lean on furniture. And the entrance to the basement can be located as close to the wall as possible.
Secondly, the hinged lid can be made in any size. Equip it with additional stiffeners and heat-insulating materials. Of course, a reinforced and insulated basement hatch will have more weight. But if it is equipped with a lifting mechanism, then even a child can handle it. Moreover, it will not need to be torn off the frame and set aside, as is the case with the removable cover option. A removable sunroof must be both lightweight and durable. Therefore, they are made in a small size, in which the combination of strength and weight becomes optimal.
Thirdly, the installation of rollers on the folding cover of the basement hatch makes the structure heavier. In the open position, the folding doors take up more usable basement entrance space than a hinged cover. In addition, it takes a lot of effort to fold the flaps.
Suppose it can be equipped with folding mechanisms and facilitate the lifting process. But what to do with the technological gap between the flaps? Such a cover must have at least one additional seam at the border of the flaps. This seam will need to be protected from contamination on the hinges.
The optimal type of hatch in the basement is a floor-mounted hinged hatch with one or two doors. The hatch should be easy enough to open and not obstruct the opening to the underground room. We will describe the design features of a convenient hatch below.
Dungeon Entry Materials
First of all, let's look at what components the hatch is made of. This is the frame of the opening and the cover itself. The frame must be fixed to the opening with anchors and have a recess for the cover. Then it lays down flush with the frame and does not fall down.
What materials can be used to make the floor frame for the entrance to the basement? In principle, the choice is small - wood and metal. But the wood species must be solid, not only because the hatch will be part of the floor, but also so that moisture and condensation do not penetrate deep into the structure of the wood and do not have a destructive effect on it. The frame for the cover is made of a rectangular bar, for example, 60 x 40 mm for better resistance to deflection, and the frame of the opening is made of a thick board, for example, 100 x 40 mm.
Important!For the top cover, a board with a thickness of at least 25 mm or plywood with a thickness of at least 12 mm is used.
Subsequently, it will be possible to sheathe the surface of the hatch with linoleum or laminate. Tiles can also be glued to plywood if the floor and cover are in the same plane.
The space between the timber is filled with insulation and sutured with a vapor barrier film. It is better to hem the bottom of the wooden cover with a galvanized sheet and bend its edges onto the sides of the frame.
Reinforced entrance
Metal can be used as a material of construction and an alternative to wood. A corner with a wall thickness of at least 4 mm is used for the outer frame, and a profile pipe for the base of the cover.
Advice! If the floor covers are used in technical rooms, it will be sufficient to weld the sheet over the pipe truss. All welds must be carefully ground.
A completely different attitude should be towards the hatch if you decide to equip it in a living room or, for example, in a kitchen. In this case, it must be installed exactly at the level of the subfloor. That is, directly onto the screed. Then you can put tiles or other flooring material on top of it and veil its presence as much as possible.
Corner, pipe, sheet and other metal components of the hatch significantly increase the overall weight of the structure. If it is impossible to do without them constructively, then it is possible to facilitate the product technologically. Black metal is heavy and “morally” unstable to moisture. It starts to oxidize and rust. The way out is nearby - to use aluminum for the frame. Excellent surface strength, frame rigidity and the most important thing for a basement is its anti-corrosion properties.
The basement floor entrance is located at the border of temperature and humidity. Wood must be treated with an antiseptic and covered with layers of varnish or drying oil. Black metal also does not like moisture. Therefore, painting in several layers with preliminary priming is a must. Aluminum is the most unpretentious material for a basement hatch.
Coveted hatch
So, we come to the conclusion that the ideal hatch to the basement should combine several qualities:
- have an insulated lid, preferably a swing type, so that a constant temperature and humidity is maintained in the basement;
- have lifting mechanisms, hinges, limiters and position latches to facilitate entry into the basement;
- be made of aluminum (preferably) to protect against rust and save yourself from systematic staining or other treatment of the surfaces of the cover and hatch frame;
- have a reinforced cover so that it is a full-fledged part of the floor and has the same finish as the rest of the floor in the room - linoleum, laminate, wood or tile;
- have a minimum size of 750 x 750 mm, so that a person can freely descend and ascend with a load in his hands.
However, to order or manufacture such a hatch, it is not enough to draw a drawing. You still need to have experience in creating such structures and know many subtleties.
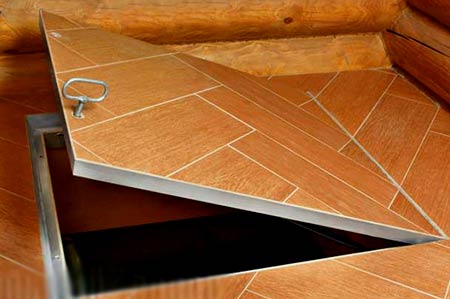
Invisible hatch
A basement floor entrance can be both secure and safe. If you glue tiles on it, the same as on the rest of the floor, hide the hinges down and remove the handle, then the closed hatch will be difficult to see. However, not all so simple.
To begin with, the cover should have the shape of a trough, the upper edges of which are located on the same level with the surface of the frame corners. Inside this trough, reinforcement should be installed, which creates a reinforcing mesh. After installing the hatch in the opening, it is necessary to fill the trough with concrete or cement mortar to the very level. Only after the cover has been reinforced with mortar can tiles or other floor coverings be laid. Without this procedure, the lid will bend under the weight of the person, and the material will crack.
When performing the tie, it is necessary to fix the tube against the key of the lock. Then it will be possible to insert the T-shaped key through the tile and turn the latch. The same key can simultaneously serve as a handle for opening the hatch. People living in the house will not stumble over the protruding parts of the hatch. The key hole can be hidden by a plug.
Invisible hatch to the basement.
Advice! It is advisable that the master lay tiles on the floor at once throughout the room, and the seams fall on the edges of the hatch cover. Then no one, except the owners, will guess about the existence of the entrance to the basement.
A safe, beautiful, reliable and inconspicuous hatch in a house with a basement is a technical highlight. You will always feel a flat floor surface under your feet and the absence of protruding elements.
Basement hatch for tiles.
Additional components of comfort
A story about a reinforced and insulated, perfectly flat and inconspicuous hatch to the basement would be incomplete without mentioning some of its features. First of all, it is smoothness and ease with which you can open it without any effort. This effect is achieved exclusively by equipping the cover with gas shock absorbers.
The hatch manufacturers calculate the shock absorber load based on the weight and dimensions of the hatch. The hinges hidden under the bezel and the shock absorbers work in tandem. They simultaneously lift the lid straight up first, and only then tilt it to the side to a vertical position.
Advice! If the outer edges of the tile or laminate are cut inward, then when the cover is opened on the gas shock absorbers, the facing surface will not rub at the joints with minimal gaps.
The hatch cover and frame must fit snugly together. This fit provides a rubber seal around the entire contour. If you decide to make or draft such a hatch, then bonnet hinges and car boot shock absorbers can be very useful to you.
Do it yourself, trust or explain to the master, or maybe buy a finished product - you choose. As well as using it with pleasure.
Do-it-yourself cellar hatch.
Almost every owner of a private house builds a basement in his own home for storing canned food, vegetables from the garden and other products. A reliable hatch to the basement allows you to ensure a lower temperature and optimal humidity in the cellar. Often the entrance is located on the floor in the kitchen or in the hallway of the house.
The access to the cellar can be closed either with a full-fledged door or with a floor hatch. The second option is more acceptable, since floor hatches save space in the living space. The entrance to the basement should fit into the interior of the house and not stand out on the floor with a rectangular spot. The floor invisible hatch can hide the existence of the cellar from prying eyes. Such doors completely merge with the flooring in the room, often they do not even have handles or hinges on them.
Most hatches are rectangular, although a semi-circular basement door can be installed if desired. In addition, the material of the cover varies. Doors are made of wood, plywood or metal.
Technical requirements
The choice of a place for installing the access door must be made based on the following rules:
- The entrance should be located in an inconspicuous place, but not near a wall. This requirement is due to the fact that the perpendicular surface will prevent the hatch flaps from opening.
- If the entrance to the basement is located in the kitchen, then it should be located in a place where no kitchen furniture is planned to be installed. The open hatch cover should not touch tables, pedestals and headset elements.
- The door leaf must be able to support the weight of a person. It is best to reinforce it with additional iron partitions or a frame.
The hatch in the floor must be sized to fit the owner. The minimum area of such a manhole is 75x75 cm. With a smaller opening, lowering and removing products from the basement will be extremely problematic. It is worth immediately foreseeing the shape and location of the handle.
The entrance to the cellar is equipped with special supports, on which shutters are later installed. For safety, it is best to attach at least four posts.
The manhole must be hermetically closed, otherwise cold air will seep into the living space. In addition, the weight of the manhole cover must be taken into account. If it turns out to be too heavy, then it is supplied with special springs or an electric drive for more convenient operation.
Design features
Ordinary door hinges can be used to attach the basement hatch. These are reliable fasteners that require a minimum of effort and cost. It is advisable to use them only for a light wooden cover.
Another way to organize the entrance is to use hood hinges from the car in the hatch structure. Spring-loaded latches allow the door to be secured in a stable position. Thanks to the lifting mechanism, even a rather weighty door opens without much effort.
The metal construction of the door makes it not only sturdy, but also prohibitively heavy. In this case, the hinges must be equipped with shock absorbers. In addition, you can build a semblance of a safe door using an electric motor and several aluminum pipes. But such a cover can only be opened if the engine is connected to a power source.
Operation and care
A basement door needs periodic maintenance as it is exposed to extreme temperature fluctuations and high humidity. Hinges and sunroof absorbers should be thoroughly lubricated about once a year.
From time to time, solutions are applied to a wooden door, which repel moisture and prevent the development of fungus. The metal hatch should be cleaned of rust and painted.
How to choose material and type of construction
When constructing an entrance to the basement, the material of the door is selected based on its location. If the manhole is installed in the corridor, and people will walk on it every day, then the cover is made of sheet metal to ensure reliability and safety.
If the choice of a place for installation fell on a remote corner of the kitchen, then you can make a door made of wood. This option is suitable if the floor is covered with parquet or wooden board.
In terms of design features, it is difficult to give universal advice. The most important thing is that the hatch cover does not interfere with movement around the room, withstand the weight of the owners and does not attract attention.
Making a basement hatch with your own hands
For self-production of a wooden hatch to the basement with shock absorbers, we need:
- saw;
- hammer;
- brush;
- screwdriver.
Necessary materials:
- flooring boards;
- beam for supports;
- plywood;
- nails, screws;
- hinges with shock absorbers and a handle.
All work is done in the following order:
- First, from the side of the manhole, supports are nailed to the flooring from the boards, on which the cover will rest.
- With the help of a circular saw, boards are cut into blanks, the length of which will be 0.5-1 cm less than the width of the hatch box.
- A rectangle is cut out of plywood. Here you need to subtract 1 cm for the gaps between the door and the floor.
- All wooden parts are covered with linseed oil, which repels moisture and prevents the development of fungus.
- On a layer of plywood, lathing slats are stuffed. A layer of insulation should be placed between the rails. Boards are attached on top of the rails.
It is important that the height of the hatch matches the height of the floor. It is advisable to select a material that will match in width and thickness with the boards laid on the floor. The manufacture of hatches of this design does not require large expenditures or experience in construction.
Size calculation
Basement entrance drawings are drawn up individually. It is recommended to follow the standards when calculating the dimensions of the manhole.
The optimal size of the hatch is 80x80 cm. In this case, the doors should be no more than 79x79 cm. It is better to choose a plywood sheet with a thickness of at least 10 mm, and a layer of wood - 25 mm. For the manufacture of a metal hatch, it is worth using sheet steel 1-3 mm.
Features of installation under the tiles
The best way to hide a cellar hatch is to disguise it as a tile. For this, the manhole cover is made in a special way.
A workpiece corresponding to the size of the hatch is cut from sheet steel. Corners are welded along its perimeter, which form the sides. Reinforcement is welded inside the walls to form the tiles for the tiles. After installing the hatch, the solution is poured onto the fittings. Tiles are laid on top.
For a more convenient descent into such basements, it would be very good to make a special floor-mounted safe hidden hatch into the basement under the laminate - a device designed to provide convenient and safe access to the premises under the house.
The original disguise of the basement hatch
It is necessary to clarify that it is multifunctional and its presence has a number of positive qualities - it is possible to store old things, food and supplies, as well as construction tools, household materials, kitchen utensils and other property in it all year round, which allows you not to occupy unnecessary space. In addition, storing things in the basement is much more convenient than in the barn, since they will always be in close proximity to you.
One of the prerequisites for a basement is to maintain the same temperature conditions throughout the year. This goal can be achieved if you correctly make a modern floor hatch into the basement under the laminate in compliance with all basic technologies, which will provide the basement with good thermal insulation.
The names of the elements and the design of the hatch to the basement
It is not at all necessary to make a floor insulated hatch to the basement for a laminate, the corresponding order can be left in the welding shop. The only possible problem is that specialists may ask you to purchase a number of necessary building materials on your own, since they are not kept in workshops or in construction warehouses.
It is best to purchase all the materials taking into account some stock, especially since all excess leftovers that are formed after construction will be returned to you along with the finished hatch.
Custom basement hatch option
So, in order to make a modern safe floor hatch for a laminate in a workshop, you will need:
- standard hinges for entrance doors;
- a lock with a snap-on mechanism;
- several metal corners;
- metal pipe (for the frame);
- steel or aluminum material in the form of sheets;
- a metal rod, which will be required in the process of constructing a hatch for the manufacture of a removable-type key handle;
- gypsum plasterboard;
- ordinary shock absorbers from a car;
- metal nuts.
Read also
The device of floors in a brick house
Also, the masters in the welding workshop will first need to make a detailed diagram or draw an accurate drawing in order to build a high-quality floor hatch in the floor under the laminate in the future. 
It is virtually impossible to compose it from scratch on your own, if you do not have certain knowledge in the field of calculating the permissible loads on metal structures and skills in construction design.
However, on the Internet today you can find a number of ready-made projects of hatches in the floor, which are freely available. It is not difficult to partially modify or transform them, taking into account individual preferences and wishes.
Self-made basement hatch
First, let's take a closer look at what requirements a safe basement hatch must meet if you decide to make it yourself, having previously drawn a detailed design drawing:
Before proceeding with the installation of the floor hatch, which you decided to build yourself, you must prepare all the necessary tools and materials in advance:
The original decor of the basement hatch in a wooden house
- corners made of metal;
- sheet metal material with an approximate thickness of 4-6 mm;
- rubber;
- welding machine and all accompanying elements for its safe operation;
- electrodes;
- self-tapping screws;
- screwdriver or screwdriver;
- grinder;
- electric drill;
- tape measure or other measuring materials.
Before proceeding directly to the construction of the hatch with your own hands, you first need to make a special frame. It must be built taking into account all proportions and technologies so that it fits perfectly into the overall design.

Basement hatch design and drawing
To do this, using a welding machine from corners and other metal parts, you can design a blank for the main part of the hatch structure, its shape should be in the form of a square or rectangle.
It is necessary to leave a small gap between the part of the frame and the opening, which will be required for the installation of the sealant material. The optimum gap width is about 5 mm.
On the further course of work, you can make the following notes and give some general advice:

Details to which you need to pay special attention when making a basement hatch
Regardless of what you decide to do - order the manufacture of a hatch in the welding shop or make it yourself, you will need to adhere to the following general recommendations:
- When choosing metal corners, you should pay attention to the fact that they are strong enough, since this is the part that will take on significant loads. The best option is to use a corner with a thickness of at least 5 mm, such dimensions will allow it to maintain its geometry and not undergo deformation even under very strong loads.
- If, when installing the hatch, you will be guided by automobile shock absorbers, then it will be necessary to ensure that the cover is securely fixed and does not fly out during operation, otherwise this can lead to various injuries.

An example of an installed sunroof cover with shock absorbers
If the shock absorber can't cope with pushing the cover outward, the hatch door simply won't be able to open. Therefore, the power of the shock absorber must be carefully examined: when the key is turned, the cover must rise easily and smoothly. The power of the shock absorbers, as well as their number, can only be accurately determined during test tests of the functioning of the structure. It is also necessary to correctly distribute their location so that the lid rises strictly at an angle of 90 °, otherwise the mechanism will quickly become unusable during operation.
- You will need to find the right balance in the location of the drywall panel. If the height is too low, then the recessed cover will not open with the tiles. If the height, on the contrary, is too high, then it will be above the floor surface.

Basement hatch installation diagram
- It is best to use the technology of concealed mounting of the hinge, by analogy with how it is done on vertical doors. However, a difficulty arises with the basement hatch, due to the fact that the door has a lining, the thickness of which can reach 1.5 cm. For this, it is necessary to take into account the minimum requirements for the gap that must be left. The process requires a separate study and calculation regarding the design of the loop, with which qualified specialists can help.
- All gaps should not have direct contact with other elements of the hatch when it is opened, otherwise it threatens to chip the lining in the hinge area.

Example of mounting fasteners
When using the above-described technology for mounting hidden hinges, well-thought-out gaps with equal distances between the cladding elements must be formed.
- The ideal design is one that has a swing-front opening. In other words, the hatch cover should initially go up, and then move to the side. If you follow all of the above recommendations, then you should get exactly the option that is considered the most reliable, and will provide you with the durability of the basement hatch.
In conclusion, I would like to note that if you make and install a hatch with high quality and competently, then it will save free space inside the dwelling, and with the proper approach, completely hide the presence of a descent, so as not to harm the design and decorative attractiveness of the dwelling. For many homeowners, this is a must.