DIY table shelf. How to make wooden shelves
Finding storage space is one of the main problems that people face while thinking through a design, and after that too. Sometimes, even in a large room, another bulky cabinet will look out of place, but what if you need to place a collection of figurines or a dozen books? Salvation in such a situation is wall shelves, which we will talk about today.
Types of shelves
Wall shelves, although they are a variety in themselves, also differ in location. Conventionally, they are divided into the following types:
The lightest and most common option, which is attached to flat wall. But precisely because of their simplicity, they provide a wide field for the flight of imagination: shelves of different geometric shapes, sizes, arranged in the form of a honeycomb or creating complex compositions.
Such structures can become a single board nailed to a wall, or form the silhouette of a tree, with each “branch” serving as storage. Bookshelves can be inclined or asymmetrical. In the ocean of interesting ideas, there are even round ones, only in the case of unusual figures it is necessary to think through every moment in advance: location, filling, support points.

This place is usually empty due to its impracticality, but corner shelves will not only rehabilitate the space, but will also help transform the interior. Fastening is carried out on two adjacent adjacent walls. In this case, not only the internal, but also the external corner can be used.
The variability in the design of corner wall shelves depends more on the materials and decor, but even this solution itself looks unusual. More often, shelves are used for books or household items in the bathroom, as well as in storage rooms.

As the name implies, these shelves are not attached directly to the wall, but are suspended on ropes from the ceiling or beam. This design is not very stable, so it is used for storing books rather than crystal vases. But it is ideal for creating original accents in a room.
Either one shelf or several can be installed. The first option is often created in the form of a triangle or the shelf is placed in a circle. The main thing is to make sure that the storage is reliable.


Materials for wall shelves
A wooden board nailed to the wall is the simplest shelf option that immediately comes to mind. But for modern design this is not enough. The choice of material, even for this simple product, is quite wide - as are their capabilities.
Wood and derivatives
Even if this is an obvious basis, it should not be dismissed out of hand. Complex shapes and fastenings will help to diversify a wooden wall shelf. For minimalism or loft, such a solution would be very appropriate. And if you want to fit an element into classic interior, it is recommended to pre-process the parts, and maybe even decorate them with carvings.
To save on material, you can use MDF, chipboard or plywood - beautiful, simple, practical.


Metal
But metal wall shelves will definitely attract attention and fit harmoniously into the interior, especially if it is high-tech, fusion or, as an option, minimalism. Only their installation will require special skills.
This foundation has high characteristics - durability, reliability, strength. And pre-treatment will save you from corrosion.

Plastic
Cheap, pliable, universal material, which can look simple or luxurious, imitating natural options, but leveling out their shortcomings. Especially if such a shelf on the wall is filled with objects, so that guests will not have the opportunity to take a closer look at its details. For the bathroom - a very good solution!


Glass or mirror
This foundation has a significant drawback - fragility. A sharp push or blow can damage the shelf, but this situation will not arise when storing light items. Is it worth mentioning how elegant glass looks and how glamorous a mirror surface is? This will give the interior a feeling of weightlessness.

What types of fastenings are there?
You will also have to choose how to attach the shelf to the wall yourself - from three options. The reliability and mobility of the design depends on your decision.
Installation is done with dowels or anchors to the wall. This ensures a strong fixation of the entire product, increasing its load-carrying capacity and strength. If the shelves are intended to store heavy items, then this type is perfect. But there is a big disadvantage - it is very difficult to dismantle it without consequences for the wall or structure.

Moderately rigid mount brackets and mounting hooks, which is easy to do at home, unlike the first type. If necessary, they can be dismantled without damaging the shelf, after which a new one can be installed.

Fully in line with modern trends towards functionality and mobility, such wall shelves are installed according to the principle of extension: the lower tiers become a support for the upper ones. Various combinations of shades or shapes that complement each other look appropriate.

Selecting shelves to match your interior style
With high-quality work, shelves turn into full-fledged furniture, which, like any other item, must be harmoniously integrated into the style of the room.
Modern style
Everything here is simple and at the same time varied: both laconic products made from different materials and entire ensembles of various geometric shapes are suitable. Instead of empty decoration - conceptual aesthetics. The priority is modular or mobile types of wall shelves.
It is necessary to focus on the decoration of the walls: in the case of a neutral coating, you can fit in bright designs, and on the side with a bright finish it is better to do without shelves.


Classic style
You won't be able to do much in the classic style. Wooden shelves on a flat wall, or, in extreme cases, corner shelves. Brackets can be brought to the fore if they are used and fit the design.


Provence
Provence also makes similar demands. Only the processing of the base needs to be approached more carefully. First, use wood or its derivatives. Secondly, cover them with white paint and, if possible, create the effect antique furniture. Some carelessness in installation will add charm to the structure, but we must not forget about its strength.


Minimalism
To begin with, we note that with this style it is unlikely that it will be possible to put a lot of “small things” on the open shelves - that’s why it is minimalism. To accommodate many items, it is recommended to provide shelves with doors, thereby hiding disharmony from view. Glass or wooden surfaces look good - flat, smooth, directed strictly horizontally.


Loft
The freedom-loving loft offers us the greatest variety. At the same time, it is not at all necessary to fanatically polish the boards to perfection - slight negligence is quite organically combined with brick walls, characteristic of this style.
An excellent option is shelves suspended on a thick rope or a corner structure based on a pipe brought to the fore. In general, the loft allows you to turn the disadvantages of space into advantages, and technical elements into decorative and aesthetic ones.


Shelf decor
In addition to choosing wall shelves with an interesting design, they can also be further decorated for greater effect. To avoid the effect of clutter, make sure that the practical content of the products does not conflict with the details.
The simplest option that is suitable for standard wooden shelves is surface decoration. Here you can use all available tools: stencils, decoupage, decorative tape, and so on. This solution will look good on neutral walls, for example, painted in White color.
The Provence style interior is characterized by the use of textile elements, so why not decorate the shelves with them, laying out several beautifully hanging scarves with patterns? Cozy and practical.
Candles placed singly or in groups will give you a romantic mood. However, you can experiment with light sources by entering some modern tendencies. For example, wall shelves with backlights—mounted lamps that softly illuminate the parts located on them—look unusual.
Tubular fasteners on shelves can be used as a kind of “hanger”: for example, for a lamp, towels or garland. With a little effort, a simple storage space turns into graceful element interior


It would seem such a simple product, but there are so many options! But not all of them are easy to do on your own and, let’s face it, even a simple look requires certain skills. Before you move on to creating a shelf with your own hands, read the basic recommendations that will help beginners in furniture making or experienced craftsmen.
So, before the main process, you need to think through the design in detail and make a sketch. Determine for yourself the purpose of installing the shelf, the expected things that will be stored on it, location, shape and size.
Having assessed the load, select the material and method of fastening. After this, markings are made on the surface of the base, and the material is cut.
The resulting modules are assembled, repeated measurements are taken, which are compared with the markings for fasteners. Next is carried out finishing elements, namely sanding, tightening and painting, if necessary.
Fasteners are installed on the wall surface and on the shelf, after which the parts are secured, as well as level adjustment with final fastening.


In addition to the options listed, we present you with 30 more photos with ideas for wall shelves that will help you decide on interesting solution. Inspiration and beautiful interiors!
A place for books, souvenirs, and trinkets dear to the heart - this is the main purpose of shelves on the wall. Some have a collection of candles on them, some have volumes of their favorite poet, and some keep photo albums on the shelves. The important thing is that the shelves themselves should be no less aesthetically pleasing than the objects stored on them.
Making a shelf out of wood is the first thing that comes to mind when self-production shelves Indeed, this option is the most common.

Wooden shelves are good because of the availability and cheapness of the material, ease of processing, and the ability to experiment with design. And you can start learning how to make such creative designs with a simple and universal shelf, which will not be superfluous in the kitchen, in the living room or in the nursery, and other options for its placement can be considered.
Shelf materials:
- Wooden scraps of different lengths;
- Rope cut;
- 5 furniture panels;
- Wall fasteners;
- 2 rope rings;
- Jigsaw;
- Drill;
- Roulette;
- Pencil.
You need to make holes on the shelves (boards). They should be drilled at a distance of 6 cm from the edge, and 12 cm between each other.
Wooden scraps need to be sawn, their length can be different, but the height needs to be the same. Inside the sawn scraps, you need to drill holes for the ropes (through holes).
The lower knots of the ropes are tied first. The bottom shield (bottom shelf) is strung on them; between the shields along the edges there will be stacks of scraps as a gap between the shelves. It is better to divide all the scraps into parts, and lay out the same number of equal sections between each floor of the shelf.

The procedure is repeated, above the highest shelf on the wall the ropes are tied in knots. This must be done firmly so that wall structure it could not be deformed either with one’s own hands or by any other forceful action.
You will get a nice shelf on ropes inside stacks of scraps; you can place it in any room.
DIY wooden shelf, the simplest way (video)
Chipboard shelves on the wall
Chipboard is a chipboard, a truly universal material for construction work. The dimensions of the slab and its flat surface allow you to make various designs with your own hands, including wall shelves.
Perhaps only cutting chipboard causes difficulties, since the material is impregnated with resins. Most suitable tool for working with chipboard – an electric jigsaw.


The following tips for working with this material will not be superfluous::
- For wall shelves, laminated chipboards are often purchased;
- Often, self-made shelves are covered with laminated film or paper, imitating various patterns (including natural ones);
- To easily tighten screws and self-tapping screws in a chipboard structure, you need to acquire an electric drill;
- In the kitchen, shelves from this material are often made, as they are convenient for storing containers with spices, cereals and pasta, jars with herbs collected with your own hands;
- In the hallway, such shelves serve as a place to store important household items;
- Such a shelf on the wall in the nursery may serve the purpose of book storage.
In small closets, which are included in the layout of many apartments, you can make original shelves for household needs - with your own hands, quickly and inexpensively.
Round shelves on the wall
Round cardboard shelves for the kitchen or bathroom are the rage in interior fashion. They are usually made from cardboard and plastic pipe, which you cut with your own hands into circles 10-15 cm wide with a saw. The edges of the circles are sanded with sandpaper, and then future shelves are painted over in several layers.

The results are quite original round shelves, very suitable for the kitchen. interesting option registration You can store in them:
- Kitchen towels;
- Various brushes and sponges;
- Decorative trinkets;
- Herbal bags for making your own tea;
- Other beautiful kitchen gadgets.
In the bathroom, round, unusual and very convenient shelves on the wall will also be appropriate: jars of cosmetics, towels, washcloths can also be stored in these cute shelves.
How to make a round shelf (video)
Square shelves on the wall
Wall compositions made from square shelves on the wall in the living room look great. Shelves of different sizes are painted in the same color, or perhaps in contrasting ones, and are combined into one wall pattern - small ones with large ones in one line, vertically or horizontally, diagonally.
Square shelves are usually small and difficult to accommodate many items. Most often these are various souvenirs, miniature vases, books.
Often these shelves are decorated with antiques and vintage items.
And to make such an interior decoration with your own hands, you can use standard materials. In most cases, wood is painted with matte bright paint and varnished. Or a self-adhesive film decorates the surface of such shelves.


Small shelves on the wall
The kitchen wall often requires small shelves. They do not take up space, do not burden the interior, but emphasize the overall mood of the kitchen. A wall shelf can be used to decorate a room.
If the shelf is made for the kitchen, you can place on it:
- Bright spice jars;
- Cookbooks and notebooks;
- Canvas bags with spices;
- Beautiful dishes.
You can make such shelves from wood, plastic, glass, and even a stack of painted and glued books.
Designer shelves on the wall
Such designs are rarely used in the kitchen, yet these exquisite things often decorate the living room, office, and nursery.

Nowadays, wall shelves in the form of:
- Labyrinth;
- Asymmetries;
- Upside-down book shelves;
- Modules;
- Forged structures in Provencal style.
Some shelves seem to continue the furniture, some are like protrusions on wallpaper, so they are disguised as a wall. There are fancy shelves that are made to order; they often echo the pattern of curtains or the pattern of parquet.
DIY bookshelf (video)
Conclusion
Shelves for the kitchen, living room, or nursery - you can make all of them yourself, armed with ideas from the Internet and your own imagination. Of course, such designs will outperform their store-bought counterparts due to their hand-made origin. And in monetary terms they can be cheaper.
Examples of shelves for the home with your own hands (photo)


In small rooms it is always important to use every centimeter of space. Shelves on the walls allow you to place almost all the little things: from cosmetics, decorative elements, flowers to heavy books. And most importantly, they are inexpensive, easy to hang with your own hands and even make. We have prepared interesting ideas shelves with photographs.
For the simplest shelf you don’t need much: one laminated chipboard board and two brackets will cost less than 500 rubles. It can support up to 50 kg when using high-quality brackets. It should be remembered that beautiful decorative brackets are not designed to hold a lot of weight.
- For attachment to concrete wall use standard dowel-nails 6x60 mm. The shelf can be hung more securely on anchors.
- If the wall is made of plasterboard, fastening is done using special dowels (butterflies, umbrellas). At the same time, the maximum load is significantly reduced: it is no longer possible to store heavy books.
- For walls made of cellular concrete When fastening, special expansion anchors are used.
We use every corner
In the kitchen, narrow shelves can be placed above dining table in several rows. This will free up the table.


The space in the toilet behind the toilet is usually not used in any way; pipes run there. If you install narrow shelves, they will not disturb anyone, and a new place for storing household chemicals will appear.
 Open shelves behind the toilet.
  They can be closed with doors.
  Or roller shutters.
In narrow rooms, shelves are mounted between two walls. 
For books
 Horizontal book shelves require holders or side walls. Therefore, they often make small vertical shelves, diagonal, corner ones - this way the books will not fall.
  In a schoolchild's children's room, the shelves are located above desk. They should be of a convenient size and reliable fastening so that all textbooks fit.


Shelves from IKEA
 IKEA LACK.
A universal solution is the IKEA LACK shelves. Why and how they were not used. They are sold in several versions: 110, 190, 30 cm, in white, black, red, wood. There is also a 30 cm vertical shelf module. With a base thickness of 5 cm, classic colors and no visible fasteners, they have a modern look that matches and complements IKEA cabinets.
LACK can be mounted evenly in a row, offset, in corners, at an angle; narrow shelves can be mounted vertically and used as limiters.
Corner shelves for small items. Mounting to adjacent walls. Shelf module in the bathroom.
Shoe storage. Storage in the toilet. Mounting above the desktop with offset.
A hidden metal bracket is attached to the wall, a shelf is placed on it and secured with two small screws from below. Maximum load 7-15 kg, depending on length and base.
Decorative
Decorative shelves are not designed for heavy loads. They are needed for arranging accessories in the style of the interior, flowers, paintings.


Original shelves made from scrap materials

If you can’t find suitable shelves on sale or you have limited finances, you can make them yourself. To do this you will need several boards, screw ties and standard set tools. When making original designer shelves, the choice of material depends only on your imagination. Simple shelves are made of boards or chipboard. In the latter option, be sure to cover the ends with an edge. The shape and size of homemade shelves can be absolutely any. If in the hallway or pantry you can give preference to simple designs, then in the kitchen or living room it is better to come up with something original. For example, for the kitchen you can make vintage shelves for spices or original bottle shelves. 
Shelves are open place for storage without door. This must be taken into account if you want to make a large shelving unit covering the entire wall. In the living room, once filled with objects, they will look ugly, so it is better to use them there only for decorative elements. Using shelves in the interior will not only help put things in their places, but also add originality to the interior.
Wall shelves can open up new storage options or provide a cute backdrop for home decor. Small and large, book and kitchen, with hidden fastening and cantilever - almost any shelves can be made with your own hands, rather than bought in a store. In this material we presented 3 simple and budget ways making shelves and shelving for various purposes, as well as 70 photo ideas for inspiration.
Universal hanging shelf
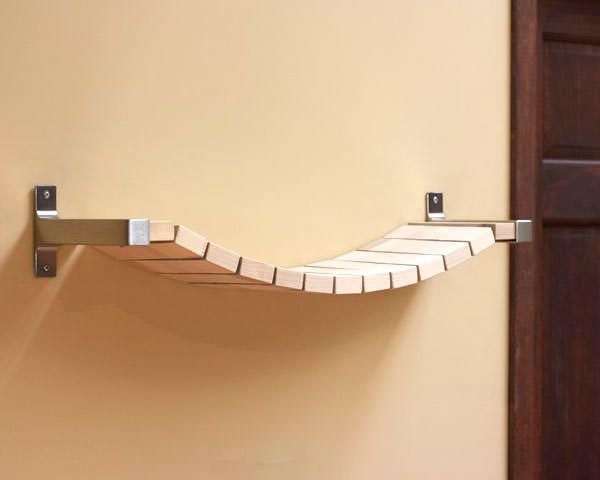
Hanging shelves on ropes have become very popular for good reason. They look much more impressive than regular shelves, and at the same time they are truly functional and versatile. They can be adapted for storing heavy items such as dishes or flower pots, as well as light accessories. And thanks to the side holders, the shelf can also be used to store books.
DIY hanging kitchen shelf made from wooden planks and ropes


This cabinet shelf is suspended from the ceiling with ropes 2 cm thick. You can make such a shelf using our instructions with the only difference that in this case the hooks are attached to the ceiling and not to the wall

Such homemade shelf made of rough wood and ropes will look great in the interior Scandinavian style, eco and country style, loft and rustic

And now we propose to move on to practice and make such a universal shelf with your own hands.

You will need:
- 4 wooden boards(2.5 cm thick and any desired length, for example, 1 m long as in our master class);
- Rope rope about 8 mm thick and 4 m long;
- Drill and feather drill with a diameter of 10 mm (the drill should be slightly thicker than a rope);
- 2 steel hooks and dowels for concrete with a diameter of 8 mm;
- Pencil.

Basic materials needed to make a shelf
Master Class:
- Drill and feather drill drill a hole in each corner of the board (draw the markings with a pencil first). Remember that the holes should not be located too close to the edges.

- Paint your board with paint/stain, and then, when the coating is dry, treat it with matte varnish or wax (this is not necessary, but it is advisable if you want to protect the shelf from wet cleaning and scratches).

- If you want to preserve the natural color and texture of the wood, then simply sand the board on all sides with coarse sandpaper or a sander.

- Install the steel hooks on the wall: first make marks using a level, then use a hammer drill with an 8 mm concrete drill to drill holes, insert 8 mm dowels into the holes and finally screw the hooks into them.

- Cut your 4 meter rope into 4 equal 1 meter lengths. Pass the ropes through the holes in the board, and then their ends with reverse side tie the boards in a knot as shown in the photo below.

- Now that you have a pair of ropes on each short side of the board, tie the ends of each pair into a knot and hang them on the hooks. Make sure the shelf hangs level and adjust the top knots if necessary. By the way, in the future you will be able to adjust the length of the ropes using the upper knots.

You can experiment a little with methods of attaching ropes and make not only shelves, but even hanging racks with your own hands.

If you have an unnecessary drawer from a chest of drawers, then you can use it to make this beautiful shelf with dividers. You can store something in it that should always be at hand or in sight.


You will need:
- Box;
- Paint the desired color and brush;
- Wax or matte varnish;
- Wooden board or plywood of small thickness;
- Wood glue or liquid nails;
- Shelf hinges;
- Two 8 mm dowels and screws for them;
- Hammer and concrete drill 8 mm;
- Phillips screwdriver;
- Jigsaw;
- Medium grit sandpaper;
- A piece of wallpaper for decorating the back wall;
- Wood putty.
Master Class:
- Use a jigsaw to cut the dividers out of the plywood/wooden board to the desired size, then sand them on all sides with sandpaper.
- If the drawer has handles, remove them and fill the holes with putty.
- Paint the box in 2-3 layers, allowing each layer to dry completely. If you want to achieve a distressed effect, rub the drawer in some places with sandpaper.
- Glue a piece of wallpaper cut exactly to size onto the back wall of the shelf. You can glue the wallpaper using wallpaper glue or any universal glue.

- Install the dividers using wood glue or liquid nails.

- Next, coat the box with wax or matte varnish to protect the top coating from damage and moisture.
- Nail or screw two metal loops onto the back of the shelf.
- Make two holes on the wall, having previously made markings using a level, insert dowels into the holes, and screw screws into them, but not all the way, but leaving about 5 mm. Well, that's all, now you can hang the shelf on the wall.

Shelf-hanger from... the back of a chair
If you have an old one wooden chair, or rather the back of a chair, then you can make a nice shelf with hooks out of it. It can also be hung in the kitchen for storage. kitchen towels and aprons, both in the bathroom and in the hallway.
This is how the back of the chair was before the alteration...

...and this is what I became after!

You will need:
- Wooden chair back;
- A small board made of wood or plywood;
- Three metal hooks;
- Wood pendulum saw, grinder or jigsaw;
- 5 or more wood screws and a screwdriver;
- Drill and drill bit 3 mm;
- Medium-grit sandpaper (for removing old varnish/paint from the back of a chair) and coarse-grit sandpaper (for sanding a wooden shelf);
- Black paint (if you want to create a worn effect), white paint or any other desired color, brush;
- Wax or matte varnish;
- Wood putty;
- Wood glue.
Master Class:
- Cut the back of the chair to the desired size, after marking it.

- In this project, it worked well for making the top shelf. wooden base former hanger. You can use a board made of wood or plywood - you need to cut it to the required size, and then sand all the ends. If possible, it is advisable to shape the edges of the workpiece with a router.

- Use medium-grain sandpaper (for example, 220 microns) to remove the old coating from the back of the chair, then paint both parts with black paint and leave to dry. This is necessary so that in the future the black layer will show through the abrasions of the top coating.
- It's time to attach the board to the back of the chair. To do this, drill a small hole from each edge (from the outside, where you want to fasten the parts), then screw in the screws, drowning them flush. If your chair back has vertical slats like in this project, then it is advisable to attach them to the shelf with wood glue.

- Mask the attachment points with wood putty, following the manufacturer's instructions.

- Now screw the hooks to the bottom rail of your shelf, having previously made markings. If necessary, the hooks can be painted (before attaching to the craft).

- If desired, screw a sign above each hook. The sign itself can also be decorated with numbers using a stencil, a small brush and black acrylic paint. However, you can come up with your own way to decorate the shelf.
- Paint the entire craft white (or whatever color you choose), and then rub sandpaper in some areas to expose the black layer of paint.
- Finally, coat the shelf with a matte varnish or, better yet, wax it to protect the top coat from chips, moisture, and scratches.

In fact, chairs can be used to make shelves for the most different configurations. Here are some more photo ideas for your inspiration.

Bathroom shelf from the back of a chair


Want to make a shoe rack without using a jigsaw or drill? It's possible, you just need to find/purchase wooden pallet(pallet) and modify it a little.
- Used pallets are often given away for free or sold for 100-200 rubles on flea market sites like Avito. You can also ask around for used pallets at local construction sites, warehouses and wholesale stores. New pallets can be ordered in specialized online stores for only 200-250 rubles.
How to turn it with your own hands old pallet in this cute country style shoe rack? Take some free time and follow the following step-by-step instructions.

You will need:
- Wooden pallet;
- Manual/electric grinding machine with a triangular and standard nozzle or a grinder. If you don't have a machine, use a small one wooden block and wrap it with sandpaper;
- Sandpaper with grits, 40, 80 and 120;
- Brush;
- Gloves;
- Soft rags;
- Protective dust mask;
- Moisture-proof primer for wood (preferably with an antiseptic);
- Paint/stain and brush;
- Wax or matte varnish.
Master Class:
- Sand your pallet on all sides or just the part that will be visible: first use sandpaper with coarse grit to remove the coarsest irregularities, knots and dirt. Then continue sanding with medium to fine grit sandpaper. Next, remove the dust with a brush, vacuum the entire pallet and finally wipe it with a damp cloth.

This is what your pallet will look like after sanding
- Apply a water-repellent primer to the entire (!) pallet. It will protect the wood from rotting and moisture that will drain from the shoes, and prepare the surface for painting.
- Once the primer is dry, start painting the shelf. You can paint the entire pallet or just the “front” part like in this project.

- When the paint is dry, coat the tray with matte varnish or wax. If you want to preserve the texture and pattern of wood, treat the pallet with a stain of the desired tone or completely cover the shelf with only matte varnish/wax.
- Using a stencil, acrylic paint and a brush, write “Shoes!” in the center of the top of the shelf. like in this project or any other word/drawing.

- The top of the shelf can be decorated indoor plants, for example, succulents in containers and buckets for baking bread.

- You can upgrade your shoe rack by integrating a bottom made of wood into the middle and top tiers. wooden planks(they just need to be cut into the right size and nail it down).
Here are some more photo ideas for making a shoe rack with your own hands.


With a little work with a nail puller, a hammer and a jigsaw, you can transform a tray into a kitchen shelf, display shelf, flower or tool rack.


Homemade kitchen shelf from a pallet

Homemade kitchen display shelf from a pallet


Display shelf made from a pallet in the living room

Photo gallery of ideas
If none of the methods we suggested for making a shelf appeal to you, we suggest looking for ideas in our photo gallery. Here we have collected other examples of wall shelves that you can make with your own hands from wooden boards, the same pallets, boxes and other readily available “lumber”.
Making your own corner shelf couldn't be easier. To make one shelf as in the photo below, cut out a triangular blank of the desired size and with the required angle (rarely internal corners walls are exactly 90 degrees) made of plywood or wood 1.5-2.5 cm thick, as well as two small support strips (the length of one strip should correspond to the leg of the triangular workpiece, and the length of the second strip should be calculated using the formula: leg length minus width first plank).

All parts need to be thoroughly sanded and then painted or simply treated with wax/varnish. Next, make the markup using building level both on the walls and on the slats (note that the holes will be through!). Drill holes in the walls, insert dowels into them, and then hang the supports using screws using the through-hole method. It is important to choose the correct screw length - it should be calculated using the formula: dowel length + thickness of support bar + screw diameter. Finally, all you have to do is install the shelves and secure them either with wood glue or wood nails/screws. If you want to hide the heads of the screws, use wood putty, and then paint over the “patches” with paint to match the shelf.

You can screw hooks for mugs into the bottom of the kitchen corner shelf

DIY Corner Bathroom Shelf

Homemade corner shelves of different sizes
To make a shelf out of a skateboard, you need to remove the wheels from it and then hang it on the wall using brackets.

Shelf in a baguette
A shelf framed by a frame is easy to make: first you need to put together a frame of boards according to the size of the frame, then you need to install several divider strips inside the box.


Shelf with flywheel hooks
If you have a simple wooden bathroom shelf, decorate it with cross ceramic faucet handles. More stylish thing It's hard to come up with!

Wall storage system
Boxes are almost ready-made shelves that you just need to hang on the wall.

From several boxes of a single type you can make a full-fledged modular system storage


Hanging shelves made of wooden boards and leather straps
From a wooden board and a couple of leather straps, you can make just such a stylish hanging shelf with your own hands.

Shelf for storing fruits and vegetables
As you know, some fruits and vegetables need to be stored at room temperature. But where can we find a place for this? Our answer is on the wall using a shelf like this made of wooden boards and metal baskets.

Pallet shelves
Roughly crafted from pallet wood, this mini shelf is perfect for storing bills and keys.

Here are some more ideas for shelves and wall organizers that you can make from pallets or pallet boards.


Homemade wine rack


The following video instructions will help you make a wine rack like in the photo above.
A win-win option for decorating any room is shelves. A multifunctional decor item that allows you to place a huge number of things so that they look neat. They occupy small space in the room due to placement on the walls and give it a more sophisticated look. Human imagination and hands can create the most unusual and beautiful shelf design that will harmoniously fit into the interior. Furniture stores provide a wide range of different design solutions, but why overpay if you can make shelves yourself.
A win-win option for decorating any room is shelves.
There are several types of shelves according to the type of their placement.
1) Floor-standing – installed on the floor. Tall structures are additionally attached to the wall. They are not stable, it is better to be safe. This type includes mainly shelves for shoes, flowers, for books, TV or small items and decorative elements. High floor shelves (more than 1 meter) are called racks.

A multifunctional decor item that allows you to place a huge number of things so that they look neat.
2) Wall-mounted – attached to the wall thanks to special fasteners. Designed for storing books, decorative elements, photo frames, family photo albums. In the kitchen, on the shelves there are often containers with spices or other kitchen utensils. In the bathroom, jars with toothbrushes and paste, combs, hair dryers, towels, etc. are installed on them. In the hallway, a wall shelf will be an excellent storage place for hats, gloves, umbrellas, and handbags.

Use in a bedroom or living room is also appropriate.
3) Suspended - they are suspended from ceiling beams, pipes running under the ceiling, or attached directly to the ceiling. Hanging models are more often used in the bathroom and kitchen, where the pipes are located under the ceiling and are not hidden in decorative boxes. Use in a bedroom or living room is also appropriate.

Designed for storing books, decorative elements, photo frames, family photo albums.
Design and construction. Types of products
The design of the shelf must be completely consistent with the interior of the room, otherwise it will look like an extra item. To avoid inconsistency, you need to choose the type that will harmoniously complement the interior.
| Types of shelves | Description |
| Classic style | Discreet minimalism and standard form are the main features of this type. They “fit” well into a classic interior, in offices, classrooms, and libraries. It’s easy to make a classic shelf with your own hands. Feel free to get to work. |
| Corner placement | Corner structures are made in a classic style. Convenient in rooms that have a small area (baths, kitchens), but also in large rooms they are appropriate. Corner shelves are divided into two types: internal and external. The second ones are installed on a protruding corner, this makes them unique. Their creation is somewhat more complicated than the classic ones, but not too much. |
| Modes | This type of shelves is a structure made of different materials of different lengths and widths. Modus shelves create a 3D effect due to their volume. Abstraction is the main feature of modes. Will decorate any room modern style. A well-designed project is easy to assemble, so you can make these shelves yourself. |
| Exclusive | This category can include all the unique shelves that have the most non-standard solutions. It’s not easy to create such a masterpiece yourself. But will you find the answer to the question of how to make a shelf exclusive? |

The design of the shelf must be completely consistent with the interior of the room, otherwise it will look like an extra item.
Choosing a material?
Traditionally, wood is used to make shelves, but metal, plastic, glass and even cardboard materials are also suitable. When choosing a material, you also need to rely on the interior of the room. Perhaps the things that will suit you are those that have already served you well and are simply lying in the pantry, then the cost of the shelf will be minimized.

Better with wood light shades gold is combined, and for dark shelves you can choose silver.
If you find an old ladder, then you will succeed original shelf for books. In this case, you just have to process appearance stairs and make fastenings. Shelf in rustic style ready for books. As you can see, making shelves on the wall with your own hands is simple and easy; the following examples will once again confirm this.

Traditionally, wood is used to make shelves, but metal, plastic, glass and even cardboard materials are also suitable.
Perhaps there is a large spool lying around in the pantry, on which a rope or wire was once wound. Now it makes a great floor shelf. The coil needs to be processed, all irregularities and roughness removed, and then covered with stain and varnish. If you want to paint it, then it is better to treat it with a primer, which will even out wooden surface, then the paint will adhere perfectly.

You can also use fabric and rope covers.
An old pallet that is just taking up space, treated, painted and placed vertically on the ground will become beautiful shelf For street flowers. They are used to create designs of various types. By sawing the pallet into pieces, you will get several shelves that can be hung on the wall, both outside and in the house. Here is another option on how to make shelves on the wall with your own hands, for your piggy bank.

Perhaps the things that will suit you are those that have already served you well and are simply lying in the pantry, then the cost of the shelf will be minimized.
Old water pipes that have been left gathering dust since the time of Stalin under the pretext “may be useful” have finally come in handy. These pipes, which have a vintage look, can be used to make an excellent shelf for books or other things.

Making shelves on the wall with your own hands is simple and easy; the following examples will once again confirm this.

Buy or make it yourself? That is the question
You don’t have to rack your brains and go on a trip to furniture stores so as not to find something that might suit you. The possibility that you will be able to find the right shelf is not excluded. But, most likely, it will be approximately similar to what you imagined, and its cost may also not be what you expected. To save yourself from disappointment and save money, you can make your own shelves. Why is this option better?
- As stated above - savings. Shelves made from materials you have around the house or old unwanted items will significantly reduce costs.
- The ability to create a unique, inimitable shelf design.
- Reliable assembly - robust design;
- Use of strong, reliable materials.

If you want to paint it, then it is better to treat it with a primer that will level the wooden surface, then the paint will adhere perfectly.
Materials needed to create a shelf with your own hands
To make a shelf, you can use boards, bars, impact-resistant types of glass, pipe remains, plastic parts, various wooden structures(food boxes, pallets, Soviet-era TVs), cardboard.

The option of applying drawings to the side parts of the shelf is also possible.
All parts of the shelf are attached to each other and traditionally use screws or nails for this. But there is rope method, when all components of the structure are connected in series with a rope. No less in an original way fastening each part of the shelf using bottles, preferably the same size. And if you place lanterns in bottles, the shelf will take on an extraordinary look.

You can find the most unexpected things in your pantry or attic that can be used as shelves, giving them a second life.
If you do not have the above materials, you should go to a hardware store to buy them. In the store you can also buy fasteners, stain, primer, paint, nails or screws and everything you need to make a shelf.

Visit a decorative store and you will realize that decorating a shelf is easy.
Required Tools
You can't assemble a shelf with your bare hands. We will talk about the tool that is useful for making a shelf below.
1) The very first woodworking tool that comes to mind is a jigsaw, but it will do just fine hand saw. A jigsaw is a convenient, dexterous, fast tool; with its help, blanks for a shelf will be made in a matter of minutes.
2) A grinding machine or sandpaper of different abrasiveness will help to sand the surface of each part of the shelf. A sanding machine will cope with this task quickly, unlike skins, which take time to work with.
3) Electric drill– helps to drill holes both in the components of the shelf and in the wall for fastening.
4) Screwdrivers or screwdriver - needed to screw in self-tapping screws, connecting the component parts of the shelf to each other. Evaluate the advisability of using a screwdriver if you need to tighten four self-tapping screws. You can handle them with a screwdriver.
5) Self-tapping screws, screws, confirmations – connecting elements. Upon completion of work on the shelf, they are masked with plugs matched to the color of the shelf.
6) Varnish for coating wood - this coating must be of high quality. The shelf will be used regularly, so its appearance should be preserved as long as possible. We recommend an alkyd wood varnish with a urethane additive, which provides strength.
7) Paint brush– necessary for applying paint and varnish coatings to the surface of the shelf. Choose a medium-sized brush.
8) Square - a special measuring tool, the design of which has a right angle. It allows you to check and position the shelf parts relative to each other at right angles. If you don’t have a square in your arsenal of tools, you can use available tools: ceramic tile, sheet of cardboard, photo frame, etc.
9) Hand router - this tool will help decorate the shelf with patterns and give straight lines non-standard shape. Decorative patterns will make the shelf even more beautiful.

You don’t have to rack your brains and go on a trip to furniture stores so as not to find something that might suit you.
How to make shelves on the wall with your own hands: step-by-step instructions
Let's consider making a classic wall shelf made of wood.
We determine the place. Where will the shelf be located? What material is needed to make it? Its shape, design and dimensions. If you use available materials to make it, use their size and quantity to determine the size. When buying materials, the situation is different; you buy as much as you need.

To save yourself from disappointment and save money, you can make your own shelves.
When choosing wooden boards, make sure that they are the same color. When processing wood, dark fibers appear more. This stage must be approached responsibly, otherwise you will end up with a shelf whose constituent parts will have different appearances.

Reliable assembly - robust design.
Marking and preparing shelf parts for assembly. The boards are laid on a flat surface for work, after which the markings are transferred to them according to the drawing.

To make a shelf, you can use boards, bars, impact-resistant types of glass, remnants of pipes, and plastic parts.
Check that the markings are applied correctly. Once you have ensured that the cut locations are indicated accurately, you can begin cutting.

All parts of the shelf are attached to each other and traditionally use screws or nails for this.
Time to start processing parts of the future shelf using sandpaper or a sanding machine. The surface of the wood must be smooth and free from roughness, so that paint coatings light as well.

If you do not have the above materials, you should go to a hardware store to buy them.
After the parts of the shelf have dried, you can begin assembly. Assembly begins with the bottom board, which is laid on a flat work surface. Markings are made on it for the holes. We retreat approximately 8-10 mm from the cut line of the board in two places and draw an even line parallel to the edge. Along the marked line we mark points at a distance of 5 centimeters from the edges of the board. Drill holes for self-tapping screws at these points. When the marks on the bottom shelf are ready, make the same markings on the top of the shelf. The holes are ready, all that remains is to screw in the screws. We take the bottom part of the shelf and install it perpendicular to the work surface. Then we attach the sidewalls and screw them on. We install the resulting structure with its lower part on the table and screw the upper part to the sides. We screw the fasteners to the sides on the back side adjacent to the wall.

You can't assemble a shelf with your bare hands.
Decoration
Decoration no less important stage in production bookshelves. Of course, you can leave it in the original video, but to add sophistication and uniqueness to your creation, you can use minimal decorative elements. Let's say the front parts of the shelves are covered with thin gold or silver strips, which are sold in all stores where decorative elements are offered. Gold goes better with light-colored wood, and for dark shelves you can choose silver. You can also use fabric and rope covers.

Decorative patterns will make the shelf even more beautiful.
The option of applying drawings to the side parts of the shelf is also possible. Drawings are applied with paint. They are made in the form of a mosaic from scrap materials (coffee, shells, rope). Visit a decorative store and you will realize that decorating a shelf is easy.

We install the resulting structure with its lower part on the table and screw the upper part to the sides.
Give free rein to your hands, turn on your imagination and decorate your home!

Decoration is an equally important stage in the manufacture of bookshelves.