Butterfly stencils for decoration. Ideas for decorating a room using paper butterflies Large paper butterflies for the wall
premises or renovate your homefor the holiday, so that it will bemore comfortable and beautiful.Usually when it comes to decoration, this implies high costs. The same can be said about a home, which requires a lot of time and money to update.
But if you come to this question creatively, then you can decorate any room without breaking the bank.
You can decorate the walls with paintings or panels, handmade, or you can decorate one or more walls with simple paper butterflies.
On our website you will also find:
- 10 simple works that can decorate any wall
- Beautiful and inexpensive DIY wall crafts
Having created such a decoration, you will be amazed how beautiful it lookswall decoration, which gives the impression that someone is sitting on your wall to restmany bright, rare butterflies.
You can also create a vortex of butterflies that like they're floating in the air flapping his wings in a synchronized dance.
This craft will undoubtedly please the eye. Moreover, butterflies can be not only paper - you can paint them on the wall, which will also look very attractive, especially if you use glowing colors.
Paper butterflies on the wall. Option 1.
You will need:
Colored paper or self-adhesive film
Bright magazine pages
Safety pins
Scotch tape or PVA glue
Scissors
Pen or marker
1. Prepare one or more cardboard templates.


2. Using templates, start making butterflies - trace the stencil on colored paper or self-adhesive film (which will be easy to stick to the wall).
* You choose the number and size of butterflies yourself.
3. If you are using self-adhesive film, then you are almost done - you just need to peel off the paper layer so that the body of the butterfly becomes sticky. Now just stick the butterflies on the wall as you like.

If you used colored paper, then you can attachbutterflies to the wall using pins, glue or regular or double-sided tape.
Wall decor with butterflies. Option 2.


You will need:
Colored paper (preferably double-sided)
Scissors
Pencil
Double-sided tape
1. Draw an image of a butterfly on colored paper and cut it out. Use this blank as a template for other butterflies. You can also make several templates of different sizes.


2. Attach the templates to colored paper, trace them and cut out new butterflies. To cut out several butterflies at once, simply stack several sheets of paper, fold them in half, draw half a butterfly and cut it out - when you unfold it, you will have several butterflies at once.
3. When you have cooked required quantity butterflies, first lay them out on the floor to figure out how they will be located on the wall.
4. Start gluing double-sided tape to each butterfly, and then begin gluing the butterflies according to the pattern you came up with in advance.
* Butterflies can be glued close to the wall, or the wings can be slightly bent to create the effect of butterflies fluttering.
DIY paper butterflies on the wall. Option 3.

You will need:
Colored paper or origami paper
Pencil
Scissors
Double-sided tape.
1. Place several sheets of construction paper into one pile and fold them in half, and in half again, to create a variety of butterflies when you cut them out.

2. Draw a butterfly on a piece of cardboard and cut it out.
3. Use cardboard butterfly to draw on top sheet from a stack of butterflies, tracing a cardboard template.
4. To stick the paper butterflies to the wall, use double-sided tape.

Glowing butterflies on the wall using stencils
For such a butterfly you need a light wall and a bright light nearby - desk lamp, For example.

You will need:
Butterfly stencils
Phosphor paint (in this example, 3 colors are used - yellow, green and blue)
Pencil
Sponges and brushes or sponge brushes (one for each paint)
Palette
Spray adhesive
1. Make some butterfly stencils. It is advisable that each paint have its own stencil (or several stencils).
2. Using spray adhesive, adhere the stencils to the wall in the desired order.
3. Prepare a sponge, cut it into several parts and attach each part to the handles of the brushes. You can buy sponge brushes and then you will skip this point.
Read also:
Wall decoration with white paper butterflies
For creating unique interior used today different variants. Butterflies on the wall, photos of which you will see in this material, are an original way to enliven an empty wall. The renovation is complete, the furniture is in place, the new curtains are already hanging, but something is missing to complete the look of the room. Paper butterflies on the wall - creative idea, which cannot fail to attract attention.

Interesting solution to decorate mirror wall in the bedroom with paper butterflies

Wall decor made of bright large butterflies

Panel of paper butterflies on the wall

Collage on the wall from a collection of framed butterflies

Wall composition of black paper butterflies
Creating such decor will require a minimum of material and free time. Even if there is no suitable paper at home, it is sold in any office supply department and is inexpensive. If you don’t want to bother with cutting out silhouettes, you can purchase ready-made stickers with a sticky base.
But fluttering beauties can be made not only from paper - there are other materials suitable for realizing the idea. This is what the conversation will be about.

Ready-made colorful butterfly wall decoration
DIY butterflies on the wall
Butterflies as a design move are used not only to decorate walls. They are used to decorate photo and painting frames, chandeliers and floor lamps, mirrors, and ceilings. However, butterflies in the interior on the wall are the most popular option. And it's not easy beautiful element decorations: according to the laws of Feng Shui, butterflies are considered a symbol of joy, rebirth and mutual love.

Decor wall clock with your own hands
Their appearance in the bedroom will add new colors to marital relationships, bring back slightly faded feelings, and rekindle the fire of passion. Fluttering beauties should not be bored alone - they are glued to the walls in pairs or large groups.

The pastel colors of the bedroom are diluted with rich shades of wall decorations
Different materials are used to make bright moths:
- Colored paper.
- Rough cardboard.
- Vinyl records.
- Starched fabric.
- Thin metal (beer cans, Coca-Cola cans).

Refined ceramic butterflies will help decorate the room
The sizes of soaring beauties can also be different, and are also allowed different shapes and colors. The embodiment of an idea depends on imagination and available material.

A homemade composition of butterflies will transform any room
Advice! You can arrange butterflies on the wall randomly or depict a rapid whirlwind. Moths can be used as a frame for any composition, for example, from several photographs.

Butterfly decoration looks great in any interior
For what style are such decorations acceptable?
Decorating a wall with butterflies will be appropriate in any interior style:
- rural Provence;
- abounding in high-tech technology;
- ascetic modernity;
- stingy minimalism;
- noble classics.

Classic bedroom with contrasting wall decor
The main thing is that the miniature applications harmonize in color with common interior. Otherwise, they will look ridiculous and tasteless. Just don’t make butterflies from paper of the same tone as the walls; they will simply blend into the background and be almost invisible.

Children's room in Art Nouveau style with bright decor made from colorful butterflies
The following combinations would be ideal:
- green or red moths on a beige wall;
- black or dark brown on a white or gray background;
- combination of bright blue and bright red on a pink wall.

Imitation of a wall picture made of butterflies and wire in modern interior studio apartments

Light pastel Provence style in the nursery with delicate butterflies on the wall
Preparing for work
First you need to think over the composition and make a stencil of butterflies for the wall. You can look up photos of ideas on the Internet, just in case your own imagination doesn’t suggest anything. Then you should choose the material, and if there is nothing suitable in the house, you will have to go to a stationery or arts and crafts store.

Beautiful butterflies made of thick colored paper
Moths of the desired shape and size are drawn on paper or vinyl film using a stencil. Ideally, there should be several stencils, then the figures will be varied. When choosing a mounting method, you need to consider some points:
- if the moths will hang on the wall, at least until the next renovation, then you can use glue to attach them;
- if the apartment owner is not sure that the butterflies will last long, it is better to secure them with pins or small buttons.

Attaching decorations to the wall using double-sided tape
Advice! Having clearly imagined the future composition or drawn up a sketch on paper, you need to mark the lines of the butterflies’ location on the walls with a pencil. This will make it possible not to deviate from the plan, which may well happen while gluing the elements.

Making butterflies yourself will help lift your spirits, refresh your room and save your family budget.
Moths made of colored paper
This is the most common decoration option, which will require colored paper. To create a sketch you can use computer program. Buying paper will not hurt family budget, which is an important factor.

Great idea for placing colored butterflies above the crib
There will be no problems attaching the paper to the wall, since it is light, and the thin wings of butterflies will flutter at the slightest movement of air. If the presence of moths on the wall begins to bother you, they can be removed at any time without receiving material damage or damaging the wallpaper.

Placing butterflies near lighting fixture, you can create a beautiful three-dimensional effect
Bright, shiny butterflies are obtained from old, long-read magazines. Photos of butterflies can be taken from the Internet and printed on glossy paper. In order for the applications to shimmer with multi-colored lights, they are covered acrylic varnish with the addition of glitter. The effect is amazing! Compositions with fluorescent paint look no less tempting.

Beautiful colored butterflies from an old magazine
Advice! When fixing butterflies to the wall, you should fix only their middle, and the wings should remain completely free and bent, creating volume.

Wall composition of colored butterflies of different sizes and shapes
Composition of fabric and painted butterflies
If the room is finished liquid wallpaper, decor with butterflies on the wall – perfect solution, but it is better to choose fabric as a material. Any variegated or plain rags that are likely to be found in any home will do. It is better to use PVA for fastening.

Textile butterflies on a newspaper basis
To prevent the edges of the fabric from fraying or fraying, and to make the fabric more rigid, it is recommended to first soak it in water with the addition of PVA glue, dry it, and only then cut out the figures.

Large fabric butterflies on the wall in the nursery
Painted moths look no less luxurious. To create a unique composition you will need:
- a stencil made from plastic or thick cardboard;
- acrylic and fluorescent paint;
- thin brush;
- sponge for washing dishes.

Wall decor with acrylic paints
Using a stencil on the wall acrylic paint the main design is applied, then the contours of the butterflies are outlined with fluorescent paint. In the dark, the hovering moths will flicker mysteriously.

Little artists can decorate the wall of their room themselves
Advice! You need to prepare several identical stencils and fix them on the wall masking tape. The stencil should be removed only after the paint has dried, otherwise it may run down the wall and ruin the finish. For the same reason, paint cannot be applied in a thick layer.

Thin cardboard stencil for wall decoration
Butterflies on the wall: photos and ideas for butterfly panels on the wall
Bright moths are used to make wall panels. To create a masterpiece you will need following materials and tools:
- Old glossy magazine.
- Scissors.
- Scotch.
- Stencils of different sizes and shapes.
- Frame.

Wall panel of bright butterflies on a beautiful turquoise background
The bright pages of the magazine will be used to make butterflies, the number of which is determined by the size of the frame - there should not be too few figures, but they should not be sculpted too thickly either.
First, a background is made, for which a sheet of colored paper is used or the base is simply painted with acrylic paint. You can attach the elements of the composition with PVA glue or double-sided tape. It is better if the butterflies do not fit tightly to the base, but rise slightly above it. To achieve this effect, you need to place small fragments of foam rubber under the tape. The finished panel is placed in a frame and hung on the wall.

Beautiful painting of butterflies in pastel colors
To create a luxurious room design, it is recommended to use several techniques at once that will combine with each other and make the room harmonious:
- One wall is decorated with a composition of butterflies.
- A panel is hung on the opposite wall.
- They attach the moths to a fishing line or colorless thread and hang this origami on a chandelier.

DIY multi-colored butterflies will replace a chandelier
Butterflies go well with flowers, small figures of birds, bees and ladybugs. If pins are used, they should be decorative (beads, beads). To attach to wallpaper, the sharp end of the pin is bent 90° and driven under paper covering. Butterflies seem to float in the air.

Garlands made of beads and paper butterflies will help decorate a room for any occasion
Any ideas are suitable for such creativity, but patience is also required. The reward for perseverance and diligence will be the unique decoration of the room.

An original idea for decorating a children's room
The completion of the renovation is marked by the pleasant efforts of decorating the room. Sometimes the desire to freshen up the situation arises spontaneously. Budget option original design rooms will become butterflies made of paper on the wall. Butterfly templates will help you make an individual decoration with your own hands, a large number of which are presented in this publication.
Preparatory work
The tradition of using paper butterflies as wall decoration arose relatively recently. Multi-colored moths can quickly transform the interior of a room, filling the atmosphere with romanticism and pleasant dreams of relaxation. The preparatory stage will help you achieve the desired result:
- It is better for paper butterflies to have a wall that is as free from foreign objects as possible. Good review enhances aesthetic pleasure from a creation made with your own hands.
- Determine the area and shape of the image on the wall. It can occupy a compact area or be dispersed as much as possible over the surface.
- The easiest way to make butterflies is from colored paper, but there are plenty more interesting ideas to decorate the wall with original moths. The manufacturing material and its compatibility with the interior of the room are thought out in advance.
- A wall with butterflies of different sizes looks impressive. Pre-prepared stencils for cutting will help you quickly complete the task.
Comment! When choosing a template, it is worth remembering the difficulty of cutting out intricate shapes.


Characteristics of individual materials for butterflies
You can make elegant moths for the wall with your own hands from various materials. Only paper models have several solutions:
- classic colored paper or double-sided colored sheet;
- cardboard;
- corrugated paper;
- newspapers and glossy magazines.
In addition to paper decor, other versions of original butterflies are used in the interior of the room:
- from vinyl records;
- a contour painted on the wall with phosphor paints, applied using a stencil;
- from nylon tights, with which the wire frame is covered;
- from tin cans or plastic bottles.
Advice! If you have no experience, it is recommended to make several copies from different materials, then attach them to the wall and choose the appropriate option.

Paper
The easiest and cheapest way to make moths with your own hands is from ordinary colored paper. There are several design techniques. If you plan to stick the entire butterfly on the wall, then paper painted on one side will do. When creating a three-dimensional composition, when only the body of the moth is fixed, it is preferable to use double-sided colored paper for work, so appearance decorative elements will only win.

In addition to classic colored paper, pieces made of corrugated material look original on the wall. The butterfly turns out more airy and light, it is easier to give volume to the figure.

Moths on the wall look extraordinary when they are made using glossy magazines, postcards, newspapers or wallpaper. In addition to simply cutting butterflies out of paper, they can be additionally colored, combined with other shades of a similar material, or made multi-layered. There are practically no boundaries for the flight of creative imagination.


Cardboard
To cut out butterflies on the wall, select cardboard of low density. Otherwise, the process will cause a lot of trouble.
Comment! Cardboard is considered the most suitable material for decorating three-dimensional wall decor with moths. It holds the shape of the figure well.
Naturally, in this case it will not be possible to make a corrugated copy of the butterfly. Rigid material cannot be folded into small folds.
Cardboard is optimal for cutting out openwork moths. For registration you will need a sharp stationery knife and a reserve of patience. A high-quality result of wall decor is possible only with perseverance and the ability to carefully work with small details.
It is also better to prepare a butterfly stencil for subsequent cutting out numerous copies from cardboard. Original templates for cutting butterflies from paper are presented below:

Textile
To give the paper wall decor a complete look, it is sometimes supplemented with similar elements on the lampshade of the lighting fixture. But paper moths are not suitable here, so they turn to fabric analogues. Butterflies made from fabric are not complicated:
- Using a cardboard stencil, the outline of the figure is applied to the fabric;
- the part is cut out;
- the workpiece is given rigidity;
- if necessary, the moth is additionally decorated (wire antennae on the body or beads on the wings);
- The butterfly is attached to a suitable surface.
Advice! Experienced needlewomen can try imitating veins on the wings using a thread and a needle.
A little exotic
Extravagant ladies will love the idea of creating wall decor based on vinyl records. Key process steps:
- Initially, the outline of a butterfly is drawn onto the vinyl with chalk.
- In the initial state, the material is hard enough to cut a figure out of it; the plate needs to be softened. An oven with a foil-lined baking sheet or a microwave will help you accomplish your plans.
- When the vinyl becomes plastic, it is taken out and the shape is quickly cut out. If the butterfly has not acquired the desired shape before cooling, the heating process is repeated.
- On final stage the moth is given the desired volume.
It is more difficult to attach a vinyl butterfly to the wall than a paper one. It cannot be removed later without damaging the surface.

The material for making a moth can be a sheet of tin or a beer can, which is pre-washed and straightened. The contours of the selected stencil are transferred to the material with a marker or an awl, and the workpiece is cut out. Decorate the figurine with nail polish or colored markers.
Attention! The edges of the butterflies turn out to be very sharp, so you need to work extremely carefully so as not to cut yourself.
Tin decor can be hung on a thread. It would be appropriate in a loft interior, for classic design yet optimal solution paper moths will become.


Making outline butterflies
Let's start with the most simple option how to make outline butterflies. Main stages of the creative process:
- It is better to cut out butterfly stencils for the wall from cardboard medium density. A suitable material would be cereal or tea packaging.
- The original moth can be selected and printed from the templates below.
- The silhouette you like is applied to cardboard and cut out. A wall with butterflies of different shapes on it looks more colorful.

Some useful tips for making paper butterflies:
- For cutting, use the entire figure; if you want to achieve perfect symmetry, the workpiece is folded in half.
- Specimens with minor asymmetrical deviations look more natural on the wall.
- If there is a need to obtain moths of different sizes, the template is converted through a graphic editor.

Design of openwork specimens
Openwork paper butterflies are best made using cardboard. To work, you will need a sharp knife, a blade and a printed template with lines for cutting. Obtaining high-quality decor on the wall is possible with painstaking work. The algorithm of actions differs only slightly from cutting out contour butterflies. First, select and print a template. The required number of elements is cut out from it.

Using a blade or a sharp knife can damage the surface of the table, so it is recommended to protect the table top with a sheet of plastic, plywood or chipboard. Openwork paper butterflies on the wall usually add volume. A little trick can make the process easier. The product is slightly moistened and rounded, the resulting bend is fixed. After the moisture evaporates, the workpiece will retain the desired shape.


Options for volumetric paper decor
Three-dimensional figures of paper moths look impressive on the wall. There are several options for creating butterflies of complex configurations:
- multilayer instances are created;
- use corrugated paper;
- the figures are formed by folding the sheet into several layers;
- The art of origami is deservedly popular.
Multilayer
Placing multilayer moths on the wall is quite simple:
- several blanks of the same shape are cut out of paper;
- color and size of parts may vary;
- the elements are placed one on top of the other, the bodies are glued together, and the wings are bent in different directions.

Multi-layer butterflies look impressive not only from contour blanks, but also from openwork details. To do this, you will need paper in contrasting colors or similar shades. For the upper part, an openwork blank is taken, the lower one remains contoured. The following photo will help you evaluate the result:

Exists interesting technique when you can make a multi-layer butterfly on the wall from one sheet of paper by folding it in a special way. The photo below demonstrates the simple manufacturing process:

Corrugated paper
It is quite easy to work with butterflies on a corrugated paper wall. The algorithm of actions includes the following steps:
- Are being selected required colors paper.
- Rectangles are cut out with an approximate size of 7x10 cm.
- The blanks are stitched in the center with large stitches, after which they are assembled with an accordion and secured with thread in several turns.
- The resulting paper bow is folded in half, and the future wings of the butterfly are straightened.
- Then the desired configuration is cut out along the edges.
- Narrow strips form flagella for antennae, which are glued to the body.
The interesting process is clearly demonstrated by the photo:


Ideas for beginners and professionals
It’s very easy to prepare butterflies from double-sided colored paper for wall decoration:
- First, a diamond or square is cut out.
- The figure folds like a small accordion.
- The two pieces are joined together and secured in the middle with thread.
- The antennae are formed from wire.
The photo will help you follow the main stages of making butterflies for the wall:

The origami process, which is so interesting for children, is somewhat complex. One option for making a paper butterfly is presented below:

Mounting options
You can securely fix paper butterflies on the wall in various ways:
- If the issue of preserving the wall surface is not relevant, PVA glue or wallpaper solution will help to secure the paper figures.
Comment! Regardless of the chosen template, whether it is a contour or an openwork butterfly, three-dimensional paper figures look more impressive on the wall. A light breeze can set the wings in motion, making them flutter like real ones.
- Small pieces of polystyrene foam will also come in handy in the process, which are initially glued to the body of the butterfly and then to the wall.
- Similarly, instead of foam plastic, they use double sided tape.
- When the task is to maintain the integrity of the wallpaper after removing paper moths from the wall, they are secured with safety pins.


There are many options for creating decorative images on the wall using paper butterflies. A huge heart or a whirlwind receding into the distance, individually distributed specimens or a flock comfortably located on flowers - there are no limits to creative imagination.
Many people often have the idea of changing the appearance of their apartment or at least refreshing it without putting a lot of effort into it. Usually this means at least cosmetic repairs.
However, in order to give the room an updated look, without incurring exhausting, repair work, this issue should be approached creatively.
It would be nice to remember one wonderful way of decorating - creating decorative panel. And in this case, a simple option for decorating walls with butterflies can come to the rescue, for which templates or stencils are used.
If you put in a little effort and effort, then, undoubtedly, ordinary walls will have a stunning view and the room will take on a completely different, fabulous look.
To do this, you need to study the basic methods of decorating walls. What's so amazing about the decoration? This is an applique, or more precisely, a DIY panel of butterflies on the wall. To make it, a variety of materials are used. Later it is mounted on walls in elegant compositions.
How to make a butterfly stencil with your own hands? To make small butterflies on the walls, there are different options for using materials for cutting out butterflies of different sizes, and based on these parameters, the final appearance of the decoration will depend. Anyone can make paper butterfly templates with their own hands to decorate the interior..
The more you try, the more impressive you will make an impression on everyone who sees such an application. That's why choose the appropriate decor, and then attach the butterflies to the wall. Imagine that on the wall, for example, many openwork butterflies scatter from the center. All of them various sizes and flowers, spinning in a round dance and vibrating with their wings.
Undoubtedly, this will attract attention and delight, although the butterflies will not be dried, but made from scrap materials.

Important! Butterflies should be highlighted against the background of the wall, and for this it is better to make them bright. This way they will not blend into the interior.
To decorate the wall, butterflies of various sizes, shapes and colors, cut along the contour from paper - the most suitable material. The implementation of such an enchanting spectacle will depend on many factors, the main one being sketch quality and accuracy.
The pattern of openwork butterflies for cutting out of paper should be cut out very carefully.
 DIY butterflies on the wall, photo
 What to pay attention to when creating butterflies
Firstly, you need to decide on the form. If you don’t have your own ideas on this issue, you can look for suggestions on the Internet. There will definitely be templates and stencils for cutting, examples finished works. You can also watch the creation of such a panel in the video:
Secondly, you need choose color future butterflies. After all, the design of any apartment is individual, so it is so important to take time to select suitable option coloring for future butterfly decor on the wall. Use the most successful combinations flowers, then the decor will best fit into the room and will be in harmony with all the elements.
The shape deserves special attention. Today, ready-made multi-colored butterflies are offered in the form of stickers. They can be ordered at any store. They come in a wide variety of colors, as well as simple and intricate shapes. But we are looking at decorations that are made independently, so for beginners it is worth familiarizing yourself with the basic recommendations.
 Butterfly stencil on the wall - diagram, photo
 At the initial stage, you should create a sketch of butterflies for cutting. Using a program that draws or edits images can help with this. Subsequently, based on the sketch, butterfly stencils are made for cutting out in different sizes from the appropriate material. Templates can be made without even using a computer.
You just need to pick up a pencil and create on plain paper or tracing paper sketches - outlines of butterflies and then cut them out.
Advice! Nai the best option- do not use strict symmetry. And for this you should try not to mirror the wings. It is best to depict them slightly different in size - literally just a little.
Thanks to this, decorative butterflies on the wall will be more voluminous and dynamic. A the applique will look great, regardless of the method of attachment to the surface. But you shouldn’t bend it too much, because the wings should be moderately different from each other.
 Stencils of simple butterflies for wall decor, photo
 Once the butterfly drawing is ready for cutting, you can move on to the next steps.
It is necessary to decide on the format of the future decorative element, the number of butterflies, as well as the method of securing them. Then you can modify the image and make it in several sizes, and then print it. You can also draw everything completely by hand if you don’t have a printer and cut it out.
After this, we make a butterfly stencil for cutting. It won’t be so difficult to do this if you put the printout on a sheet of cardboard - and the outline of the butterfly is ready for cutting.
The printed butterfly silhouette is first trimmed along the outer edge, only then can you proceed to the inner holes and cut them thin where necessary nail scissors or a special knife.
 Butterfly stencils for the wall made of paper - photo of the cutting process
 To decorate walls with butterfly decor, you can also use an option such as origami. You will not need to spend energy on drawing the silhouette of a butterfly for cutting out of paper, but will only have to learn the ability to assemble origami.
Important! You should not achieve the grace of a butterfly by increasing the number of folds or frills on the wings: openwork butterflies look more airy.
Further cutting with scissors or a paper cutter will be meticulous and the many details will quickly tire you.
In fact, creating such elements is not very difficult. There are quite a lot of ready-made training videos on the Internet on how to make butterflies on the wall, and also lessons on making origami. Here is one of them:
Features of fastening elements
When you have already cut out the moths using a stencil, you can begin to create a pattern on the planned surface. Worth a look first various options on the Internet if your imagination has exhausted itself.
Most often, if a person decides to create such an element of room decor, he already has his own assumptions about the location of the pattern itself on the plane. The most popular are images of a vortex, a growing flow, the arrangement of blanks in a chaotic order, in the form of creating a decorative pattern, and so on.
Important! By attaching butterflies to the wall, you can highlight the boundaries between certain areas in the room.
The main thing is to comply correct placement moths and do everything possible to prevent them from getting into the wallpaper pattern.
 Original decor - butterflies on the wall, photo
 For colored wallpapers (with ornaments and a repeating, pronounced pattern), it is preferable to make the butterflies monochromatic (black or snow-white coloring is ideal); for monochromatic wallpapers, the palette can be expanded and silhouettes of butterflies can be cut out from bright rich flowers.
When the workpieces are cut and prepared, you can begin to attach it. Before you start doing this, you should recreate your idea on paper to understand how good it will look after implementation. Next, you need to mark with a pencil on the wall the places where the butterflies will be located.
All marks should not be made boldly, so that later the butterflies can be removed without leaving marks on the walls.
To attach these elements to the wall, you can use glue, pins, or hang them on a strong thread.
 DIY wall decor with butterflies, photo
 Materials
When decorating the interior with butterflies created by yourself, you can choose various bases for this:
- cardboard;
- textile;
- vinyl film;
- paper.
You should choose any of them based on the complexity of the picture you have in mind. Paper is the most accessible base of all listed, plus it is the easiest to cut out blanks from. White sheets can be colored to create colorful butterflies.
However minus of this material is that it is fragile. It can be selected if you want to attach butterflies for a short time.

Cardboard is a stronger base. You can choose double-sided and create plain blanks. Butterflies look beautiful from vinyl films. This decoration will delight the eye with its bright colors and glossy surface.
To create a “warmer” look, you should give preference to fabric, but they won’t be able to stick to anything except glue.
If you have a preference vinyl version, you should fix the butterflies in the middle of the body, so that at the slightest air flow they begin to move their wings. Then the spectacle will be simply amazing.
When choosing hard cardboard for making butterflies, if you try very hard, you can give them various shapes. In addition, such applications will please the eye for a long time and will not lose their unusual three-dimensional 3D shape.

Anyone who wants to make voluminous paper butterflies with their own hands will be satisfied with the result. Although this method changing the interior is not easy and takes a lot of time, the emotions that you will receive after completing the work will be truly unforgettable.
The process of creating such an application is very exciting and is guaranteed to make your room original without any renovation work.
See a selection of photos of interiors decorated with artificial butterflies - an incredibly beautiful sight.
What to do if you are tired of decorating a room, but there is no money or energy for repairs? The fastest and least expensive way is to change textiles and decorative elements. Moreover, not all decor needs to be purchased. For example, decorative butterflies will help add an element of lightness. They are used to make panels and wall compositions. Larger and brighter ones “live” on curtains or flowers.
What are they made of?
Butterflies on the walls are made from different materials, sometimes even exotic. The spring appearance of the resulting decor depends on this choice. While you have no experience and you don’t really imagine the end result, you can make several different decorative butterflies for testing. They can be attached to the location of the planned decor. This will make it easier to evaluate the effect and choose the most suitable option.
Paper
Butterflies for decoration from paper are the easiest and cheapest to make. There are several different techniques. If the product is flat and is glued entirely to the wall/panel, only the front surface is important. If a three-dimensional composition is intended, the paper should be double-sided - both sides should be colored, because the white “wrong side” often spoils the impression.

Instead of regular colored paper, you can use corrugated paper. The effect will be different - it is lighter, airier, translucent, with its help it is easy to make the decor with butterflies three-dimensional.

Butterflies for decoration made from corrugated paper are airy and light
You can make butterflies from an old magazine, newspaper, postcards, colored napkins, wallpaper of a suitable color, or any other printed material.

As you can see, there are a lot of options just from paper. If you consider that they can still be slightly tinted, combined, made multi-layered, it is clear that there is huge scope for imagination...
Cardboard
Cardboard is not very dense. It's more like a very thick paper. It is also colored and double-sided. It is often used to create voluminous decor - you can easily bend the wings relative to the body. This material even holds its shape better. Just remember that you can’t make corrugated wings - the material is too hard to make a small fold.

It is also easier to make openwork butterflies from cardboard. Having a sufficiently sharp knife, cut out the “extra” leaving only the partitions. Such decorations require perseverance, great patience and accuracy.

Cardboard is also used to make templates for “mass” production of identical butterflies. With the help of such stencils you can make insects of the same type and size and spend a minimum of time on it.
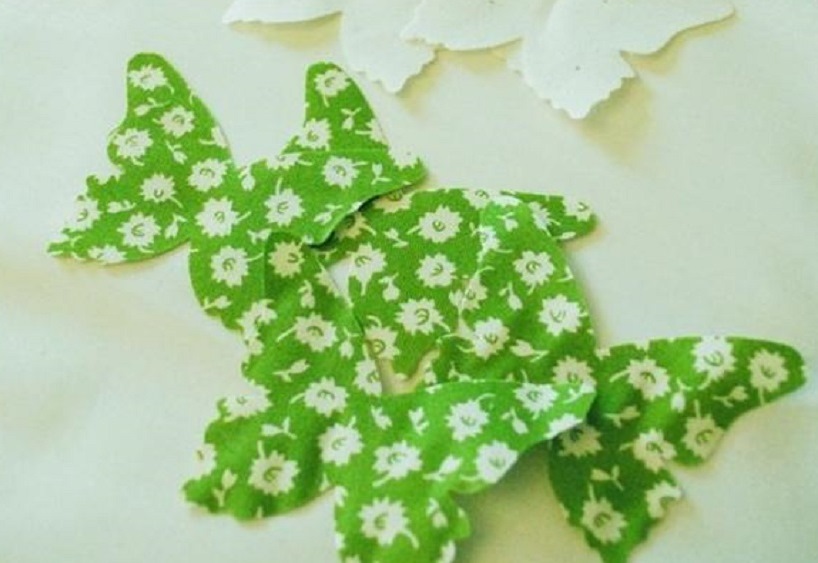
Textile
Having a template, you can make butterflies for wall decoration or a fabric chandelier lampshade. The fabric will need to be given additional rigidity, but the rest of the process is not much different: the outline is applied, cut out, decorated if necessary, and mounted on the wall.

It is more difficult to work with fabric, although the results are very interesting. decorative crafts. This is an option for more advanced decorators and needle or sewing machine skills. With their help you can recreate the veins on the wings.
Exotic materials
Old vinyl records will also be an excellent raw material for making butterfly decor. Since vinyl is hard, you will have to heat it in the oven to cut a butterfly out of it. And in order not to spoil the baking sheet, you need to cover it with foil.

An outline is applied to the vinyl using chalk, the record is placed in a preheated oven, as soon as it begins to soften, it is taken out and quickly cut along the outline with scissors. Often the “workpiece” has to be heated several times. After cutting it out, warm it up. last time and give it the desired shape.
Beer cans or any other relatively soft sheet metal also make excellent flying beauties. First you need to cut off the bottom and lid and level the piece of tin. Then, using an awl, transfer the contours from the template to the sheet metal, connect them with a marker and cut along the resulting contour.

Even beer cans can be used for “butterfly” wall decor.
You can decorate the back - the shiny part. To do this, you will need markers or felt-tip pens; you can try decorating with nail polish. The painted beauties are given the desired shape. One caveat: the edges are very sharp, you need to work carefully, otherwise cuts cannot be avoided.
How to make outline butterflies from paper
Let's start with the simplest, but most effective - contour butterflies. You will need colored paper or magazine pages, outline maps, etc. You can use old postcards or colored cardboard. You will also need regular cardboard to cut out the template.

These are contour butterflies for decoration - they are easy to make and look great
Preparing the template
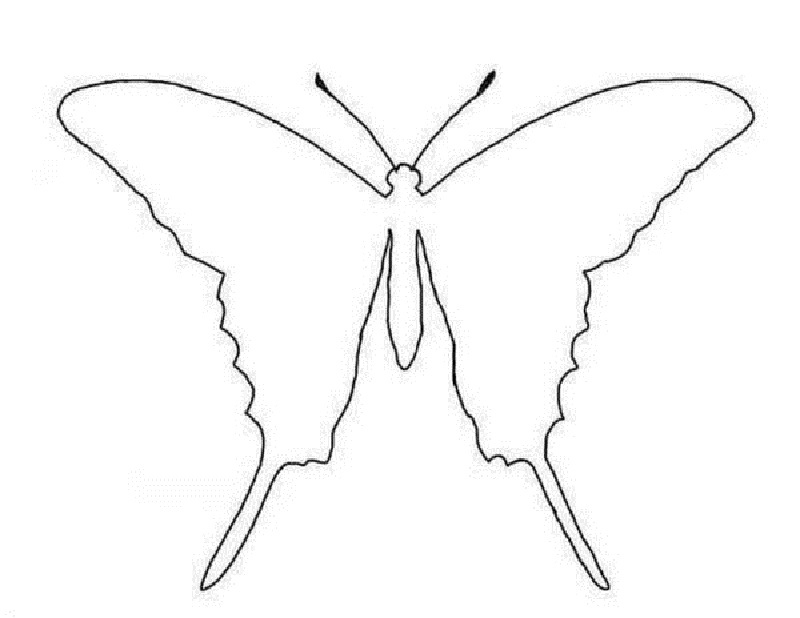
We take a piece of cardboard - any kind, you can even use some kind of packaging (tea, breakfast cereals, cereals, etc.) the main thing is that the cardboard is dense and not porous. Find a butterfly silhouette that you like, transfer it to cardboard and cut it out. There are several silhouettes in the photo gallery. They can be printed, then cut out and transferred to cardboard.
A butterfly on the wall - it would be nice in color. The swallowtail is attractive with its “tail,” but the paper consumption is greater and the work requires more accuracy. Paper butterfly templates for interior decoration are made in half. The second is obtained “automatically” after unfolding a piece of paper folded in half
Some tips for working with templates. Many butterfly contours are given with two wings, but it is better to cut off one wing - you will definitely get it symmetrically.
Decorations made from winged insects of different sizes look good. Therefore, the same contour can be enlarged or reduced using the simplest functions of graphic editors - the same Paint, which is available on any computer. Since in this case only the outline is important, the quality of the drawing is not so important, so feel free to experiment with sizes. We cut out the printed template, apply it to cardboard and trace it. We cut it out and get a hard working template with which you can make dozens of identical elements.
Cut and attach

Take a sheet of paper, fold it in half, attach a template, and trace it. Cut along the drawn line. Next, we bend the wings from the “body” and get a working blank. Having cut out a certain number of butterflies, we attach them to the chosen place - on the wall, a piece of cardboard, etc.
Can be mounted on regular glue(PVA is usually the best option), small strips of double-sided glue. You can use wallpaper glue, etc. If you are in doubt about the result, stock up on sewing pins. They can be mounted on the wall several times without much risk of damaging the surface. When you have placed all the butterflies and you are satisfied with the result, you can glue or use tape.
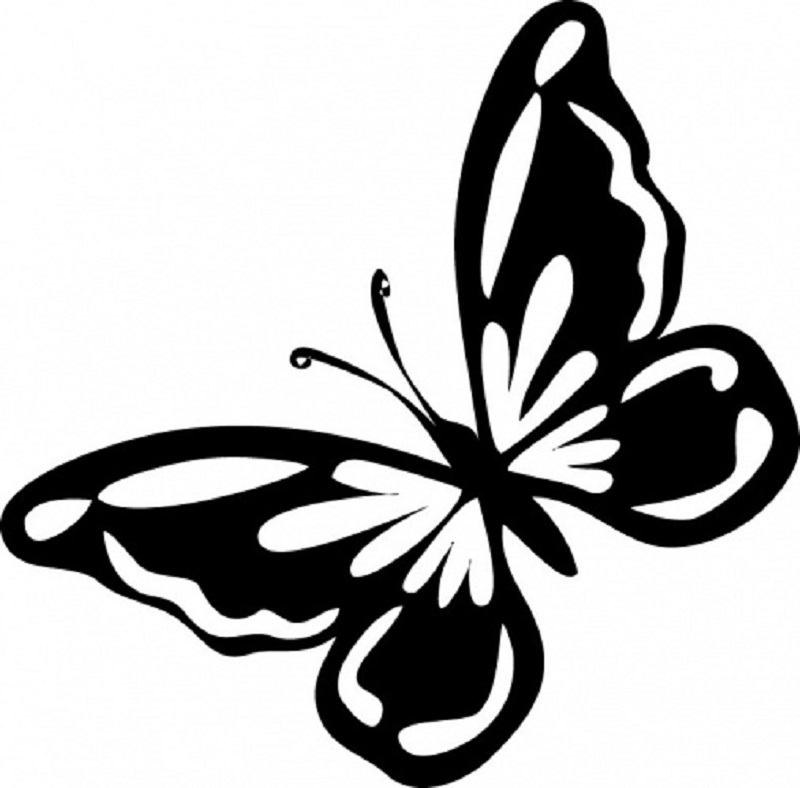
Openwork
The situation is a little more complicated with openwork butterflies. They are made from paper or cardboard. It is important to have a good sharp knife and a template with lines marked on it along which you will need to cut out the excess paper. It’s worth saying right away that this is painstaking work.
Patterns of butterflies with openwork wings - a variant of medium complexity The second half is symmetrical
The process is the same as described above: prepare a template, then cut out the required number of elements from it. The peculiarity is that they first cut out and remove small fragments, and then cut out an outline from a piece of paper. With this sequence of actions, there is less chance of breaking thin jumpers, and it’s easier to work this way.

How to make an openwork butterfly from paper - the process in pictures
You need to work with a knife with a thin and sharp blade. It’s better not on the table, but by placing something quite hard - maybe a piece of plastic, etc. But you need to understand that grooves and cuts will remain on the surface, so it will be problematic to use this piece for any other purposes.
Multilayer volumetric
When making multilayer volumetric butterflies, several pieces of the same shape are cut out (size and color may vary). They are stacked one on top of the other, the “bodies” are glued together, and the wings are bent at different angles. This is how these butterflies turn out to be more voluminous.

You can make a combination of openwork and contour butterflies. Take paper of contrasting colors or find the same color, but different shades. Make them into butterflies of the same shape. Only some will be with openwork, others - without. Arrange them by placing a fragment without a pattern underneath. This produces an interesting effect.

There is a technique that allows you to immediately cut out three-dimensional butterflies from paper. You will need two rectangles of paper - a larger one (for large wings) and a smaller one. We fold them diagonally once, then a second time. You get two triangles different sizes. Now we bend the paper inward from two opposite sides so that we get a triangle like in the third photo (with the newspaper).

Draw wings on the resulting triangles. In larger ones, the openwork can be located only along the edge, in smaller ones - over the entire area. We cut out the blanks and put them one inside the other and glue them together. On top we glue a separately cut out “body” with antennae. Due to the fact that the paper is folded and the wings are double, the products have a larger volume.
Corrugated paper
WITH corrugated paper It’s easier to work with and butterflies for decoration are more airy and light, since the paper is translucent. We select suitable colors, take threads, scissors, glue. Nothing more is required. We cut out rectangles of approximately 7*10 cm from paper.

We sew the resulting rectangles in the middle with a needle and thread, tighten them, and make a couple of turns with the thread. It turns out something resembling a bow. We fold it in half, straighten the paper with our fingers, trying to leave as few folds as possible - we form wings.

When the result satisfies you, take scissors and cut off a strip of a few millimeters from that edge - into antennae. On the rest of the part we form a patterned edge reminiscent of a butterfly wing.

We twist the antennae strips with our fingers into thin tubes. Now they definitely resemble antennae. We unfold the wings and finally straighten them. The result was light butterflies.
From folded paper
You can make paper butterflies for decoration from double-sided colored paper or old magazines by folding them into a small accordion. We cut out two squares or rhombuses from paper (one a little larger, the second a little smaller), fold them into a small “accordion”, starting from one of the corners. The smaller the fold, the more interesting the product will be.

We put two folded rhombuses next to each other, tie them in the middle with thread or flexible wire in a sheath suitable color. We make antennae from the remnants of the wire, straighten the wings, and adjust the shape if desired.
Photo for inspiration
First, a little about how and what you can attach already made paper butterflies to. The easiest way is to apply glue to walls or panels. The second, no less simple way is to use double-sided tape. But to make the decoration more voluminous, it is best to glue it not directly to the wall, but to a small piece of foam rubber. The result will be a more airy composition, with clear shadows.

Use paper butterflies to create three-dimensional decorative compositions on small hoops with a fishing line tied to them. Cut out paper insects are attached to the fishing line. You can’t hang them on the wall, but they look very original, although creating such a composition is more difficult than on the wall.

Hoops and fishing line are all you need to create this beauty
And several wall compositions in which butterflies are used for decoration, made from different types paper.


Another option with a large butterfly...

Colorful tornado...


The main thing is to find a bright picture and even a simple silhouette will look great