Installation of heated floors in a private house. How to make a water heated floor with your own hands - materials, calculation, installation and connection
Heating technologies of the last century with radiator batteries are inferior in efficiency to new ones, services central heating are constantly becoming more expensive. Therefore, consumers are looking for an alternative on how to make a heated floor in a private house with autonomous economical heating.
This technology is more economical in terms of fuel costs, it allows you to remove bulky radiators, freeing up space for other useful interior elements. Pipes under the floor covering do not damage appearance environment and do not interfere with cleaning the premises.
On the environmental side, heated floors provide ideal heat distribution for a person’s comfort. The space warms up well at a level of 1-1.5 m above the floor; higher up there is cooler air. Therefore, many are studying techniques on how to make heated floors in a private home. The simplicity of proven technologies allows you to make a heated floor with your own hands.
Types of heated floors
Long-term practice of using “warm floor” technology has shown its effectiveness: uniform distribution of heat over the entire area of the room and economical energy consumption. There are some restrictions: heating the flooring to more than 30-40 °C is not recommended, this will create some discomfort when walking, and you can burn your bare feet.
With a large number of rooms, high ceilings, especially in regions where low temperatures are worth long time year, you should not rely entirely on the underfloor heating circuit. You can make a heated floor in your house with your own hands and use it as an additional source in the general heating system.
Make a smart calculation heating system Taking into account heat loss, it’s difficult to do it yourself. This is done by highly qualified heating engineers, and many parameters are taken into account:
- room volume;
- thickness and type of building materials of walls and flooring;
- climate zone;
- average annual temperature, wind roses and much more.
Such calculations are not cheap; it is easier to install a heated floor in a private house with your own hands, using already accumulated statistics. Practice shows that in the north of Russia, in brick buildings with a load-bearing wall thickness of 60 cm, warm floors are used as additional heating. IN middle lane and southern regions, these technologies can be used as the main heating system.
There are two main designs of heated floors:
- water heated floor, where pipes are laid with liquid coolant circulating through them;
- under floor coverings heating units are stacked electrical cables or films.
Accurate calculation and planning of the laying scheme for pipes or heating cables are made taking into account what type of heated floors are installed and at what site.
Water heated floor heating central system mounting is not recommended, it is illegal. This issue needs to be coordinated with utility services, which is very difficult, and it is not a fact that everything will subsequently function reliably. It is better to make heated floors in the house from an autonomous boiler using its own fuel.
The installation of a heated floor and the calculation of the amount of heat required for the floor in a private house in a certain room are made based on practical experience. Laying cables or pipes 3-5 meters long per 1 m 2 in increments of no more than 30 cm allows the release of heat of 60-80 kW/m 2. This is enough to heat a residential private house. The premises are provided with a temperature of up to 25 °C in the middle zone and in the south of Russia with well-insulated walls and windows.
Water heated floors
The technology of water heated floors is effective in operation from an economic point of view. Payment costs are 20-30% less compared to a classic radiator system. But installation of the system is labor-intensive; the design contains a large number of expensive elements and connection units.
Essential elements:
- Heating boiler: models can be electric, gas, liquid and solid fuel, hybrid options. The choice is made based on the cost and availability of energy resources in a particular region.
Warm floors in the house are especially in demand gas models, this is explained by the autonomy of this type of boiler. Gas in many regions of Russia is the most accessible and inexpensive fuel. The heating system of these boilers does not depend on central heating and water supply. It allows you to independently regulate power consumption and fuel consumption depending on your needs.
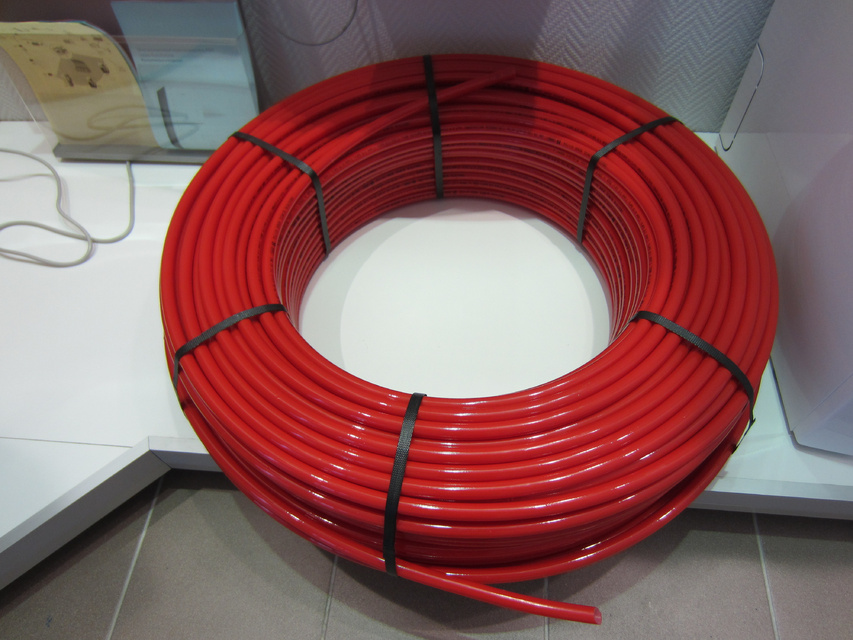
- Pipes. 3-5 m are consumed per 1 m 2 of heated surface; these standards are determined by many years of practical experience. Popular models of pipes made of cross-linked polyethylene, durable heat-resistant products with a material density of 60-80%. To achieve these qualities it is used different ways processing.

When irradiated with an electron flow in a magnetic field, a density of 60% is achieved, treatment with peroxide creates a crosslinking density of 75%, and with selanium gas – 65%. In any case, this density is sufficient for laying heated floors.
A good option is metal-plastic pipes, durable and heat-resistant, with three load-bearing layers and two adhesive layers.

The inner and outer layers are cross-linked polyethylene, the middle layer is aluminum foil 0.2-2.5 mm, hermetically welded along the entire length.
- Collector. It distributes the coolant along the circuits; this is the main heat mixing unit; all individual circuits are connected in it. A manifold is installed with as many thermal valves as there are in the circuit system. The length of the circuits is different, so the amount of coolant in them is not the same, the cooling time of the liquid in the circuits does not coincide. For supporting set temperature Temperature sensors are installed in each circuit; they promptly control servos, distributing hot and cooled flows in given directions.
- Thermovent. A three-way mechanical valve is often used to distribute the intensity of hot and cooled flows. For automatic control, electric drives are installed on the valve.
- Circulation pump. It is recommended to install a pump with a wet rotor; its impeller rotates and is lubricated by coolant, the operation is very quiet.

- Coolant. This could be water, antifreeze or antifreeze.
Costs will be required for waterproofing materials, thermal insulation, cement screed and flooring.
Laying sequence
On the floor basements a preliminary screed is made on the ground, the surface is covered with sand to a depth of 5-7 cm, then with crushed stone 3-5 mm to a thickness of 8-10 cm. For vapor barrier, everything is covered with plastic film, a layer of 8-10 cm is applied on top river sand with fraction screening from 0.05 to 0.1 cm.
A layer of waterproofing is laid on the preliminary screed. This can be bitumen-rubber mastic; it is applied with a brush. It is easier to use adhesive rolls based on bitumen with polymer ingredients. Sheet structure – fiberglass reinforced or polyester. An insulating layer is laid on top - extruded polystyrene foam(Styrofoam). The thickness of the insulating layer in basements is 10 cm or more; on upper floors 5-10 cm is sufficient.
It is very effective to use thin elastic insulation with a reflective surface. The structure of the rolls is made up of a polymer filled with air bubbles, or mineral wool, layer thickness from 2 to 50 mm.
The reflective layer, 14-20 microns, comes in several structure options:
- double-sided – foil on both sides of the roll;
- one-sided;
- self-adhesive, with an adhesive surface on one side and foil on the other.
Heat-resistant metal-plastic pipes in the shape of a snake or snail are laid on the reflective insulation. The pipes are attached to special metal or plastic strips, often applied to reinforce the screed and evenly distribute the load on the pipes. metal mesh.
The pipes are fixed to the mesh with plastic bundles, the wire on the mesh is Ø 3-4 mm, the mesh size is 5-10 cm. The concrete screed is applied 7-8 centimeters thick, it is carefully leveled, and after drying the floor covering is laid.
For heated floors it is recommended to use ceramic coating, it accumulates and transfers heat in the best way. When installing pipes on concrete slabs no pre-screed elements are made. The process begins with cleaning, leveling the surface and waterproofing, the rest of the operations are the same.
Can't do concrete screed on wooden floors, they may not support the weight and collapse. IN wooden houses Hydro- and thermal insulation is installed on the floor, logs are nailed, between which pipes are laid. Boards, plywood, chipboard are placed on the logs, after which facing coating, parquet, laminate or other materials are applied.
Electric heated floor
Less equipment is required for the installation of this structure, and installation is simpler. Absence coolant liquid significantly simplifies the entire heating system. For heating, a heating cable or infrared film is used; they are connected to electrical circuits through thermostats.
Laying heating cable and plates
In the absence of liquid coolant, waterproofing on the slabs can be eliminated, since there will be no chance of leakage. When laying on the ground, it is recommended to leave the preliminary screed and waterproofing. Such a warm, waterproofed floor in a private house will prevent the penetration of moisture from the ground into the room. Otherwise, the materials for the screed and the sequence remain the same.
The cables are laid in a similar way, like a snake or snail. To warm well-insulated rooms to +18-25 ̊C, 150-200 W/1m2 is required, if you take 3-5 m of cable per 1m2, the laying step will be 10-30 cm. The temperature threshold for rooms is calculated based on their functional purpose , in the bathroom it’s warmer – up to +25 ̊С, in the hall – +20 ̊С. Manufacturers make different cables; when purchasing, you need to ask how much power 1 linear meter consumes.
Infrared plates are produced in rolls of width 800 mm, 500 mm and 1 meter, length 0.7-15 m. They are fixed to thermal insulation coating thermal tape, laid 20 cm from the walls and no closer than 6 mm from each other, connected in parallel to a 220V network.

The power consumption of the plates is 45-65 W/m 2 *h, this is the amount of electricity consumed by 1 m 2 of film per hour, the melting temperature of the insulating film on the plates is 130 ̊C. There are ready-made mats, insulation with a reflective layer is attached to them on infrared plates, the width of such products is 83 cm, length is 1-12 m.
It is imperative to take into account the installation locations of furniture and large items. household appliances (washing machine, refrigerator, cabinets) indoors. It is not recommended to lay cables and plates under them.

Laying of heating cables and plates should be planned on the free surface of the floor covering. This will reduce the load on heat sources, and the space in the room will be heated more efficiently.
Connecting electrical heating elements
Exists different types cables:
- Single-wire - not divided into parts, produced at a certain power and length. After installation, they are connected to the network through a thermostat, with opposite ends;
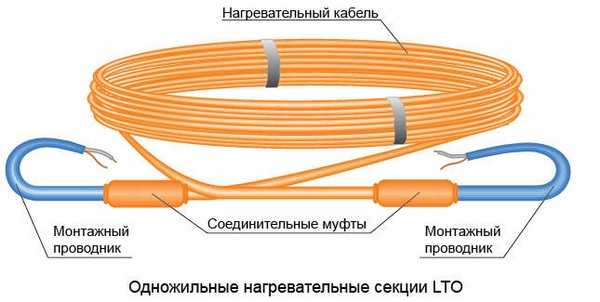
- Two-wire cables are closed at one end, which is hermetically sealed with a plastic cap. The other end with two wires is connected to the network through a thermostat; the cable is not cut into pieces.

- Two-wire self-regulating cable - cut into pieces in certain places. A film matrix located along the entire length between the copper conductors works as a thermostat. Resistance changes with temperature environment. Current begins to flow between the wires in places where the temperature is below +5 ̊C. The lower the temperature around the cable, the greater the current and heating of the cable. Such models are expensive.
Thermostats
Manufacturers offer many different types:
- Mechanical (analog) regulators are the simplest and most reliable.

- Digital - with liquid crystal displays, which display several parameters: the temperature of the floor covering, the air in the room, and sometimes the current time.

- Digital programmable thermostats - allow you to set a specific temperature at different time day (day - night) or by day of the week. In the absence of people, the temperature drops and rises before arrival, this makes the operating mode more economical.

- Thermostats with remote control can be controlled by a remote control in the infrared range, like on TVs, via a radio channel. More expensive models work over the GSM network, over the Internet online, and are controlled from an iPhone, tablet or PC, from any place where there is a cellular connection or cable Internet.
Thermostats differ in their controls: in mechanical models, the wire resistance is changed by a moving contact on a plastic disk in the device body.
In digital regulators, the resistance is changed by a microcircuit, which includes an electronic switching relay. Control can be carried out by mechanical buttons or touch segments on the display, as on mobile iPhones or tablets.
Regardless of the thermostat model, the control units are connected according to a typical scheme to elements with the same functional purpose:
- to 220V network;
- to the heating cable;
- to one or more temperature sensors;
- through grounding.
For safety reasons, all electrical heating systems in private households are connected to the network in the distribution panel through a short circuit protection circuit breaker and an RCD (touch protection device).
Bottom line
Technologies for installing heated floors include many various options installation To determine the appropriate method and best materials, we must proceed from financial capabilities, take into account the climatic conditions of the location of the object and functional purpose premises.
The distribution unit includes:
- (on natural circulation the warm floor will not work);
- collector providing radial wiring coolant along individual circuits ();
- mixer supporting optimal temperature in different circuits. In this capacity, two- and three way valves, thermal heads. IN automated systems a servo drive monitors temperature maintenance;
- pressure gauge, air valve.
A pipeline is a pipe laid in a spiral or snake with a cross-section of up to 2 cm (preferably 1.6), closed on top with a screed or floor covering ().
The best way to make a warm water floor depends on the budget: economical option- a pipe made of metal-plastic or cross-linked polyethylene, expensive - copper.
Copper pipes are strong, durable, bend well, and do not corrode. Metal-plastic is inexpensive, also lasts a long time, and holds the load better than cross-linked polyethylene. U polypropylene pipes There is a serious drawback for heated floors: they bend poorly.
An unsuitable option is stainless steel: it does not bend, and a large volume will be required during installation. welding work(threaded and fitting connections in the construction of heated floors are unacceptable).
The maximum length of one circuit is 100 meters, the optimal is 80. If this is not enough to heat the room, more than one circuit is made. IN different rooms the contours are different, because temperature conditions different (for example, in the bedroom and on a non-residential veranda).
Pie structure
To prevent heat from escaping downwards, the cake design requires three layers: waterproofing, thermal insulation, reflective surface (). A popular insulation material for heated floors is polystyrene foam.
Different brands, starting with foam with a density of 35 kg per cubic meter and ending with the extruded variety. The higher the density, the thinner layer. EPS is cheap, it has low thermal conductivity, and lacks hygroscopicity and vapor permeability.
In addition to sheet insulation (), there are several types of ready-made mats () for the floor: PPS, penofol, cork, etc. Many types already have a foil coating and/or a waterproofing backing. Flat mats have markings for laying pipes; profile mats are equipped with tongue-and-groove locks for connecting to each other.
Ordinary polyethylene is suitable as waterproofing. It is placed on the walls with an allowance. When installing with a screed, an allowance of at least 15 cm is required: the edge must be higher than the concrete. Aluminum foil or metal plates are used as a reflective element. The screen is placed directly under the pipes.

How to properly make a heated water floor depends on the characteristics of the house:
- construction material. If you have to lay pipes on a wooden floor, the option with a screed () is eliminated: for a plank base, concrete has too much weight;
- installation location. When laying on concrete base the amount of work involved in constructing the pie is less, but more on the ground: you will need to pour a sand-gravel or expanded clay cushion and perform a rough screed;
- The thickness of the insulation depends on the materials of construction, the installation location and the climate in the area. For cold places (first floor, used basement) a layer with a total thickness of up to 15 cm is used; on the second or third floor, 3 is enough;
- ceiling height. The screed will take up more space than installation using the floor method;
- in the absence of ground floor when laying on the ground, not only standard waterproofing measures will be required, but also a device drainage system, especially if the soil waters lie high.
Installation of any heating system requires high-quality thermal insulation the whole house. If it is not there, even with proper floor installation, energy losses will be high and efficiency will be low: heat will escape through the roof and walls.
Installation options and diagrams
 How to make a water heated floor - with or without screed? The purpose of the screed is to protect pipes from mechanical damage. Concrete has high thermal conductivity and will not reduce the effectiveness of the floor.
But there are many disadvantages: the volume of work and completion time increases many times (full hardening of concrete and strength gain lasts about a month), the floor with a screed has poor maintainability. What is better to make a warm water floor from if you choose the option without a screed?
There are three methods: laying, using joists and using profile PPS mats. Mats perform two functions at once: they serve as a heat insulator and form a rigid frame for the floor. They already have channels for laying pipes. The height of the ridge is up to 2.5 centimeters, the hard edge is located above the pipe.
Laying method: a sheet of waterproof chipboard in which channels for pipes are selected. Or like this: to flat sheet nail slats with a height greater than the cross-section of the pipe.
If you choose how to make a water heated floor with your own hands minimal costs, this option is optimal: it’s easier to fill the slats yourself than to mill the channels, and you can get by with simple sheet insulation (it’s cheaper than mats).
When installed along joists, the channels form the joists themselves (). To bend pipes, grooves are milled into them, and reflective plates are installed in the grooves. It is also recommended to wrap the pipes with foil.
How to make a water-heated floor with a screed:
During installation, use concrete of at least M200 with the addition of fiber and plasticizer. It is mandatory to lay damper tape along the outer contour of the floor. In large rooms, additional expansion joints are made in the middle.
You can save money on mats: choose flat ones or just sheet insulation. A metal mesh with a mesh size of 10-20 centimeters is placed on top of the reflective layer and pipes are attached to it. It is recommended to place another mesh in the thickness of the concrete. The optimal thickness of the screed is 3 cm above the pipes.
The main pipe laying schemes are snail and snake (). For a water floor, a snake is worse: the coolant moves sequentially from one wall to another, cooling along the way. This diagram can be used for small rooms: place the hottest coil at outer wall. Or combine with snail.
When installing the snail, the hottest coil is placed along the walls, then the spiral is twisted into the room. The cooled coolant falls in the middle.
From the middle, the return pipe is led parallel to the supply pipe back to the collector. Optimal step styling - 15 centimeters, external walls less. If the heated floor is not the main/only heating system, the step can be increased, but not more than 30 centimeters.
Completion of work
![]() Before laying the screed or finishing coating, it is necessary to test the system for operability and absence of leaks. The circuit pipes are connected through the manifold to the boiler, and water is supplied. The pressure is gradually increased to 3-4 atmospheres and left for several hours.
Before laying the screed or finishing coating, it is necessary to test the system for operability and absence of leaks. The circuit pipes are connected through the manifold to the boiler, and water is supplied. The pressure is gradually increased to 3-4 atmospheres and left for several hours.
When installing with a screed, it is important to prevent the concrete from setting quickly. It is recommended to spray the screed with water every day and cover it with polyethylene.
Universal coating for heated floors - tiles: high thermal conductivity, water resistance, durability (). When choosing other materials (laminate, linoleum, parquet), you should pay attention to their compatibility with warm floors.
Otherwise:
- the coating may crack due to high temperature;
- the effectiveness of the floor will decrease due to the thermal insulation properties of wood and plastic;
- Some materials emit toxic gases when heated.
When installed without a screed, the laminate can be laid directly on top of the flooring/mats/joists; for tiles and linoleum, a solid base will be required - a sheet of waterproof plywood.
Conclusion
 These recommendations fully apply to country houses. It's more difficult in the city.
Before deciding how to make a water-heated floor in an apartment yourself, you need to find out: is this possible? Will the local administration allow it to be connected to central heating?
Install a gas boiler with a connection to the main line? It must also be remembered that the floors from the central heating system or riser with hot water difficult to adjust. For full regulation, the heater must be autonomous (boiler).
Video on how to properly make a water-heated floor.
Publication date: Edited 21 Sep 2015 Rating:
- Comparison of electric and water underfloor heating systems
- Installation of a water floor
- Heated floor calculations
- Components of the structure
- How to make a heated floor
- Preparatory stage
- Insulation of floors and pipes
- Snake, spiral or snail
- Collector block and its arrangement
- Warm floor and methods of its installation
- Concrete floor
- Subfloor
- Finish floor
It is no longer possible to surprise anyone with warm floors. New houses or those that have just experienced major renovation, for the most part have water system heating hidden under the floor covering. Here the temperature of the energy carrier does not exceed 60 0. Despite the laboriousness of the process and the high cost of all components, it is not so difficult to make a water heated floor with your own hands. How to carry out installation, choose components and why it is better to make such heating is in this article.
Comparison of electric and water underfloor heating systems
Heating, the temperature of which is low (electric or water floors), subject to installation technology, can serve faithfully for decades. An electrical system can be installed in 1-2 days (“pie” is easier to make here), which cannot be said about a water system.
The advantage of installing electric floors is that they can be used in any house, private or multi-storey. Moreover, they can be laid even on old coating.
But the installation of water floors is a big “pie”, a clear diagram, painstaking installation and a high screed. It takes more than a month to assemble the structure. But the result of using the heating system should offset all the disadvantages associated with the labor-intensive and expensive installation process. This means that using water floors is more profitable. So, the table shows Comparative characteristics water and electric floor.
At the same time, heating large areas warm water floors are more than justified. The required temperature in the circuits takes a long time to “accumulate”, but the “pie”, the installation of which was carried out flawlessly, can operate at a lower heating mode than at the beginning.
Return to contents
Installation of a water floor
Having decided to make a warm “pie”, you need to decide on some aspects. For example, in the house there will be
- radiator heating with underfloor heating or only low temperature;
- low temperature circuit for which it is selected separate mode. It is necessary to take into account that one circuit is heating an area of no more than 20 m2;
- a boiler that can supply heat to circuits, batteries, and will also provide the house with hot water.
How to make it yourself relatively quickly? Installation must begin with the acquisition of all necessary elements designs.
Return to contents
Heated floor calculations
All calculations should begin with clarification of the characteristics of the object. You need to decide whether the “pie” of a heated floor is main heating or only heating. The layout may miss a place where there will be furniture that no one plans to move for decades.
So, for the calculations you will need the following knowledge:
- the length of one circuit must be within 100 meters;
Attention! If the length of the pipes exceeds 100 meters, there are more turns in the circuit, which means that the hydraulic resistance increases, the water circulates less well in the system and, as a result, the temperature in the circuit is uneven.
- when the circuits are the only source of heating, the step between the turns should not exceed 20 centimeters. If the water floor is additional method heating is enough for the step to be within 30 centimeters;
- When laying the contour, you need to retreat at least 10 centimeters from the walls.
Let's assume that on the ground floor of a private house in moderate climatic zone 5 rooms and 1 corridor (its length is 10 meters) and there is also a boiler room. It would be logical to install a separate circuit in each room. Then, through the corridor to the boiler room, you need to carry out pipes to connect to the collector. Thus, there is no need to lay pipes separately in the corridors, but the distance from the room to the collector must be added to the length of each circuit.
In our house the heating is only low temperature (20 cm increments). This means that the length of the pipes can be calculated using the following formula:
– this is the square footage of the room, ours is 15 meters;
– distance between turns (0.2 meters);
– standard coefficient, it is needed to take into account pipe bends.
Meter of pipe.
This is the farthest room, which means that the water will travel a little over 15 meters from the collector to it. Thus, the length of the primary circuit, taking into account the distance to the boiler room, is 98 meters.
So you need to calculate each circuit. And in the end, have an idea of how many meters of pipes in our private house are needed for a warm water floor.
By correctly calculating the number of meters, pipes can be purchased in bulk
Return to contents
Components of the structure
To create a system you will need not only a pipe, but also
- boiler. It is best to purchase one that can work even in summer for hot water supply without heating the house. The power of the device primarily depends on the square footage of the house.
- mixing unit. It consists of several elements. These include a manifold (it should have as many leads as there are underfloor heating circuits), valves, and air vents. As well as fittings and a circular pump.
The collector is installed on the wall above the floor next to the boiler, the temperature is set for each circuit separately. All this can be installed first, and then directly proceed with the installation of the heated floor.
Return to contents
How to make a heated floor
The installation of a heated floor in a private house must follow the order of laying each layer. Right assembled structure will provide normal work the entire system, which means there will be a comfortable temperature in a private house. General installation a water heated floor takes at least a month (this is the amount of time allotted for drying the screed in winter; in summer, the time is reduced to 2-3 weeks).
Return to contents
Preparatory stage
In a private house, you need to prepare the base so that all layers of the pie can be laid. The smoother it is, the better. It is necessary to cover up the cracks and, if necessary, fill the base with screed. Further installation of the floor requires the presence of a waterproofing layer. It is laid end-to-end, gluing the joints with construction tape. you need to make an allowance for the walls.
As concrete expands, the tape narrows, clearly defining its boundaries, thereby improving the quality of pouring
Return to contents
Insulation of floors and pipes
Let's start putting the “pie” together. Next up is laying the insulation. There should be no gaps between the sheets. The joints must be glued.
It is much easier to work with insulation that has special grooves for pipes.
But you need to put a foil backing on top of regular insulation. Considering that the temperature at the outlet of the system should not exceed 60 0, the use of such a substrate will help to maximize the use of thermal energy and direct it exclusively to heat the room.
It’s easier to lay the pipes on the insulation when the “pie” gets reinforced layer. This can be a grid or a special track. The main thing is that pipes can be easily attached to it.

For large rooms, it is better to choose a wide mesh that almost does not have to be cut. Using a mesh will simplify the installation of water pipes for heated floors
Return to contents
Snake, spiral or snail
With a step of 20 centimeters per 1 m 2 there are at least 5 linear meters pipes. This installation stage is quite complicated. Pipe laying takes place different methods, for example, like this:
- snake This method involves direct location a supply branch from the collector to the end of the room with further laying of the pipe in the form of a snake;
- snail or spiral. Laying begins from the center of the room. Here the pipe is folded in half and double turns are made around the center.
When laying pipes, the following requirement must be met: return and supply must be connected to the collector. The circuits are energized and filled with concrete after final assembly the entire system.
If a private house used for year-round use, it must be additionally insulated. This helps reduce heating costs and create a favorable microclimate during the cold season. Many owners of low-rise real estate are primarily interested in the question of how to install heated floors in a private house and minimize heat loss? In this article we will describe the simplest solution - installation of a water heated floor system, we will talk about the advantages and disadvantages of the technology, and the features of pipeline laying.
Why has the underfloor heating system become so popular? Owners of private houses have received an excellent alternative to radiators, which do not cope with the assigned tasks so effectively. They cannot heat the room evenly, so the wall opposite the battery has a much lower temperature than the one on which the heating source is attached. The difference between the temperature at the floor and the ceiling is huge - heated air rises upward, and this is where the main heat is concentrated. The floor remains cold, resulting in a feeling of unpleasant discomfort.
Decide this problem Water heated floors in a private home help, providing a number of additional benefits. Here is a list of their main positive qualities.
Clear advantages
The first and most important advantage of a water heated floor system is uniform heating of the room.
- Using it as an additional or main source of heat, you can significantly save on heating your home.
- The system helps to completely eliminate the use of bulky radiators, which fit very poorly into the concept of modern interiors.
- This type of heating does not dry out the air in the room and does not burn oxygen.
- When the system operates, there is no large temperature difference between cold and heated air, so swirling processes are eliminated. This means that air currents will not raise dust from the floor, creating difficulties for allergy sufferers and people suffering from pulmonary diseases.
- The presence of a thermostat allows you to regulate and independently control heating modes.
- Unlike electrical systems Water heated floors do not create electromagnetic radiation. It is easy to install it yourself, without resorting to the expensive help of professional craftsmen.
Existing disadvantages
Before installing a water system, experts recommend becoming familiar with the disadvantages it has. Such knowledge will help you avoid the most common mistakes:
- Firstly, the process of assembling a heated floor is a very labor-intensive and lengthy set of measures that requires high initial costs.
- Secondly, its installation requires pouring concrete on the floors. The pipeline through which the coolant will be forced to flow must be buried in a cement-sand screed. If it fails, it will be difficult to repair individual sections. You will have to turn off the system, completely dismantle the floor covering and chisel the concrete screed. And this is very difficult.
Undoubtedly, the system has many more advantages than disadvantages. Today, new technologies have emerged that help avoid them.
Note! If you assemble the system correctly, water heated floors will help you forget about the discomfort in your home associated with poor-quality heating for many years.
Installation features

How to make the floor warm.
There are two ways to assemble a water heated floor system:
- Execute cement-sand screed(if there is a need to lay the highway on a concrete base).
- Use a special flooring system (if the floor base is wooden).
- When installing pipes using a concrete screed, the installation diagram is as follows:
- The concrete base is cleared of construction waste and dust. It is carefully examined to identify defects. Cracks and potholes are filled with thick cement-sand mortar.
- Waterproofing is spread on the floor. Polyethylene film can be used as it. It is overlapped and the seams are secured with construction tape.
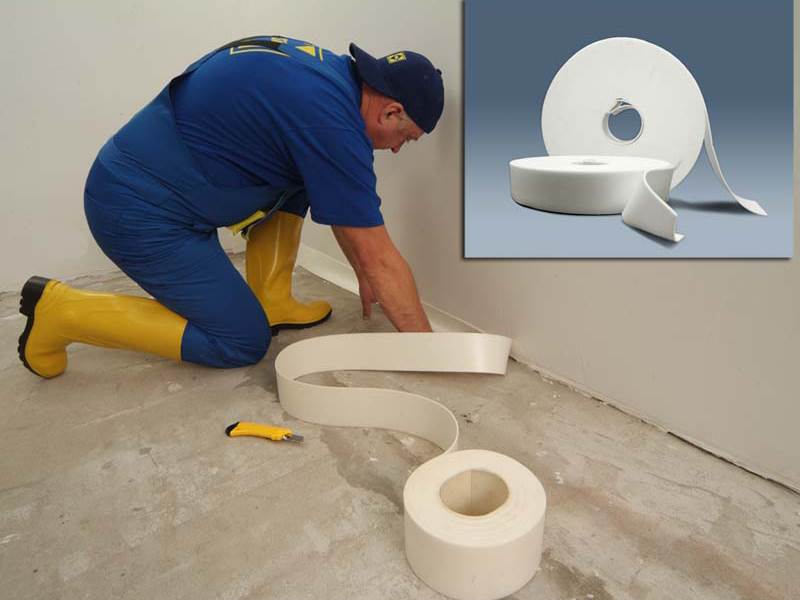
- A damper tape is attached to the walls along the entire perimeter of the room. It minimizes the effects of screed expansion when drying.
- To prevent the heat generated by the system from going down, insulation is laid on the film, one side of which has a foil layer. The thermal insulation material is located with this side facing up. It is better for these purposes to use a rigid material that is laid tightly end-to-end, and possible gaps between the individual elements are filled polyurethane foam. There is a reinforcing mesh on top of the insulation. The pipeline is attached to it according to the drawn up diagram.
- The main line is connected to distribution manifold. The system is pressure tested and checked for leaks.
- If the system is working normally, pour the floor with concrete yourself. The concrete screed will level the surface and prepare it for laying the finishing floor covering. The main thing at this stage is to follow all the subtleties of the technology and prepare the solution correctly. Therefore, let us dwell on this point in more detail.
Concrete screed

Thickness of water heated floor screed
To ensure a smooth floor surface, you need to know in advance how to make a concrete floor in a private house. The video posted on our website will help you study the features of this technology in detail. From the video tutorial it will become clear how to set up beacons, how they can be attached directly to the reinforcing mesh, how to pour a concrete floor by preparing the solution yourself. Therefore, we will not dwell on this issue in detail, but will describe how to properly dry a concrete screed.
Cement and sand are used as a filling solution - two ingredients mixed with water make it possible to obtain a special mixture that takes a very long time to gain its strength. The concrete screed will finally strengthen only three weeks after pouring. To prevent it from cracking, the screed must be properly dried:
- On the second day after pouring, the concrete screed is thoroughly watered and covered with plastic film. You can lay a layer on top sawdust or sand, which will also need to be watered every two days.
- The film can only be opened after a two-week period has passed. In the last third of the time, the screed dries open, but it is again watered every two days.
- You can turn on the heated floor system only a month after pouring the concrete. Increase the heating temperature gradually.
Now you know how to fill the floor in a house and how to properly dry the screed. The final stage– selection and installation of flooring. For finishing it is necessary to select materials that have a minimum heat transfer coefficient. Optimal choice – ceramic tile. However, today you can also use laminate, linoleum and carpet.
Semyon KnyazevThe floor is heated with electricity or water. Both methods are imperfect and have pros and cons. About, and in this article we will talk about how to make a warm floor using water and pipes, or rather, about how to make a water heated floor with your own hands and what is needed for this.
Operating principle of water heated floor
The coolant is heated in two ways:
In both cases, a reduction in coolant temperature is required: operating parameters radiator system for which these sources are created are in the range of 65-95°C, while underfloor heating requires only 35-55°C. This range is explained by the fact that the temperature of a water heated floor, according to SNiP, cannot be higher than 30 °C. Agree that it will hardly be pleasant to walk on a hotter floor.
To achieve the desired temperature, the hot coolant is mixed with cooled water from the “return” before entering the pipes. This way the required temperature is obtained, and then, through the underfloor heating manifold, it enters the pipes.
This is all the mechanics of how a water heated floor works, but there are some technological nuances that increase its comfort and simplify adjustment.
Temperature adjustment
In order to be able to support comfortable temperature heated floor, available special device- thermostat, or as it is also called a thermostat. This device works in conjunction with sensors that measure the temperature of the floor and coolant.

Water heated floor pie
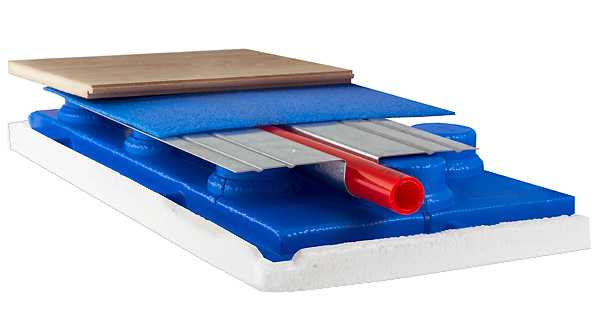
Now let's talk about the structure of a heated floor: so that you know what and in what order to do when filling it with your own hands. A water heated floor is a multi-layer structure. An approximate diagram is shown in the figure.
Thermal insulation is first laid on a flat base (height difference no more than 1 cm per 1 m2). The choice of material and its thickness depend on the initial insulation of the floor and which room is located below (if there is one). The goal is to achieve minimal heat leaks. Then heating will be economical (you will pay little for it, and the house/apartment will be warm). Therefore, when choosing a material and its thickness, it is better to take the characteristics with a reserve: in this case it will definitely not be worse. If there is a heated room below, thermal insulation of 20-30 mm is sufficient; if there is an unheated basement or soil below, a solid thickness of 50 mm or more is required, in northern regions The thickness of the insulation can be from 100 to 150 mm.

Installation of a “pie” of a water heated floor
A damper tape is rolled out around the perimeter of the room or thermal insulation tape is laid; you can use polystyrene foam, expanded polystyrene or other sheet insulation (about 10 mm thick) cut into strips 10 cm wide; you can also use mineral wool cardboard.
This measure is necessary, firstly, to ensure that cracks do not appear around the perimeter of the floor due to thermal expansion, and also to reduce heat loss through the walls and foundation.
After the pipes are laid, you can begin pouring. A special composition is used - with additives that increase thermal conductivity. In some cases, to increase the strength of the structure and additionally protect the pipes from mechanical loads, a reinforcing mesh is laid on them, and only then the solution is poured. The concrete layer should be such that there is at least 3 cm of solution above the pipe. Only with such a thickness will the floor not “walk” underfoot and its temperature will not have pronounced hot/cold bands.
And there is one more nuance: Pouring a warm water floor with a solution should take place when the pipes are filled, that is, under pressure. Then they take on “working” dimensions and no problems will arise during further operation.
The most unpleasant moment in all this is long term drying of the screed. At least 28 days must pass after pouring for it to acquire its final strength. But further work can begin after 7-10 days, if the average daily temperature was higher than +17°C.
While the concrete is gaining strength, the heated floor cannot be turned on. An increase in temperature will cause cracks to appear, which will negatively affect the thermal conductivity of the floor and its durability. So wait patiently for it to dry naturally.

Beacons have been installed for pouring screed - for many floor coverings the floor must be perfectly flat. Please note: thermal insulation is installed around the perimeter. Its height is higher than the height of the finished floor; after the screed has dried, the excess is cut off with a knife. A model with markings, like the one produced by Valtec, was used as a substrate for thermal insulation.
These are only the main layers of the water heated floor cake. Often, at the very bottom under the thermal insulation, a hydrobarrier (dense plastic film). It will protect the lower premises in case of leakage. It is often recommended to lay a heat-reflecting coating on the heat insulator so that the heat does not go down, but is reflected upward. But here it is worth remembering that when laying in the screed aluminum foil or foil materials are useless: after a month or two, the foil collapses and turns into dust. If you use a heat-reflecting coating, it should be metallized. It is very similar to foil, but is made of other metals that perform well in cement-sand mortar for many years. As you can see, installing a water heated floor is not an easy undertaking, with a large number of components and components.
System parameters
To make a warm water floor with your own hands, you need to know a few more features and rules that you cannot do without.
Which pipes to use
Pipes for warm water floors can be used as follows:

All these types of pipes can be used in both screed and deck systems. Moreover, it is necessary to lay coils of pipes without connections inside the floor. If the length of one bay is not enough, you can make several contours, each of which is displayed on.
Pipe parameters: diameter and length
The length of the pipe in one circuit depends on the diameter: the smaller the diameter, the shorter the length can be used, but circuits that are too long are unprofitable. And not only because a meter of such a pipe costs more, but also because there is too much water in the system, and it becomes too sluggish and ineffective. For any pipe material, it is recommended to use diameters from 16 mm to 20 mm. This cross-section is sufficient to heat any domestic space.
- Using metal-plastic pipes With a 16 mm section, the maximum contour length is 100 m, but in reality it is better not to make it more than 60-80 m.
- When using pipes of the same material, but with a cross-section of 20 mm, a maximum of 140 m can be laid, but in reality - 100-120 m.
Approximately the same loop sizes can be used for other materials. If the declared quantity is not enough for the premises, several circuits are made, each of which is connected to the corresponding input/output of the collector.

If there are several circuits, the damper tape is rolled out not only around the perimeter of the room, but also separates the circuits. And one more nuance: in order to make it easier to maintain the same temperature with several circuits, it is advisable to make the circuits the same length.
Pipe laying diagrams and steps
The most common are “snake” and “snail”. When laying “snake”, the pipe consumption is less, but at the same time uneven heating of the floor is observed: along the supply pipe water is coming much hotter, and from about the middle of the length, it becomes quite cold. Therefore, when using a simple “snake”, one part of the floor will be much warmer than the other. This disadvantage can be used wisely: start laying out from the outer walls, near which heat loss is greater. If you are not satisfied with this option, install the “snail”. It is somewhat more complicated to calculate, but gives a more uniform floor temperature. In any case, it is advisable to use a “snake” on short contours.

For high-quality and uniform heating, the step of laying a warm water floor is no less important. It is in the range of 10-30cm. The closer the pipes are to each other, the more the floor heats up. Based on this, the required distance between two adjacent pipes is determined. For example, in the kitchen the step can be made less than 25 cm - there are enough other heat sources. In the bathroom, on the contrary, it needs to be made small - firstly, tiles are a heat-intensive material, and secondly, more high temperatures. Therefore, in the bathroom the step of the water floor is from 15-20cm. A similar distance is required for children's rooms. In addition, the step can be made uneven in one room: for example, near windows or doors, along external walls, lay the cable closer to each other, and less often in the center.
Read more about which pipes are best for a water floor and why, what is the maximum length of one circuit, what diameters can be used here.
Water heated floor without screed
Warm floors with screed have several significant disadvantages:
- it has a large height - the thickness of the water-heated floor is 8-10 cm, depending on the thermal insulation layer,
- weighs a lot ( cement-sand mortar a layer thickness of at least 4-5 cm over the entire area has a solid mass);
- the screed takes a long time to dry;
- has low maintainability.
All these disadvantages lead to the fact that many people are looking for options for installing heated floors without screed. There is such an opportunity and this is it. They do not require “wet” work, are light in weight and height, and are quickly installed. Therefore, they are often used in houses with wooden floors(you can’t use screeds in them because of its heavy weight) or in rooms with low ceiling heights, where losing 10 cm to install a heated floor is unacceptable.

There are two types of floor heating systems: polystyrene and wood. In both cases, these are slabs in which there are special grooves for laying pipes. Polystyrene boards are a well-known high-density foam plastic in which grooves for pipes are molded. Wood systems made of chipboard or OSB. Since these materials have low thermal conductivity, to increase heat transfer, metal plates with similar grooves are placed in the grooves and on the plates, and pipes are already fixed in them.
After installing the pipes, you can immediately begin laying hard surface- laminate, parquet or boards. Using soft covering a rigid base is required - sheets of plywood, chipboard, etc. They are laid directly on top metal pipes, fasten, and roll out carpet on top or lay it down. When installing a heated floor without a screed under the tiles, the glue can be placed directly on the metal plates, but you need to use a special composition for heated floors.
As you can see, doing it with your own hands is even easier than using a screed - the principle is clear, the work is not the most difficult, and there won’t be a lot of materials needed. Moreover, you can not only mount ready-made slabs from polystyrene or fiberboard, and do everything yourself. It will take more time, but it will require less money.
Results
Do-it-yourself warm water floor is a difficult undertaking to implement, but it is possible. Of course, you will spend more time - you need to figure everything out, digest a lot of information. But you will do everything yourself, and according to your mind, and not in the way that is faster or more convenient, and as hired workers often do. You will also save quite a decent amount - the services of builders are not cheap at all.