How to make elastic salt dough. Dough modeling
All children, young and old, love to make various crafts with their own hands. For this purpose, you can use the traditional one, or you can replace it with an environmentally friendly plastic mass prepared independently. Modeling from dough is suitable for the little ones, because they try everything to their teeth, and it’s too early to give them purchased plasticine.
Children's play dough is completely harmless if it comes into contact with the baby's delicate skin and even if it gets into the mouth. After all, this recipe includes flour, water and salt - completely harmless products. The concentration of sodium chloride is so high that after trying a piece, the child will immediately lose interest in food and will use the plastic mass for its intended purpose.
Modeling from dough is very useful for the development of children. It is softer and more flexible compared to plasticine, and therefore the tactile sensations are also different. It is excellent when working with plastic mass, which in turn has a positive effect on the development of speech skills and more coordinated brain function.
How to make play dough?
Making homemade mass is not at all difficult. The most important thing is to maintain the correct proportions. Before preparing play dough for children, you need to decide what recipe to use. After all, there are several different methods.
Recipe 1
- Flour - two parts.
- Salt - one part.
- Water – ¾ cup.
Dissolve the salt in cold water, then add the flour and knead into a stiff, elastic dough. When it is sticky, add a little flour; if it is too tight and crumbles, add liquid.
Recipe 2
- Salt – 1 glass.
- Flour – 2 cups.
- Vegetable oil - 1 tablespoon, or 50 grams of starch.
- Water - enough to make a soft but elastic dough.
Some people prefer oil, others prefer starch, but the meaning of their use is identical - these components give elasticity. Liquid should be added gradually in small portions.
Recipe 3
- Flour - one glass.
- Salt - half a tablespoon.
- Lemon acid- two teaspoons.
- Water – half a glass or more.
- Vegetable oil - one tablespoon.
- Dyes.
The recipe for this modeling dough is for those who want to get bright figures. It is advisable to use food dyes, those used in the confectionery industry.  Even more safe method– add natural ingredients like saffron, cocoa, instant coffee, brilliant greens, paprika.
Now you know how to make play dough - it's not difficult! Do not forget that for this you need to take only Extra salt, and not stone salt, even sifted. It makes the dough not of the same quality at all and has a gray tint.
The big advantage of homemade plasticine is that it can be stored for a very long time in the refrigerator, tightly wrapped in cellophane. Before you start, the modeling dough needs to be softened at room temperature for about half an hour. During the creative process, do not forget that the mass dries quickly and use small pieces and keep the rest in a bag.
Even children in our country know the fairy tale about Kolobok and the cartoon “Plasticine Crow”. Stories about how the leader of the world proletariat made inkwells from bread are remembered by older people. A spineless person was compared to the softness of dough, and stale bread to the hardness of a stone.
In the Scandinavian countries, amulets (wreaths, horseshoes) were made from dough to protect the farmstead from demonic forces. In China, puppets were made from dough. With the advent of plasticine in everyday life, modeling from salt dough was undeservedly forgotten, but is now experiencing a rebirth.
The opportunity to express oneself through creation and creation and exercises on fine motor skills are necessary for a person of any age, and most of all for children. The safety of the material for children to use, the availability and ease of making salted dough for modeling, and the “survivability” of crafts are undeniable.
“Mukosol, mukosolka, testoplasty, Arkhangelsk ceramics or bioceramics” are all modern names for ancient needlework, making handicrafts from salted flour. In order to captivate your child and try to “be like God” (who sculpted man) without leaving home, you need to know how to do salty dough for sculpting.
Preparation and ingredients
There are many recipes that differ in composition and proportions, some are intended for sculpting small particles, others for making large crafts, without flour, without starch, but all of them must contain salt.
The absence of salt makes the dough more porous and less strong. Obviously, our ancestors knew about this property of salt and added it to the dough not only for taste. You can experiment with other variations (proportions and methods of preparation, adding dyes and various components) in the future, when the first experience is gained.

Classic recipe
The classic recipe for salted play dough consists of three ingredients:
- 300g. salt;
- 300g. flour;
- 200g. water.
Flour and salt must be taken in equal proportions (1 to 1, by weight, not by volume!). A glass of salt weighs approximately 200g, a glass of flour 100g. Flour for the “classic” is white wheat flour, finely ground. It is advisable to take the finest salt, not iodized!
When using iodized salt, the dough will not be completely homogeneous; inclusions of foreign bodies will be visible. The water should be clean and as cold (ice) as possible. You can knead the dough in 2 ways:
- dissolving the salt in water and then adding flour (in this case, flour of different humidity requires various quantities water);
- After mixing salt and flour, add water little by little (if you follow the written standards, the dough will turn out to be very plastic).

The initial mixing process is done in a bowl. You can use a blender or mixer. After the formation of a homogeneous plastic lump, the dough continues to be kneaded by hand on the table. The finished mass should be plastic, but should not stick to your hands.
Advice:
If the dough breaks, add water; if it sticks to your hands, add flour. It should be borne in mind that the amount of dough obtained will be considerable, so for the first experiment it is possible to simply reduce the proportions of all parts.
The dough made in this way can be used for modeling without cooling, or placed in a plastic bag and kept in the refrigerator for 2 hours. It would be more correct to place it there overnight, then after drying the material will break off less at the edges.
During the modeling process, you should pinch off pieces from the total mass and use them immediately, since in the air the dough quickly weathers (spoils) and becomes crusty. The shelf life of the material in the refrigerator ranges from a week to a month, depending on the preparation method, the tightness of the packaging and the temperature.

Other recipes
To make three-dimensional figures, the dough is prepared in the same way as in classic recipe, only the amount of salt and flour will be 2k1. You will need:
- Salt 400g;
- Flour 200g;
- Water 125ml.
This dough will be especially strong; it can be used to cover a frame made of aluminum foil in the manufacture of three-dimensional figures.

There is also a recipe for cooking with the opposite ratio, 2 parts flour to 1 part salt. You will need:
- Salt 200g;
- Flour 400g;
- Water 125ml.
This recipe already uses boiling water. All the salt is poured into it and stirred. After brine will cool down to room temperature, add flour and prepare the dough. For achievement best result you can add 1 tbsp to the dough. glue (wallpaper or PVA) and 1 tbsp vegetable oil.

Recipe with oil and dye
Colored salted modeling dough is made according to a different recipe with the addition of dyes either during the cooking process (large volume) or into separate pieces of the future composition (small parts). As you become more interested in the art of modeling, you will move on to other salt dough recipes.
Recipe with oil and dye. To prepare you will need ingredients:
- Salt 250g;
- Flour 150g;
- 5 tbsp. sunflower oil, which will improve the elasticity of the dough;
- Water (the amount will depend on the amount of dye);
- dye (you can use carrot, beet or cherry juice).
The cooking technology is the same as in the classic recipe.
Oil is added to the mixed salt and flour and water is gradually added. It should be remembered that you need to add a little juice to give the mixture color. The juices of cherries, currants (red or black), beets, carrots, corn, and spinach are used as dyes. You can add color to the dough using tea or cocoa. If necessary, you can add food coloring.

Recipe without starch with glycerin
Among the examples of crafts there are panels and products that will amaze with the abundance of small, mosaic details. In such things, a composition prepared according to the recipe “without starch, with glycerin” is used. The dough for such “jewelry” modeling is prepared from:
- 200g salt;
- 300g flour;
- 4 tbsp glycerin;
- wallpaper glue or PVA 4 tbsp;
- water 125-150ml.
The main ingredients are flour and salt, but there is a recipe that allows you to make play dough without flour. You will need:
- 1 tbsp. starch;
- 2st. baking soda;
- 0.5 tbsp. water.
Mix starch with soda, pour in a small stream of water at room temperature and simmer over low heat. When a dense “ball” forms in the bowl, you need to turn off the stove, wait until the mass cools down and place it on a floured table. All that remains is to knead with your hands. Having no flour in its composition, this mass is excellent for modeling.

There is also a recipe that does not contain salt: mix 150g of flour with a glass of water and 2 cups of chopped oatmeal. Add 2 tbsp to the resulting mixture. vegetable oil. This dough “plasticine” is stored in a cool place for about a week. If it has absorbed moisture and droplets appear on the surface, you just need to roll it in flour and mash it.
Other test options
There is another option for preparing dough with glycerin and starch. Flour 300g, salt 150g, 1-2 tbsp. starch, 100-125 ml water.
There are recipes with the addition of natural creams:
- salt 200g;
- flour 200g;
- water 125-150ml;
- hand cream 1 tbsp.
Cream and oil are added to prevent the finished product from cracking during the drying process.
It should be noted that preparing salted dough is impossible only from flour with impurities (pancake). Rye flour is used together with wheat flour for crafts. It will give a warm, rustic tone to the product. It is impossible to make salted dough from rye flour alone, as it will be very difficult to mold (tight).
Recipe for making rye flour:
- wheat flour 300g;
- rye flour 100g;
- salt 400g;
- water 250ml.

It should be borne in mind that the density of rye dough is greater, so it should be taken a little more during preparation in order to obtain the required volume. You can add another 1 tbsp to this composition. oil, which will enhance plasticity and prevent the mass from sticking to your hands.
Drying crafts
Modeling dough made from rye flour has one more nuance - drying crafts. First you need to air dry (0.5 cm thick for a week), then in the oven over low heat.
Drying crafts made from salt dough is carried out in 2 ways: in the air, this is the longest (about 2 weeks) and “gentle” drying, since there is less chance of cracks appearing. Every day the craft must be turned over to dry evenly on all sides.
Suitable for small and medium-sized products. Baking in the oven at temperatures up to 80°C. The finished craft is placed on baking foil and placed in the stove. The drying process lasts 1-2 hours (depending on the dimensions of the product).
Almost everyone who makes crafts from salt dough improvises in the creative process and adds their own components to the dough. A variety of components are added to the composition: glycerin for shine, wallpaper or PVA glue for strength, hand creams for plasticity.
Dough that contains less salt allows you to sculpt openwork details, but becomes less durable. With increased salt content it will become rougher and tougher. There is no universal recipe that suits everyone. Create, invent, try!

Our distant ancestors decorated the surface of loaves with figurative images of spikelets, berries, and leaves before baking to attract good luck and receive blessings from their deities. Today we do this without any religious background, just for beauty.
In addition to decorating edible products, the use of a dough of a special composition allows you to create very impressive and beautiful decorative figures, pictures and flowers. In this case, the dough perfectly replaces more difficult and expensive materials, so it is ideal for young children. But this is such an exciting activity that even respectable adults enjoy doing it.
Anyone can use salt dough for self-expression and relaxation; it is only important to know how to make a durable and flexible material, as well as to properly dry and paint the finished product.
Subtleties of preparing dough for crafts
The modeling of products itself is no different from working with plasticine or other similar materials. The advantage of salted dough is that it is more flexible, less dirty on hands and surrounding objects, provides more opportunities for complex work, and is also perfectly preserved after proper drying, becoming hard and durable.
- The difficulty is how to prepare the right dough that will not stick to your hands and tools, and will not crack or crumble. To do this you need to use several simple tips:
- Do not use pancake flour for work - it is more sticky and the dough will turn out to be of poor consistency.
- Use only “Extra” fine salt. Coarse salt will create a rough crumbly dough due to grains when kneading directly in dry form, and dissolving such salt in water will take too long. In addition, rock salt can contain impurities that will stain the play dough, but “Extra” salt is purified and very fine.
By diluting the flour with ice water, you can get an excellent, plastic and very homogeneous dough.
Using these simple tips, you can start working with your children to create a variety of amazingly beautiful products. Salt dough is simple, inexpensive and very available material for creativity, and children are simply crazy about such useful entertainment.

Tools and materials used
When we sculpt from salt dough, we need special tools. All of them are available in our homes, kitchens or among stationery, materials for sewing and handicrafts.
Basic tools and materials for work:
- Rolling pin for rolling out dough. If it is not there or the existing one is too large for children’s hands, you can find a replacement in the form of an ordinary glass bottle.
- Knife for cutting dough. Children can be given a plastic knife from a set of colored plasticine.
- Board for rolling out dough and making products.
- Paints for coloring (watercolor, acrylic, gouache - any water-soluble dyes).
- Finishing varnishes (on water based, best of all - in aerosols). Additionally, you can use spray varnishes “with special effects” - “snow”, with sparkles, gold, silver or other metallic varnish.
- Set of brushes for coloring.
- Container with water.
- Cookie molds.
- A variety of items to add texture finished product- toothbrushes, combs, knitting needles, buttons, lace and much more.
For small children, it is worth providing special clothing, as they can get very dirty. Before work, stock up on a pack of dry and wet wipes - they are convenient not only to clean your hands, but also to blot your brushes from excess paint. This will prevent the dyes from spreading over the finished item.

Three best recipes
To knead salt dough, you can use own hands or entrust this process to modern technology - a mixer or dough mixer. With their help you can obtain a particularly smooth and elastic dough.
To ensure that the finished product does not crumble, you must first add the required volume of water to the salt, and then mix it thoroughly with the flour. It is important to mix the product well until completely homogeneous, otherwise, when drying, the finished item may crack or fall apart into separate pieces.
Basic recipe:
- A glass of flour (wheat or rye).
- A glass of finely ground salt, “Extra” type.
- Half a glass of ice water.
Mix the ingredients and knead the dough until smooth. This recipe is great for projects with delicate details: for creating flowers, leaves, ornamental plants and so on.
Recipe for plastic soft dough:
- Flour - one glass.
- Fine salt - one glass.
- The water is very cold - half a glass.
- Vegetable oil - 2 tablespoons.
Instead of oil, you can take glycerin, a fairly rich cream or cooking oil. The introduction of fats or oils into a salt dough recipe allows you to make its consistency more plastic and elastic, and also avoid cracking of the product after drying. This option is especially suitable for “thick-walled” products that may crack if the dough is completely dry.
To work with thin parts or many small elements, you will need to use an improved salt dough recipe:
- 1.5 cups flour.
- 1 glass of salt.
- 0.5 glasses of water.
- 2 - 3 tablespoons of PVA glue, Methylane wallpaper glue or any other water-soluble glue.
This dough holds its shape perfectly, you can make small thin elements from it, and with definitely “stuffed” hands you can make things that are outwardly indistinguishable from good porcelain.
Any recipe for salt dough can be regarded as a basis, since you can endlessly modify it “to suit yourself”, experimenting with various ingredients until you get the correct composition.

How to perfectly dry salt dough
The main difficulty for beginners is the technology of drying the finished product. Drying can be done in different ways:
- “Bake” in a heated oven like regular cookies, at a temperature ranging from 50 to 80 degrees (depending on the size and thickness of the product). The finished item is placed on parchment paper for baking and placed in a preheated oven for about an hour. The duration of processing depends on the dimensions of the product. Until completely cooled oven the thing is not taken out of it.
- Drying in a cold oven, that is, the product is placed in a cold oven, the heat is turned on and brought to the desired temperature. Everything else is exactly the same as in the previous paragraph.
- It is best to simply air dry products made from dough with salt, although this takes a lot of time. A well-dried craft becomes durable, hard and not subject to external influences. Regular drying is great for small items or items with delicate parts.
Do not use electrical appliances or batteries for drying central heating. They dry the dough unevenly, which can cause the item to crack or spoil if it is only dry on one side, has a dry surface and has “damp insides.”
Dyes and finishing materials used
When preparing salt dough, the dye can be introduced directly into the product itself and obtain a material very similar to plasticine. But the difficulty in this case will be working with the material - you will have to connect individual colored parts, and this is too difficult for kids. Everyone loves to work with paints, so for children it is preferable to paint a ready-made monochromatic item.
The easiest way to work is to use water-soluble paints. Acrylic dyes are very good - they give a dense and uniform color, have a large color palette and are easy to use and dry quickly. But you can also use regular watercolors. It gives an excellent translucent layer, and paints can be layered with glazes to obtain special effects - volume, tone transitions, tints and different textures. If there is a need to obtain an opaque color using watercolors, you can use a white primer. Her role could be played by a white woman acrylic paint, gouache or tempera with the addition of PVA glue to hold it on the surface of the product.
For decoration you can use volumetric paints, metallic dyes, beads different sizes and shapes, buttons, rhinestones and other little things that do not deteriorate from high temperature if you plan to dry them in the oven.
Is it worth varnishing crafts?
In principle, a finished craft made from salt dough holds paint very well, but if you plan to use this thing, for example, for games, or it is a chess piece, a decorative vase, a box, in short, a thing that will suffer from constant touching, then it should be coated varnish. It will not only protect finished products from external influences, but will also give a beautiful glossy shine, which is necessary for many types of crafts.
The easiest way is to use varnish in an aerosol, processing on outdoors or in a well-ventilated area. If necessary, varnishing can be repeated several times, thoroughly drying each previous layer. To make it especially decorative, you can use special sprays, for example, with a snow effect or with glitter.

Types of salt dough products
For kids or beginners you need to use more simple shapes and objects they understand. You can start sculpting with traditional cats or dogs, fruits and berries, cars and other simple figures without numerous and complex details. Gradually, with the growth of the level of skill and the young sculptors themselves, the work can become more complicated, moving on to the creation of figures, paintings and compositions.
The pinnacle of craftsmanship can be considered the creation of flowers from bioceramics, as salt dough is also called. Of course, even a child can make a simple chamomile, but only an “advanced” user can make a full-fledged bouquet of roses or a flowering branch of jasmine.
To learn how to work with salt dough, you need to follow the instructions step by step and not rush into complex products.
Various panels and paintings made from dough with salt
Creating pictures from dough is not as difficult as it seems. At the first stages of creativity, it is worth using a hint in the form of a photograph of the future “work of art.” For example, let's say you want to create a beautiful autumn landscape. Find beautiful photo with a few small details and use it for inspiration.
- A piece of thin plywood is suitable as a basis for the picture, but if it is unavailable, you can also use thick cardboard. A rolled out layer of dough is placed on the surface of the base. It can be glued with any suitable glue.
- All the details of the future painting are cut out or molded from salt dough and superimposed on each other as they move away from the background of the painting. That is, the objects furthest from the viewer will be laid out on the base first. This method will allow you to obtain very neat and expressive three-dimensional images.
- The finished painting is thoroughly dried and then painted. suitable paints. After the paints have dried, the painting is varnished and placed in a frame. The product is ready, you can hang it on the wall in your room or give it to someone who can appreciate it creativity and the talent of the performer.
If you use foil as a base for the product, the dried and painted part can be easily removed from it and then transferred to any other material. It could be thick fabric, stretched over a frame, glass, plastic, even metal. Such flat and at the same time voluminous products can be used to decorate caskets, decorate children's furniture, boxes with various things, or be used for identification, for example, lockers for things in a kindergarten locker room.


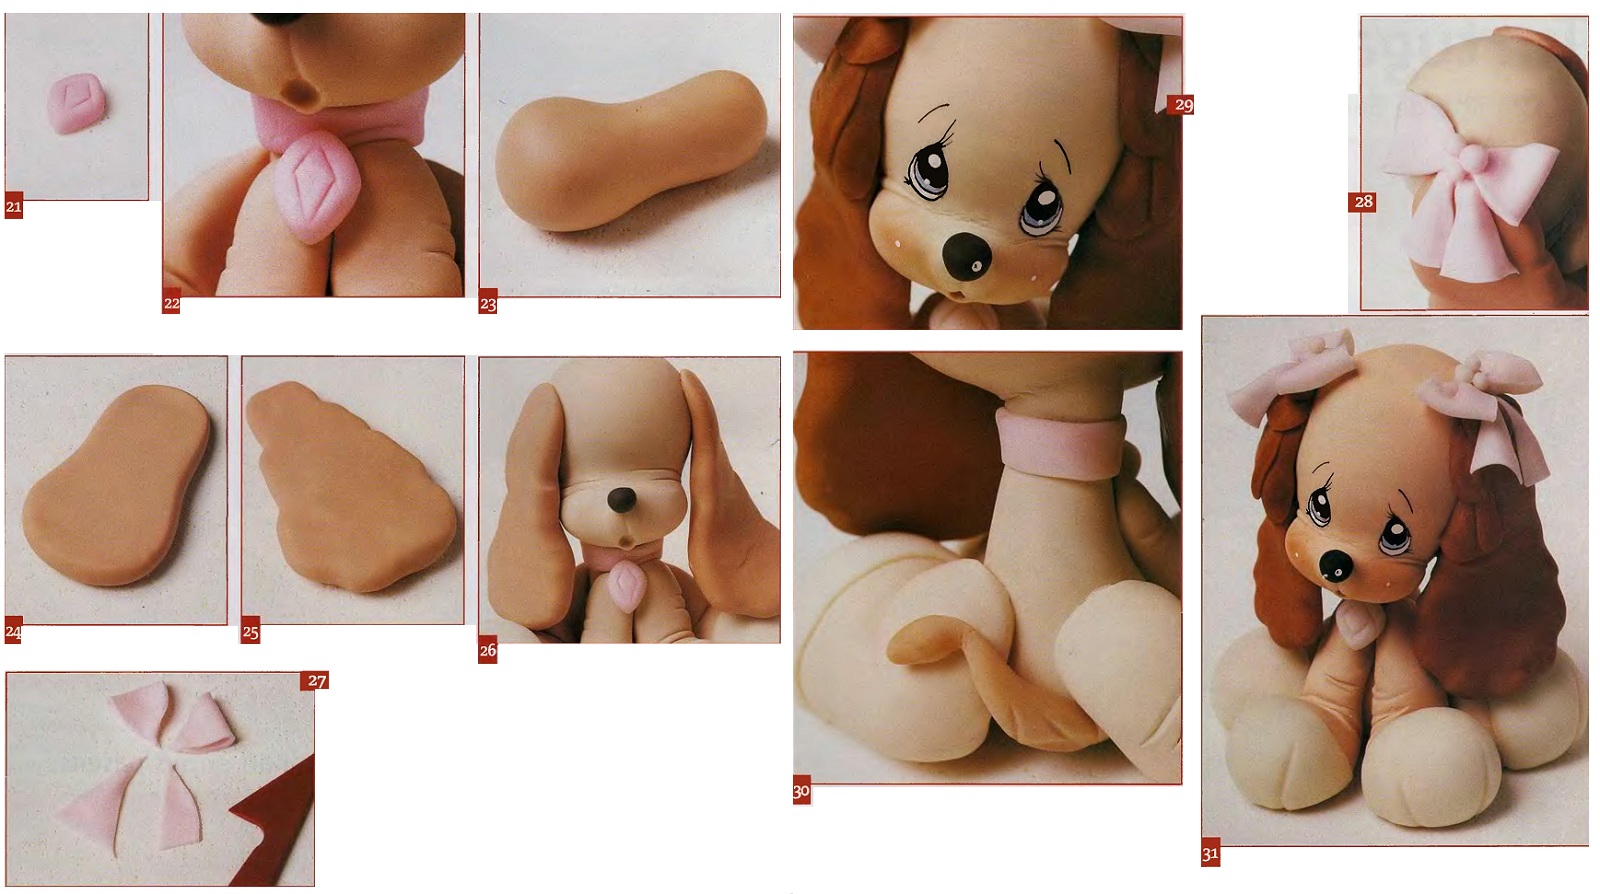
Bioceramic figurines and dolls
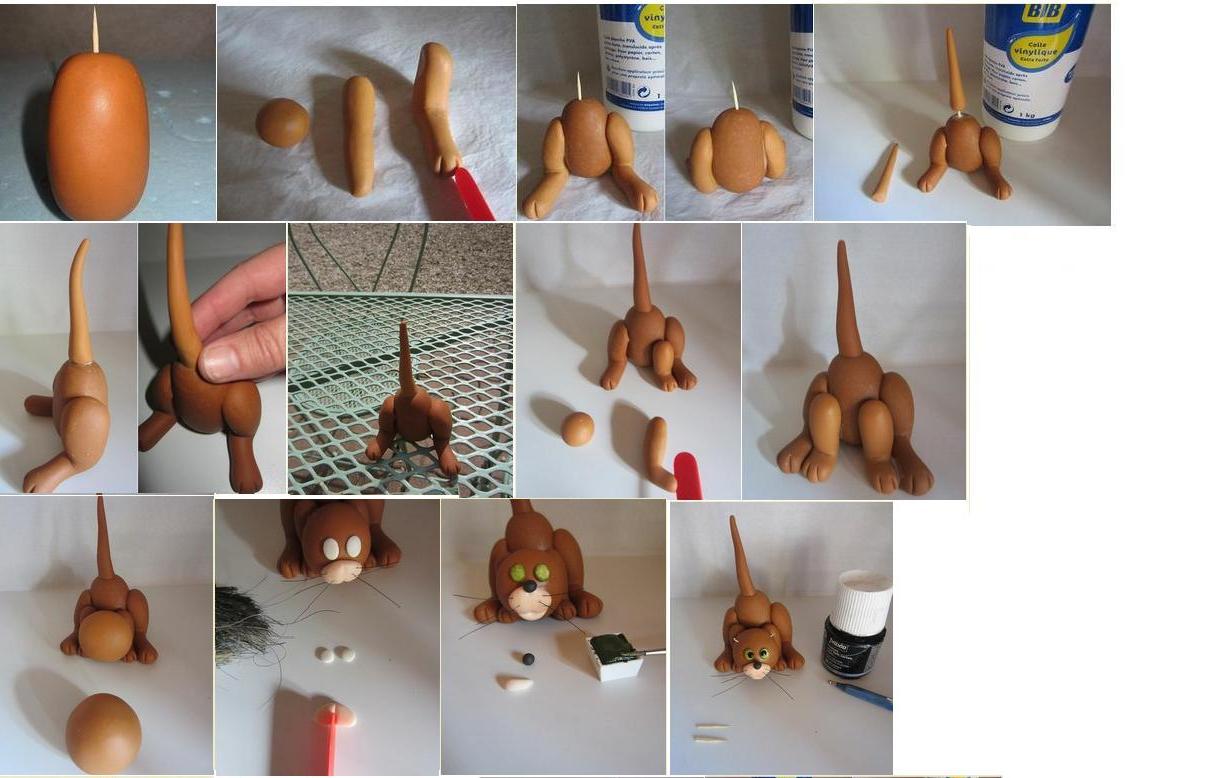
There is nothing more interesting for kids than sculpting “people”. They really like “cartoon” characters, for example, fixies, Masha from the cartoon about the bear, heroes of comics and fairy tales. From salt dough you can make not only figurines and dolls, but also various houses, benches, trees, fountains - in a word, everything that your imagination can suggest.
If you plan to make fairly large figures, you should take care of the internal frame and stands for stable standing. Matches with the sulfur head removed, plastic and wooden toothpicks are suitable as supports for small plastic pieces; for larger products, cocktail skewers or chopsticks for Asian cuisine may be required. Save wooden sticks from ice cream - they can become the basis of many different products.
For stability, the figures should be placed on a base made of salt dough in the shape of a circle or oval - this will ensure a flat plane.
If the figure is depicted in motion, it may be necessary to create a wire frame - it will help in sculpting and will not allow the finished product to crumble.
In addition to three-dimensional, three-dimensional figures of people and animals, you can create various fruits and vegetables from salt dough. They are beautiful both on their own and as part of various compositions. For example, elegant fruits can be effectively laid out on a beautiful dish and used to decorate the kitchen or dining room.
Flat shapes can be cut out using cookie cutters. Hearts can become original valentines, Christmas trees can be decorated New Year's table, flowers - used to designate places when seating guests at a party. Only imagination can limit the scope of application of various dough products.

Spectacular flowers and plants made from mucosa
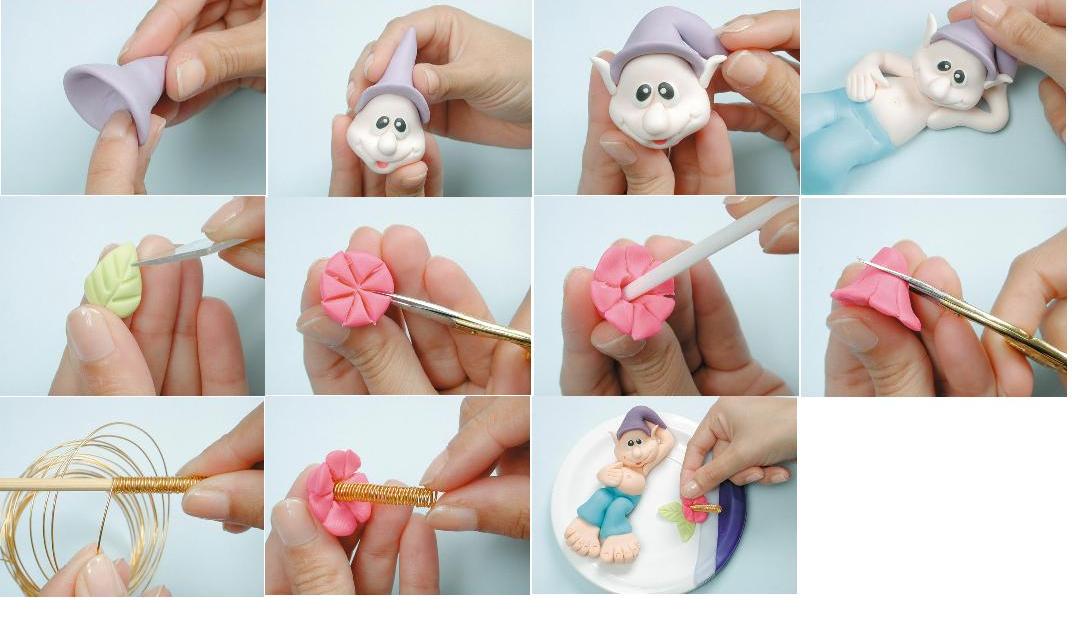
The pinnacle of craftsmanship is the thin and graceful flowers made from flour salt, as salt dough is also called. This work requires great perseverance, talent and accuracy, so it is more suitable for adults and teenagers. Kids can successfully sculpt stylized flowers of simple shapes.
How to make a complex three-dimensional flower, for example, a rose?
- You need to take a piece of dough and roll it into a drop-shaped core. The base of the drop is the bottom of the flower.
- Then you need to roll out the dough thinly and cut out rose petals of different sizes and shapes from it.
- By carefully placing one petal after another on the teardrop-shaped base, you can get a rose blank. To make it look like a real flower, each petal must be carefully bent, giving it a natural shape and outline.
- To complete the work, you need to create a flower cup with the sepals turned away, cut out some beautiful leaves with carved edges and connect all the parts together using wire and pieces of salt dough.
- The finished crafts are left to dry completely, and then painted in the chosen colors.

Using this principle, you can create any flowers, entire bouquets, complex compositions, and even imitations of plants in pots. The choice of plot depends on the imagination and creativity of the creator. A good example It could become a cute cactus that should be kept near the computer. Living plant, even something as resilient as a cactus may not survive in an office environment, but a lovely prickly creature made from salt dough will perfectly survive any disaster.

How to deal with possible problems
In any work, errors may occur, or things may not go at all as expected. Even if you do everything step by step, taking into account all the nuances, product defects may appear. This mainly involves cracking and chipping of individual parts of the product.
Cracks in crafts appear due to incorrect composition of the dough, errors in drying, or the start of painting the finished item when the base is not completely dry. If the cracks are small or the surface of the product is covered with a thin network of small cracks, they can be repaired.
To do this, you need to completely dry the item, and then carefully sand the defects using sandpaper varying degrees abrasiveness. You can bring the surface to perfection with “velvet” sandpaper. Then the remaining cracks can be filled with putty with a dough slightly diluted with water and salt. The procedure may have to be repeated several times if the cracks are very deep.
The lesson learned will teach that much attention must be paid to the basis of the future thing. more attention than even finishing - not only depends on its quality appearance the product itself, but also the very fact of its existence.
It happens that during the drying process part of the product simply falls off, this especially often happens with thin parts or fragile small fragments. Sometimes elements of the work break off during painting when the impact is too intense. In order to repair a toy with a straight break line, you can use regular PVA glue. Layers of glue must be applied carefully to avoid unsightly streaks. The finished and dried item must be sanded and re-painted and varnished.
If a product made from fresh dough breaks, just moisten the broken areas thoroughly with water, press the individual parts together and wait for them to set. Decorate the dried work as planned.
You can try to restore a damaged figurine with the loss of individual elements by replacing the missing parts with pieces of fresh dough. Dry and fresh pieces may not connect securely, so after the new pieces dry, they may need to be glued together for strength.
Give yourself and your children the pleasure of creativity, because working with dough is easy and enjoyable, and the cost of materials is minimal. The result of the work can exceed any expectations!
Handmade is a special type of art and creativity in which the author puts a piece of his soul and energy into his products, so it is highly valued. Even such seemingly child labor as making crafts from dough (also called bioceramics or testoplasty) has been popular among the peoples of Russia and all of Europe for centuries, and it pays off with interest.
Salt, flour and imagination
More than one recipe is known salt dough for sculpting crafts. The craftswomen took the traditional set of components as a basis, and made their own adjustments through trial and error. The base may include different kinds glue, Vaseline or hand cream, cream, potato starch, sunflower oil, glycerin. We’ll talk separately about what other tricks creative people go to in order to turn lumps of dough into fabulous masterpieces. Let's start with what recipes for salt dough for making crafts are especially relevant today.
A minimum of materials and financial costs are transformed into in capable hands into magnets, key holders, three-dimensional figures and entire compositions, depending on the skills and desires of the master. It will be interesting for children to come up with crafts made from fairly soft, pliable and uncomplicated material using available materials that can be found in any kitchen. Adults will help the little ones give vent to their imaginations and contribute to the development fine motor skills and imagination, will keep little creators busy with useful and good work.
Let's look at some recipes for salt dough for making crafts
1. Simple. Suitable for beginners.
To prepare the base you need:
- Equal amounts of flour and salt. Depending on the volume of material needed for the craft, you can take 200/300/500 grams of ingredients.
- You need 125/200/250 ml of water, respectively.
2. Entry level. We take the already known “simple” recipe, add 1-2 teaspoons of PVA glue to it. It will give strength.
3. Average level. Suitable for creating 3D crafts and plates. The base is quite rough and durable.
- Wheat flour – 200 gr.
- For the strength of the product, salt is required twice as much - 400 g.
- Water – 125 ml.
4. For jewelry parts.
- Flour – 300g.
- Salt – 200 gr.
- Water - half a glass.
- Wallpaper glue – 2 tbsp.
- Glycerin (sold at the pharmacy) – 4 tbsp.
5. For craftswomen with experience.
- 1 cup each of fine salt and flour. To stir thoroughly.
- Water is excluded, and bustilate is taken instead.
The recipe is excellent, but beginners are unlikely to be able to work with it due to the fact that kneading the base is difficult. But compositions based on bustilate have a lot of advantages: they do not break, do not become damp, and do not crack when fired.
You will also need:
- Tea spoon.
- Measuring cup (you can use a kitchen scale or measure the ingredients by eye).
- Plastic bag or cling film.
- Deep plate or bowl.
- Cutting board.
- Rolling pin.
- Any decorative elements. Buttons, cookie cutters, combs, paper clips, a fork - all this may be needed to give the dough a relief.
Secrets of craftswomen
Although the recipes are simple, there are some tricks and nuances noted by experienced masters. For example, you need to use exactly wheat flour, which does not contain impurities so that the parts do not deform during drying.
Coarse or iodized salt will most likely give the effect of a “fur coat” that covers the outer walls of houses. If you are not going to make a tiny bioceramic house, it is better to use fine salt for the composition. This product is not dissolved in water, but mixed with flour, and only then cold water is added to the resulting mixture.
For greater strength, instead of water (or with a small amount of it), use wallpaper glue, PVA or bustilate. But in this case, it is difficult to mix the base, so beginners should refrain from such recipes for now.
If you add a spoonful of vegetable oil or potato starch, the dough will be more pliable and pliable, but may crumble. This also needs to be taken into account in your work.
The workpiece should be elastic, dense, softer in consistency than plasticine, and should not stick to your hands, crumble, or contain lumps. The longer you knead the mixture, the better and more uniform it will be. After this, it is “sent” to the refrigerator for 2-3 hours, wrapped in plastic. Leftover material can also be stored at low temperatures, but not more than a month.
In the absence of special scales or a measuring cup, it is important to understand: the main components are different in volume, if we take 1 glass of salt, then 2 glasses of flour.
Dry it properly
Known 4 ways to dry salty food dough so that the craft lasted for a long time : in the air, on a battery, in the oven or a combined method. It is selected depending on the thickness of the work, the recipe used to prepare the base and the presence of convex parts in the composition.
Air drying salt dough suitable when there are free days, or even weeks, available. It is recommended to turn flat compositions over to ensure uniform evaporation of moisture, but volumetric or multi-layer compositions cannot be turned over without injuring them.
Things will go much faster in the oven. Before placing the work in gas oven, you need to air dry it for 2-3 days. Firing is carried out at a temperature of 50 degrees; it is not recommended to increase it in order to eliminate the risk of swelling of the dough and the appearance of cracks.
In an electric oven, the figures are fired from half an hour at a temperature of 150 degrees, to two hours at 50-75 degrees, and it is recommended to keep the door ajar. Before firing the dough, cover the baking sheet with food foil.
The base is ready for coloring when there are no damp spots on its front and back sides, and when you tap with a finger you can hear ringing sound, not deaf.
Drying on the battery – the process is controversial, because with the wrong approach the work will be hopelessly damaged, deformed and bursting. It is impossible to dry salt dough evenly on Soviet-type batteries; their surface is uneven. Modern radiators flat, which is why this type of drying finds admirers. Unevenness is smoothed out with paper, cloth or foil placed under the work.
Combined drying also involves an “open” method of influence sun rays, and firing.
It is important to remember: the product is not baked, but rather dried, and although high processing temperatures for salted dough are allowed, it is better to avoid it, and do not close the oven door tightly!
The final stage of creating salt dough for sculpting crafts
If you did everything correctly, then you can proceed to last stage work - painting, varnishing and attaching the ties on which our decorative composition will be attached to the wall.
You can tint the craft both while mixing the base and after giving it strength. In the first case, gouache paints, food coloring or natural coffee, cocoa, and beet juice are added to the water while preparing the mixture. This is done in the case when the entire base should be painted the same color. You can divide the total mass into several separate parts, paint them in different colors, and sculpt from multi-colored pieces. In the second, they paint the finished work.
Salt dough is absolutely unpretentious; it can be painted homogeneously even with acrylic, oil or construction paints. Jewelry details can be emphasized with ink, ink, felt-tip pen or marker.
On finished product the colors will be brighter if you varnish it before painting. If this is done afterwards, the work will be protected from moisture by a reliable “shield”. Do you like glitter? Add a little PVA to the varnish. I do not like? Use matte varnish.
Varnish to prevent fading of shades using liquid varnish. Its only “minus” is that it gets inside the base, so the varnishing process must be repeated several times, taking breaks for it to dry. If you take a thick transparent varnish or aerosol, then 1 use will be enough.
Step-by-step master class on salt dough recipe No. 2 “Octopus” key holder
Let's take 2 containers for bulk materials, 1 for water, and another 1 deep plate or bowl in which we will knead the base. I use items from a coffee set, they are almost “doll” size, but we don’t need them for this idea a large number of test.
Take 1 cup of fine “Extra” salt and 2 cups of wheat flour. Mix well.

 Add water. Knead the dough until smooth, making sure there are no lumps.
 The finished mass is pliable, dense, pleasant to the touch. Knead it well in your hand for 10-15 minutes. Place in a bag and put in the refrigerator for 3 hours (more is possible).
 We prepare a rolling pin, a fork for decorating the edge, a knife, a teaspoon. We divide the mass into 2 parts: the first is the base to which we will attach the volumetric parts, the second is the material for these parts.
Using your fingers, roll out the “sausages” on a hard horizontal surface. This is our main part; the tentacles and umbrella will be made from it. We sculpt one circle (the character’s face). We transfer the details to the “background”. Use a fork to frame the edges of the composition.
 We untwist the ballpoint pen and use the frame to make 4 holes in the base. 2 – for keys, 2 – for strings. Transfer the dough to a baking sheet and place in the oven for 2 hours at 50 degrees.
Today we will look at how to make salted play dough at home. Salt dough is rightfully considered one of the the best materials for modeling, especially small children are involved in this process. It has a lot of advantages. The main thing is its environmental friendliness, because the composition of salted dough includes only flour, water and salt itself. Also, unlike plasticine, this material does not leave stains. The child can easily do the modeling on his own, without fear that he will have to clean the whole house later. Another undoubted advantage is its low cost. It can be prepared in any quantity, depending on the size of the crafts, regardless of the price.
Main ingredients for the dough
 Flour. It is best to use regular wheat flour for this dough, without any impurities or additives, otherwise the figures may crack.
Salt. It is recommended to use fine salt, it dissolves well. Iodized salt is quite coarse; during cooking, grains of salt may not dissolve, causing the dough to crumble.
Water. It is necessary that she was cold enough.
Starch. It is used to achieve elasticity of the dough.
PVA glue. An optional component, but adding it to the dough will make the figures stronger. Before adding it, you need to dissolve it in water; one or two teaspoons of glue will be enough.
Dyes. In order to make colored dough, you can use various dyes, both food and natural origin(vegetable juices, coffee).
Required Tools
 To prepare the salty mass, you will need the following items: a kitchen board, a knife and a rolling pin. A wooden spatula, ruler and towel will also help.
But in the sculpting process itself, many more tools are involved.
You will need:
1) Rubber mat. It is convenient to sculpt on it, the salty base does not stick to it, it is easy to wash and dries quickly.
2) L any textured objects that can be used to create patterns. Experienced craftsmen use buttons, combs (to create lines), a garlic press, cookie cutters, a toothpick or a pen for making holes, beads, lace, and various shaped knives. You can use absolutely any items based on your imagination.
3)Baking paper or foil for drying the resulting figures.
How to knead the dough correctly
To mix the base for modeling, it is better to choose a deep bowl. You need to knead in it until a lump forms, and then you can work on a rubber mat or board.
Pour salt into the dishes and then add water. And you don’t need to pour out all the water at once. Pour in a little more than half, and if necessary, you can add it.
In the resulting saline solution, you need to gradually add sifted flour. While kneading, add the remaining water.
It is advisable to knead the mass longer, then the mass for modeling will be of the required quality. The end result should be a fairly soft, elastic dough that will not stick to your hands or crumble. For colored dough, the color should be uniform. You can make a colored base by adding dyes to it during the kneading process. In addition to food coloring, you can use beet or carrot juice, coffee, and cocoa.

Methods for preparing play dough
Recipe 1
The dough for this recipe is suitable for both beginners and beginners. experienced craftsmen. You will need:
1) Flour – 150 g;
2) Salt – 150 g;
3) Water – 100 ml.
Recipe 2
This recipe is more suitable for working with large, voluminous shapes. Products made from this material are more durable due to the double amount of salt. However, for beginners it will be difficult to work with such material; the dough is quite rough and non-plastic. So, you need:
1) Flour – 200 gr;
2) Salt – 400 g;
3) Water – 125 ml.
Recipe 3 
For creating small and delicate details, this recipe will come in handy.
1) Flour – 300 gr;
2) Salt – 200 g;
3) Glycerin – 4 tbsp. spoons (you can buy it at the pharmacy);
4) PVA glue – 2 tbsp. spoons;
5) Water – 130-150 ml.
Recipe 4
According to this recipe, the dough comes out very soft and pliable, best option for modeling with kids.
1) Flour – 500 g;
2) Salt – 250 g;
3) Water – 125 ml;
4) Sunflower oil– 1 tbsp. spoon.
Making a craft from salt dough
 After you have prepared the base for modeling according to the above recipe, you can begin to sculpt. The process of modeling from salt dough is as easy as from plasticine. Although flat crafts, for example, paintings, photo frames, are easier to make than voluminous ones. But if you try, you can make a magnificent three-dimensional craft. For such a figure you will need a frame (for arms, legs, head), you can make it yourself from matches or wire. First you need to make a base, then stick the dough on it. After the dough has dried, add the details. They connect to each other quite easily, just moisten the joint with water and press them together. See also .
It should be remembered that salted dough hardens quite quickly. Therefore, during modeling, the bulk of the dough should be kept under the film, removing it as needed.
The finished craft needs to be dried; this can be done in the oven or in the open air.
 To obtain the most plastic material, jelly is used instead of water. However, not store-bought, but made with your own hands. Need 1 tbsp. dissolve a spoonful of starch in half a glass cold water. Next, you need to boil 250 ml of water, gradually add water with starch, stir until a thick transparent mass is formed. Be sure to cool before use.
To make the colors of the figurine look brighter and more interesting, you need to apply white nail polish or enamel to it before painting.
We wish you inspiration, and let creativity be only a joy!