Alpine slide, we do it step by step with our own hands. Alpine slide - how to make a rock garden with your own hands How to design a slide in your country house
Kirill Sysoev
Calloused hands never get bored!
In your garden or summer cottage, it’s easy to create an atmosphere of pristine nature with the help of an alpine slide - a beautiful composition of stones and plants. It has been actively used for a long time landscape designers. Such a solution will not only hide any unevenness or ledge in the garden plot, but will also allow you to implement everything creative ideas.
Alpine slide in the country
Admiration for the harmony of a professional rock garden in pictures is often replaced by bewilderment: how to build an alpine slide with your own hands and where to get this material? In fact, anyone can create such a masterpiece in a country house or in an apartment using any available materials. Even if the cost of creating a professional rock garden turns out to be prohibitive, a flower bed surrounded by a random arrangement of stones would be a great idea. If everything is done correctly, then the maintenance of the alpine slide will be minimal, and you long years You will admire your rocky garden.

Rock garden design
The name itself indicates that the landscape design is reminiscent of the views of the Alpine mountains. The rock garden at the dacha should be a small copy of the area where gorges, rocks, plains, waterfalls and beautiful mountain plants are located. It is impossible to find two identical alpine slides, since each is the result of the invention of one person.
How to make an alpine slide without resorting to the expensive services of landscape designers? You should know what types they are divided into:
- Rocks. They are made from ordinary stone boulders. Placed in areas located on slopes.
- Mountain valley. You need large stones covered with moss or covered with bark.
- Lawn. Perfect option For flat area. Often this design is complemented by a mountain valley and rocks.
- Ravine. Great for small crevices. Looks beautiful with a small artificial waterfall or pond.
- Gorge. It acts as the main component of a landscape with several elements.
- Stone garden. Performed on a flat area in the style of a Japanese garden.

How to create an alpine slide with your own hands
It cannot be said that creating an alpine slide with your own hands at the dacha is easy. Landscaping the hill should begin with choosing a place for the rock garden. To do this, certain conditions must be met:
- find an open place so that the slide is visible from all sides;
- place the flower garden in a sunny, bright place, not shaded by trees;
- It is better to build a rocky hill and conifers in a space sheltered from the wind;
- high level groundwater reduced by drainage.

Alpine slide drainage device
How to make an alpine slide so that it is inexpensive? Do all types of work yourself, starting with drainage. To do this you need:
- pre-mark the future rock garden using pegs and a cord;
- dig a pit, which should be slightly larger in size than the rock garden, and the depth should be at least 0.8 m;
- fill the hole with pebbles, crushed stone or broken bricks to a height of 0.3 m, and fill each layer of backfill with water;
- pour 5-10 cm of sand-gravel mixture onto the top of the gravel layer, which is also filled with water and compacted thoroughly;
- dug and cleaned soil is poured on top of all drainage layers;
- to lay the rock garden you need to wait until the drainage shrinks, and this will take 2-3 weeks;
- an alpine slide of stones, as a rule, begins to be created in the fall so that the soil settles naturally by spring.

Stones for an alpine slide
After the base shrinks, a support structure is laid out around the perimeter, which is created from the largest stones. Their depth is about 60% of the volume. Small pebbles are placed next to large ones so that the rains cannot wash them away, otherwise the entire structure will be damaged. Between the stones you need to leave space for planting a flower bed, placing a home pond, fountain and other elements of the garden that are provided for according to the plan.
In order not to pay a high price for stones, they are looked for in local quarries or quarries. Often, in private households or on farms, people want to remove unnecessary stones. The required material is found at construction sites or abandoned sites. True, the choice is limited and you will have to take what is available. therefore, it is better to purchase stones of the same breed for the rock garden, which belong to general type.

Do-it-yourself rock garden - which plants to choose
For a rock garden, choose special vegetation. Flowers need to be selected taking into account the timing of flowering, the neighborhood different plants and other factors. How to properly make an alpine slide so that it pleases the eye with luxurious blooms not only in summer, but also in autumn time of the year? For arrangement beautiful flower bed you just need to select low growing plants, which bloom alternately. Low coniferous specimens (dwarf pine, cypress, juniper) look beautiful and natural. For an accent, you can plant a couple of decorative evergreen shrubs (boxwoods, barberries).
It is better to choose perennials, because the flower garden is created for many years. Preferred for the flowerbed are delicate small flowers that are associated with the mountain landscape: armeria, erinus, salvia, primroses, daisies and other varieties. Their choice is very wide, so it’s difficult not to overdo it with the variety of colors. In order not to violate the concept of the rock garden, it is better to first draw its diagram (drawing), which will indicate the flowering dates of the selected plants.

How to make an alpine slide in the garden yourself according to the diagram
The phased creation of an alpine slide requires a certain sequence of actions. When planning, it is taken into account that the rock garden looks most natural when its height does not exceed 1 meter. Alpine slide schemes make the tasks easier. Step-by-step instructions on how to design a rock garden:
- Site selection. South or southwest side personal plot preferable.
- Site preparation. Provides a high-quality device drainage system.
- Purchase and laying of soil. If the price allows, it is better to buy good soil. Make it yourself by mixing clay soil with peat 3:1.
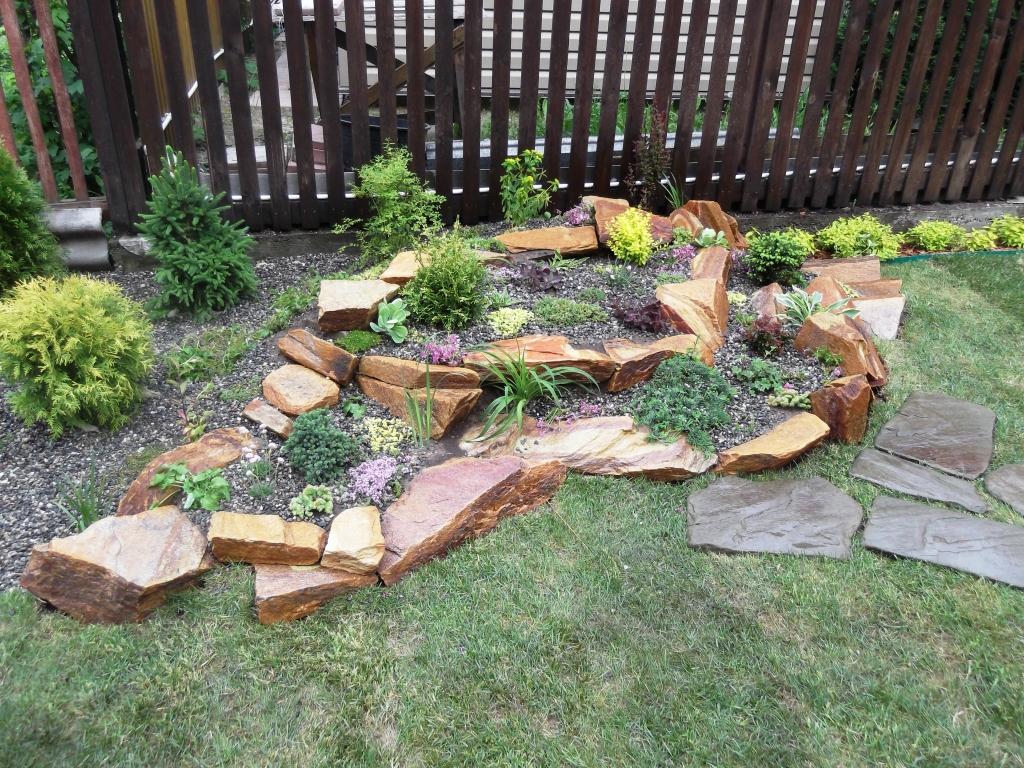
- Selection and placement of stones. Depends on the chosen style. It can be shell rock, granite, basalt, limestone, sandstone and others. The color and texture of the stones should be in harmony with the overall picture. To make them look natural, arrange them randomly.
- Selection and planting of plants. Place them so that they do not block the stones and the view of the entire composition. Flowers are planted in front, then low-growing shrubs, and dwarf trees in the background. Flowers of the same color are planted in groups.
- Paths and steps. They are designed to provide access to the flower garden for care. Avoid sharp corners or straight lines, because they do not exist in nature. For paving, strong and flat stones are selected, which are firmly fixed. Ground cover perennials or lawn grass must be sown between them.
The price of creating an alpine slide with your own hands
All elements for an alpine slide can be easily selected from a photo from the catalog and ordered in the online store. The cost of such a purchase will be much higher than collecting natural elements on your own, but the rock garden will also look more harmonious. Initial estimate for the installation of an alpine slide from professionals:
Video: making an alpine slide with your own hands
Found an error in the text? Select it, press Ctrl + Enter and we will fix everything!
Alpine slide- one of the favorite elements of landscape design, both owners of garden plots and design specialists. But, at the same time, it is also one of the most difficult. To make a rocky hill in your garden yourself, you need to follow a sequence of fairly clear rules.
Algorithm for creating an alpine slide:
1. Choosing a place in the sun.
2. Decide on the size and outline.
3. Selection and purchase of stone.
4. Drawing the outline of the rock garden on the ground.
5. Removal of the top fertile layer of soil.
6. Preparation of soil mixture.
7. Construction of a drainage system.
8. Vertical planning of a rock garden.
9. Water support on the hill.
10. Selection and planting of plants.
Choosing a place in the sun
A fragment of a mountain landscape is best placed on an elevated, well-lit area. In this case, those with a hilly area or slope are more fortunate. The rock garden will look most attractive against the backdrop of a lawn away from tall trees who can project their shadow onto him.
Since our rock garden is a hill, it will have slopes oriented towards different sides Sveta. The rock garden project should be designed in such a way that the observer for the most part surveyed its southern and southeastern sides. These slopes are made flatter than the northern and northeastern ones.
Deciding on the size and shape of the slide
No matter how you imagine an alpine hill in your imagination, it should fit harmoniously into the overall style of the garden and not look like a pile of stones from behind which the house peeks out modestly.
There are clear rules for determining the size of a rock garden for a specific area of land. On a plot of 6–8 acres, an alpine slide can occupy an area of up to 5–10 m2 and reach a height of 60 cm. The minimum size of a slide is 1.5 x 2.5 m. If you are the happy owner of a larger territory, recalculate based on the data numbers. The maximum height of an alpine slide with an area of more than 40 m2 can be up to 1.5 m.
Selection and purchase of stone
The size and number of stones are chosen according to the size of the rock garden. For a rock garden measuring 1.5 x 2.5 m and 0.5 m high, you will need about 1t of stone.
To create stone compositions, stones of one type are used, mainly local, which is the easiest to obtain and which will be most harmoniously combined with the area.
Stones and plants should emphasize the beauty of each other, therefore, in order for the final composition to correspond exactly to your ideas of beauty, choose the stones yourself and be present when they are loaded and unloaded.
Do not take stones chipped with unnaturally sharp edges or, conversely, perfectly smooth river ones. The best option would be a moss-covered stone that you accidentally found in the forest - and you don’t need to pay, and nature itself has already worked on the design.

Drawing the outline of a rock garden on the ground
On the site that is intended for the construction of a rock garden, we draw the contours of the future structure. This step seems simple at first glance, but its implementation is the basis of the entire process of constructing a slide. After drawing the outline of the structure (using a rope, for example), view the future composition from all vantage points; you may need to adjust the boundaries and location on the ground.
Removing the top fertile layer of soil
It is important to carefully remove the top fertile layer of soil, which, after sifting, is added to the substrate to fill the space between the stones on the hill. The top layer of soil is removed to a depth of 20–30 cm over the entire area of the future rock garden. It is advisable to carry out such work when the ground is dry enough to be sifted. If the area is heavily overgrown with grass weeds, it is necessary to apply herbicides, otherwise the seeds remaining in the soil will germinate on the hill into dense turf.
Preparing the soil mixture
The substrate for filling the space between the stones on an alpine hill should be sufficiently nutritious and moderately moist. Prepare it yourself from 1/3 turf land, 1/3 peat or compost, 1/3 coarse sand, you can also add perlite. If the land on the site is sufficiently fertile, then upper layer, which was removed to prepare the pit for drainage, is used to prepare the soil mixture. Many gardeners recommend adding fertilizers to the substrate to increase soil fertility. But this is by no means applicable for alpine slides. Plants on such soil become very elongated, their appearance is dominated by green mass, and flowering becomes less abundant; in addition, aggressive ground covers quickly grow, covering the stone, as a result of which the whole point of a rocky garden is lost.
The soil mixture is poured onto the hill at the same time as the stones are laid, compacting it a little. At the final stage of work, the resulting hill must be well watered, and then the resulting recesses must be corrected.
Drainage system design
Creating a drainage system for an alpine slide is not always required. Drainage is necessary in areas with loamy or clay soil, as well as in flat areas with high groundwater levels.
For drainage, crushed stone or other small stones are used, which are poured in a layer of 0.1 - 0.3 m. The drainage layer is poured unevenly - where the hill is planned to be raised, the layer will be thicker.
Sand is poured on top of the rocky layer in a layer of 0.1 m. Moreover, in places of future elevations it is thicker.
The next stage of building a slide will be abundant watering, after which the drainage will become a little denser and all the shortcomings of the work done will appear. But at this stage everything will be fixable.
Vertical planning of a rock garden
The most important stage in the construction of a slide is the installation and grouping of stones. Using stones, three-dimensional compositions are created. Moreover, each individual group must differ from the neighboring one in size, ratio of sections and color. When imitating a mountain landscape, avoid regular geometric shapes.
For vertical planning of the rock garden, the most large stone. Its location should be shifted from the center to the east side. Then smaller stones are laid, adhering to the rule - the closer to the border of the hill, the smaller the stone should be. Some groups of stones are placed close to each other, while gaps are left between others, avoiding symmetry as much as possible. When laying stone, it is necessary to leave soil pockets for planting.
The stones should not swing, so small recesses are prepared for their base, at least 1/3 of the height of the stone itself. If necessary, add soil or small stones.
If you are the owner of a completely flat plot, then you will need imported soil at the rate of 0.5 - 0.7 t/m2.

Water support on the slide
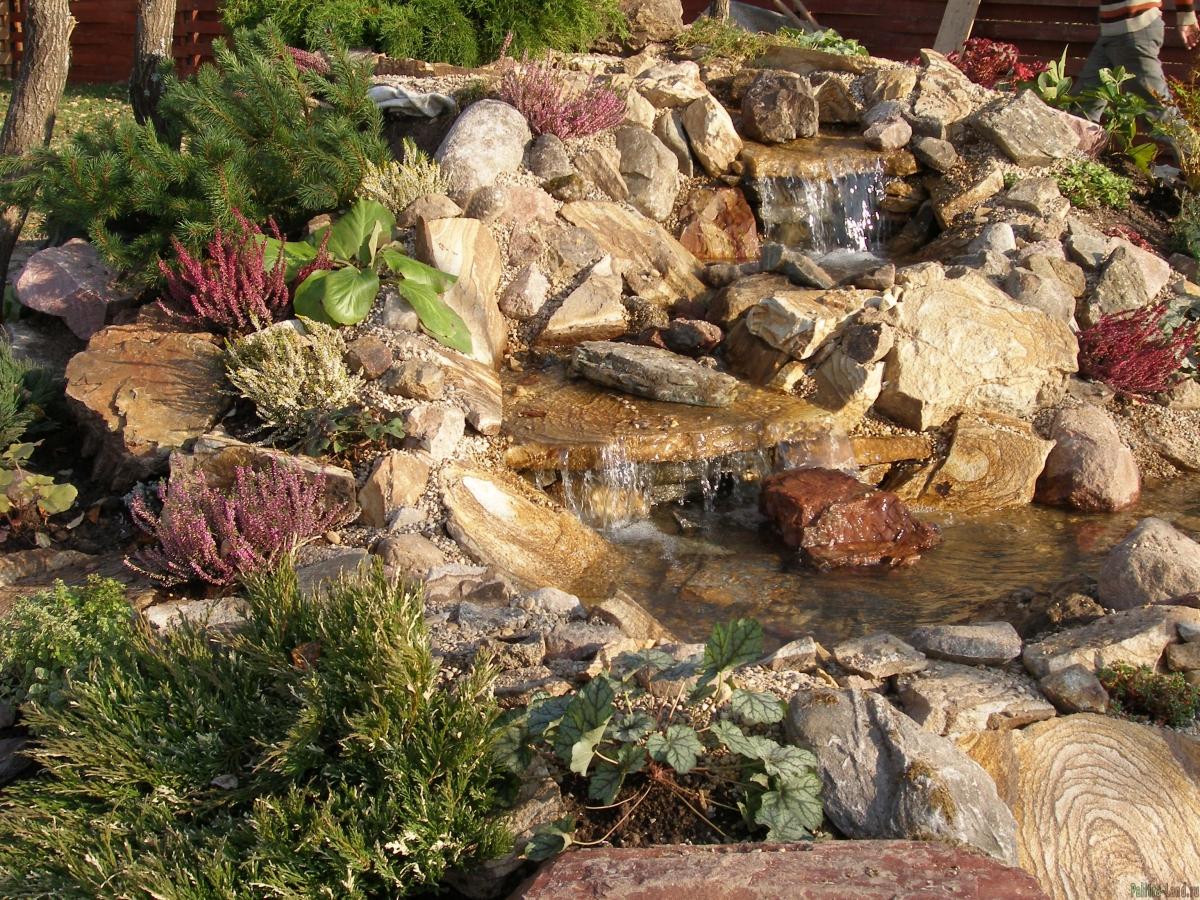
The combination of water, stone and plants in an alpine slide is the most successful option for implementing your project. You can decorate a rocky hill with a babbling stream, which will flow from stone to stone to a reservoir located on the south side at its foot.
Selection and planting of plants
Planting begins after several abundant waterings, when the earth settles and the resulting depressions are filled up.
The most light-loving plants are planted on the southern or southeastern side of the hill. Large plants are planted near large stones, small plants - near small ones, avoiding close placement of plants on the hill. Ground cover plants, which grow quickly, are planted at 3 - 5 pcs./m2. Cushion-shaped perennials are placed 8 - 12 pcs./m2. Dwarf trees and shrubs are planted separately or in small groups in such a way as to emphasize the asymmetry of the hill. Under no circumstances should trees be planted in the center of a stone placer or on its top.
After planting, the soil is mulched by screening out the stone that was used in the construction of the rock garden.

10 mistakes when building an alpine slide:
1. Construction of a rock garden in an area with close groundwater without drainage.
2. Placement of the rock garden against the background of outbuildings.
3. Unstable placement of stones.
4. Use of several different rocks in one composition.
5. Use of fragments of concrete slabs.
6. Using rich soils and fertilizers that increase fertility as a substrate.
7. Maintain symmetry when laying stones and planting plants.
8. Ignoring watering the hill after installing drainage and at the final stage.
9. Planting ground covers that grow quickly next to small rosette or very rare plants.
10. Planting annual plants.
Natalya Vysotskaya, landscape designer, Ph.D. -X. Sci.
And to make your idea of the ideal alpine hill more complete, we invite you to admire the photo gallery of the most interesting (in our opinion) rock gardens and rocky gardens.
We also remind you that in our store you can purchase from private collections. On sale there are always seeds of gentians, carnations, saxifrage, primroses, penstemons, bells and other mountain (and not only!) species of plants. The assortment is constantly updated.
Every modern, well-appointed dacha must be decorated with either a garden or various kinds of flower beds. At the same time, the size of the dacha plot does not have to be huge at all in order to realize even the most daring ideas. Nothing interferes with small area create something beautiful, unusual and elegant. For example, a miniature alpine slide, which you can easily create with your own hands when using available materials even for beginner gardeners.
Such a compact rock garden has several advantages over a regular flower garden. Firstly, it looks much more original. Secondly, it takes up little space, and thirdly, it does not require complex care. For those who strive to master the arrangement of alpine slides, the creation miniature version will be great practice.
Anyone can build an alpine slide with their own hands, even small areaWhat is the difference between a rock garden and a rock garden?
Rock garden and rock garden are two different ways flowerbed designs that have a lot in common. Due to the large number of identical characteristics, sometimes even gardeners with extensive experience are confused about these concepts. Both of them are a flower garden, for the arrangement of which flowers and stones are used. What is the main difference between them?
A rock garden is a garden made of stones in its pure form. When creating it, only one type of stone is used. They are laid in two ways: chaotically, without observing any order, or in parallel rows. This helps create a visual effect wildlife. The secondary elements of the composition are plants and flowers, which in this case serve only as a natural floral background.
It is the role of plants in the flower garden that is the main distinctive feature between an alpine hill and a rock garden. In this type of stone garden, such as a rock garden or mini-rock garden, the main emphasis is on the plants. Its composition consists of various types of colorful, unusual flowers and their combinations, turning the flower garden into a small magical world from which it is impossible to take your eyes off.

 A rock garden differs from an alpine slide in its emphasis on natural beauty stones, flowers in this case serve only as an addition
 An ideal place to create a small rock garden
When planning to create a small alpine slide with your own hands, it is important to choose the right place. For example, a one-sided mini-slide is best placed next to the wall of a house or near a fence, as an addition to a general flower garden or as a separate element of the garden. A round flower bed will look great in the center of the lawn. Thus, all its sides will be available for review. Ideal place for a mini rock garden in a flowerpot - a porch or terrace.

 Interesting idea: the roof of the cellar gradually turns into an alpine slide
 Also, when choosing a place for a rock garden, it is important to consider not only how it will look, but also pay attention to other points related to its placement:
- Illumination. The place must be sunny so that the plants receive required amount Sveta. A shaded location will cause the flowers to fade and become elongated.
- Lack of trees nearby drainpipes. When the flower bed is located under a tree, its leaves will fall off and spoil the appearance of the entire composition. Rainwater from drainage system may cause erosion of the ground.
- In the flower garden you should place “neighbors” who get along with each other and have similar care and growing conditions.

 An open, well-lit clearing will be an excellent place to build a rock garden
 Options for small alpine slides
When starting to work on a miniature rock garden with your own hands, you need to think about the choice of style in which it will be decorated; it completely depends on the desires and imagination of its creator. Photos of the most spectacular and colorful mini-rock gardens can help you decide on a specific option, for example:
- The generally accepted alpine slide in miniature. It is a stepped structure that is installed directly on the ground. It can become a wonderful decoration for the entire flower garden as a whole.
- Mini rock garden combined with a pond. The amazing effect is achieved thanks to the presence of even a small bowl at the base of the stones, which will imitate a pond. This element of the composition will make it even more charming and attractive. An addition in the form of a mini-waterfall or fountain will make this place the most attractive in the entire dacha area.
- Small alpine slide in a flowerpot. An excellent solution in case of lack of free land plot. You can always find many photos of such mini-rock gardens and not only in flowerpots, but also in other various containers.
 A rock garden can be completely different - from a mini composition in a pot to a large slide with waterfalls and a fountain
 Materials for designing a slide
To create a small, simple alpine slide, even novice gardeners do not need a lot of skills or much effort. The main thing is to get in a creative mood. The process itself will not take much time, since a mini rock garden is a completely small and not labor-intensive project.

 Organic stone placement creates the impression of a natural landscape
 Once you decide to set up a small rock garden with your own hands, you will need very little material, which is definitely available at any dacha:
- several large stones;
- gravel;
- ceramic shards.
Sometimes even old sinks or leaky basins can act as scrap materials. They can also be transformed into a genuine floral masterpiece.
To make the composition more interesting and original even with a minimum of vegetation, preference should be given to stones with unusual shape and colors. It is advisable to surround cobblestones of a common gray color with gravel of other shades or bushes with bright flowering.
Choosing plants for a small alpine hill
What plants will make up the composition of the mini-alpine slide is determined by the area that the latter will occupy. In the case of small areas, miniature plant species are also required. The most suitable are dwarf-sized conifers, as well as rocky species that grow slowly. Among them you can choose:
- boxwood;
- juniper;
- herbaceous erica;
- saxifrage;
- Phlox awl-shaped.
If we want to dilute the composition bright colors, you should plant low-growing plants that have small flowers, for example:
- creeping thyme;
- aubrietta;
- lobularia.
In the case when the mini-garden made of stones will not remain for the winter, then it is permissible to include cacti and succulents, for example, crassula or agave, in its composition. With the arrival of autumn, a miniature rock garden in a flowerpot can be simply removed from the street into the room.

 Plants for the slide should be unpretentious to environmental conditions
 The sequence of creating a mini rock garden for beginner gardeners
In various sources you can find a lot of diagrams and step-by-step instructions with photos for creating mini rock gardens. The simplest sequence of actions, which is easy to implement even for a beginner in gardening, is as follows:
- marking the area for a mini-alpine slide;
- placing stones and fixing them in the ground;
- planting plants between stones.
Site preparation
When starting to arrange a flower garden, you should remove all weeds and roots from the area intended for it. This will save time and effort in the future.
Since the mini-rock garden occupies a plot small sizes, a pit about 50 cm deep is enough. A similar hole should be dug in the place where you plan to place most of the stones and filled with drainage. The latter may be suitable for ordinary construction garbage, which is not toxic. After compaction, it is covered with earth. It is important to carry out intermediate watering of the soil with water, which is added in layers. This measure promotes better compaction and will prevent subsidence of your creation in the future. To mark the tiers of the rock garden, twine and stakes are used.
 When placing stones, you can be guided by your own taste and general form resulting rock garden
 Quite often, one of the most impressive stones is placed in the middle of the flower bed. It is installed on a special substrate, which is buried in the ground until its base is level with the ground. A plaster bowl or a substrate made of cement mortar can serve as a support. First you need to install the support in the right place, drowning it in the ground, and then lay a stone on it. You can make the placement of the stone reliable by using cement mortar or gypsum.
Next, using a similar principle, you should start arranging and securing smaller stones. When creating an alpine mini-slide, the most commonly used materials are shell rock, dolomite and tuff. Samples with natural colors and structure look especially elegant, although modern landscape design methods allow the coloring of stones, the appearance of which does not fit well with the overall composition. Usually, when designing miniature rock gardens, they try to use small samples of stones from one color range, but it is quite possible to use bright colors that create contrast to the main background. This will add gloss and elegance to the flower garden.
When installing stones, you must adhere to the descending rule, that is, arrange them in height that decreases downwards. The lower stones should act as a reliable and stable support for the upper ones. There is also an option for layering stones, which also looks very impressive.
Stones that have an even and flat shape should be laid out in layers, round stones should be placed one at a time or several together. The main thing is that the number of stones in the group is odd, and it is necessary to focus on one of them.
Disembarkation
 Before planting plants on a hill, flowers can be placed directly in pots and look at the general appearance of the composition; planting can be done after all the amendments have been made
 In the process of placing and installing stones, it is important to leave space between them, which will later be occupied by the plants chosen for the mini-rock garden. These spaces between the stones must be filled with fertile soil. You can plant plants and flowers not only between, but also around the stones. The largest plants should be placed first. Concerning dwarf trees, which have quite a powerful root system, then they need to be planted when the first stones are still being laid. At the end, medium and small plants are planted. At the end of all the work, the flower garden should be watered. After this, all that remains is to apply the final design touches. To do this you will need sand, small pebbles and any elements of garden decor.
How to install a miniature pond
A miniature pond in the composition of a small rock garden will give it a special appeal. To create it, you will need a regular container designed for artificial reservoirs. You can buy such a device at any store specializing in garden supplies.
However, you can build such a container yourself from scrap materials, for example, an old basin. First you need to mix a cement solution with a consistency similar to thin sour cream, and add medium-sized crushed stone to it. The inverted basin should be covered evenly with the resulting mixture in a layer 1-2.5 cm thick.

 When creating a rock garden with a pond, it is not at all necessary to purchase expensive structures; you can use unnecessary containers, for example, a bathtub or basin
 It wouldn’t hurt to create additional decor. It may be a pattern scratched on outside, or laid out mosaic. Ceramic shards are suitable for mosaics, broken glass, shells and pieces of tiles. Decoration should be done when cement mortar still remains damp. In this option, there is no need to add crushed stone to the solution.
Now you should prepare a place to install the dried container. To do this, a hole is dug, at the bottom of which expanded clay or gravel is poured as drainage, in a layer of 5-7 cm. The container itself is placed on top of the hole. You can beautifully lay small pebbles along the edge of the created pond.
- Choosing the right plants. Playing important role in the composition, not all flowers are suitable for this type of flower garden. For example, ordinary garden flowers, such as phlox or daylilies, do not look in the best possible way among a pile of stones. It should be taken into account that garden types of flowers require vast open spaces, while a mini-rock garden has rather poor soil. As a result, plants simply will not be able to exist normally. When choosing plants for a miniature alpine hill, you should choose those species that are compact and winter-hardy.
- Final general view. When drawing up a plan for the future mini-flower garden, it is important to take into account how it will look in the end. The higher the slide, the more stones should be in its composition. Thus, plants, especially on the upper tier, will be protected from freezing. Everything turned out correctly if your creation resembles mountain landscape with rugged rocks, fertile gentle slopes and shaded hollows.
The Alpine slide is a fashionable attribute for arranging modern garden and park areas. Making a rock garden at your dacha with your own hands: step by step photos, diagrams, selection of plants.
Choosing a location for an alpine slide
When choosing a place for an alpine slide, it is important to provide for the following conditions:

IN landscape design There are many styles of garden design, including elements of a desert landscape, rocky gardens, ponds and bridges, which must be in harmony with the built slide.
Making a slide with your own hands is most preferable when decorating a garden. At independent execution work, you can avoid high costs for the services of a landscape architect. Having step-by-step photos and diagrams for arranging the slide, it will not be difficult to complete the work of constructing a rock garden with your own hands.

It is very important to do it right preparatory work so that the slide is stable
Alpine slide - preparation
First you need to determine the location on the site where the slide will be located. Perennial shrubs and trees should not grow nearby, which could over time obscure the plants on the hill. A place that is open on all sides and accessible to view from all corners of the garden must be dry. High level groundwater will adversely affect the durability and strength of the slide base. In this case, the groundwater level must be lowered using special drainage.
Do-it-yourself drainage under an alpine slide (step-by-step guide).

Do-it-yourself alpine slide arrangement diagram
While it's happening natural shrinkage soil, you can draw up a diagram, determine the location of boulders and stones on the hill, and select the type of vegetation for planting. To create a rock garden you will need:
- natural stones, including pebbles;
- coarse sand;
- ornamental plants and flowers, including – miniature trees and shrubs;
- sphagnum moss.

Scheme: arrangement of an alpine slide
The diagram and detailed plan according to which the rock garden will be created must take into account that the construction of the slide is carried out at a height of 1 to 3 m.
Advice. If the height of the rock garden is over 1 meter, a slide core is required.
The Alpine slide is a very unusual element of the garden, changing its appearance several times a season.

Scheme: alpine slide in layers
Rock garden stones - choosing the right ones
Typically, when building a slide, natural rock stones are used: basalt, granite, sandstone, limestone, as well as rare rocks that are characterized by low porosity and strength. It is undesirable to use tuff, shell rock and dolomite to construct the slide. These rocks absorb water strongly because they are porous, so the stones quickly collapse.

Stones for an alpine slide must be durable, different sizes
The shape and color of the stones are of great importance. You should avoid round-shaped stones, as well as excessively sharp-angled boulders. Stones of different colors look harmonious only on alpine slides of a certain type. Classic version Arranging a slide involves using stones of the same type, but of different shapes.

Scheme: deepening stones for an alpine slide
The stones are placed on the hill so that the edges in the viewing area have the most attractive shape. Stones with defects should be disguised by placing them in the most favorable way. Stones should be laid taking into account size and weight, ensuring the most harmonious appearance created slide. Stones should be placed randomly, in the most natural way, so it is better not to use stone blocks and artificial boulders made industrially.
DIY Alpine slide - selection of plants
The construction of an alpine hill, especially the selection of plants, requires additional knowledge about plant varieties and agricultural technology. Plants are selected depending on the type of hill. A rocky hill for sunny locations requires specific, drought-tolerant plants. The classic version of the rock garden involves planting miniature trees and shrubs, perennial herbs and flower crops.

Example No. 1. Decorating an alpine slide with plants
They have proven themselves excellent when planted in rockeries: fescue, lavender, rock alyssum, geranium, sedum, Iberis, young, lumbago. Small-bulbous plants planted in small groups feel great on rocky hills: crocuses, scylla, miniature hyacinths, low-growing tulips and hazel grouse. Small-bulbous plants bloom in the spring, when few plants are still blooming and the hill looks unpresentable. Everything changes when bright, blooming crocuses appear from under the snow.

Example No. 2. Plants for alpine hills
To create a highly decorative slide, it is necessary to provide for planting perennial plants having different flowering periods. Then the slide will look unusual and decorative throughout the entire period. A riot of colors flowering plants will please the eye from spring to autumn.
It is especially important to consider the height of the plants used when planting in rockeries. Too tall specimens should not depress low-growing varieties, thereby influencing their full development. Bright plants should be placed in the foreground, in the viewing area.
The basis of the composition are miniature trees, especially conifers: spruce, juniper, cypress, pine. These plants have different shape crowns and look great on an alpine hill.
Decorative flowering shrubs used for arranging an alpine hill: rhododendrons, Erica, blueberries and lingonberries.
Perennial crops perfectly complement the alpine hill: bergenia, astilbe, daylily (low-growing), drooping reed.

Alpine slide surrounded by lawn
Advice: when forming a rock garden, you should give preference to decorative deciduous plants that retain their beauty even in the absence of flowers.
How to properly care for a rock garden?
In the first year, you will need to add soil several times, which is washed away during watering and precipitation, and also, if necessary, strengthen the stones. View various videos and photos taken by professional landscape designers will help you complete this work correctly. The soil is poured carefully and compacted.

The soil should be evenly distributed between the stones
Caring for plants involves timely watering, removing faded flowers, damaged leaves, and pruning. During the season, plants should be fertilized several times with appropriate fertilizers. You should not use nitrogen fertilizers, they cause rapid growth of the plant, which should be avoided when planting on a hill.
Advice. Do not overfeed the plants on the alpine hill. Plants should not be overgrown.
Water the plants carefully using a hose or watering can with a sprayer, making sure that the soil is not washed away.
It is advisable to strengthen loose and falling stones.

Various small bodies of water will look very beautiful on an alpine hill
If necessary, plants are treated with pest control agents. Diseased plants that cannot be cured must be removed and the soil replaced at the site of their growth.
When replanting plants, you can use a special drug - epin - to relieve stress.
Alpine slides in landscape design

An alpine slide that does not require painstaking care will be a wonderful decoration for the entire summer cottage
The design of park areas increasingly includes the creation of decorative rock gardens. The rock garden serves as a continuation of the rocky gardens and is in perfect harmony with ponds, bridges, decorative lanterns, lawns and vertical gardening. Creating an alpine slide with your own hands on a summer cottage will perfectly decorate the area and add charm and variety to the landscape design of the area.
How to create an alpine slide from scratch: video
Alpine slide: photo


Relatively recently in landscape design ridges and plaster sculptures have been replaced by new types of site decoration - rock gardens . They are settled in rich estates and on summer cottages, in city gardens and squares, on lawns near offices and in restaurant areas. Properly and tastefully selected stones and plants will allow you to create a zone of luxury, aesthetics and peace even on the most modest piece of land near.
Being a unique and very labor-intensive decoration of the landscape, rock gardens seem to be complex in execution and hard-to-find decorative elements. However, if you understand the technology of creation, then an alpine slide at the dacha can be built without the involvement of expensive designers .
A piece of the Alps at your dacha
- When developing the design of an alpine slide, you need to take into account that this is an imitation of rocky natural areas. This means that the basis of the composition should be stones and creeping low plants, characteristic of high-mountain areas. And the definition of “slide” dictates general shape rock garden - a hill with mandatory elements: base, slopes and top.
There are several options for rock gardens, which repeat their appearance in different areas of the mountainous terrain:
- rocky cliff – a pile of practically bare large boulders with a minimum of plants in niches and “pockets”;
- mountain slope – a complex high composition of stones of different sizes and with a wide variety of creeping and low-growing plants;
- valley in the mountains – large stones, partially protruding from the ground, surrounded by abundantly flowering ornamental plants;
- gorge- the most difficult to implement, but also the most spectacular type of rock garden, which can be placed in a natural hollow, framing the slopes with stones and planting representatives of rock flora.
A separate species is considered rockery- a garden of rocks, which are the main " actors”, unlike a rock garden, where stones serve as a backdrop for plants.
How to make an alpine slide in a small area?
If you have firmly decided that a self-made alpine slide will become the decoration of your garden, step-by-step instructions will give you the opportunity to avoid gross mistakes and get the desired result.
Before starting work, sketch out a sketch of the rock garden - this will help you decide how much area it will occupy, what configuration it will have and how many tiers you will make on it.
You can even roughly estimate how much an alpine slide will cost you - a diagram drawn to scale will help you calculate how many and what kind of stones you will need, how much drainage, sand and soil will need to be prepared. You need to make a diagram in relation to the area in order to take advantage of all the advantageous moments.
When deciding on the location for the future rock garden, do not forget that you will need to look at it - choose the most favorable angles. Also, think about it - you might want to spend your time near him. free time. Then you will need an adjacent flat area with paths, space for a table and fireplace.
Advice! Planted plants for an alpine hill will need solar heat - this means that the slopes must be oriented to the south and east.
Very interesting visual effects will be obtained by using natural uneven terrain - decorative elements inscribed in the natural landscape will be a great addition to it.
- The next step is to transfer your diagram to the site. Make the markings using a string or filling the required lines with a contrasting material - sand, lime. This will allow you to look at the proposed location of the rock garden from the outside. You may decide to slightly change its configuration to suit the terrain.

- The largest boulders are placed along the perimeter of the prepared site. If necessary, they can be buried in the soil - then they will have a more natural appearance. The internal space is filled with soil, which will become the basis for the next tier, as well as a habitat for plants.
- Having retreated the calculated distance from the first row, insert the next chain of stones, maintaining the desired configuration of the rock garden.
Advice ! When laying large stones, leave free space between them, which will be filled with soil - the planted plants will need space to develop the root system.
- Having completed required quantity tiers, decorate the top. To do this, you can lay one large stone, or use several small ones stacked in a pyramid. This will prevent erosion of the soil, and will also complete the composition.

Advice! It is better to begin work on laying a rock garden in the fall, then by spring the soil poured between the stones will settle and it will be possible to fill in all the resulting voids. You will also have the opportunity to make final adjustments to rock placement before planting.
Advice! The main rule is that a rock garden should look decorative and beautiful even without flowers. Stones must be harmonious and balanced to create a stable and extremely natural composition. The less symmetry it has, the more organic it will look.