Correct installation of a chimney on the roof. The passage of a chimney through the roof: its significance, design options. The passage through the roof for a stainless steel chimney
The appearance of chimneys made from sandwich pipes raised many questions among inexperienced developers, especially the elderly. They constantly react with great caution to new technologies, give preference to traditional solutions and consider only them to be the most correct, time-tested and with numerous users. But this is not always the case, new Construction Materials and technologies can significantly simplify the process of building a house, improve its performance, reduce costs, increase safety, etc. Such technologies also include chimneys made from sandwich pipes.
In order to better understand the installation technology, you need to become a little familiar with the operational parameters and technical characteristics of modern chimneys.

The chimney must meet two main requirements: guarantee the necessary draft and be safe from a fire point of view. The installation of any chimney, including those made from sandwich pipes, must necessarily meet these requirements; it is with their implementation that work should begin.
How to choose the diameter and location of the chimney
The amount of thrust depends on several factors.

These are the main ones regulatory requirements, but there are also fire safety standards. All of them are based on the fact that wooden structures located next to pipes cannot heat above +400°C. It is at this temperature that wood ignites. Specific distances are not regulated; it all depends on the temperature of the exhaust gases. The distance is influenced by power and coefficient useful action boiler, thickness of the thermal insulation layer, ceiling height and attic space, outside temperature, etc. The science that describes these dependencies is called thermal engineering and belongs to one of the most complex branches of physics.
What to consider when choosing a chimney
As mentioned above, the task of the chimney is to safely heat residential premises. Pipe parameters depend on many factors and must be taken into account. Otherwise, no matter how the chimney is installed, use stove heating It will be impossible, you will have to buy new sandwich pipes and redo everything. What to look for when choosing a specific chimney?
| Parameter | Short description |
|---|---|
| High-quality sandwich pipes for chimneys should be made only from alloyed, heat-resistant and of stainless steel. The steel grade is selected taking into account the gas temperature; the higher it is, the more heat-resistant the steel should be. For gas temperatures within +1000°C, AISI 304 steel is used, for a wood-burning boiler (gas temperature up to +600°C) AISI321 steel is needed. Practical advice. Never buy pipes made from AISI 409 or AISI 430 steel. They are not only susceptible to high temperatures, but are also corroded by acids very quickly. And there is quite a lot in the smoke chemical elements, which when combined with condensate form sulfuric and hydrochloric acid. Such low-quality pipes are sold by counterfeit Chinese companies and some domestic ones. |
| Heating boilers can be wood, coal or gas fired. The temperature of the gases and the concentration of acids depend on the type of fuel. The coal boiler produces the most acid, and it also has the most heat gases For this boiler you need to select a sandwich pipe made of the highest quality alloy steel. Practical advice. Modern boilers have high efficiency, which means that they produce maximum amount thermal energy to the coolant. As a result, the temperature of the gases is relatively low, in all modern boilers it does not exceed +400–500°С. The main problem for pipes is acids. |
| Pressed material is used as thermal insulation. mineral wool. The thickness of the thermal insulation is within 2–5 cm, the thicker it is, the lower the heating temperature external pipe. And this has great importance during the arrangement of passages through the wooden structures of the house. |


A wide variety of manufactured pipes and additional elements for them allows you to create chimneys of varying complexity. To increase traction, a deflector can be additionally mounted, fire safety provides a spark arrestor, the outlet hole is covered by a thermal fungus, etc.

Each additional element of the device has its own purpose and performs a specific function, thereby increasing the reliability of using chimneys made from sandwich pipes.
The lining of the pipes on the roof is done using conical elements and aprons; the chimneys are supported in a vertical position by unloading platforms and metal brackets.

Various manufacturers may slightly expand or shorten the list of additional elements, change their appearance or design features, but these differences hardly change the installation technology.
For example, we will take the option of installing a chimney on the roof of a gazebo, the chimney is connected to a stationary barbecue. The technology for performing work on a residential building, gazebo, bathhouse or other outbuilding is no different. We specifically chose a gazebo; using this example, it is possible to talk about all the nuances of installation. You can skip some operations on the house, it all depends on the specific architectural features of the building.
But they indicate only the minimum height, and there is also the concept of air flow speed. This parameter has a huge impact on the efficiency of boilers. If it is too big then thermal energy does not have time to be transferred to the heat exchanger, which significantly reduces the efficiency of the boiler. Another problem is that too strong a draft can completely extinguish the burners of gas boilers. Such unpleasant situations arise in large cottages, when the boiler is installed in the basement technical room or on the first floor, and the building itself has two or more floors.

In these cases, only a professional heating engineer can help; he will select the optimal chimney diameter depending on the specific conditions. The fact is that the parameters of SNiPs are outdated; they are used for brickwork, and there are completely different air flow resistance coefficients than those of perfectly smooth stainless steel pipes.
Sandwich chimney prices
Step-by-step instructions for installing a chimney made of sandwich pipes
The gazebo does not have a ceiling, so we will not consider this operation. The installation is done in two stages: preparatory and installation. The roof of the gazebo is flat, covered with flexible tiles. The sheathing is continuous, made of moisture-resistant OSB.
Preparing for chimney installation
Our barbecue has two chimneys: one from the stove and the second directly from the hood of the barbecue, it is technologically impossible to combine them into one, you will have to make two. Another problem is that the chimney from the stove is located exactly opposite the rafter, it needs to be sawed. To ensure that the roof structure does not lose its original stability, the sawn rafters should be connected with metal corners, and a circle should be welded in the middle. The diameter of the circle should be a few millimeters larger diameter external pipe sandwich chimney.

If such a problem arises during the installation of a chimney in a residential building, then cutting the rafter leg is strictly prohibited. You should try to move the boiler a little. If for some reason this is not possible, then you will have to bend the chimney; special additional elements are sold for this.
Step 1. Locate the center of the chimney on the roof. This will require a long building level or an ordinary plumb line. If it is not there, then tie a nut or bolt to a rope, this will be an elementary plumb line; the accuracy of such a tool is quite sufficient for the measurements being taken. Place the plumb line against the roof and move it until the weight is in the center of the chimney. You can control the position by eye. If in doubt, find the center of the chimney pipe by placing two sticks along the diameter at an angle of 90°. The point where the sticks intersect will be the center of the pipe. Draw a dot on the roof with a pencil.

Step 2. Drill a through hole in the marked place, making sure that the drill does not move during operation. The hole will indicate on the roof the center of the location of the hole for the chimney pipe.

Step 3. Now you need to go to the roof of the building. Due to the fact that the soft tiles have already been laid, some of them will have to be dismantled. Using a thin metal putty knife, carefully lift up the soft shingle shingles.

By the way, you will immediately see that the adhesive strength of the shingles is not as reliable as the manufacturers of mastics and bitumen shingles advertise.
Step 4. Lift the sheets of tiles a little and use a screwdriver to unscrew the screw.

If the tiles are fixed with nails, then pulling them out is much easier with a special nail puller. Remove the first shingle. Using the same procedure, remove all shingles from the area of the roof where the chimneys will exit.

On this preparatory work finished, you can begin to install the chimney pipe.
Installation of a chimney on the roof
Prices for popular models of screwdrivers
Screwdrivers
A few words need to be said about the fire distance between the pipe and wooden elements roofs. Nobody makes accurate calculations in each specific case; it is very difficult and time-consuming. Practitioners say that if the height of the attic space is at least 1.5 meters and it is unheated, then the sandwich chimney pipe does not need to be further insulated from the sheathing or rafters. The outer surfaces of the chimney never heat up more than two hundred degrees, and this temperature is safe for wood. But for insurance purposes and to avoid problems with firefighters, it is recommended to deviate from wooden structures at least 20 cm around the entire perimeter. This is not very difficult and will eliminate possible claims from the commission during the commissioning of the building.
Step 1. Open the packaging of the pass-through element. The passage element is made of polypropylene; modified heat-resistant rubber is used to seal the pipe.
Step 2. Cut a hole in the rubber to match the diameter of the pipe. It has concentric rings indicating the different diameters. Find the one you need and remove the extra part. You can cut with an ordinary sharp knife, try to make the cut as even as possible. If you have large scissors, that’s great; working with them is much easier and safer.


Step 3. There are circles on the walkway indicating the slope of the roof. This is done to ensure that the chimney pipe on any roof is strictly vertical. It is necessary to cut off the circle that corresponds to the angle of inclination of the roof slope. The penetration is made of polypropylene; it cannot be cut with ordinary scissors; you must use special ones for metal or pruning shears.

Cutting the penetration with pruning shears
Step 4. Locate the hole that was drilled from the inside of the gazebo, this hole indicates the location of the center of the chimney. Place the penetration on the continuous sheathing so that it is in the middle of the element. Draw a line with a pencil or felt-tip pen to create a circle for cutting. If you have several chimney outlets on your roof, then such actions must be done for each.
Step 5. Use an electric jigsaw to cut the hole. To do this, you should first drill holes for the nail file with a drill, and only then insert the tool into it and work. Be careful that the saw does not come into contact with metal hardware; they should be pulled out or bypassed.


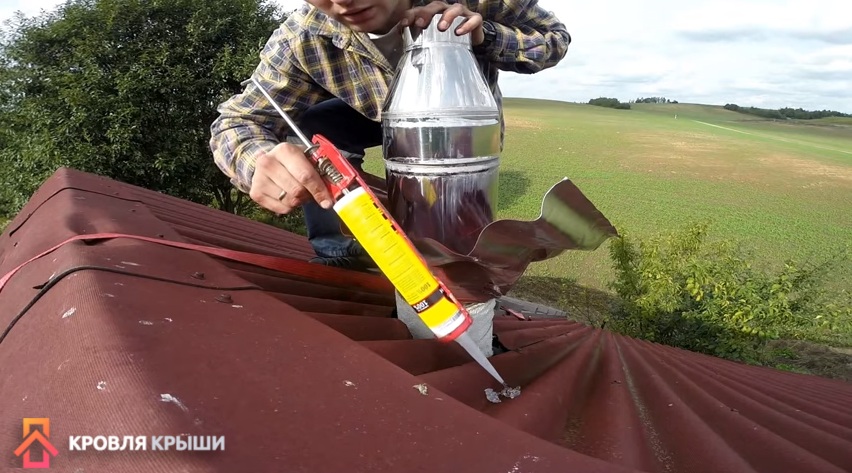
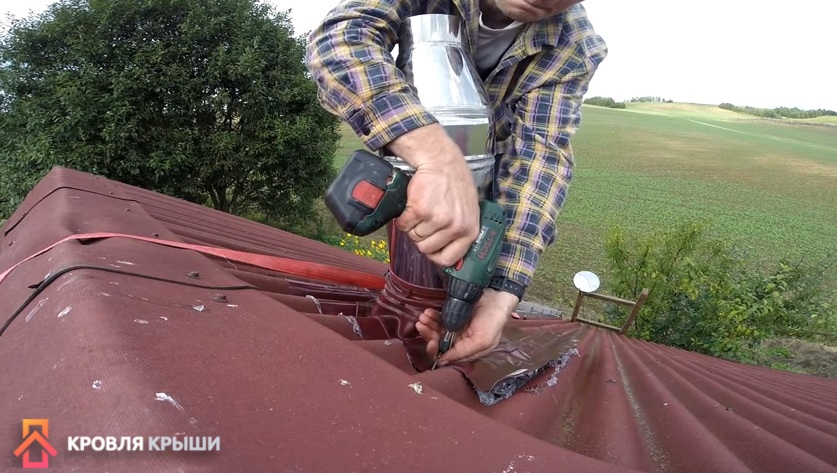
Step 6. Attach the passage element and secure it to the plate with self-tapping screws. If you wish, then for peace of mind you can place the passage element on any sealant; the squeezed-out excess should be carefully removed with your finger.

Step 7 Reinstall the chimney. Individual pipes can be additionally tightened together with clamps.


It is recommended that on soft, flammable roofs, be sure to cover the pipe with a tip with a spark arrestor. This is especially important for a wood-burning boiler. If the top has a deflector, great; with a side wind, the draft will increase, which eliminates the formation of reverse draft.


Step 8 Replace the rubber weather stripping to prevent rain from flowing through the pipes and under the roof. The casing has a special mark indicating in which position to put it on. The mark should face forward towards the roof ridge.
Step 9 Tighten the casing tightly to the pipe with a clamp, using sealant as desired.
At this point, the installation of the chimney is completed; the previously dismantled roof can be returned to its place.
Step 1. Install the underlayment strips. It is pushed around the perimeter into a special slot in the passage element.

Step 2. Begin reinstalling the previously removed shingles. In the places adjacent to the passage element, cut the tiles so that they overlap the contour of the element by 2–3 cm.
Laying soft tiles is done in the usual way using bitumen mastic for sealing joints.


Installing Master Flash
Prices for roofing master flash
This device has a perimeter edging made of aluminum sheet, the edging is hermetically sealed into a rubber gasket. Due to this technological features the element copies the profile with maximum accuracy roofing, the likelihood of leaks is minimized.

How to install Master Flash correctly?
Step 1. Coat the perimeter of the outer chimney pipe soap solution. This is done in order to tightly place the rubber apron on the chimney.

But this can only be done if the diameter of the hole on the apron is 2–3 cm smaller than the diameter of the pipe. If the parameters differ more, then the rubber will have to be trimmed a little. For this purpose, manufacturers made special rings on it indicating the diameters. There is no need to try to stretch the apron too much. Rubber can't long time be in such a tense state, over time it will definitely begin to tear. As a result, leaks will appear, and they will be so strong that to eliminate them you will have to completely change the master flush.
Step 2. Give aluminum the profile of the roof roof. You can do this with your hands, a rubber hammer or a mallet. Start bending from the middle, and then move symmetrically to the edges. If you do the opposite, the last waves will be stretched out, and you will have to start all over again.

Step 3. Apply silicone or other sealant to the area of the roof that is located under the master flush. Do not spare the material, especially carefully coat the upper part of the element and those places where water drains.
Practical advice. If the house is located in the southern regions of our country, and the penetration is black, then you need to use special sealants. The fact is that on bright sunny days the surface of the master flush heats up to a temperature exceeding +100°C, and ordinary sealants can withstand no more than +80°C.
The lower part of the element does not need to be coated with sealant; water will not flow upward. But for guarantee and personal peace of mind, it is recommended to apply a silent sealant.
Step 4. Screw the element to the roof. To do this, use special screws. Make sure that the sealant protrudes from under the aluminum plate along the entire perimeter. Screw the screws into the lower waves first, and only then into the upper ones. This fixation technology increases the tightness of the connection of elements.
Step 5. Gently remove any excess sealant with your finger. There is no need to leave it on a lot or spread it in a thin layer over a large surface of the roofing, this will not help increase the service life of the joint. The fact is that after 3–4 years the smeared thin layer The sealant will definitely peel off from the roof, and water will begin to enter the gap. Ensures the tightness of the connection only the material that is located between aluminum plate and roof covering.
It is important to know that tightness does not depend on the thickness of the protruding material; durability is affected only by its quality and degree of adhesion. Regarding resistance to ultraviolet rays, then these are non-critical indicators, the sealant is protected by an aluminum sheet. It is more important to look at frost resistance.
Step 6. Apply sealant around the perimeter of the pipe between the wall and the rubber cap.

Applying sealant between the wall and the rubber cap
Replace the pipe cap and tighten the clamp.

If all work is done correctly and used quality materials, then there will be no problems with the chimney for many years of operation.
Video – Flash Master. Installation
Building a chimney is enough complex process, which must be carried out in accordance with building regulations. Often when creating new houses, pipes are laid through an already created roof. Exit through the wall is also possible. Before installing a chimney through a finished roof, it is worth learning about the consequences of incorrect actions in order to be more attentive to each rule for performing the work.
Consequences of improper pipe installation
It is worth remembering that many stove makers charge a fee for building the stove, but do not install the chimney. Many owners have to do all the work themselves. Subject to certain rules, all work can be done efficiently without the help of professionals. If the finishing of the chimney on the roof is carried out incorrectly, this can lead to certain consequences:
- Moisture will penetrate through the cracks between the roof and the chimney, destroying the chimney and the materials from which the roof is made.
- Increasing humidity inside the pipe, which can cause mold to grow in it. It is worth noting that spores of some types of fungus are dangerous to human health, so ignoring the problem can lead to a deterioration in the condition of people in the house.
- Changing characteristics thermal insulation material due to moisture getting on it. It is important to remember that after drying, the insulation does not restore its characteristics.
- Impaired air circulation due to the presence of cracks near the chimney. Air penetration into winter time leads to increased heat loss.

To avoid the problems described, it is enough to correctly install the pipe and its thermal insulation, following the advice of professionals. It is worth remembering that the height of the chimney relative to the roof ridge must be at least 0.5 m if it is located close to the ridge.
Features of different types of chimneys
Can be used to create a chimney following materials:
- metal pipe;
- fire brick;
- asbestos cement pipes
Different waterproofing materials are used for each type of pipe. It is also important to take into account the features of piping through the roof. When choosing the type of chimney installation, the type of fuel used is taken into account, since the combustion temperature depends on this.

That is why, before starting to develop a chimney project, it is necessary to determine what type of fuel will be used to heat the house. Metal pipes should not be used in cases where the stove is heated with wood and coal. In this case, the chimneys of such furnaces must be equipped with spark arresters.
How to choose a place for a pipe
Since the pipe heats up as smoke passes through, fire safety requirements must be taken into account when venting it to the roof. It is best to place the chimney on the roof at a close distance from the ridge. This is due to several reasons:
- Avoiding leaks during rain. Also, due to the close location of the pipe from the ridge, accumulation occurs in winter. minimum quantity snow.
- Minimal condensation formation in the pipe. If the chimney is located low and has a large height, it will appear inside a large number of moisture due to temperature differences.

If the pipe is located at a distance of more than one and a half meters, it should be no lower than a line drawn from the ridge at an angle of 10 degrees to the horizontal. When choosing a place to install a pipe, you must consider other tips from experienced builders:
- The pipe should not be placed close to skylights. This is due to the fact that carbon monoxide can get into them.
- Also, the chimney should not be installed at the internal joint of the roof, since in winter a large amount of snow accumulates above the chimney.
- You should not rigidly connect the roof to the pipe, since deformation of the roof will cause the pipe to collapse.

It is worth remembering that the pipe must be routed in such a way that the roofing materials are reliably protected from high temperatures.
Rules for creating a chimney box
To properly route the pipe through the roof, you need to create your own beam system for it. It must be at a certain distance from the pipe. This parameter is indicated in SNiP and depends on the characteristics of the chimney.
In order to insulate the structure, it is necessary to use non-flammable materials. Most often glass wool or stone wool is installed. These materials are stuffed into the space between the pipe and the box.

It is worth noting that the waterproofing material is cut crosswise, after which the edges are folded and secured to the rafter system. When creating the box, it is necessary to additionally seal the joints with sealing tape.
WITH outside Elements are fixed above the roofing covering to protect the joints from moisture penetration. It is worth considering that creating a pipe box can worsen air exchange under the roofing material. To prevent Negative consequences installing such a system is worth doing additional elements ventilation system.

Important! If the pipe has a width of more than 800 mm, it is necessary to create a slope on the roof higher up the slope.
Using flexible penetration
Many owners of private houses install round pipes. To ensure the tightness of the junction of the roof and the chimney, an elastic penetration is used. Such products are created from elastic silicone and look like a funnel. They can be adjusted to the angle of the slope, so they reliably protect the junction from moisture penetration.

When buying an elastic penetration, you must be guided by such parameters as pipe diameter and color finishing material for the roof. Step products are suitable for almost all types of roofs and chimneys. Installation of such products is quite simple. To do this, you need to put an apron on the chimney, and then secure it to the roof using a metal circle with holes for fastenings. After this, you need to treat the joints with sealant.
Installation of a metal passage pipe
In many hardware stores you can purchase a pipe for round pipes, made of metal. It is used to pass a chimney through a roof that does not have a relief. When purchasing, you must select such products based on the angle of the roof.
To perform installation, perform the following steps:
- First, a hole is cut in the roof. To do this, using a marker, markings must be created on the roof surface. Cutting is done using a grinder and sharp scissors.
- After this, the thermal insulating material is removed and waterproofing material. If necessary, it is worth removing some elements of the sheathing. If this causes the structure to weaken, it must be strengthened by securing new boards.
- A sheet of fire-resistant material is secured to the underside of the roof. It is worth remembering that there was a margin of 15-20 cm on each side of the product.
- After this, the module is installed in the hole and docked with the laid chimney.
- After this, the outlet pipe is put on the pipe, which is then secured with self-tapping screws and fire-resistant sealant.
- On next stage the pipe is built up to the required level.

Some builders solder the chimney into the passage pipe in advance and cover it with thermal insulating material. The most commonly used material is stone wool. Only after this the structure is mounted in the passage. Before removing the chimney through the roof, it is necessary to calculate the dimensions of the structure by drawing up a drawing. This will help remove the chimney without making mistakes.
Output through the roof of rectangular and square chimneys
Pipes that are made of brick have square shape, therefore, the described methods cannot be used to seal them. When the chimney being created approaches the roof, a hole is created in it, the size of which will be approximately 2.5 cm larger than the pipe. The chimney is lined with asbestos sheets on the outside. This is necessary to protect the roof from fire.
The soft waterproofing of the chimney on the roof is secured to the brick pipe using a metal profile. The lower edge of the material is fixed to the roof using sealant. After carrying out this work, a decorative apron is installed, which consists of additional elements and reliably protects the joints from moisture.

Before you start using the stove, you should check the reliability installed structure. If the connections are defective, moisture will penetrate under the roofing material. Many builders who build a chimney through the roof with their own hands make mistakes that later have to be corrected. In order to carry out all actions correctly, it is necessary to prepare all materials in advance and double-check the calculations made during the creation of the drawing.
In buildings with stove heating, such as a private house, bathhouse and others, the construction of a chimney and the organization of its outlet to the outside are required. When arranging the passage of a pipe through the roof, it is necessary to comply with certain standards in order to ensure safety and maintain the protective properties of the roof.
Chimney passage through the roof
The chimney is designed to remove fuel combustion products (coal, gas, firewood, peat) and form stove draft. The method of exiting the pipe through the roof is determined at the design stage. The main condition for this is to ensure the fire safety of the roof, especially at its junction with the pipe, as well as to protect the joint from the ingress of atmospheric moisture and the accumulation of condensate. The height of the pipe is determined by SNiP standards and depends on the distance at which it is located from the roof ridge:
- if the distance from the center of the pipe to the ridge is no more than 1500 mm, then the height of the pipe above the ridge should be no less than 500 mm;
- when the distance between the center of the chimney and the roof ridge is from 1500 to 3000 mm, the height of the pipe coincides with the height of the ridge;
- if the distance exceeds 3000 mm, the height of the chimney should not be lower than a line drawn from the ridge at an angle of 10°.
The height of the chimney pipe is determined by SNiP standards and depends on the distance to the roof ridge
The shorter the distance from the pipe to the ridge, the greater the height of the pipe should be.
Chimney passage unit
This element can be located in different places roofs. One of the preferred options by roofers is to pass the chimney directly through the ridge. This method is characterized by the easiest installation and avoids the accumulation of snow above the pipe wall. The disadvantage of this arrangement is that it reduces the strength of the rafter system, in which the ridge beam is either absent or sawn and secured with two supports on the sides of the pipe outlet, which is not always possible to implement.
The chimney outlet through the ridge is simple to install, but can compromise the strength of the rafter system
Most often, the pipe is located near the ridge. This way the chimney is least exposed to cold, and therefore condensation accumulates inside. The disadvantage of this arrangement is that the closer the pipe is to the ridge, the greater its height, which means that construction will require additional funds.
Exiting the chimney at a short distance from the ridge is the most common and convenient option.
It is not recommended to route the chimney through the valley, as snow can accumulate in these places, which will lead to a violation of the waterproofing and the occurrence of leaks. In addition, it is difficult to organize a chimney duct at the junction of the slopes. You should not place the chimney at the bottom of the slope - it can be damaged by snow coming off the roof.
The material from which the pipe is made also affects the organization of its outlet system. Typically, pipes are made of metal, asbestos cement or fire bricks, but sometimes ceramic ones are also found. The methods of waterproofing them will be different. In addition, each type of fuel has a certain combustion temperature, and this must also be taken into account when constructing a chimney.
Depending on the shape of the chimney pipe, the outlet hole can be square, round, oval or rectangular. To protect the roof covering from the action elevated temperatures and protect it from fire, a box is placed around the chimney. This happens as follows:
- Additional rafters are installed to the right and left of the pipe.
- Horizontal beams are laid at the bottom and top at the same distance and of a similar cross-section. The distance between the box beams and the pipe walls is determined by SNiP and is 140–250 mm.
- Inside the box is filled with non-flammable insulating material, for example, stone or basalt wool. It is not recommended to use fiberglass due to its high flammability.
The space of the box should not be filled with fiberglass - it can ignite under the influence of high temperatures
It is necessary to take into account that the construction of the box may disrupt the ventilation of the under-roof space, so additional ventilation systems can be installed.
Video: installation features of the chimney passage unit
Features of chimney outlet through different types of roofing
When arranging the passage of a chimney pipe, you need to pay attention to protection from precipitation that will flow down the pipe and roof. To moisture-proof the connection between the pipe and the roof, a protective apron is installed around the chimney. This technology is similar for roofs with different coatings.
Metal tile covering
Metal tiles are a popular roofing material consisting of thin steel, aluminum or copper sheets coated with a protective layer.
Output of a square or rectangular pipe
If the pipe is made of brick and has a square or rectangular cross-section, you can use the materials included with the coating to pass it through the metal tile roof. Because brick chimneys can have non-standard sizes, before removal, part of the coating sheets is removed or a hole of a larger area is cut out.
To waterproof the joint, special elastic tapes with an adhesive layer applied to one side are used. One edge of the tape is glued to the base of the pipe, the other - to roofing sheathing. The edge is fixed at the top with a metal strip, which is attached to the pipe wall with heat-resistant dowels. All joints are coated with sealant.
To reduce the likelihood of water flowing down the chimney wall, you can make a recess under the bar - a groove
Apron for square or rectangular pipe It is possible to do it yourself. It is made from smooth metal sheet the same color as the main coating. The upper edge of the apron is tucked under the row of metal tiles located above so that water flowing from above does not fall under it. If the pipe is located close to the ridge, the edge of the apron can be tucked under the ridge or bent to the other side. To protect the passage opening from precipitation, a tie is installed under the apron.
It is better to organize the outlet of the chimney before laying the metal tile covering.
Conducting a round pipe
When leading a round chimney or sandwich pipe through a metal tile roof, roof penetrations are most often used, connected to a cap through which the pipe is routed. A neat cut is made in the coating round hole according to the size of the chimney, a universal glass or master flush is placed on the pipe, the joints are sealed.
To seal the joint between the round pipe and the roof, special penetrations are used
Video: sealing the passage of a brick pipe through a metal tile roof
Corrugated roofing
Profiled sheet is one of the most common roofing materials. But a leak can also occur in it if the chimney outlet is not arranged correctly. With this type of coating, it is better to place the chimney vertically. The hole in the roof is cut with a grinder, and it is necessary to ensure that the cut edge of the corrugated sheet is without jagged edges.
Carrying out a rectangular pipe
If it is necessary to organize a passage for a rectangular or square pipe, the apron can be made from galvanized sheet.
- 4 strips are cut out of metal, which will be placed in front, behind and on the sides of the pipe.
- A sheet of galvanized steel is laid from the bottom edge of the chimney to the eaves. This element is called a tie and is subsequently covered with roofing material.
- The planks are tightly attached to the pipe, their lower part is fixed to the sheathing, and the upper part is placed on the chimney.
- A groove is made in the wall of the pipe into which the curved edge of the strip is inserted. First, the bottom bar is installed, then both sides and the top. The sheets are folded under one another.
- Before laying corrugated sheeting, the passage of the chimney must be waterproofed. You can use a regular waterproofing film, which is cut with an “envelope” and glued to the pipe, but it is better to use self-adhesive waterproofing tape.
The upper bar adjacent to the pipe is filled with sealant
Round pipe outlet
When a round pipe is routed through a corrugated sheet covering, roll bitumen waterproofing or foil bitumen tape is used. Put on the chimney roof penetration, which is glued to the sheathing and sealed with heat-resistant sealant. If the passage is made of rubber, it can melt from the heating of the pipe, so it is necessary to secure a clamp with a heat-resistant gasket under it.
If you use a roofing duct made of heat-resistant rubber, you can avoid its melting
Video: passing a pipe through a corrugated roof
Ondulin roofing
Ondulin is also called “Euroslate”. The peculiarity of this coating is that it is flammable and does not have great strength. Therefore, in order to pass the chimney pipe, you will need to make a large hole in the roof and fill it with fire-resistant material that will prevent moisture from entering.
To waterproof the joint between the chimney and the roof, install a metal roof trim with an apron, the edges of which are placed under sheets of ondulin or use an elastic tape “Onduflesh”. This coating requires additional ventilation.
In the roof made of ondulin, you will need to make a hole for a larger diameter pipe and fill it with fire-resistant material
Video: sealing a chimney on a roof made of ondulin
How to route a pipe through a soft roof
Soft roofing is also a flammable material, so a gap of 13–25 mm must be left between the covering and the chimney. Waterproofing the pipe is carried out in the same way as with other coatings, only instead of an elastic tape, a valley carpet is used or the coating itself is applied to the pipe - bitumen shingles or roofing felt.
When waterproofing the joint between pipe and soft roof the covering itself can be used instead of an elastic band
Stages of work to remove the chimney through the roof
To bring a chimney through a finished roof, the following steps are necessary:
- The location of the passage in the roof between the rafters and the cross beam is selected.
- The box is mounted: rafters are constructed from beams, parallel rafter legs, and beams. The cross-section of the beams for the box is taken equal to the cross-section of the rafter beams. The width of the sides of the box will be 0.5 m greater than the diameter of the pipe.
- A hole is cut in the roof slope. To do this, in the four corners of the box from the inside, at the junction of the rafters and beams, they are drilled through holes. After this, the layers are cut roofing pie along the inner perimeter of the box and diagonally.
After installing the flange, it can be given the required shape with a hammer
Video: DIY chimney box
Exiting a chimney pipe through the roof is a responsible matter, in which strict adherence to installation technology is required so that there is no danger of leaks and pipe destruction. Carrying out pipe removal work includes many nuances that take into account the roofing covering, the material and shape of the pipe, and waterproofing methods. Therefore, you should study all stages of work in advance and consult with a specialist.
Most stove builders will probably agree that installing a chimney on the roof is one of the most difficult jobs. In addition to professionalism, the implementation of this process requires: the ability to correctly calculate and determine the location for installing the pipe, an understanding of how the roofing pie is constructed and knowledge of the basic requirements regulated by GOST and SNiP.
You will also need to ensure that the installation and fastening of the chimney pipe to the roof is done in such a way that it can withstand wind loads. This raises several important questions:
- How to bring a chimney through the roof?
- What should you consider when using a metal chimney?
- How is the roofing pie waterproofed and thermally insulated?
- Do SNiP and GOST regulate what height of the chimney above the roof is required?
- How to make a cut, and what materials can be used to line a chimney?
How to remove a brick chimney through the roof
In order for the work to be completed efficiently, and not have to redo your own mistakes, you need to follow a few simple recommendations:- Layout - even with a “spontaneous” repair, there should still be time when you should stop and think about: where exactly the stove will be located, how the smoke removal system will be installed. Where on the roof will the chimney go? The calculation will make it possible to calculate what height of the chimney above the roof will be sufficient to provide the necessary draft.
- Pipe location- exists general rule, how better pipe blown by the wind, the stronger the draft in the furnace. Following this, they try to place the chimney as close as possible to the center of the roof - to the ridge. The height above the ridge depends on how far the pipe is from it.
- Sealing and insulating a chimney on the roof– single-layer metal chimney They may become hot during intense combustion, the brick does not heat up so intensely, but still requires the use of thermal insulation in the area where the roofing pie passes. The outlet through the roof of the chimney must be carefully insulated so that moisture does not pass through the opening.


There are certain standards regulating what the gap between the chimney and the roof should be. According to SNiP, the distance to hot materials from the chimney should be at least 13-25 cm.
Passage of a metal stove pipe through the roof
Installation and installation of an iron chimney through the roof is a process that cannot be rushed. The master needs to understand the characteristics of each roof with which he will have to work. The essence of the work comes down to two important principles:- After installing the chimney, the integrity of the roof should not be lost; in other words, it is necessary to avoid a situation in which the roof will leak after the first rain. Often water runs straight down the installed chimney. At the same time, waterproofing a chimney on a slate roof is significantly different from how the same operation is performed on a metal tile or soft bitumen roof.
- A single-layer metal chimney gets very hot, so it is necessary to install a thermal insulation barrier or duct.


For chimneys made of different materials, there is a solution to this problem. Namely:
- Waterproofing a brick chimney - a special plate is used for it. For a slate roof, you will need to make a special pedestal around the chimney. A sealant plate is placed on top of it for sealing.
- Pipe box - used if the roof is made using a roofing pie. The fact is that violation of the integrity of the pie leads to the loss of waterproofing and thermal insulation properties. To avoid this, a special box is made. The structure surrounds the chimney around the perimeter and a special heat-insulating composition is poured into it.
- The roof pipe can be protected using a special insulating apron. The advantage of the apron is that it completely follows the curves roofing material and fits tightly, protecting against moisture. The apron is rubber seal, made of durable and resistant to temperature and atmospheric conditions material.
- Installing a roof covering around a round chimney is the best solution. In this case, the material is laid according to a completely finished structure. This allows you to narrow the required opening. For a roof made of metal tiles or corrugated sheets, the hole for the chimney can be made larger than the diameter of the pipe by only 0.5-1 cm.
The cutting of the roof must be carried out taking into account the material from which it is made, as well as technical characteristics chimney.
What is the height of the chimney from the ridge
The presence of draft in the stove, rapid heating of the pipe, and slow settling on the chimney depend on the correctly calculated height of the chimney. back side soot designs. These standards are strictly regulated by GOST and SNiP. In particular, the regulations specify the following requirements:- Installation of the chimney at a distance of up to 1.5 m from the ridge. The edge of the chimney should protrude at least 0.5 m above the top point of the roof.
- The distance of the pipe outlet is 1.5-3 m from the ridge - the optimal height would be above the roof so that the chimney is approximately level with the ridge.
- More than 3 meters from the ridge - the chimney should be 10 degrees below the ridge.

To increase traction, pipe heads are used. The head divides the air flow, directing it in two directions (down and up the pipe), thus increasing the draft by 15-20%. The distance from the chimney to the ridge is important requirement related to the safe operation of furnace equipment.


It is not possible to fix the chimney to the roof; its stability depends on fixing it below when passing through the attic. Typically, brackets are used for these purposes, with which a metal chimney is rigidly screwed to wooden beams and rafters.
How to seal a chimney on the roof
Bypassing the chimney and waterproofing it is carried out as follows:


In most cases, cutting the roof can be done using already ready-made structures, which can be purchased at any construction supermarket.
How to cut a chimney on the roof
 The connection between the pipe and the roof and its subsequent waterproofing can be done either independently or using ready-made structures. Each type of roofing material has its own way of performing this work.
 The roof to be maintained should be carried out by a professional construction team; the remaining work can be done independently.
Practice has shown that penetration for a chimney through metal roofing from corrugated sheeting is best done using a lead apron placed on the roof cut. The advantage of this solution is that lead is soft and pliable, which allows it to completely follow the shape of the roofing material.
Framing the junction is done using a hammer. By lightly tapping, you can give the apron the desired shape. After this, the cutting is removed and generously coated with special silicone. Top part the apron is laid under a sheet of roofing material.
A soft roof around the chimney can also be installed using a similar structure or a special rubber insert.
You can solve the connection problem using other methods of laying a metal pipe, namely its side exit from the room.
 The device for connecting the chimney and the metal tile roof also consists of an apron, but in this case the apron is made not of lead, but of galvanized metal, painted in the color of the roof.
Most manufacturers of metal tiles also blow out structures for the chimney. The exit assembly through the roof made of ondulin is also sold ready-made. The apron of the product completely follows the curve of the wave of the material. After installation, the apron is covered with sheets and then insulated with self-adhesive tape.
Additionally, it is recommended to use the following materials for cutting: 
The easiest way to remove a metal sandwich chimney from a round-section chimney is through the roof. The surface of the sandwich pipe practically does not heat up, and in the place where the floor and roof slabs pass, you will need to install a regular sleeve.
Roof chimney lining
Finishing the roof pipe can be done using facing bricks. The resulting design will resemble a classic chimney. The only requirement is to make a base for the chimney apron on a roof made of metal tiles or other material. It is best for such a structure to come from the very bottom, or in extreme cases, rest on the floor slab.Heating appliances are a necessary attribute of any residential building, providing comfortable temperature for life during the cold period, which in most regions of Russia lasts 9 months. However, additional comfort comes with a certain degree of fire risk. That's why special attention given to the chimney, through which smoke and combustion products are removed from the heat generators and discharged outside the room. This article will tell you how to remove a chimney through the roof in compliance with all safety requirements.
As a rule, the work of a stove maker or installer gas equipment chimney installation services are not included; the homeowner must ensure the passage of the chimney pipe through the roof independently. The imaginary simplicity of the task makes home craftsmen refuse the services of professional roofers. However, poor-quality pipe installation on the roof can have serious consequences:
- Through an unsealed pipe passage, moisture seeps into the masonry, gradually destroying it.
- High humidity inside stimulates the spread of mold microorganisms and fungi. Spores of some types of fungus are dangerous to the human condition, so it is unsafe to use an infected tube. IN advanced cases Both the chimney and stove masonry must be replaced
- The penetration of water into the passage of the chimney pipe through the roof reduces the thermal insulation properties of the insulation by half. Moreover, after the thermal insulation layer dries, its characteristics will never return to their previous level.
- Even the rafter system suffers from poor-quality pipe removal through the roof, since moisture penetrating into it through a leaky passage leads to rot and destruction.
- Gaps near the pipe passage disrupt the normal air circulation inside the attic, leading to increased energy losses and heating costs.
By the way, not only are they brought onto the roof stove chimneys, pipes from gas boilers and ventilation vents are also placed there, for installation of which the same methods are used.
Choosing the location of the chimney outlet and its height
The first condition for high-quality pipe exit through the roof is correct placement chimney on the roof. The functioning of the entire heating system, therefore, in order to avoid mistakes, installation is carried out in accordance with construction and fire safety requirements:
- Chimney pipes are placed in close proximity to the highest point of the roof, at a distance of 1-1.5 m.
- The recommended height of the chimney relative to the roof ridge to ensure normal stove draft is 0.5-1.5 m.
- The greater the height of the chimney, the greater the draft force in the stove or gas boiler she provides.
- The lower the pipe is located on the slope, the longer its length must be so that the recommended height of the chimney above the roof complies with the recommendations.
- Parameters such as chimney height and cross-sectional diameter are selected according to the recommendations of the manufacturer of the thermal generating device or based on calculations.
- The chimney consists mainly of vertical sections of pipes; the length of horizontal segments should not exceed 1 m.
- The outlet location is placed between the elements of the rafter system so as not to violate its integrity.
The main difficulty of passing a pipe through the roof is that during the passage of smoke, the temperature of the walls increases, which creates a risk of fire of flammable materials in the rafter system.
Elastic penetration
Most often in private construction they encounter installation metal pipes round section. To ensure tightness of the passage, use special device– elastic penetration. This is a product made of high-strength silicone or rubber, shaped like a funnel with a wide flange in the form of a square or circle, called an apron. Thanks to its properties, the elastic penetration takes any shape, adapting to the angle of inclination of the slope. It can withstand extremely high or low temperatures, exposure to aggressive chemicals and has a wide palette.


When purchasing an elastic penetration, they are guided by the diameter of the pipe and the color of the roofing material. Universal models, in the form of a stepped pyramid, are suitable for any size; adjustment is carried out by trimming the penetration to the desired level. Installing an elastic apron on the roof is very simple, you need to place it on the chimney passage, apply a metal circle with holes for fasteners, treat the joint with fire-resistant sealant and secure it with a screwdriver. For roofs with steep slopes, a special type of plastic penetrations with a specified flange mounting angle is used.
Metal feedthrough
In hardware stores you can find another type of penetration for round pipes - a metal feedthrough. It is used to pass a chimney through a roof that does not have a relief. Finished alloy steel pipes have a standard roof angle, which is adjusted to the roof slope. To perform installation, you must:

Cut a hole of a suitable shape in the roof. To do this, markings are applied to the roof surface using a marker. Depending on the roofing material, cutting is performed with a grinder or sharp scissors, retreating 1-2 cm inside the circle.
- Remove the waterproofing and thermal insulation material from the hole made, freeing the passage for the chimney. If necessary, remove the sheathing elements by carefully sawing them off.
- On the underside of the roof, secure a sheet of fire-resistant material with a hole of the required diameter of such an area that there is a margin of 15-20 cm on each side of the chimney.
- Insert the pipe module into the hole, connect it to the laid chimney, tightening the connection with a clamp.
- Place the outlet pipe onto the pipe, securing it to the surface of the slope with fire-resistant sealant and self-tapping screws with a rubber head.
- Add new segments to the pipe so that the height of the chimney exceeds the level of the ridge by 0.5-1.5 m.

Some craftsmen prefer to use a different method - they solder a chimney pipe into the passage pipe in advance, line it with thermal insulating material, for example stone wool, and only then install this structure into the passage.
Output of rectangular and square pipes
Made of brick, most often square or rectangular shape, therefore, other methods are used to bring it to the roof. This task is for the experienced furnace master, and not a home craftsman, because the process uses a special masonry technique. When the chimney approaches the roof, a hole of the appropriate size is cut out in it with an allowance of 2-5 cm, through which the stove maker discharges. Although heat-resistant brick perfectly retains heat inside the pipe, the inside of the passage is lined with asbestos sheets to protect the rafters from fire.


On brick pipe using a metal profile, a soft waterproofing tape on a lead or aluminum base is attached, the lower edge of which is fixed to the roof using sealant. After this, the unsightly waterproofing is covered with a special decorative apron. It consists of four additional parts and is installed under the roofing material, making the passage neat and well protected.
Installation of the outlet box
The roof structure consists of layers of several materials, the fire-resistant qualities of which are expressed in different ways. While most roofing materials do not burn or support combustion, a rafter system traditionally made from wood does not have such properties. In order to safely remove the chimney pipe through any material, install a passage box:


- The first step is to purchase or make a box from a fire-resistant material, for example, metal or asbestos. The size of the box is selected in accordance with the cross-section of the pipe, so that there is at least 15 cm between their walls.
- After making the hole, a box is installed in it, the upper edge is aligned with the level of the roof slope.
- Exit the chimney through the hole in the passage box. The edges of the waterproofing film and vapor barrier are glued to the pipe using fire-resistant sealant and reinforced tape.
- Expanded clay is poured inside the box or laid stone wool for thermal insulation of the chimney. Thermal insulating materials are placed taking into account that they should not impede air circulation.
- The outside of the chimney pipe, depending on the shape and roofing material, is finished using an elastic penetration, a decorative apron or a metal pipe.
A high-quality chimney outlet does not spoil the appearance of the roof, does not allow moisture to pass through and is safe from the point of view of fire safety standards. Observe the right technology passage of tubes through ceilings to protect yourself and your property.
Video instruction