New life for an old cabinet. High-quality do-it-yourself furniture refurbishment
Often people don’t even think about how many pieces of furniture are nearby that are amazing in beauty and execution. Dilapidated chairs, tables, chest of drawers, inherited or bought for pennies, old sofa or a chair never fit into the interior of a modern apartment, so they often become a burden and are sent to the country. At the same time, a relatively simple refurbishment of old furniture, which only takes a couple of weekends, will return the rarities to their former shine and beauty. If, of course, you know how to properly handle such items.
What can you do with old furniture?
Until recently, old furniture was of interest only to connoisseurs, collectors and professional restorers. Today, remodeling interior items has turned into a colossal business, the existence of which many are not even aware of. Therefore, before throwing away or sending old furniture to the stove at the dacha, you can try your hand at restoring and remaking old items, at the same time increasing their value by an average of 10 to 50 times.

It goes without saying that high-quality alterations and restoration require considerable knowledge, work skills and special tools. However, even for a non-professional restorer, remaking furniture with your own hands is quite an affordable activity, but in a slightly shortened version:
- If the old structure has retained the strength and main details of the cladding and load-bearing elements, you can restore the paintwork, reupholster and rework soft upholstery and replace wooden parts hidden from view;
- If the items being restored are in terrible condition, missing covering elements, cladding, legs, drawer faces, and countertop surfaces can be restored and remodeled using modern materials. In this case, you will get antique furniture, with clear signs a remake, but preserving the features of old rarities;
- Complete refurbishment of old items. From old tables, chairs, chests of drawers, cabinets, only the frames and drawers are preserved; everything else must be radically remade into stylish and modern furniture.
Any work on restoration and alteration of old interior items requires a separate, dry and well-ventilated room where the wood can be varnished and dried without the risk of harming the health of household members.
Important! The most difficult stage is reupholstery upholstered furniture, upholstery of chairs, sofas, ottomans. Similar works It is best to entrust it to an experienced craftsman.
The simplest option for remodeling furniture is known to almost everyone. This is re-gluing the surface of old cabinets, sideboards, furniture walls, kitchen furniture Soviet-made laminated films. Old varnished surface furniture boards made of chipboard has long faded and lost its attractiveness, so redoing it with film will significantly refresh appearance. It is enough to buy a self-adhesive film “for water”, stock up stationery knife, a set of rulers, a spray bottle, a dry cloth and a place for cutting the film.
We remodel the cabinet in the following sequence:
- We free furniture from drawers and fittings;
- For each item, we cut out our own film pattern, with an allowance of at least 3-4 cm per side;
- Wipe off old surface from dust, spray it from a spray bottle and carefully stick the film on;
- Using a napkin, carefully squeeze out air bubbles, as when gluing wallpaper.
For the most persistent bubbles, the film can be pierced with a needle. After drying, we install handles, fittings and return the cabinets and doors to their place. This method of remodeling old furniture will take a maximum of one weekend day.
Options for remaking old furniture
It's easiest to work with the old one lacquered furniture, remodeling and restoring a chest of drawers, coffee table or old chairs is much easier and more affordable than you might imagine. To work with old paint and varnish coatings, you only need to remove the old varnish, polishing paper, high-quality varnish or paint, and sometimes repair compounds for veneer surfaces. It is worth making a reservation - only furniture made from solid wood or prefabricated structures lined with natural sawn veneer are subject to radical alteration. Any furniture options from Chipboard restoration are not subject to, the maximum that can be done is to cover it with film.
We restore old wooden furniture, chairs, cabinets, tabletops
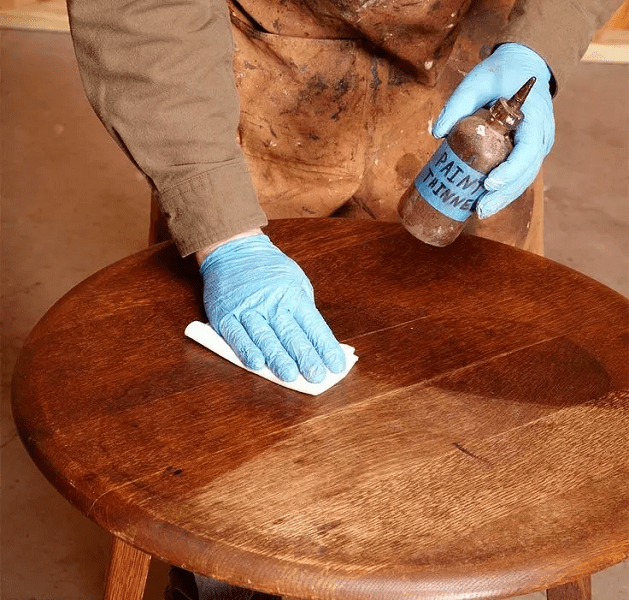
First of all, it is necessary to disassemble the piece of furniture as carefully as possible and remove any contaminating paint or varnish residues.

The easiest way to remove old varnish is in three ways:
- Chemical remover, most often a mixture of acetone, alcohol and 647 solvent;
- Clean with sandpaper;
- Heat it with a hairdryer and carefully scrape it off with a sharp knife, then sand it by hand with sandpaper.
For your information! As a rule, old furniture is subject to repeated painting over a long life, so the most difficult thing in such a remodel is to carefully remove the old paint and varnish.
If you do everything carefully, then even a child will be able to do the further part of the remodeling. Will need to cover wooden surface varnish, preferably under mahogany or ebony.


When restoring countertops, the most common defect is a chip on the edge of the polished surface. In the old days, the defect was filled with acrylic paste and painted with alkyd enamel. It is clear that such a rework is tantamount to destroying the table, so it is easier to restore the old polish with a special tool.
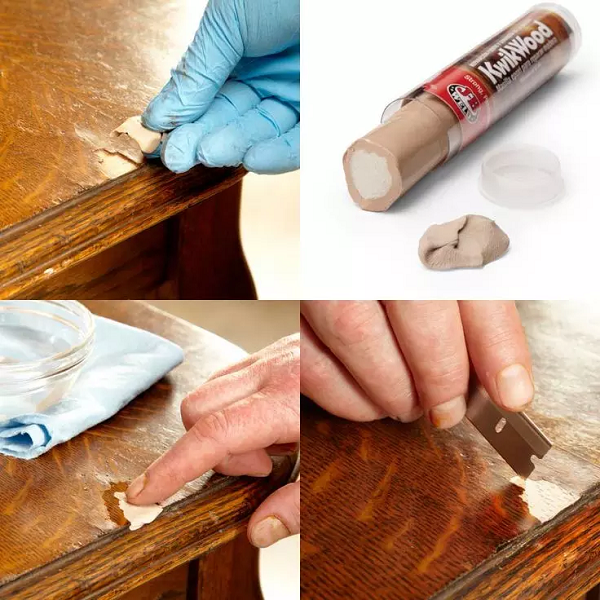
Often, during a remodel, it is necessary to replace some of the old rotted, cracked or lost pieces of furniture with new parts. For example, you can make new drawers for an old chest of drawers or cabinet.
To make the parts look old, you have to use an awl to apply marks of the bark beetle in dots, and use a bronze brush to imitate marks and abrasions.
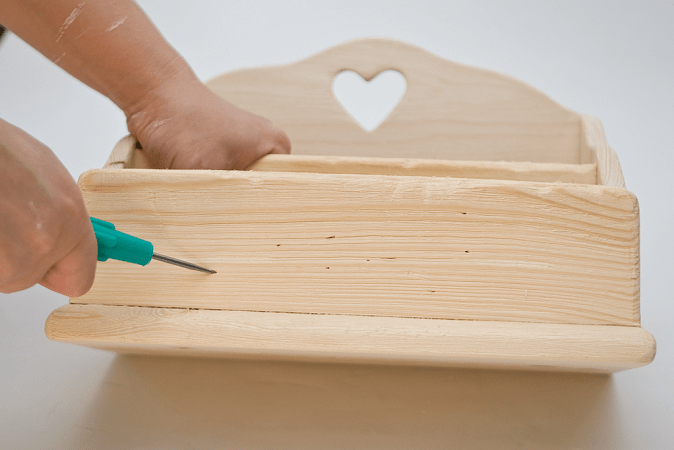
After remodeling, the wood of the box is bleached and painted to match the old furniture.
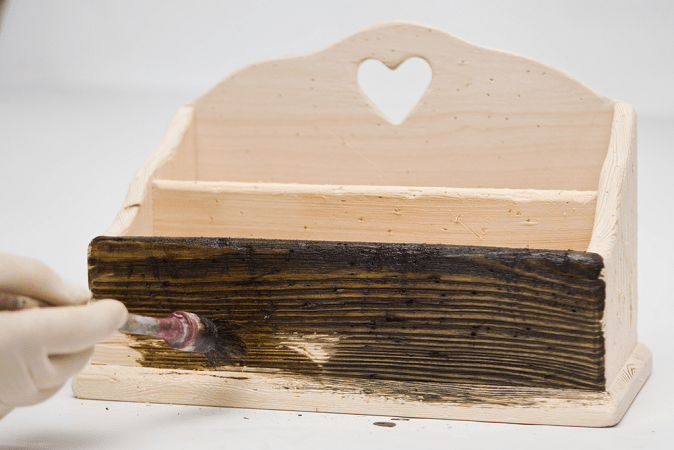

Advice! If you do not have the opportunity to select the desired coating during the renovation, then it is better not to paint the old furniture, but leave the natural, cleaned wood texture.

Sometimes during the rework you should not strive for complete authenticity of the restored copy; this can be done by professionals. If the old furniture is in extremely poor condition, then instead of an unsuccessful alteration, it is better to make an adapted version of the new furniture from it. For example, very good idea is to repurpose an old chest of drawers into a new sofa.

To do this, cut off the upper part that has become unusable - the lid and front part, leaving only the frame with legs. After installing the stand and stowing soft pillows It turns out to be a very nice sofa.
The most successful examples of remaking old things
Not everyone can handle the labor-intensive cleaning, varnishing and polishing of wooden furniture. There are two ways to simplify the remodeling process - choose an unusual style for the new coating or abandon the use of paints and varnishes altogether. Restorers, who are rightfully considered the trendsetters of style and rules in matters of furniture refurbishment, have the most bad decision Regular painting with paints is considered, no matter what, acrylic or expensive powder compositions.

For example, old wooden furniture- a cabinet or chair with style and beauty varnished wood, after painting they turn into dull monochromatic trash.
The exception is black and white varnishes. If you like painted furniture, use glossy, non-bleeding white or black paints. This remodel will give style and a spectacular look to old furniture.

Sometimes several colors are needed to enliven the space of a room and interior, in this case good decision There will be painting, application of thematic drawings to the tabletop or front part. This will not only not spoil the item, but will also make it original. True, its price, as a rarity, will decrease several times.

The option of remaking an old bedside table by covering it with newspapers and varnishing can be called ingenious.

Such a product can be safely put up for auction of old items - demand and positive responses are guaranteed.
Separately, it is worth mentioning a very special category of old furniture - designer chairs with elements of carving and edges. If you still have similar items, know that they are worth reworking and being restored by the hands of a master. Firstly, walnut chairs are very beautiful in any setting and are highly prized. Secondly, any designer furniture from a famous master from the beginning of the last century can cost very good money.


Often, owners, starting with the remodeling and restoration of one chair or table, assemble entire sets of restored furniture. Interestingly, the results of a relatively simple alteration will only increase in price and value every year.
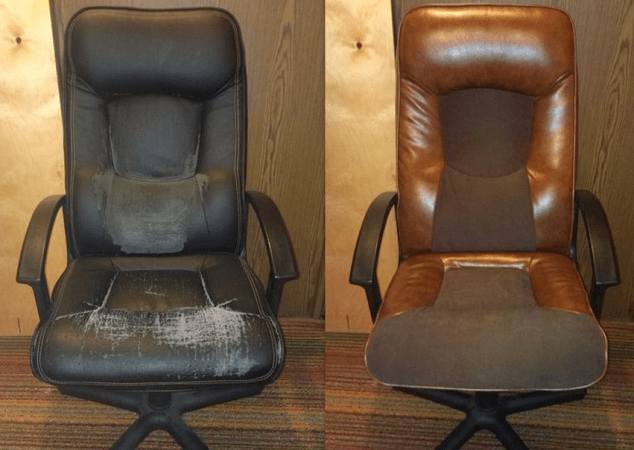
It is clear that it is not only old wooden objects that can be restored and remade. An ordinary office chair, after being reupholstered, can also become part of an antique decor.
Conclusion
Restoring old furniture does not require special equipment or technology. This is the case when the main decoration of a table or an old chest of drawers is not the ideal shape or color, but the visible labor invested by people in the manufacture and restoration of the item. If you are lucky and the furniture has been preserved with minimal damage, then it is best to leave it maximum amount original details, paint coating, accessories. The furniture will only benefit from such a remodel.
We all come from childhood and know how difficult it is sometimes to maintain the atmosphere of tenderness and carefreeness of these times. Special charm youth is largely formed thanks to the environment: caring parents, absence of problems, faithful friends, surroundings of the house. But if it is impossible to maintain a serene mood, then everyone can surround themselves with memorable things.
The old wall can be easily restored to normal condition using available materials, sold in construction stores.
It is a rare adult who does not have memories of an almost bottomless wall of furniture in which mothers and grandmothers carefully kept memories, packing them in boxes and hiding them behind glass. Many people still have such sets today, but the furniture, alas, not only becomes obsolete morally, it wears out. It is not necessary to exchange a thing dear to your heart for a modern soulless wardrobe. You can update or remake the wall with your own hands by giving it new life, in which she will store your memories.
Second life as before
If a wall dear to your heart has worn out over time, scratches and chips have appeared on its surface, it can be renewed. Restoration will not take much time, and the set will get a second life.
To correct deficiencies you will need:

Furniture wax can easily cover all scratches on old furniture.
- soft and hard furniture wax;
- candle or lighter;
- spatula, soft cloth;
- PVA glue;
- furniture varnish in spray;
- felt-tip pen, regular or special;
- self-adhesive furniture edge;
- clamps.
This set of materials and tools is sufficient for high-quality restoration mechanical damage. Before carrying out any manipulations work area You need to clean it thoroughly with soapy water and let it dry. This preparatory stage will ensure better adhesion of the materials to the surface.
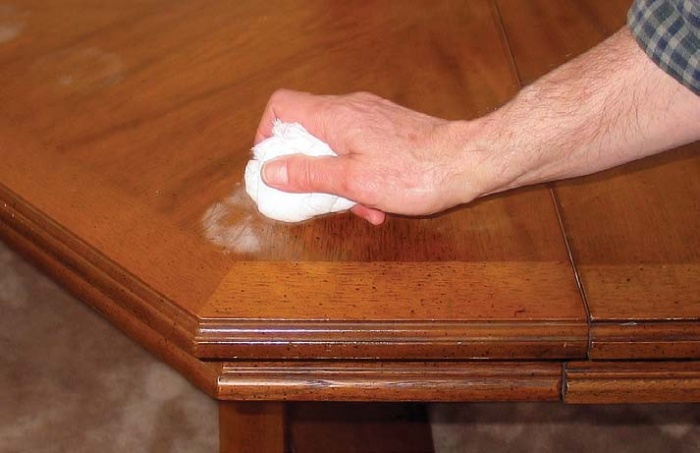
To get rid of a scratch, it is enough to apply hard wax to it, after softening it using a fire source. After the material has hardened, you need to use a felt-tip pen suitable color apply strokes that imitate the structure of chipboard. The lines should be thin, slightly uneven. You need to focus on the drawing on the undamaged area. After applying the strokes, you can lightly smudge them by lightly rubbing with a dry cloth. Excessive graphics will be too conspicuous. After the desired result is achieved, the restored area must be covered with a layer of varnish. If the coating on the facade is fairly worn, you can use spray varnish to renew the entire surface.

Furniture edging is necessary for gluing the ends of old furniture.
It’s even easier to eliminate unsightly abrasions on the facade. To do this, just moisten a small piece of fabric with a felt-tip pen of a suitable shade and treat the damaged area. Movements should be smooth, parallel to the lines of the structural design. You can also fix the result with varnish.
To get rid of cracks and delamination, a syringe, PVA glue and an adjustable clamp are enough. Using a syringe, you need to inject into the split sufficient quantity adhesive, compress the parts of the slab and carefully remove the excess. Then secure the area with clamps and leave for at least a day.
The chip needs to be smoothed out using a spatula and a sufficient amount of hard wax applied. After drying, use a spatula and cloth to form a right angle and sand the surface. Next, as when processing scratches, apply strokes with a felt-tip pen and fix the result with varnish.
Return to contents
Lacquer miracles of transformation
If a simple restoration does not suit you for certain reasons, the old wall can be radically transformed. This can be done in several ways, each of which has a right to exist. And you need to choose based on preferences, free time and, of course, artistic skills.
The simplest and affordable way restorations - varnish coating. It’s not at all difficult to do this, the main thing is to understand the order of actions and not ignore important stages.
To update you will need:

An old wall can be easily updated with a fresh coat of varnish.
- soft fabric;
- putty knife;
- sandpaper;
- brushes or roller;
- suitable varnish.
The set is simple, and in order for the result to exceed expectations, you should proceed according to the following scheme.
First of all, take a photograph of the assembled wall. This documentation will avoid future confusion and make assembly simple and enjoyable.
After this, you need to disassemble the furniture as much as possible, remove the doors and all fittings. Be sure to thoroughly clean the furniture. Wipe the facades with a weak soap solution, clean the joints using toothpicks or an old toothbrush. The better this stage is carried out, the better the varnish will adhere.
Next, it is necessary to assess the condition of the facades. If the old coating is well preserved and only requires updating, you can move on to the final stage. If multiple mechanical damage is detected, the old layer should be removed using a spatula. You can use special compounds for removing furniture varnish. After this, treat all cracks and chips as suggested above.

Furniture coated with wax is sanded with fine sandpaper.
After the wax has completely dried, you need to sand the facades using fine sandpaper. Carefully remove dust and proceed to the next step.
The surface must be coated with several layers of varnish. It is better to make more thin layers, this will avoid the formation of drips that will ruin the look of the furniture. Manufacturers usually indicate on the label required amount layers, it is these recommendations that you should focus on.
After drying, the wall needs to be assembled and the updated handles returned to their place. To enhance the effect of restoration, the fittings can be replaced with modern ones, but it must be taken into account that such manipulations can deprive the furniture of its original appearance.
Return to contents
Updating with self-adhesive film
Today it is often used for furniture restoration. self-adhesive film. The advantage of such a coating is that it is easy and pleasant to work with, the material is not too expensive, and the wide range allows you to choose a color or pattern that will complement the existing interior. In addition, the film protects furniture from external influence and the vagaries of the environment.
To update you will need:
- self-adhesive film;
- edge tape;
- scissors, iron, rags.

Using self-adhesive film you can quickly update the facade old wall.
First of all, you need to do the preparatory work, just like before varnishing: disassemble the wall, remove the fittings.
After this, thoroughly clean the facades by wiping them with a weak soap solution. After drying, the fat layer that prevents the adhesion of the materials should be removed. This can be done using a weak vinegar solution.
While the facades are drying, it is necessary to cut the film. Each sheet should be 5-10 mm larger on each side than the surface to be coated. After gluing, the excess can be easily removed with a sharp knife, but the gaps will be impossible to hide. Once everything is prepared, you can proceed directly to gluing.
The surface to be treated should be lightly sprinkled with water. Apply the film to the top edge and peel off the strip of protective layer. Gradually move down, removing protection. You should not remove it immediately; removing an incorrectly fixed coating will be extremely difficult.

After gluing, the film is smoothed with a dry cloth.
After application, smooth the film using a dry soft cloth. You need to move from the center to the edges, removing moisture and air bubbles. Movements should be light and smooth. If the bubble cannot be removed, it must be punctured using a fine game and smoothed out.
At the final stage, the surface is ironed with a moderately hot iron, this effect stimulates the film to shrink and adhere more tightly. All that remains is to stick the tape on the edges and return the fittings to their place, the alteration is complete.
You shouldn’t get hung up on a film that imitates solid wood. Today there are a lot of colors on the market that allow you to turn old furniture into a masterpiece of design. Bright colors and skillful combination of shades will breathe new life into a worn-out but dear wall. Feel free to use the ideas and advice of the masters.
Return to contents
Classic and original coloring
Repainting old furniture allows you to completely refresh its appearance while maintaining its lines and charm. To carry out such restoration work You don't need a complex set of tools or special artistic skills.
For the remodel you will need:

An old wall can be updated by painting.
- wax;
- putty knife;
- sandpaper;
- dye;
- brushes or rollers;
- additional elements: stencils, lace.
Of course, first of all you need to prepare the wall, remove the fittings and disassemble it. These manipulations will lengthen the restoration process, but when painting disassembled, it is much easier to avoid drips and layering of the coating.
After disassembling, the parts need to be cleaned and the coating removed, partially or completely. Estimate general state and, if necessary, treat scratches, chips and delaminations. After drying, use sandpaper and soft fabric clean and sand the facades. After this, you can proceed to coloring.
It is better to apply 2-3 thin layers. You need to paint slowly, making sure that sagging does not form. If a defect is discovered after drying, it must be sanded using fine sandpaper and covered with an additional layer of paint. Once the desired effect is achieved, the wall should be left to dry completely. After this, return the fittings to their place.
Repainting should not be perceived as a boring and primitive method of restoration. This technology allows you to get a completely unique result with a minimum of effort. There are many methods, and everyone is sure to find an option to their liking.

A wall in the style of Provence will fit into classic interior premises.
- Spirit of Provence. The wall or part of it after preparatory stage you need to paint it with white paint, making sure that the strokes are even, but not too dense. The background should “look through” the coating. Additionally, you can sand the corners with sandpaper. This alteration of the old wall is designed to preserve traces of use.
- A world of brightness. The doors of the set can be painted with paint of different shades within the same color. The gradient also looks stylish and interesting - a transition of tones from light to dark within the same range.
- The charm of lace. A unique pattern can be applied to the facade using ordinary lace. To do this, it must be secured with reverse side doors and paint the wall with paint from a can. The interplay of renewed and unpainted areas will create a delicate, washed-out print.
Remaking furniture with your own hands is about giving old furniture a second life. Even when old, peeling furniture from Soviet times spoils the entire updated interior of the apartment, you should not rush to take it to the landfill. There are many ideas and ways to update old furnishings.
Remaking old furniture with your own hands (the photo illustrates the process) allows you to create stunning compositions that are difficult to recognize as old. Old furniture had important advantage– it used natural wood and was made “to last forever”, i.e. with a large margin of safety. Using your own or borrowed imagination, you can make optimal use of all the features furniture sets and individual items.
You shouldn’t rush to throw away old furniture
Furniture produced in Soviet times was not particularly elegant in its time, but it served well for many years and is capable of serving for no less time. Its main disadvantages: lack of originality, i.e. standard color and appearance; almost complete absence of decorative elements.

Good example remodeling an old sideboard
In addition, signs of aging and mechanical damage should be added. As a result, fairly durable tables, cabinets, and chests of drawers turned into junk that in no way fit into the modern apartment.

Example of remodeling an old cabinet
At the same time, it should be recalled that currently such styles as country, Provencal, in which elements of antiquity, and even made of natural wood become the basis of the entire composition.

Photo of an updated kitchen in Provence style
Taking into account the above, a logical question arises about whether it is possible to remake old Soviet furniture with your own hands, and so that it looks like new and is original. In other words, there is a need to preserve antiquity, but so that the neighbors do not have the same. It turns out that such a task is quite doable, and remodeling furniture with your own hands is accessible to many people.

An example of IKEA furniture conversion
In the not very wide range of Soviet furniture, walls were considered a special chic. And in our time, when remaking furniture with your own hands is started, the old Soviet wall is first of all taken for processing.
In general, it is worth thinking about restoring any items from natural wood– such furniture will never go out of fashion, but you need to use maximum imagination to improve the appearance. Remaking IKEA furniture with your own hands also promises great opportunities, because... products of this Swedish company have always been successful, but they will have to be given a more modern touch.

Furniture will never go out of style
What principles can be used
The method of restoration depends on the degree of wear of the furniture. The easiest way to improve it is by painting it and hanging elegant fittings. It is the fittings that can give any product a certain style and originality, and the range of its choice on the market is huge, plus the possibility of individual creativity should not be discounted.

Decoupage - decorating furniture surfaces using multi-colored napkins
Remaking furniture with your own hands (the photo clearly demonstrates the possibilities) is based on the following basic methods:
- Painting. Diversity color solutions When using acrylic paint it makes it possible to achieve any style. Even imitation gilding, silvering, bronze tint, etc. is available, which can give the furniture Rococo or Baroque features.
- Varnish coating. Modern varnishes have numerous shades and are able to bring out the wood texture very well.
- Decoupage is the decoration of furniture surfaces using multi-colored napkins (most often paper), on top of which a layer of varnish is applied. The possibilities of this method are enormous and allow you to express your personal attitude to decoration.
- Craquelure - technique artificial aging painting or varnish layer. Currently, this method of interior decoration is very popular. In practice, imitation of a network of cracks is achieved by applying a special craquelure varnish.
- Gluing film (self-adhesive film) or wallpaper. It is considered very common and simple method. Do-it-yourself kitchen furniture remodeling is often based on the use of self-adhesive film different color and design, but wood imitation is most in demand.
- Hanging fittings and decorative elements. This method is necessary for any furniture restoration technology.
Preparatory activities
Before starting work, first of all, you should understand that remaking Soviet furniture with your own hands makes sense only if it is made of natural wood.

Sanding machine for furniture renovation
Important! An attempt to restore objects made of chipboard is a waste of time, because... the durability of this material is not so high, and the service life is often already exhausted .
In order to apply any of the above methods of updating furniture, it is necessary to carry out preparatory measures that are common to all cases.

Chisel necessary tool in working with wood
They include the following works:
- Removing outdated fittings and decor, cleaning surfaces from contamination. Next, you need to remove the old layer of varnish (paint). For this purpose, the surface is first treated with emery cloth or using a grinding machine, and then a dissolving liquid - an aqueous ammonia solution - is applied to it.
- If there are noticeable cracks, they are grouted using a special composition. After grouting, the treated area is carefully sanded.
- Surface primer. Regardless of the quality of the surface of old furniture, various dents and microscopic cracks form on it, which in the future can disrupt the integrity of the new coating. To eliminate any unevenness, it is recommended to prime the façade surface of old furniture. After drying, the primer is carefully sanded.
To carry out preparatory work, you should prepare the following tool in advance: Grinder, chisel, screwdriver, hammer, spatula, paint brush.

Hammer necessary for restoring old furniture
Features of wall modification
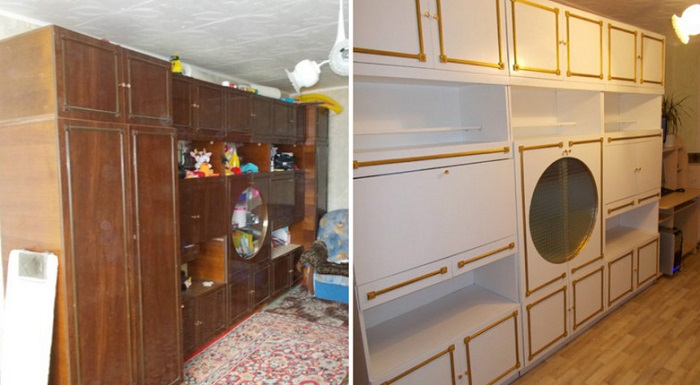
The old Soviet wall does not fit in at all modern interior due to its overly typical appearance, not to mention its aging, scratches, etc. This furniture set was made in a modest style with rather discreet colors, without decoration. All this does not allow us to fit it into any single designer style.

An example of remaking an old Soviet wall
The most common way to remake an old Soviet (and not only Soviet) wall is to cover the facade with film (wallpaper) of bright colors, as well as install original fittings and decorative elements. As an example, we can cite one of the options used: on the doors there is a self-adhesive film in the color of “cream” with a matte surface; on glass elements– matte translucent film; The edging is done with a chrome-look film.
This do-it-yourself alteration of old furniture is carried out in the following order:
- Carrying out standard preparatory work.
- The prepared surface is treated with dishwashing detergent, which is then washed off with a weak vinegar solution and dried.
- The film is cut so that it has a 5-8 mm margin.
- The surface of the wall is sprayed with water from a spray bottle, because It is much easier to apply the film on the wet side, with the possibility of slight shifting.
- The self-adhesive film is carefully applied, smoothing out air bubbles.
- Ironing is carried out on top of the film with a slightly heated iron through the fabric.
- Imitation chrome edging strips are glued on.
- Fittings and decorative elements of the chosen design style are installed.
Similarly, you can cover the facade of the wall not with film, but with non-woven wallpaper. PVA is used as glue.
How can you repurpose other items?
Do-it-yourself furniture remodeling can successfully affect other items as well.

Old chest of drawers can be turned into an elegant modern piece of furniture
For some reason, an old chest of drawers most often ends up in a landfill, but in vain. It can be turned into an elegant modern piece of furniture after the following events:
- Carrying out preparatory work.
- Fastening polyurethane moldings, in this case there is no need to strive for large elements - their width is not recommended more than 3-4 cm (it is important to very accurately align them in the corners so that there are no gaps).
- Primer application: one of the composition options is an aqueous solution of PVA (50%).
- Painting using acrylic paint. The color of coffee with milk looks very impressive.
- Decoration can be done with wallpaper with a silk-screen printing element.
- The final coating is provided by varnish.
How can you transform an old bedside table? One option is door decoupage. In this case, after carrying out the preparatory work outer side the doors are first painted acrylic paint. Then a paper sheet with a beautiful design or ornament is glued onto it. The plot and color scheme completely depend on the taste of the owner. If there is also drawer, then a drawing in the same style is pasted onto its front side. Varnish is applied on top of the paper. acrylic base semi-gloss type. Important element– beautiful and original pens.

On the surface of the tabletop you can paste paper with a pattern in one sheet or assemble an abstract pattern from paper pieces
It's possible to use the old one coffee table turn it into an elegant thing. After preparation, the table needs to be painted, and it looks modern bright hues. The next step is decoupage of the tabletop. You can paste a single sheet of patterned paper onto the surface or assemble an abstract pattern from paper pieces. PVA glue is used. After gluing, it is advisable to go over the tabletop with a roller to remove defects. The surface of the table should be as smooth as possible. The final coating is formed by two layers of varnish.
The apartment has a Soviet-era wall made of high quality natural wood. But over time, the facades became distorted, the fittings failed, and the appearance became unpresentable. It’s a shame to throw away this piece of furniture, so many people have a question about how to update an old furniture wall with their own hands and they study photos before and after restoration.
Before starting any work, you need to prepare everything you need - buy material, tools. The list consists of the following:
- Furniture fittings;
- Putty material for wood;
- Facades, if necessary;
- Paint or stain (preferably spray);
- Construction knife;
- Construction hair dryer;
- Screwdriver;
- Sharp scissors;
- Iron;
- Self-adhesive furniture film;
- Wax for furniture of different consistency;
- Candle;
- Spatulas;
- Rags, clamp;
- PVA glue;
- Wood varnish;
- Felt pen;
- Edge for processing ends.
This is not the entire list of materials and tools, since you can update old furniture in several ways, each option has its own specific set of necessary tools.


Types of update
If you don’t know how to update an old furniture wall with your own hands, before and after photos can be found on the Internet. In addition, we present several methods that can be used to give a second life to any furniture.
Restoration of an old wall
If old furniture is dear to you as a memory, but its appearance has been greatly damaged by time - chips, creases, deep cracks have formed on the surface - it can be restored. After spending a minimum of time, you will receive an updated piece of furniture. For repair work use a standard set of materials and tools. For quality repairs it is enough to do the following:
- The working surface must be cleaned and washed with a solution of water and soap, and dried well - this will help increase the adhesion of the material to the wall facade;
- To rid the plane of deep scratches, they are filled with melted wax. After the fill has hardened, you need to take a felt-tip pen to match the wood, apply strokes to the wax that will imitate the structure of the wall material. This is not difficult to do; just continue an existing drawing. After this, take a clean rag and carefully rub it over the frozen wax, slightly smearing the lines. As soon as the desired result is achieved, the plane is coated with furniture varnish;
- If severe abrasions are visible on the facade, they are painted over with varnish the desired shade from a can;
- If there are cracks and delaminated areas on the facade, you can update the old wall using basic means - PVA glue, a medical syringe and a fixative. You need to fill the syringe with glue and inject it into the crack. required quantity composition. Then press the split and remove excess glue. Using a clamp, press the area and leave to dry for 24 hours;
- Are there many chips on the façade? The same melted wax will help you deal with them. First, you need to use a spatula to trim the edges of the chip and fill it with wax. Once the wax has dried, buff the area well with a clean, dry rag. Then perform the same steps as when filling scratches and apply varnish.
After this treatment, the wall will not change its design, but its appearance will become much more attractive.

We remove dirt and dust from coatings

Treating cracks with wax

Repairing chips with glue

Painting over abrasions
Transforming a wall with furniture varnish
If the interior of your apartment has changed, and simple restoration does not suit you, then you can radically change the old furniture with your own hands. There are several ways to update furniture, the choice of which will depend on artistic skills, preferences and the amount of free time.
The most in a simple way is varnish coating. The process is not complicated, provided that the procedure and restoration technology are followed.
The set of tools is standard, but for a good result you need to follow the following algorithm:
- Take a photo of the wall before starting work. This will help you assemble it later after the update without confusion;
- Disassemble the structure. It is necessary to remove the fittings and doors;
- Wash the wall and all components with soapy water;
- Remove dust and soot deposits in the corners using a toothbrush or toothpicks. This stage should not be ignored, since the quality of the final result depends on preparation;
- Inspect the condition of the facades. If the surface is not badly damaged, then it will be enough to simply coat it with varnish;
- If the facades are in poor condition, there are a lot of chips and deep scratches on them - the old coating is removed without leaving a trace. To make the work go faster, you can use special compounds that help remove varnish, or use a regular spatula;
- As soon as all the exfoliated areas are removed, the old varnish is removed, you can begin restoration with wax - how to do it is described above;
- Using fine-grain sandpaper, sand the surface and remove dust;
- Cover the wall façade and all components with 3-4 thin layers of furniture varnish. It is worth remembering that when applying a thick layer, drips may form that will spoil the appearance of the wall;
- Once dry varnish coating, the wall should be assembled and the fittings replaced with new elements.
By updating old furniture in this way, you can add a few more years of life to the wall in your interior.

Removing dust and dirt

We remove cracks

Removing old varnish

Varnish in several layers

Installing new handles
Application of self-adhesive wallpaper
Today there are a lot of materials that can be used for restoration. Renewing old furniture with self-adhesive wallpaper is one of the most simple options. This material is easy to work with and inexpensive. In addition, the range is so wide that you can choose material to suit every taste. The film is waterproof, so it can protect the wall from environmental influences. The algorithm for performing the work is as follows:
- Make preparations as in the previous method - remove the fittings and disassemble the structure;
- Clean the facades, wash them, and after drying, treat the surface with white spirit to degrease;
- While the facades are drying, we cut out the material. Sheets of film should be 10 mm larger than the original size on each side. This is necessary in order to eliminate gaps in the finishing;
- The surface on which you plan to stick the material must be moistened. Apply the film to the top edge and carefully peel off a small strip of the protective layer. The film is pasted gradually, slowly moving down;
- After gluing, you need to level the material with a soft rag, moving from the center to the edges;
- As soon as the entire wall is covered, you need to heat the iron and iron the plane through the fabric - this will help the film adhere tightly to the surface;
- Replace the doors and fittings and apply edge tape.
It is not necessary to use wood-look film; you can choose any color. A competent design combination of different shades will help turn an old wall into a real masterpiece.

We disassemble the furniture

Cleaning the surface

We moisturize the coatings

We glue the film

Putting it back together
Restoration using staining
Repainting an old wall will change its appearance beyond recognition, while the main outlines will remain unchanged. You don't need artistic skills, just like special tool. The work is not difficult to complete, just follow the basic rules:
- The wall is completely disassembled and the fittings are removed - this makes the restoration process much easier;
- The old coating must be completely removed, obvious flaws must be repaired with wax;
- Sand the surface after it has dried with sandpaper or a soft rag;
- Painting is carried out in several layers, and care must be taken to ensure that no sagging or smudges appear. As soon as the painting is completed, we leave the structure to dry, after which the wall should be assembled.
If a sagging has formed during the work, which was discovered after drying, it should be cleaned with sandpaper and additionally coated with paint. For a complete understanding of the painting system, watch a master class for beginners on updating furniture with your own hands.
Work technology
Carrying out work for any type of restoration has one general technological sequence - preparation and actual updating.
Preparatory work
Before you decide to remake old Soviet-era furniture, you need to understand that such a process is only justified if it is made of wood. It is not advisable to renew old furniture made of chipboard, since the service life of these structures is not long, and perhaps the wall is no longer suitable for restoration. So, there are preparatory activities that must be carried out before any restoration:
- Clean the surface from dust and dirt, while dismantling all decor and fittings;
- The old layer of paintwork must be removed. This can be done with coarse sandpaper or a sanding machine. A solvent solution can also be applied;
- Grout deep cracks with a special material;
- Fill chips and dents with wax and sand;
- Prime the surface with a wood compound. It is advisable to use acrylic compounds that fill all microscopic cracks.
The preparation stage is very important, since the final result depends on the quality of surface cleaning.

Removing dust and dirt

Clearing from old paint or varnish

We erase the deformations

Prime the surface
Update instructions
Before you restore old furniture, you need to decide on the design you want to get. Let's look at the most popular this moment renewal method - decoupage. Preparatory work carried out successfully, restoration can begin. The algorithm for performing the work is simple and will not cause difficulties even for a beginner:
- Cut out the desired design, or take special napkins for decoupage. If you are doing the work for the first time, take pictures of medium size relative to the surface on which they will be applied;
- Apply PVA glue to the surface, you can use a blending composition. Do not coat the entire wall at once, as the glue may dry out while you are covering one area, so you need to work in stages;
- When gluing a pattern, you must strictly ensure that the edges adhere to the surface. Drawings can be pasted overlapping each other, so the decor will be voluminous and original;
- If you need to paste over a corner, the material just neatly bends around the corner, there is no need to cut anything. Smooth out the picture with your fingers, or rubber spatula to remove air bubbles and leave to dry;
- The next stage is varnishing. Apply a thin layer of clear furniture varnish with a brush or lint-free roller and let it dry. We repeat the process 3-5 times;
- After last layer Once the varnish has dried, you need to rub the surface until it shines; this can be done with a soft cloth. Polishing should be done in a circular motion without pressing.
In the before and after photos you can see how to update an old furniture wall with your own hands. If you follow the instructions and apply designer methods of decorating furniture, you can get a great result that will be the pride of the apartment owners.
What can you make from an old wardrobe? There is no need to rush to throw it away or give it away. Let's take a closer look at some options with cabinet use ideas.
Desktop
From the walls of the closet you can construct a desk for children. And use the shelves to make closed drawers for the table. Then carefully connect everything and clean it with sandpaper. Next, apply several layers of wood varnish.
Important! Let the first coat of varnish dry thoroughly before applying the second.
Cabinet
Make a versatile bedside table out of an old closet. A new piece of furniture like this will always come in handy. After all, you can put in it any accessories that will always be at hand. Drawings with patterns will add originality to the cabinet. To make the cabinet look more comfortable, place it on top flower plant in a pot.

Taping or painting the cabinet
Update old wardrobe and giving it a second life is very simple. The main thing is to choose the right material for gluing. Self-adhesive wallpaper will do.

Reference! Before gluing, you need to temporarily unscrew the handles on the cabinet, then you will get an amazing effect.
If you decide to paint a part, then select a varnish or special paint to match the color of your apartment interior. The assortment in hardware stores has a wide selection for every color and taste.

Important! The style is given by two types of painting. Recommended, for example, in the form of black and white, etc.
Shelf in the garage
Depending on the size of the old cabinet, you can make your own shelf of any size for the garage. Since the garage almost always has a lot of different tools scattered in the corners, a shelf is needed for them. Assembling the shelf takes less than an hour.

Sideboard
The sideboard is made in several stages:
- Make an ordinary rectangular bedside table and screw the light rear half of the cabinet to the back on both sides. And for greater beauty, add a mirror with holders along the edges of the outline.
- In a cabinet with inside attach two slats for the shelves.

Floor stand for flowers
The stand can be made of any shape. The ideal option is in the form of a square pyramid. This stand will fit many more flower pots. Geometric shapes fashion trend of the 21st century. Originality without repetition. It is unlikely that you will be able to find and purchase such a stand in a store.

Important! The bottom square should be stronger and more stable, because the main weight of the flower pots and pyramidal subsequent structures will press on the bottom.
Potato box
Most quick way Making such a box from an old cabinet is suitable for storing large amounts of potatoes. Simply place the cabinet on the back wall, open the door and add the potatoes. If you need a much smaller size, then disassemble the old cabinet and assemble a regular box from the walls. To add beauty, you can design a lid with a lock or latch.

Soft ottomans for the hallway
Remove the shelves and connect them together to make a square. Place foam rubber on the top part and cover it with fabric. The walls of the ottoman can be painted in any suitable color.
