Planting petunia seeds for seedlings - different ways. Sowing petunias in the snow
For inexperienced gardeners, information on how to plant petunia seedlings is very important, since the cost planting material quite high. Growing seedlings on your own will allow you to save money and purchase useful experience, which will be useful when forming a flowerbed on your own.
How to properly plant petunia seeds for seedlings?
Because the optimal time for planting petunias in open ground is mid-June, sowing seeds is best done in mid-March.
The soil for planting seeds is selected to be neither alkaline nor strongly acidic. It should be loose and nutritious. The main characteristic soil is its ability to retain moisture, but at the same time not accumulate excess water. You can purchase ready-made soil mixture or make it yourself. For this they take peat, sod land, humus and sand in a ratio of 2:2:2:1. The ingredients are mixed well and sifted through a coarse and finer sieve.
Drainage (expanded clay) is placed at the bottom of the prepared container, then a soil mixture of coarse screenings, and fine ones on top. The soil is moistened, seeds are scattered on it in even rows and sprayed with water from a spray bottle.
The planted seeds are covered with glass, which is removed for ventilation for 5-10 minutes every day, gradually increasing the time intervals until the leaves appear. Another option would be shelter from nonwoven fabric, which will ensure the flow fresh air seeds.
For good seed germination, it is important to follow the correct temperature regime(+24ºС) and provide the required level of humidity. The seeds are moistened by spraying with water and potassium permanganate.
After the leaves appear, the seedlings are planted in separate containers. When the seedlings grow up, they are planted in open ground. Many people have a question: how close to plant petunia seedlings in the ground? The distance depends on the variety. So, if multi-flowered forms are planted, then the plants are planted 10-15 cm from each other. For large-flowered varieties the distance is 20-25 cm.
How to plant petunia for seedlings with snow?
Planting petunia seedlings with snow is convenient, as it allows you to evenly distribute the seeds, which are difficult to see on black soil. Also, when snow melts, natural moisture occurs. This method takes place in several stages:
- The soil mixture is poured into the container so that it does not reach the edges by 2-3 cm.
- The mixture is leveled and compacted. The soil is watered with a fungicide solution a day before sowing to prevent the development of diseases.
- Snow is placed on the mixture in a 1 cm layer.
- The seeds are scattered evenly over the snow.
- The container is covered with glass or paper until shoots appear.
How to plant petunia in tablets for seedlings?
The method of planting petunias is suitable if you purchase pelleted seeds. Regular seeds It will be better to sow with snow. The advantages of tablets are:
- the ability to instantly become saturated with water;
- absence of compaction and mold;
- scattering when divided into several parts, which keeps the roots of the seedlings uninjured;
- the ability to determine the need for watering by the color of the tablet;
- the ability to plant up to five seeds in one tablet at a time.
Pills are poured hot boiled water, and then cool. Petunia seeds are placed in special recesses using tweezers. 
How to plant petunia seedlings in diapers?
A diaper is a plastic bag measuring 20x30 cm. This method will allow you to save space on the windowsill. The bag is laid out on the table and soil is placed in it in a heap. A hole is made in the soil in which the seed is placed and moistened. The bag is rolled up and placed in a container, which is covered with film on top. The seeds are periodically moistened.
You can plant petunias using one of the following methods.
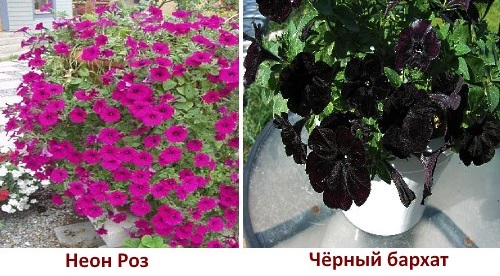
Petunia is a magnificent annual that blooms all summer and is a favorite of many gardeners. Her flowers are bright and varied in color. It grows beautifully both in flower beds and in flowerpots. It blooms for a very long time, almost all summer, from the end of May until the fall (and if you cut off the faded inflorescences in time, then even longer). Varieties and types of petunia great amount. Every summer resident will be able to choose what he likes.
So there are a lot of ways to grow petunias from seeds. We will tell you how to plant petunia seedlings with snow. The most a big problem When planting petunia at home for seedlings, it has very small seeds. In this regard, many have difficulties with how to sow petunia seeds for seedlings.
One of the options for solving this problem is to plant petunias under the snow. There is a trick here. We sow petunia seedlings with snow, and when the snow melts, it draws the seeds into the ground, where they successfully germinate. It should be noted that melt water for plants is the same as “ living water" Very soft and useful. If you have the opportunity, water all your seedlings with melt water. Tomatoes, peppers, and eggplants respond very well to it.
How to plant petunia for seedlings with snow
Planting petunia in the snow is accompanied by the following materials:
- Soil for flower seedlings
- Pure snow
- Favorite petunia seeds
- Small garden scoop
- Sowing container
- Glass or plastic
- Scissors
Step 1

Place soil in the seedling container, level and compact it. Soil for flowers is placed in a bowl so that it upper layer the soil did not reach the edge by about 2–3 cm. It is good when planting petunia with snow occurs in soil that has been spilled with a fungicide solution (Fundazol, Ridomil, etc.). This is done in order to prevent various diseases, blackleg disease, for example. The solution is spilled on the soil no later than 24 hours before sowing petunia seeds. Then the snow is spread on the soil surface in a layer of 1–1.5 cm.
Step 2

Take suitable item and compact the snow in the bowl.
Step 3

Place the petunia seeds on a sheet of paper and shake them into a bowl in small portions, trying to distribute them evenly. Spread the granulated seeds over the surface.
Step 4

Then lightly loosen the snow with a toothpick in those places where the petunia is sown too thickly, and distribute some of the seeds to the free places. When the snow melts, the seeds will be slightly drawn into the soil. There is no need to sprinkle the crops with soil - petunia sprouts in the light. Planting petunia in the snow for seedlings does not require burying the seeds; they remain spread out on top.
Step 5

To germinate seeds, place the pot in a bright, warm place. If it's cold on the windowsill, you can put it under table lamp and cover with glass or a plastic bag. The first shoots will appear in about a week. Petunia grows very well under the snow, you should not have any problems.
As soon as the first green sprouts appear, you need to ventilate the pot with plantings 1 - 2 times a day. When removing the lid, first wipe off any condensation from it and leave the crops uncovered for 10–15 minutes. Doesn't have an exact time of great importance. Nothing bad will happen if you cover the crops right away (for example, when you are late for work). You can ventilate for an hour if you have other things to do at that time. It’s just important not to forget to do this regularly, every day.
At first, how to sow petunia in the snow, the seedlings will develop very slowly: all the main forces of the flower are spent on creating and growing the root system.
If the petunia seedlings are very dense in some places, you can thin them out using tweezers.
When the petunia seedlings grow and the leaves touch the glass or plastic bag, remove it. At this time, you need to carefully monitor the soil moisture. Petunia seedlings love moist soil. Overdrying will ruin your plants. You can moisten from a tray or by watering “under the root”; try to water so that no drops of water remain on the leaves of the seedlings.
As soon as the petunia seedlings grow so large that they can be held with your fingers, pick them into pots or cassettes, carefully loosening the thin roots with a spatula or toothpick.
Step 6

If, when picking, you see that the roots are long, then pinch them so that when planting you can freely distribute them in the ground. After transplanting, water carefully until the soil settles.
We’ll give you one piece of advice on how to plant petunia in the snow. If you plant granulated seeds for growing in a flower pot or balcony box, plant them directly on permanent place growing. This way you will avoid transplantation. They do this if there is enough space on the windowsills for flower seedlings.
Step 7

To prevent the plants from stretching, place the grown petunia in a cooler place. A month after picking, it can be taken out to glass balcony, veranda or greenhouse.
Step 8

Petunia varieties and hybrids with strong shoot growth need pinching. Then the petunia bush will bush. To do this, when the petunia plant reaches a height of 5–7 cm, for better tillering of the plants, pinch the shoots above the 4–5th leaf.
Step 9

A new shoot grows from the axil of each leaf, and the petunia blooms more profusely, and the bush will look more decorative.
Step 10

In early June, petunia seedlings will be ready for planting in a flowerpot, balcony box or to a flowerbed at the dacha. There is nothing complicated about how to sow petunia in the snow. Try this petunia planting method and share your results.
Petunia is one of the most popular and beautiful annuals ornamental plants. Bright petunia is famous for its beautiful flowers various shades, splendor, long flowering period and unpretentiousness.
Planting material for a large flower bed is quite expensive - it is costly, many people try to grow it themselves. Many people fail to grow this plant due to the intricacies of growing seedlings and they give up.
But if you take into account all the features of sowing and growing, you can get seedlings of this beautiful plant not only for yourself, but also for sale.
Why should petunia flowers be grown from seedlings?
Petunia is a small-seeded, long-growing plant and is grown through seedlings. If you sow seeds directly into the ground, flowering will occur only at the end of summer. With early frosts, flowers may not be seen.
Petunia from seeds can be grown in any quantity and, if desired, decorate not only the flower bed, but also improve paths, gazebos, terraces, balconies, areas near the fence, flowerpots and hanging flowerpots.
Seedlings obtained with one's own hands guarantee the safety of seedlings, and this is the main requirement when choosing flowers. After all, sick and infected plants can not only die themselves, but also destroy nearby flowers.
When should you plant petunia seedlings in 2018-2019?

The best time for sowing petunia seeds is the end of January - beginning of March. When sowing and following certain rules, petunia will begin to bloom in late May or early June.
The growing period for petunia seedlings takes an average of 2.5-3 months. The first shoots appear a week after sowing the seeds. In a month or a month and a half, 2 main leaves will appear on the seedlings and the plants can be planted in separate containers. There are 1.5 - 2 months left before flowering.
Seedlings begin to bloom at about the age of three months. Plus another week of non-germination of seeds and stress after picking. So it turns out that in order to plant plants with buds and flowers in the ground at the beginning of June, you need to sow seeds and seedlings in the second half of February.
If you want to grow flowers for sale, then sow them in January - then in May you will delight buyers with beautiful blooming petunias.
When sowing in January-February, the sprouts require additional lighting phytolamp. If you cannot provide additional light to the plants, then you need to start sowing in March, otherwise the sprouts will die from lack of lighting.
In addition to additional lighting, good growth of petunia requires stable temperature conditions and care. Sudden temperature changes, waterlogging or insufficient watering, all this leads to the death of plants.
Ampel varieties of petunias need to be sown half a month earlier than standard varieties.
For hanging varieties, it is better to immediately use separate cassettes and sow the seeds in granules.
Lunar calendar in 2018-2018 for sowing petunia

Almost all gardeners have heard, and many put into practice, recommendations for growing plants according to lunar calendar. Some people are skeptical about this, but for others it is a guide to action. But no one will deny
The most unfavorable days The periods for sowing petunias are the New Moon and the Full Moon, especially 12 hours before and 12 hours after their onset.
For capricious petunia, the timing of sowing seedlings is no less important. These flowers are also traditionally grown seedling method due to the size of the dusty seeds and the soil requirements of the seedlings.
If you have the opportunity to provide high-quality lighting for the seedlings, you can plant the seeds even at the end of the year; in this case, you will transplant already flowering bushes into the ground in the spring. Sowing petunia seedlings according to the lunar calendar is carried out on the same days that are favorable for other annuals.
Favorable days in 2018:
- in November - 9, 14, 21, 22;
- in December - 3-5, 8-12, 27, 31.
Unfavorable days in 2018:
- in November - 1, 2, 7, 14, 15, 23, 28, 29;
- in December - 2-4, 7, 8, 10, 17-19, 21-23, 26.
Favorable days in 2019:
- in January - 10, 11, 15-19, 20;
- in February - 6-8, 12-17;
- in March - 7, 10-12, 14-16; 19-21;
- in April - 7-11, 16-19.
Unfavorable days in 2019:
- in January - 5-9, 22;
- in February - 3-5, 11, 18, 20;
- in March - 3-6, 13, 17, 18, 22, 30, 31;
- in April - 1, 4, 5, 12-15; 21, 27, 28.
On a note! Sowing dates vary depending on the species of petunias. Cascading varieties must be sown 2 weeks earlier than standard forms; dwarf small-flowered varieties, on the contrary, are sown 2 weeks later.
Planting on dates that are not on the list does not in any way affect the growth of seedlings and plant development - these dates are considered neutral.
Attention!All listed dates are taken into account when picking, as well as planting seedlings in open ground and have the same meaning!

In order to admire these beautiful flowers in your garden, you need to know that in each region you need to adhere to the appropriate time.
In Central Russia and the Moscow region, the period for planting seeds to obtain flowers in May should occur from February 1 to February 15. More is possible late sowing(March to May), but flowering in this case will be postponed to a later date.
For regions with a cooler climate (Ural, Siberia), sowing should take place no earlier than the beginning of March. Earlier sowing leads to overgrowth of seedlings.

The seeds collected from plants are very small and many gardeners have a problem with sowing in the form of thinning.
To simplify this procedure, gardeners buy ready-made granules that dissolve in moist soil and accelerate plant growth. On next year Having gained experience, you can safely sow self-collected seeds.
Attention! Seeds collected from hybrid plants will not preserve parent properties! But it’s all the more interesting to see what grows!
Sowing
The soil for sowing must have a neutral or slightly acidic environment. We prepare the soil in advance so that it is loose, nutritious, and well-permeable to moisture.
The soil mixture can be purchased at a specialty store or prepared at home. For the mixture you will need:
- 2 parts of turf,
- peat,
- rotted humus,
- coconut substrate
- 1 part sand.
To normalize soil acidity, add to the mixture charcoal, lime. All components are mixed and sifted into a large and fine sieve.
The finished mixture is heated in the oven or poured with boiling water.
The container for sowing (boxes, pots, containers) must be deep enough, at least 10 centimeters, and have holes for water drainage. For drainage, fine expanded clay or perlite is poured onto the bottom of the container. Then there is a large screening, the remaining third of the container is filled with small screenings from above.
The soil is pressed a little and watered warm water. Seeds are laid out in rows using a toothpick and sprayed with water. Seeds can be mixed with sand and sown without using improvised means.

When sowing without using sand, you can use a sheet that, when bent, will allow the seeds to roll off one by one and not thicken the planting. For closer contact with the ground, the seeds are pressed a little.
Attention! Do not sprinkle with soil!
- They need to be soaked in boiling water and cooled.
- Then, using tweezers and a toothpick, insert the seeds into special recesses.
- The tablets are placed in a container.
After which, regardless of the sowing method, the container is covered transparent film, glass. The temperature under the shelter should be 24 degrees.
With more low temperatures germination, especially in hybrids, will be poor or not at all. High temperatures lead to stretching of sprouts and their diseases.
For getting sufficient quantity moisture, seedlings are sprayed with water with the addition of potassium permanganate 3-4 times a day. Such conditions allow the seeds to germinate on day 7.
 It is convenient to grow petunias in a container with a lid that can be ventilated
 After emergence of seedlings, the film cover is removed. If glass was used, then gradual hardening is carried out, removing the protection for 5 minutes, then 10, 20 and so on until the sprouts get used to room temperature. This usually happens when the first leaves appear. After the first shoots, the seedlings are placed in a bright place.
Direct Sun rays should not touch plants.
Picking
When 2-3 true leaves appear (1 - 1.5 months after sowing), the seedlings undergo picking. The soil mixture used is the same as for sowing. Before planting, water with a weak solution of potassium permanganate.
In individual containers, plants quickly adapt to new conditions, grow and become stronger. The planted seedling is buried in the ground until the first main leaves. This will allow the plant to develop strong and healthy root system and not get sick with black leg.
 A toothpick or match helps transplant babies
 Small petunias appear to be very weak, with a root thinner than a hair, but this is deceiving. They are very tenacious, grow well after transplantation, do not be afraid if the tip of the root comes off during transplantation - this is even good.
If you sow petunias often and they come up in a heap, then replant 5-6 plants in small bouquets and let them grow like that. After transplanting into the ground and pinching it properly, you will get a gorgeous flowering bush!
Seedlings in peat tablets are simply transplanted into plastic cups, peat pots or cassettes.
Don’t worry that at first the seedlings grow very slowly - in the first half of cultivation this is the norm, then the green mass will grow very quickly.
Seedling care
To get healthy and strong seedlings Petunias need timely and careful watering. Drying out the soil leads to the death of plants, and waterlogging leads to illness and death of seedlings. Watering grown plants in separate containers is done carefully at the root. Only warm water.
Do not water on the leaves - they may get sick!
For hardening, from the second week the window is opened slightly for 10 minutes, so the temperature in the room will drop. In this case, the direct flow of cold air and drafts must be excluded. The seedlings themselves should not cool down.

Fertilizers are applied half a month after picking the seedlings. First, spray the leaves with liquid fertilizer every 2 days. Complex mineral fertilizers with an admixture of nitrogen should alternate with growth stimulants. Then, during the entire period of growing the plants before transplanting them to a permanent place of growth, fertilizing is done 2 more times.
When the root system fills the entire space of the pot, the plants are transplanted into containers bigger size. If plants grow in peat pots, planting is done together with the pot.
If the petunia begins to stretch, you need to add soil mixture.
For the first month and a half, petunia develops a root system, and the above-ground part develops slowly, then everything happens the other way around and the plant begins to grow.
Watering
Watering grown plants in separate containers is done carefully at the root. The frequency of watering depends on the soil. The earth should not dry out.
The formation of a crust after watering is excluded, since the seedlings suffocate and die. Condensation formed on the film (glass) is removed daily.
Additional lighting

Petunia seedlings need light almost around the clock. In gloomy weather, the lights are turned on during the day and dimmed at night. The lamp must be located at a large distance, otherwise the plants may get burned. Daylight hours for petunias should be at least 16 hours a day.
Pests and diseases
Viral diseases manifest themselves in the form of yellowing of leaf veins, discoloration of foliage, and slower growth. The carrier of the disease is most often aphids. Control measures consist of removing diseased seedlings.
Petunia is susceptible to diseases such as: black leg, root rot, gray mold, chlorosis, powdery mildew, downy mildew, fusarium.
To combat diseases, the following drugs are used: Ferrovit, Albit, Izumrud, Planriz Topaz, Skor, Previkur, Fundazol, systemic fungicides.
In addition to diseases, petunia is affected by many pests.
When thrips appear, young leaves become deformed and the growth point becomes bent. Flowers become spotted and turn brown. To combat the pest, sticky traps are placed in flowers.
For complete relief, Aktara, Confidor, Biotlin are used. Spraying is carried out 2 times with an interval of 4 days.
 For successful flowering it is necessary to prevent the occurrence of diseases and pests
 Aphids cause curling of leaves, buds, flowers, and their further yellowing. Sticky secretions appear on plants. Single lesions are sprayed with soapy water; for larger lesions, Actellik, Antitlin, Aktara are used.
Caterpillars are collected by hand or the plants are sprayed with chemical and biological insecticides.
To combat snails and slugs, mechanical traps, metaldehyde, and dolomite flour are used.
When miners appear on plants, the plants are immediately removed. To combat the pest, Karbofos, Actellik, Fufanon are used.
Sowing seeds in granules
If you want to grow expensive or rare varieties, it is better to use peat tablets. The pelleted seeds are moved into the soil using tweezers. Planting pattern for petunia 3 by 3 centimeters. When cassette planting, one seed is planted. This planting allows you to preserve plants without picking them and keep their root system intact.
Sowing in the snow
When sowing your seeds, there are many ways to carry out this procedure. Seeds can be sown in the snow. The snow is laid out in a thin layer on the surface of the soil, the seeds are sown and, if necessary, distributed over the surface with a toothpick.
When to plant in open ground?

Petunia must be planted in a sunny place on the south side of the site. Most often this happens in mid-May - early June, so that early frosts have already passed.
The soil should be fertile, moist, loose and well heated. Fertilizers are applied in the form of humus, double superphosphate, potassium sulfate and, if necessary, ash. A distance of half a meter is maintained between plants. Disembarkation takes place early in the morning or evening.
After planting, the plants are watered with warm water and mulched with humus. After a week, they are fed with mullein infusion in the proportions of 1 part mullein and 10 parts water.
How to sow beautiful petunia: video
Subsequently, the petunias are fertilized and watered, and as a reward they decorate the garden with beautiful flowers that bloom for a long time, and when transferred to warm room continue to bloom almost all year round.
Happy sowing and beautiful petunias to everyone!
Petunia is a favorite ornamental culture most flower growers. The bright flowers of this wonderful plant can decorate an area like a scattering precious stones. In addition, petunia is actively used as a potted crop, with which balconies, verandas and terraces are decorated. There are several types of petunias, differing in flower shape and size. However, sowing petunia for seedlings is almost the same for each of these species.
To achieve high-quality flowering of the crop, great efforts should be made. And it’s not surprising, because growing petunia seedlings is considered a true art, and if you don’t master it, you’re unlikely to achieve good results. We will try to understand the peculiarities of sowing petunia so that you do not end up with bitter disappointment.

Before you start sowing the seeds of this crop, you must decide which specific variety and type seed material you will work. And if when choosing a variety you need to be based solely on personal preferences and the characteristics of the place where the flowers will grow in the future, then the choice of the type of seed is limited to only two forms of sale.
More specifically, petunia seeds are sold:
- in granules;
- in bulk.

The advantage of granulated (pelled) seeds is that they are more convenient to sow. In addition, they have a higher germination rate, although the same can be said about the cost. But loose seeds will cost less, and you can determine by eye how high-quality the seed is.
Note! After selecting and purchasing seeds, it remains to decide when exactly is the best time to start sowing. This moment is extremely important, but for some reason many beginners forget about it.

As a rule, about two months pass between sowing and the formation of the first flowers. Therefore, if you plan to enjoy the colorful neighborhood of petunias in the spring, you must take care of everything in advance. But the sprouts of this crop are susceptible to spring colds, and therefore too early transplantation into open ground may simply cause the death of seedlings.


Familiarize yourself with the generally accepted planting dates.
- If you can take care of daylighting of the plants, you can sow in the last days of February.
- If this is not possible, postpone it until mid-March. The reason is extremely simple: petunia seedlings “like” light with a certain wavelength, and in February this light is clearly not enough.

Timing of ripening and planting of seedlings of popular crops (including petunias)
Also, to obtain strong and high-quality seedlings, take the choice of containers and soil responsibly. Due to the fact that seeds germinate best when greenhouse effect, give preference to wide containers with an average depth (it is also important that they have a lid that allows sunlight). For example, transparent plastic containers for storing food are suitable for this. To get healthy shoots, be sure to monitor the quality of the soil mixture used. You can use packaged soil for indoor plants(this is sold in every specialized store) or, as an option, (we’ll tell you more about the latter a little later).

If you wish, you can prepare the soil mixture yourself. To do this, mix lowland peat, soil (both turf and leaf) and humus in equal proportions. You can also add sand (approximately 1⁄2 part). Before filling the container, be sure to sift the soil mixture through a sieve.

Note! It is recommended to place a drainage layer on the bottom of the container, which can be pebbles, expanded clay or small broken bricks. After this, air will freely flow to the root system, and such a nuisance as waterlogging of the soil will be prevented.
Preparatory activities
Immediately before sowing, prepare the selected containers (and these can be either the plastic containers mentioned above or small wooden boxes). Preparation consists of disinfection, for which you can use any antiseptic– for example, Formalin.

If using wooden boxes, place a layer of thick paper on the bottom. The instructions below use special seedling greenhouses, which are sold in every gardening store.
Fill the soil mixture with a layer of at least 6 cm, but at least 2-3 cm should remain to the edge of the container. Make drainage first (optional, but preferable if the substrate has a fine-lumpy structure).

How to sow seeds correctly
Petunia seeds are very small, their size often does not exceed 0.5 mm. For this reason, the seed is quite difficult to distribute in a certain step. From this point of view, granulated seeds are more convenient - you can take them with tweezers and place them on the soil in even rows. If so, the conditions will be the same for all sprouts, and further diving will be noticeably simplified.

Important information! The seeds do not go deep into the ground due to their small size, but are simply laid on top and sprinkled with a 1- or 2-mm layer of substrate.
If you plan to sow loose seeds, you can use one of the instructions below.

Method one. Seeds mixed with sand
Many gardeners mix seeds with sand or soil to facilitate even distribution over the soil surface. It looks something like this.

Take a container for seedlings, fill it with soil mixture in accordance with the above requirements, and then water it thoroughly.

Then take a shallow plate, pour the seeds and a little sand into it. Mix the contents thoroughly.

Spread the resulting mixture evenly over the surface of the moistened soil.

Moisten the crops (you can use a spray bottle), and then sprinkle with a 1- or 2-mm layer of soil.

Important information! Do not use a watering can for watering, otherwise the seeds will go too deep into the soil (and they should be located as close to the surface as possible). Sometimes the seeds, after being moistened, are not covered with anything at all.
Method two. Use of snow
The next option is to sow thin layer snow (no more than 1-1.5 mm), laid on top of the substrate in a container.

First, take a spoon and evenly distribute the snow over the soil mixture in which you plan to sow the seeds.

Sprinkle the seeds themselves onto the snow. Dignity this method is that the seeds will be clearly visible on the snow. Therefore, even if they are unevenly distributed, you can easily move them with a toothpick.

The melting snow itself will draw the seed into the soil to the required depth. This means that in this case there is no need to water or sprinkle anything.
Method three. Using a toothpick
In this case, you can evenly distribute the seeds over the surface of the substrate in such a way that it will be convenient to plant the seedlings in the future.

In addition, the use of this method is advisable if it is necessary to sow a limited amount of seed in separate containers (for example, in).

Take the seeds and place them on a piece of paper so that they are clearly visible. You will also need a couple of toothpicks for this work. The seeds, as noted earlier, are very small, so it is easier to pick them up with the pre-moistened tip of a toothpick. In the future, to shake them into the ground, use a second toothpick (it should already be dry).

Note! After completing sowing, close the containers and transfer them to a room where the temperature is about +20-22°C. Pay attention to ensuring that the substrate is always moist, but the water should not stagnate. Wipe off any condensation that accumulates on the lid every day; do not forget to ventilate the seedlings daily for 10 minutes.
If you do everything correctly, you will see the first shoots within a week.

Aftercare
When the first shoots appear, you can congratulate yourself - the hardest part is behind you. Next, nature will take over, but you have to help her a little. Start with 10-minute hardening of seedlings (that is, airing) daily, later do this several times a day. When the first true leaves appear on most of the sprouts, you can remove the lid of the container altogether.


When the seedlings grow to 4-5 cm, start diving. To do this, take a narrow garden knife and dive each sprout to a depth of about 3 cm, pointing the blade strictly at an angle of 45 degrees relative to the surface of the soil. As a result, you will pinch off the tip of the main root, which will stimulate the development of a branched root system.


Transplant the picked seedlings into " kindergarten", which can be:
- larger common box;
- separate container ( this option more preferable).
Note! To ensure that the seedlings turn out to be of high quality and strong, each seedling should be buried slightly during planting so that a maximum of 3.5 cm of the trunk remains above the surface. This will prevent the seedlings from stretching.
The use of separate containers for picking will make subsequent planting in open soil easier, and the plants themselves will not experience stress, since their roots will remain intact. Typically, disposable plastic cups are used for this purpose, having previously made holes in the bottom and filled with a drainage layer for the outflow of moisture and free access of oxygen.

When new leaves appear after picking, continue hardening the seedlings. The best option- This is ventilation of the room. In this case, containers with seedlings should not be placed directly on the windowsill, otherwise there will be a risk of frostbite on the foliage. Start with the same 10 minutes every day, gradually increasing this time to half an hour.
When each seedling has 3-4 true leaves, you can start fertilizing. It is important that the first few fertilizers are not applied at the root - you can spray the seedlings with fertilizers intended specifically for these purposes. It is also advisable to use growth stimulants that strengthen the leaves and stems, ensuring strong plants by the time they are planted in open soil. The transplant itself should take place around the end of May.

"Agricola" - fertilizer suitable for petunia
Large seeds of flowers such as dahlias and purslane are great for beginners. Also very popular among gardeners are geranium, zinnia, petunia, calendula, begonia, aster, lobelia, Snapdragon, primrose, salvia, verbena and other plants. Read more.

An alternative option is to use peat tablets
In the absence of the opportunity or desire to grow petunia seedlings using standard methods, we recommend using peat tablets for sowing granulated seeds. This way you will reduce the loss of seedlings, and also save yourself and the seedlings from the unpleasant procedure of diving.

The sowing process itself is not complicated. Medium-sized peat tablets (about 3-4 cm in diameter) will suit you. You will also need a special pill tray or plastic food container. Algorithm necessary actions is given below.

Table. Step-by-step instruction for sowing petunia seedlings.
| Steps, illustrations | Description of actions |
|---|---|
| Fill the tablets with water until they are completely swollen, about a few hours before planting. You can add water if it is completely absorbed. But if the tablets swell and there is still water at the bottom, drain it. |
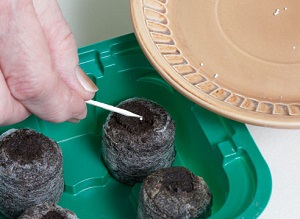
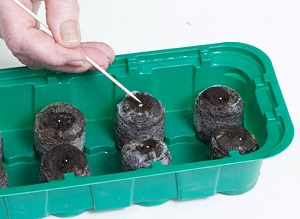
| Place the seeds in special recesses (one piece at a time). You can use a toothpick or match for this. Note: even granulated seeds stick well to a moistened toothpick. |
| People often complain that granulated seeds take a very long time to germinate, and the plants themselves turn out weak. The reason is simple - the seeds require more moisture to “break through” the protective shell. And so that the seedlings are good and friendly, moisten the spread seeds with a spray until the shell is soaked. As an option, you can drop a few drops of water on each seed, for which it is convenient to use a pipette. |
| After 5 minutes, spread the soggy coating on the tablet. This way the shoots will be friendly. |
| Cover the container. In the absence of a mini-greenhouse, use a container for food products. It is necessary that the tablets do not come into contact with the lid. Place the container in a heated place. |
| At a temperature of approximately +25°C, you will be able to see the first shoots within a week. If the temperature is below +20°C, then they most likely will not appear at all. After the seedlings form, reduce the temperature to approximately +18°C, otherwise they will stretch. The tablets should be kept moist at all times, but there should not be excess water at the bottom. Ventilate the seedlings periodically. No fertilizing is required, since the tablets already contain all the necessary fertilizers. |
| Picking, as noted earlier, is not necessary, because the seedlings must be transplanted along with the tablets. In this case, the soil in the new container should be loose and fertile. Here is one of effective recipes: Stir the washed river sand, peat and humus in a ratio of 0.5: 2: 1, you can also add wood ash (2 tablespoons per 1 liter). As an option, you can use a “store-bought” fertile mixture. |
| Remove the protective coating from the tablet. Do this with extreme caution so as not to damage the film. This way the roots will be able to master the new soil earlier. |
| If the roots have managed to grow through the shell, you can simply make several cuts in it. |
| Place the tablet with the plant in the pot, and fill the remaining voids with the prepared soil mixture. Tamp down lightly. It is important that the root collar is flush with the surface. |
| Water the soil around the plant. If she sits down after this, add more to align her with the tablet. |


Note! After 10 days you can begin hardening. Take the containers out to the veranda or greenhouse (a lot depends on the weather here). Remember about mandatory protection from drafts, wind and direct rays of the sun.
In conclusion, we note that floriculture requires considerable patience and love for plants, and this is especially true when it comes to petunias. But if you know all the rules for sowing petunia seedlings, you will certainly be able to tame it and achieve excellent results!
Video - Features of growing petunia seedlings using peat tablets
Pour the prepared soil mixture into the bowl, compact it slightly and level it. Pour the prepared soil mixture into the pot so that its top layer does not reach the edge of the container by 2-3 cm. No later than a day before sowing, water it with a fungicide solution (Fundazol, Ridomil, etc.) - in order to prevent various diseases. Spread the snow over the surface of the soil in a layer of 1–1.5 cm.
Step 2
Compact.
Step 3
First, shake them off a sheet of paper in small portions.
Step 4
Then lightly loosen the snow with a toothpick in those places where the petunia is sown too thickly, and distribute some of the seeds to the free places. When the snow melts, the seeds will be slightly drawn into the soil. There is no need to sprinkle the crops with soil - petunia sprouts in the light.
Step 5
Place the bowl in a bright, warm place. If it’s cold on the windowsill, you can place it under a table lamp and cover it with glass. In a week the shoots will appear. From now on, they need to be ventilated at least once a day (preferably twice). When removing the lid, first wipe off any condensation from it and leave the crops uncovered for 10–15 minutes. The exact time doesn't matter much. Nothing bad will happen if you cover the crops right away (for example, when you are late for work). You can ventilate for an hour if you have other things to do at that time. It’s just important not to forget to do this every day. At first, petunia seedlings develop very slowly: their energy goes into building up the root system. If the seedlings are too thick in some places, thin them out using tweezers. When the petunia leaves touch the glass, remove it, but continue to carefully monitor the soil moisture. Petunia is demanding when it comes to watering. Overdrying will ruin your plants. You can moisten from a tray or by watering “at the root”, the main thing is that there are no drops left on the leaves. As soon as the petunia seedlings grow so large that they can be held with your fingers, pick them into pots or cassettes, carefully loosening the thin roots with a spatula or toothpick.
Step 6
If the roots are long, pinch them so that when planting you can freely distribute them in the soil. Water carefully until the soil settles.
Step 7
To prevent the plants from stretching, place the grown petunia in a cooler place. A month after picking, it can be taken out to a glassed-in balcony, veranda or greenhouse.