Types and features of coffered ceilings. Coffered ceilings in the interior, photo coffered ceiling on 2 square meters
It is the ceiling that our gaze rests on in moments of thoughtfulness and dreams. Therefore, it should be designed in such a way as to evoke pleasant thoughts. Caissons will help bring beauty to the ceiling!
- 1 of 1
On the picture:
What it is?
Caisson is king ceiling decor. This name comes from the French caisson (“box”) and in our case means square or polygonal decorative recesses on the ceiling. A coffered ceiling can be made of plaster, polyurethane foam or wood.
Gypsum caisson
Classics of the genre. Gypsum stucco is the most spectacular and majestic way of ceiling decoration. If you want to add a touch of luxury to your home, gypsum caissons are perfect.
Peculiarities. A gypsum coffered ceiling is quite expensive both in installation and in further maintenance. Dust settles on the bends and small elements of the gypsum caisson, so this ceiling must be periodically cleaned and painted.
Price issue. A caisson measuring 605×605×70 mm costs from 2 thousand rubles. A molding 1.2 m long will cost 400-500 rubles, and a cornice (1 linear meter) will cost 500-600 rubles. On average, the cost of materials per 1 m² of area will be about 10 thousand rubles, labor - 7 thousand rubles/m². The production of a set for finishing a ceiling of 40-50 m² will take at least 20 working days.

- 1 of 1
On the picture:
Polyurethane foam caisson
Affordable replacement for plaster. Stucco molding made of polyurethane foam is actively taking away the monopoly on chic ceiling decor from gypsum. This material is much cheaper, but is visually in no way inferior to gypsum caissons in terms of aesthetics.
Peculiarities. The caisson made of polyurethane foam is light, strong and durable, does not turn yellow or crack over time. By the way, decorative beams made of polyurethane foam are not only white, but also in the color of wood. And using a special type protective coating, can be imitated marble chips, achieve the effect of gilding, etc.
Price issue. The cost of a caisson made of polyurethane foam depends on the manufacturer and the complexity of the product: from 1 to 3 thousand rubles for one caisson measuring 612x612x78 mm and about 2 thousand rubles for a beam 2 m long.
Wooden caisson
Expensive and difficult to manufacture and install, wooden caissons are beautiful and durable. We can confidently say that they will serve for more than one generation and will become real family antiques.
In the photo: a living room from a project implemented by architect Anna Varbanskaya.
Natural choice. The coffered wood ceiling is suspended structure from beams and various inserts (illuminated glass, plywood, MDF, natural wood). Wooden decor The ceiling creates a feeling of comfort and harmony and is perfect for eco-style apartments.
Peculiarities. Inserts in wooden caissons are attached not to the base, but to a special frame made of plywood or metal profiles. Caissons and beams are made of solid wood or MDF boards lined with veneer. The shape of the caisson can be either standard (rectangular, square, polygonal) or unusual (round or oval).
Price issue. Caissons made using mechanical carving technology cost 20 thousand rubles/m², and those made by hand cost 60 thousand rubles/m². A ceiling with oak beams and colored glass inserts will cost 20-22 thousand rubles/m². It will take about three weeks to produce 10 m² of this design. It will take approximately the same amount of time to install 40-50 m² of ceiling.
Comment on FB Comment on VK
Also in this section

Using plasterboard, you can make the ceiling flat or curved, single or multi-level; with lighting, a single chandelier or spotlights. Fantasy is limited to almost nothing!
A coffered ceiling resembles a box design: wooden beams attached to a flat ceiling slab intersect horizontally or diagonally to create a grid. The material for such a ceiling is usually wood, polyurethane, plasterboard or wood-fiber boards. Caissons and beams are decorated with moldings, plaster rosettes and other decorative elements. Such a ceiling serves not only aesthetic purposes, but also practical ones: you can hide pipes or wires under it, hide imperfections existing ceiling.
Coffered ceilings are usually installed in rooms with high heights. In rooms with high ceilings, coffers reduce echoes and help control noise from other rooms. Small coffers will make the ceiling more textured, large panels will give the illusion extra space. In rooms with a ceiling height below 2.5 meters, the installation of caissons is not recommended.
Installation sequence
- ceiling design on paper;
- treating the ceiling with plasterboard, paint, wallpaper or ceiling tiles;
- marking the grid for the location of beams on the ceiling;
- installation of beam system;
- installation of ceiling plinth;
- decorative ceiling decoration.
Acceptable options: if you plan to use separate ceiling tiles for the caissons small size or ready-made polyurethane caissons, these elements will be attached after installing the beam profile (step 4), i.e. step 2 can be skipped provided that pre-treatment of the ceiling is not required.
One of the options for installing a coffered ceiling is that it can be mounted according to the principle suspended ceiling with a special type of ceiling cassettes in the form of an already manufactured caisson. In this case, the functional advantage of a suspended ceiling is added - a damaged caisson can be easily replaced with a new one.

Materials and tools
Although installing a coffered ceiling will take time and certain skills, you can design such a ceiling yourself. Take care of necessary tools for this project before you start - this will save time and avoid disappointment.

Table. Use of materials and tools at every step of the installation process.
Stage 1. Ceiling design
In its simplest form, a coffered ceiling is formed by a series of beams with a baseboard, where the intersecting wooden beams directly create a grid on the ceiling, which is done quite quickly. The basic rule here is that the larger the room, the thicker the ceiling beams should be. Beams are commonly used square section, but rectangular designs are also possible. Once you have decided on the size and shape of the beams, select ceiling plinth appropriate height.

Think about how the wooden beams will be positioned on the ceiling, at what pitch and what shape to give the caisson - rectangular, square or something more complex. If you are planning to install a chandelier, consider its placement in relation to the beams - whether it will be in the center of the caisson or at the crossroads of the beams, or provide a medallion for the chandelier.
Draw a proposed ceiling sketch on paper, not forgetting to indicate the size of the room and the planned location of the lamps. The required placement of recessed ceiling lights must be planned at the design stage of the ceiling design. Later, when installing the beams, you will need to prepare holes through the middle of the beam or attach a cable along the side of the beam to achieve the desired placement of the ceiling lamps.
At self-installation With a coffered ceiling, you can make its installation easier if you follow little tricks that will simplify the task.
- Make straight joints on the profile. Each end of the beam is cut at a right angle. If you want a more complex joint shape, it is easier to do it in the form decorative element, attached to the already finished ceiling, then cover up all the cracks and irregularities.
- Use ceiling molding rather than molding. Positioned at a 45 degree angle to the beams and ceiling slabs the plinth will hide all the imperfections in the installation of the coffer box.

Stage 2. Preparation
MDF panels or plasterboard can be used as ceiling panels. If the ceiling is flat and is in good condition, you can completely abandon the use of panels, simply paint the ceiling or stick wallpaper on the ceiling, and then attach a beam mesh to it.

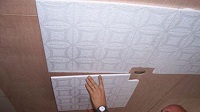
If you want to use ceiling panels that are directly inserted into the space between the beams, cut them into 1 cm smaller size each caisson, in order to make it easier to place them there. The gaps will subsequently be closed with ceiling plinths. When using prefabricated caissons, their size determines the size of the ceiling space between the beams.
Stage 3. Grid marking
Use colored chalk, a tape measure and a square to mark a grid for installing beams on the ceiling. Refer to the schematic sketch made when designing the ceiling.
Step 1. Measure the length of each side of the room, dividing each measurement in half to determine the center of the room. Mark the central points with chalk and connect the opposite sides of the room with a line.

Step 2. Determine in which direction the main ceiling beams will be located, mark the position of the ends of the beams on opposite walls and draw lines along the ceiling connecting these points. Extend the lines onto the walls a few centimeters lower than the final ceiling height.
Step 3. Make markings for the location of the main and cross beams. Mark full width ceiling beams to know exactly the size of the panels and beam joints. The choice of panel size, shape and quantity is up to you.
Stage 4. Installation of the beam system
This is the most critical step in installation, since its accuracy will ultimately determine general form ceiling. Beams can be made hollow; with this design, it is convenient to hide electrical wiring for lamps, pipes and other utilities in them. If the beam is made of solid wood, make a channel in it for laying wires.
If you are working individually, make yourself a T-shaped support from wooden slats to the height of the ceiling minus the beam. This will hold one end of the beam against the ceiling while you work at the other end of the beam.
Step 1. Install beams around the perimeter of the room. The longest beam is installed first. If the room is square or irregular shape, start with a beam that runs perpendicular to the support beams to create a strong connection.
Step 2. Apply glue along the length of the beam and glue it at the junction of the ceiling and floor.

Step 3. Using a pneumatic nailer, nail the beam with two nails on both sides every 30 cm, starting at one end of the beam. Do the same with the opposite perimeter beam.
Step 4. Measure the distance between the beams on each side of the room and prepare the beams for the cross sides of the perimeter. Attach them to the ceiling in the same way.
Step 5. After installing the perimeter, install the main longitudinal beams according to the markings in the same way as the perimeter beams.
Step 6. Measure the distance between the main beams and cut the cross beams. Install them similarly in the marked positions.
Step 7 Strengthen the structure - Hold the nailer at a 45 degree angle close to the junction of the cross beam and main beam and drive the nail into the cross beam at an angle.
If you are using pre-cut caissons or pre-cut panels for the space between the beams, insert the panels and nail them to the beams.

Alternative - coffered plasterboard ceiling
Stage 5. Installation of ceiling plinth
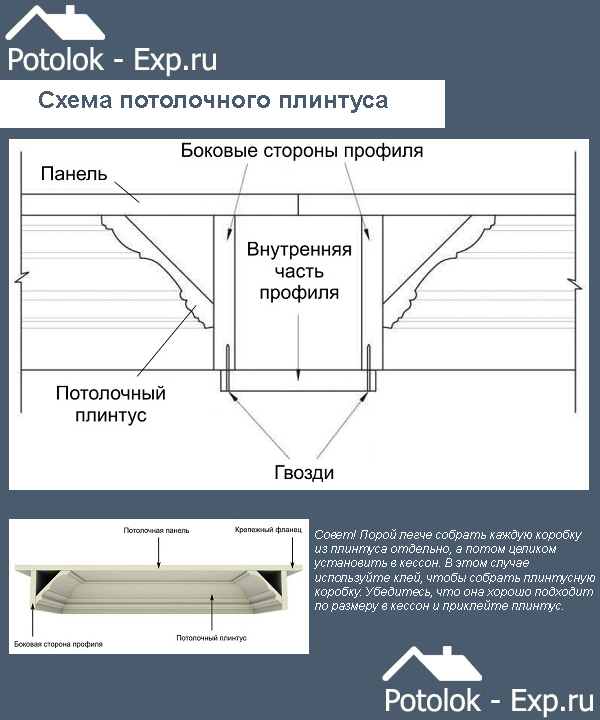
While the shape of the caisson and its actual depth are created by the height and placement of the beam profile, the boundary and visual depth of the caisson is created by the ceiling plinth.
Step 1. Measure inner dimensions all sides of one of the caissons. If there is a gap between the ceiling and the beam due to the unevenness of the ceiling, take this height into account in the size of the baseboard.
Step 2. Cut the ceiling plinth to the appropriate length. Using a machine, cut a 45 degree angle on each side of the baseboard.
Step 3. You can install the cut plinths directly one by one. To do this, apply glue to each part and secure it to the beams.
Step 4. Sometimes it is easier to assemble each box from the baseboard separately, and then install it entirely in the caisson. In this case, use glue to assemble the baseboard box. Make sure it fits well into the caisson and glue the baseboard.
Step 5. Secure the ceiling plinth with nails to the joists at each corner of the plinth box.

Stage 6. Ceiling finishing
The last stage is to give the ceiling a finished look and hide all working irregularities, if any.
Step 1. Use latex caulk to fill all joints and gaps between joists, baseboards and ceiling panels.
Step 2. Use wood putty and a putty knife to seal the nail heads.

Step 3. Apply two coats water-based paint. Use semi-gloss paint and a 5-7 cm wide brush to paint the molding. Then use a paint roller to paint the beams.
Step 4. Install ceiling lamps. If you covered the ceiling with plasterboard panels, you just need to cut holes in the plasterboard under the lamps. Glue the plastic rings to the lamp hole. When you install new fixtures, they should be flush with the surface of the finished ceiling.
Decorative elements of a coffered ceiling
A standard coffered ceiling will look more interesting if you add decorative and functional elements.

Video - DIY installation of a caisson on the ceiling
Modern and stylish coffered walls are an opportunity to make the design of your home truly unique and luxurious. Ceilings often play a huge role in the interior. The larger the room, the higher the ceiling, the more spacious the room will appear visually.
Every year more interesting and laconic ideas come into place. In a room where the ceiling height exceeds 2.70 m, ideal solution will be the production of coffered ceilings made of wood. Caissons are mounted recesses or niches that are made by joining beams. The main advantage is that the shape and ornament can be completely different:
- square;
- rectangular;
- rhombus;
- honeycomb;
- triangles.
When creating a project for ceilings with coffers, you need to be prepared for the fact that they will steal 10-25 cm from the entire height. Coffered wooden ceilings, the price of which always depends on the chosen material and the cost of the wood, have a variety of shapes and patterns.
What types of coffered ceilings are there?
Types of ceilings can be made from the most various materials. Wood, of course, looks the most noble. Execution options:
- Classical. The most pleasant and stylish design of the ceiling is made of wood. For the most harmonious combination of such a ceiling with the interior of your room, you need to think in advance about the shapes when making it. After creating the layout, the master will install the ceiling, which will be entirely made of wood.
- A combination of wood and MDF. This technique is as similar as possible to the classic one, the only difference is that not the entire ceiling will be made of wood; it also uses MDF board. At high-quality manufacturing even experienced master will not always be able to determine what type of work it is. Visually, this type is no different from the classic version.
- Caissons from and. This option is certainly the most budget-friendly, but it is not suitable for self-assembly. This work is quite difficult to perform, and only a professional can handle it.
Design decision in choice
Classic production of wood coffered ceiling and its traditional look will give your room a unique design. But another advantage of such ceilings is the originality of their design. Here you can realize your most bold decisions, create a ceiling according to your own sketch and taste. Here are a few ways you can create a unique look for your space.
- Clear edges. When choosing this option, the emphasis is on highlighting one element: the end or the entire horizontal surface can be highlighted with a shade. In such coffered wooden ceilings, photos of which can be viewed on the website, the main task is to create a clear distinction.
- Center of composition. Based on the layout of a large room, you can create an original center for the entire ceiling composition. The starting element can be a circle or square, from which the main lines of the ceiling will diverge. The placement of an object on the floor of the same shape, like a reflection, will look especially beautiful and interesting: or.
- . Caisson options are not only a destiny. They look quite interesting and or chalets, then roughly processed beams with a natural look are used. For maximum response to the design of the room, textile elements can be mounted in the ceiling, which are used in the design of the room.
- Honeycomb shapes. This option is quite complex in the technique of execution, but the result will be wonderful and interesting. The main thing is to choose the right color and size of the honeycomb, which will help create maximum harmony.
- . This type is perfect when you plan to deepen up to 15 centimeters, while volume and richness can be compensated by a skillful combination of contrasting colors.
- A combination of wood and lining. If you plan to adhere to, when creating a coffered ceiling, you can use lining, which can be painted in a noble white color.
Self-installation of a coffered ceiling
Caissons are elements of ceiling manufacturing that are very diverse in their design. They will fit equally beautifully both in and in, where the height of the ceilings allows it. The basic rule of manufacture is the correctly selected material and shape that will fit into the interior as beautifully as possible.
In case you do not want to provide work professional builders, you can make the ceiling yourself. To do this, you need to carefully prepare and follow the basic rules and accessible to common use instructions. It would also be useful to consult a specialist who can tell you what exactly is needed for your premises.
A do-it-yourself wooden coffered ceiling contains several manufacturing stages: preparatory, selection of materials, frame manufacturing and the actual installation of finished slabs.
Stages of preparatory work
First, you need to evaluate the room in which you plan to install coffered ceilings. Do not forget that on a low ceiling such a design is not always appropriate. Minimum height ideally should be at least 2.5 meters. When designing, you need to adhere to the following rule: the larger and higher the room, the larger number beams can be used in decoration. For optimal performance Universal and standard strips of 12-15 cm are used.
In a room with relatively low ceilings place beams stands in the openings of a window or door, pushing apart and expanding the space. Don't plan coffered ceilings in the room where the furniture is located and the color of the walls is dark, since they will only make the interior heavier.
Secondly, there are several secrets in choosing colors. For example, when choosing white and shifting the flow downwards, you can accidentally achieve the effect of a “falling ceiling”, so you need to be careful in choosing colors and shades. If you want to create coziness in the room, then you should choose, and the wallpaper will be suitable with a delicate ornament. At the same time, in the center of the ceiling you can safely make an accent in color, appliqué or original choice figures.
Building materials required for work
After choosing the color and shape, you need to decide on the general composition and draw an exact sketch, which should include all calculations, take into account the height from floor to ceiling, since everything should turn out as beautiful and harmonious as possible. To calculate correctly required quantity materials, the sketch must be as accurate as possible.
When purchasing materials, have the drawing with you. For a universal option, they are best suited with or without a pattern, which will be glued to the base of the ceiling. The simpler the wallpaper, the more interesting the tree will look against its background.
Next, pay attention to the selection of blanks from which the entire structure will be created. The simplest option for working with your own hands would be to purchase ready-made individual modules that act as caissons when directly placed on the ceiling. The pitch of the caissons themselves varies from 80-100 cm, taking into account the fact that the height of your ceiling is standard.
If we are talking about large rooms, That the best solution will be the purchase of pine or any other light wood. Of course, processing can also be applied natural veneer from beech or spruce, oak, then additional attractiveness and style are acquired. In addition to wallpaper and wood, adhesive paint and nails are also useful.
Creating a frame for the structure
For maximum strength and reliability when installing the material, the surface is primed; for rapid absorption and drying, 2 layers must be applied. Then wallpaper is being glued: It’s more convenient to do this with two people for the most even tension.
Next, markings should be applied to the wallpaper that needs to dry: finished wood structures will be applied to them. It is best to start from the center, from the central beam. The main part of the entire structure is the support beam, which has a complex box structure. It is attached to the ceiling in the required order, thereby achieving the desired ornament. Having decided on the installation location of the main part, you need to begin creating the box beam. To do this, cut a strip along the length of the block, on the side of which small boards are neatly packed at equal distances.
Next, the assembled frame is attached to the ceiling with nails, strictly following the prepared markings. Next, the strip covering the side of the structure is measured and cut out. Having finished working with the frame, close it at the bottom with a board as tightly as possible. The main thing is to strictly follow the instructions and the intended drawing, and also choose high-quality materials.
The next step is to create box beams and place them parallel to the installed central structure, following the sketch. After fastening all the longitudinal elements, you need to proceed to installing the transverse structures. Everything must be applied strictly according to the marks, especially paying attention to the corners, because it is accuracy that creates the final beautiful result.
To process narrow gaps, the thinnest slats are used, which help not only to close the gap, but also to give the structure additional volume. Installed ceiling you can paint it completely with one color or try a composition of several shades, creating contrast and volume general design ceiling.
The thickness of the slats should be such that they can cover all imperfections and possible indents. This will help, allowing you to find the necessary atmosphere. If you want to complement the composition with plaster elements, it is best to attach them using self-tapping screws, but for cardboard elements, construction adhesive is suitable.
Everything new is well forgotten old, and coffered ceilings that are fashionable today only confirm the truth of these words. Once upon a time, such systems were used in Ancient Greece for architectural purposes, and then the Greeks learned to decorate beams and cells so cleverly that the coffered ceiling became not just functional, but also decorative. Today, there are no longer real ceilings with coffered ceilings - only their imitation is used, and it is presented a huge amount options. Let's figure out what a coffered ceiling is, what types it comes in, which design is best to choose, and answer the question of whether a coffered ceiling will always be appropriate.
No. 1. What is a coffered ceiling?
Despite the fact that coffered ceilings appeared in Ancient Greece, the word we use today to refer to these structures is of French origin: “caisson” translates as “box,” subtly hinting at the main feature of such ceilings. Indeed, a coffered ceiling can be represented as a system of boxes or recesses that are formed between intersecting beams. Previously, these beams were needed to reduce the load on the supports; they were used to create bearing structures For interfloor ceilings. Later another one was discovered interesting property such a system improves acoustics.
When the beams began to be decorated with stucco, painting and marble tiles, the prototype of the modern coffered ceiling actually appeared. Such designs look very beautiful and add chic and elegance to the room. To create a real coffered structure, it is necessary to use a special technology at the construction stage, but almost no one does this today, because to get the desired decorative effect with the help of modern building materials much easier. 
In terms of design and appearance, coffered ceilings can be absolutely anything. The most common option is to create cells of square or rectangular shape, but design ideas know no boundaries, so if desired, you can create caissons of round, diamond-shaped and polygonal shapes. 
No. 2. When can coffered ceilings be used?
Today, to imitate caissons they use wood, MDF panels, polyurethane foam, plasterboard and construction cardboard. The installation technology in all these cases, of course, is somewhat different, but common feature a decrease in height remains. To create a volumetric recess, you need fairly high beams that reduce the height of the room. If a suspension system is used, the ceiling becomes even lower. Specialists It is recommended to use coffered ceilings in rooms with a height of about 3 m. In rooms below 2.5 m, such decoration will be completely inappropriate. As for style restrictions, the coffered system can fit into everything, except, perhaps, for high-tech and minimalism styles. 
Coffered ceilings look great in spacious classrooms, as well as in offices, conference rooms, restaurants, cinemas, and libraries. If the room is disproportionately high, then those in it may feel as if they are in a box. A similar feature is typical for old-built houses. Coffered ceilings allow you to elegantly solve this problem, making the space more harmonious and proportional.
Chic appearance is not the only thing advantage of coffered ceilings. If used in installation suspension system, then behind the structure you can hide a lot of utilities, such as and. In addition, you won’t have to worry about leveling the surface of the main ceiling. A coffered ceiling, like any suspended ceiling, provides ample opportunities to create a unique lighting system. It also allows you to increase . 
The main disadvantage of coffered ceilings– they “eat up” the height. It is also a fairly expensive finishing system, and to carry out the installation correctly, you will need some construction skills, so it is easier to call a team of specialists for help, but this, in turn, makes the installation even more expensive. 
No. 3. Wooden coffered ceiling
This option is considered classic, but at the same time the most expensive. All structural elements are made of solid wood.
Advantages:

Additionally, using different breeds wood, can be obtained ceiling covering different shade. With the help of stains and paints, you can further expand the range of possible shades. Elite coffered ceilings are made from oak, walnut and ash, but you can choose something simpler (pine, for example). The price of such a solution still remains high, and this is the most basic minus wooden caissons. In addition, the installation of such ceilings requires careful calculation and considerable time investment. A massive frame base will be required, so almost no one carries out such work on their own.


No. 4. Coffered ceiling made of MDF
They have become the most popular way of organizing coffered ceilings today. They are obtained by pressing wood shavings with urea resins, due to which it is possible to reduce the emission of toxic formaldehyde to almost zero. The top of the slab can be finished with a film imitating any pattern, thin wood veneer or a layer of paint. Appearance deserves the highest praise, especially in the case of panels finished with veneer - after installation it is almost impossible to distinguish them from wood. 
Advantages:
- a wide selection of panels and the ability to create a ceiling of any design;
- lower weight compared to wooden beams, due to which the structure can be mounted on a regular metal profile (the one used when working with drywall). From all this it follows that such a ceiling will place less load on the floors, and installation will be much easier;
- affordable price, especially when compared with its wooden counterpart.
On sale you can find ready-made coffered MDF blocks, thanks to which the installation process becomes even simpler - you just need to join the finished parts. 
Among the main shortcomings:

No. 5. Coffered plasterboard ceiling
The ubiquitous one is also suitable for organizing a coffered ceiling, and it can significantly reduce the cost of the structure. Drywall is easy to cut, so you can use it to implement virtually any idea, it is lightweight, and almost everyone has already mastered the principle of working with it. The material allows you to quite simply organize a complex lighting system using spotlights and chandeliers. 
Installation of plasterboard elements is carried out in advance installed frame from a metal profile, but there is also alternative method, which allows you to do without a frame. Once the ceiling structure is assembled, it can be decorated different ways: painting, gluing and then painting them (this option allows you to get a solid external finish), using gypsum to create stucco elements.
If the ceiling is used in a damp room, then take better sheets moisture-resistant plasterboard. The only difficulty in installation is the precise joining of individual elements. 
No. 6. Coffered ceilings made of polyurethane
Polyurethane coffered ceilings are distinguished by excellent performance and aesthetic qualities, are made of durable and wear-resistant polymer and are sold, as a rule, in the form of ready-made volumetric elements that only need to be joined, and in this case this is not difficult. 
Advantages:
- widest range of elements with different designs. These can be either minimalistic caissons or elements simulating luxurious stucco. If desired, the material can be additionally colored;
- light weight and simple installation, which consists of gluing and simple additional fixation of elements;
- resistance to moisture and high temperatures;
- the opportunity to organize interesting lighting.
The only downside is the high price. 
No. 7. Coffered cardboard ceilings
The easiest to install and cheapest option for coffered ceilings is the use of elements made from building cardboard. The material has a dense structure, high tear resistance, can be different thicknesses, but at the same time it remains lightweight, so its installation is not difficult. Ready-made construction cardboard beams are mounted directly on the ceiling using wood glue. Can be used for decoration self-adhesive film, the most popular option is a film with an imitation of wood texture.
On sale you can find water-repellent cardboard that is treated with a special salt solution. This material will easily withstand periodically increased humidity.
Externally, a coffered ceiling made of cardboard looks somewhat simpler than one assembled from wood or MDF panels, but if you have a limited budget, it will be a good alternative to other ceiling finishing options. 
No. 8. What else to consider when choosing coffered ceilings?
When thinking about the future design of a coffered ceiling, consider the following points:
- if the ceiling is not high enough (2.5-2.7 m), then the beams are placed near the door and window openings. Use of furniture flooring And wall decoration dark shades in this case can turn the space into a gloomy hole;
- Another option for not the highest rooms is the use of elements light shades, then their relief will not greatly reduce the space;
- coffered ceilings in warm dark shades make the room cozy, but reduce its height - this is an option for high spaces;
- The caissons may not occupy the entire ceiling, but only part of it;
- It’s not enough just to think through the future design of the ceiling - it’s better to draw a detailed sketch.

No. 9. Installation of a coffered ceiling
Installing a coffered ceiling is a labor-intensive task that requires certain knowledge and skills, so the easiest way would be to turn to professionals so as not to waste your nerves and spoil the materials. Be that as it may, it is still necessary to know the principle of arranging such systems.
The first thing is creating a sketch. You can handle this yourself. In the drawing, it is necessary to depict the ceiling to scale and apply a coffered mesh to it, which is best to start creating from the center of the room so that geometry and proportionality are preserved. At this stage, they decide what the pitch between the caissons will be (usually the distance is 0.8-1.2 m), what the elements will look like, and where the lighting sources will be located. 

WITH wooden systems let the professionals work, but installation of a coffered ceiling made of MDF much easier to do. The principle is as follows:
- It is better to install a coffered ceiling made of MDF panels on the Knauf P113 suspension system, use metal profiles PP 60*27 and PN 28*27, as well as a single-level connector for “crab” profiles;
- the minimum distance from the frame to the existing ceiling is 125 mm, so that it is possible to install a caisson cell. The distance between the profile depends on the size of the cells;
- the PP 60*27 profile is mounted with the curved edges down so that in the future the caisson guide strip can be easily snapped onto it;
- installation of short guides, pre-cut into elements of the required length. If the cell has a size of 60 cm, then the guide is made 51.6 cm, if 90 cm - 81.6 cm. The cut elements are snapped into the PP profile 60*27;
- the caisson cells are carefully wound behind metal carcass and are attached to mounted short guides;
- All that remains is to cut and install the long guides;
- if there are holes left around the perimeter of the ceiling, then they are covered with cut laminated fabric, which is usually supplied complete with cells;
- installation around the perimeter of fillets using. Fillets, also known as fillets, provide a smooth transition from the ceiling to the wall;
- For lighting devices, holes are first made in the cells. Chandeliers are installed Spotlights, spots and other lighting equipment after installation of the ceiling
Lightweight caissons are sometimes installed on a frame made of wooden blocks, using ordinary nails for fastening. Often, ready-made coffered panels are attached in this way, which, by the way, may have transparent inserts.
If used ready-made slabs for coffered ceilings, it is better to start their installation from the center. You can use glue or mounting brackets.
Coffered systems allow you to create a unique ceiling design with carved elements, spectacular lighting, stucco, transparent inserts and even - the main thing is to think through the design in advance and not be tempted by such finishing if the ceiling height is less than 2.5 m.
Coffered ceiling
Everything new is well forgotten old. Coffered ceilings have been part of our lives for a long time; they were used mainly in the decoration of castles and rich houses. Having reached our times, this method of finishing has become available to everyone, moreover, now it is quite possible to make a coffered ceiling with your own hands (see).
Caissons are a type of ceiling design in which square or polygonal recesses are made, made from intersecting beams. The coffered ceiling is decorated with decorative rosettes and carvings, because at all times such ceilings played not only a constructive role, but also served to decorate rooms.
It is worth noting that this ceiling design perfectly absorbs sounds, thereby improving the sound insulation of the room.
How to make a coffered ceiling
Project
- Everything needs to start with an idea and a project. Try to imagine what you will really like in the future. To do this, you can view several photos on the Internet, consult with friends or relatives. Take into account the parameters of the room, lighting, height, purpose, and only after that proceed to the selection of materials. Making a coffered ceiling with your own hands is a rather complicated task, but at the same time, it’s interesting to do it.
Sketch
- The sketch is the heart of the project. This will be the next step in your renovation, because all your thoughts need to be put together and see how they will look later. Use a regular piece of paper and a pencil. For clarity, you can add a little color to the sketch by coloring it with colored pencils.


Preparation
- When the ideas are ready and the coffered ceilings are laid out in the sketch, you can begin the renovation itself. First of all, check the condition of your ceiling. If its surface is relatively smooth and solid, then it is quite suitable for finishing. Otherwise, smooth it with putty and let it dry thoroughly(cm. ).
- To ensure reliable fixation of materials, the ceiling surface must be primed. If the primer is very strongly absorbed, cover the surface with another layer after drying (see).
- Wallpaper should be placed under the coffered ceiling. It is advisable to choose a pattern that is monochromatic or has a slight structure. It is better to do this together; the wallpaper should be smoothed with a special plastic spatula (see).

Advice: if you buy smooth, plain wallpaper and do not smooth it out when pasting it under coffered ceilings, you get a rather interesting “crumpled” pattern. To do this, stretch the strip from wall to wall and glue it, first pressing it with your hand in several places, then casually level it across the ceiling with a board with a round end or a mop.
Installation
- Based on the sketch on the wallpaper, we mark the future caissons. At this time, you need to be very careful, and it is better to take measurements again and check the sketch.
Tip: Start marking from the center of the room, otherwise you may break the symmetry.
- We cut out a development from construction cardboard and, bending it along the lines, glue the beams together

- Glue the caissons to the ceiling using mounting adhesive. It is important not to stain the wallpaper during gluing.
- All joints and connections must also be covered with cardboard. This will be our main frame for the ceiling (see)
- Cover all beams with self-adhesive film, choosing a pattern depending on how you want your ceilings to look. They can be white or marbled; they also often use a pattern that imitates the structure and color of natural wood.
- We glue decorative elements onto the finished beams. You can paint them if you wish.

Second way
Another option is coffered ceilings made of polyurethane; this option is not so difficult to work with, but is more expensive. You can buy ready-made modules in the store and glue them to the ceiling. There are also modules mounted on special hidden fastenings. Modules can be selected to suit your taste, because there is a huge selection of beams, rosettes, stucco molding, etc.


Third way
Ideal for those who do not have high ceilings. This is the use of ceiling coffers, which consist of slabs and do not require significant labor during installation. Perfect option for apartments with low ceilings– select slabs that are not too high and mount them on the ceiling. There are several options for installing such slabs.
Installation
- Mounting on a special profile

- Fixing the slabs to the ceiling using mounting adhesive or self-tapping screws

Coffered ceilings can be decorated with a large rosette in the center of the room, or an ornament can be drawn.. Also, a great option would be to cut out ornaments and thematic designs from wallpaper purchased for this purpose and then stick them on the ceiling. As a photo, instead of wallpaper, you can use tapestry fabric - it will look very impressive.
The ceilings will look just wonderful if you approach this issue judiciously and do not rush. After all, if you are not constantly engaged in repairs, then do not rush to create a castle right away. It's better to start with a small room and practice on it, and then move on to larger ones. grandiose projects. Then installing your ceilings will only be a pleasure.