Experiments at home for young chemists. Chemical experience
Guys, we put our soul into the site. Thank you for that
that you are discovering this beauty. Thanks for the inspiration and goosebumps.
Join us on Facebook And In contact with
There are very simple experiments that children remember for the rest of their lives. The guys may not fully understand why this is all happening, but when time will pass and they find themselves in a physics or chemistry lesson, a very clear example will certainly emerge in their memory.
website collected 7 interesting experiments that children will remember. Everything you need for these experiments is at your fingertips.
Fireproof ball
Will need: 2 balls, candle, matches, water.
Experience: Inflate a balloon and hold it over a lit candle to demonstrate to children that the fire will make the balloon burst. Then pour plain tap water into the second ball, tie it and bring it to the candle again. It turns out that with water the ball can easily withstand the flame of a candle.
Explanation: The water in the ball absorbs the heat generated by the candle. Therefore, the ball itself will not burn and, therefore, will not burst.
Pencils
You will need: plastic bag, simple pencils, water.
Experience: Fill the plastic bag halfway with water. Use a pencil to pierce the bag right through where it is filled with water.
Explanation: If you pierce a plastic bag and then pour water into it, it will pour out through the holes. But if you first fill the bag halfway with water and then pierce it with a sharp object so that the object remains stuck into the bag, then almost no water will flow out through these holes. This is due to the fact that when polyethylene breaks, its molecules are attracted closer to each other. In our case, the polyethylene is tightened around the pencils.
Unbreakable balloon
You will need: a balloon, a wooden skewer and some dishwashing liquid.
Experience: Coat the top and bottom with the product and pierce the ball, starting from the bottom.
Explanation: The secret of this trick is simple. In order to preserve the ball, you need to pierce it at the points of least tension, and they are located at the bottom and at the top of the ball.
Cauliflower
Will need: 4 cups of water, food coloring, cabbage leaves or white flowers.
Experience: Add any color of food coloring to each glass and place one leaf or flower in the water. Leave them overnight. In the morning you will see that they have turned different colors.
Explanation: Plants absorb water and thereby nourish their flowers and leaves. This happens due to the capillary effect, in which water itself tends to fill the thin tubes inside the plants. This is how flowers, grass, and large trees feed. By sucking in tinted water, they change color.
floating egg
Will need: 2 eggs, 2 glasses of water, salt.
Experience: Carefully place the egg in a glass with a simple clean water. As expected, it will sink to the bottom (if not, the egg may be rotten and should not be returned to the refrigerator). Pour into the second glass warm water and stir 4-5 tablespoons of salt in it. For the purity of the experiment, you can wait until the water cools down. Then place the second egg in the water. It will float near the surface.
Explanation: It's all about density. Average density the eggs are much larger than those of plain water, so the egg sinks down. A density saline solution higher, and therefore the egg rises upward.
Crystal lollipops
Will need: 2 glasses of water, 5 glasses of sugar, wooden sticks for mini-kebabs, thick paper, transparent glasses, pan, food coloring.
Experience: Boil in a quarter glass of water sugar syrup with a couple of tablespoons of sugar. Sprinkle some sugar onto the paper. Then you need to dip the stick in the syrup and collect the sugar with it. Next, distribute them evenly on the stick.
Leave the sticks to dry overnight. In the morning, dissolve 5 cups of sugar in 2 glasses of water over a fire. You can leave the syrup to cool for 15 minutes, but it should not cool too much, otherwise the crystals will not grow. Then pour it into jars and add different food colorings. Place the prepared sticks in a jar of syrup so that they do not touch the walls and bottom of the jar; a clothespin will help with this.
Explanation: As the water cools, the solubility of sugar decreases, and it begins to precipitate and settle on the walls of the vessel and on your stick seeded with sugar grains.
Lighted match
Will be needed: Matches, flashlight.
Experience: Light a match and hold it at a distance of 10-15 centimeters from the wall. Shine a flashlight on the match and you will see that only your hand and the match itself are reflected on the wall. It would seem obvious, but I never thought about it.
Explanation: Fire does not cast shadows because it does not prevent light from passing through it.
We bring to your attention 10 amazing magic experiments, or science shows, that you can do with your own hands at home.
Whether it's your child's birthday party, the weekend or the holidays, have a good time and become the center of attention of many eyes! 🙂
An experienced organizer of scientific shows helped us in preparing this post - Professor Nicolas. He explained the principles that are inherent in this or that focus.
1 - Lava lamp

1. Surely many of you have seen a lamp with a liquid inside that imitates hot lava. Looks magical.

2. B sunflower oil water is poured and food coloring (red or blue) is added.

3. After this, add effervescent aspirin to the vessel and observe an amazing effect.

4. During the reaction, the colored water rises and falls through the oil without mixing with it. And if you turn off the light and turn on the flashlight, the “real magic” will begin.
: “Water and oil have different densities, and they also have the property of not mixing, no matter how much we shake the bottle. When we add effervescent tablets inside the bottle, they dissolve in water and begin to release carbon dioxide and set the liquid in motion."
Do you want to put on a real science show? More experiments can be found in the book.
2 - Soda experience

5. Surely there are several cans of soda at home or in a nearby store for the holiday. Before you drink them, ask the kids a question: “What happens if you immerse soda cans in water?”
Will they drown? Will they float? Depends on the soda.
Invite the children to guess in advance what will happen to a particular jar and conduct an experiment.

6. Take the jars and carefully lower them into the water.

7. It turns out that despite the same volume, they have different weight. This is why some banks sink and others don't.
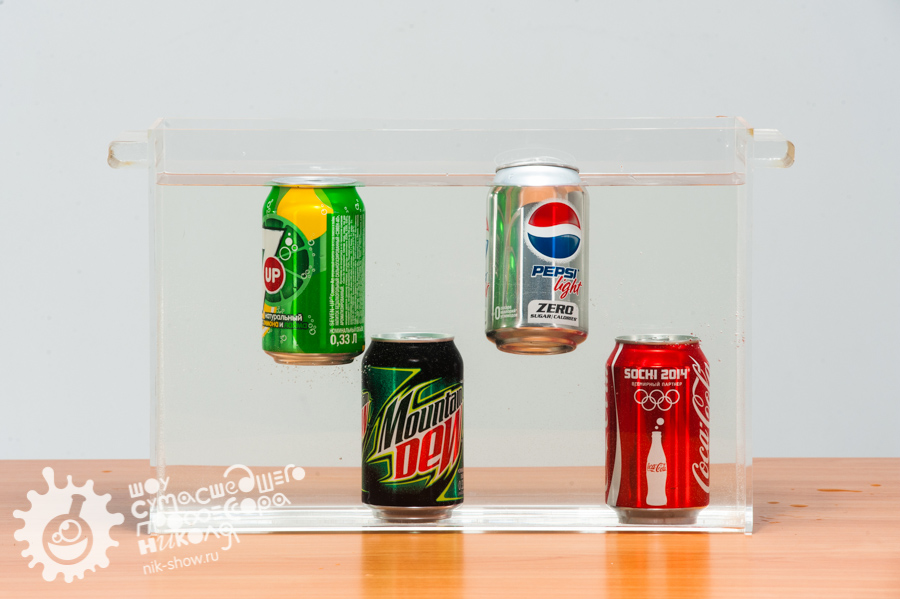
Professor Nicolas's comment: “All our cans have the same volume, but the mass of each can is different, which means that the density is different. What is density? This is the mass divided by the volume. Since the volume of all cans is the same, the density will be higher for the one whose mass is greater.
Whether a jar will float or sink in a container depends on the ratio of its density to the density of water. If the density of the jar is less, then it will be on the surface, otherwise the jar will sink to the bottom.
But what makes a can of regular cola denser (heavier) than a can of diet drink?
It's all about the sugar! Unlike regular cola, where granulated sugar is used as a sweetener, a special sweetener is added to diet cola, which weighs much less. So how much sugar is in a regular can of soda? The difference in weight between regular soda and its dietary analogue will give us the answer!”
3 - Paper cover
Ask those present: “What happens if you turn a glass of water over?” Of course it will pour out! What if you press the paper against the glass and turn it over? Will the paper fall and water will still spill on the floor? Let's check.


10. Carefully cut out the paper.

11. Place on top of the glass.

12. And carefully turn the glass over. The paper stuck to the glass as if magnetized, and the water did not spill out. Miracles!
Professor Nicolas's comment: “Although this is not so obvious, in fact we are in a real ocean, only in this ocean there is not water, but air, which presses on all objects, including you and me, we are just so used to it to this pressure that we don’t notice it at all. When we cover a glass of water with a piece of paper and turn it over, water presses on the sheet on one side, and air on the other side (from the very bottom)! The air pressure turned out to be greater than the water pressure in the glass, so the leaf does not fall.”
4 - Soap Volcano
How to make a small volcano erupt at home?


14. You will need baking soda, vinegar, some dishwashing chemicals and cardboard.


16. Dilute vinegar in water, add washing liquid and tint everything with iodine.

17. We wrap everything in dark cardboard - this will be the “body” of the volcano. A pinch of soda falls into the glass and the volcano begins to erupt.
Professor Nicolas's comment: “As a result of the interaction of vinegar with soda, a real chemical reaction occurs with the release of carbon dioxide. And liquid soap and dye, interacting with carbon dioxide, form colored soap foam - and that’s the eruption.”
5 - Spark plug pump
Can a candle change the laws of gravity and lift water up?


19. Place the candle on the saucer and light it.

20. Pour colored water onto a saucer.

21. Cover the candle with a glass. After some time, the water will be drawn inside the glass, contrary to the laws of gravity.
Professor Nicolas's comment: “What does the pump do? Changes the pressure: increases (then water or air begins to “escape”) or, conversely, decreases (then gas or liquid begins to “arrive”). When we covered the burning candle with a glass, the candle went out, the air inside the glass cooled, and therefore the pressure decreased, so the water from the bowl began to be sucked in.”
Games and experiments with water and fire are in the book "Professor Nicolas' Experiments".
6 - Water in a sieve
We continue to study magical properties water and surrounding objects. Ask someone present to pull the bandage and pour water through it. As we can see, it passes through the holes in the bandage without any difficulty.
Bet with those around you that you can make sure that water does not pass through the bandage without any additional techniques.

22. Cut a piece of bandage.

23. Wrap a bandage around a glass or champagne flute.

24. Turn the glass over - the water doesn’t spill out!
Professor Nicolas's comment: “Thanks to this property of water, surface tension, water molecules want to be together all the time and are not so easy to separate (they are such wonderful girlfriends!). And if the size of the holes is small (as in our case), then the film does not tear even under the weight of water!”
7 - Diving bell
And to secure the honorary title of Water Mage and Lord of the Elements for you, promise that you can deliver paper to the bottom of any ocean (or bathtub or even basin) without getting it wet.

25. Have those present write their names on a piece of paper.

26. Fold the piece of paper and put it in the glass so that it rests against its walls and does not slide down. We immerse the leaf in an inverted glass to the bottom of the tank.

27. The paper remains dry - water cannot reach it! After you pull out the leaf, let the audience make sure that it is really dry.
Useful tips
Children are always trying to find out something new every day, and they always have a lot of questions.
They can explain some phenomena, or they can show clearly how this or that thing, this or that phenomenon works.
In these experiments, children will not only learn something new, but also learn create differentcrafts, with which they can then play.
1. Experiments for children: lemon volcano

You will need:
2 lemons (for 1 volcano)
Baking soda
Food coloring or watercolor paints
Dishwashing liquid
Wooden stick or spoon (if desired)

1. Cut off the bottom of the lemon so it can be placed on a flat surface.
2. On the back side, cut out a piece of lemon as shown in the image.
* You can cut off half a lemon and make an open volcano.

3. Take the second lemon, cut it in half and squeeze the juice into a cup. This will be the reserved lemon juice.
4. Place the first lemon (with the cut out part) on the tray and use a spoon to “squeeze” the lemon inside to squeeze out some of the juice. It is important that the juice is inside the lemon.
5. Add food coloring or watercolor inside the lemon, but do not stir.

6. Pour dish soap inside the lemon.
7. Add a spoonful to the lemon baking soda. The reaction will begin. You can use a stick or spoon to stir everything inside the lemon - the volcano will begin to foam.

8. To make the reaction last longer, you can gradually add more soda, dyes, soap and reserve lemon juice.
2. Home experiments for children: electric eels made from chewing worms

You will need:
2 glasses
Small capacity
4-6 gummy worms
3 tablespoons baking soda
1/2 spoon of vinegar
1 cup water
Scissors, kitchen or stationery knife.
1. Using scissors or a knife, cut lengthwise (precisely lengthwise - it won't be easy, but be patient) each worm into 4 (or more) pieces.
* The smaller the piece, the better.
*If the scissors do not cut properly, try washing them with soap and water.

2. Mix water and baking soda in a glass.
3. Add pieces of worms to the solution of water and soda and stir.
4. Leave the worms in the solution for 10-15 minutes.
5. Using a fork, transfer the worm pieces to a small plate.
6. Pour half a spoon of vinegar into an empty glass and start putting worms into it one by one.

* The experiment can be repeated if you wash the worms plain water. After a few attempts, your worms will begin to dissolve, and then you will have to cut a new batch.
3. Experiments and experiments: a rainbow on paper or how light is reflected on a flat surface

You will need:
Bowl of water
Clear nail polish
Small pieces of black paper.
1. Add 1-2 drops of clear nail polish to a bowl of water. Watch how the varnish spreads through the water.
2. Quickly (after 10 seconds) dip a piece of black paper into the bowl. Take it out and let it dry on a paper towel.

3. After the paper has dried (this happens quickly) start turning the paper and look at the rainbow that appears on it.
* To better see a rainbow on paper, look at it under the sun's rays.


4. Experiments at home: rain cloud in a jar

As small drops of water accumulate in a cloud, they become heavier and heavier. Eventually they will reach such a weight that they can no longer remain in the air and will begin to fall to the ground - this is how rain appears.
This phenomenon can be shown to children using simple materials.
You will need:
Shaving foam
Food coloring.
1. Fill the jar with water.
2. Apply shaving foam on top - it will be a cloud.
3. Have your child start dripping food coloring onto the “cloud” until it starts to “rain” - drops of coloring begin to fall to the bottom of the jar.
During the experiment, explain this phenomenon to your child.

You will need:
Warm water
Sunflower oil
4 food colors
1. Fill the jar 3/4 full with warm water.

2. Take a bowl and stir 3-4 tablespoons of oil and a few drops of food coloring into it. In this example, 1 drop of each of 4 dyes was used - red, yellow, blue and green.

3. Using a fork, stir the coloring and oil.

4. Carefully pour the mixture into a jar of warm water.

5. Watch what happens - the food coloring will begin to slowly fall through the oil into the water, after which each drop will begin to disperse and mix with the other drops.
* Food coloring dissolves in water, but not in oil, because... oil density less water(that’s why it “floats” on the water). The dye droplet is heavier than the oil, so it will begin to sink until it reaches the water, where it will begin to disperse and look like a small fireworks display.
6. Interesting experiments: ina circle in which the colors merge
You will need:
- printout of the wheel (or you can cut out your own wheel and draw all the colors of the rainbow on it)
Elastic band or thick thread
Glue stick
Scissors
Skewer or screwdriver (to make holes in the paper wheel).

1. Select and print the two templates you want to use.

2. Take a piece of cardboard and use a glue stick to glue one template to the cardboard.
3. Cut out the glued circle from cardboard.
4. TO back side Glue the second template onto the cardboard circle.
5. Use a skewer or screwdriver to make two holes in the circle.

6. Thread the thread through the holes and tie the ends into a knot.
Now you can spin your top and watch how the colors merge on the circles.


7. Experiments for children at home: jellyfish in a jar

You will need:
Small transparent plastic bag
Transparent plastic bottle
Food coloring
Scissors.

1. Place the plastic bag on a flat surface and smooth it out.
2. Cut off the bottom and handles of the bag.
3. Cut the bag lengthwise on the right and left so that you have two sheets of polyethylene. You will need one sheet.
4. Find the center of the plastic sheet and fold it like a ball to make a jellyfish head. Tie a thread in the area of the jellyfish's "neck", but not too tightly - you need to leave a small hole through which to pour water into the jellyfish's head.
5. There is a head, now let's move on to the tentacles. Make cuts in the sheet - from the bottom to the head. You need approximately 8-10 tentacles.
6. Cut each tentacle into 3-4 smaller pieces.

7. Pour some water into the jellyfish's head, leaving room for air so the jellyfish can "float" in the bottle.
8. Fill a bottle with water and put your jellyfish in it.

9. Add a couple drops of blue or green food coloring.
* Close the lid tightly to prevent water from spilling out.
* Let the children turn the bottle over and watch the jellyfish swim in it.
8. Chemical experiments: magic crystals in a glass

You will need:
Glass glass or bowl
Plastic bowl
1 cup Epsom salts (magnesium sulfate) - used in bath salts
1 cup hot water
Food coloring.
1. Place Epsom salts in a bowl and add hot water. You can add a couple of drops of food coloring to the bowl.
2. Stir the contents of the bowl for 1-2 minutes. Most of salt granules should dissolve.

3. Pour the solution into a glass or glass and place it in the freezer for 10-15 minutes. Don't worry, the solution is not so hot that the glass will crack.
4. After freezing, transfer the solution to the main compartment of the refrigerator, preferably on the top shelf, and leave overnight.

The growth of crystals will be noticeable only after a few hours, but it is better to wait overnight.
This is what the crystals look like the next day. Remember that crystals are very fragile. If you touch them, they will most likely immediately break or crumble.

9. Experiments for children (video): soap cube
10. Chemical experiments for children (video): how to make a lava lamp with your own hands
If you're wondering how to celebrate your child's birthday, you might like the idea of hosting a science show for kids. IN Lately Scientific holidays are becoming increasingly popular. Almost all children enjoy entertaining experiences and experiments. For them it is something magical and incomprehensible, and therefore interesting. The cost of hosting a science show is quite high. But this is not a reason to deny yourself the pleasure of watching the amazed children’s faces. After all, you can get by on our own, I do not resort to the help of animators and holiday agencies.
In this article, I have made a selection of simple chemical and physical experiments that can be carried out at home without any problems. Everything you need to carry them out can probably be found in your kitchen or medicine cabinet. You won't need any special skills either. All you need is desire and a good mood.
I tried to collect simple but spectacular experiments that will be interesting to children different ages. For each experiment, I prepared a scientific explanation (it’s not for nothing that I studied to be a chemist!). Whether you explain to your children the essence of what is happening or not is up to you. It all depends on their age and level of training. If the children are small, you can skip the explanation and go straight to spectacular experience, saying only that they will be able to learn the secrets of such “miracles” when they grow up, go to school and begin to study chemistry and physics. Perhaps this will make them interested in studying in the future.
Although I chose the most safe experiments, they still need to be taken very seriously. It is better to perform all manipulations with gloves and a gown, at a safe distance from children. After all, vinegar and potassium permanganate can cause trouble.
And, of course, when holding a children's science show, you need to take care of the image of a mad scientist. Your artistry and charisma will largely determine the success of the event. Transform from ordinary person It’s not at all difficult to become a funny scientific genius - all you have to do is tousle your hair, put on big glasses and a white coat, get smeared with soot and make a facial expression appropriate to your new status. This is what a typical mad scientist looks like.


Before putting on a science show on children's party(by the way, this can be not only a birthday, but also any other holiday), all experiments should be done in the absence of children. Rehearse so that there are no unpleasant surprises later. You never know what can go wrong.
Children's experiments can be carried out without a festive occasion - just so that you can spend time with your child in an interesting and useful way.
Choose the experiences you like best and create a holiday script. In order not to overburden children with science, even if it is entertaining, dilute the event with fun games.
Part 1. Chemical show
Attention! When conducting chemical experiments, you should be extremely careful.
Foam fountain
Almost all children love foam - the more, the better. Even kids know how to make it: to do this, you need to pour shampoo into the water and shake it well. Can foam form on its own without shaking and also be colored?
Ask the children what they think foam is. What does it consist of and how can it be obtained. Let them express their guesses.
Then explain that foam is bubbles filled with gas. This means that for its formation you need some substance from which the walls of the bubbles will consist, and a gas that will fill them. For example, soap and air. When soap is added to water and stirred, air enters these bubbles from environment. But gas can be obtained in another way - in the process chemical reaction.
Option 1
- hydroperite tablets;
- potassium permanganate;
- liquid soap;
- water;
- glass vessel with a narrow neck (preferably beautiful);
- cup;
- hammer;
- tray.
Setting up the experiment
- Using a hammer, crush the hydroperite tablets into powder and pour it into the flask.
- Place the flask on a tray.
- Add liquid soap and water.
- Prepare an aqueous solution of potassium permanganate in a glass and pour it into the flask with hydroperide.
After the solutions of potassium permanganate (potassium permanganate) and hydroperide (hydrogen peroxide) merge, a reaction will begin to occur between them, accompanied by the release of oxygen.
4KMnO 4 + 4H 2 O 2 = 4MnO 2 ¯ + 5O 2 + 2H 2 O + 4KOH
Under the influence of oxygen, the soap present in the flask will begin to foam and lick out of the flask, forming a kind of fountain. Due to potassium permanganate, part of the foam will turn pink.
You can see how this happens in the video.
Important: The glass vessel must have a narrow neck. Do not take the resulting foam into your hands and do not give it to children.
Option 2
Another gas, for example carbon dioxide, is also suitable for foam formation. You can paint the foam any color you want.
To carry out the experiment you will need:
- plastic bottle;
- soda;
- vinegar;
- food coloring;
- liquid soap.
Setting up the experiment
- Pour vinegar into the bottle.
- Add liquid soap and food coloring.
- Add baking soda.
Result and scientific explanation
When soda and vinegar interact, a violent chemical reaction occurs, accompanied by the release of carbon dioxide CO 2 .
Under its influence, the soap will begin to foam and lick out of the bottle. The dye will color the foam in the color you choose.
Fun ball
What's a birthday without balloons? Show the children the balloon and ask how to inflate it. The guys, of course, will answer with their mouths. Explain that the balloon is inflated by the carbon dioxide that we exhale. But there is another way to inflate the balloon.
To carry out the experiment you will need:
- soda;
- vinegar;
- bottle;
- balloon.
Setting up the experiment
- Place a teaspoon of baking soda inside the balloon.
- Pour vinegar into the bottle.
- Place the balloon on the neck of the bottle and pour the baking soda into the bottle.
Result and scientific explanation
As soon as soda and vinegar come into contact, a violent chemical reaction will begin, accompanied by the release of carbon dioxide CO 2. Balloon will begin to inflate before our eyes.
CH 3 -COOH + Na + − → CH 3 -COO − Na + + H 2 O + CO 2
If you take a smiley ball, it will make an even greater impression on the guys. At the end of the experiment, tie a balloon and give it to the birthday person.
Watch the video for a demonstration of the experience.
Chameleon
Can liquids change color? If yes, why and how? Before you try the experiment, be sure to ask your children these questions. Let them think. They will remember how water is colored when you rinse a brush with paint in it. Is it possible to discolor the solution?
To carry out the experiment you will need:
- starch;
- alcohol burner;
- test tube;
- cup;
- water.
Setting up the experiment
- Pour a pinch of starch into a test tube and add water.
- Drop some iodine. The solution will turn blue.
- Light the burner.
- Heat the test tube until the solution becomes colorless.
- Pour into a glass cold water and immerse the test tube in it so that the solution cools and turns blue again.
Result and scientific explanation
When reacting with iodine, the starch solution turns blue because it forms a compound dark blue I 2 *(C 6 H 10 O 5) n. However, this substance is unstable and, when heated, breaks down again into iodine and starch. When cooled, the reaction goes in the other direction and we again see the solution turning blue. This reaction demonstrates the reversibility of chemical processes and their dependence on temperature.
I 2 + (C 6 H 10 O 5) n => I 2 *(C 6 H 10 O 5) n
(iodine - yellow) (starch - clear) (dark blue)
Rubber egg
All children know that eggshell very fragile and can break at the slightest blow. It would be nice if the eggs didn’t break! Then you wouldn’t have to worry about getting the eggs home when your mom sends you to the store.
To carry out the experiment you will need:
- vinegar;
- raw egg;
- cup.
Setting up the experiment
- To surprise the children, you need to prepare for this experience in advance. 3 days before the holiday, pour vinegar into a glass and place a raw chicken egg in it. Leave for three days so that the shell has time to completely dissolve.
- Show the children a glass with an egg and invite everyone to say a magic spell together: “Tryn-dyrin, boom-burym!” Egg, become rubber!”
- Remove the egg with a spoon, wipe it with a napkin and demonstrate how it can now become deformed.
Result and scientific explanation
Eggshells are made of calcium carbonate, which dissolves when reacted with vinegar.
CaCO 3 + 2 CH 3 COOH = Ca(CH 3 COO) 2 + H 2 O + CO 2
Due to the presence of a film between the shell and the contents of the egg, it retains its shape. Watch the video to see what an egg looks like after vinegar.
Secret letter
Children love everything mysterious, and therefore this experiment will certainly seem like real magic to them.
Take an ordinary ballpoint pen and write a secret message from aliens on a piece of paper or draw some kind of secret sign that no one except the guys present can know about.
When the children read what is written there, tell them that this is a big secret and the inscription must be destroyed. Moreover, it will help you erase the inscription magic water. If you treat the inscription with a solution of potassium permanganate and vinegar, then with hydrogen peroxide, the ink will wash off.
To carry out the experiment you will need:
- potassium permanganate;
- vinegar;
- hydrogen peroxide;
- flask;
- cotton buds;
- ball pen;
- paper;
- water;
- paper towels or napkins;
- iron.
Setting up the experiment
- Draw a picture or message on a piece of paper with a ballpoint pen.
- Pour some potassium permanganate into the test tube and add vinegar.
- Soak a cotton swab in this solution and swipe over the inscription.
- Take another cotton swab, moisten it with water and wash off the resulting stains.
- Blot with a napkin.
- Apply hydrogen peroxide to the inscription and blot it again with a napkin.
- Iron or place under a press.
Result and scientific explanation
After all the manipulations you will receive Blank sheet paper, which will greatly surprise children.
Potassium permanganate is a very strong oxidizing agent, especially if the reaction occurs in an acidic environment:
MnO 4 ˉ+ 8 H + + 5 eˉ = Mn 2+ + 4 H 2 O
A strong acidified solution of potassium permanganate literally burns many organic compounds, turning them into carbon dioxide and water. To create an acidic environment, our experiment uses acetic acid.
The product of the reduction of potassium permanganate is manganese dioxide Mn0 2, which has a brown color and precipitates. To remove it, we use hydrogen peroxide H 2 O 2, which reduces the insoluble compound Mn0 2 to a highly soluble manganese (II) salt.
MnO 2 + H 2 O 2 + 2 H + = O 2 + Mn 2+ + 2 H 2 O.
I suggest you watch how the ink disappears in the video.
The power of thought
Before setting up the experiment, ask the children how to extinguish a candle flame. They, of course, will answer you that you need to blow out the candle. Ask if they believe you can put out a fire with an empty glass by casting a magic spell?
To carry out the experiment you will need:
- vinegar;
- soda;
- glasses;
- candles;
- matches.
Setting up the experiment
- Pour baking soda into a glass and fill it with vinegar.
- Light some candles.
- Bring a glass of baking soda and vinegar to another glass, tilting it slightly so that the carbon dioxide produced during the chemical reaction flows into the empty glass.
- Pass a glass of gas over the candles, as if pouring it on the flame. At the same time, make a mysterious expression on your face and say some incomprehensible spell, for example: “Chickens-borers, moors-pli!” Flame, don’t burn anymore!” Children must think that this is magic. You will reveal the secret after the delight.
Result and scientific explanation
When soda and vinegar interact, carbon dioxide is released, which, unlike oxygen, does not support combustion:
CH 3 -COOH + Na + − → CH 3 -COO − Na + + H 2 O + CO 2
CO 2 is heavier than air, and therefore does not fly up, but settles down. Thanks to this property, we have the opportunity to collect it in an empty glass, and then “pour” it onto the candles, thereby extinguishing their flame.
How this happens, watch the video.
Part 2. Entertaining physical experiments
Genie strongman
This experiment will allow children to look at their usual action from a different perspective. Place an empty wine bottle in front of the children (it is better to remove the label first) and push the cork into it. And then turn the bottle upside down and try to shake the cork out. Of course, you won't succeed. Ask the children: is there any way to get the cork out without breaking the bottle? Let them say what they think about this.
Since nothing can be used to pick up the cork through the neck, there is only one thing left to do - try to push it out from the inside. How to do it? You can call the genie for help!
The gin used in this experiment will be a large plastic bag. To enhance the effect, you can decorate the bag with colored markers - draw eyes, nose, mouth, hands, some patterns.
So, to conduct the experiment you will need:
- empty wine bottle;
- cork;
- plastic bag.
Setting up the experiment
- Twist the bag into a tube and insert it into the bottle so that the handles are on the outside.
- When turning the bottle over, ensure that the cork is on the side of the bag, closer to the neck.
- Inflate the bag.
- Carefully begin to pull the package out of the bottle. The cork will come out along with it.
Result and scientific explanation
As the bag is inflated, it expands inside the bottle, expelling air from it. When we begin to pull out the bag, a vacuum is created inside the bottle, due to which the walls of the bag wrap around the cork and drag it out with them. This is such a strong gin!
To see how this happens, watch the video.
Wrong glass
On the eve of the experiment, ask the children what will happen if you turn a glass of water upside down. They will answer that the water will pour out. Tell them that this only happens with the “right” glasses. And you have the “wrong” glass from which water does not pour out.
To carry out the experiment you will need:
- glasses of water;
- paints (you can do without them, but this makes the experience more spectacular; it’s better to use acrylic paints– they give more saturated colors);
- paper.
Setting up the experiment
- Pour water into glasses.
- Add some color to it.
- Wet the edges of the glasses with water and place a sheet of paper on top of them.
- Press the paper firmly against the glass, holding it with your hand, and turn the glasses upside down.
- Wait a moment until the paper sticks to the glass.
- Slowly remove your hand.
Result and scientific explanation
Surely all children know that we are surrounded by air. Although we cannot see him, he, like everything around him, has weight. We feel the touch of air, for example, when the wind blows on us. There is a lot of air, and therefore it presses on the ground and everything around. This is called atmospheric pressure.
When we apply paper to a wet glass, it sticks to its walls due to the force of surface tension.
In an inverted glass, between its bottom (which is now at the top) and the surface of the water, a space is formed filled with air and water vapor. The force of gravity acts on the water, pulling it down. At the same time, the space between the bottom of the glass and the surface of the water increases. In conditions constant temperature the pressure in it decreases and becomes less than atmospheric. The total pressure of air and water on the paper from the inside is slightly less than the air pressure from the outside. That's why water doesn't pour out of the glass. However, after some time, the glass will lose its magical properties, and the water will still spill out. This is due to the evaporation of water, which increases the pressure inside the glass. When it becomes more atmospheric, the paper will fall off and the water will pour out. But you don’t have to bring it to this point. It will be more interesting this way.
You can watch the progress of the experiment in the video.
Gluttonous bottle
Ask your children if they like to eat. Do they like to eat? glass bottles? No? Don't they eat bottles? But they are wrong. They don’t eat ordinary bottles, but they don’t even mind having a snack with magic bottles.
To carry out the experiment you will need:
- boiled chicken egg;
- bottle (to enhance the effect, the bottle can be painted or embellished in some way, but so that children can see what is happening inside it);
- matches;
- paper.
Setting up the experiment
- Peel off the shell boiled egg. Who eats eggs in a shell?
- Set fire to a piece of paper.
- Throw the burning paper into the bottle.
- Place the egg on the neck of the bottle.
Result and scientific explanation
When we throw burning paper into a bottle, the air in it heats up and expands. By closing the neck with an egg, we prevent the flow of air, as a result of which the fire goes out. The air in the bottle cools and contracts. A pressure difference is created inside the bottle and outside, due to which the egg is sucked into the bottle.
That's all for now. However, over time I plan to add a few more experiments to the article. At home, you can, for example, conduct experiments with balloons. Therefore, if you are interested this topic, add the site to bookmarks or subscribe to the newsletter for updates. When I add something new, I will inform you about it by e-mail. It took me a lot of time to prepare this article, so please respect my work and when copying materials, be sure to include an active hyperlink to this page.
If you have ever conducted home experiments for children and organized a science show, write about your impressions in the comments and attach a photo. It will be interesting!
How to interest a child in learning new substances and properties various items and liquids? You can set up an impromptu chemical laboratory at home and conduct simple chemical experiments for children at home.
The transformations will be original and appropriate in honor of some festive event or in the most ordinary conditions to familiarize the child with the properties different materials. Here are some simple tricks that are easy to do at home.
Chemical experiments using ink
Take a small container of water, preferably one with transparent walls.
Dissolve a drop of ink or ink in it - the water will turn blue.
Add one tablet to the solution activated carbon pre-shredded.
Then shake the container well and you will see that it will gradually become light, without a tint of paint. Coal powder has an absorbent property, and the water returns to its original color.
Trying to create clouds at home
 Take a tall jar and pour some hot water into it (about 3 cm). Prepare ice cubes in the freezer and place them on a flat baking sheet that you place on top of the jar.
The hot air in the jar will cool, forming water vapor. The condensate molecules will begin to gather together in the form of a cloud. This transformation demonstrates the origin of clouds in nature when it cools warm air. Why is it raining?
Drops of water on the ground heat up and rise upward. There they cool and meet each other to form clouds. Then the clouds also combine into heavy formations and fall to the ground as precipitation. Watch a video of chemical experiments for children at home.
How your hands feel at different water temperatures
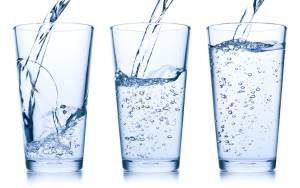
You will need three deep bowls of water - cold, hot and room temperature.
The child should touch cold water with one hand and hot water with the other.
After a couple of minutes, both hands are placed in a vessel with water at room temperature. How does water feel to him? Is there a difference in perception temperature?
Water can be absorbed and stain the plant.
 For this beautiful transformation you will need living plant or flower stem.
Place it in a glass of water colored in any bright color (red, blue, yellow).
Gradually you will notice that the plant takes on the same color.
This happens because the stem absorbs water and takes on its color. In the language of chemical phenomena, such a process is usually called osmosis or one-way diffusion.
You can make your own fire extinguisher at home
 Necessary actions:
- Let's take a candle.
- It is necessary to light it and place it in the jar so that it stands straight and the flame does not reach its edges.
- Carefully place a teaspoon of baking powder into the jar.
- Then pour a little vinegar into it.
Next we look at the transformation - White powder baking powder will hiss, forming foam, and the candle will go out. This interaction between the two substances produces carbon dioxide. It sinks to the bottom of the jar because it is heavy compared to other atmospheric gases.
The fire does not receive oxygen and goes out. This is the principle behind the fire extinguisher. They all contain carbon dioxide, which extinguishes the flames of fire.
What else you should definitely read:
Oranges have the ability to float on water
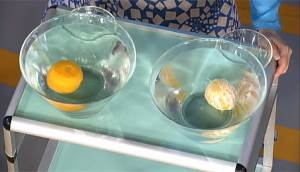 If you put an orange in a bowl of water, it will not sink. Clean it and dip it in water again - you will see it at the bottom. How did this happen?
The orange peel has air bubbles that keep it floating on the water, almost like an air mattress.
Testing eggs for their ability to float on water
 We use jars of water again. Place a couple of tablespoons of salt in one of them and stir until dissolved. Dip an egg into each jar. In salt water it will be on the surface, and in normal water it will sink to the bottom.