How to make a threshold for a balcony. Four practical ways to install a plastic threshold on a balcony door Installing a threshold on a balcony door
In the area between the balcony/loggia and the adjacent room, the threshold is removed. However, this is not recommended. When this threshold is removed, a so-called “cold bridge” is formed.
As practice shows, when it is dismantled, a strong draft and freezing begins from the bottom of the door.
Dew or condensation also forms at the bottom of the element or on it. inside in wet weather. Ice formation is also possible in winter.
What is a "cold bridge"?
Cold bridges are structural sections of a building where increased heat transfer occurs due to a break in the continuity of the thermal insulation shell.
There are two types of cold bridges - geometric, which are determined by architectural and structural features, and material, due to different thermal conductivities building elements.
In practice, a combination of both types is often found, for example, in balcony slabs.
Correct installation of double-glazed windows while maintaining balcony threshold


Incorrect installation of double-glazed windows, balcony threshold removed
What can “cold bridges” lead to?
- Increased energy consumption
Due to additional heat losses in the adjacent area, more energy will be required to heat this room in order to maintain constant temperature air.
The elimination of “cold bridges” is necessary not only for energy reasons, but also for sanitary and hygienic reasons.
- Increased likelihood of mold formation
In the area where a cold bridge is formed, the wall surface temperature decreases. In the cold season, it becomes below the dew point temperature of 9° C (in the case of room temperature about 20 °C and air humidity about 50%). The moisture contained in the indoor air forms condensation and leads to the appearance of dampness - an ideal breeding ground for mold.
Very often in construction practice, geometric, structural and material “cold bridges” are layered, which significantly increases the risk of damage to the building.
Bridge of Cold–element building structure or assembly seam, having high thermal conductivity. Leads to the formation of condensation on the inner surface of the slope or assembly joint during the cold season.
The solution to this problem creates the prerequisites for the long-term preservation and functional reliability of buildings.
Given the requirements for thermal protection, individual “cold bridges” have a great influence on the thermal parameters of the building facade.
So, depending on the level of thermal insulation and the design features of the connecting parts, up to half of the total amount of heat can be lost due to “cold bridges”.
As a result, when carrying out repair work affecting a balcony or loggia, the best solution will not dismantle the threshold between the balcony/loggia, even with the installation of “French” glazing.
Removing the threshold
However, if before carrying out the redevelopment it is decided to remove the threshold, then it is important to understand that such work is not possible in all houses. Everything will depend on the type of house and the condition of its structures.
- If the apartment is located in a residential building built according to monolithic technology, then along with the window sill block they will be allowed to remove the threshold.
- In panel and block houses touching the threshold located at the exit from the apartment to the balcony is prohibited by their developers - state design institutes (MNIITEP, Mosproekt). And if they do not give their consent, then the Moscow Housing Inspectorate will refuse the apartment owner to approve such a redevelopment.
- In houses built of brick, in most cases it is also prohibited to eliminate the threshold, since it holds balcony slab. But it is possible to determine whether demolition of the threshold is possible or not only after a specialist conducts an engineering inspection of the apartment.
If you decide to carry out redevelopment with dismantling the window sill block and balcony threshold, then our company can develop for you project documentation, on the basis of which you will legitimize and carry out the redevelopment. You can also order turnkey redevelopment approval from us.
Get Additional information You can contact our specialists about removing the threshold to the balcony and other types of redevelopment.
The balcony threshold is a transitional area between the room and the balcony or loggia. Often, when decorating an apartment, it is left unattended. And in vain! It can also be highlighted somehow. Below are 5 finishing options balcony threshold, with which you can make it more accurate.
There are several ways to decorate the threshold of a balcony. But the choice of finishing material depends largely on the design of the room. After all, if the room contains such an element as brickwork, a plastic threshold will not always be appropriate. Below are the most popular options for finishing the balcony threshold.
Tree
First, a frame is made from timber, its size is adjusted, focusing on the size of the threshold. Additionally, the body is reinforced with metal plates to make it more durable. Then holes are drilled in the corners so that the threshold can be easily secured in the future. After installing the structure, the draft version is covered with a chipboard sheet: take a piece the size of the threshold and secure it with self-tapping screws. Next it is coated with varnish.

Attention! This option for finishing the threshold is more suitable for a room decorated in Provence or country style. A “wooden step” will add some zest to the interior of the room.
Plastic
Plastic is the most popular look finishing the balcony threshold, but not the most durable. Some people think that an interior with such a threshold looks cheap, but in reality it is not so. It looks great if the door and windows are made of PVC.
Before installation work, remove all debris and then cut out the plastic blank to the required size. Glue is applied to the surface of the step and a threshold is mounted on top. Self-tapping screws are also screwed into the wall and the voids are filled with foam. After the foam has set, its excess is removed, and the corners are formed with special corners.

Brick and tile
To install a brick threshold, first dismantle the old threshold if it has completely become unusable. The surface is cleaned of dust and debris. Putty is then applied to it to roughen it up. The next step is brick laying. Per layer gypsum- cement mortar a row of bricks is laid. Apply to the last row last layer putty and after it has set, the surface of the threshold is tiled.
Worth knowing! Between the balcony door and the last row of brickwork, it is necessary to leave a small gap for the tiles.

A tiled balcony threshold looks better if the walls are lighter than the tile itself. It can be used not only brickwork. The main condition is that the surface must be flat.
Laminate
This great alternative wooden covering. In addition, you don’t need a lot of laminate – one strip is enough. They take measurements, then cut off the required piece and check for any defects. Then using liquid nails glue it to the threshold, pressing it tightly. After the glue has dried, the edges are covered with corners.

Linoleum
Are being done necessary measurements, then cut out a linoleum blank along them. Then they coat construction glue its base and press this piece of linoleum to the surface of the threshold. To ensure that its joints are less subject to various damages in the future, metal corners are attached.

This finishing of the balcony threshold goes well with wooden floors or laminate flooring. In addition, if the doors and walls of the room are light, the dark threshold will stand out perfectly against their background.
The threshold on the balcony is integral element interior of the room adjacent to the balcony. If the appearance of this element leaves much to be desired, then what beautiful room adjacent to the balcony or loggia was not old or a poorly finished threshold will be conspicuous and spoil the integrity of the picture. And if it still blows, then installation or replacement is simply necessary.
In this article we will look at how to make, replace and finish a threshold on a balcony step by step without involving specialists, since this type the work does not require additional skills there is an opportunity to save.
The first step is to make the base. There are two options for creating a base for the threshold: from brick or from cement-sand mortar. If you already have a level base that is suitable in height, then you can skip this step and immediately begin finishing.
Note!
The height of the base of the threshold is made taking into account the fact that a layer of finishing material will be laid on top. The point is that the finished balcony threshold does not interfere with opening and closing balcony door.
Instructions for creating a brick base:
The brick base is made when there is a large difference between the balcony frame and the floor (not less than the height of the brick).


After all these steps, the threshold will be smooth and you can proceed to finishing.
Instructions for creating a base from cement-sand mortar:
This method is suitable if the height of the base of the future threshold is less than the height of the brick.

The base is ready. Now you can start cladding with any material you like.
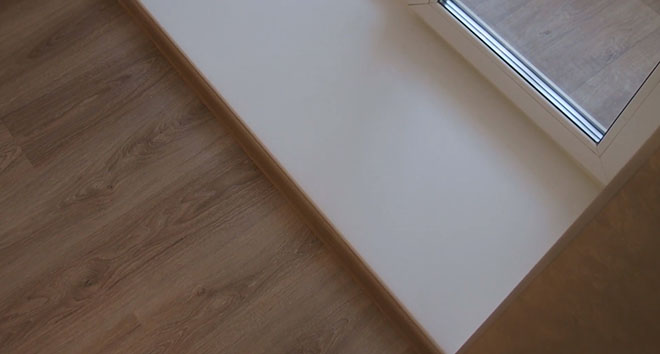
Threshold made of plastic window sill
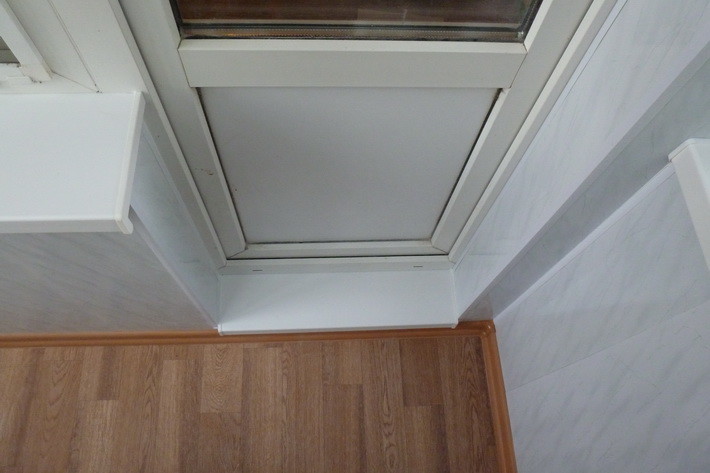
Plastic threshold on the balcony is considered the most practical, not expensive and universal option. It looks most aesthetically pleasing if the whole thing is made of plastic.
Instructions for installing a plastic threshold from a window sill:
- The surface under the threshold is cleaned of dust, debris and primed. If there is an old threshold, it must be dismantled.
- Next, you need to lay out the beams on the base of the threshold. We do not recommend installing the threshold only on polyurethane foam - it is unreliable. The threshold will be laid on the bars. The size of the bars must be selected in such a way that the finished threshold does not interfere with the opening and closing of the balcony door.

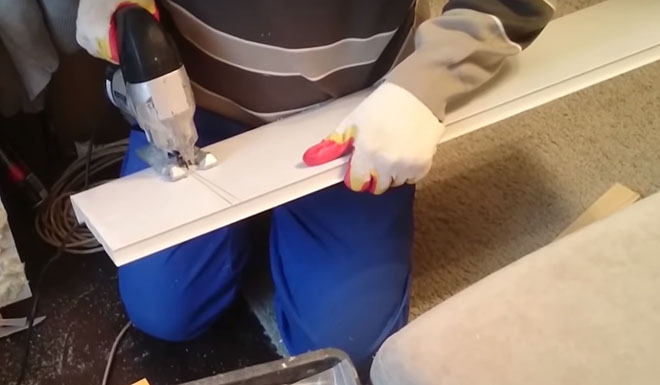
- The next step is to cut the plastic window sill to the size of the threshold.
- Next, we place the threshold and check whether everything fits and check the evenness of the surface with a level. If necessary, we trim the threshold. If the threshold is suitable, but the surface is not flat, it is necessary to install a base under the bars. Substrates can be any available materials (for example: pieces of drywall or plastic).

- After the threshold is adjusted to the level, we proceed to applying polyurethane foam. Carefully remove the threshold and apply an even layer of polyurethane foam between the bars, and liquid nails can be applied to the bars themselves.
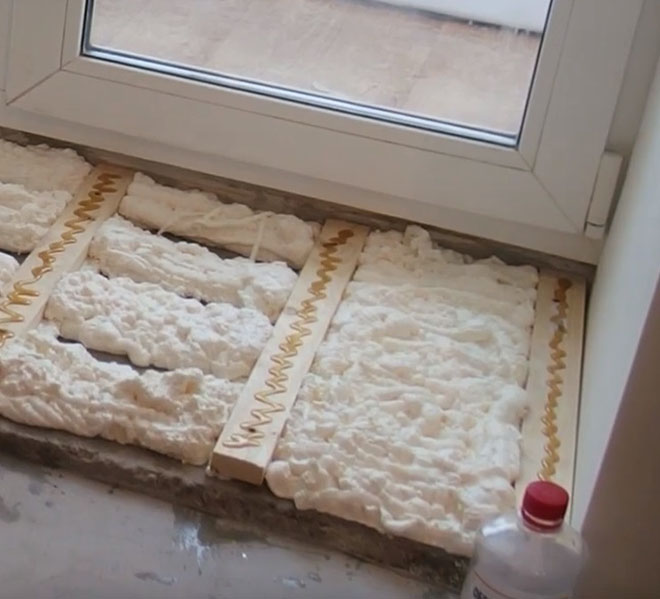
- Next, carefully glue the threshold. It should be noted that foam tends to expand, so after installing the threshold it is necessary to place a weight on its surface.


- Threshold from plastic window sill ready.
Tile threshold

Tiles are a durable, beautiful and practical option. A variety of sizes, textures, colors and patterns makes it possible to choose tiles to suit any design and interior.
Instructions for finishing the balcony door threshold:
You should not choose tiles with a glossy surface as they are slippery.

In addition to the text version of the instructions, we recommend that you read the instructions in video format, where the installation is shown in more detail with an explanation of the nuances.
Laminate threshold
How to make it yourself - instructions:
- The first step is to putty the threshold.
- Measurements are taken and cut necessary elements laminate In most cases, one strip may be enough, since laminate can be different widths and there is an opportunity to choose optimal solution. When cutting the material, use a wood saw with fine teeth, a hacksaw for metal or a jigsaw.


- For beautiful design Starting guides are used for joints between the wall and the laminate. We cut them to size and fix them around the perimeter.

- Apply to the base of the threshold silicone sealant or liquid nails and glue the laminate.

- The final stage is cutting to size and installing a decorative corner.

Linoleum threshold

The threshold on the balcony is an integral element of the interior of the room adjacent to the balcony. If the appearance of this element leaves much to be desired, then no matter how beautiful the room adjacent to the balcony or loggia is, an old or poorly finished threshold will be striking and spoil the integrity of the picture. And if it still blows, then installation or replacement is simply necessary.
In this article we will look at how to make, replace and finish a threshold on a balcony step by step without the involvement of specialists, since this type of work does not require additional skills there is an opportunity to save.
Preparatory work
The first step is to make the base. There are two options for creating a base for the threshold: from brick or from cement-sand mortar. If you already have a level base that is suitable in height, then you can skip this step and immediately begin finishing.
The height of the base of the threshold is made taking into account the fact that a layer of finishing material will be laid on top. The point is that the finished balcony threshold does not interfere with the opening and closing of the balcony door.
Instructions for creating a brick base:
The brick base is made when there is a large difference between the balcony frame and the floor (not less than the height of the brick).


After all these steps, the threshold will be smooth and you can proceed to finishing.
Instructions for creating a base from cement-sand mortar:
This method is suitable if the height of the base of the future threshold is less than the height of the brick.

The base is ready. Now you can start cladding with any material you like.
Threshold made of plastic window sill

A plastic threshold on a balcony is considered the most practical, inexpensive and versatile option. It looks most aesthetically pleasing if the entire balcony block is made of plastic.
Instructions for installing a plastic threshold from a window sill:


Tile threshold

Tiles are a durable, beautiful and practical option. A variety of sizes, textures, colors and patterns makes it possible to choose tiles to suit any design and interior.
Instructions for finishing the balcony door threshold:
You should not choose tiles with a glossy surface as they are slippery.

In addition to the text version of the instructions, we recommend that you read the instructions in video format, where the installation is shown in more detail with an explanation of the nuances.
Laminate threshold
How to make a threshold for a balcony from laminate with your own hands - instructions:

Do you need a threshold? types, finishes and what material it can be made from
Some people believe that it is not necessary to install a threshold on the balcony, especially if the balcony has glazing. However, this design is necessary in any case, since it performs several functions:

- Improvement general view premises, the ability to create a smooth transition from the living room to the loggia or balcony, which is especially important when large differences height.
- Protection against heat loss, drafts, and dust accumulating under the door.
- The ability to hide joints, especially if they are not made carefully, or a layer of polyurethane foam under the door frame.
Types of balcony thresholds
Before you start creating and finishing the threshold for the balcony, you need to choose what it will be made of. The following types of design exist:
- Plastic. This is one of the most inexpensive options, such a threshold is not afraid of moisture, is resistant to mechanical stress, and is quite durable. The best option for installation is a PVC window sill, which can be installed ready-made: you just need to select the product to size or cut it.
- Cement-concrete. This is a more reliable and durable option, but its installation is more complicated, and outside It is advisable to trim it to give it a more aesthetic appearance. The covering can be made of tiles, laminate, linoleum, and other materials.
- Brick. It is quite difficult to lay out such a threshold; you need to calculate the dimensions and carefully level it. Finished design can be finished with any materials, from wood to tiles.
- Wooden. The product is lightweight, easy to install, attractive in appearance, but it is resistant to moisture and pests. This balcony door threshold has a shorter service life than its analogues.

Work options
Once you have decided what can be made from, you can understand exactly how to arrange and finish the structure. Creating a threshold for a balcony with your own hands is possible in the following ways:
- If there is too much empty space under the doorway or the opening itself is deformed and severely damaged, it is better to lay out the structure
- To create you can use cement-sand mixture, which is used to fill the structure. This option is optimal if you need to raise the level, but the space between the floor and the frame is less than the thickness of the brick.
What can a threshold be made from?
Regardless of how the work is carried out, it is necessary to prepare the opening and the floor surface: they need to be cleaned of dirt and debris, thoroughly wiped inside and out. Finishing is done on both sides; the outer one must be cleaned and dried, especially if you have to work with mortar. In addition to selecting materials, you need to do the following:
- Select the shape of the structure. The step can be rectangular or rounded, have a smooth transition to the floor surface or a sharp drop
- Select tools and materials for work; tools may be different, it depends on the design and method of finishing.
- Inspect the opening and eliminate major defects if necessary.
Brick threshold
For this design it is better to use sand-lime brick: It is resistant to moisture, withstands temperature fluctuations and has a long service life. The process of installing a balcony threshold will be as follows:

- Floor preparation, leveling, cleaning and degreasing, applying putty. After this, the surface should be rough.
- After this, you can lay the brick: before this you need to prepare a solution of cement with sand (proportion 1:3) and water; to improve adhesion, you can add gypsum. It is very important to immediately begin installation after creating the mixture, since the cement hardens very quickly.
- Laid out on the floor thin layer mortar, then the first row of bricks. It is necessary to leave a small space at the ends.
- A cement mixture is applied to the bricks; the solution should not be too thick, 3-5 mm is enough. Then you can lay the next layer of bricks. If the threshold is made of one row, you can immediately apply putty to the material, and then begin installing the finishing coating.
- Most often, such a structure is finished with tiles. The putty layer must be treated with a primer and the material must be laid.
Threshold made of cement-sand mortar
If there is a small gap between the frame and the floor, you can make a threshold from cement mortar. To do this, you will need to prepare the cement itself, sand, water, putty, a mixing container, lumber for formwork, as well as tools in the form of a trowel and spatula. Sequencing:
- Preparation and surface treatment with putty.
- After this, you need to build formwork from wood, for which timber or boards up to 20 mm thick are suitable. You can install ceramic tiles or broken bricks on the side to make the structure more stable. The height and width of the formwork is made with a margin of 3-5 mm from the size.
- Then you need to mix cement and sand in a ratio of 1 to 3 parts, add water. The composition should be homogeneous, without inclusions of dry mixture, and quite thick. You can mix it either manually or using a construction mixer.
- Then the solution is poured into the formwork. It must be leveled so that the surface is smooth and has no protrusions or other defects. It takes 24 to 48 hours to harden, the exact time depends on indoor and outdoor temperatures, as well as humidity levels.
- After hardening, the formwork part of the structure is dismantled, the finished threshold can be painted or other finishing and construction materials can be used for cladding.
Threshold made of plastic and laminate
Often a plastic window sill is used for installation; When installing, a support made of wooden beam, pre-treated with an antiseptic, and the gaps are sealed using polyurethane foam. Besides, plastic panels can be used to finish a concrete threshold: they are secured using self-tapping screws and construction adhesive. This design has an attractive appearance and durability; if the balcony threshold is made of a window sill supported by timber, its strength will be lower, but the installation process will take less time.
As an alternative, a laminate-covered element can be installed. It is used as a finishing material, can be mounted with glue, liquid nails, using special fasteners, allows you to design it with a smooth transition to the floor. For corner finishing, plinth is used.
How can you make a threshold for a balcony from laminate?
If the plastic threshold does not match the style of the room, you can make a threshold from laminate: the entrance to the balcony will look neat and aesthetically pleasing. For installation, you will need to clean the surface of the step, then cut the strip to the size of the threshold. Liquid nails or another adhesive composition is applied to its reverse part, then the product is pressed against the working surface. The finished balcony threshold can be equipped with an anti-slip strip.
Threshold made of wood and OSB

The threshold for a balcony door can be made from OSB boards on a wooden frame. This design better protects the room from heat loss and drafts, however wooden parts requires treatment for mold and mildew. Sequence of work:
- Installation of a timber frame. You can fasten the elements with self-tapping screws; the ends must be filed hand saw or a jigsaw if you need to connect the product at an angle.
- Laying the frame, drilling holes for mounting dowels.
- Fastening the sheathing, installing the OSB board.
- Insulation with cotton wool or polystyrene foam.
- The finished threshold for a balcony can be finished by laying a covering made of laminate, cork or other material.
Subsequent finishing
After installing the balcony threshold, you need to decide how to finish it. In some cases this is not necessary: for example, plastic product, made from PVC window sill, does not require additional processing. To finish the threshold of a balcony door made of cement, brick or wood, the following materials can be used:
- Cork covering;
- Laminate;
- Floor tiles, mosaics;
- Plastic panels;
- Linoleum.
How to remove the threshold?

In some cases, owners decide to make the balcony a residential part of the apartment, and when this is necessary, they have to get rid of the threshold. If such repairs are planned in a panel house, changes must be agreed upon housing inspection. Before dismantling, it is necessary to remove the doors, disassemble the frame, and then begin work. The easiest way is to remove the plastic or wooden threshold, it is not advisable to disassemble a structure made of cement or brick yourself; it is better to entrust the work to specialists.
To create a level floor, you can raise it; this is especially true if you plan to install infrared heating system. To do this, a screed is made, the surface is leveled, and then the finishing material is laid. You can do the work yourself or order it from a construction company.
Installing a laminate threshold between the balcony and the room
The threshold on a balcony or loggia performs many functions. But first of all, it is thermal insulation and decor. In the latter version, such an element requires additional finishing with one of the types of flooring: tiles, boards, linoleum and others. Most often the question arises of how to make a threshold for a balcony from laminate, since such material has become quite common today, displacing competitors. What is worth knowing about such finishing, and the principles of installing laminated boards at the transition between two rooms?

This is what a laminate threshold looks like between the room and the balcony


Why install a threshold on the balcony
Despite the fact that such an element as the threshold to the balcony is located indoors, it performs several important functions that improve comfort and living in the apartment:

These are the main reasons why it is necessary to make and finish a threshold between rooms. Otherwise there may be unpleasant consequences, from drafts or freezing, to water entering through an unglazed room in the form of precipitation. 


However, most often such an element as a threshold is already in the design of the apartment, and it just needs to be finished, and not necessarily with laminate, because the range of materials is more extensive.
Various options for balcony thresholds
When choosing this or that material for making or finishing the threshold between the balcony and the room, you should be guided by the rule that this part should be matched to the door leading to the balcony, or to the main flooring in the room. They must be selected in one color scheme without creating too sharp contrasts that will catch the eye.

Design option for a laminate threshold between the room and the balcony


So, depending on design solution In terms of design, it is possible to use the following types of threshold finishing on a loggia or balcony:


Wooden threshold to the balcony

An example of a linoleum threshold for a balcony
The most common types of threshold covering today are linoleum, tiles and laminated boards, selected depending on the design of the room.


But, if everything is clear with the first two options, then how to make a threshold for a balcony from laminate?
Assembling a laminate threshold
The entire process of installing a balcony threshold is quick and easy, you just need to follow the following technologies:
- Installation begins with the design of the future product. It is best to make a diagram with the specified threshold parameters, its height and width. At the same time, according to the first point, you should not make it too large, otherwise it will create inconvenience when moving. Not really needed low level so that the threshold fully performs its functions.
- It is necessary to remove from the surface at the construction site old finishing, clearing it of debris and dust. Also, before laying a new flooring, you need to treat the base with antiseptics to prevent the formation of fungus and mold.

Preparing the threshold for laminate installation


The process of installing laminate flooring on a balcony step
The video shows the process of assembling a laminate threshold.
You can also make a threshold from brick, laying it with cement mortar. Making a balcony threshold with a laminate finish is simple and does not require large expenses. It is only important to follow installation technologies and purchase high-quality material.
We make a threshold for the balcony from laminate or install a plastic one
These days, the balcony is no longer exclusively auxiliary room in the house. It can serve as a bedroom, guest room or kitchen. Therefore, renovations in this part of the apartment should be carried out conscientiously, using modern technologies and materials. When you are arranging a loggia, important stage works - flooring and threshold design.
Some owners of apartments with balconies even dismantle this step between the room and the auxiliary space, mistakenly believing that it is not needed. However, the balcony threshold performs several useful functions. Firstly, it makes the balcony structure more durable. Secondly, it keeps the room warm. When the door to the loggia is located in line with the floor, cold air easily penetrates into the room. Protect this area from low temperatures it won't be easy. Hence, best option- raise the door a little. Thus, the threshold acts as a heat-insulating element.
Types of balcony thresholds
The steps may be different sizes. They differ in height, length and width.

For their installation and finishing, materials such as plastic, tiles, and laminate are used.
The threshold is not only practical. Of course, it protects residents from the cold, but can also become a decorative detail in the interior. For harmonious and stylish design apartment it is important that the step into doorway the balcony was combined with the floor covering. If you have chosen laminate for your home, then it is advisable to cover the transition from the room to the balcony with this material.
Sometimes this elevation on the border of two rooms is turned into a full-fledged step. To do this, the old threshold on the balcony needs to be expanded and designed differently. In the case when the room is combined with a loggia, it is necessary to take into account the possible difference in floor levels, as well as the floor covering. If they differ, then a threshold is installed between the loggia and the adjacent room. You can make and install the ledge yourself.
Balcony threshold installation technology
First you need to decide what width and height you will have. balcony steps. Having decided on the dimensions, mark the contours. Then we install the formwork taking into account the height of the difference. After this, the form is filled with cement-sand or cement-concrete mortar and leveled. The solution should harden. It is left to dry for at least 24 hours. The final stage of installation involves directly covering the threshold.
Finishing the threshold on the balcony
Most Popular finishing materials are cork, linoleum, laminate, plastic panels, and ceramic tiles.

Threshold with tile trim
Trim threshold with tiles
To lay out the steps leading to a balcony or loggia with tiles, you will need the following tools:
- Mounting level for laying tiles evenly.
- Crosses for tiles.
- Grout for seams.
- Ceramic tiles for interior decoration and adhesive cement.
It should be noted that in the process of laying porcelain stoneware products, the fastening composition is applied only to the crossbar itself. When the tiles are firmly glued to the surface, you can remove the crosses and grout the seams.

Laying process floor tiles at the entrance to the balcony
This way you can quickly finish the threshold on the loggia.
Laminate covering for the threshold on the balcony
Wood as flooring and finishing of balcony thresholds is an expensive material. A great alternative wooden floor There will be laminated products on the loggia. Today in construction stores it is presented big choice such coatings. For laminate cladding, various fixing compounds are used, as well as liquid nails. To decorate the edges of the barrier, you can purchase special corners or plinths.
If you are thinking about how to make a threshold on a balcony from laminate, feel free to choose this material.

Laminate threshold
Many people install laminate flooring on their balconies on their own, without turning to a professional. It's not difficult at all.
At the same time, remember that it is better to start installation after completing other repair work. To install this flooring you will need a hammer, measuring tape, a block of wood, a saw, wedges, a pencil and a square.
Before laying the laminate, you need to carefully level the floor and remove all existing defects. After purchasing laminate flooring, experts recommend leaving the coating in the room being renovated for several days. After this, you can begin installation. Installation begins with the wall opposite the door. The panels are placed along the long side of the balcony. For stronger adhesion of the laminate, each subsequent row should move at least 40 centimeters, as when tying brickwork.
To prevent the laminate from creaking or swelling, the joints are treated with a special sealing material. The threshold on the balcony is fixed with self-tapping screws and covered with thick glue for more reliable fastening. When laying flooring indoors, it is necessary to maintain a certain temperature regime. It is necessary that the air temperature is not lower than 5 degrees. There should always be a small gap between the wall and the laminate plates, which is then covered with a plinth.
Threshold to the balcony from the window sill
Often used as a threshold for a loggia plastic pvc windowsill.
If you want to install such a step, you need to install support blocks made of wooden blocks under it. The wood must be coated with an antiseptic. The remaining gaps are filled with polyurethane foam.
Plastic thresholds
One of the disadvantages of a plastic threshold is its fragility. Such products may be subject to deformation. Therefore, some owners prefer to make aluminum thresholds instead of plastic steps, of stainless steel or brass. However, plastic slopes are much easier and faster to make. They retain heat well. Transitions made of plastic are easy to install by balcony owners themselves. This threshold masks small defects in the old concrete elevation at the border of two rooms and is easy to clean.

Appearance of the plastic threshold
As a rule, plastic steps are mounted together with a balcony block when creating a doorway. Before installing the plastic threshold on the balcony, you need to thoroughly clean it of dust and debris. concrete base after repair. To the old one concrete step apply a layer of glue. Then fix the plastic threshold, further strengthening it with self-tapping screws. In this case, there are two types of fastening with self-tapping screws: open and closed. At open version The fastenings of the screw heads are visible, but when closed they are not. To install a plastic crossbar, it is important to finish the part of the wall underneath it. For cladding, you should use the same materials that were used in the design of the balcony.

Door threshold on the loggia
The installation of the plastic step itself will take very little time.
Removing the threshold
Sometimes there is a need to combine a loggia with an adjacent room. In this case, the threshold is removed. IN panel houses this may cause damage load-bearing wall, therefore, it is better to coordinate such a redevelopment with the relevant organization.

Removing the balcony threshold
In the case where the threshold is not very high, the floor level on the loggia can be raised. This is especially convenient if additional thermal insulation or installation of a “warm floor” system is required. First, make a screed using cement mortar and level the surface. Remember that before this the floor is well cleared of debris. In this way we obtain a flat floor surface without elevation.
Before you begin dismantling the balcony threshold, you need to pull out the doors and disassemble the balcony frame. When the threshold is removed, the block is placed in its original place, but its lower part is no longer needed - instead, a wooden strip or a special metal plate is installed.
However, it is necessary to take into account some nuances of dismantling the threshold on the loggia. The folding mode for opening the balcony door will no longer work. The tightness of the joint between the door and the floor surface may weaken. Need to carry out high-quality insulation balcony doors. If your balcony is located on the ground floor of the house, it is better not to remove the threshold. Wooden step on the balcony you can dismantle it yourself, but it is recommended to entrust the dismantling of the concrete threshold to professionals.
Door thresholds become a kind of barrier to cold air and drafts, protecting the room from dampness. They also perform a soundproofing function. A step at the entrance to a loggia or balcony is by no means a useful element that connects a room with an external extension. Therefore, you should take a responsible approach to the issue of installing and finishing the balcony threshold. If renovation work will be carried out taking into account all requirements, your apartment with a balcony will become even cozier and more comfortable.
Specialization: master in construction plasterboard structures, finishing works and styling floor coverings. Installation of door and window units, finishing of facades, installation of electrical, plumbing and heating - I can give detailed advice on all types of work.
The threshold to the balcony is the place where two different rooms, and in this area there are very often significant differences height. If you do not refine this part of the structure and make it more convenient for use, then you risk stumbling over a protruding door frame for years.
It is much easier, after installing the balcony block, to build a comfortable and safe platform or even steps (this also happens if the height difference is too large), this is what I will talk about in the review.
Work options
From the title it is clear that I will talk about four options for carrying out the work, each of them has proven its reliability, so you need to choose the one that best suits your design. And the surrounding interior should be taken into account, because if you have wood trim, then installing plastic is at least unwise.
Method 1 - building a brick threshold
This option was previously used everywhere, in Soviet time no one came up with it at all simple solutions: “Since everyone is laying brick, it means it’s right,” the developers reasoned and built a threshold for the balcony from this material.
But even today this solution is often used; it is most suitable in the following situations:
- When the height difference between the balcony door frame and the opening is very large. Often installers lay down a brick when installing a balcony block, in this case ask them to position it so that it stands level, and you can then lay the rest of the space without problems;

- If the opening is severely damaged and its strength is of concern, this happens in old houses. It’s easier to lay the threshold with a brick; it will definitely strengthen the plane, and it will not crack and crumble under loads.
This work option can only be used if the difference is at least a few centimeters greater than the height of the brick. You will need to level the surface and then finish it, and if the height is not enough, then your threshold may be higher than the door frame.
For work we will need the following materials:
| Brick | Most often you need several pieces, many advise using the silicate version, but, in my opinion, other types are no worse. The strength of any of the types is enough for the eyes; it will withstand much more than the weight of a person |
| Masonry mortar | I could advise you to buy cement, dig up sand and mix the solution yourself, but it is much easier to buy a bag ready-made composition, which just needs to be diluted with water and used for its intended purpose. The price of a bag weighing 25 kg is approximately 250 rubles, and we don’t need more |
| Perforated corner | We need a piece to level the corner, but the corner is sold only in pieces of 2.5-3 meters, we will have to buy a whole one. The cost of this product is cheap, so you will not incur large expenses |
| Primer | It can be used to pre-treat the surface if it is too loose. Also, the primer is applied to the finished result after the solution has dried, this is necessary to strengthen the surface, sand stops coming from it, and absorbency decreases |
In order for the solution to harden faster, you can add a little (10-15%) gypsum; no more is needed. If you overdo it, you will have to work hard with the solution, and most likely it will harden faster than you can use it.

We can’t do without a tool:
- To prepare the solution you need a container and a drill with a mixer attachment. But, as a last resort, we can do without a power tool, then we will need a strong stick with which we will vigorously stir the mixture;
- The mortar can be applied to the brick either with a mason's trowel or with a spatula; the amount of work is small, so use what you have. It is convenient to use a spatula to level the surface at the end of work; this is also important;
- Most likely, in some places you will have to put pieces of brick; the easiest way is to beat it to the required size with a mason’s hammer; we don’t need perfect accuracy, but there won’t be a column of dust, as when cutting with a grinder;

Instructions on how to make a threshold on a balcony look like this:
- First of all, it is necessary to clean the base of debris and dust; if there are sagging solutions, protruding areas and protrusions on it, then they need to be removed. Try to prepare the surface as best as possible - the smoother it is, the easier it will be for you to carry out the work. If there are sagging foam, then they must be carefully and evenly cut off with a sharp construction knife;

- Then the masonry mortar is prepared, this is done as described in the instructions on the package, everything is very simple, and the main thing is to maintain the proportions of water and mixture. It is important to mix the mass well so that there are no lumps or unmixed areas left in it, it should be uniform;
- The mortar is applied under the base of the brick. After which it needs to be spread on end side so that the seams are also filled with the mixture. The laying is carried out in one layer, so there is nothing complicated in the work - lay an even layer and carefully press the elements;

- If necessary, the brick is beaten with a pick until the right size, here you need to look at the situation. The surface is covered with a layer of mortar, a corner is placed on the corner, level it with a spatula to achieve best result. When the surface dries, it can be slightly moistened and leveled with a foam float, so the plane will become almost perfect.
At this point the process is over, our threshold is ready, I will tell you below how it can be finished.
Method 2 – filling the threshold with solution
The device of this type of design differs from the one described above. It is suitable for cases where the level needs to be raised, but the height smaller size bricks Honestly, I use this option almost always when I need to raise the plane; I find it simpler and faster.
To work we need the following:
- Cement-sand mixture brand M-150, it is very convenient for pouring screeds and it is inexpensive - about 100 rubles for a 50-kilogram bag;

- To construct the formwork, we need a board of the required height, 25 mm thick, its length should be slightly larger than the width of the opening in which we will fill the threshold.
The tools you need are a container for stirring the solution, a spatula and a grater for final leveling.
The work is carried out according to the following scheme:

- First of all, you need to clean the base from dirt and cut off the mounting foam if it sticks out. There is no need to beat off protruding areas; if the surface is very crumbly, you can walk over it with a primer;

- Then you need to install the formwork, the board is simply pressed tightly against the wall and fixed with any heavy object - a tile, a bag of mixture, etc.;
- The solution is prepared as indicated on the package; its consistency, in fact, is not important, but you should not add a lot of water, as the mixture will turn out to be too liquid;
- If the layer of mortar is thick, then stones are placed in the cavity, broken brick, crushed stone or concrete chips . The layer should not be higher than the level of the future threshold; if the thickness of the fill is small, then you can do without filler;
- The solution is poured carefully so that it fills the entire volume and reaches the level we require. The surface is leveled with a spatula, and excess composition, if any, is also removed;
![]()
- After the surface has dried (in an hour or two), you need to moisten it and rub it with a grater., so you get a flat surface, the side that is adjacent to the board, and so it will be smooth.
Again, I’ll tell you about the finishing below.
Method 3 – threshold from a plastic window sill
This option is good for its simplicity and low cost. But there is one important nuance: if the window sill is of poor quality, it will quickly break when people move around, and you will have to replace it. But if you buy a good option, there will be no problems.

To work we need the following:
- Plastic window sill of the required length and width;
- Polyurethane foam for gluing the element;
- Sealant for filling joints;
- End plates for side faces;
- Blocks for stops (if necessary).
A plastic threshold from a window sill is made as follows:
- The base is cleaned of dust and dirt, excess foam is cut off;
- The opening is measured and the window sill is cut according to the profile we need.. Do not cut too much at once, it is better to fit the element as accurately as possible, it is undesirable to make mistakes;
- The element is tried on, you need to determine to what height it needs to be raised; if the difference is small, then you can put the threshold on foam, but if the height is more than 1 cm, then it is better to place bars or plastic plates under the structure at the required level;

- Then apply in an even layer polyurethane foam, you don’t need to put too much of it, as it expands during polymerization and can lift our structure. The threshold is carefully glued to the surface and pressed with a weight to hold it in the desired position;

- After the foam has hardened, it is worth inspecting our structure; if there are cracks at the joints, then they need to be sealed with white silicone, it will protect the space under the threshold from moisture. The ends are closed with special plugs, and the work is completed.

On the Internet, I often saw advice to screw the threshold with self-tapping screws, in my opinion, this is at least frivolous: there is simply nowhere to screw in the hardware, concrete is not the best base for them. And I have no doubts about the strength of the fastening without self-tapping screws.
Method 4 - constructing a wooden threshold
This option is good in the appropriate setting, if you have wooden trim or the room is decorated in rustic style and other similar areas. To work we need the following:

- Board or others wooden elements for the construction of a threshold;
- A couple of bars to create a base for the threshold.
Let's figure out how to install such a structure:
- First of all, as always, the base is cleaned and all unnecessary is removed;
- Next, you need to build a frame, it is made from bars of a tedious height; if necessary, they can be trimmed or, conversely, slats can be placed under them to create a flat plane at the level we require;
- Using a hammer drill, holes are drilled in the base and block, into which dowels are then inserted. quick installation the required length and screws are driven in to secure the structure. It should be smooth solid foundation under the future threshold;
- Next, our board for the threshold is placed; it can be fixed around the perimeter with screws or nails. In the future, all joints will be closed wooden corner and no fasteners will be visible. The easiest way to glue corners is with liquid nails;

- You can assemble a balcony threshold from clapboard; to do this, it is cut into pieces of the required length and attached to the groove. After installation is completed, the outer corner is glued or nailed with finishing nails;

- Naturally, wood needs protection from moisture and abrasion. The surface must be treated with an antiseptic composition, after which either varnish is applied to it, it all depends on your wishes. The compositions must be wear-resistant; the threshold must be painted at least twice.
Threshold finishing options
Of the options we reviewed, two provide an excellent final result, and two act as a base on which to lay the coating. Let's figure out how to finish a threshold on a balcony using brick and mortar with your own hands. The first option is to use ceramic tiles, this material is different highest strength and wear resistance, which means it is perfect for our purposes.
The technology for carrying out the work is as follows:
- Since our plane is prepared and primed, we can immediately begin measuring. You need to calculate how the tiles will be positioned. It should lie symmetrically, that is, it should not look like a whole piece is laid on one side and half on the other; arrange the elements evenly, it looks much better;

- Ceramics are cut using a tile cutter or grinder with a concrete disc. It is important to take careful measurements so that the elements lie evenly;

- The tiles are placed on a special adhesive, which is applied with a notched trowel. To ensure that the seams are the same size, you need to insert spacer crosses into them. Control the plane using a level; all elements must lie flat;
- You can also tile the wall under the threshold, it all depends on your wishes, the work here is carried out in the same way. For strength, can be inserted into gusset a special element, but this is not necessary if you have a smooth joint;

For the threshold, choose tiles with structural surface, smooth ceramics are extremely undesirable, as you can very easily slip on them.
- After hardening adhesive composition its excess is removed, and the seams are filled with fugue, it makes appearance the threshold is neater and protects the base from water penetration.

The second finishing option is a laminate threshold; it is quite simple to implement and therefore popular these days. The technology of work is as follows:
- Measurements are taken and the required piece of laminate is cut out; most often, one strip is enough, especially since they come in different widths and you can choose the optimal solution. You can cut the material with a fine-toothed wood hacksaw or a metal hacksaw, but if you have a jigsaw, the process will be even easier;

- The finished piece is tried on, if everything is fine, then liquid nails are applied to its back side, after which the element is pressed tightly to the surface. Proper Use The instructions on the packaging will tell you the composition;
- Lastly, the corner is attached to the step; they are sold in hardware stores, and you just need to cut a piece of the required width.

I’ll tell you about one more solution - finishing the threshold on the balcony with linoleum. This material is inexpensive, especially since you can buy a piece from waste. The work is done like this:
- A piece of material is applied to the surface, after which the lines along which it will be cut are marked; try to cut the linoleum as carefully as possible so that the joints are without defects;

- Then the base is lubricated with linoleum glue and the material is pressed into place, level it and press firmly for the best adhesion, Special attention pay attention to the joints;
- Lastly, a metal corner is attached, which will strengthen the protrusion and prevent damage to the linoleum in this place.

Conclusion
The threshold to the balcony should not only be reliable and safe, but also attractive, so be sure to use one of the options described above. The video in this article will help you understand some important nuances even better, and if you suddenly don’t understand something, then don’t hesitate to ask questions in the comments under this review.