Interior decoration of a room in a wooden house. Options for finishing a wooden house inside, materials, photos of the main stages of work
Interior decoration wooden house- this is the most creative construction process, during which you can recreate the design that your imagination requires. Now the construction market offers a lot of finishing materials, among which you can always choose the one that suits your price and style. The interior decoration of the home will indicate the owner’s taste, because how the house is decorated is how its owners are judged.
Preparation before interior finishing of the log house
Before you begin to repair interior walls, you need to learn about some features that should be taken into account when carrying out interior decoration:

Types of interior wall decoration
Wall decoration in wooden house can be carried out in various ways. Everything depends only on the desires and capabilities of the owner himself. First you need to determine the goal that should be achieved as a result of finishing. The options can be completely varied: from the natural beauty of wood to a modern style made with alternative materials. In practice, a finishing trend has been noticed wooden houses inside with progressive materials that completely hide the wood structure. Below we will discuss how traditional ways finishing, as well as those that are becoming increasingly popular among owners of timber houses.

Decoration with carriage board
Lining is a simple and available material, with which you can finish not only walls, but also floors and ceilings. To create an even coating, you need to worry about the sheathing in advance. Creating a sheathing will help hide unnecessary pipes and wires, as well as additionally insulate the walls, if necessary.
The construction market offers buyers three types of lining that can be purchased:
- Ordinary carriage boards are simple sanded boards that do not have recesses or recesses. This is the most cheap material finishes among those presented. This board is fastened to the sheathing with galvanized nails. Disadvantage of this material it is considered that the boards do not adhere to each other during laying, which can lead to an incorrect and crooked fit to the surface. Also, during installation, chipping of the boards is common due to their small thickness.
- Universal type carriage board. This material is more convenient and practical. Due to the fact that the boards have tongues and grooves, they can be easily adjusted to each other and this design will no longer be bent. This lining is reliable and practical in finishing.
- Block House carriage board. This is a type of lining, very similar to the second option, but on one side it imitates a rounded log. It was created in order to create an even more pleasant look for the entire design. The mounting method is the same as for the universal board.
Important! The lining must be treated with an antiseptic and other compounds that increase its service life.

Like any material, carriage boards have their own advantages:
- The design becomes more decorative, wood adds coziness and comfort to the house.
- Lining helps to hide communications that are unpleasant to the eye (pipes or defects in the log house itself)
- This finish helps retain heat in the room. Even the thinnest lining can make a house warmer without the use of special material.
- Easy installation, thanks to which you can completely decorate the house even with your own hands.

But, despite all the advantages that distinguish the lining, it also has several negative sides:
- The material does not resist fire like any wood, so it must be treated with special compounds. This treatment will increase finishing costs.
- Additional components for such a design greatly increase the cost of finishing with economical lining.

Natural finish
Paint and varnish products will help preserve the pristine beauty of interior wood decoration. This option will do only if the log house itself is sufficiently insulated and treated with special solutions to protect it from moisture.
Before finishing, be sure to clean the surfaces from dirt and dust and sand them thoroughly. It will not be superfluous to treat with putty and primer.

It is believed that there is no need to wait for the house to shrink before painting. This assumption is correct, but painting is also not done immediately after construction due to the fact that the moisture present in the wood will come out, forming smudges and bubbles on the surface.
If the house was built using the “paw” method, then it is best to cover the surface with paint, and if it was built “in a bowl”, then ordinary transparent varnish will look great, which will not hide the natural grain of the wood.

Using paint, you can create accents on certain surfaces or zone a room. Materials for interior wall decoration should be as environmentally friendly as possible, because the safety of the coating is especially important inside the house.
IN Lately Art painting of walls and ceilings is very popular. This design will bring modern notes to the interior, without affecting the virgin beauty of the wood pattern.

Important! With this finishing, communications cannot be hidden, so the wiring is placed in the corners of the room, and the pipes are placed in a pre-created frame.
The floors and ceilings with this type of wall decoration are made of carriage boards or parquet.
This type of interior decoration also has its advantages and disadvantages that you should be aware of:
- Saved original style wooden frame.
- Material costs are much lower than with alternative finishes.
- The coating must be renewed every 4 years so that it does not lose its decorative qualities.
- After shrinkage, log houses, as a rule, become slightly curved, and finishing with paint or varnish will no longer provide the opportunity to visually adjust this situation.
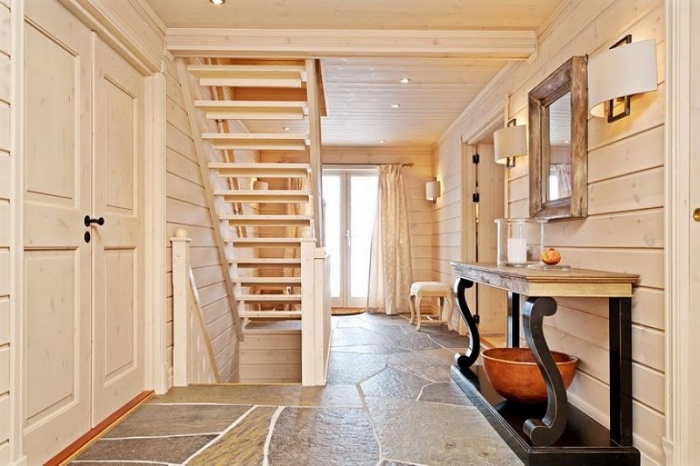
Usually, a house made of wood on the outside already presupposes the same decoration on the inside, so there will be no limit to the amazement of guests if, upon entering wooden frame, will be found there modern interior, which has nothing to do with the village. On this moment It’s possible to decorate your home this way. For the floor it is best in this case parquet will do, laminate or carpet, some rooms may have tiles. For the ceiling, suspended structures or plasterboard are often used.
Plasterboard decoration
Drywall is a very convenient finishing material that allows you to create any the desired design without any problems. In order to attach drywall to the wall, you need to create a frame from a galvanized profile, onto which the material is attached with self-tapping screws.
Important! Plasterboard finishing should be done after the house has settled, as during this process cracks may appear that will ruin the appearance.
The advantages of plasterboard design include ease of installation, low cost, and the ability to hide all unnecessary communications.
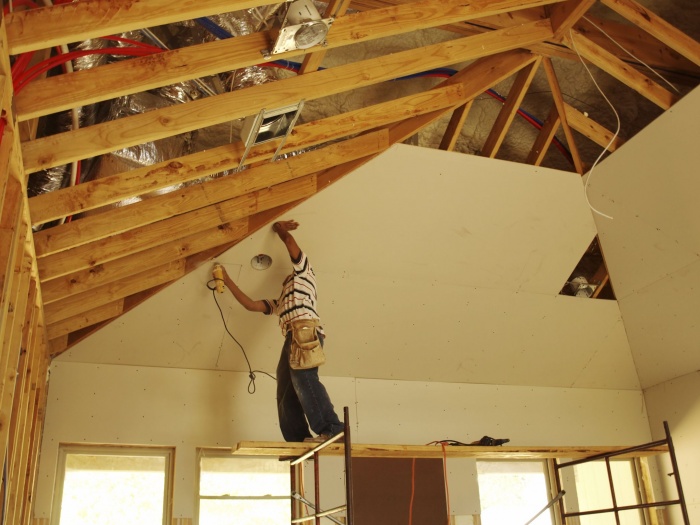
Since this material is very fragile, its main disadvantage is that it is not at all resistant to mechanical damage. Also a small negative point is that finished design plasterboard needs to be improved, for example, with wallpaper or putty. The interior finishing of the wooden house in the photo was done with plasterboard.
Decoration with plastic panels and plaster
Installation of plastic panels is as simple as installation of drywall. The main and most significant difference from the previous material is the variety of colors and patterns, thanks to which you can decorate the room in different styles by combining materials.
Another advantage of this finishing material is that, thanks to laying on the lathing, you can hide unnecessary communications. This coating can be washed, as the plastic is resistant to moisture.
Plaster too interesting option wall decoration in a wooden house. Due to the fact that now there are decorative types of plaster, it is not necessary to completely level the surface. With the help of such material you can easily create the necessary relief or even drawings using the sgraffito technique, as shown in the photo below. The coating is very reliable and durable, so it will last for decades.

Interior finishing of ceiling and floor
The cladding of the floor and ceiling must be in harmony with the decoration of the walls of the house. The most successful options for flooring would be parquet or laminate. This is due to the fact that such a coating retains heat better and is environmentally friendly, which is very important inside the house, because the safety of all its inhabitants depends on it.
Important! After assembly, the parquet is covered with paraffin and parquet varnish.

Proper installation of parquet will give you the opportunity to enjoy a perfect floor. long years. The varnish coating is refreshed every 2 years due to the fact that it wears out.
You should take the cladding of the ceilings in a house made of timber very seriously. Finishing can be done only after the house has completely settled, and this is a period of 2 - 3 years. Otherwise, ceiling structure It simply becomes deformed, which will ruin all subsequent repairs.

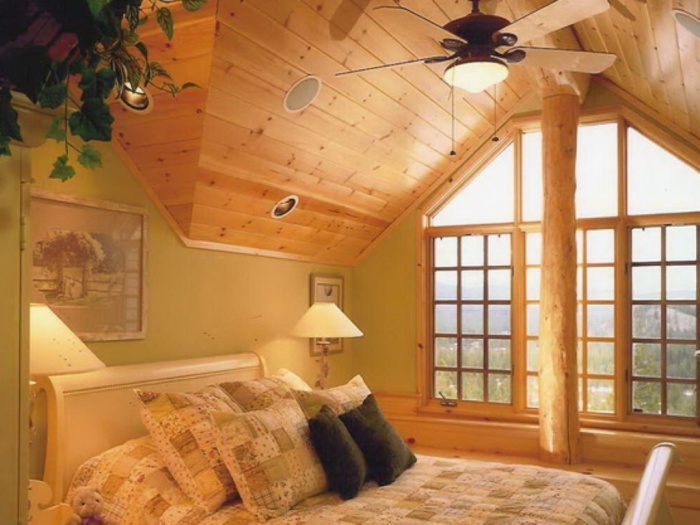
For interior in modern style It is enough to install a suspended ceiling, which will eliminate problems with plastering and other related work. If the interior is designed in a Scandinavian or rustic style, the ceiling beams are not hidden, but, on the contrary, they focus attention on them. They can be painted in any color that suits the style or covered with stain for better decorative effect from natural wood.
Important! If there is an attic on the second floor of the house, then the space between the rough and finished ceiling is filled with insulation and vapor barrier materials.

A lot of materials are used for construction, but residential buildings built from wood continue to be popular. The atmosphere in a wooden house is characterized by positive energy and comfort. However, the interior decoration of a wooden house is accompanied by many nuances.
The easiest way to have a beautiful front lawn
Of course you saw perfect lawn in the cinema, on the alley, and perhaps on the neighbor’s lawn. Those who have ever tried to grow a green area on their site will no doubt say that it is great work. The lawn requires careful planting, care, fertilization, and watering. However, only inexperienced gardeners think this way; professionals have long known about the innovative product - liquid lawn AquaGrazz.
Start of finishing work
It is worth immediately noting that it is not worth starting finishing work from the inside of the house immediately after its construction. The structure is made of wood and must stand for some time and shrink. For houses built from laminated veneer lumber, this period is about a month. Other wooden houses must stand for at least ten months before finishing work begins. The exact timing is determined based on the moisture content of the material, the climatic conditions of the region and the time of year. During this time, the wood that served as the material for construction dries out. Accordingly, the timber or logs are reduced in size, and at the same time the insulation laid between the rows of the log house is compressed. Premature onset finishing works in a wooden house will lead to the fact that the cladding will be warped or will not stay on the wall at all. In other words, haste in finishing a wooden house will lead to additional costs of time and money.
Log crowns and their tightness
You can ensure the tightness of the wooden walls of the house with the help of tow; jute material is sometimes used with moss. The process of sealing the cracks between the crowns of a log house is called caulking. As a rule, caulk a log house in two approaches. The first time this happens 1-1.5 months after completion of construction, and the second time after 6-8 months. The cracks between the rows of timber or logs are caulked, immediately from the outside and from the inside. Otherwise, the structure may warp. Therefore, in the process, the caulks move along the walls of the house and seal them alternately on both sides. Caulk starts from the lowest crowns.

It is worth noting that after caulking the log house becomes 5-7 centimeters higher. Then, the weight of the walls of the log house makes itself felt and it settles. As a result, insulation laid between rows of timber or logs reliably seals the walls. The temperature in the house depends on the quality of this work. In addition to preserving heat, the second caulk allows you to eliminate small distortions that arose during the process of settling the log house.
Interior decoration of the walls begins only after they are finally caulked and the house itself has settled. The shrinkage process of the building is checked using control measurements of the height of the walls. A wooden house is considered ready for interior decoration if, after the second caulking, the height of its walls has not changed for 90 days.
Sanding walls inside a wooden house
In some cases, finishing work inside a wooden house is not required. This is true for houses built from quality material and as a result having a pleasant appearance, both outside and inside. In this case, you can save a lot cash. The walls of such a house just need to be sanded and painted. It is better to use a varnish coating to protect the floor from abrasion. Walls and ceilings can be treated with special paints and antiseptics for water based. The surfaces treated with them will not lose their natural appearance, but on the contrary, the texture of wooden walls will become more expressive. The use of antiseptics is necessary in any case, if, of course, you want to maintain the pleasant external design of wooden walls.

A caulking seam between rows of timber or logs can spoil the impression of any wooden walls. Therefore, to refine such a seam, a twisted cord is used. He not only acts as decorative decoration, but also additionally protects the premises from drafts.
Lathing and its significance in the interior decoration of a wooden house
Sanding the walls of some houses will no longer bring any benefit. This applies to overly old or crooked buildings. For the interior decoration of such houses, options such as products made from plasterboard, lining, decorative panels, etc. are used.

Installation of any such finishing material involves the use of a frame or sheathing that will help level out the curvature of the walls. In addition, the presence of the lathing will allow air to circulate freely. For wooden structure, this is an important factor. As a result of natural air movement, the wall material will not change color and will not rot. Only dry wood is not subject to these processes. Circulating air between the walls and finishing materials will allow the wood of the walls to maintain its normal condition.
The distance between the wall and the finish is also used for laying cables and wires for various communications: electricity or household appliances. Electrical wiring, by the way, in wooden houses should only be installed in pipes made of non-flammable material(the most common are corrugated stainless steel tubes). If necessary, a material providing thermal insulation is placed in the gap provided by the sheathing. However, if the house keeps comfortable temperature, you should not use any additional materials. Wood itself does an excellent job of maintaining the required humidity in a room, and excess materials can do harm rather than good.
However, fixing finishing materials to the sheathing also has its drawbacks. For example, if insects or rodents appear between the wall and the cladding, it will be quite difficult to eliminate them. However, before attaching finishing materials to the wall, it will need to be leveled. It is not easy to achieve an absolutely flat surface of wooden walls, but with the right approach, quite possible. In order to seal the gaps and cracks remaining between the wall and the cladding, special mastics are used. Once upon a time, clay was used instead, and in some places it is still used. 
Regardless of the finishing materials, it is necessary that a gap of at least 20-40 millimeters be maintained between the cladding and the ceiling. This will play the role of insurance in case of additional shrinkage of the new house. For an old building, the gap will compensate for changes in the wooden walls. A material such as wood “breathes” throughout its entire service life. It changes accordingly: it swells when it takes on water, or it dries out. A gap left under the ceiling in time will allow the metamorphosis of wooden walls to remain without consequences for the facing materials. The absence of such precautions can lead to deformation or the appearance of cracks in finishing materials. To ensure that the gap does not stand out against the general background, it is used ceiling plinth, it is rigidly fixed only to the ceiling.
Lining for interior decoration of a wooden house
Manufacturers offer the most different variants facing materials for interior decoration. However, to decorate a wooden house, they often resort to lining. It allows you to save general style and the atmosphere of a wooden building. Such material can be used both for exterior finishing, and for internal ones (only the methods of processing them differ). Lining comes in a variety of types. Moreover, we are not talking about the wood from which it is made and not about its size. The profile of the lining, depending on the wishes of the customer, can be modified. There are wavy or even design of the material, as well as imitation of timber or logs (block house).

To finish the walls inside a wooden house, lining 15-20 millimeters thick is used. Its cost is less than that of thicker analogues, but such material fulfills its tasks. You can arrange the lining boards in any order: horizontally, vertically, at an angle. Those with remarkable patience and hard work are able to create entire paintings from lining.
When fixing the lining to the sheathing or to the walls, do not forget about possible shrinkage of the house. To compensate for possible changes in wooden walls, leave a gap of 20-40 millimeters near the floor and ceiling.
Decorative wall panels

Often, decorative panels are used for interior decoration of houses and apartments. There are claddings made from different materials and imitating a variety of surfaces:
- MDF panels (veneered or laminated).
- Glass panels: smooth, corrugated, colored, matte, transparent.
- Polymer panels.
- Panels made of wood or bamboo.
- Leather panels.
The panels also differ in size; they are produced in the form of slats assembled together or directly in the form of a shield (sizes vary). The lining, by the way, is the same panels, but it stands apart because... this material was used for finishing work long before the appearance of other similar products.
Decorative panels are fixed to the wall, usually using lathing. The thickness and location of the bars, which depends on the type and size of the selected decorative panels. This finishing material is popular among designers and homeowners because the abundance of colors, sizes and materials allows you to create unusual, memorable interiors. Decorative panels They also differ in price. For example, panels made of polymers and MDF are significantly cheaper than leather products.
Some types of panels are mounted only with glue (gypsum products), so to fix them to the sheathing, additional gypsum fiber boards or plywood are used. These are called backing panels and are attached to the sheathing first. The main ones cladding panels are already glued to them.

Drywall in a wooden house
The interior decoration of walls with plasterboard is no different from the decoration of rooms made of other materials. Drywall is attached to a pre-assembled frame. True, as in other cases, it is necessary to leave a safety gap.
The main condition under which it is permissible to finish walls with plasterboard is the operation of the house for several years, i.e. the house must be warmed up and undergo final shrinkage. This is due to the fact that plasterboard is fragile, and with significant changes in the geometry of the walls, it will become unusable. Such metamorphoses of wall surfaces can be ignored if the frame is movable. To do this, its profiles are not fixed too rigidly to the walls.

When finishing walls with plasterboard, there is one more nuance: all joints and seams, as well as in the corners, must use reinforcing mesh. The use of such a mesh will prevent or slow down the occurrence of cracks in problem areas.
Interior decoration of an old wooden house
If the age of the wooden house in which finishing work is planned is several decades, then the first step is to assess the safety of the wood. To do this you will need to dismantle all old cladding. After which, carefully examine all places that differ from the general background of the wall surface in color or texture of the pattern. If necessary, suspicious areas should be checked by trying to damage them with a knife, screwdriver or chisel. If the tree has a dense structure everywhere and has no signs of mold or fungi, then you can begin finishing work. In some cases, it is recommended to treat the wood with special impregnations. When using them, remember that such impregnations are based on chemical elements.

However, if the wall material crumbles due to mechanical stress, then it is necessary to identify the causes of destruction. The most likely options are the appearance of insects, mold and other microorganisms. Sometimes, an outside specialist is invited to determine treatment methods for the infected section of the wall. Damaged areas of wooden walls must be dismantled and replaced; areas adjacent to these elements will need to be intensively treated with special compounds.
After assessing the condition of the walls of the old house, and carrying out, if necessary, repair work, you can begin interior decoration. Work on decorating the premises of an old wooden house is carried out in the same order as described above. The only difference is that the safety gap should not be left.
Today, the construction of wooden houses, and especially houses made of round logs and wild logs, is again at the peak of popularity. And even despite the fairly high cost and long construction period, such houses can increasingly be seen outside the city. If previously wooden houses were built with virtually no finishing, today, thanks to the development of technology and the emergence of new materials, finishing a log house is becoming the norm. The log house is finished inside and outside, and everyone decides for themselves what the house will look like after that. Will the natural attractiveness of the wood be preserved or will the logs be completely hidden under artificial materials?
Features of finishing a log house
Carrying out finishing work for a log house has a number of features, many of which are often overlooked when finishing a log house with your own hands. Such miscalculations can ultimately lead to dampness of the wood and its rotting, the appearance of fungi and mold. To finish the walls of a log house correctly, the following requirements must be met.
Firstly, all finishing work is carried out after the house has settled. In this case, it is necessary to take into account what kind of log the house is made of. If it is made from rounded material, then its shrinkage will be less due to pre-drying. For a wild log house, the period and strength of shrinkage will be greater due to natural humidity wood. A newly built house is left unfinished for at least a year. During this time, the logs will settle, and it will be possible to more accurately take measurements and further install windows, doors, and also finish the walls of the log house.
Secondly, it is extremely important to create proper heat and vapor barrier during finishing. For proper vapor barrier you must adhere to one simple rule- the vapor permeability of each subsequent layer of finishing towards the street should be higher than that of the previous one. The result of violating this rule will be the appearance of mold, mildew and rotting of the logs, and in addition constant dampness in the house. A thermal insulation layer for the walls of a house may only be required when finishing an old, already slightly dilapidated house. A house made of new timber with a diameter of 26 cm has the same thermal conductivity as a house with one and a half meter thick brick walls. It would be better to properly insulate the floors, interfloor ceilings and roofs.

Thirdly, for finishing a log house choose natural materials. Despite the fact that modern building materials have a number of undeniable advantages, it is much better if the decoration of the walls of a log house is made from the same natural materials. The result will exceed any expectations, because natural materials They combine much better with each other than a combination of artificial and natural ones.
Finally, the following should be noted. Try to save and highlight natural beauty at home, instead of covering the walls with MDF sheets or plasterboard. Thus turning Vacation home from natural wood to the same gray apartment as in the city. The option of wall cladding can be justified only in one case, when a wooden house is old and the wood has darkened and lost its warm natural color.
Interior decoration of a log house
Wooden houses, and especially houses made of logs, due to the natural color of the wood, have a beautiful interior that is desirable to preserve. Therefore, when planning the interior decoration of a log house, you need to carefully think through every little detail. What the interior will be like is discussed and planned at the stage of creating the house project. During interior decoration, you just need to bring everything to life. Finishing construction of a log house begins after the installation of water supply and sewerage.
Ceiling
We begin the interior decoration of the house from the ceiling. This is dictated by the fact that during finishing the surface of the walls and floor can be stained or damaged, and redoing it is more difficult than doing it again. Finishing the ceiling is somewhat more difficult compared to walls and floors due to the inconvenience of applying and securing the materials. But with a certain skill, everything can be accomplished in the shortest possible time.

The ceiling in a log house is a structure made of beams and boards. This is exactly what you will have to start from when finishing it. In some ways, this makes the task a lot easier. In the space between the beams you can lay insulation and electrical wiring, and on top of the beams themselves you can fasten sheets of gypsum plasterboard, plywood, clapboard or make a suspended ceiling, or simply sand the wood and cover it with clear varnish. Let's consider ceiling finishing options that most organically combine with log walls. This includes covering the ceiling with clapboard, veneer panels and varnishing or painting.

Ceiling paneling made quite simply. This is facilitated by the fact that wooden beams are used in the floors of the house, to which the lining will be attached. The lining strips relative to the walls of the room can be installed either diagonally or straight, or by combining these two methods. The planks themselves are fastened with nails or self-tapping screws, which are placed in recesses in the grooves of the planks. And also with the help of clamps, which is much more convenient. We start creating a lining ceiling with laying and fastening insulating materials, if required, and electrical wiring. Then we proceed to fastening the planks. It should be noted that when installing the lining, it is necessary to leave a small ventilation gap of 5 mm near the walls. We carefully cut off the tenon on the first plank, install it in place and secure it using one of the methods described above. We install all subsequent planks with a tenon in the groove of the previous one, finish it off carefully with a mallet and secure it in place. Finally, we sand the surface and cover it with varnish.

They are one of the most expensive finishing options. The ceiling decorated with them will look impressive, showing the wealth and good taste of the owners. Installation of the panels is not particularly difficult thanks to the tongue-and-groove fastening. In fact, their installation resembles the installation of lining. The difference lies in the need to create a frame to which the panels will be attached, but this is only if there is a need to hide the floor beams. Alternatively, such panels can be placed between the beams.
It will look most simple and at the same time attractive ceiling exposed with clear varnish. Of course, surface preparation will require considerable effort. Since you will have to carefully sand and varnish every centimeter, but as a result you will always be able to admire the natural beauty of the wood. To speed up the grinding process you will have to use special tool and several types sandpaper different grain sizes. First, sanding is done with coarse-grained sandpaper, and finally with fine-grained paper. This is done in order to first remove the exfoliated pieces of wood, and at the end to make the surface of the wood smooth, without any roughness.
Important! After sanding, the surface of the wood must be impregnated protective compounds- fire retardants and antiseptics. This applies not only to the ceiling, but to all parts of the house.

Another less popular, but at the same time excellent option for finishing the ceiling is its painting. Just one clarification needs to be made. Paints must have high vapor permeability, that is, “breathe”. Therefore, any acrylic, silicone and similar paints cannot be used. The best option There will be the use of lime and water-based paints or it may be ordinary whitewash.
Walls
After finishing the ceiling, the next step will be finishing the walls. As has been noted more than once, a log house has its own atmosphere and the decoration of the walls must be approached in a special way. The best option would be sanding and coating the walls with special compounds and caulking with decorative rope. Simply put, preserving and enhancing the natural beauty of wood. But in some cases, a log house is covered with plasterboard, MDF, finishing tiles and other similar materials.
Grinding And caulking walls carried out both inside and outside the house. For grinding, a special tool and several types of sandpaper are used. If you have to do such work yourself for the first time, then it would be a good idea to practice on a workpiece and then move on to the main work. Then the surface of the wood is treated with special compounds that preserve the natural color of the wood and protect it from the effects of negative factors.

Caulking log joints is a mandatory type of work, but using decorative materials you can make the walls of your house more attractive. To perform the work you will need a special tool - a caulk and a hammer. If you have already done similar work when building a house, then decorating with caulking will not cause any special problems. Otherwise you will have to practice a little.
Sheathing a log house with plasterboard, MDF and wall panels used to hide electrical wiring or create a flat surface under tiles or other facing material. And also to protect the walls made of logs from negative impact moisture. This type of finishing is suitable in the kitchen, bathroom or toilet. For living spaces, living rooms, corridors and hallways, it would be better to preserve the natural beauty of wood; in extreme cases, you can line it with clapboard. Before covering a log house with sheets of plasterboard, MDF or wall panels, it is necessary to create reliable frame, to which the sheets will be attached. For these purposes, you can use either wooden slats or metal profile. Vertical frame strips are installed in increments of 600 mm. The transverse planks are placed in such a way that in one row the plank is at a level of 75 cm from the floor, and in the next row it is 75 cm below the ceiling. This is done so that the attached sheets are placed in a checkerboard pattern. The frame itself is attached at the points of contact with the logs using self-tapping screws. Further work consists of sheathing with sheets, which, if necessary, are trimmed and attached to the frame using self-tapping screws. Final finishing walls covered in this way can be made of tiles, wallpaper, decorative plaster or otherwise.

Important! When covering the walls of a house, very often insulation and vapor barrier are installed in the free space. This has very disastrous consequences for log walls. So it's better to leave air gap, and lay a layer of vapor barrier on the outside.
Special mention should be made painting the walls. As in the case of the ceiling, you can use natural paints - lime and water-based paints. This will allow the walls of the house to “breathe” and protect them from mold and mildew. The only drawback is that after a while you will have to renew the places where the paint has chipped, since the house will shrink for some time.
Floor
The completion of the interior decoration of a log house is the creation of the floor and laying of the floor covering. For the most part, the floor has already been created. The floor beams, subfloor and joists were laid during the construction of the house. All that remains is to finish what we started. The design of the floor of a log house is known in advance, so there will not be any particular difficulties when choosing a floor covering. In such houses it is created wooden floor on the joists, which means that the topcoat can be parquet, solid board, carpet, linoleum, vinyl.
Which of the above will be installed depends on the choice of the owners and the purpose of the room. In any case, you will have to do some work to create the floor. Firstly, this is the creation of a lower subfloor, laying a waterproofing layer and insulation in the space between the joists. Secondly, laying the subfloor boards. And only after this can you begin to create the finishing coating. If floor will from solid board , then you can lay it directly on the subfloor boards. The flooring process itself is performed as follows. The tenon is cut off from the first board, then it is laid against the wall. Several 2.5 cm thick spacers are installed between the wall and the board, which are removed after laying the floor boards. We secure the board itself with self-tapping screws, for which we pre-drill holes. We place subsequent boards with a tenon in the groove of the previous one. For reliable fastening, we finish it with a mallet along the entire length and then fix it to the joists with a self-tapping screw. In this case, it is necessary to remember about a 2.5 cm gap between the boards and the wall; in the future it will act as a ventilation hole.

After laying the boards, their surface polished And opens with varnish. We install a plinth around the perimeter of the room.

Parquet laying in some ways similar to laying solid boards - the similarities are in the tongue-and-groove system. The difference is that this work is very painstaking and time-consuming, and an absolutely flat surface is required under the parquet, and the planks themselves can be laid with glue. To create a parquet floor, we first install a finishing underlay of moisture-resistant plywood on top of the subfloor. We lay the plywood sheets at intervals and secure them with self-tapping screws. Further work will consist of laying and fixing the parquet strips. Finally, the surface is sanded and varnished.
Laying floor coverings such as linoleum and carpet is not particularly difficult. The main thing when creating them is to ensure a flat surface. This can be done, as in the case of parquet, using sheets of plywood.
The finishing work of a log house, in addition to the interior, also includes the facade of the building. At the same time, the walls and basement are finished. If everything is quite simple with the base, you can plaster it, cover it with clinker tiles or decorative stone. The walls of a log house will require a special approach.

The simplest option for such a house is log sanding, decorative caulk and coating the surface with special compounds that preserve the natural color of the wood and protect the logs. But quite often, especially with old log houses, this is difficult to do. That's why covering a log house with siding, clapboard, make it simple curtain façade with metal or plastic panels.
As already noted, in order to protect logs from rot, fungus and mold, they are treated with special substances. In addition, it is necessary to comply with the vapor barrier rule. Everything is simple with the first condition, but the second must be taken into account when cladding a log house with siding, creating a curtain wall, or cladding it with other materials.

Before covering a log house with siding, you will have to take care of ventilation and vapor barrier of the walls of the house. To do this, we put spacer strips on the walls that will provide ventilation. We take the planks themselves with a thickness of 10 - 15 mm and install them in increments of 50 cm, using self-tapping screws as fasteners. Now we lay a layer of vapor barrier on top of the spacer strips, which we secure with thin wooden slats.
The next stage is insulation of log house walls. But here we must turn to operational characteristics wood, namely thermal conductivity. As a result, it may turn out that the insulation layer will be completely out of place.

If you decide to insulate the house, then we create a sheathing frame for the siding panels, between which we lay insulation, and a wind barrier on top. For the frame we use wooden blocks, equal in thickness to the thickness of the insulation, and using self-tapping screws we fix them to the previously installed strips.

All that remains is to install the siding panels in place. We carry out all work from the bottom up. First we install the initial profile, secure it with nails or self-tapping screws. Further work will be similar to assembling a construction set, since subsequent panels are inserted into the previous one and fixed to the sheathing. Must be given Special attention corners, doors and window openings. They use siding of a certain shape, and this should be kept in mind during installation.
Finishing a log house inside and out is a matter that must be approached with special care. And the point is not that some types of finishing work are complex, but that wood itself is a beautiful finishing material. And the main task when decorating a house made of logs is to preserve and highlight the natural beauty of the wood as much as possible.
Interior decoration of a wooden house is one of the integral components construction work. The installation of internal surfaces is important not only from a practical point of view, but also for the entire design of the room. If you have certain skills, it is quite possible to do all the work yourself.
The peculiarities of finishing wooden surfaces are related to the nature of the material itself: along with its unconditional environmental value and ability to store heat, wood is highly susceptible to rotting processes. Negative influence it is affected by temperature changes, exposure to moisture and the activity of various microorganisms. It is important to take all this into account before starting to decorate the inside of a wooden house.
The entire finishing process can be divided into 4 stages:
- Wall finishing - wood processing, removal of all cracks, irregularities and paneling.
- Decorating the ceiling of the house.
- Flooring finishing.
- Creation of interior design of the room.
Each stage will be discussed in detail and provided with examples of ready-made solutions and step by step instructions work.
Decorating the walls of a wooden house: step-by-step instructions
Walls are one of the main sources of heat loss (up to 30% of the total). Accordingly, it is important not only to treat yourself well wooden floors, but also to install a layer of insulation that is optimal for this case.

Treating wood material with an antiseptic
Before carrying out all major work, it is important to carefully process all internal and external wooden surfaces special antiseptic.

Antiseptic is liquid product, which performs several functions at once:
- water-repellent properties make it possible to protect a wooden wall from moisture that penetrates with precipitation, as well as from the air; this is especially true in coastal regions with a humid climate;
- protection against temperature changes by creating an additional layer;
- protection against the action of microorganisms (mold, bacteria) due to disinfecting properties;
- additional fire protection (some products contain special fire-fighting components);
- Many antiseptics contain various pigments, thanks to which the surface acquires a beautiful color after treatment.

There are a lot of options for all kinds of antiseptics on the market, and in principle they can be divided into several groups:
- Those made on a water basis are used mainly for interior work, provided there is no constant contact of wood with moisture.
- Based on organic solvents, they are used in both external and internal works: form a dense layer that does not allow moisture to pass through and has a detrimental effect on bacteria.
- Combined ones include fire-fighting components represented by special substances.
The treatment solution can be cancer, paint, primer and other means. A description of their purpose and advantages are presented in the table.
scuba diving  |
prevent the development of bacteria and mold; colorless; do not produce odors, so can be used indoors |
wood varnishes  |
protects well from moisture by creating a dense layer |
oils  |
penetrate very deeply into the wood, providing protection inner layers; do not emit strong odors, can be used indoors |
paints  |
used both as an independent product and as an auxiliary after treatment with the main composition; paint wood in different colors |
| antiseptic primers |
universal products that are applied directly to raw wood |
waxes  |
viscous materials that are applied to prevent swelling and mechanical damage to wood |
More details about the rules for choosing an antiseptic for wood:
The antiseptic is applied using regular paint brush or a sprayer, if the volume of work is quite large. When working with organic-based materials, it is better to wear safety glasses and a bandage.

A few simple rules should be taken into account:
- Before applying the product, you should wipe the wood from dirt or mechanical deposits - but this is done not with water, but with the help of a scraper and dry cloths.
- Processing proceeds from the bottom up (so that the product does not drip onto your hands).
- First of all, it is necessary to process non-uniform surfaces - with knots, cracks, as well as cross-sections of cuts and the ends of the beams.
- Processing is carried out at a temperature not lower than +10°C in dry weather (humidity should be no more than 75%).
- After treatment, leave the room to ventilate for at least 12 hours.
NOTE. You should not impregnate with an antiseptic if the wood is very wet or cold, since in this case it will not be able to saturate the material sufficiently.
Finishing cracks
The next important stage in the interior decoration of a wooden house is caulking the cracks to ensure complete tightness of the room.

You can choose different materials for this work:
- artificial polymer products: sealants, resins, polyurethane foam;
- traditional - flax, tow, moss;
- most affordable option– a mixture of sawdust, shavings, wood dust with wood glue.
According to the technology of work, there are 2 finishing methods:
- In a set - the material is first twisted into strips, then they are inserted into the slots and driven in.
- In stretching - first the cracks are filled with material, and then they are twisted and driven in.
The technology for caulking cracks is simple and consists of the following steps:
- The wall is cleaned of all irregularities, small protruding chips, fasteners using grinding machine(this is done at the stage of antiseptic treatment).
- Next, the material is inserted along the borders of the beams and hammered.
- The cracks are caulked with finer material, often using sealant or polyurethane foam.
Video - technology in action
You can also make the so-called decorative caulk. It is more accurate and is performed in new log houses, which involve extensive renovation work to create a beautiful interior. The technology is as follows:

NOTE. It is advisable to carry out such work immediately upon completion of construction, since wooden beams shrink strongly in the first year.
Sheathing and insulation of walls in a wooden house
This is the most labor-intensive and very important stage, since the quality of the insulation and finishing of the room determines its ability to maintain temperature in winter and how neat the appearance of the walls will be.
The sequence of work is carried out using the following technology:
- Laying a vapor barrier layer.
- Installation of a layer of insulation on a wooden or profiled frame.
- Installing a protective layer from the wind.
- Finishing of the internal surface (block house, lining, drywall).
The corresponding sectional diagram of the wall is shown in the figure.

Vapor barrier
The following are used as vapor barrier (waterproofing) materials:
- polyethylene;
- special mastics;
- Membrane-based films are the best option, since they are able to retain moisture, but at the same time allow air to pass through well, thereby creating conditions for normal year-round ventilation in the house.

Insulation layer
Insulation materials are most often mounted on a wooden frame or metal (aluminum profiles).

Schematically, methods for attaching insulation using wooden beams are shown in the figure.

In the southern regions, you don’t need to use insulation, since wood itself stores heat sufficiently. However, in most cases, the installation of such a layer is an absolutely integral part of the work on the interior decoration of the wall of a wooden house.
There are several popular insulating materials:


Video: Technology of wall insulation using mineral wool and wooden profiles
Internal surface finishing
Among the most popular materials that form the basis for interior wall decoration in a wooden house are the following:
- drywall;
- lining;
- block house.
Drywall is a material that will provide a smooth internal surface, the ability to paste wallpaper or PVC panels to create a beautiful interior of the room.

The undoubted advantages of this material include the following:
- he has high thermal insulation properties, which is especially important for regions with a Siberian, northern climate;
- drywall is a very pliable material, therefore, it is easy to work with; in addition, you can provide almost any bends that will hide the unevenness of the main wall and create the basis for the original design of the house;
- moisture resistance - many types of this material have similar properties.
The disadvantages of the material include:
- fragility - you need to work carefully; in addition, when the house settles, the sheet can often crack and tear the wallpaper or other finishing materials;
- drywall retains moisture strongly and does not allow the walls to “breathe”;
- the material does not effectively protect the house from outside noise.
NOTE. Drywall does not hold well any weights that are supposed to be suspended (shelves). Therefore, if you choose it for decoration, you should think through all the features of the interior in advance and decide in advance on the places for shelves, niches, etc.
Drywall is very useful when you need to make a false wall to create another small room. It is installed very simply - based on aluminum profiles.
Another popular material for interior decoration of the walls of a wooden house is lining.

This is the most environmentally friendly material, and at the same time it is very affordable. Lining has other obvious advantages:
- it looks very beautiful and allows you to create an interesting interior interior;
- working with lining is very simple - just treat the wood with stain and fix it to pre-installed wooden profiles;
- the material is not difficult to care for - it is easy to clean and quite resistant to mechanical stress;
- “breathes” perfectly and does not pollute the air in the room with artificial odors;
- the wall surface is neat and smooth, thanks to which you can start gluing wallpaper or PVC installation panels.
The only one significant drawback lining is its ability to rot and high flammability. However, treatment with previously discussed means significantly reduces such risks.
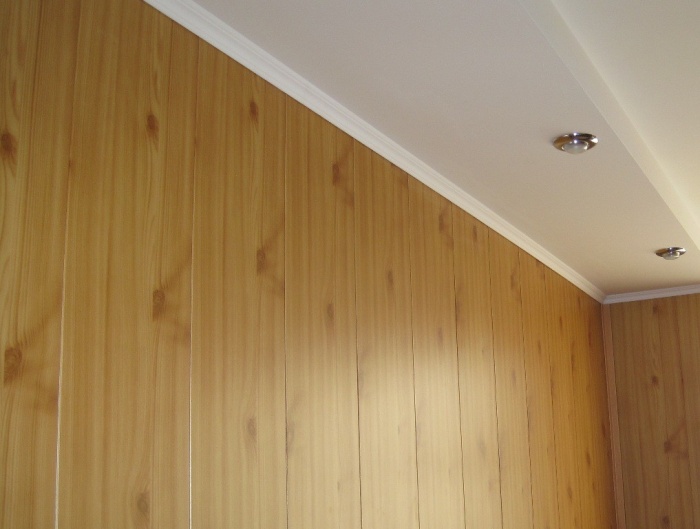
Finishing with clapboard made of solid pine
And one more interesting material, which appeared relatively recently, is a block house. Essentially this wooden plank, which has two different surfaces:
- the front one is convex, creating the effect of a log wall;
- the back is flat.
Since the material is wood, it has approximately the same pros and cons. However, it has great visual appeal - in fact, it itself creates a unique country-style design that can be preserved in its original form.

Internal installation technology - on video.
Finishing the ceiling of a wooden house from the inside
Finishing work to insulate the inner surface of the ceiling and give it an attractive appearance is a very important stage, since heat loss through the roof is no less than through the walls (all heat rises upward).

In addition, it is important to ensure that the roof is completely waterproof. If in attic it is supposed to equip living room(attic), accordingly, sufficient sound insulation and floor strength should be ensured.

Most often, environmentally friendly wood materials are selected for these purposes. They create a pleasant fresh air at home, and on their basis you can create a lot of design options for every taste.
Wood processing
The use of wooden cladding is the most natural and logical option in the case of interior decoration of a wooden house. The material options are as follows (in order of increasing service life):
- plywood;
- lining;
- arrays coniferous species(spruce, pine, larch and others);
- more expensive solids (beech, bast, ash, birch).
Structurally, there are 2 technologies:


The finishing methods are very simple, and the ability to attach them to load-bearing beams allows you to complete all the work quite quickly. Some design options are presented in the video.
other methods
Of course, along with wood materials, there are other technologies for manufacturing the inner surface of the ceiling in a wooden house. The most common option is to create a stretch ceiling.

Along with obvious advantages In terms of the possibility of creating your own design and the high operational strength of the material, in the case of wooden houses there are significant disadvantages:
- suspended ceilings do not allow air to pass through, therefore, to some extent, a greenhouse effect is created;
- profiles from suspended ceilings together with the canvas, they may become somewhat deformed as a result of subsidence of the house.
NOTE. This problem is most likely for old houses with worn-out foundations and roofs, as well as for newly built structures, which will inevitably shrink during the first years.
Finishing flooring in a wooden house
The final stage of finishing work involves insulating and laying the floor surface.

In general, its structure is not fundamentally different from the wall - it also contains insulation, a layer of waterproofing and the finishing material itself.

There are several important requirements for the floor:
- it must constantly withstand heavy loads;
- keep the house warm;
- be perfectly level;
- resistant to rotting and mechanical damage.
Wooden floor
Structurally, the floor can be constructed in two ways:
- wooden load-bearing beams with decking;
- concrete floor with wooden flooring.
Both options have their pros and cons, and you need to choose based on the specific object. Concrete is durable, tightly blocks access to the house for insects and rodents, and is also very resistant to long-term mechanical loads and is not susceptible to rotting.
At the same time, wood is not so durable, but it is warmer and does not heat up the house in hot weather. The best option in many cases - a concrete floor with a thick layer of insulation and wooden flooring. In this case it turns out exclusively reliable design with additional heat-insulating properties.
The technology for installing a wooden floor is simple:

NOTE. If the floor is mounted on wooden beams, then special attention should be paid to treating them with an antiseptic. It is better to do several approaches of 2-3 layers.
Concrete floor
In the case of constructing a concrete floor, the material is poured in two ways:
- directly onto the ground (the pre-dug pit is reinforced with a layer of sand, crushed stone and gravel to provide additional protection and drainage);
- between wooden joists running under the house.
The concrete is reinforced, after which there is always a layer of waterproofing, and then a wooden floor is laid using the same technology.
Creating an interior in a wooden house
The interior decoration of a wooden house should be carried out with preliminary design planning. Conventionally, two design groups can be distinguished:
- “Urban” - when they are glued to the inner finishing layer regular wallpaper or PVC or MDF panels are installed, and in this case the interior is no different from an ordinary city apartment.
- Country - styling for a natural, rustic look with classic light and dark brown warm tones. In this case, the finishing material itself (especially block house or lining) serves as the basis for the design.
The use of country wood is especially successful in the case of spacious rooms with 2 or more floors, spacious living rooms, since a wooden wall creates the effect of space and provides fresh air due to the characteristics of the material.

Light colors are perfect for a bedroom or children's room.


Warm, rich colors are appropriate in the kitchen, creating a cozy atmosphere for pleasant family evenings.


Wood surfaces are a versatile design element, as they also work well in spaces such as the bath.


Interior decoration of a wooden house is a job that can be done independently. It is only important to think through all the details in advance and take into account how design features, the quality of the material and its design capabilities.
The natural beauty and graceful texture of wood always delights everyone, so the interior decoration of a wooden house is intended only to emphasize nature and protect it from the effects of time. Log walls we can simply cover it with a high-quality varnish that preserves all the charm of this natural material, but with more complex solutions it is necessary to maintain an optimal balance of other materials used.
Decoration Materials
Today there is something to decorate the inside of a wooden house. For its design, traditional lining, innovative Block House, familiar drywall, or regular board ().
At the same time, it is precisely modern materials are valuable for their advantages: they are easy to use, attractive, durable and environmentally friendly.

- Wood cladding traditional and well complements the natural appeal of the building, even with its ultra-modern interiors.
- Stone– an excellent and indestructible material that contrasts favorably with wood. The stone-clad fireplace and part of the wall are spectacular and very appropriate.
- Drywall it is easy to use and relatively light in weight - it will highlight adjacent walls, successfully decorate the ceiling, and its price is low.

- Range ceramic tiles is striking and we can find the color and texture reminiscent of wood. But an interesting option is its contrast with wood, which enhances its natural advantages.
Finishing nuances

The finishing options for the inside of a wooden house are numerous and varied.
- When designing a new building, we plan its future interior and choose the cladding method accordingly. And when cosmetic repairs of the old log house we will only update its finishing.
- Typically, a wooden house takes up to 8 years to shrink, although its greatest degree occurs only in the first year. Let's take this point into account before.
Note! We apply cladding to laminated timber and dry logs within three weeks, and before it begins, the room needs to be heated even in summer, because the circulation of warm air will speed up the drying of the wood.
- It is important to start working with an antiseptic impregnation (Pinotex, Pirilax or Tikkurila), which will make any coating as reliable and durable as possible - they protect the structure from rotting and instantaneous ignition.
- Instructions from experts state that decoration is only load-bearing structures you need to start after sanding the surfaces of the walls, and the impregnation here is better than tinting, with a lasting decorative effect.
Interior styles

Decorating the inside of wooden houses is a limitless space for our imagination. And the end result is a beautiful, cozy design, as comfortable and functional as possible. Country style and ultra-modern high-tech prefer rough and simple textures of materials to create a nice, cozy interior.

In the photo - Scandinavian style in decoration
Houses made from modern laminated veneer lumber are popular on the Scandinavian Peninsula.
Their architecture increases the flow of daylight into the building:
- big windows;
- luxurious stained glass windows;
- glass exterior walls.
Color solutions are also subordinated to this goal - light yellow or colorless tinting of wood, coating it with white paint.
Internal lining with imitation timber
The unique technology made it possible to achieve absolute similarity of the imitation with natural timber.
Work order

Do-it-yourself finishing of the inside of a wooden house always begins with measuring the walls to accurately calculate the amount of materials.
Note that the dimensions of this beam are different.
- Let's prepare the surfaces of the walls.
- We stuff a frame of slats onto them.
Note! The slatted frame will hide the unevenness of the walls - obstacles to the joining of the panels. In addition, we will hide communications in this way and at the same time insulate the room with the resulting air cushion.
- We will attach the imitation timber parts to the slats using clamps and small nails.
- The tongue-and-groove system speeds up and simplifies our work: we lay the panels horizontally without joining seams.
Decorating the premises with a block house

- Renovating old houses, insulating them, and decorating them is possible with the help of such innovative panels.
- The appearance of a prosperous Russian hut, ancient comfort, beauty and warmth is given by a block house.
- The material is also made from wood, but is similar to rounded logs, only without cracks and knots.
- Advanced technologies ensure high resistance of these panels to temperature changes and moisture.

Plasterboard finishing
![]()