Disassembly of aluminum radiators. How to disassemble an aluminum heating radiator. Sectional Battery Repair Tricks
Sooner or later every owner heating system the question may arise how to remove the heating battery, how to assemble radiators. Let's figure out how the heating pipelines are assembled.
Preparation - the subtleties of the assembly
Depending on what heat loss the room has, the batteries may have different amount sections. If necessary, they are regrouped among themselves, that is, it is partially necessary to both disassemble the heating battery and assemble it, but already with necessary quantity sections. A video on how to disassemble a heating radiator can be viewed below.
Sections of radiators are interconnected by nipples, they have external right and left threads, inside there are two protrusions specially for the key. The nipples are screwed simultaneously from above and below into two blocks.
When do-it-yourself heating radiators are assembled, gaskets made of paronite or rubber up to one and a half mm thick are placed between the sections. You can use a special cushioning cardboard soaked in water and boiled in natural drying oil. The gaskets must not protrude beyond the radiator necks. It is also worth noting that the upper edges of the sections of the assembled heating battery should be placed in the same plane with a tolerance of no more, no less than 3 mm.
Before opening the radiator, assemble the nipples, support planes and threaded sockets of the sections to be inspected, cleaned and lubricated with red lead on natural drying oil. It is worth noting that the threads on the nipples and in the sockets must be complete, and the protrusions on a turnkey basis inside the nipples should not have various chips or height differences. Before assembling a heating radiator, you should know that the assembly is carried out on wooden shield, which is located at the level of the table.
Basic condition correct assembly- this is equal eversion in the battery section of the nipples.
So, the sections are placed on the shield, shifted, nipples with a gasket put on them beforehand are placed between the sections. On the outer surface of the nipple, left and right threads of 16 mm are cut. So, on one side of the radiator section, the nests have a right-hand thread, on the other - a left-hand thread. This design allows, when the nipple is rotated in one direction, to attract the sections one to the other, when turning in the other direction, they are separated. To rotate the nipples, there are two protrusions in the inner cavity. Turn the nipple with a special radiator key.
When each of the nipples is rotated half a turn in the battery sections, they must be baited. And if this is not done in all nests (there are 4 of them), then the operation should be repeated. After baiting, the nipple is turned manually by 2-3 threads, then the final screwing of the battery section is done with a radiator key - already to the stop.
Assembling a heating battery - its quality and characteristics are easy to check. To do this, pressurize them with compressed air.
A special product is made - a nipple from the autocamera is soldered into the Du-15 tube, the tube is screwed into the radiator cap. With the help of such a device and a car pump equipped with a pressure gauge, it is very easy to create a pressure of one atmosphere and check how the rules and regulations on how to assemble a heating battery were observed, how well and accurately the assembly was carried out. The system is checked for tightness using a soapy solution.
Battery Mounting Rules
After the assembly of the heating radiator, we will carry out the installation of the system. It will not differ from the installation and work on the installation of water supply systems. You just need to follow a few rules:
- The slope of the pipeline to be supplied hot water, should not be less than 2 mm per 1 running meter, rise - towards the air collector.
- The return slope is the same, but towards the boiler.
- Pipelines are firmly attached to the building structures of buildings or fit snugly to the supports.

- If the floor height is up to 3 meters, then fastenings on steel risers are not provided.
- If the height is greater, then they are placed at half the height.
- The assembly of radiators in attics is carried out on suspensions to the rafters.
- The main riser from below should be laid on a solid support and every three to four meters fastened to the wall with clamps.
- Pipelines of a vertical type should not deviate from the vertical axis by more than 2 mm per 1 running meter of their length.
These and other installation rules must be observed during the installation of radiators. It is best to get the advice of a specialist in this regard, who will tell you the most best option exactly in your case.
The need to disassemble the heating battery may arise due to different reasons, for example, if the junction of the sections began to leak or a crack appeared on one of the ribs. In most cases, you can save the device by removing the damaged fin or sealing the joints. Below we will take a closer look at this operation, which will return the radiator to its original efficiency.
General information
Not so long ago in exclusively cast-iron radiators, however, nowadays the choice heating appliances expanded significantly, in particular, aluminum and metal batteries. Moreover, each type has its own structural features, respectively, the process of disassembling them looks different.
Therefore, below we will consider how to disassemble heating batteries with our own hands of all the most common types.
Advice!
To clean the device from scale and other contaminants, it is not necessary to disassemble it.
There are special liquid formulations who do their job well.

In the photo - a key for radiators
Disassembly
Tools
Before proceeding with the disassembly of the batteries, it is necessary to prepare the following tools:
- Wrenches for battery disassembly- 1 inch for bimetallic and aluminum appliances and 5/4 for cast iron.
- Plumbing wrench;
- Blowtorch ;
- gas key.
Cast iron
Regardless of the type of radiator, before disassembling it, it is necessary to shut off the coolant supply, drain all liquid from it and then dismantle it. As a rule, cast-iron radiators are hung on hooks-brackets. Therefore, for dismantling, it is enough to disconnect them from the pipeline; for these purposes, you should use a plumbing adjustable wrench.
Further work is carried out in the following order:

Advice!
In parallel with the described work, you can adjust the number of sections, for example, install additional ones, or vice versa - remove the extra ones.
In case of addition of sections, it is necessary to install additional brackets.
This completes the process of disassembling the cast-iron battery. Now, you can paint it and install it in place.

Aluminum and bimetallic
Now let's see how to disassemble aluminum radiator heating. Please note that the following information applies to bimetallic devices because they have the same structure.
The disassembly process is in many ways reminiscent, however, there are some nuances:
- The nipples are smaller, respectively, other keys are used for them.
- Bimetal and aluminum devices are usually new products, respectively for disruption threaded connections does not require significant effort, as is the case with cast iron appliances.
- On the front side of the plugs there is a designation of the right or left thread.
- They are significantly lighter than their cast iron counterparts.
All this greatly simplifies and speeds up the assembly / disassembly process. The only thing is that the work should be done carefully so as not to damage the paint. To do this, before disassembling a bimetallic radiator or an aluminum battery, you need to cover the area with rags.

Note!
Metal spacers are installed between sections of modern appliances.
After disassembly, it is extremely important to clean and wipe them so that they are perfectly smooth, since the tightness of the joints depends on this.
It should be noted that many models of aluminum appliances are non-separable. Of course, they can be disassembled, but it will not be possible to reassemble them. Here, in fact, is the entire instruction for assembling and disassembling radiators of various types.
Conclusion
The process of disassembling radiators is quite simple, however, difficulties may arise with cast iron batteries, due to the "sticking" of parts. But, if you follow the recommendations above, every home craftsman can cope with the task. The only thing is, for this you need to have the whole essential tool which is listed above.
Get more useful information on the topic voiced, you can from the video in this article.
Is it possible to independently change the configuration of the radiator, increase or decrease its heat transfer? This problem can be solved if you first understand the design. Therefore, you need to find out the specifics of each type of heating radiator section: quantity calculation, assembly instructions and performance properties.
Design features of radiators
Before assembling sections of a heating radiator, you should find out the structural features of this heating element. Its main task is the transfer of thermal energy from the coolant to the room. Therefore he must have large area heating.
Inside there are 2 channels through which hot water flows. From them, heat is transferred to the surface of the battery. According to this principle, aluminum, cast iron and bimetallic models are made. Steel most often have a non-separable body.
- Heat loss in the room. They will determine the necessary heating energy to compensate and maintain a comfortable temperature;
- Section power density. It depends on the material of manufacture, the dimensions of the structure and must be indicated by the manufacturer;
- Thermal mode of heating operation. For low-temperature, it is not recommended to set the maximum number of sections in the heating radiator. This can lead to a decrease in water heating and thermal imbalance in the following areas.
When choosing a material of manufacture, it is necessary to consider not only the performance of radiators, but also the possibility self installation(dismantling) sections. At home, this can only be done with aluminum and bimetallic models.
There are non-separable types of sectional radiators. Their channel is an all-metal pipe. It is impossible to change their sizes.
Calculation of the number of sections for heating radiators

Correct calculation of sections bimetallic radiators heating begins with an analysis of the room where they will be installed. Its basis is the calculation of heat losses in the house. Most of of them going through walls and windows.
It is they who should become the basis for calculating the number of heating radiator sections per room. Comfort temperature in the room should be 18-22 ° C. Based on this, the thermal mode of operation of the heating is selected, and as a result, the parameters of the batteries.
Approximate calculation
The material for the manufacture of walls and the characteristics of insulation are not always known. In this case, an approximate calculation of the number of sections is made cast iron radiators heating. To do this, you can use two methods:
- For 10 m² of area, 1 kW of thermal energy is needed;
- For 1 m³ of room volume, the heating system should generate 34 watts.
As an example, you can calculate the number of sections of heating radiators for a room of 20 m² with standard height ceilings 2.55 m. In this case, the total volume will be 51 m³. Assume that the heat output of one section is 160 watts. We calculate their number:
- By area - 20m² * 0.1kW / 0.16kW = 12.5 or 13 sections;
- By volume - 51 * 0.34 \u003d 17.
As can be seen, when calculating according to the latter method, the number of sections is much larger. This is due to regulatory requirements.
Accurate calculation
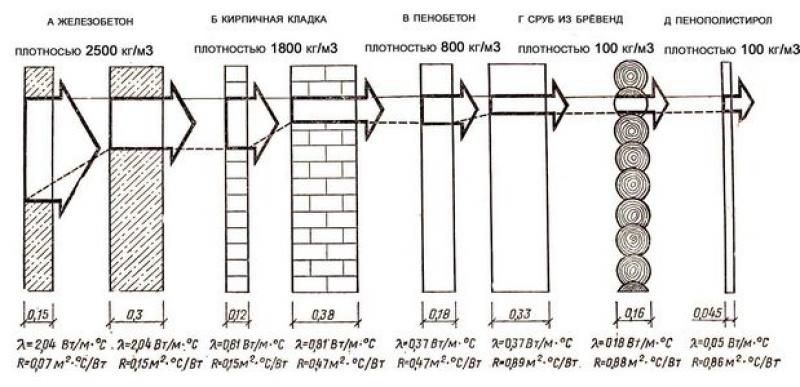
For an accurate calculation of the maximum number of sections in a heating radiator, it is necessary to operate with the characteristics of the thermal conductivity of materials. This indicator determines how much heat will leave the room through the walls.
First, the total area of \u200b\u200bthe outer walls and separately the window structures are calculated. Suppose the first ones occupy 2.55 * 5 \u003d 12.75 m². The total window area is 3 m². Then, to calculate the sections of bimetallic heating radiators, we find out what materials were used in the construction of the house. Most often this building brick, the thermal conductivity coefficient of which is 0.16 W / m * C.
But for the correct calculation of the number of heating radiator sections per room, you should find out the thickness of the walls. This is necessary to calculate the heat transfer resistance - the inverse coefficient of thermal conductivity. Average thickness load-bearing structures is 0.6 m.
We calculate the heat transfer resistance for 1 m²:
0.6/0.16=3.75 m²*s/W
Based on this heat loss for the wall will be:
(1/3.75)*12.75=3.4 kV
By the same principle, we calculate heat losses through window structures, taking the average value of heat transfer resistance of 0.9 per 1 m²:
(1/1.9)*3=1.57 kW
The final heat loss in this case will be 3.4 + 1.57 = 5 kW. This figure must be taken as the basis for the correct calculation of the number of sections of cast-iron heating radiators, in which the specific heat output is on average 200 W:
5/0.20= 25 sections
This number is not overestimated, since according to the initial data, the wall is not insulated. If you install at least 100 mm of expanded polystyrene on outer wall, then the estimated number of sections of heating radiators will decrease significantly. The heat transfer coefficient of expanded polystyrene is 0.015 W/m*s. Then the heat loss will consist of the sum of the heat transfer resistance of the walls and the insulation:
(0.6 / 0.16) + (0.1 / 0.015) \u003d 10.41 m² * s / W
(1/10,41)*12,75=1,22
1.22+1.57=2.77 kW
2.77/0.2=14 sections
As can be seen from the calculation maximum number sections in the heating radiator - even relatively small insulation significantly reduces the heat loss of the room.
In addition to walls and window structures, heat loss through the ceiling and floor must be taken into account. This is especially important for the first floors of private houses without a basement.
Assembling a heating radiator with your own hands

Having performed the calculation of bimetallic sections heating radiators you can start assembling them. If possible, it is best to entrust this work to professionals. Most often trading companies provide this service.
For self-assembly of the heating radiator section, you will need a special key. If this event is a one-time event, it is best to rent it. Each channel of the battery must have a thread onto which a nipple is screwed - a steel pipe. The key's valley rod allows you to assemble radiators with up to 7 sections.
The thread direction in the nipple is different. Those. to connect the heating radiator section, it is enough to install it in the mounting groove and tighten it with a key. After final assembly the tightness of the structure is checked and pressure testing is mandatory.
The video material describes in detail the specifics of the installation of radiator sections:
Hello to all! this short post will focus on assembling or disassembling sectional heating radiators. Here we will talk about three types of radiators:
- Aluminum.
- Bimetallic.
- Cast iron.
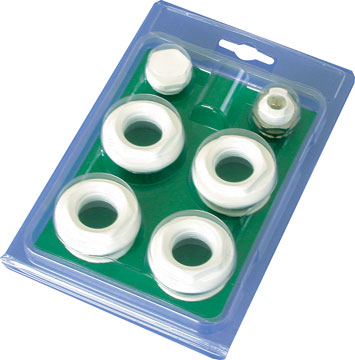
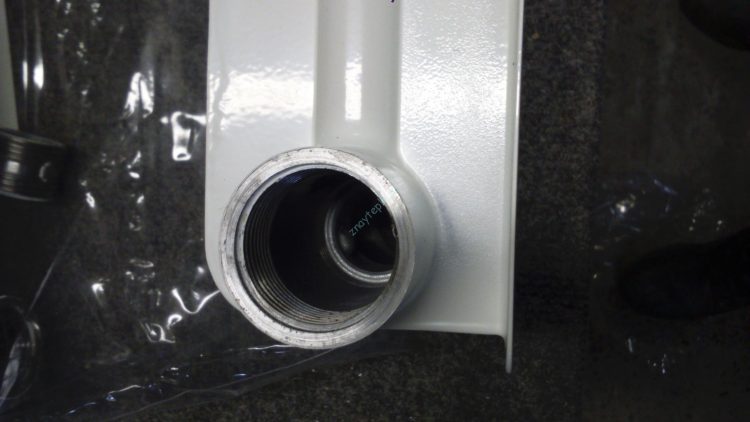
All of them are sectional and therefore they can be assembled and disassembled. Although some manufacturers specifically change the nipples so that their radiator cannot be disassembled with an ordinary key. So, I uttered an incomprehensible word - nipple. Now I'll show you what it is:
This is an ordinary piece of iron, on which there is a left-hand thread on one side and a right-hand thread on the other. The white ring in the middle is between the sectional gasket. In this case, it is made of silicone, but can be made of paronite. The diameter of the nipple for aluminum and bimetallic radiators is one inch, but for Soviet cast-iron radiators, the nipples have a diameter of 1¼ inches. This means that different keys are needed for these heaters. Now let's talk about keys.
You will need a tool to disassemble and assemble the radiator. This “miracle of technology” looks like this:
This is not the only version of this kind of instrument. In stores you can find many design solutions. For example, these are:
Regardless of what the key looks like, its task is to unscrew and tighten the nipples. Personally, I have always assembled radiators using the first key option. It is desirable that the tool be made of hardened steel. Otherwise, one key will be enough for you for only a few joints, and then it will become unusable and you will have to buy a new one.
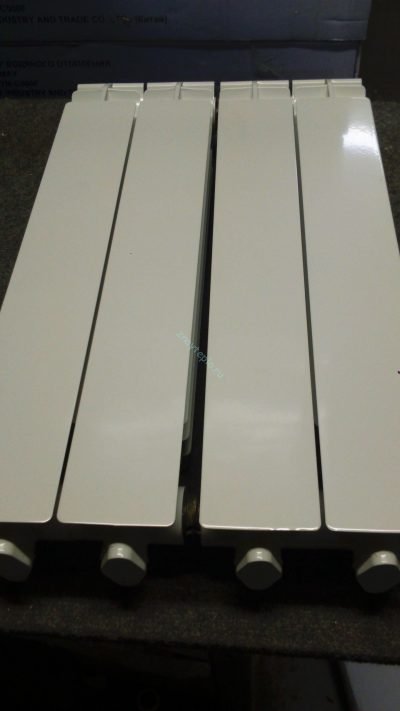
In order to build a radiator, you will need a pair of nipples, a pair of gaskets, a key, and it is advisable to have an assistant. Twisting radiators alone is an extremely inconvenient task. First, inspect the ends of the sections. The paint layer on the end may be thick and will need to be cleaned with a knife. At the end should not remain any sags and bumps. This mainly applies to Chinese heating appliances, while in European ones the paint layer is usually thin, even and does not require further work with a knife.
After processing the ends, you should see the following picture:
Only no need to use a file to clean the end face! You can damage the planes of the ends and they will no longer compress the gasket.
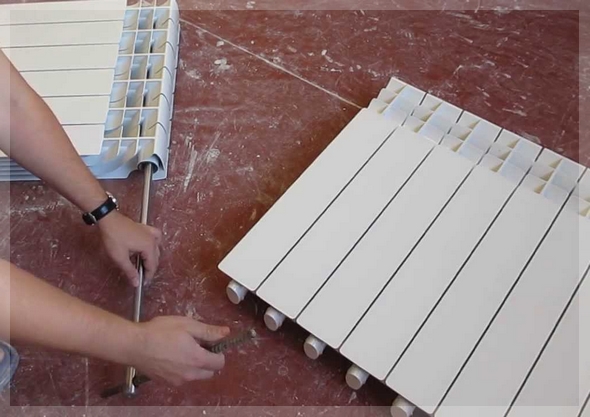
Now I will show a brief photo-instruction for assembling / disassembling the radiator. So let's get started:

Lay the heatsink face up on a table. Then insert the key into it until the joint that needs to be untwisted. In this figure, the key must be turned towards the fins.

Having slightly unscrewed one joint, rearrange the key (to the lower or to the upper) and repeat the operation. The end result should be:

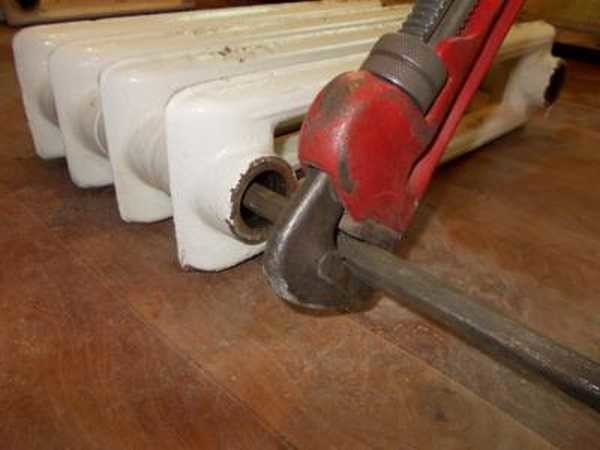
Unscrew the nipple to the end and that's it! The radiator is broken!
The radiator is assembled in the reverse order. See the following photos:

Here, the ends of the sections are already cleaned and gaskets are put on the nipples. Go ahead!

The nipples are twisted alternately. In this case, it is necessary to compress the radiator so that the nipple enters both sections equally. Otherwise the joint will leak. Then we begin to alternately tighten the joints. You need to do this a little bit, rearranging the key from one joint to another. If you sharply twist one joint, then you will not be able to twist the second one due to the skew of the nipple. It just won't go down the drain. Everything should be as shown below:
After the sections close, you need to forcefully stretch the joints. Without it, they will leak. You don't have to apply too much force, otherwise you can break the key or it will slip in the nipple and you will injure yourself with its handle. Unfortunately, I did not have the opportunity to shoot my own video on assembling and disassembling the radiator, so I have to use someone else's, but as soon as I have the opportunity, I will replace it with my own:
For a change, let's see how cast-iron radiators are disassembled:
The results of the article.
So what can be said in the end? If you need to remove sections from the radiator, then you need to remember one thing - it's easier to do it on a new deviceheating! Nipples in a radiator that has stood for several seasons can stick to it and it will be impossible to disassemble it. But you can add sections without any problems, except for the addition of extra brackets for mounting to the wall. In general, it’s easier to do everything at once and not to redo it later! That's all, I'm waiting for your questions in the comments!
They are the most efficient components in the heating system. The devices are widely used when installing new devices and replacing old ones. How to properly assemble and install aluminum radiators?
Instrument design
Aluminum heating panels consist of sections that are made of metal alloys with silicon additives. This composition makes the device much more resistant to mechanical damage and exposure to hot temperatures. The metal alloy is not subject to corrosion damage. Often to enhance the protection of the inner surface from exposure heating fluid the thinnest polymer coating at about 50 µm.
Radiator panels are usually produced in standard white color. If desired, they can be repainted with enamel that can withstand exposure high temperatures. Often, the original photographic image is applied to the devices.
Also, most manufacturers with a personal order produce equipment of any color and design. In order to disguise them, you can use special decorative grilles.
Advantages of aluminum heating appliances
The growing popularity of devices is due to a number of advantages of their use in the device of the heating system:

- compact, take up little space;
- high heat transfer;
- light weight (does not complicate transportation, installation and connection of devices);
- rapid heating of the equipment by the coolant;
- convection heating method prevents the accumulation of dust deposits between sections;
- favorable price-quality ratio;
- attractive appearance;
- the ability to choose a custom-made radiator of any design;
- Sections are powder coated to prevent corrosion.
Flaws
These devices, despite all their positive performance, have their drawbacks. Poor-quality coolant and water hammer resulting from an increase in pressure inside the heating system can lead to breakage and breakthrough of the radiator. Also, the low quality of the liquid causes corrosion of the metal.

Often the equipment is connected to pipes made of metals that are antagonists to aluminum - copper and steel. Their interaction provokes the formation of rust. To avoid this, experts recommend using chrome-plated and nickel-plated metal through-hole plugs when installing aluminum radiators indoors.
Installation diagrams
Aluminum radiators are suitable for both two-pipe and one-pipe wiring. In the first case, the connection of the supply pipe and the outlet occurs in parallel, they are independent of each other and are connected through the end device of the heating system.
With single-pipe wiring, the coolant passes through one pipe in series through all radiators, gradually cooling down.
There are several schemes for connecting aluminum appliances:

- diagonal;
- lateral;
- bottom.
All schemes differ from each other not only in the installation method, but also in the quality of heat transfer.
Diagonal
The most effective and common installation method is a diagonal connection (heat loss is no more than 2%). The method is well suited for radiators with a large number sections.
The supply pipeline is connected to one of the upper nozzles. The outlet pipe is connected to the lower one on the opposite side.

This binding method is mainly used for two-pipe systems heating, because single pipe system the coolant noticeably loses heat as it passes through each radiator.
The disadvantage of such a connection lies in the aesthetic unattractiveness, since the pipes run along the upper edge of the radiators.
Lateral (unilateral)
The scheme is similar to a diagonal connection: the hot water supply pipe is on top, the outlet pipe is on the bottom, but the installation is made to the nozzles located on one side. It is important not to confuse the pipes and not swap them.

This method is more commonly used in high-rise buildings with small heatsinks. It is not suitable for devices with more than 15 sections, since with more of them, the far (opposite to the connection point) side of the unit does not warm up well.
lower
Such a connection is made to the nozzles located at the bottom of the heater. This installation scheme allows you to hide the pipes of the heating system under the floor, which is beneficial from a design point of view.

But heat transfer with such an installation is much lower (about 15% less than the nominal value of the radiator power).
General connection requirements
Before mounting the device, it must be properly assembled. Detailed Instructions usually supplied with the equipment itself by the supplier.
Radiator Assembly
The procedure for assembling the device is as follows:
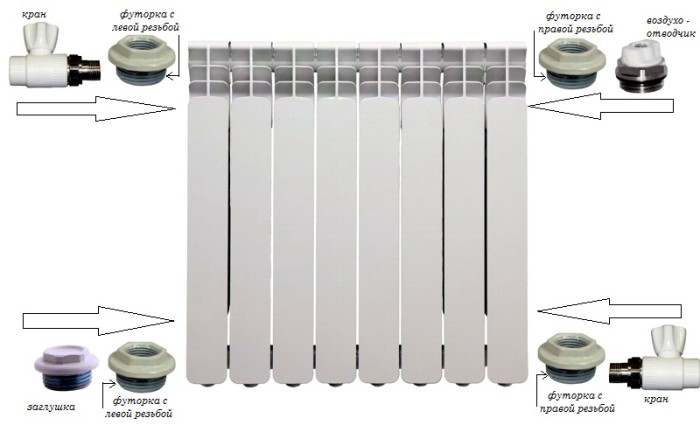
- screw in the plugs and plugs in the radiator;
- attach shutoff valves;
- attach temperature controllers;
- inspect the nipples for reliability;
- join air valves heads up.
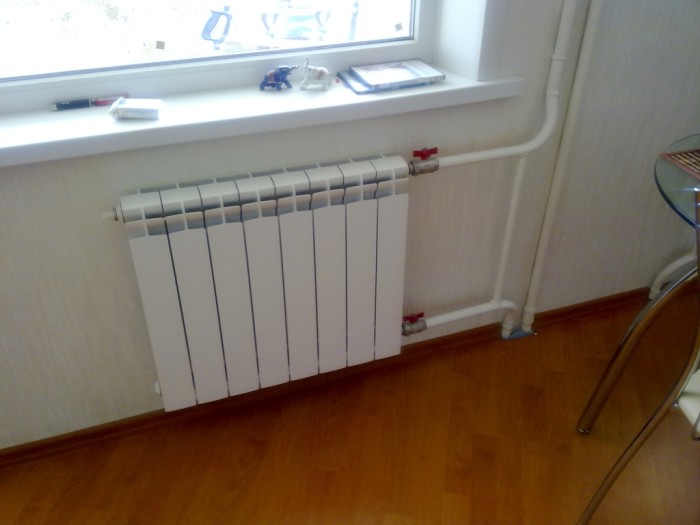
Installing the instrument
Installation of aluminum radiators can be done independently. For correct installation all requirements and rules must be strictly observed. Before starting work, calculations should be carried out. The device must be located at least 10 cm from the window sill, at least 12 cm from the floor and at least 3 cm from the wall. Then you need to attach the brackets with dowels. Holes are smeared cement mixture. The radiator is attached to the wall.
After installing the aluminum device on the brackets, you can start connecting. You will need a pipe wrench for this. Before doing this, make sure that the heating system is turned off. Tighten the sections onto the FUM tape. Next, a radiator is attached to the pipes with the help of spurs.
After all the connection work has been carried out, the device is pressure tested. Each element must be filled with coolant gradually in order to avoid pressure shock inside the radiator. Packing tape removed after the connection is completed. It protects the device from mechanical damage.
Aluminum radiators should be checked twice a year. It is also recommended to periodically flush the water completely for two weeks.