How to install heating radiators in the apartment. Installing heating batteries in an apartment: highlights
1.
2.
3.
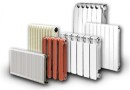
With coming winter cold heating issue becomes relevant. The heating design must be efficient, which largely depends on the choice of equipment and the installation scheme of the heat supply system. AT last years becoming more and more popular aluminum radiators heating to replace old appliances. According to experts, batteries made of aluminum or bimetal are outwardly the most attractive and aesthetic (see photo), and the degree of their heat transfer can provide a comfortable environment in a house or apartment even in the most severe frosts.
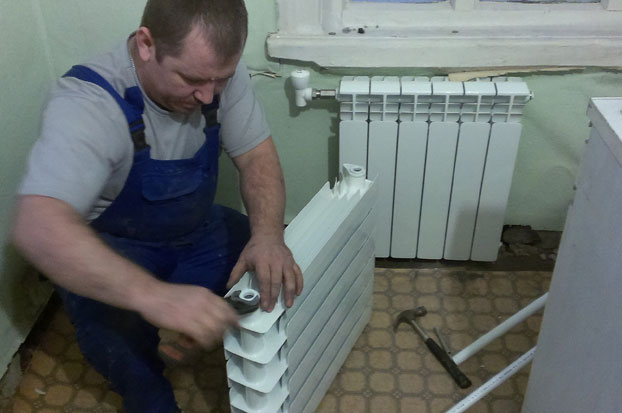
Each home craftsman will be able to perform the installation on their own. To do this, you should familiarize yourself with the rules on how to install aluminum heating radiators, and in the process of work, firmly fix everything and tighten it securely (in more detail: "").
Necessary materials and tools
To install an aluminum radiator, you will need:- tape measure and pencil;
- building level;
- a set of keys;
- perforator;
- radiator;
- a set of fasteners (it is desirable that they be with 3-4 loops).

Marking and installation of aluminum heating radiators
The work is done in the following order:- Before installing an aluminum heating radiator, measure the middle of the window opening. This mark is the main reference point when conducting. Simplify measurements using building level- well, if it is laser.
- The middle of the window is marked with a tape measure and a vertical is drawn along the level. Next, measure the height of the wall in the interval from the floor to the window sill. Then they retreat 10 centimeters from the window sill and draw a horizontal line, which will be the upper boundary of the heater.
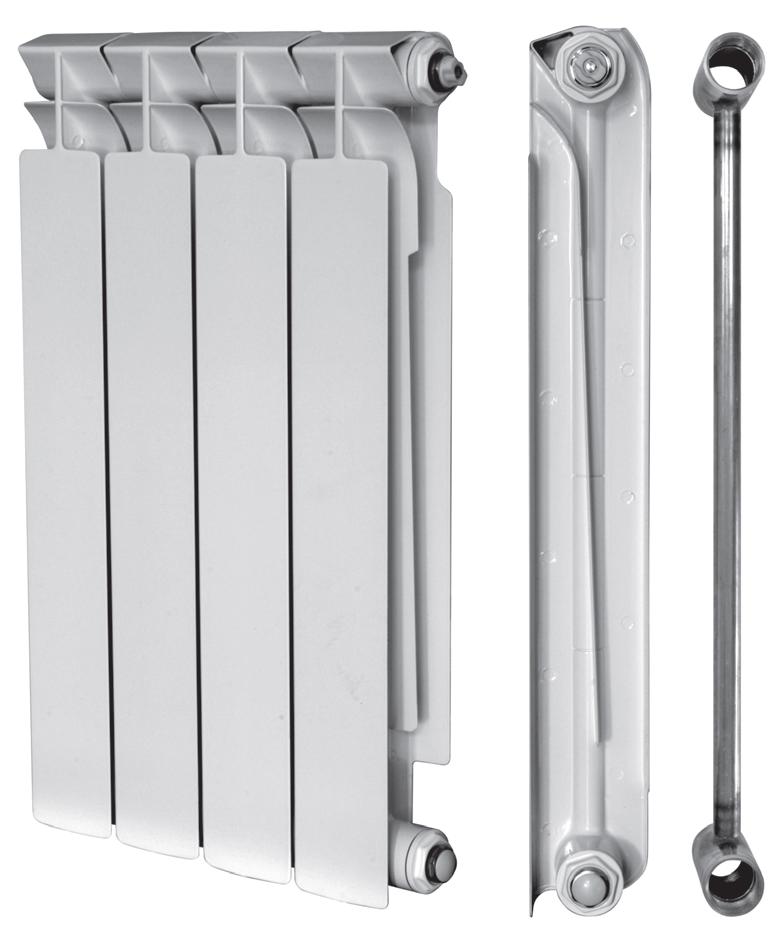
- Now you need to measure the aluminum radiator. The loops in the seven-section battery will be located between the first and second sections, as well as between the sixth and seventh. You want to know the distance between the listed sections. In this case, it is 42 centimeters. On both sides of the vertical, measure 21 centimeters and put marks on the horizontal. The markup for the top loops is complete.
Completing the installation of the aluminum battery
After opening the kit for mounting aluminum batteries, a drill for a puncher is selected, focusing on the dowel for the loop. In accordance with the markings, holes are drilled, a dowel is inserted and hinges for the radiator are screwed on. Then the device is hung up and connected to the heating structure with an American tap, ensuring the tightness of the connections.Using a level, check the correct installation. This does not complete the installation of aluminum heating radiators. It is necessary to start the coolant, check the joints for leaks and bleed the air using a special tap.
Installation of aluminum heating radiators on video:
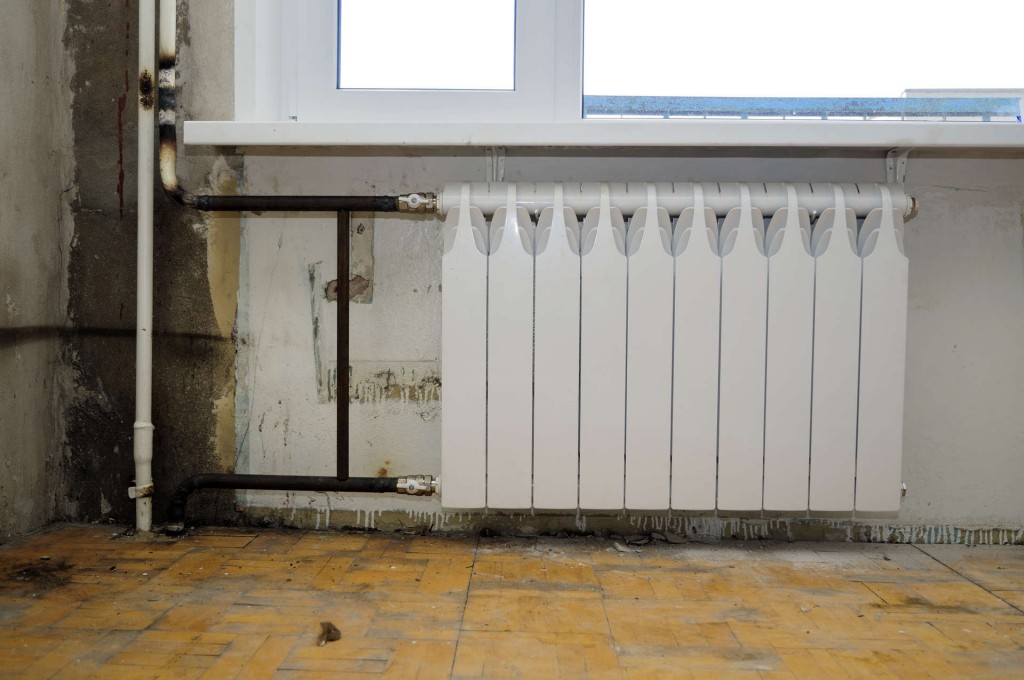
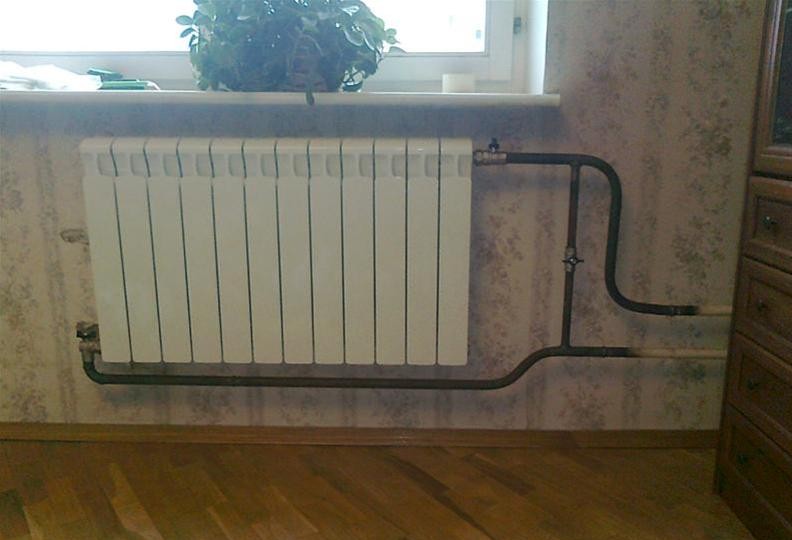
We have to choose and replace heating devices in our apartment. Let's look at the main stages of this work and the problems that we may encounter in its process.
In the photo - a radiator after replacement with a change in the configuration of the eyeliner.
Procurement
Material
In order not to take up the reader's time with a description of the alternatives, let us immediately point the finger at the best candidate for the role of a heating device in a city apartment.
Bimetallic batteries (steel core and aluminum fins) combine four important properties:
- They have a high mechanical strength . The lower limit is 16 atmospheres of working pressure when tested at 30; on sale can be found that have been tested at a pressure of 150 kilograms per square centimeter.
- The chemical stability of the core is another advantage. If aluminum can form a galvanic couple with copper pipelines, then steel is only afraid of corrosion.
Healthy: stainless steel it is used as a core of sections very rarely; however, the corrosion resistance of the steels used is still much higher than that of steel water pipes of late Soviet buildings.
- The thermal conductivity of aluminum and, accordingly, heat transfer with sufficient finning is beyond praise.
- Finally, what is important for the apartment, appearance bimetallic radiators quite presentable.
The price of one section, however, is quite high and reaches 600-700 rubles.
Calculation of the number of sections
Again, in order not to overload the reader with unnecessary information, we use the simplest algorithm calculation: 1 section for 2 square meters area of the room.
Nuance: for Far East and regions of the Far North, a coefficient of 1.5 - 2.0 is used.
It is better to take the number of sections with a margin of at least 20% and supply each heater thermostat - thermostatic head or conventional throttle. In general, a conventional ball (plug) valve can also be used to adjust the patency, although it is not intended for this.
Additional elements
In addition to a thermostatic head or throttle, near each radiator it is desirable to have:
- An additional valve on the second line of the supply line, which completely cuts off the radiator and allows, if necessary, to completely turn off and dismantle the heater.
- A valve on the jumper, in the closed position, directs all the water flow in the riser through the radiator. It is clear that either this valve or any shut-off valves on the supply line can be closed at the same time - otherwise we will regulate the patency of the entire riser and will surely collect a bunch of fans from neighboring apartments.
- Locknuts (typically 3/4 inch diameter) are also best replaced with new ones. Just to make the radiators look better.
- If, as in most Soviet-built apartments, the piping remains lateral, and the number of sections is at least a dozen, a flushing tap will not interfere.
Useful: the best flushing agent for a bimetallic radiator is a DN20 valve with an adapter for DN25, which will be screwed into the end of the heater. Again, ball valves: it is better to completely forget about the existence of screw valves of all types, regardless of the purpose of the valves.
- On the upper floors, at the upper point of the jumper between the risers or at the end of the radiator, Mayevsky cranes are installed. They can also be replaced by conventional water taps. Better - with ceramic crankboxes. In this case, you are guaranteed not to encounter a torn or flown gasket.
Dismantling the old heater
The instruction depends on how it will be done.
If it is planned to install heating batteries for the apartment in place of the old ones, and the piping is in good condition, we will leave it in its original form.
- When the riser is dropped, the locknuts are driven to the end of the thread on the liner. If the paint interferes, it softens. gas burner, blowtorch or building hair dryer.
- Radiator plugs are given. In most apartments, on the side of the liner, there is a regular, right-hand thread; a few exceptions are easily recognized by the letter "L" on the cork.
- The remaining water is drained from the radiator into a substituted basin; the heater itself is removed from the brackets. In some cases, this has to be turned off with pliers or socket wrench a pair of nuts that hold it in place.
- Old radiator plugs and lock nuts are unscrewed; if the thread is partially knocked down or a lot of paint and other contaminants remain on it, it is driven by a die of the appropriate diameter.
An equally common situation is when new heaters are changed along with the supply section with an offset closer to the wall with risers. Here, dismantling is even easier: you choose a place convenient for making a weld on the liner and cut the pipes in it with a grinder.
If the use of old brackets is not planned, they are also cut off at the wall level.
Installing a new battery
We'll figure it out simplest case- installation in place of old cast iron sections new heater with the same center distance eyeliner (see also). We have to install the battery with our own hands without any alteration of the eyeliner, without including polymer and metal-polymer sections.
What is the reason for choosing this particular scenario?
- We chose a bimetallic radiator, if you remember, precisely for its strength and ability to withstand off-design pressure and water hammer. The use of much less mechanically durable pipes and fittings will deprive our undertaking of any meaning.
- Welding work on the tight connection of the eyeliner requires a certain skill. It seems that a specialist capable of doing this work does not need advice aimed at beginners.
How is the actual installation of a new heating battery in an apartment carried out?
- The radiator without plugs is hung on brackets. If necessary, they are bent in any direction using a lever - a pipe segment. The axes of the end face of the radiator must exactly correspond to the axes of the connections; the heater itself is set strictly according to the level.
- Then, with the radiator removed from the brackets, locknuts and plugs - adapters are sequentially driven onto the threads of the liner.
- The radiator is re-hung on the bracket; then the through plug is screwed into the radiator so that about a centimeter of open thread remains between it and the radiator housing.
- The thread is wound along the threads. The best winding - sanitary flax with paint: you apply a little paint on the bare thread and over the winding; when you tighten the cork, the linen is soaked evenly.
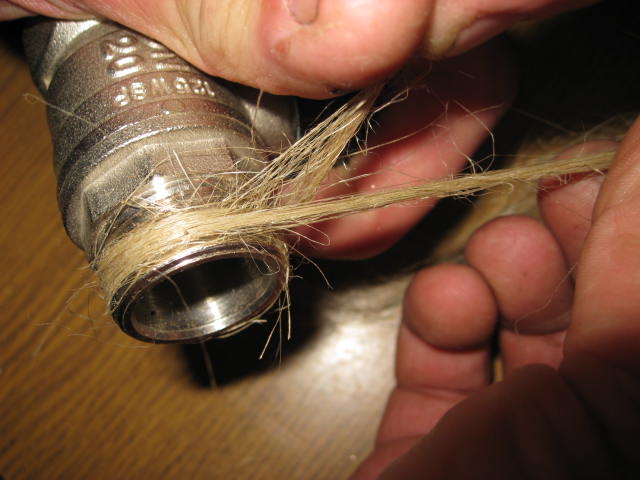
Useful: a small amount of paint will inevitably squeeze out onto the edge of the cork. So that it does not catch the eye, it is better to take the paint to match the radiator.
- Then the cork is tightened with moderate effort; the same operation is repeated for the locknut.
- After the batteries are mounted, be sure to fill the risers and carefully inspect the threads and the devices themselves for leaks. It is clear that the pressure and temperature will not be equal to the operating one; however, all serious flaws will come out.
If the batteries are changed in winter, at the height of the season, when starting the risers, it is better to have any means of communication with you that allows you to reset the risers immediately in case of a serious leak, without wasting time going up to the apartment and back down.
By the way: plumbers in such cases simply knock on the riser, having stipulated the agreed signals. The sound is perfectly transmitted through several overlaps.
Conclusion
As usual, Additional information you will find about the installation process in the video at the end of the article. Warm winters!
A radiator made of a material such as aluminum will work for the entire operational period only if you install the heating equipment with your own hands exactly according to the instructions. To make the learning process easier. A video instruction is attached to the installation rules.
Aluminum radiator mounting scheme and its main characteristics
Each heating equipment is characterized by the following parameters:
- What is the temperature maximum of the coolant that can pass through the device?
- The internal pressure formed in the aluminum heating radiator during the operation of the equipment.
- Pressure value obtained during crimping heating system.
How and where the battery will be installed depends on all the above parameters. in apartments and residential buildings it is placed under any light opening. Usually the radiator is placed under the windowsill. Also, the device can be mounted near the wall using special racks.
Connection of polypropylene pipes with a radiator
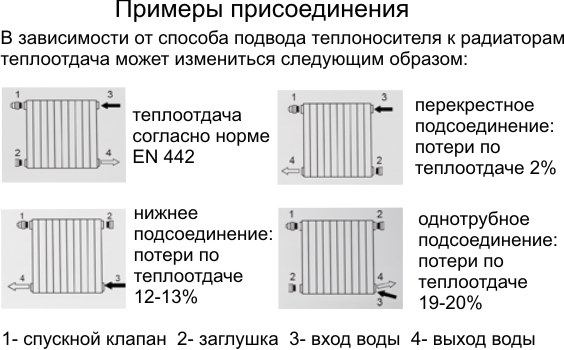
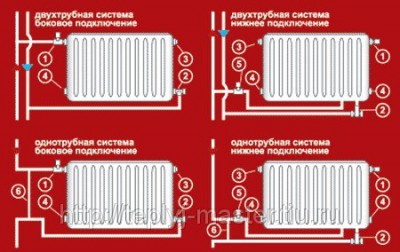
The connection of polypropylene pipes with heating equipment is carried out either from one side of the panel, or from both sides of the radiator.
If a 1-way connection has been chosen, then the so-called extension of the battery sections must also be carried out. With this connection scheme, the width of the heating radiator must be greater than the standard size.
If the house was designed forced circulation coolant, and the battery has more than 24 compartments, then you need to mount according to the scheme of 2-sided connection of the device to polypropylene pipes. If it was chosen natural circulation according to the coolant system, then the battery should contain no more than 12 sections.
From wiring diagram heating equipment depends on the heat produced by the radiator. Often this indicator differs significantly from that given by the radiator manufacturer.
Features of mounting an aluminum radiator with your own hands
Masters advise installing the battery according to the following dimensions:
- 6 cm from the floor;
- 3-6cm from wall to device;
- 10 cm from the window sill to the radiator.
With such dimensions, it is possible to provide the most efficient heat transfer of an aluminum radiator.
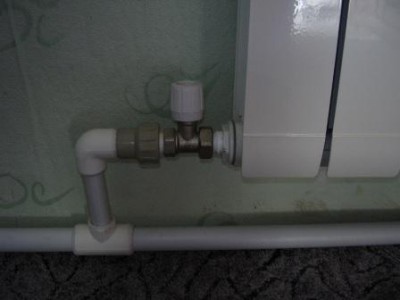
During installation, shut-off and control valves must be installed both at the inlet to the equipment and at its outlet. This makes it possible to monitor the temperature in the room both manually and automatically. In the latter version, it is still necessary to equip everything with valves, heads and thermostats.
Locking equipment helps the owner of the heating system during the period when there is no need to use the battery. Also, with local repairs, you do not need to turn off the entire house for heating. It is enough to shut off the coolant supply only to the repaired equipment.
Before starting the installation of the radiator, it is necessary to check the availability of all components:
- A valve that helps release the system from airlock. (Crane Mayevsky).
- Plugs for left and right side.
- Seals in the form of rubber gaskets.
- Racks on which equipment is placed.
- Brackets.
- Ball valve.
Once all the elements are in place, you can proceed to the assembly and installation of aluminum radiators.
The lesson of mounting an aluminum radiator in the video below:
Additional Information:
 Heating radiators - which is better for an apartment. You need to know this in order to maximize comfortable temperature in room. There are several options...
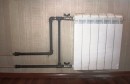 Connecting bimetallic heating radiators is not as difficult as tie-in other types of batteries. The procedure is simplified due to the basic properties of the material from which ...
Heating radiators are an important part of the heating system in the house. From them right choice and proper placement depends on the efficiency of the heating system of the home. Heating radiators allow not only to improve the efficiency of work autonomous system heating in a private house, replacing them with more modern and high-quality ones will even increase the air temperature in apartment buildings powered from the main water supply systems. Usually initial installation radiator batteries is carried out by builders, and their replacement either by local specialists management company or by a third party specialized firm. But in both cases additional costs can be avoided if you install heating radiators with your own hands.
General characteristics of the process of installing radiators
First of all, it should be clear that different types heating radiators have different installation requirements. The easiest to install will probably be aluminum radiators, but the classic cast iron batteries will require specialized equipment- you will have to resort to welding work, and this is a very specific area that requires the presence of professionals.
However, modern radiators heating, created from light, but at the same time durable materials, are assembled and installed a little more difficult than the children's designer, do not require any specific skills and can be placed on almost any surface. They can even be broadcast on a plasterboard wall.
The geometry of the placement of heating radiators
An important role in creating a comfortable atmosphere from the heating system is the location of heating radiators.
There are certain building standards for the placement of heating radiators both relative to the wall and relative to the floor. SNiPs determine that the minimum gap between the bottom edge of the battery and the floor cannot be less than 5 centimeters.
It is also necessary to provide a gap between the body of the heating radiator and the wall surface. It must also be at least 5 centimeters. Only in this case will normal air circulation heated by the battery be ensured.
In accordance with the existing standards, we calculate the installation of batteries and mark the places for their fastening.
Required Skills
In order to independently carry out the installation of a heating radiator, you must have at least minimal construction and plumbing skills. To receive them, there is no need to enroll in specialized courses - just carefully read the video instructions published in in large numbers in the Internet.
Preparing the tools
Of course, for the installation of heating batteries you need to stock up necessary tools. Do not be afraid that you will be required to purchase expensive devices. Most of the tools for such work can be found in your back room, and the necessary, but missing items can be rented or borrowed from friends.
So, find or borrow an electric screwdriver, pliers, a hammer drill or a drill with an impact function and a special drill or drill for them and a regular building level.
When purchasing a heating radiator, pay attention to the completeness of the complete set of purchased devices. To do this, take a picture of the outlets of the pipes of the heating system in your house.
In the case of initial installation during construction, it is better that the outlet pipes of the pipes of the heating system fit the inlet pipes without adapters. But if you replace batteries during repairs, the situation can become more complicated.
We bring pipes to the radiators
When repairing and replacing a radiator, you may have to change the outlet pipes of the pipes of the heating system in your room.
The simplest and reliable way connections of old metal pipes with modern batteries looks like this:
- The heating system is blocked and excess water is drained from it.
- An angle grinder cuts off the excess part of the old water supply pipes. At the same time, we are guided by the rule “Measure seven times, cut once.
- We cut a new thread on the remaining piece of steel pipe.
- A shut-off valve of a suitable diameter is screwed onto a piece of pipe.
- FROM new battery heating, the new valve can be connected using a specialized flexible connection made of metal-plastic pipe or with copper pipe wiring. Installation of metal-plastic looks easier, however, such a pipe may collapse from excessive high temperature in pipes of the main heat supply. But copper pipe can withstand even superheated steam, but for its installation it will be necessary to use soldering, which not everyone can succeed.
The main characteristic of the installed hot heat supply to heating radiators is tightness. Water in heating systems can be under high pressure. When checking the tightness of the connections, it is recommended to let the water flow in stages, initially with a small level of pressure.
Also, when buying, we check the complete set of pipes and, if necessary, buy additional connecting elements. Please note that when assembling the sections, a key of a special configuration can be used - check its availability in the delivery set.
We install radiators
After preparing the heating system, we begin to mark the place for installing batteries. We estimate where the brackets should be located, mark their future position and check the horizontal level of the installation using the building level.
We fasten the brackets and broadcast the battery assembly on them.
Please note that the number of attachment points for a heating radiator to a wall directly depends on the number of sections and the design of the battery.

In case you are connecting steel pipes to the radiator for welding - then you can limit yourself to two brackets. If the connection to the water heating main is on polypropylene pipes and fittings, then at least three brackets are needed to fix the battery. In addition, the number of fixation points depends on the number of sections. With the number of sections up to 5, you can limit yourself to three attachment points: 2 from above and 1 from below. Further, when increasing the sections to 10, it is necessary to add 1 fastener point at the top and bottom.
Modern batteries are mounted on almost any surface, including wooden walls.
Do-it-yourself installation of heating radiators: video