How the truss system of an attic roof works: a review of designs for low-rise buildings. How to make an attic on the roof Attic-type rafter system
Using all possible space, giving the house originality and significantly reducing heat loss through the roof - these are the tasks that the attic solves. If there is a certain margin of safety at the foundation, in this way you can turn cottage in two-level. Another attractive thing is that you can build an attic roof with your own hands even without special construction skills. It is important not to make a mistake with the choice of materials and do everything according to the rules.
Windows on a regular floor are located in the walls. In attics there are no or almost no walls. They are replaced by a roof. That’s why windows are made special: they not only must let in sufficient light, but also withstand wind and snow loads, which are much greater on the roof than on the walls.
Dormer windows
When planning an attic, you should take into account the recommendations of SNiP. They recommend making the window area no less than 10% of the floor area. So if the attic is divided into several rooms, each should have a window.
Of all the methods shown in the photo for installing skylights with an attic, inclined installation is the easiest to implement. In this case, it is necessary to ensure the proper degree of waterproofing of the junction, and also to use special models with reinforced frames and reinforced glass - the load on the surface can be significant.
Advantages of a sloping roof window:
- more light, less sharp boundaries of light and shadow;
- the roof surface remains flat, its relief is not complicated;
- relatively easy installation.
When planning such a window, it is necessary to remember that its area increases with increasing angle of inclination. At what height is it more convenient to install such a window and how its height increases in centimeters depending on the inclination, look at the photo.

The steeper the slope relative to the floor, the smaller the window height should be.
The width of the window frame should be 4-6 cm less than the pitch between the rafters. Then it can be easily installed without disturbing the structure of the frame. If the window is wider, it is necessary to make a reinforced beam above it and calculate the load.
If you need to have a larger window, it is easier to place two narrow ones side by side. They look no worse than one big one, and there will be fewer problems.

When installing a dormer window, the roof geometry becomes more complicated: a valley appears on top and on the sides. Because of this, the rafter system becomes more complex both during planning and during assembly. The complexity of installation also increases roofing. All valleys are the places where leaks are most likely to occur. Therefore, everything needs to be done very carefully. In regions with a lot of snow, it is advisable to install snow guards over such windows so that they are not blown away in the event of a sudden meltdown.

Installation of a vertical dormer window in an attic roof
The advantage of such a window: you can stand near it full height. But they let in less light, the terrain becomes more complex and the roof becomes more problematic.
A recessed window is usually used if there is access to a balcony through it. In other cases, this method of arrangement is not the best option: little light gets in, the shadows turn out to be very deep, which is tiring for the eye, the geometry also becomes more complex, although not to the same extent as in the previous version.
The easiest way is to make a window at the end of the attic. In this case, a reinforced frame or reinforced glass is not needed. Just high-quality glass is quite enough. It is this option that can most often be seen in country attics: this is the most inexpensive option, which you can easily implement with your own hands.
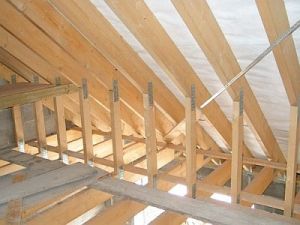
Rafter system
At self-construction In private houses with an attic, a broken roof is usually chosen. It allows you to get a room of significant area, larger than under a gable.

With the same width of the base (of the house), the attic space under a sloping roof is larger than under a regular gable roof. Rafter system It’s becoming more difficult, but a gable roof with an attic under a sloping roof is still more popular
Polyline design mansard roof is such that the overhangs can be lowered quite low, giving the house interesting view. But a long roof overhang is not only decorative role. They're still closing top part walls from precipitation and divert the bulk of water away from the foundation. Although when planning you need to keep in mind that in strong winds they increase windage. Because of this, it is necessary to use more powerful boards and beams. Therefore, the size of the roof overhang is chosen based on several considerations, the main one of which is weather conditions.
Tilt angle
Depends on the roofing material, but most of all - on the region and weather conditions. The classic version is shown in the figure: the lower slopes in relation to the plane of the attic floor are inclined by 60°, the upper slopes by 30°. Based on these data and the parameters of your building, you can calculate all lengths. Just take into account that according to SNiP, the ceiling height in the attic cannot be less than 2 m. Then, by definition, this is an attic. A person will feel comfortable if the ceiling is raised to a height of at least 2.2-2.3 m. Based on this, according to the rules of geometry, calculate the required lengths.

In the classic version, the load from precipitation on side surfaces may not be taken into account. Precipitation can only be retained on the upper part, the angle of inclination of which is less than 45°.
In general, the inclination of the side surfaces usually varies between 45° and up to 80°. The steeper the slope, the greater the windage it has, this must be taken into account: in regions with strong winds it is better to make flatter roofs. Then wind loads will be perceived much better.
Types of rafter systems for sloping roofs

The design of a sloping mansard roof is one of the options for the rafter system (the most common)
For making a frame sloping roof with their own hands, they most often use pine lumber, grade no lower than 2. The choice of cross-section of timber and boards depends on the size of the roof, the selected roofing (its weight), wind and snow loads in the region, and the pitch of the rafters. All these parameters are taken into account in the calculation. The methodology is prescribed in SNiP 2.08.01-89 and TKP 45-5.05-146-2009.

One of the options for constructing a frame with hanging rafters
The figure above shows a drawing of a frame with hanging rafters. It can only be implemented if the base of the upper triangle is no more than 4.5 meters (in this case, this is the width attic room). If more, you will have to make layered rafters, which should rest on the load-bearing wall in the middle (the attic will be divided into two parts by a row of beams).
Another version of the upper part is shown in the photo below (the picture is clickable). In this case, the side rafters are reinforced with struts. They significantly increase the rigidity of the system.
There is a second way to achieve a similar effect - to establish contractions - in the figure they are only outlined with barely visible lines. The length of the side rafter leg is divided by three, and contractions are established in these places. They will be needed if the roof covering will have a significant weight.

Option for installing a sloping roof truss system - with struts that increase the rigidity of the system
For a building that is small in size, the roof frame can be generally simple: at the top there are two hanging rafters, a tie rod, floor beams, racks and side rafters (pictured below).

Installation of a rafter system for a broken mansard roof for a small house
How to calculate a sloping roof
The attic sloping roof of a small house (no more than 6-7 meters wide) has been built so many times that, based on experience, we can say what materials should be used. Many parameters are dependent on other materials. For example, the installation step of the rafters is tied to the parameters of the insulation. To ensure that there is as little waste as possible during insulation and installation is simpler, it is necessary that the distance from one rack to another be slightly less than the width of the insulation (20-30 mm). So, if you are going to use mineral wool, its width is 60 cm. Then the racks need to be installed so that the gap between two adjacent ones is 57-58 cm and no more.
The width of the board for the rafter leg is again determined based on the insulation. For central Russia required thickness basalt wool is 200-250 mm. That's not all. In order for the thermal insulation to dry, a ventilation gap of 20-30 mm is required (without it, condensation will gradually rot the wood and render the mineral wool unusable). In total, it turns out that the minimum width of the rafter leg should be 230 mm. The thickness of the board is at least 50 mm. This is in regions with light winds and not very heavy snowfalls. To summarize, for all rafters - ridge and side - a board of 230 * 50 mm is required.
If lumber with such characteristics turns out to be too expensive, it will be possible to do the insulation in two directions: partly along the rafters, partly, filling the sheathing, across. You can lay a minimum of 100 mm of basalt wool, therefore you can take a standard board 50 * 150 mm and leave a 50 mm ventilation gap, or order a non-standard 130 * 50 mm. It's up to you to see which is more profitable for the money.
For racks and beams, it is better to take a beam of at least 80 * 80 mm, better - 100 * 100 mm. Especially in areas with difficult weather conditions - heavy snowfalls or strong winds.
Order a more accurate calculation from specialists. This is a long process consisting of collecting loads from the roofing material, the structural elements themselves, wind and snow loads. After which, according to a certain formula, elements are selected. More detailed information For information on how the calculation is carried out, see the following video.
Do-it-yourself mansard roof: installation procedure
The design of the Mauerlat on mansard roofs is no different from the standard version. If or logs, you can use the upper crown as a mauerlat. It is only pre-treated with impregnation with high protective properties.
If the wall is made of foam blocks, a reinforced monolithic belt is placed on top of it. On a brick wall or made of shell rock, others similar materials, the device of such a belt is not necessary. Waterproofing is laid in two layers on the wall, and on top is a timber treated with an antiseptic - 150 * 150 mm or a log. It is secured with embedded studs.

When assembling all elements, long nails are used - at least 150 mm long. In the most critical places, it is better to connect three or more elements using bolts or studs with double-sided threads. It is advisable to strengthen all joints with steel plates or corners.
First way
Installation of attic roof rafters is done in two ways. First: they assemble the parts on the ground, then lift them up in finished form. There, the outer structures, which will become pediments, are put up first. They are placed vertically and secured. It is often more convenient to secure them with long bars nailed to the wall (temporary). The following assembled structures are inserted into the prepared recesses in the Mauerlat (they are made at the required pitch). They are positioned strictly vertically and carefully secured. If necessary, additional temporary spacers are installed to fix them in the desired position. Side beams are installed.
How to build a sloping roof in this way and assemble the nodes, see the video below.
Second way
The second method - the construction of a sloping roof is carried out sequentially by assembling elements directly on site. This method is more convenient if the structure is large and when assembled it can only be lifted using special equipment (crane).
First, the floor beams are laid. Stands and ties are attached to them, and temporary spacers are installed to hold them in the vertical direction. Next, the upper and side rafter legs are assembled, and the tie rods and jibs are installed.
During installation, the following sequence of actions is observed: first, the outermost elements are installed and adjusted to the desired position, and securely fastened. If necessary, use temporary spacers. A fishing line, rope, and cord are stretched between them, which will serve as a guide for the installation of all subsequent elements. This simple move allows you to get the ideal geometry (don’t forget to check the slope angle, verticality or horizontality).
On top of the racks, tie-downs are attached - bars, to which the side rafters are then fixed and onto which the tie-down of the upper triangle is installed. The ties are secured using metal corners. Since the beams are long, they sag. This can be eliminated later - after installing the upper rafter legs- with help vertical beams fixed or adjustable height. And temporarily they can be supported with racks (so as not to pull the entire system).

To make it easier to maintain the desired angle when installing the side rafter legs, templates are made according to which cuts are made. But since the geometry of buildings built with your own hands is rarely ideal, adjustments may be necessary. To check the resulting angle of inclination, another template is knocked down from several boards, which is used to check the correct installation.
If standard length lumber - 6 meters - is not enough, or they order the required length (expensive) or increase it. When building up, two boards measuring at least 0.6 meters (30 cm on each side of the joint) are nailed to the joint. They are nailed on both sides or bolts are used.

A reliable way to build rafters. The length of the “patch” is at least 60 cm
After installing the side rafters, all that remains is to install the top ones. A template is also made for them, pre-cut on the ground, and installed on top.

The top part can be made in different ways. Its structure depends on the width of the base. How to make it, look at the photo below.

Since the structure of the attic sloping roof does not provide for the presence of a ridge, a beam is placed in the middle to tighten it, to which the slopes are attached, fixing the triangle in the required position.

Nodes and their drawings
When installing a rafter system, questions may arise regarding the assembly of nodes—the intersections and connections of several structural elements. In the photo you see drawings of key connections.

The second option for connecting the side layered rafters and the upper triangle. Bolts are used for more secure fastening.

How to make a do-it-yourself fastening of the upper tee and rafter leg on an attic roof
Methods for attaching rafter legs to the mauerlat or, as in this case, to the side beam are shown in the figure below. To make it easier to mount a heavy element, a thrust board (bar) is nailed to the bottom of the rafter, which limits its movement: the board rests against the edge and does not allow it to sink lower.

An attic in a house is always interesting, beautiful and profitable. However, not every master will undertake to do all the work independently. Reasons: ignorance of technological subtleties and the complex rafter system of the attic roof. But you can build an attic yourself, the main thing is good project and sober assessment own strength, financial opportunities. And we will advise and tell you what types of rafters there are, and we will analyze the structure of the rafter system of the attic roof of various types.
The drafting must take into account all the nuances. If miscalculations are made, the developer runs the risk of ending up with something different from what was planned. How simpler roof, the more convenient it is to do it yourself. Types of roofs are:
- Gable, where the slopes descend on both sides;
- A broken line, consisting of two or more slopes of different angles of inclination;
- Hip with a triangular shape of slopes;
- Semi-hip - end-type slopes are located approximately half the height distance;
- Dome for polygonal or round buildings;
- Vaulted - in cross-section, such a roof has the shape of an arc.
The attic roof is distinguished as ventilated and non-ventilated. The type is selected depending on the climatic characteristics of the region, for example, in areas with high rainfall it is better to build ventilated facilities.
Types of rafter systems

The rafter system of the attic roof is selected depending on the layout of the building and differs as follows:
- Layered rafter system attics are installed when the load-bearing partition runs through the middle of the building. The design redistributes the weight load and is suitable for buildings where the distance between the external wall panels and the internal support system does not exceed 7 m.
- Hanging rafter systems applicable in the absence of internal partitions and walls. Supported by a mauerlat and a ridge girder, they are suitable for buildings where the distance between the external walls and the structure does not exceed 14 m.
- Combined rafters Attics are most often needed in buildings where columns are installed instead of partitions. It turns out that part of the rafter structure rests on columns, and part is made in a hanging version. The absence of auxiliary elements, reduced load on the foundation and no cluttering elements are the main advantages of the system, because this option is used most often.
Important! The types of rafter systems are selected at the design stage in order to correctly calculate the required strength of the foundation. In the case when the decision to build an attic arises on final stage construction of the facility, an accurate diagram of the mansard roof truss system and a complete recalculation of the weight of the house will be required, taking into account new data. The process cannot be neglected, especially in areas with weak soil. Otherwise, the end result will be that the house will quickly subside, and groundwater will render the foundation unusable in a short time.
Structural features of the rafter system

The main components are little different from a conventional gable roof:
- Mauerlat is the base of the roof that bears the weight.
- Rafters are elements of the system that form the inclination of the slopes. The top is fixed to the ridge, the bottom - to the mauerlat or stand.
- Post - an element that supports the ridge or back of the rafter leg.
- Struts are needed to strengthen and support the rafter legs. The strut has an oblique cut and serves to prevent the rafters from bending under the weight of the mass.
- Ties - a horizontal tie of a pair of rafters, placed in the upper or lower part.
Important! Rafter elements are often made from the highest grade wood. A timber with a moisture content of no more than 15-18% is purchased and pre-treated with anti-rotting compounds and antiprenes.
Assembly diagram of the rafter system for the attic

An attic rafter system is quite a troublesome task, so it is better to entrust the assembly to a specialist. But if this is not the case, tips and videos will help you do it the simplest design on one's own.
- The mauerlat beam is laid on the top frame of the walls. If the house is log, you can get by with upper crowns reinforced with brackets.
- Install floor beams. Mounting on the mauerlat or protrusions of wall panels. The simplest fastening is without extension, supported on the walls, but with extension is when the beam is carried outside the perimeter of the house to create an overhang. In this case, the distance between the end of the beam and the wall panel should be at least 0.5-1.0 m.
- Vertical racks are installed. To do this, determine the middle of the floor beam, then equal intervals are set aside from it - the distance should be equal to the width of the attic room.
- The puffs are secured to the racks, and it turns out that each pair of racks looks like the letter “P”.
- Installation of lower rafter elements carried out with mounting on a stand. Fasteners - self-tapping screws or nails, fasteners on the mauerlat in the form of a movable fastening slider, compensating for the shrinkage effects of the timber.
- Installation of rafters for the upper part of the attic roof is carried out by connecting each pair with a metal plate or bar.
- Final processing includes laying a waterproofing membrane and sheathing. The lathing for soft roofing material is solid, for profiled sheets and other hard materials it is sparse.
The proposed installation of the rafter system is the simplest. It is quite possible to equip such a structure with your own hands, you just need to make the correct calculations, the rafter system, drawings of the attic roof, and diagrams will help you complete the work without errors.
Rafters with extension behind the wall panel

This option is used when there is a small amount of internal space. You will have to rest the rafter leg on the upper floor beam. Mauerlat is not needed here, but reinforcing struts are required. To strengthen the base, you can fill in a reinforced concrete belt. Fastening floor beams to monolithic belt is made by anchors where they are driven support posts to the maximum timber thickness.
Important! The remote structure forms a cornice: for wooden houses width from 0.5 m, for those made of concrete and stone - from 0.4 m.
Scheme of work:
- Install the outermost floor beams that form the outline of the overhangs. The section of the beams is 150*200 mm.
- The remaining beams are mounted along a cord stretched between the outer beams: the distance between them is equal to the pitch of the rafter legs. Insulated roofs require a rafter pitch of 0.6 m; if rafters are installed with the specified pitch, they can be made from timber with a section of 50*150 mm.
- Having cut out the tenons, prepare the supports.
- Install the corner posts and secure them with temporary supports.
- Using a plumb line, determine the location of the support points of the beams and select holes for them.
- Install row posts and a pair of load-bearing supports in the centers of the attic gable.
- Lay purlins from 50*150 mm boards. Secure the purlins with corners.
- Connect the supports with bars, also securing them with corners to the purlins.
- Fasten the crossbars using temporary fasteners with an inch. The deviation from the edge of the frame is 300-350 mm.
- Make a template for the bottom row of rafters: attach the blank board to the end of the purlin and beam, determine where to cut off the excess, try it on and trim it.
- Install the end rafter posts.
- Make a template for the top of the rafter legs.
- Try on the template and build a tier, how the rafter system will be, photos of the attic roof will clearly show the entire structure.
- If the templates fit perfectly, make required quantity rafter legs, mount them in place, strengthen the crossbars with the headstock to avoid their sagging and firmly sew them to the ridge area. The lower part does not require rigid hemming, it should be free.
Final completion - installation of the gable frame, sheathing and roofing material. If it is not entirely clear how to complete this project, watch a video from professionals; the material will help you understand the intricacies of construction.
Attic from frame modules

The mansard roof rafter system involves a version of frame modules that is much simpler than the previous one. It is not groups of individual supports that are mounted on the ceiling, but ready-made block modules of the side walls of the future attic room. Similar designs of mansard roofs and their rafter system allow you to work not at height, but below, calculating and measuring every step. The step-by-step process is as follows:
- Make the walls of the attic according to the design in advance, with the longitudinal beams acting as purlins and support elements. Together with the racks, lay out these elements on a flat area and mark the sockets for the support points of the side walls with squares - make cuts along them.
- Select a spike on the racks.
- Connect the longitudinal beam with the vertical posts and you get a frame module (double). These are the future walls of the attic.
- Lift the frames up and install them in place. Temporarily secure the installed frames with spacers and then fasten them with brackets.
- Select sockets at the edges of the beams for mounting the lower row of rafters; if necessary, modify the sockets with a chisel.
- The upper rafter tier is made on the ground, for which the blanks are first adjusted to the required elements.
- The base of the upper triangle of the attic structure is a stretcher, and its length is equal to the distance between the installed planes (vertical) of the already mounted frames.
- Select sockets along the edges of the stretch, and spikes on the lower heels.
- Assemble rafters for the attic of the upper tier, mount a crossbar for additional fastening, and reinforce the ridge assembly with a triangular-shaped wooden overlay.
- Pre-production of rafter legs for the attic will allow you to avoid working at height. You only need to cut the top bevel, resting on the top post wall panel and for stretching the upper trusses.
- Try on the lower rafter part to the end, mark the tenon shape area on the lower heel, cut out the tenons according to the drawing made.
Now all that remains is to move upstairs and raise all the rafters. First install the trusses, securing them to the upper frame of the walls, and then install the lower part, attaching them to the ceilings (beams) with brackets. It turns out to be a completely comfortable floor, the rafter system for which was assembled on the ground. To facilitate understanding of the construction task mansard roof, modular rafter system, watch the video. All other stages are carried out according to the standard scheme of a conventional gable structure; the attic and rafter system are shown above.
The attic rafter system can be of various configurations; if installed correctly, it is reliable and functional. The rafter structure is a powerful frame, capable of withstanding the load not only of the entire roof, but also the influence of external natural factors.
The frame made of rafter boards is the basis of the entire attic roof structure, which is capable of supporting the weight of the entire roofing system. Before you install the roof for the attic, you need to know in what order to install everything necessary elements truss structure.
The structural elements of the roof truss system intended for the attic are:
- Mauerlat. The basis of everything roofing structure, which able to withstand and evenly redistribute the load from the roof system to the supporting walls. Mauerlat consists of boards that are attached to the external walls of the building, and elements of the rafter structure are also attached to them;
- Beam posts or rafter legs, which form the frame of the roof structure. Boards for rafter legs should bear the load roofing pie together with the outer covering;
- Vertical racks. Racks are installed for holding the central part of the rafters and protecting them from bending, as well as to support the ridge beam;
- Runs. Additional bars that are installed at an angle for supporting rafter legs;
- Ridge beam. Mounted on long systems (more than 7 meters) and serves for creating structural rigidity;
- . An additional wooden structure that is attached to the rafter system and serves as a base for the roof.
In addition, there is additional elements: beams, purlins, crossbars, which are installed in various parts of the roof frame to create fastening rigidity and strength of the structure as a whole.
Mansard roof truss system: drawings and photo of the plan below.
Rafter drawing plan
Types of rafter systems for mansard roofs
Roof rafter structures for warm room may be different, and accordingly, the installation of such structures will be different. In addition, the rafter system may have:
- Hanging structure. It rests on the side walls of the room with one edge of the structure and at the top when connecting the rafters - on the ridge element;
- Layered design. Most often it is installed in buildings with a span of more than 10 m. With this structure of the roof structure, the rafter system has support on external walls and a partition inside the building.
Rafter systems for attics can be installed during installation:
- designs;
- roofs;
- Broken gable;
- roofs;
- designs;
- Dome system (cone);
- Vault system.
The classic look of an attic space is represented by a rectangular structure, which is mounted inside the covering, resting its upper corners on the slopes, and the lower corners are included in the support system.

Layered rafters
Installation of attic roof rafters and pitch calculation
The decisive indicator for calculating the pitch of the roof rafters in a warm room is the choice outer covering roofs. Yes, for different types It is necessary to install the rafters for the attic roof as follows:
- Under . The pitch between boards with a section of 50 by 50 mm should correspond to 60-80 cm;
- Under . A beam with a cross section from 50x100 mm to dimensions 50x150 mm is required. The pitch when installing under slate should be 600-800 mm;
- Under . When the cross-section of the rafter leg is 50x150 mm, the step size should not exceed 95 cm and should be at least 60 cm;
- Under . The section of the beam can be 50x100 mm, as well as 50x150 mm. With such a board, the step must be taken at least 60 cm and no more than 90 cm.
In addition, when calculating the step, it is of great importance roof slope. If the slope is 15%, then the distance between the rafter boards is recommended to be at least 80 mm. As the degree of slope of the roof slope increases, the distance between the rafters increases proportionally.

Rafter pitch
How to move rafters beyond the wall line
 The rafters extend beyond the line external wall in order to increase the attic living space. The peculiarity of this method is that the support of the lower rafter beam is the floor board, and not the Mauerlat board.
Wherein install reinforcing struts under the extreme part of the triangular sides.
In this case, it is not always advisable to install a Mauerlat, but Concrete pouring must be done, since floor beams will be attached to the concrete with anchors.
When the rafters are moved beyond the outer line, a cornice should be formed, the width of which for houses made of wood should be at least half a meter, for structures made of stone or concrete - at least 400 centimeters.
Removing the rafters beyond the line of the external wall must be done in the following sequence:
- Install external slab beams, with a cross-section of at least 15*20 cm. They serve as the outline of the overhangs and should form a rectangle (based on their roof shape);
- Pull the cord between the outer beams and install the remaining beams in increments of 0.6 m (for a warm room);
- Measure this distance from the left to the right edge, which should correspond to the short leg of the triangle, and mark the points by cutting out sockets for installing the extreme supports;
- Make supports the dimensions of the timber nests are 10*15 cm. The length of the support boards should be more than 10 cm;
- Install temporary spacers for mounting corner posts;
- Using a plumb line on a cord attached to the posts, check the uniformity of the points selections for supports;
- In the central part of the attic gables install two supports;
- Install purlins on supports, firmly attaching them with corners;
- Connect opposite supports with bars, also attach them to the purlins using corners. Install a temporary support under each beam;
- The beam, which serves as a crossbar, temporarily fasten with an inch at a distance of 200-300 mm from the edge. To make it convenient to mount the top of the rafter structure, install temporary plank flooring;
- From edged boards it follows make templates, along which opposite trusses are then mounted:
- The template is made by applying the workpiece to the beam and the end of the purlin, and corresponds to the rafters of the bottom row. Mark the groove lines to size to eliminate excess;
- Install the rafter legs from the end, and then from the lower level of the attic;
- Next according to the template install the top rafter frame;
- To avoid sagging of the crossbars, it is necessary to the trusses fasten the headstocks from below - in a hinged way, from above - with a rigid fastening.
The rafter boards are attached to the walls using wire ties and the gable frame is installed.

Removing the rafters from the wall
How to calculate the rafter system
 Before calculating the rafter system, it is necessary to definitely know the shape of the roof.
It should be taken into account that for comfortable living in the attic the height of the walls of the room must be at least two meters, and the length - from three meters.
The attic project involves the calculation of a rafter system that matches the size and nuances of the building.
If a layered system is provided, then additional support needs to be installed.
In addition, you should keep in mind:
- The ridge beam must be installed when the roof length is more than seven meters, since it significantly makes the structure heavier;
- Don't forget about window system in the roof, for which it is necessary to additionally construct a frame;
- Necessarily take into account the loads from climatic factors: wind, snow, which may be important for determining the roof overhang;
- A lot of roofing cake, which is determined on the basis of one sq. meters of its entire structure. In this case, it is necessary to multiply the result by a coefficient (from 1.5 to 3) for a margin of safety.
In addition, the characteristics of the flooring and the performance of the roof should be taken into account.
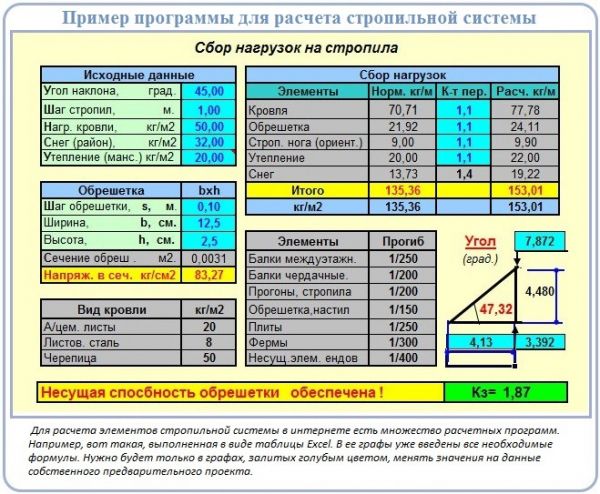
Calculation example
Installation of the rafter system
Installation should begin with the floor beams, which are attached to the mauerlat, and the rafter legs are attached to them. It is important to consider.
- Mark the installation location of the ridge element and supports in the center of the beams;
- At equal distances, install racks made of boards equal in cross-section to the floor beams. It should be fastened with corners, having previously been temporarily secured with nails to determine the accuracy of installation;
- The first pair of racks is fastened with bars made of bars;
- To the resulting structure in U-shape rafters are attached, which are installed either on the mauerlat or on the floor beam by cutting a groove;
- Install ridge rafters by connecting them with bolts and washers or metal plates;
- The rigidity of the structure is provided by struts, which are attached to the center of the side rafters and the post and headstock, which are mounted in the center of the tie.
Other trusses are made in a similar way and are secured together by purlins. The distance between farms can be from 60 to a meter.
To secure the assemblies of the attic structure and give them strength it is necessary to fix them with staples. Next, the sheathing is installed.

Installation of the rafter system

Installation diagram
Installation of attic roof sheathing
Depending on the type of external roof covering provided, there are two lathing options: solid and sparse.
Solid is most often installed when covering:
- Roll. In this case, the lathing is installed in two floorings: the lower one - in 30 cm increments from 20 cm bars, the upper one - from 50x20 boards, which are nailed at an angle relative to the lower flooring of 30-45°;
- Slate flat asbestos-cement;
- Flexible tiles.
The sparse type is set when:
- Steel, metal coating. The bars, the cross-section of which is 5x5 cm, are laid perpendicular to the rafters in increments of 20-30 cm. Installation is carried out from the eaves upwards. A flooring of 70 cm wide boards is mounted on the overhang. Butt-joined bars are attached along the ridge and ribs;
- Metal tiles;
- Asbestos cement slate;
- Clay tiles.
The pitch of laying the sheathing and the thickness of the boards directly depend on the roofing covering and are calculated individually depending on the load and the specifics of the installation.
ATTENTION!
The sparse sheathing bars should be nailed offset so that the joints in adjacent rows are not located on the same rafter beam.
Sheathing boards should be slightly less than the length of the slope.

Lathing
Conclusion
Thus, it has its own installation features. They must be taken into account, since the attic is extra space for residence, and it must meet all the criteria of a given function.
Useful video
In this video you will learn everything about the rafter system of the attic roof:
In contact with
The attic roof must have great strength. The rafter system of such a roof is subject to serious loads and its design must be calculated in such a way that these loads are evenly transferred to the walls and foundation of the building.
Attic design options
An attic is a building whose facade is partially or completely the surface of the building's roof (sloping or broken). An attic differs from a used attic in that the line of intersection of the roof and facade is located from the floor level at a height of no more than 1.5 meters. The attic space can be used in different ways - it can be a living room, gym, utility room or greenhouse.
Attics can be arranged in the following types roofs:
Gable. The simplest form is symmetrical pincer. In such roofs the pediment is triangular. The advantages of this type of roof are reliability and ease of installation. For houses with a width of up to 6 meters the best option is a gable roof with an angle of 45 degrees. If the width of the building is more than 6 meters, pointed roofs (angle of inclination - 60 degrees) should be made. Gable gable roofs do not make it possible to build attics big size.
Asymmetrical(with slopes of different lengths and angles of inclination) gable roofs have an original appearance and allow you to implement the most daring architectural solutions. However, such roofs require professional calculations and have a rather complex design.
Broken gable roof- This is one of the most suitable types of roofs for installing an attic. Its design allows the use of under-roof space with maximum effect. In addition, it significantly reduces costs for Construction Materials. Each slope of such a roof is divided into two parts with different angles of inclination (usually the slope of the upper part is 30 degrees, and the lower part is 60 degrees).
This is one of the types of roofs with two slopes. Its frame is practically no different from the frame of a conventional symmetrical roof; the peculiarity of a half-hip roof is two small slopes (hips) above the gables.
It’s as easy as shelling pears to equip a comfortable and spacious additional floor. The attic fits perfectly into their design.

Advantages of hip mansard roofs:
- The hip roof rafter system can withstand significant wind loads because there are no gables.
- This type of roof allows you to install large overhangs that protect the walls and foundation of the house from precipitation.
- The hip roof structure is rigid (thanks to the corner ribs) and is much less susceptible to deformation.
- Houses with hip roofs they look solid and fit organically into the architectural ensemble.
The disadvantages include the complexity of the design, the mandatory arrangement skylights on the roof for lighting and the fact that short (end) hips slightly reduce the usable roof area. Windows need attention Special attention when designing a roof. If they are located in the plane of the slopes, then they will have to be closed when it rains. Vertical windows more practical, but their design is quite complicated.
Calculation of frame elements
When creating a project, you first need to decide on its configuration, design and roofing material. By choosing a certain type of roof, you can make the necessary calculations; Based on them, the parameters of all elements of the rafter system are established.
 is carried out taking into account the amount of precipitation falling in a given area and the average wind force (data are given in SNiP).
The weight of the “roofing cake” is easy to determine - specific gravity of all materials (vapor barrier, waterproofing, insulation and sheathing) per sq. m of roofing is multiplied by the total roof area. The loads on the roof, its weight, shape and angle of inclination of the slopes determine the parameters of the rafters.
Typically, for the construction of the rafter system of attic roofs, they are used structural elements from durable wood(larches, pine trees). Rafters, due to increased loads (on average, they are 200 kg/m2), must be at least 70 mm thick. Rafter step in the mansard roof design is shorter than in others - the distance between the rafters is about 50 cm.
In order to create the necessary safety margin, a multiplying factor is used in the calculation. For large buildings, it is possible to install a metal rafter system; it is calculated in accordance with the technical characteristics of the hardware used (can be found in reference books).
Thanks to the computerization of the entire country, it became possible to calculate using the Internet. Calculators allow you to determine:
- Roof surface area.
- Angles of inclination of ridge and side rafters.
- Quantity of insulating materials.
- The length of the rafters.
- Recommended cross-section of mauerlats, rafters, struts, sheathing.
- The area of the attic and the entire under-roof space.
- Rafter step.
- The number of rows of sheathing and the distance between them.
- The number and volume of sheathing and rafters.
Construction of the rafter system
The rafter system is, of course, the fundamental element of the roof. How well it is designed and how correctly it is made determines the functionality and durability of the roof. Her  components:
- Mauerlat;
- purlins (ridge and side);
- beds or support beams;
- rafters (sloping and hanging);
- struts, support posts, diagonal struts.
All necessary parameters of the elements are determined during the calculation. When installing an attic roof, layered and hanging rafters are used. Hanging ones are used when the rafter system rests only on two main walls. In case of additional support on the load-bearing central wall or beams (supporting transverse beams), layered rafters are used.
In order to choose the right rafter system correctly, you should pay attention to:
- roof functionality;
- the probable amount of precipitation in the area;
- total roof load
Correct connection of all components guarantees the strength of the roof. The main fastening units in the rafter system (see photo below):
- Mauerlatny. produced in two ways. The rigid method is used when installing layered rafters and ensures a strong connection between the rafters and the mauerlat. Fastening is done using corner hardware and a support bar or by cutting (a “saddle” is cut out in the rafter leg, with which it rests against the mauerlat. The rafter is attached to the mauerlat with nails and metal staples). arranged by cutting out a recess in the mauerlat for the rafter and securing it with a metal corner).
- Beam.
- Skate.
- As a rule, rafters are attached to the ridge and support beams using threaded connections, brackets and roofing hardware (metal corners of various profiles and shapes).
- Important structural unit is a rigid structure of interconnected rafters. They are needed to evenly redistribute the load on the main walls of the house. Connections of rafter elements made of timber are made by cutting and are additionally strengthened using threaded connections, anchors and roofing hardware. To avoid sagging and bending of large trusses, additional supports are created - purlins or transverse struts and beams.
Sloping mansard roof design
The peculiarity is that usually both types of rafters are used in its design. The upper slope (from the bend to the ridge) is made of hanging rafters, which rest on posts or a side girder.
To prevent bending, they are equipped with horizontal ties. When installing the lower slope (from the bend to the ceiling), layered rafters are used, supported by the Mauerlat and a side girder.

To increase the stability of the structure, struts are installed. In some cases, layered rafters are attached to a mauerlat lying on floor beams that protrude significantly beyond the walls of the building.
The lower slopes of the rafter system have a large angle of inclination (about 60 degrees), the upper ones are flat (from 30 degrees). Hanging trusses make it possible to do without a ridge girder; they can be assembled on the ground.
The best option is to connect layered and hanging rafters end-to-end.
When installing, the following factors must be taken into account:
- The lumber used for its construction must be dry (humidity no more than 15%).
- All wooden structural elements should be treated with antiseptic liquids before installation.
- The minimum cross-section of the rafters is 10×15 cm, the Mauerlat – 15×15 cm.
- It is best to use wood coniferous species, without cracks, with minimum quantity knots.
- Particular attention should be paid to the installation of windows.
Installation instructions for rafters
Required tool:
- hacksaw (gasoline or electric saw);
- axe;
- hammer;
- screwdriver;
- metal square;
- construction cord;
- marker or pencil;
- plumb line;
- level.
Installation technology:
- First, lay the Mauerlat on the supporting walls and securely fasten it. As a rule, fastening elements are pre-provided in the walls.
- Mount the beds (if necessary). They are located parallel to the Mauerlat at the distance specified in the project. Timber is used as a bed large section or sanded gun carriage.
- Racks (at least 10 cm thick) are installed on the beds, which will serve as a support for the purlin and as a base for the attic walls. The racks must be given a strictly vertical position using a plumb line and a building level, and then securely fastened (you can make cut-ins in the bed at the fastening points, but this is not necessary) using corner metal elements and brackets.
- The racks are secured with struts.
- Side purlins are installed on the racks (strictly horizontally), and they are firmly fixed with hardware.
- Install the outermost layered rafters on both sides and fasten them according to the design.
- Stretch the construction cord and place the rafter legs along it one by one.
- Hanging trusses are installed (if the upper slope is made with a ridge girder, then install it first, and then install the top row of rafters).
- Arrange a frame for windows if they are provided for in the project.
- They arrange the sheathing.
After installation, you can begin to create a “roofing cake”.
For more information on DIY installation, watch the video.
Let's sum it up
An attic is the most rational way to arrange a roof. The designs of many types of roofs make it possible to arrange such a room. Hip and broken ones are especially suitable for this purpose. gable roofs(this type of roof will also allow you to save on building materials). If you correctly calculate the design and strictly follow the installation technology, a roof with an attic will decorate the house and significantly increase the living space.
The installation of an attic roof allows you to significantly increase the usable area and rationally organize the space of a low-rise building. However, its construction often frightens home craftsmen because the process is too complex and labor-intensive.
There is no need to be afraid, because the result will provide a beautiful roof and comfortable additional rooms. And in order for the result of the work to please the owner and household members, you need to know what rules are used to construct the rafter system of an attic roof, and what is the easiest and best way to arrange it.
When we mention mansard roofs, we instantly remember the pentagonal gable structure of impressive size over a log house, concrete or brick walls. Visual memory suggests that its slopes must certainly have different slopes, i.e. the bottom of the roof simply has to be much steeper than the top. Due to the difference in the angles of inclination, a convex fracture is formed, which gave the roof the popular name “broken”. The term justifiably migrated to technical definitions attic structures. It reflects the essence of the usual standard in the device, but often has nothing in common with the configuration. Despite the fact that the design of all mansard roofs necessarily includes two parts, their presence cannot always be determined visually.
Purely based on external indicators, the predominant number of attic structures can be divided into:
- Triangular roofs, the lower and upper parts of which have an equal slope. Outwardly, they resemble traditional gable structures without kinks in the plane of the slopes.
- Pentagonal roofs with slopes having convex corners. This category clearly demonstrates the presence of two joined parts in the design.
In both of these varieties, the rafter system consists of two tiers stacked on top of each other. The lower structure forms the useful space of a residential attic with a height of 2 to 2.5 m, so that moving inside it is not difficult. The second tier creates the shape of the roof top and is allowed to be of arbitrary height.

By varying the angle of inclination of the upper and lower rafter legs, you can obtain the optimal roof shape in your own opinion. It is believed that a pentagonal attic, the corners of which are in contact with an imaginary circle, looks best.

Note that the principle of constructing a sloping roof is suitable not only for gable rafter systems. Interpreting the basic method, the attic can be organized in hip, single-pitched, hipped and other roofing structures.
Sometimes an existing structure is converted into an attic, the construction of which did not use “broken” technology. However, these roofs cannot a priori be classified as attic. True, no one bothers, if the rafter legs have sufficient power, to use the crossbars of pitched rafter systems as ceiling beams, and the supports of additional purlins as timber for cladding the attic.

Found out that main feature a mansard roof is the presence of two adjacent rafter structures connected into a triangle or pentagon of a shape that is attractive to the owner. In their construction, standard ones are used:
- Layered, according to which the lower tier of the attic is built and used in the construction of the upper part.
- Hanging. In accordance with it, only the upper part of the structure is built.
If, to simplify, the section of the attic roof is divided into two halves, you will get a trapezoid at the bottom and a triangle at the top. The inclined sides of the trapezoid are allowed to be exclusively layered, and the sides of the triangle are layered and hanging.

Basic diagrams of rafter systems
The pentagonal diagram of the rafter system of a mansard roof with support posts forming the walls is rightfully considered a “classic of the genre.” interior space. Its section is conventionally divided into protozoa geometric figures. In the center there is a rectangle, on the sides of which there are two mirrored rectangular triangles, and an equilateral triangle on top.
Standard attic construction
The layered rafters of the lower part of the structure rest at the bottom on the mauerlat, and with the upper heel on the right or left purlin. The part of the mansard roof frame that crowns the structure is made up of hanging rafter arches. They are supplemented with a suspension headstock in the middle if they are intended to cover a span of more than 3 m. The headstock cannot be connected to the arch tightening with a notch, like a support post. Its job is to prevent the tie from sagging - it is not a support, but a suspension.
The supports-racks of the layered rafters of the lower part rest through the beam on the ceiling. If it is necessary to increase stability, struts are installed under the supports. The racks are connected to the beams and purlins by notches, the connection points are duplicated metal corners and toothed plates. If the floor is concrete, bitumen waterproofing is laid under the floor. The bed can be laid not on the ceiling, but on brick pillars or on leveling boards. When installing an attic wooden floor you can do without the beam altogether and embed the posts directly into the beams.

It has practically no effect on the rather steep lower parts of the slopes of mansard roofs. snow load, precipitation does not linger on them. However, steeply installed rafters have another problem - gusty winds will tend to overturn and tear off the roof. Therefore, attaching the system to the Mauerlat must be taken very seriously. In an attic situation, each rafter is tied to the walls with twists, and not through one, as in conventional pitched structures.
Method of moving rafters beyond the wall line
It often happens that the planned attic structure creates too narrow an internal space. It can be expanded by moving the rafter legs outside the walls. Those. the rafter leg will rest not on the mauerlat, but on the beams of the upper floor. This case, in theory, does not need a Mauerlat at all. But reinforcing struts in the scheme with the removal of rafters are used without question, because there is no support at all under the extreme part of the side triangles.
The installation of the Mauerlat can be eliminated, but pouring a monolithic reinforced concrete belt for attaching beams to brick walls is highly desirable. The floor beams are attached to the monolithic belt with anchors, and support posts are driven into them to a maximum of 1/3 of the thickness of the beam. An important point: moving the rafters outside the wall is simply required to form a cornice for wooden houses with a width of at least 0.5 m, for concrete and stone houses at least 0.4 m.

Technology for constructing a rafter structure with the rafter leg extending beyond the wall:
- We install the outermost floor beams that define the contour of the eaves overhangs. Because the ceiling will be loaded, the section of the beams is taken from 150x200mm. If, when laying the starting beam, it turns out that the walls do not form an ideal rectangle, we try to correct the flaws by changing the position of the beams.
- We lay and fix the remaining bars along the laces stretched between the fixed outer beams. We control the height and pitch of the beams before fastening. The distance between the floor elements is equal to the step between the rafter legs. For insulated roofs optimal step installation of rafters is 0.6 m, because it is equal to the width. If the rafters will be installed with a similar frequency, they can be made from 50x150mm boards.
- From the left and right edges we set aside a distance equal to the length of the short leg of the right triangle. At the marked points, carefully use a chisel to select nests a third of the height of the beam under the outer supports.
- Let's make supports by cutting out tenons. They need to be made according to the size of the selected nests. For the manufacture of corner supports, a beam with a cross-section of 100×150 mm is suitable, and two load-bearing supports for the gable sides of the roof should be made from it. For ordinary racks, 50×100 mm timber is sufficient. The material for the supporting elements should be longer than the design height by the length of the tenon, but it is better by 10 cm in case of errors during cutting.
- We install the corner posts and fasten them with temporary spacers. We connect the posts with lace.
- We use a plumb line to check the points in the beams for selecting nests for row supports and select the indicated holes.
- We install row posts and two load-bearing supports in the centers of the attic gables.
- On the installed supports we lay purlins - boards with a section of 50x150mm. We fasten the purlins with corners. It is not necessary to use as many nails as in the corners of the holes. Two or three are enough for each plane. As a result of laying the boards, the frame of the walls of the future attic is obtained.
- We connect the supports installed opposite each other with bars, attaching them to the purlins with corners. These elements will serve as tensile crossbars. Therefore, for their manufacture you will need 1st grade lumber with a cross-section of 100×150mm. For each installed crossbar, a temporary support from a 25x150mm inch is needed.
- We temporarily fasten the crossbars on top with the same inch, retreating 20-30cm from the edges of the frame. Temporary thin flooring of one, two or three boards is needed for ease of installation of the upper part of the rafter system.
- We make a template for the rafters of the bottom row from an inch. To do this, we apply a blank board to the end of the purlin and beam. Then we outline the lines of the grooves along which the excess will be sawed off. We try it on and trim the excess if necessary.
- We make rafter legs using the template. If there are doubts about the flawlessness of the construction, then it is better to cut out only the upper groove first. By placing the rafter in its proper place, you can then adjust the lower groove after the fact without unwanted damage to the material.
- We install the end rafter legs, which will need to be connected again with lace.
- Using the lace as a guide, we install the rafter legs of the lower tier of the attic.
- Similarly, we make a template for the upper part of the rafter system. In order to find the line of the top cut, we temporarily sew a board onto the gable support.
- Let's make a mirror version of the previous template. The rafters of the upper tier will rest against each other.
- Let's try both templates on the roof. If everything is normal, we use them to make the required number of upper rafters from 50x150mm boards.
- We are constructing the upper tier of the rafter system.
- To prevent the crossbars from sagging, we install headstocks of the required size to each upper truss. We firmly sew them only to the ridge area; the bottom should not be rigidly fixed.
Next, the rafter legs are screwed to the walls with wire ties. Then the pediment frame is installed, along which it needs to be sheathed. Finally, the sheathing is installed at a pitch corresponding to the characteristics of the roofing material.

Method with frame modules
The technology differs from the previous method in that it is not individual supports that are installed on the floor, but modules-blocks of the side walls of the future attic that are completely prepared for fastening.
The block method of constructing a rafter system allows you to optimize the construction of an attic roof, because the construction of modular elements is carried out on the ground. In calm conditions without a sense of height, achieve accuracy node connections easier.

The process of installing a block mansard roof:
- Based on a pre-made design, we manufacture the frames of the attic walls. Using this method, longitudinal beams play the role of purlins and beds. We lay them out together with the racks on a flat area and use a square to mark the sockets for the supports of the side walls. We make cuts along the measured lines.
- We cut out spikes on the racks, the size of which must correspond to the size of the nests.
- We connect the longitudinal beam with vertical posts, we get two modular frames - these are the walls of the attic.
- We lift the frames up and install them in the intended place. We temporarily fix the position of the walls with spacers, then attach them to the floor beams with brackets.
- Using a chisel, we select sockets at the edges of the beams for installing the lower row of rafters. They need to be placed in one line. To maintain the geometry, it’s easier to first mark them with a chainsaw, then modify them with a chisel.
- We perform the upper rafter tier of the attic on the ground, having previously fitted the blanks to the installed elements. To ensure an accurate fit, we temporarily nail a board to the end of the future roof so that one of its edges clearly follows the central axis of the rafter system. The base of the upper attic triangle serves as a stretcher. Its length is equal to the distance between the outer vertical planes installed frames. We select nests along the edges of the guy wires, and spikes on the lower heels of the rafters.
- We assemble the trusses of the upper tier, for reliability we install an additional crossbar, and we reinforce the ridge assembly with a triangular wooden overlay.
- Before we move to the roof, we make preparations for the rafter legs. We try them on to the frames laid out on the ground. It is more convenient to “cut” them in one fell swoop, grabbing several pieces with a clamp. We cut out only the upper bevel, taking into account the fact that it will rest partly on the wall post, partly on the stretch of the upper rafter trusses.
- We try on the bottom rafter to the end. In the area of its lower heel we draw the shape of a spike, repeating the configuration of the nest in the beam. We cut out the thorns.
- We move the trusses of the upper tier and the rafters of the lower tier to the roof. We first install the trusses, attaching them to the upper frame of the walls with staples, then the rafters of the lower part, attaching them to the floor beams with the same staples.
The subsequent stages of roof construction are carried out according to standard rules. Drawings for a mansard roof, clearly representing the structure, will introduce you in detail to the described principles of constructing a rafter system. Thanks to the production of joints by cutting half a tree, the strength and rigidity of the frame as a whole increases, which will eliminate the need to install additional struts.

The disadvantage of this method is that the finished modules are quite difficult to transport to the roof. To transfer the assembled blocks there without the use of lifting equipment, a minimum of 4 people will be required.


Board and nail rafter system
It is impractical to build a powerful attic over small country houses, but you still want to save space on a small plot. For owners of small buildings there is great option– lightweight board and nail layered structure. The method should appeal to those who love saving, because the construction does not use solid timber.
For the manufacture of each of the supporting elements, two boards are used, between which spacer sections of the bar are installed. The cavity formed by the bars explains why the system is lightweight compared to its solid counterparts. To ensure spatial rigidity, wind braces are installed connecting the supports to the rafter legs. The lathing, in turn, will make its contribution to strengthening the structure.

The popular way to develop a layout
For a successful work result, a project is very desirable. It is not a fact that the presented drawings with dimensions are suitable for arrangement specific house. Typology in construction is now not at all welcome. If there is no documentation at all, it is better to make at least a sketch of the future roof, not forgetting the height of the ceilings in the attic. Wherein:
- Proportions must be observed, because an attic that is too large can turn a small house into an awkward, mushroom-like building.
- It must be remembered that the lower part of the attic roof is built using layered rafter legs, and they optically lower the overhang and overlap the upper part of the high windows. There will be no noticeable overhanging effect when constructing an attic according to the scheme with the rafters removed.
- Do not forget that the height of the attic room must ensure freedom of movement. It is this landmark that is required to correctly determine the height of the racks of the attic walls.
You can select the best roof proportions using the traditional template-layout method. According to it, bars or boards are laid out on a flat, spacious area, repeating the contour of the building in real size. By changing angles and moving components, you can achieve the optimal configuration. The elements need to be fixed with nails and immediately measure the lengths of beams, rafters, tie rods, and posts. The resulting dimensions will help in making templates.

The video will demonstrate the calculations and layout of the rafter system for an attic roof:
Given by us basic options and diagrams of the attic truss structure will help determine the choice of the optimal type of truss structure.