Insulation of the roof from below. Technology for laying insulation between rafters
The greenhouse is an important attribute country house or dachas. This is due to the harsh climate, and for gardeners and gardeners who do not have the opportunity to grow vegetables in open ground, she is the only way out. And yet, without good heating this gardening attribute will not bring sufficient benefit.
To effectively use a greenhouse throughout the year, you need to approach the heating issue correctly. Today, the following methods of heating greenhouses are possible: natural gas, electricity, infrared and stove heating.
Greenhouses made from a material such as polycarbonate reliably retain heat, meet all quality standards, are a new generation of greenhouses and can be heated in several ways.
Types of heating for polycarbonate greenhouses

The simplest heating for a greenhouse is, of course, a stove. The temperature is maintained with this type of heating in the greenhouse using stoves, barbecues, and boilers. The fuel used is coal, wood, peat or liquid fuel: diesel fuel, fuel oil. To prevent plants from dying from smoke in the room, use simple ventilation. The method, which at first glance seems simple, is in fact very labor-intensive and does not give the desired effect. After all, with such heating it is very difficult to achieve uniform heat distribution throughout the room.
The second most popular type of heating for polycarbonate greenhouses is electric heating. This action occurs with the help of various shades and convector systems that are installed along the entire perimeter of the greenhouse.
If the greenhouse has small size, you can install fan heaters; they will be most preferable for small rooms.
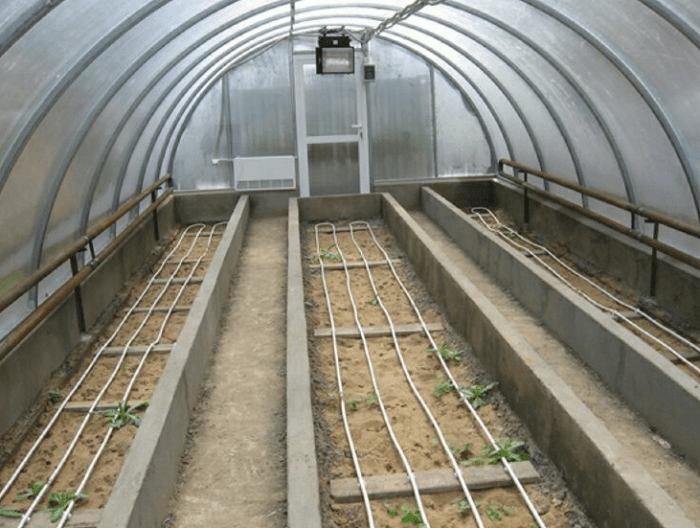
Cable heating of a greenhouse is also very popular. He has great benefits before the other above methods of heating a polycarbonate greenhouse. Here, a big role is played by the minimum installation costs, great savings in operation, ease of maintenance, uniform heat distribution, and automatic heat regulation. Such heating has a long service life, safety and the ability to regulate heat at different stages plant growth.

Installation diagram of heating cables for heating a greenhouse.
You can equip the greenhouse with special catalyst burners, which will be connected to home gas equipment or to conventional gas cylinder. It is worth remembering, however, that at the installation level this method is labor-intensive and not cheap, and also requires increased care when assembling the equipment. The slightest gas should not enter the greenhouse, as this will cause irreparable damage to both plants and people. Therefore, special careful and uninterrupted control should be installed over this method of heating a polycarbonate greenhouse. At correct device this type of greenhouse heating can be achieved good results harvest.
Return to contents
Is it possible to use infrared heating in a greenhouse?
Infrared heating of a greenhouse is the most the best option for gardeners. This type The heating system is designed in such a way that when it is used, it is not the air in the room that is heated, but objects. In addition, infrared heating does not emit light, which makes it completely invisible. With proper selection and installation infrared heating You can achieve a much larger early harvest, and besides, this method is harmless for both plants and people. The temperature is adjusted automatically. The only drawback is the high cost of the equipment, but everything is compensated by a good harvest and not much effort in maintaining it.
Return to contents
What types of infrared heating are there?
In total, two types of this type of heater can be used to heat a polycarbonate greenhouse. The first is an IR light heater, its power reaches 600 °C, it is used for heating large areas.

In a polycarbonate greenhouse that has a small or medium area and is located on suburban area, it is best to use a long-wave IR heater. This type of heater can be mounted both at the top and at the bottom of the structure. At sufficient quantity money, it would be optimal to install both an upper and a lower IR heater in a polycarbonate greenhouse. If the greenhouse is small, within 3 or 4 m, you can get by with one row of heaters.
In a polycarbonate greenhouse, which is installed in one place and does not move to a new one each time, it is advisable to use the bottom heating method. To do this, use a special IR film, which is buried along its entire length to a depth of approximately 50 cm. Or it is laid vertically between the beds along the entire perimeter. The service life of IR film for heating polycarbonate greenhouses is 30 years. Therefore, it is recommended to use this method for stationary structures. Film heaters can be used to heat boxes with seedlings, which will be located either on the ground or on a rack. In a polycarbonate greenhouse, you can also use lamp IR heaters, they give an excellent effect.

Installation diagram of infrared heaters in a greenhouse.
The advantages of a polycarbonate greenhouse heated with infrared heating over others: the ability to control the microclimate, high yields, the possibility of early planting and early harvest, preservation of beneficial vitamins in the cultivated crop, no drying out of the air, all moisture remains in the plants, such heating completely kills harmful infections and prevents plants from being susceptible to fungal diseases. It has a long service life, low energy consumption costs, reliability, and safety.
In conditions of changeable weather in our country, when building greenhouses, you should think about heating it. In winter, spring and autumn, plants sometimes cannot survive without it. In this article we will look at how to heat a polycarbonate greenhouse and how to build a heated room.
What does a heated greenhouse consist of?
The designs of various greenhouses are similar. However, a winter greenhouse has some features, which must be taken into account at the construction planning stage.
Being a stationary building, a winter greenhouse must have durable frame, which will stand on a quality foundation.
You should not make a foundation out of wood because it needs to be replaced periodically.
But the concrete one strip foundation, as well as those made from block and brick will work perfectly.
When building a frame, you should remember the expected load on it from snowfall in winter, which can cause destruction of the structure.
Wood or metal should be used as the material for the frame.
However, both materials will need to be prepared first due to their susceptibility to destruction. Some frame elements will need to be changed periodically.
Polycarbonate sheets retain heat well, however, to increase the thermal insulation properties, the ends of the material plates are closed with plugs. So, cold cannot enter the cells.
Typically, a winter greenhouse is equipped with a vestibule (on the north side of the building) to prevent blowing and provide for plants thermal curtain. It is in the vestibule that heating equipment is often located.
Priming winter greenhouse It is better to insulate so that the soil layer is far from the cold lower layers. To do this, use sand, insulation and expanded clay (as drainage).
How are greenhouses heated in different climates?

Depending on the region where the greenhouse will be located, the principle of how to heat the building may differ. In the southern regions, it is not advisable to build greenhouses with boilers for heating, because they will only be used for 2-4 weeks a year, and you will have to spend a lot on equipment.
Northern regions require that greenhouses be equipped with constant heating.
Let's consider different systems heating depending on climate:
- Warm climate. It is quite sufficient in its conditions to have warm beds with bioheating and installations backup source heating in the form electric convectors to protect plants during frost periods. The energy of the sun in such greenhouses will play the role of the main source of heat. During the day, the air and soil in the building heat up, at night they gradually cool down, and when the temperature drops to the minimum permissible, the convectors are activated. Additional warming of the soil occurs due to the processes that occur in a warm bed (the organic residues filling it, decomposing, release heat). In such a climate, a ventilation system is important.
- Temperate climate. In winter, greenhouses located in temperate climate require insulation of the blind area and installation of heating devices. A stove that will be heated with wood or other fuel will be inexpensive. It is located in the northern part of the building (it is better if there is a vestibule there). To heat the entire area of the room, natural convection or air ducts are used, which are laid along the beds. The soil can be heated using warm beds. Also, in case of strong temperature drops, you can use infrared lamps or heaters. Convectors or fan heaters are used to heat the air.
- Cold climate. Greenhouses located in regions with cold climates require continuous heating. To do this, you can use a water heating circuit, which is laid along the entire perimeter of the building. It is based on registers or radiators connected by pipes. In this case, a curtain of warm air is formed near the walls, so the external cold does not affect the plants. It is better not to use biofuel to heat the soil in such a climate; here it is better to use artificial heating from beds located at the bottom heating pipes or electrical cable. Very severe frosts require temporary use infrared heaters. To quickly heat the air, convectors can be used.
How is solar energy used?
Traditional heating of greenhouses occurs due to solar energy. Light-transmitting material is used to make their walls.
In summer and spring, heating the air and soil due to solar energy is sufficient for the normal functioning of plants. In autumn and winter, sun rays Penetration ability decreases, since the sun is low above the horizon and the day is shortened. This way the soil is illuminated at an angle, which means it heats up less. 
On a note: To increase the efficiency of heating from the sun, the greenhouse is located at a slope to the south. Thus, lighting and warming by the sun's rays occurs more efficiently.
Reflective material is often used for wall cladding. The sun's rays are reflected from it, and additional heating of the greenhouse space is carried out.
It is also common to place a black barrel filled with water in buildings with plants. It plays the role of a heat accumulator. Heating during the day, such a barrel gives off heat at night.
Greenhouse roofs are often equipped with solar collectors, which are a pipe system placed in an insulated housing with a transparent cover. Such a system is filled with water and connected to a water heating system. The circulation of solar-heated water through the pipes helps to heat the building space.
Solar energy can be used as a stand-alone heating system or used in conjunction with other types of heating.
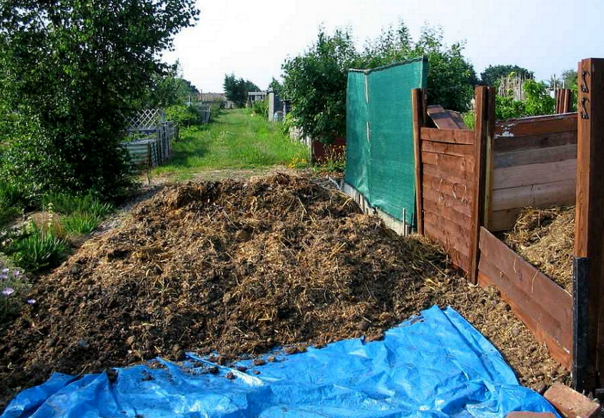
Biological heating
 Biological heating of greenhouses occurs due to warm beds filled with organic components. Soil microorganisms contribute to the decomposition of organic matter and the release of heat. To do this, where there will be a bed, they dig a trench 0.5-0.7 m deep, make wooden, brick or other fences, sprinkle the bottom with stones, then with wood chips and tree bark. Next, such a bed is filled with manure and watered with water, which contains biobacteria. The top of the bed is covered with cardboard or paper, on which dry leaves and mowed grass are laid out. Fertile soil is laid on top of the grass.
The finished bed is covered with polyethylene and allowed to stand for 3-7 days. During this time, bacteria in the soil actively decompose organic matter, promoting the release of heat.
As biological heating, a pit 15 cm deep is also often used in a greenhouse, in which a heat insulator is laid, covered with polyethylene, sprinkled with sand and soil on top. Thanks to the energy of the sun, this method leads to maintaining high temperatures in the greenhouse.
You can also use air heating. To do this, take a metal pipe, the diameter of which is 50 cm, and the length is 2-2.5 m. One end of the pipe is placed in a greenhouse, a fire is lit under the other, which should be constantly burning.
Electric heating
 The most accessible method heating the greenhouse in winter is electric heating. But in order to organize it, you need to have a constant current source to which you can connect all the necessary devices.
Distinguish the following types electrical equipment:
- The location of radiators or heating cables in the greenhouse, which are dug into the ridges to resist soil freezing. Basically, this heating method is used in combination with other methods.
- The use of electric heaters or convectors (only if the building is equipped with solid walls). This is the best way to protect plants from cold air currents, but the downside is the risk of fire and deformation of the greenhouse skin.
- The use of infrared equipment (lamps or heaters), which is the most modern source of heat for greenhouses. In this case, it is not the air that is heated, but the surface that the rays of the device touch.
- The use of an electric boiler with a water heating system. This installation can be easily done independently, you will only need to purchase some elements.
Stove heating
 Using stove heating You can heat the air in the greenhouse in any weather. It is only important to take into account the need to match the thermal power of the furnace to the volume of the building.
The stove should be installed where the coldest part of the building is located (in the northern part). To distribute air masses, you can use fans, air ducts or natural convection. The stove can be heated with firewood, briquettes and wood processing waste.
Let's look at the designs of stoves that can be used to heat a greenhouse:
- A potbelly stove is a metal stove with a straight chimney. It has a combustion chamber, a door for loading fuel and an ash pan. With its help, the air in the greenhouse quickly warms up, but the space may heat up unevenly. Such a stove requires a lot of wood consumption and significantly dries out the air. Often, to improve the quality of a potbelly stove, a water circuit is used.
- Buleryan is an improved type of potbelly stove. It contains built-in hollow pipes through which air constantly moves. Thanks to this, the air does not overheat. Such a stove is highly efficient and has low fuel consumption, but it is very difficult to make it yourself.
- A brick oven is installed in greenhouses that are used all year round. Its dimensions and design may vary and depend on the size of the greenhouse. This oven gives high heat capacity, does not cool down for a period of time from 12 to 24 hours, does not require large quantity fuel, heat is supplied in a spectrum that is beneficial to plants. For such a stove it is necessary to make a foundation, and if you are laying it yourself you will need professional skills.
Water heating
This type of greenhouse heating can be called the most effective way creating the necessary microclimate for plants.
This heating system includes:
- boiler;
- contour of pipes and radiators;
- expansion tank;
- pump for pumping water.
The fuel for boilers can be gas, diesel, electricity, wood or peat.
The main advantage of such heating is that the process is fully automated. It can be used in any greenhouse.
Modern boilers allow you to regulate the temperature and delay heating for a selected time.
What can IR heating be like?
IR modern production are light and elegant. They are easy to install in the greenhouse yourself.
The basis of these heaters is represented by a ceramic emitter and a steel reflector polished to a shine.
Let's consider two types of IR heaters:
- Cabinet-mounted ones are very mobile and can be mounted on both ceilings and walls. New models of such heaters are equipped not with a flat, but with a spherical radiating surface, which increases the dispersion angle to 120 degrees, making heating more uniform.
- Film (tape) - permanently mounted in the ceiling. They are less mobile, but significantly save energy and heat the soil more evenly.
The energy source for such heaters is mainly electricity. However, it is possible to use liquid fuel and gas.
What to consider when making a greenhouse heating system with your own hands?
Installation work to equip the greenhouse with a heating system will depend on which heating method is chosen.
Today, the most common is heating in winter using infrared emitters. No special skills are required to install them, which means installation is easy to do on your own. Therefore, when deciding how to heat a greenhouse and wanting to save on additional services of builders, you should pay attention to this option.
Other types of heating are also often used to heat greenhouses that are used all year round. However, they require great knowledge and skill.
Preparatory stage
Before you begin building a heated greenhouse, you need to plan the following:
- The correct choice of location regarding lighting (extent of the greenhouse from west to east), wind conditions (location near the fence of the house or trees that can protect against wind and damage to the building) and ease of use (availability of wide and convenient access).
- At the preparatory stage of construction, it is very important to choose the right shape of the greenhouse roof. Snow should not accumulate on it. The easiest way to install a gable roof.
- Particular attention should be paid to the choice of material for the frame. The most durable option is metal. However, in order to build metal carcass, it will be necessary to carry out welding work. Using wood for a frame is more accessible and does not require special skills. You can significantly extend its service life by covering the material with paint in several layers.
- The choice of polycarbonate is also important. To build a winter greenhouse, you need to use thick sheets (8-10 mm each). If you use thinner material, it may not withstand the load.
Stages of work on the construction of a heated greenhouse
 More details:
- Laying the foundation. Dig a trench 30-40 cm deep. Gravel and small stones are filled in. Fill the trench with a layer of concrete.
- Ruberoid is laid on the well-hardened solution as waterproofing.
- Formation of the base of the building.
- Making the frame. During construction wooden frame prepare the bars required thickness, thoroughly clean and sand them, then apply several layers of paint. For the side parts of the frame, a 100 by 100 mm beam is used, which is placed along the perimeter of the future building. A 50 x 50 mm beam is suitable for the roof. Self-tapping screws and metal tape are used as fastening elements.
- Construction of a small vestibule (if necessary).
- Installation of communications - heating systems, heating systems and so on.
- Installation of polycarbonate sheets on the frame. Sheets of material are fastened together with a U-shaped profile. When screwing in self-tapping screws, seals are used to prevent moisture from penetrating into the room. A sealing tape is placed between the frame and the polycarbonate sheets.
Video on the topic
Having your own land plot, makes you think about its rational use not only in summer, but also in winter. The most common option is to build greenhouses and even greenhouse complexes that can provide fresh fruits, vegetables and berries all year round. If you approach the issue of constructing a greenhouse competently and take into account even minor nuances of the operation of such a structure, you can grow a rich harvest of not only local crops, but also tropical ones.
The most popular and suitable for such purposes are greenhouses built from polycarbonate panels. Special condition A good quality building is the presence of heating. Having studied the issue of installation heating system, it becomes clear that all the work can be easily done with your own hands. The main thing is that the effect of the completed heating system meets expectations, you need to think carefully in advance about what type of heating should be present in the greenhouse, clarify the features of its installation, and only then start working.
Types of greenhouse heating
There are many ways to make heating in a greenhouse with your own hands; let’s look at the most popular ones in more detail.
Solar heating
Heat from the sun's rays is a simple way to warm a room without requiring any material costs. sunlight, penetrating through the transparent coating of the greenhouse walls, heats not only the air inside the room, but also the soil. In the summer, the hot and bright sun provides enough energy to warm the air in the greenhouse. The main thing is to make the structure in a place protected from the wind, away from the shade of trees.
The disadvantage of this heating method is insufficient heat in winter, when daylight hours are shortened and the sun no longer provides such luminous intensity. To ensure the required level of heat in a greenhouse in winter, as a rule, slightly different heating methods are used.

Air heating
This method involves the operation of heating and ventilation devices. They can be purchased either factory-assembled or made with your own hands. To do this, a small steel pipe is installed as follows: one end is located indoors, the second is led outside through the chimney. This method has one minor drawback, so that in winter warm air entered the greenhouse, it is heated with fires, which is a very fire hazard.

Use of ovens

This method is the oldest for heating rooms. Various options fuel usage makes it quite economical. The boiler is installed inside the greenhouse, and only the chimney is exposed to the outside. There is one pretty significant drawback Using such a heating system is a risk of fire due to excessive heating of the boiler walls.

Heating with biological fuels
Waste from animals and birds (manure, bird droppings, mullein) rots and decomposes and releases heat. This can be used to heat the room.
Important ! It is worth noting that biological waste in the process of decomposition humidifies the air and creates a very favorable microclimate for the growth and development of plants.
Gas heating
The trend of constant growth in the cost of gas makes this method very expensive, and growing vegetables and fruits in such conditions is economically unprofitable. Gas can be supplied to the greenhouse from centralized system, but you can use liquefied gas in cylinders. One of the undeniable advantages of gas heating is the ability to continuously supply heat to the greenhouse.

Use of electrical energy
The method is quite simple to use, but today it is losing its popularity due to rising electricity prices. However, a variety of heating devices operating from the network allows you to choose the best option for yourself.
One such device is a convector. It is a device equipped with a heating element in the form of a spiral. Warm air is evenly distributed throughout the greenhouse and mainly warms up the air. Unfortunately, the heat from the convector is not enough to warm the soil.

A heater is a small fan that is equipped with an air heating function. Attracts with its inexpensive price and ease of use. The heater is not only capable of warming up the air, but also ensuring its circulation.

Cable as a heating element. The principle of using a cable to warm up the greenhouse is as follows: it is placed around the perimeter of the greenhouse and the location of the beds. When connected to the network, the cable blocks cold air from passing through the soil, thereby keeping warm air indoors.

Water heating. This method is quite difficult to install and costly. A system of pipes is installed through which heated water circulates. Thus, not only the surface of the pipes heats up, but also the air in the room. It is also worth noting that water system heating system functions effectively, its installation should only be carried out by professionals.
How to choose a heating system
To choose and make heating in a greenhouse correctly, you need to approach the issue wisely and take into account the following factors:
- greenhouse dimensions;
- type of heating used in a residential building;
- the amount of money that makes up the installation budget for the future heating system.
If a greenhouse already exists, then do future system heating is necessary taking into account the finished structure. Example: it is neither rational nor practical to make an expensive heating system in a small greenhouse.
Important ! Heat consumption must be rationally calculated and distributed over the entire area of the greenhouse.

Installation of water heating

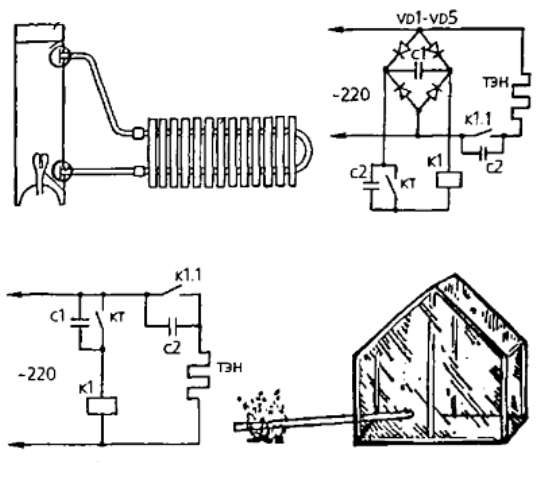
In order to make heating using a water system quickly, and the result meets expectations, you should follow fairly simple instructions for its installation:
- An old fire extinguisher, which has already served its intended purpose, can be used as a heater. For further use, the top of the fire extinguisher will need to be cut off.
- Heating elements are installed at the bottom of the flask, the power of which should not exceed 1 kW. Electric heating elements taken from an old samovar are perfect for such purposes.
- We make a cover for the heater body from any available means.
- We connect two pipes from the radiator to the base of the heater. To do this, you need to use nuts and special rubber seals that will prevent water leaks.
- In order for the assembled device to operate in automatic mode, it will be convenient to make a special relay with a voltage of 220 V. This mechanism allows you to block the operation of electric heaters when the water reaches the desired temperature.

Air heating installation
To make heating using air system it is necessary to use the following work algorithm:
- We select a steel pipe, the length of which is about 25 meters, the diameter is 600mm.
- One end of the pipe is taken outside the greenhouse, and the other is left inside the room.
- WITH outside, in the area located under the pipe, a fire is lit, the combustion of which must be constantly maintained. Due to the flame, the air in the pipe heats up and enters the greenhouse.
Attention ! This method is very simple to implement, the only thing is that it requires free time to maintain the strength of the flame in the fire.
Installation of electric heating
This heating system can be made based on the principle of “warm floor” functioning.
In this case, instead of the floor, the soil surface in the greenhouse protrudes. An electric cable or water heating pipes are located deep in the soil, on a previously prepared surface. To do this, remove the top layer of soil to a depth of about 30 cm. Place heat insulating material, on top of which sand is poured and heating elements are laid.
Advice ! To avoid accidentally damaging them during loosening the soil, a special protective mesh must be made over the pipe or cable. On last stage It is necessary to fill the soil and plant the plants.
Heating a greenhouse using infrared heaters
In the greenhouse, along its length, you can place several infrared heaters that will help warm the plants. For a greenhouse 3 meters wide, 6 meters long and 2 meters high, it will be enough to mount 3 devices. It is imperative to install a temperature sensor and an electrical panel with a thermostat together with the heaters.

Heating a polycarbonate greenhouse
Due to the fact that polycarbonate retains heat better than glass or polyethylene, such designs are widespread among gardeners and gardeners. It is also worth noting that this synthetic material very light and affordable. Installation of a heating system in polycarbonate greenhouses is no different from any other greenhouses.

Conclusion
It is very difficult to answer the question of which heating is the most economically profitable and efficient in terms of the level of heat generated. Each of them known methods has its positive and negative sides. Therefore do right choice heating can only be a consumer who, to the best of his financial capabilities, can choose the ideal option for himself.
What mistakes do gardeners and gardeners make when installing heating in a greenhouse, we will look at in the next video
Possibilities of a heated greenhouse
Such conditions begin to develop in the second half of March, so sowing can begin around the middle of the month.
From April, by heating the greenhouse, you can harvest the first harvest: first onions, radishes, parsley, dill, kale, salads, then cauliflower and early cabbage. Tomato seedlings are planted in the vacant spaces, and then cucumbers.
A heated greenhouse without lighting allows you to start the season about a month earlier than usual. Conditions acceptable for plants occur from the moment the soil warms up to +5...+7 °C. Therefore, it is not heating the air that is more important, but warming the soil. This can be achieved in three ways:
- we put biofuel into the soil (the so-called warm beds, where under a layer of soil 30-35 cm high there is a layer of organic material - dry leaves, food waste, fresh manure, which decompose with the release of heat and warm the root layer of plant soil);
- we heat the greenhouse using an underground pipeline (but timely watering will be important, since underground heating dries out the soil);
- we warm the soil with infrared heaters (the most natural, but also the most expensive method associated with high energy consumption).
Greenhouse design
1. Covering material.
In spring, no less a problem than warmth is lighting. When choosing a coating material, you have to look for the ideal balance of thermal conductivity and light transmission.
- glass allows you to get good lighting, but gives very poor thermal insulation;
- double-glazed windows are good in every sense except one: they are too expensive;
- cellular polycarbonate is the most acceptable option. For sheets 4 mm thick, light loss will be about 13% (twice as high as glass), but it is 4 times warmer. For comparison, when using even a single-layer film, we already lose about 40% of the light. In a greenhouse without lighting, which is “launched” in March, single-layer polycarbonate is sufficient. If there is light, you can make the greenhouse year-round, then polycarbonate is laid in two layers - outside and inside the frame (the same “four” is enough).
Frame.
Its strength is very important. A glass greenhouse allows heat to pass through from the inside - on a relatively clear day, the radiation from the heated soil is enough to cause the snow to melt off the slopes. But due to low thermal conductivity, a film of water does not form on polycarbonate, especially two-layer polycarbonate, and snow accumulates.
Requirements for the design of a heated greenhouse with an area of 3x6 m

In the drawing the numbers indicate:
- Polycarbonate with a thickness of 4 mm and a density of 860 g/m2 and above (for a given thickness). A lightweight one is not suitable - it will bend and fall under the snow. High-quality polycarbonate will last at least 10 years.
- The height should be balanced. The higher the greenhouse, the greater its thermal inertia (the volume cools down more slowly, as if storing “free” solar heat for the night). But if the height is too high, this heat will accumulate under the ceiling, and cold air will sink to the plants. In practice it has been established that optimal height greenhouses along the ridge are about 2 m. For example, 210-215 cm. It’s convenient to walk on such a greenhouse and it’s easy to heat.
- Profile – welded square pipes with a cross-section of at least 30 mm and a metal thickness of at least 1.5 mm. A bent profile (steel strip folded in a “P”) is not suitable for our greenhouse: under load it simply unbends, turning into a strip, and sag. Frame - attached by eyelets to pipes driven into the ground to a depth of about 100 cm.
- Expanded clay thermal insulation around the perimeter (easy to do with your own hands). If you allow the roots of plants to freeze, then it no longer matters what the air temperature will be in the greenhouse. Expanded clay filling will protect against heat loss through the ground. For a spring greenhouse, a depth of 20 cm is sufficient; for a year-round greenhouse, we provide thermal insulation to the freezing depth (70-100 cm). Expanded clay has very low thermal conductivity, so a width of 10 cm is sufficient in a spring greenhouse, and 25-30 cm in a winter greenhouse. To prevent expanded clay from mixing with the soil, you can install a separator - plastic or roofing felt. Cover the top of the filling with a layer of soil (3-5 cm) so that it does not fly apart. The backfill will simultaneously serve as drainage - it will prevent melt water from the roof from going into the greenhouse.
- Longitudinal jumpers. The distance between them should not be more than 80 cm, otherwise there is a high risk of getting a “snow bag”. Thus, a greenhouse 2 m high and 3 m wide has at least 9 longitudinal jumpers. Some manufacturers, at the request of the customer, install 7 jumpers, but on the condition that the greenhouse will be regularly cleared of snow. Of course, in this case we are no longer talking about the factory warranty.
- Cross section. Its length is not so important, since the polycarbonate ribs lie in the longitudinal direction. Usually two-meter sections are made. Sections of shorter length are used in areas where the snow cover reaches 2 m, but this is rare.
Heating a greenhouse with an underground pipeline (pipes)
The pipeline requires metal-plastic or polypropylene pipes.
They are laid below the root system of plants to a depth of approximately 30 cm. The slope of the pipe from the top point ( hot pipe) do about 1 cm per linear meter pipeline.
We maintain the coolant temperature at +10…+15 °C. You can use water or antifreeze - in the second case, the coolant is not drained for the winter.
The system is gravity-fed: circulation in the circuit occurs due to the difference in the weight of warm and cold water.
The depth of the pit for the boiler is about 1.5 m (the deeper, the more active the circulation will be). It is enough to make a hole with a drill and install a wide metal pipe and lower the boiler into the resulting “well” (it is a sealed pipe with a diameter of 10-15 cm with an inlet and outlet for hot and cold water).
To heat the coolant, you can use a regular inexpensive electric boiler with a heating element (indirect heating boiler) with a power of about 1.5 kW. It serves for a long time, about 10 years.
Craftsmen, in order to save electricity, replace the boiler by independently making a water jacket for it, but the stove needs an approach from below to lay firewood - ultimately, such a structure will take up a lot of space.
At gravity system It is not recommended to install heating circuits that are too long (optimally about 25 m). To heat the entire greenhouse, splitters are connected to the inlet and outlet of the boiler. For example, for a two-row greenhouse with an area of 18 m2, four circuits are sufficient - 2 for each row 120 cm wide.
The components for such a system are inexpensive - it’s quite possible to spend less than 5,000 rubles. But expensive excavation But when laying a long pipeline, you will either have to give up greenhouse tomatoes for one season and slowly dig with your own hands, or pay workers to move 3-4 cubic meters of soil twice.
Infrared heating of a greenhouse
The good thing is that it does not require serious preparation. Infrared panels with a power of 0.7 kW are hung on wires from the ceiling of the greenhouse at a height of about 2 m - the result is an electric sun. The panels do not heat the ceiling, almost do not heat the air: the heat is delivered directly to the soil and plants. For a greenhouse with an area of 18 square meters. m you need 4-5 panels, they provide the necessary power even with a reserve. It is not necessary to turn on all panels every night. At a night temperature of about 0 ° C, the two extreme ones are sufficient; at -7...-5 ° C, three panels can be turned on (one after another), and only if frost below -10 ° C is expected, all devices are used.
Infrared heating consumes more power than underground heating; the estimate for equipment will be approximately 13,000-15,000 rubles, excluding the cost of the cable, which will also cost a pretty penny if the greenhouse is far from home. But infrared heating dries out the soil less.
On a note:
Heating the entire greenhouse may be too expensive. For radishes and early greens, as well as for planting the first batch of tomatoes, most likely half or even a third will be enough. Then the heated part must be separated from the rest of the space by a partition - at least a thick plastic film.
In drawing 2:
On the right is an example of placing two heating circuits under a bed about 120 cm wide. It is important that the lines with hot water covered the outer perimeter of the plantings.
Left: Heat rays from infrared heaters form an invisible volume in the form of cones, the bases of which overlap at the soil surface. Therefore, in relatively warm weather, it is enough to turn on 2-3 devices. They will warm up the entire greenhouse, although with less power. If frost is expected at night, all panels are turned on for more intense heating.
 Yofeil gas gas torch gun cooking torch soldering butane self-ignition Gas...
IN middle lane Russia get good harvest It is simply impossible to grow heat-loving crops without greenhouses. If they are also heated, then from the beginning of March you can plant seedlings of any plants in it, and also get early greens for the table. Moreover, installing most greenhouse heating systems with your own hands is quite simple and does not require special skills.
Which method should you choose?
Read also: Do-it-yourself drip irrigation device in a greenhouse: from a barrel, a plastic bottle, or even an automatic system. For tomatoes and other crops (Photo & Video)+Reviews

It all depends on the goals, type of greenhouse, type of crops, as well as financial capabilities. If you plan to grow vegetables or flowers in it throughout the year, you will need a fully insulated building, which can be heated using infrared electric ceiling heaters, underfloor heating or a water circuit. To heat the greenhouse only in spring and autumn, it is enough to install a stove-stove, a gas gun or put biofuel (manure or plant residues) in the soil.
When calculating the required amount of heat, it is necessary to take into account that its consumption depends on the degree of insulation of the room and the ratio of the wall area to the soil area.

It makes no sense to heat a room that is blown from all sides. Therefore, before proceeding with the installation of heating a greenhouse in winter, it should be thoroughly insulated. For this you will need:

This heating method ensures uniform heating of both soil and air. Another advantage is the creation optimal microclimate indoors – the air with such a heating system does not dry out. Heating in this way is possible using firewood, peat, gas, coal or even waste automobile fuel. Therefore, you can choose the most best option, taking into account the cost of energy in a particular region.
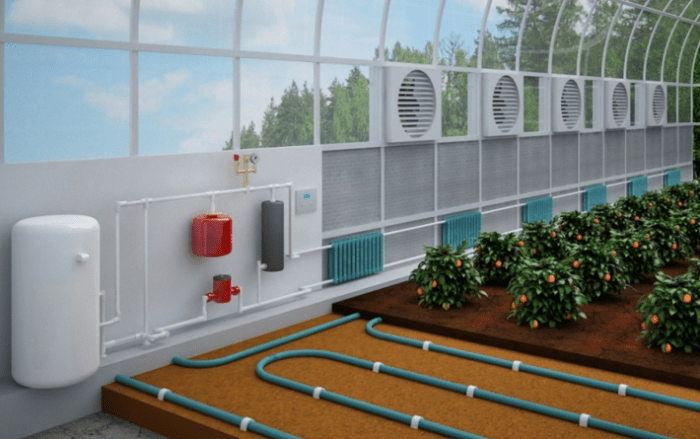
How to make water heating of a greenhouse? This heating system consists of:
- boiler or furnace
- expansion tank, serving to store water
- radiators
- pipeline
- pump: since lowering the heating boiler in a greenhouse below ground level is quite problematic, water circulation through the pipes is forced
- chimney
Even if there is a circular pump, the pipeline in such a system is best positioned at a slight inclination. In this case, even with a temporary failure pumping system the heating will continue to function.
To calculate the thermal power of radiators, the formula is used:
P = S * 120 ,
S– area of the greenhouse (at standard height walls of 3 m, calculation of the volume of the room is not required).
For example, to heat a greenhouse measuring 3x8 m, its area will be 3 * 8 = 24 square meters. m. Find the required thermal power: 24 * 120 = 2880 W. You can clarify this parameter for one radiator section in the data sheet.
Stove heating
Read also: Blind area around the house: types, structure, schematic drawings, instructions on how to do it yourself correctly (30 Photos & Videos) + Reviews
Stove heating of a greenhouse
So that heating costs are not “eaten up” the lion's share profit from the sale of grown products, when choosing the type of boiler or stove, you should take into account the cost of fuel in a particular region of residence. Also take care of effective system insulation of the room.
Brick structures are more complex in execution. Without experience, it is difficult to build them yourself. Plus, to build brick ovens that are heavy, you will need a strong foundation. The cost of a brick structure will be considerable. However, such stoves are capable of storing heat for a long time, saving fuel. If you attach a horizontal chimney (“hog”) made of metal to such a stove, you can get an additional source of heating.
Read also: Building a chicken coop: description, tips, arrangement of premises for 5, 10 and 20 chickens (105 Photo Ideas) + Reviews

Metal oven If you have basic skills in working with metal, you can weld it yourself from scrap metal or even old iron barrel. Therefore, the price of such structures is minimal.
However, if there is no radiator system in the greenhouse, the stove will heat mostly air. Therefore, it is advisable to install it in the center of the room and slightly deeper into the ground. You can also raise the beds or place them on shelves, where the air temperature is always higher.
Read also: A septic tank for a home - a sewer pit without pumping: device, step-by-step DIY production from concrete rings and other options (15 Photos & Videos) + Reviews

Convection and pyrolysis ovens . Such designs are quite complex to implement, so it is better to buy them ready-made. In convection boilers, air passes inside the casing. The operating principle of pyrolysis structures is based on the complete combustion of gases that are formed during fuel combustion.
Read also: Construction and arrangement of a summer kitchen at the dacha with your own hands: projects, design, arrangement, with barbecue and barbecue (60+ Photos & Videos) + Reviews

Stove "Buleryan", surrounded on the sides open pipes, takes in cold air from below using them. The rapidly circulating air in the room warms up faster even after adding fuel once. If you put “sleeves” on the lower pipes, you can distribute the heat evenly throughout the greenhouse.
Read also: Making vertical beds with your own hands: the best ideas of 2018. For vegetables, berries, herbs and flowers (65+ Photos & Videos) + Reviews

Feature of the Butakov boiler is increased heat transfer, which occurs due to the special design of convective pipes. However, it is quite difficult to clean it from combustion products. Plus one single bookmark to ensure comfortable temperature won't be enough. And it heats the air unevenly. The absence of a secondary combustion chamber significantly reduces the efficiency of the design.
Read also:

Works only on used machine oil. Essentially, this is a modified version of a potbelly stove with two chambers, a lowering and rising piston and a valve for adjusting the air supply. Such a unit can operate without refilling for up to 61 hours! Therefore, if you have the opportunity to regularly refill it with spent fuel, this is the option for you.
To increase the efficiency of your furnace or boiler, install a fan next to the loading door. The efficiency of their work will increase significantly.
Read also: Making and laying paving slabs with your own hands: step-by-step instructions for dry and wet mixture. Making a mold, vibrating table (Photo & Video) + Reviews

The latest developments in greenhouse heating include ceiling-mounted infrared heaters. They spend minimal amount electricity, plus the effect of their action far exceeds any other types of heating devices, including water radiators and even heated floors.
The heat from them does not rise upward, but spreads evenly throughout the room. Moreover, it is the soil that warms up most intensively, and not the air, which is very important for plants.
It should be noted that to heat greenhouses it is necessary to use only long-wave devices(preferably ceramic) with heating of the working fluid to 270-300°C. Unlike medium-wave emitters, which heat up to 1700-1900°C, they are not capable of burning plants.
To significant advantages infrared heating may also include:
- environmental friendliness and harmlessness: such heaters do not emit air harmful to plant health carbon dioxide and other combustion products
- infrared devices do not dry the air at all, since they do not heat it, but any objects and surfaces; no humidification of the room is required during their installation
- no heat loss - the efficiency of such heaters is 95%
- efficiency: since they heat the soil rather than the air, the required volume of thermal resources is reduced by 35%; Plus, such devices consume a minimum of electricity
- installation of systems is simple
- the risk of fire when using infrared devices is minimized
Underfloor heating system

An ideal option for heating the soil in a greenhouse is also a heated floor system. After all, for successful plant growth, it is the roots that need to be warmed up.
Since heating a greenhouse with electric heating elements will cost a lot of money, it is better to install a stove or boiler in it. The heating system can be combined by installing radiators around the perimeter.
- It is better to use polyethylene pipes to heat the greenhouse. They are buried to a depth of about 40-50 cm in the drainage - a layer of crushed stone and sand
- It is not advisable to use metal-plastic for laying in the ground. After all, his fittings ( connecting elements) require regular tightening. If you still decide to use such hard plastic, use compensation loops when laying the pipeline
- The first to be laid polyethylene film , serving as waterproofing
- Next, a layer of thermal insulation is laid made of polystyrene foam or polystyrene foam
- You can also reduce the thermal conductivity of the soil using compacted sand., which is poured over the heat-insulating layer to a height of 10-15 cm
- The distance between pipelines should be 0.36 m. To ensure uniform heating, 2 collectors are placed along the edges of the greenhouse. Pipes are connected to them alternately
- To protect the pipeline from damage when digging the soil with a shovel or pitchfork, slate or metal mesh is laid on top of it
- The next 35-40 cm layer– fertile soil
Heating with gas

The disadvantages of such heating include the need for mandatory coordination with special services. And do gas heating you will not be able to do greenhouses - the design and installation of such systems is carried out only by specialists. Due to the high risk of ignition during operation, the operation of gas boilers will need to be constantly monitored. Due to the excess carbon monoxide generated during fuel combustion, in order to avoid poisoning and the threat of explosion, it is imperative to install ventilation.
But still, such devices have much more advantages. The cost of gas is not that high. You will only have to spend money on purchasing a boiler and equipment for it. Such designs ensure uniformity and rapid heating of the greenhouse, plus they are as easy as possible to maintain. But in order for it to heat up evenly, it is better to install heaters or connect several burners at once.
Let's list the main types gas equipment used for heating greenhouses:
- convectors: industry produces special devices similar type specifically for heating greenhouses; built-in heat exchanger distributes heat evenly throughout the room; ventilation in it is provided using a coaxial (pipe in pipe) chimney
- heater with two open burners(the second of them serves as a spare) and a vertical chimney; ventilation system installed separately
- burners with infrared radiation: they are located in separate zones for local heating of certain types of crops or accelerating seed germination; equipped with a smoke exhauster that throws combustion products into the chimney; their operation does not require any arrangement coercive systems ventilation – quite natural
In most cases gas heating greenhouses are combined with water. The principle of its arrangement is similar to that described above.

Thermal gas guns , used for spot heating, can be easily connected to both the gas main and the cylinder. Such structures are light in weight and quite mobile; they can easily be moved to any other place. The fuel in them burns completely, so the risk of carbon monoxide poisoning during their operation is minimal. Modern heat guns, operating on gas, are equipped with a temperature and even humidity control system.
Solar batteries

Collecting and accumulating heat given off by the sun's rays will help to obtain early harvest in the spring. Heating a greenhouse using solar batteries can also be used as an additional option. For winter period the heat received only from them will not be enough.
To accumulate solar energy, the greenhouse must be installed at the very open place and place it from east to west. It has been proven that arched polycarbonate structures are capable of “assembling” maximum amount rays. Plus, the air in the cells of this material will serve as a natural heat insulator.
Solar batteries are divided into:
- aquatic: the heat storage in this case is water containers (barrels or pools); Moreover, several small containers have a higher efficiency than one large one, because water always warms up better closer to the surface; they are distributed evenly throughout the room
- stone: this material is capable of retaining heat for a long time, so it makes sense to line the walls of the greenhouse with stone or cover it with a sufficiently large layer around the perimeter of the structure
- air: are among the most efficient battery devices (see photo); for efficient heating, heat exchangers are positioned perpendicular to the direction of the sun's rays; heated air enters the greenhouse through pipes; cold air is taken in through the second duct
When installing an air heating system in