How to make an attic floor correctly. How to build an attic roof with your own hands and not make mistakes
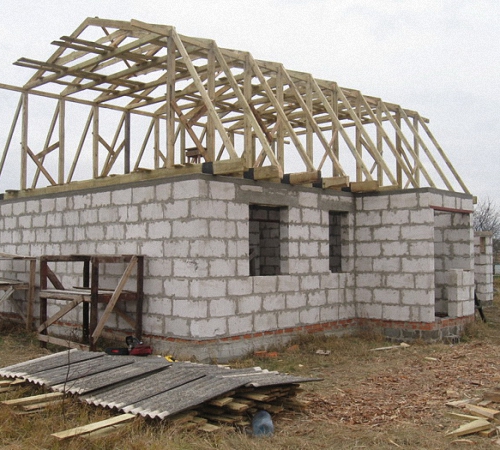
The attic roof makes it possible to significantly increase the total living space, while the financial investment will be minimal. The most common option is a gable broken structure, which is easy to build yourself.
How to make a mansard roof yourself
Under the attic roof you can arrange living rooms. The shape of the building can be different, but in most cases the attic is built under a roof with two slopes. The optimal solution, which allows you to obtain a significant area of living space, is a broken structure.
Broken roof is the best option for arranging an attic
Drawings and calculations of a mansard roof
The first step is to decide on the frame diagram. Rafters can be layered or hanging type. Layered ones rest on the walls of the building. They are mounted in structures where the distance between the walls is less than 6.5 m. Hanging rafters are placed on fillets and a mauerlat. If the width of the spans is large, then the rafter system will need to be reinforced with auxiliary ties.
The main condition for the comfortable construction of an attic is the ceiling level - it must be higher than 2.5 m. To ensure a similar height, the break line must be placed at a height of more than 2.8 m, taking into account the thickness of the layer of material for insulation and cladding of the structure. It is also important to consider the thickness of the floor.
An example of a drawing can be seen in the image:
The minimum ceiling height of the attic roof is 2.5 m
To calculate the expected snow loads, you will need to apply this formula: S = Sg x µ, where S is the snow load, Sg is the weight of the snow cover per 1 m 2 area, µ is the value that depends on the roof slope (1.0 - For flat design with a slope of 25°, 0.7 - for a design with a slope of 25–60°).
Parameters Sg and Wo can be found in the relevant SNiP, in the “Rafter systems” section. If the roof has a steep slope, then the snow load can be ignored.
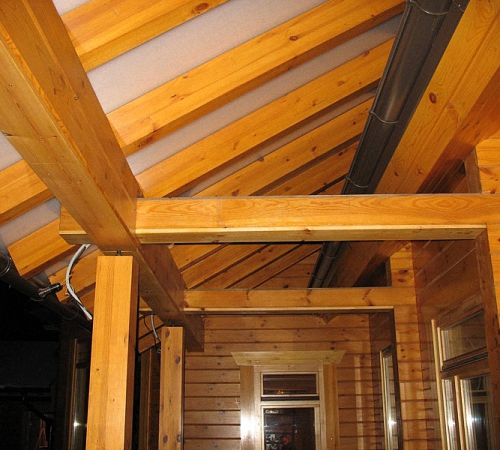
Roof structure
The frame structure includes the following parts:
- Mauerlat - a support bar that transfers the load from the rafters to the walls of the building;
- racks - supporting parts that support the rafter system in a vertical position;
- floor beams - planks that form half of the attic and the ceiling of the lower floor;
- rafters - slats that form the main contour of the roof;
- purlins - horizontal supporting parts for rafters;
- sheathing - slats or plywood sheets that are intended for laying roofing material;
- fillies - strips that are attached along the axis at the bottom of the rafter legs.
The frame consists of a mauerlat, racks, purlins, floor beams and other elements
A sloping roof differs from an ordinary structure with two slopes. The difference is that the slopes, which are placed opposite each other, have a special shape: they do not form a straight line, but consist of several slopes that are fastened to one another at an obtuse angle. The design is also symmetrical.
The extreme part of the rafters is generally set at an angle of about 60°. The support posts that support the rafters form the frame structure of the interior walls. The upper part of the rafters is mounted at a small angle, it can be from 15 to 45°. This makes it possible to reduce material consumption, while maintaining the functional properties of the roof and resistance to loads from snow.
Vertical posts that rest against the floor planks, purlins and crossbars that fasten them form a parallelepiped. The design limits the dimensions of the attic from the inside. To give the product additional rigidity, struts should be installed between the floor slats and the lower rafters.
If the roof span is more than 8 m, then you will need to install struts
After installing the upper elements, to fix the truss and prevent sagging of the crossbars, you should install hanging support elements - headstocks. For auxiliary fixation of the lower rafter legs, they must be pulled together with the uprights using tacks. The parts are fastened using nails and bolts.
Stages of self-construction of an attic
If you decide to make such a structure yourself, it is important to provide for the use of the following materials in the project:
- roofing material;
- vapor barrier;
- waterproofing;
- insulation material.
The choice of insulation affects such a parameter as the pitch of the rafters. To reduce the amount of insulation, it is best to place the rafters so that the slab or mat fits tightly between them. The type of sheathing and its pitch will depend on the choice of material for roofing. You need to pay attention not only to choosing high-quality material for insulation, but also to creating an effective ventilation system.
Ventilation is arranged by preparing technological gaps
The construction of the rafter system must be carried out using fireproof materials. All parts should be treated with fire retardants. You will need to prepare the following elements:
- wooden blocks with a cross section of 100x50 mm;
- slats 50x150 mm;
- unedged boards;
- building level;
- self-tapping screws;
- nails;
- steel wire with a diameter of 4–5 mm;
- plumb line;
- roulette;
- hacksaw;
- axe;
- hammer;
- sharp knife.
Drafting
One of the most important parts of the work is drafting the project. It is very important to analyze the layout features of a private house. It is necessary to determine the dimensions and shape of the structure being built, and also provide for the placement of windows and a balcony.
All structural elements should be marked on the project
In the process of drawing up a project, the following requirements must be taken into account:
- It is important to decide in advance what the height of the attic should be. It should be remembered that the distance from the floor base to the highest point of the structure must be at least 0.5 m.
- It is recommended to take into account the heating area and the main interior elements.
- The attic layout should be expanded. If you plan to install windows, they must be indicated on the drawing.
Drawing up a drawing must begin with choosing a shape, determining the cross-section of the rafter legs and the step of their placement. To determine the size of the rafters, you need to take into account the following parameters:
- slope;
- roof roofing material;
- climate features in the construction region.
It is also important to provide the required number of rafters in the project. They can be layered or hanging type.
Rafters can be hanging or layered
At the end, you should determine the number of parts to fix. In the figure below you can see some of the data necessary for the calculation, however, drawing up the project is complex process. This work It is recommended to entrust it to qualified specialists.
Mauerlat installation
The design of the attic roof rafter system should be selected based on the type of roof, as well as the prepared attic design. A simple option is a design with two slopes.
The main details of a roof rafter system with two slopes are:
- linear elements (column, rod system, beam);
- flat parts (slab, flooring, panel);
- spatial elements (vault, shell, volumetric part).
Before carrying out work, you will need to thoroughly dry the wood. The first step is to mark and install the Mauerlat. It is fixed to the walls of the building. The part can be made from a block or a powerful lath. If you plan to build a roof with two slopes, then the Mauerlat is laid on the long walls of the building. The element is necessary not only for reliable fixation of the lower part of the rafters, but also for the correct distribution of the load on the walls and the main part of the building.
To fix the Mauerlat, you should use metal pins that are attached to a beam made of monolithic concrete.
To fix the Mauerlat, you need to install metal pins
The beam should be placed at the top of the wall. It is also possible to use steel wire embedded in brickwork.
To secure the Mauerlat to the upper rim of the wooden wall, you need to use wooden dowels. Auerlat requires high-quality waterproofing of timber timber. Therefore, it is necessary to use roofing felt or other material with water-repellent properties.
Before installing the Mauerlat, the base must be covered with roofing felt.
installation of a Mauerlat is required if it is planned to erect a roof frame, the rafters of which rest against top part walls with beveled ends or prepared cutouts.
If you plan to make an attic, the width of which corresponds to the width of the building, the rafter legs should rest with their lower ends against the external supporting parts. It is possible to use powerful beams laid across long walls as supports. The number of supporting elements corresponds to the number of rafters. The beams must be secured to the walls in the same way as the Mauerlat.
Sequencing:

Frame construction
The frame of the attic roof consists of floor beams, rafters, purlins and racks
Bars are often used as a material coniferous species 200x100 mm. The floor slats are placed on top of the mauerlat with an indentation of 30–50 cm beyond the surface of the walls or into prepared grooves in the masonry. In the first case, the parts are fixed using angles and self-tapping screws.
Fixing the timber to the mauerlat can be done using steel corners
To make an even floor, the planks should be installed in this sequence:
- First of all, the outer parts are placed level.
- Next, you should tighten the cord and install intermediate elements along it.
- The pitch of the beams should be from 60 to 100 cm. A distance of 60 cm makes it possible to install insulation boards without cutting.
- To level the beams in height, they can be trimmed. Another option is to use plank underlays.
- If beams are inserted into prepared pockets, their outer parts must be processed liquid waterproofing and wrap it in roofing felt.
You need to place the racks on the outer planks:

After installing the racks, crossbars and purlins, you can get reliable design, which will limit interior rooms attics. To increase its strength, it should be secured in the future with struts and tacks.
Installation of rafters
At this stage, the installation of the lower rafters is carried out:

After this, the upper elements are installed:
- The first step is to mark central part roofs. This can be done using a stand that was previously attached to the Mauerlat and a tie from the end of the roof. The outermost part of the board should run along the center of the roof. The rafter legs need to be aligned along this board.
- Next, you need to prepare a template from a 150x25 mm slats. It should be applied to the extreme part of the mounted batten at the required level and to the purlin on which the lower rafter legs will rest.
- You should mark the upper and lower cuts and cut out a template. The device is applied in turn to two sides of the roof. This will make it possible to check the accuracy of the marking of the central part. If the rows of racks are placed in parallel, then there will be no difficulties in securing the upper elements - they will have identical dimensions.
- According to the preparation it is necessary to prepare required quantity rafters The parts are placed on purlins and tied together in the upper parts using iron plates or trim strips. In the latter case, self-tapping screws are used as fasteners. In the purlin, the rafter strips rest against the cuts and are caught with iron corners. To ensure that the parts stand straight, they are secured using struts, mounted with the lower part on ties. All rafters are installed using this method.
- The hanging racks are fixed - pieces of 150x25 mm planks. The upper part of the batten is attached to the place where the rafters are fixed, the lower part is attached to the tie.
Video: mansard roof rafter system
Installation of struts and gables
Sequencing:

Sheathing of the structure
The sheathing is needed for:
- distribution and transfer of the weight of the roofing material to the rafters;
- performing additional fastening of the rafter system;
- bases for fixing roofing material.
The sheathing can be made in one or two layers, continuous or with vacuum.
The sheathing can be solid or with relief
The installation method depends on what material is planned to be used to cover the structure. If a roof is being built from slate or metal tiles, the sheathing should be made of slats that are attached to the rafters with nails. In this case, the installation step of adjacent planks can be 27–30 cm.
Continuous sheathing is used in case of fastening soft material in rolls.
Solid sheathing is necessary for a soft roof
In this case, you can use moisture-resistant plywood sheets or particle boards. It is allowed to use pine wood material- trim strips.
It is important to take into account the fact that when installing such a sheathing, the material that will be laid must follow the contours of the external base. Therefore, the frame structure must be strong and level.
When laying out the material, you should use a cord, with which the slats or slabs will lie flat. The parts must be placed parallel to each other. Before fixing, the material must be treated with an antiseptic composition to protect it from rotting, fungus and dampness. The workpieces must be smooth and of high quality. It is recommended to give preference to wood grades 1 and 2. There should be no knots on it. To prevent the boards from warping, they must first be dried.
Sequence of actions for installing the sheathing:

Waterproofing a mansard roof
Roofing material does not have thermal insulation properties, so you will need to prepare high-quality material that will be environmentally friendly for human health. Quite often mineral wool or glass wool is used. Both materials have excellent sound and heat insulation parameters. It is also important to take into account that if the roof is made of metal, if the insulation gets wet, all its qualities can be reduced to zero. Therefore, it is important to carefully consider the design.
Insulate an attic without a gasket waterproofing material will not work, so the process should be considered in its entirety. Step by step guide for waterproofing the structure:

Practice has shown that it is better to protect insulation using modern materials, for example, Tyvek or Izospan. The use of ordinary polyethylene film gives poor results, as condensation may appear. Experienced craftsmen believe that it is not necessary to waterproof the structure with roofing felt.
Before proceeding with the work, you need to decide on the thermal insulation material.
Mineral wool is a fairly popular material used for roof insulation.
The most commonly used heat insulators are:
- glass wool;
- mineral wool;
- Styrofoam;
- foam glass;
- wood shavings;
- straw.
The material must be selected taking into account four parameters.
- Thermal conductivity index. For roof insulation, 0.05 W/m*K or lower is optimal.
- Water resistance. The higher the score, the better.
- Fire resistance.
- Environmental Safety.
The insulating qualities of mineral wool deteriorate significantly after some time. The material can also be damaged under the influence of mechanical loads. However, mineral wool has a low cost, so the material is used quite often. Polyfoam is not afraid of water and has excellent thermal insulation characteristics. If you plan to build a house only from environmentally friendly materials, then you can use foam glass or straw.
Step-by-step guide to roof insulation:

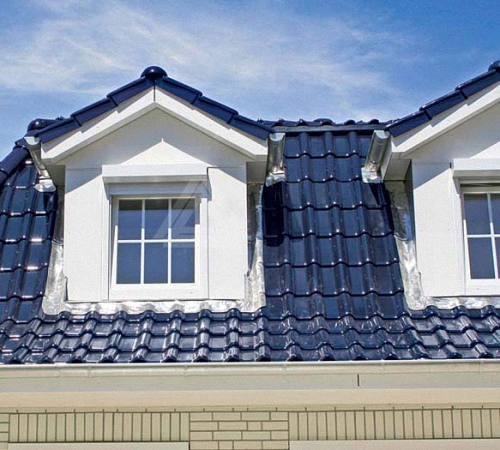
Laying roofing materials and installing window openings
As an example, we will consider the installation of metal tiles, since this material is used quite often:

The number of windows is determined by the ratio of the useful glazing area to the base of the floor of 1:10. For example, if the attic area is 100 m2, then the glazing should be approximately 10 m2. When installing windows, you need to consider the following nuances:

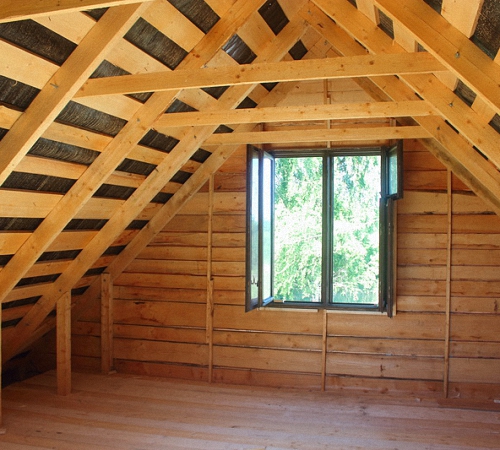
Attic finishing
The interior decoration of the attic can be done using wood or plasterboard sheets. If the latter option is used, then after installation the sheets must be covered with wallpaper or painted. water-based paint. In some cases, the attic is divided into several rooms. This can be done using plasterboard partitions.
If you plan to use the attic frequently, then the floor and walls can be additionally insulated. This can be done using, for example, mineral wool.
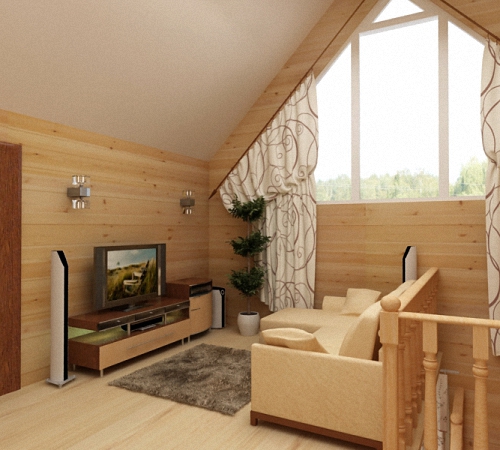
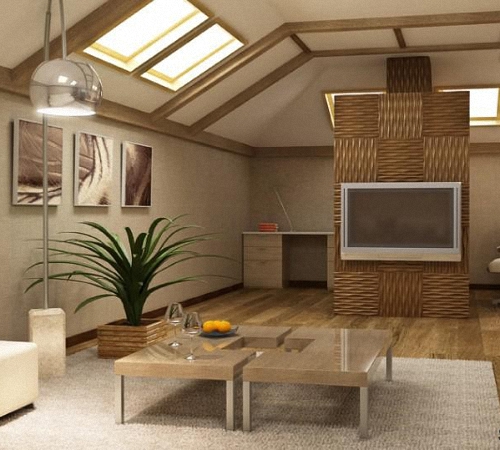
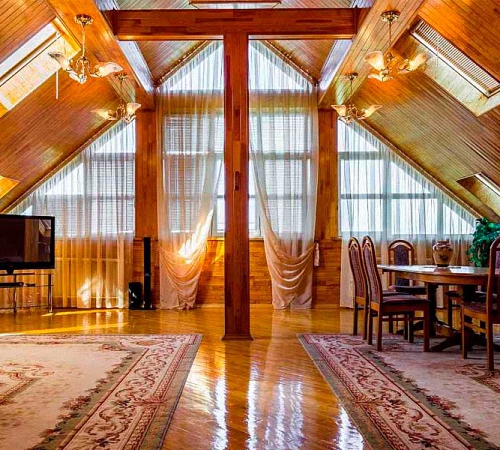
Interesting attic room design options
The attic can be made cozy by symmetrically arranging sofas on both sides. In the attic you can place a long sofa. In the attic you can create a place to relax by hanging a hammock. In the attic you can make not only a living space, but also a bathroom. On the attic floor you can even make a kitchen. If on the territory it is not possible to place a hammock, then this can be done on the attic floor. One of the parts of the attic can be completely glazed. The attic can be an excellent place to create a home library. The walls of the attic can be lined with brick. In the attic you can arrange a full-fledged living room. On the attic floor you can arrange a relaxation room. If the house is located in a beautiful area, the roof can be made panoramic The bed can be positioned front part to the window In the attic you can make a bedroom with high ceilings. In the attic you can place a hanging chair. This will make the roof more comfortable
Video: making a mansard roof
The last roof mansard type is quite popular among owners of private houses. To experience all the positive aspects of living in a building of this type, you need to pay due attention to the insulation of the building.
Construction of an attic is a very important process that is performed both at the design stage of the entire house and after its construction. This premises provides its owners with additional square meters living space. Let's look at the features of the attic construction below.
Construction of an attic: project and its development
The attic is a rather difficult part of the building to construct. It is preferable to design it at the stage of building the house itself. Because building a residential attic on a finished building is not always possible. First of all, due to the fact that the attic space has considerable weight, and therefore loads the foundation.
The construction of an attic consists of a certain kind of stages, such as:
- attic construction drawings;
- dismantling old roofing materials, if the attic is being built on an already completed building;
- strengthening the walls on the upper floor, strengthening the foundation, if necessary;
- walling attic room;
- construction of the roof, its insulation, waterproofing and finishing;
- installation of window structures;
- interior finishing works.
Compliance with all technological nuances in the construction of an attic, will allow you to get a reliable and durable building.
The first and most important stage is drawing up a project for the attic space. At this stage, you should take into account such features as the size of the room, the material used in its construction, the roof and the level of its slope and many other nuances.
There are three ways to design an attic. The first is the most budgetary, drawing up the project manually. However, minimal design experience is required to carry out this operation. The second way is to use ready-made project documentation However, it is not a fact that someone’s attic design will be completely suitable for your home, so you will still have to make some adjustments to it. The third way is to contact specialized organizations that, in the shortest possible time, will help you draw up an attic project that is ideal for your home.
In progress independent design The wall loads on the building, its appearance and the finishing materials used both inside and outside the building should be taken into account. In addition, it is imperative to take into account the load from the building on the foundation; it may need to be strengthened. If the attic is too heavy, there is a risk of deformation or cracks in the house.
Experts will help you choose the optimal building materials, which, on the one hand, will ensure the attic's durability in operation, and on the other hand, will help reduce its load on the base of the entire building.
In addition, after drawing up the project, it should be agreed upon with special government agencies. If you have a competent project, this process It will go by pretty quickly.

Do-it-yourself attic construction in the house
We invite you to familiarize yourself with the option of constructing an attic in an already built and commissioned residential building. In this case, the first step is to dismantle the old roof. Thus, it will be possible to expand the under-roof space and increase the safety of the building under construction.
To dismantle the roof, it is not necessary to hire specialists; all work can be done with your own hands. To do this, you must first get rid of the external roofing finishing material. Next, you need to completely remove the sheathing and rafter system.
After this, it is necessary to strengthen the walls on the adjacent floor, since the attic will exert a certain pressure on them. The design features of the attic exert pressure not only on the surface of the base of the building, but also on its walls. Therefore, first of all, before constructing an attic, it is necessary to strengthen the walls close to it. To do this, you should use special calculations, according to which this process is carried out and the strength level of old walls is determined.
The next stage is insulation and waterproofing of the attic floor, which is also the ceiling on the previous floor. With the help of these actions it will be possible to ensure a healthy atmosphere in the room. To insulate the attic, you can use various thermal insulation materials in the form of polystyrene foam, mineral wool, etc.
Construction of the attic photo:

Next follows the process of erecting walls in the attic. The walls are made in accordance with the project developed in advance. Most often, wood or timber is used to build walls. To insulate the attic, it is recommended to use mineral wool or expanded polystyrene. Choosing material for external and interior decoration walls, try to give preference to materials with a high level of fire safety.
The next process is the construction of the roof. In this case, the calculation correct angle The slope of the roof is very important. Since a roof that is too flat will negatively affect the ease of use of the attic space. Please note that the roof must be properly waterproofed, since if there is the slightest leak on its surface, moisture enters the attic.
In addition, the shape of the roof should be as simple as possible; the presence of broken and shaped elements will only complicate the process of their construction. Also important is the issue of insulating the attic space. For these purposes, various types are used Construction Materials. When choosing insulation for the attic, try to give preference to materials that do not absorb moisture and are resistant to frost, temperature changes and rodents. Besides, thermal insulation material should not allow heat to escape from the room.
It is best to focus on conducting internal thermal insulation works. To create it, follow a number of steps:
- install finishing in the form of plasterboard or plywood base;
- form a vapor barrier layer; special films are used for these purposes;
- lay thermal insulation material - the ideal solution is mineral wool;
- ensure proper waterproofing of the roof using a special type of membrane;
- lay external finishing roofing material.
To erect a roof, you will also need to install a rafter system and install sheathing, the installation step of which depends on the type of roofing material. After the roof installation is completed, windows should be installed.
In order to ensure high-quality lighting in the room, several windows should be installed in it, the size of which directly depends on the size of the attic itself. The window in the attic ceiling must be of high quality. It must be resistant to precipitation, wind, and temperature changes. In addition, with the help of window structures, high-quality ventilation of the attic is ensured.
Further actions for the construction of the attic are related to the internal finishing works, heating organization, decoration and design of the premises. Strict adherence to all recommendations for attic construction will help ensure long-term operation of this room.
Frame attic construction technology
A frame attic is an excellent solution for any home, garage and even bathhouse. Among the advantages of frame-type attics, we note:
- lightness of the structure, so it does not load the main building, there is no need for additional strengthening of the walls and foundation;
- affordable cost of the attic - in comparison with its stone options;
- high level of thermal insulation and sound insulation;
- the possibility of constructing an attic of almost any shape and configuration;
- ease of construction work, since the materials for the construction are quite light and special equipment is not required to lift them to the surface of the house.
The construction of a frame attic allows you to obtain a finished building with excellent heat and sound insulation properties. In addition, the roof will remain completely intact, and the usable area of the room will increase significantly.
A simpler process is to build an attic on a building that has not yet been erected. Construction of an attic on an already finished house requires dismantling the old roofing. Work should begin by studying the characteristics of the soil on the site and determining the bearing capacity of the foundation. If the foundation is not able to support the attic, then a series of works will be required to strengthen it.
Next, you should inspect the walls of the house for their susceptibility to additional loads. In this case, if necessary, it is necessary to strengthen the walls. After this, the old roof is dismantled and the ceiling is strengthened.
Construction wooden attic consists of the following stages:
- production of frame system;
- installation of walls;
- insulation of attic walls;
- installation work related to the installation of the roof;
- attic finishing roofing materials and roof insulation;
- interior decoration of the attic.
In addition, the construction of an attic involves the installation of window and door designs, manufacturing and installation of stairs, etc.
In order to construct an attic from timber, you should prepare an edged board, plywood, screws and the timber itself. The frame structure should be of a height convenient for the average person to move around. The optimal height of the attic is at least two meters. The height of the ridge zone should be about 350 cm.
The easiest way is to assemble the frame on the ground and then lift it onto the roof. The top beam or frame frame will act as a hearth in the attic. To fix the frame structure on the surface of the house, special boards or plywood are used. In this way it is possible to obtain a special platform. The knots and quality of fastening depend on the material from which the attic walls are made. Self-tapping screws are used to connect the timber at the top of the structure. After production frame walls the roof should be thermally insulated and waterproofed. After this, the external and interior lining walls, windows and doors are installed, interior finishing work is carried out.

When planning an attic, you should carefully analyze the general condition of the main building. The attic can be one room or will consist of several rooms. At the design stage, you should also take into account the design and shape of the windows, as well as their location.
The attic should be constructed from light, but at the same time durable materials. Since the materials should easily rise to the roof and place minimal load on the base of the building.
The most optimal materials for the construction of an attic - wood or steel profile. An attic made of stone or concrete will load the main building. Roof finishing materials should also be light, but at the same time durable and reliable. It is preferable to use bitumen shingles or piece metal for roofing. We recommend using plasterboard for interior wall decoration and leveling.
Since the attic is located above the main building, it is in greater contact with cold air. Therefore, proper thermal insulation of this room should be ensured. Heated air in the room should not penetrate through the insulation. In addition, in order to prevent moisture from entering the room, it is necessary to ensure its waterproofing.
In relation to the design features of the attic, it consists of a rafter system, which is installed in increments of sixty centimeters. To fill the gaps between the rafter system, it is recommended to install thermal insulation materials, such as mineral wool, inside them. It is possible to lay the insulation in one, two or even three layers. To calculate the total thickness of the thermal insulation material, the total heat loss coefficient in the room should be taken into account. To protect the roof from inside the room, a vapor barrier should be installed. Next, you should finish the roof using plasterboard, lining or finishing panels.
Do not forget to leave a ventilation gap, the main function of which will be to get rid of excess moisture in the under-roof space. The width of this gap directly depends on the type of roofing material. A vapor-permeable wind barrier should be installed on the outside of the heat-insulating material.
An excellent vapor barrier material is polyethylene film, glassine or roofing felt. The insulation is laid with an overlap of 15 cm. Construction tape is used to seal the seams. Please note that foil waterproofing is laid with a foil covering inside the room. Thus, the foil will reflect the heat that comes from the room.
Construction of the attic video:
The installation of an attic roof allows you to significantly increase usable area and rationally organize the space of a low-rise building. However, its construction often frightens home craftsmen because the process is too complex and labor-intensive.
There is no need to be afraid, because the result will provide beautiful roof and comfortable additional rooms. And in order for the result of the work to please the owner and household members, you need to know what rules are used to construct the rafter system of an attic roof, and what is the easiest and best way to arrange it.
When we mention mansard roofs, we immediately recall a pentagonal gable structure of impressive size over a log house, concrete or brick walls. Visual memory suggests that its slopes must certainly have different slopes, i.e. the bottom of the roof simply has to be much steeper than the top. Due to the difference in the angles of inclination, a convex fracture is formed, which gave the roof the popular name “broken”. The term justifiably migrated to technical definitions attic structures. It reflects the essence of the usual standard in the device, but often has nothing in common with the configuration. Despite the fact that the design of all mansard roofs necessarily includes two parts, their presence cannot always be determined visually.
Purely based on external indicators, the predominant number of attic structures can be divided into:
- Triangular roofs, the lower and upper parts of which have an equal slope. Outwardly, they resemble traditional gable structures without kinks in the plane of the slopes.
- Pentagonal roofs with slopes having convex corners. This category clearly demonstrates the presence of two joined parts in the design.
In both of these varieties, the rafter system consists of two tiers stacked on top of each other. The lower structure forms the useful space of a residential attic with a height of 2 to 2.5 m, so that moving inside it is not difficult. The second tier creates the shape of the roof top and is allowed to be of arbitrary height.

By varying the angle of inclination of the upper and lower rafter legs, you can obtain the optimal roof shape in your own opinion. It is believed that a pentagonal attic, the corners of which are in contact with an imaginary circle, looks best.

Note that the principle of constructing a sloping roof is suitable not only for gable rafter systems. Interpreting the basic method, the attic can be organized in hip, single-pitched, hipped and other roofing structures.
Sometimes an existing structure is converted into an attic, the construction of which did not use “broken” technology. However, these roofs cannot a priori be classified as attic. True, if the rafter legs have sufficient power, no one bothers to use the crossbars of pitched rafter systems as ceiling beams, and the supports of additional purlins as beams for cladding the attic.

We found out that the main feature of an attic roof is the presence of two adjacent rafter structures connected into a triangle or pentagon of a shape that is attractive to the owner. In their construction, standard ones are used:
- Layered, according to which the lower tier of the attic is built and used in the construction of the upper part.
- Hanging. In accordance with it, only the upper part of the structure is built.
If, to simplify, the section of the attic roof is divided into two halves, you will get a trapezoid at the bottom and a triangle at the top. The inclined sides of the trapezoid are allowed to be exclusively layered, and the sides of the triangle are layered and hanging.

Basic diagrams of rafter systems
A “classic of the genre” is rightfully considered to be the pentagonal diagram of the rafter system of an attic roof with support posts forming the walls of the interior. Its section is conventionally divided into protozoa geometric figures. In the center there is a rectangle, on the sides of which there are two mirrored rectangular triangles, and an equilateral triangle on top.
Standard attic construction
The layered rafters of the lower part of the structure rest at the bottom on the mauerlat, and with the upper heel on the right or left purlin. The part of the mansard roof frame that crowns the structure is made up of hanging rafter arches. They are supplemented with a suspension headstock in the middle if they are intended to cover a span of more than 3 m. The headstock cannot be connected to the arch tightening with a notch, like a support post. Its job is to prevent the tie from sagging - it is not a support, but a suspension.
The supports-racks of the layered rafters of the lower part rest through the beam on the ceiling. If it is necessary to increase stability, struts are installed under the supports. The posts are connected to the frame and purlins by notches, the joints are duplicated with metal corners and toothed plates. If the ceiling is concrete, lay it under the floor bitumen waterproofing. The bed can be laid not on the ceiling, but on brick pillars or on leveling boards. When installing an attic wooden floor you can do without the beam altogether and embed the posts directly into the beams.

It has practically no effect on the rather steep lower parts of the slopes of mansard roofs. snow load, precipitation does not linger on them. However, steeply installed rafters have another problem - gusty winds will tend to overturn and tear off the roof. Therefore, attaching the system to the Mauerlat must be taken very seriously. In an attic situation, each rafter is tied to the walls with twists, and not through one, as in conventional pitched structures.
Method of moving rafters beyond the wall line
It often happens that the planned attic structure creates too narrow an internal space. It can be expanded by moving the rafter legs outside the walls. Those. the rafter leg will rest not on the mauerlat, but on the beams of the upper floor. This case, in theory, does not need a Mauerlat at all. But reinforcing struts in the scheme with the removal of rafters are used without question, because there is no support at all under the extreme part of the side triangles.
The installation of the Mauerlat can be eliminated, but pouring a monolithic reinforced concrete belt for attaching beams to brick walls is highly desirable. Floor beams to monolithic belt fastened with anchors, they are cut into support posts maximum 1/3 of the thickness of the timber. An important point: moving the rafters out of the wall is simply obliged to form a cornice for wooden houses width of at least 0.5 m, for concrete and stone at least 0.4 m.

Construction technology truss structure with the rafter leg extended beyond the wall:
- We install the outermost floor beams that define the contour of the eaves overhangs. Because the ceiling will be loaded, the section of the beams is taken from 150x200mm. If, when laying the starting beam, it turns out that the walls do not form an ideal rectangle, we try to correct the flaws by changing the position of the beams.
- We lay and fix the remaining bars along the laces stretched between the fixed outer beams. We control the height and pitch of the beams before fastening. The distance between the floor elements is equal to the step between the rafter legs. For insulated roofs optimal step installation of rafters is 0.6 m, because it is equal to the width. If the rafters will be installed with a similar frequency, they can be made from 50x150mm boards.
- From the left and right edges we set aside a distance equal to the length of the short leg of the right triangle. At the marked points, carefully use a chisel to select nests a third of the height of the beam under the outer supports.
- Let's make supports by cutting out tenons. They need to be made according to the size of the selected nests. For the manufacture of corner supports, a beam with a cross-section of 100×150 mm is suitable, and two load-bearing supports for the gable sides of the roof should be made from it. For ordinary racks, 50×100 mm timber is sufficient. The material for the supporting elements should be longer than the design height by the length of the tenon, but it is better by 10 cm in case of errors during cutting.
- We install the corner posts and fasten them with temporary spacers. We connect the posts with lace.
- We use a plumb line to check the points in the beams for selecting nests for row supports and select the indicated holes.
- We install row posts and two load-bearing supports in the centers of the attic gables.
- On the installed supports we lay purlins - boards with a section of 50x150mm. We fasten the purlins with corners. It is not necessary to use as many nails as in the corners of the holes. Two or three are enough for each plane. As a result of laying the boards, the frame of the walls of the future attic is obtained.
- We connect the supports installed opposite each other with bars, attaching them to the purlins with corners. These elements will serve as tensile crossbars. Therefore, for their manufacture you will need 1st grade lumber with a cross-section of 100×150mm. For each installed crossbar, a temporary support from a 25x150mm inch is needed.
- We temporarily fasten the crossbars on top with the same inch, retreating 20-30cm from the edges of the frame. Temporary thin flooring of one, two or three boards is needed for ease of installation of the upper part of the rafter system.
- We make a template for the rafters of the bottom row from an inch. To do this, we apply a blank board to the end of the purlin and beam. Then we outline the lines of the grooves along which the excess will be sawed off. We try it on and trim the excess if necessary.
- We make rafter legs using the template. If there are doubts about the flawlessness of the construction, then it is better to cut out only the upper groove first. By placing the rafter in its proper place, you can then adjust the lower groove after the fact without unwanted damage to the material.
- We install the end rafter legs, which will need to be connected again with lace.
- Using the lace as a guide, we install the rafter legs of the lower tier of the attic.
- Similarly, we make a template for the upper part of the rafter system. In order to find the line of the top cut, we temporarily sew a board onto the gable support.
- Let's make a mirror version of the previous template. The rafters of the upper tier will rest against each other.
- Let's try both templates on the roof. If everything is normal, we use them to make the required number of upper rafters from 50x150mm boards.
- We are constructing the upper tier of the rafter system.
- To prevent the crossbars from sagging, we install headstocks of the required size to each upper truss. We firmly sew them only to the ridge area; the bottom should not be rigidly fixed.
Next, the rafter legs are screwed to the walls with wire ties. Then the pediment frame is installed, along which it needs to be sheathed. Finally, the sheathing is installed at a pitch corresponding to the characteristics of the roofing material.

Method with frame modules
The technology differs from the previous method in that it is not individual supports that are installed on the floor, but modules-blocks of the side walls of the future attic that are completely prepared for fastening.
The block method of constructing a rafter system allows you to optimize the construction of an attic roof, because the construction of modular elements is carried out on the ground. In calm conditions without a sense of height, achieve accuracy node connections easier.

The process of installing a block mansard roof:
- Based on a pre-made design, we manufacture the frames of the attic walls. Using this method, longitudinal beams play the role of purlins and beds. We lay them out together with the racks on a flat area and use a square to mark the sockets for the supports of the side walls. We make cuts along the measured lines.
- We cut out spikes on the racks, the size of which must correspond to the size of the nests.
- We connect the longitudinal beam with vertical posts, we get two modular frames - these are the walls of the attic.
- We lift the frames up and install them in the intended place. We temporarily fix the position of the walls with spacers, then attach them to the floor beams with brackets.
- Using a chisel, we select sockets at the edges of the beams for installing the lower row of rafters. They need to be placed in one line. To maintain the geometry, it’s easier to first mark them with a chainsaw, then modify them with a chisel.
- We perform the upper rafter tier of the attic on the ground, having previously fitted the blanks to the installed elements. To ensure an accurate fit, we temporarily nail a board to the end of the future roof so that one of its edges clearly follows the central axis of the rafter system. The base of the upper attic triangle serves as a stretcher. Its length is equal to the distance between the outer vertical planes of the installed frames. We select nests along the edges of the guy wires, and spikes on the lower heels of the rafters.
- We collect roof trusses upper tier, for reliability we install an additional crossbar, we reinforce the ridge assembly with a triangular wooden overlay.
- Before we move to the roof, we make preparations for the rafter legs. We try them on to the frames laid out on the ground. It is more convenient to “cut” them in one fell swoop, grabbing several pieces with a clamp. We cut out only the upper bevel, taking into account the fact that it will rest partly on the wall post, partly on the stretch of the upper rafter trusses.
- We try on the bottom rafter to the end. In the area of its lower heel we draw the shape of a spike, repeating the configuration of the nest in the beam. We cut out the thorns.
- We move the trusses of the upper tier and the rafters of the lower tier to the roof. We first install the trusses, attaching them to top harness walls with brackets, then the rafters of the lower part, attaching them to the floor beams with the same brackets.
The subsequent stages of roof construction are carried out according to standard rules. Drawings for a mansard roof, clearly representing the structure, will introduce you in detail to the described principles of constructing a rafter system. Thanks to the production of joints by cutting half a tree, the strength and rigidity of the frame as a whole increases, which will eliminate the need to install additional struts.

The disadvantage of this method is that the finished modules are quite difficult to transport to the roof. To transfer the assembled blocks there without the use of lifting equipment, a minimum of 4 people will be required.


Board and nail rafter system
It is impractical to build a powerful attic over small country houses, but you still want to save space on a small plot. For owners of small buildings there is an excellent option - a lightweight board and nails layered structure. The method should appeal to those who love saving, because the construction does not use solid timber.
For the manufacture of each of the supporting elements, two boards are used, between which spacer sections of the bar are installed. The cavity formed by the bars explains why the system is lightweight compared to its solid counterparts. To ensure spatial rigidity, wind braces are installed connecting the supports to the rafter legs. The lathing, in turn, will make its contribution to strengthening the structure.

The popular way to develop a layout
For a successful work result, a project is very desirable. It is not a fact that the presented drawings with dimensions are suitable for furnishing a particular home. Typology in construction is now not at all welcome. If there is no documentation at all, it is better to make at least a sketch of the future roof, not forgetting the height of the ceilings in the attic. Wherein:
- Proportions must be observed, because an attic that is too large can turn a small house into an awkward, mushroom-like building.
- It must be remembered that the lower part of the attic roof is built using layered rafter legs, and they optically lower the overhang and overlap the upper part of the high windows. There will be no noticeable overhanging effect when constructing an attic according to the scheme with the rafters removed.
- Do not forget that the height of the attic room must ensure freedom of movement. It is this landmark that is required to correctly determine the height of the racks of the attic walls.
You can select the best roof proportions using the traditional template-layout method. According to it, bars or boards are laid out on a flat, spacious area, repeating the contour of the building in real size. By changing angles and moving components, you can achieve the optimal configuration. The elements need to be fixed with nails and immediately measure the lengths of beams, rafters, tie rods, and posts. The resulting dimensions will help in making templates.

Calculations and planning of the rafter system for mansard roof will demonstrate the video:
Given by us basic options and diagrams of the attic truss structure will help determine the choice of the optimal type of truss structure.
A modern attic roof is an excellent opportunity to significantly expand the living space of your home without any hassle. But if you involve builders in the work, it can cost a pretty penny. It is quite understandable that each of us has thought about the question of whether it is possible to do everything on our own without experience. We assure you that a do-it-yourself attic roof is more than possible. We offer you comprehensive instructions.
Currently the best option – broken attic. It is quite spacious and can really become a full-fledged living space with a large area. Naturally, for this you need to make accurate calculations.
Construction of an attic roof will require you to consider many factors before. Let's list the main ones.
Video about the attic roof of a house with your own hands
It is quite clear that the smaller the angle of inclination, the more usable space there will be in your attic. But it is not always necessary to strive for the most flat placement. Let's list some features of the choice:
- If your home is located in an area with temperate climate where the weather is often windy and snow is rare, then you can safely make a roof with a slight slope;
- If snowfalls and downpours are a frequent occurrence in your area, a flat roof should be abandoned;
- Do not forget that you need to take care of high-quality heat, sound and waterproofing. The attic is a living space like the rest of the rooms in your house;
- The best materials for roofing are tiles or slate. Many people mistakenly put metal coating, but with the arrival of cold weather they are faced with problems of heat conservation in the attic. Please note that materials must be fireproof and moisture resistant. The roof always consists of wooden elements. For better preservation, it is recommended to treat all such surfaces with an antifungal solution;
- An external staircase for the attic will significantly save space in the house. An internal staircase is a much more convenient option, but it also takes up a lot of space. It’s great if you take care of installing a ceiling ladder. It takes up practically no space. As an alternative, you can install a spiral staircase, but its convenience is often questionable.

An external staircase for the attic will significantly save space in the house
- To get started you will need wooden beams 10x10 cm in cross section. They are applied on top of the waterproofing. The best material for it is roofing felt or roofing felt, which is sold in rolls. Working with them is quite convenient and you don’t need any additional skills. If your ceiling is also made of wood, then there is no need to lay additional timber under the main beams.
- The next step is to install the racks on the beams. The same timber with a section of 10x10 cm will suit you. These racks are a kind of skeleton of the walls of your attic. In order for them to fully perform their functions, they must be placed no further than two meters from each other. Make sure each one is perfectly level. We recommend checking each one with a level and, if necessary, filing in the right places. When the racks are installed, they must be sheathed on both sides. For the inside, an excellent option is plasterboard or ordinary plywood, for the outside - slab. It is important not to forget at this stage to lay the insulation between the racks. Each rack is separately secured with spikes and brackets. To prevent them from tilting, we recommend using temporary braces to secure them properly.
- Next, lay the top beam. Its cross-section should be the same as in the previous paragraphs. You can secure it in any way that is convenient for you. But make sure that the beams are held tightly and firmly.

Each rack is separately secured with spikes and brackets
- Now you need to install the Mauerlat. This is a kind of support for the rafter leg, which is located at the bottom of the structure. For the Mauerlat you will need a beam with a section of 40x40 cm or a board with the same thickness. Thanks to the Mauerlat it will be ensured high strength fastening roof rafters to walls. It allows you to redirect the weight of the roof directly onto the walls. It is not necessary to take a section larger than 40 cm. All the same, the Mauerlat lies directly on the wall and the load on it is relatively small. Just be sure to put waterproofing underneath it, otherwise it will start to rot over time.
- A well-fixed Mauerlat protects your roof from the effects of wind, snow in winter and other loads. Therefore, make sure that it is secured carefully. For this you can use wire with a diameter of up to 5 mm. It is best to choose annealed wire, which is specifically intended for tying. To make the walls more durable, the wire is embedded directly into them.
- Now you need to install the rafter legs. Make markings on the rafter frame and mauerlat in the places where the rafters will be installed. Usually the pitch is 1-1.2 m. For rafters, you will need a board with a cross-section of 4-5 cm and a width of 15 cm. Choose only perfectly flat boards. It’s better to overpay a little money for them, but be sure that a residential attic with your own hands will not cause your attic roof to collapse.

For rafters, you will need a board with a cross section of 4-5 cm and a width of 15 cm
- The rafter legs should rest on the ridge beam. If your attic has a large area, then the weight of its roof will be large. Therefore, the beam is a mandatory structural element. It is not needed only if the rafter length is less than eight meters. In this case, you can get by with regular stretch marks.
- Installation of fillies. Produce it according to the same scheme as the rafters. To simplify the process, start with the two outermost ones, stretch the twine between them and align with it when installing the next ones.
- Now you need to nail the hem board to the fillies. It will become an obstacle to wind and almost any precipitation.
- Before you make a mansard roof, you must think about where the windows will be installed. Remember that their area should occupy at least 12-13% of the area of the side walls. Where you decide to install windows, you need to strengthen the rafters. To do this, install cross bars. They will take on the role of the lower and upper parts of the opening, where the window frame will be installed and fastened.

Before you make a mansard roof, you must think about where the windows will be installed
When the previous ten points are completed, you need to carefully double-check everything that has been done. Already at this stage you will understand how to make a roof with an attic without any problems, but you should always play it safe. Especially if you are doing this for the first time.
Carefully go through all the rafters and beams with a level, check whether they really hold tightly and reliably, whether there is insulation everywhere, and whether problem areas need to be improved. It would be better if you ask one of the more experienced builders to evaluate with a trained eye whether everything is really done as it should be. Remember that the roof of your home must be safe and strong. But if everything is fine and the structure holds securely, you can proceed to further work:
- You have already created the roof skeleton. Now you need to nail the furring slats to the rafters. The step depends on what roofing material you choose for your roof.
- When the sheathing is installed, you need to install a water barrier on it. In most cases, regular plastic film is best suited for this. It is inexpensive, effectively protects the attic from moisture getting inside and is easily attached using construction staples. The main thing to remember is that the layers of film must be laid from bottom to top with the layers overlapping each other.
- A thermal insulation layer must be placed on top of the film. One of the best materials which serves for these purposes is mineral wool. It is lightweight, retains heat well and is completely safe for your health, unlike many other thermal insulation materials. In addition, it effectively prevents the spread of rodents in your home.

A thermal insulation layer must be placed on top of the film.
- When you reach the roof, follow the same procedure as with the plastic film. The roofing ball also lies from bottom to top, and the elements overlap each other. Make sure that in those places where there is a break in the roof, the upper ball of the roof protrudes above the lower one. It is very important. Otherwise, with the slightest rain, your roof will leak and the structure will gradually rot.
- The ridge must be installed in such a way that its design completely eliminates the possibility of precipitation getting under the roof of your roof.
Completion of installation
The main part of the work has come to an end. It is recommended to make attic roofs multi-layered so that they provide better heat, sound and waterproofing of the entire attic. Do not forget also that the attic must “breathe”. Modern windows and the doors are integral element any such roof.
If you have not completely decided on the installation of the stairs, then it is better to install an external one first. It will be cheaper and easier this way. In any case, if you feel that this option is not suitable for you, you can make a staircase indoors at any time, sacrificing space in the house.
Video about a gable roof
Now you know how to build an attic roof according to all the rules and without resorting to the help of an expensive team of builders. Be patient, choose quality materials and tool, and then follow our instructions. Good luck!
The attic design of the attic allows you not only to increase the living space of the house, but also to make the structure unusual and beautiful. Moreover, a building with this type of roof can be made in almost any style. The mansard type roof, the design options of which can be very different, is found both in urban areas and in rural areas. Let's look at how to create such a design yourself, and find out what its features are.
Mansard roof - options
This roof has a special slope design, usually consisting of a flat upper part and a steeper lower part. Thanks to this shape, a fairly spacious room appears inside, which can be used as an attic or even turn into a very cozy living room.

The history of attics began in the 17th century, such a roof design was invented by the architect Francois Mansart - it was a derivative of his name that such a roof was named. But this Frenchman was far from the first to implement the idea of economical use of the attic floor of the house. The mansard roof was first built by Pierre Lescot, also a Frenchman, who worked on the construction of such famous buildings as the Louvre and Notre-Dame de Paris.
On a note! In the 19th century, poor people usually lived on attic floors, but now this floor can appear in the housing of fairly wealthy people.

Nowadays, attics are quite often built during the construction of country houses or small two-story cottages, but the idea can well be implemented when creating other types of buildings. The attic has a number of advantages:
- it is cheaper to build a house with an attic than with two full floors and a roof;
- foundation costs during the construction of such a structure are also reduced;
- an attic can significantly increase the living space of any building;
- it gives the house an unusual and beautiful look;
- it is not difficult to build the structure, the work can be completed quite quickly;
- the attic is always associated with comfort;
- a house with an attic is warmer by reducing heat loss through the roof.

But attics also have several disadvantages. This type of attic space has sloping ceilings, which results in low wall heights, making it difficult to choose furniture. Also, the roof must be well installed so as not to leak and not let heat out of the house - you will have to spend money on good hydro- and thermal insulation materials. And building attics is still more difficult than, for example, a regular gable roof.

Design Features
The attic is a universal element. It was also used for ordinary houses, and for the construction of country houses, often this type of attic space was chosen even for the construction of palaces. Of course, it could decorate workshops, commercial buildings, etc. And despite the fact that they were used for its construction different materials, different styles were chosen, the attic still remained an attic - it has certain design features.

So, this building may have different geometric shape– triangular, broken, have symmetrical or, conversely, geometrically complex and non-standard slopes. It can be located both across the entire width of the building, and only on one side of it relative to the longitudinal axis.

Prices for timber
On a note! If the roof has a broken shape, then the lower part will have very steep slopes with an inclination angle of about 60-70 degrees, and on the top the slopes, on the contrary, will be flat (about 15-30 degrees).
But whatever the attic, it will be located within the walls of the main building. In relation to the external walls, the attic may be slightly wider, but then it rests on the ceiling extensions. If the offset is large, then you will have to install additional supports (for example, columns, walls, etc.).

Height mansard roof it cannot be less than 2.5 m, otherwise it will not be possible to create a spacious room under it. Windows, which also need to be provided here, will be manufactured using special technologies using durable tempered glass and a reliable frame. They will cost several times more than usual. And supporting structures can be made of reinforced concrete, metal or wood. But in the case of the latter, it is important to carefully consider fire safety measures.

The mansard roof is a multi-layer structure, which complicates installation. It can be insulated completely or only in the area where there is a living room - where there is heating. But in any case, the design of the attic implies the presence of rafters, a ridge, the roofing material itself, thermal and waterproofing, and a vapor barrier layer. The interfloor ceiling will serve as the foundation under the roof.
Rafters for an attic roof must have good load-bearing capacity. The cross-section of the materials used will depend on the angle of the roof slope and cannot be less than 5x15 cm at a pitch of 100 cm. If the slope angle is 45 degrees, then a pitch of 140 cm is maintained.
Attention! In areas where it snows frequently and the amount of precipitation is high, it is recommended to install rafters at intervals of no more than 80 cm.

If the attic will be used as a living space, then it is important to consider that in this case there is a risk of large amounts of condensation forming under the roof. Because of this, pockets of mold may appear inside the structure, fungus may develop, etc. The presence of a large amount of moisture will also negatively affect the insulating properties of the material. That is why it is important to follow all the rules for installing an attic roof, and the heat-insulating material must be reliably protected from moisture not only from the outside, but also from the inside, that is, a layer of vapor barrier material is also located on this side.

Important! Don’t forget about creating roof vents that will allow air to circulate quietly inside the roof structure and help remove condensation.

Types of mansard roofs
There are 4 main types of mansard roofs, which differ from each other in their design features. They can be divided into single-level and two-level. The first are the simplest to implement, usually combined with a sloping or gable roof with a slope angle of 35-45 degrees. The second involves the arrangement of two rooms at different levels. A mixed support system is used here.
On a note! When building an attic under a gable roof, the height of the walls can be no more than 1.5 m, followed by sloping ceilings. With a broken-shaped roof, the ceiling height along the perimeter of the walls is up to 2.5 m.

When building a house, you can choose one of the types of attics - a single-level attic with a gable roof, a single-level with a sloping roof, with external consoles, or a two-level with a special mixed type of supports.
Table. Main types of attics.
| Type | Description |
|---|---|
| In this case, the attic has one level and is located under a regular gable roof. The simplest option, the design of which does not require the use of complex calculations. Rainfall with a simple gable roof goes away on its own, there is no need to equip any additional elements. |
| In this case, the attic also has one level, but the rafter system is performed differently. It looks like four roof slopes are formed. A much larger room can fit under it, but creating such a roof is more difficult. |
| Of the single-level attics, this is the most difficult option. Here the room under the roof is even more spacious. Usually in this case the attic room is shifted to one of the edges of the house. This design allows you to make large vertical windows on one of the sides. The main disadvantages are the complex shape and the complexity of construction. But under the edge of such an attic you can make a functional canopy where a terrace, garage or other extension can be located. |
| The most difficult option is the attic, since here at least two rooms are arranged under the roof, located at different levels. When designing a house, such a design immediately becomes part of its structure. |


The attic roof can also have a balcony. It is created according to the principle of window construction. The main thing is that the load-bearing capacity of the walls allows it to be equipped. By the way, the balcony can also be supported by columns, but in this case it is built above the entrance.

Types of rafters for attics
Rafter trusses can be of two types - and layered. You will have to choose between them depending on the method of attachment to the walls of the house. Hanging ones are simpler and are usually used for houses that do not have a middle load-bearing wall. The rafters rest only on the main walls of the house, without intermediate supports. The width of the span between the walls cannot be large - usually it does not exceed 6 m. If the span is larger (over 9 m), then it will be necessary to install struts and headstocks.

Layered rafters are usually used to create houses with two spans, that is, those that have a load-bearing wall in the middle. In this case, the rafters have three support points - directly this wall, as well as the main ones around the perimeter of the house.
Material for the manufacture of the rafter system
Rafters can be made of metal, reinforced concrete or wood. Each material has its own advantages and disadvantages. Wooden rafters are environmentally friendly, they are easy to use, and can be easily adjusted to the desired size. But wooden structures are afraid of excess moisture and are susceptible to the formation of mold and mildew.
On a note! Before construction wooden materials It is recommended to treat them with protective compounds that will extend their service life.

Metal and reinforced concrete structures do not need to be coated with such compounds - fungus and mold do not appear on them. Due to this, they are considered more reliable and durable. But the main disadvantage is that, if necessary, adjusting them on site to the right sizes It will be difficult, and the slightest error in the calculations can lead to the fact that the roof will be skewed. Also, a craftsman working with reinforced concrete or metal rafters may encounter other difficulties - this is a large mass of products, which forces the use of special equipment even to lift the elements.
Difficulties and features of arranging an attic roof
When designing and constructing an attic roof, a number of design features should be taken into account, based on which a number of operating rules are formed. For example, the Mauerlat must be secured very securely with anchor bolts. It is he who will experience the maximum load, and therefore support the entire roof. It is additionally recommended to wall up the anchors cement mixture, if the main walls of the house are made of stone, brick and other similar materials.

It is also important to remember the correct design and layers of the roof. For example, mansard roofs cannot be covered with metal roofing materials. They get very hot and on the top floor in the summer it will be too hot, there can simply be no talk of any comfortable living. It is not recommended to use roofing felt as a waterproofing material - when heated, it begins to smell specifically. It is best to cover the attic roof with slate or soft tiles. For thermal insulation, it is usually recommended to purchase mineral wool, which is laid with a waterproofing film on both sides.