What program can you use to create presentations? How to make a presentation on a computer - detailed instructions
Let's consider several possible sources:
- Text content. Books, thematic periodicals or their electronic equivalents are suitable for creating text blocks. A variety of abstracts and reports on the required topic will also come to the rescue.
Various publications on Internet resources or even posts on forums will also serve as material. - Images, graphs and diagrams. It is better to use the author's content to the maximum. Your own photographs and images will be an excellent addition.
Schemes and graphs can be drawn with your own hands, if you have special editors. To optimize the speed of creation, you can also use ready-made ones. - Video and music. Creating high-quality video and audio is a labor-intensive and costly process. Therefore, you can use materials from third-party resources here.
Important! Creating a powerpoint presentation is critically important to align with your speech plan. The right balance of presentation and speaking time will ensure the best understanding of the topic being covered.
It is also important to consider the time allotted for the performance. For a short one, it is better not to create a cumbersome presentation with video and audio accompaniment.
It is better to briefly state the essence, and Additional materials distribute to the audience on media.
Creating master pages
With a ready-made speech plan and collected material, you can begin creating a presentation. The entire presentation consists of separate slides.
First you need to launch the PowerPoint editor.
In the top menu of tabs you will need “Home”. It contains the “Slides” block, the “Create slide” button in which adds pages.


Note! In the left column of the navigator you can change the order of slides and delete them. To delete, select the one you want and click “Delete”.
As a result of these manipulations, we have a simple slide. You can change the layout of elements on it using the corresponding menu.
To do this, in the navigator you need to right-click on the desired slide and select “Layout...” in the menu and select the desired one in the drop-down menu.

Let's add a few more pages. The example presentation now consists of four slides.
The new pages are just white. To make them even more decorative, they need to be decorated. To do this, select the desired page in the navigator. In the top row of tabs you will need “Design”.
In the “Themes” block there will be a button of the same name, clicking on which will bring up a list of all available ones.


The result is obvious, the presentation has acquired appearance.
Adding and working with text
Special blocks are used to add text content. The text in them can simply be printed or copied.
The configuration of the block arrangement is quite easy to change using the mouse by dragging a special frame.


Adding and editing tables and graphs
Graphs and diagrams express various processes extremely clearly. To add one to your presentation, you'll need the Insert tab in the top menu bar.
In the “Illustrations” block there will be a diagram icon, which will open the creation window.

There you will need to select a chart type from the presented library.

After selecting the required one, a spreadsheet will open for editing the parameters. Changes you make to it are reflected in the diagram's configuration in the presentation.


To insert a table, you will need the same top menu tab as for the chart. On the left side there will be a “Table” block and a button of the same name, which will open the configuration window.


Filling table cells occurs in the same way as text fields.

Adding and designing pictures
Good themed images will make your presentation more interesting. It is better to use one image for one slide, but of the highest quality possible.
The insertion is done in the same tab as the diagram, only the “Drawing” button is responsible for the images.


In this article we will try to cover the topic of creating proper presentation on a computer that can interest and convince listeners. Today our daily life It’s hard to imagine without computer technology. In business, such technologies play a special role; for example, it is not enough to simply talk or write about your idea or business plan.
Colleagues, management and business partners want to see the future project with their own eyes. To visualize business ideas, photographs, graphs, drawings, diagrams, clips, three-dimensional models, etc. are used. Agree that such a visual demonstration is much more informative than “dry” printed text. Particularly important this technique for those who perceive information better visually, and such people, according to scientists, are about 30%, i.e. every third. This method of demonstration is called “presentation” and is widely used in various fields: design, marketing, economics, pedagogy, engineering, etc.
Presentations are indispensable in learning processes, for demonstrating ideas and results, and for comparative analysis.

You can create a presentation on your PC using the PowerPointe program. With the help of which 95% of presentations are prepared. It is part of the standard Office suite. Microsoft Office PowerPoint is an easy-to-use, reliable and informative program for implementing a variety of presentation projects that meet the highest requirements.
Using PowerPoint you can create effective tool to accompany an oral or written presentation. The program allows you to create graphs, diagrams, photos, and contains various special effects, allowing you to create a memorable, bright project.
Taking the time to learn the basics of PowerPoint is a worthwhile investment in self-development and education, since everyone has to give presentations, speeches, and demonstrations sooner or later.
Creating a presentation using PowerPoint (standard Microsoft program)
You can find the Power Point program on your computer using Windows search.
The most important rule is the presentation is not a replacement for your report or speech, but only complements it, illustrating your words and allowing you to focus on the main points. That is why you first need to carefully think through the plan for your speech and only then make the presentation.
Step 1. Take into account all the details of the presentation!
The most important questions to ask yourself before putting together a presentation are:
- What is the main purpose of my presentation?
- What features will my listeners/viewers have?
- What is the duration, content and dynamism?
Step 2. Let's start creating!
Creating a presentation begins with launching the program. Next, using the “create slide” option, which is located in the right corner of the panel at the top, select a slide layout. This layout not only applies to the entire presentation project, but can also be customized for each slide.

Important! Try not to place several blocks of different types of information (photos, text or diagrams) on one slide at once. This distracts potential viewers, dissipates attention, which ultimately leads to a decrease in the perception of your performance.
Step 3: Use the template!
PowerPoint uses a presentation template for all new presentations you create. To use it, you need to click “File” and after opening the menu, select the “create” command. A window will appear where the “templates” will be displayed. Here you need to select “new presentation” (by clicking the mouse twice).

You can also select templates for your presentation using the “installed templates” command, which gives access to the “classic” and “modern” album, “ advertising brochure", "quiz" and "wide screen presentation".
Step 4. Select a template theme!
In order for the presentation to have the desired look, you need to go to the “design” tab, go to “themes” and select the document you like. To change the visual appearance of your slides, you need to find the "slides" tab, highlight the slides you want, and click on the theme you want to use for the selected slides.

The themes available in PowerPoint are universal for presentations various types. You can change the color, style, add effects using the corresponding buttons: “effects”, “background styles”, etc.

You can also create topics for presentations yourself, using your own photographs, drawings and solutions.
Important! Please note that the text must be in contrast to the background, otherwise it will be difficult to read. You shouldn’t make your slides too bright or overload them with color, because... this harms the perception of visual images. Optimal solution- use no more than 3-5 colors on one slide that harmonize well with each other, improving perception.
Step 5. Choosing font size and color?
Microsoft's PowerPoint presentation software allows you to change the type, size, and color of the font used for text elements. Working with presentation texts is as easy as working with documents in Office Word.

To write text, you just need to place the cursor in the desired place, for example in the “heading” or “text” field and start typing. To select the required font, you need to go to the “font” group, where you select its parameters: size, color, type.
Important!
- Classify the text into main and additional. It is better to highlight the main one in some way so that it brings maximum information to the listeners. You can highlight the main text by size, color or special effect, as well as the order in which it appears on the screen. Additional text serves to explain the main text; it is better to apply more “calm” effects to it: smaller font size, less saturated color, etc.
- Don't forget about the concept of "readability"! The text should be readable and easy to understand. To do this, it must have a clear structure, which is emphasized by the font size. For example, for the heading you can use a font size of 22-30, for subheadings - 20-24. For captions under tables, explanations, footnotes - 8-10. Body text usually reads well at a font size of 14-20.
- Highlight the title, subheadings, and main points in bold or underlined font. By preparing comments, explanations, footnotes, Additional information— italics.
- Don't forget about the "principle of six": 6 words per line, 6 lines per slide.
- Don't use different fonts on the same slide! Better yet, use the same font for all slides of your presentation project.
- Do not use complex, unclear, or bulky fonts. Best options for presentation are Times New Roman, Bookman Old Style, Verdana, Calibri, i.e. those fonts that are most often used to create printed materials.
- Do not overload the slide with test material; remember that a presentation is not a replacement for your speech!
Step 6. Better to see it a hundred times!
To make your speech more interesting and well-reasoned, you need to PowerPoint presentations use graphs, diagrams, drawings, infograms, collages and photos. To place these elements, you need to go to “illustrations” and click on the group. You can also insert a photo or drawing into a presentation using the traditional “copy” and “paste” commands.

Important!
- Minimize the “picture surrounded by text” technique, because This combination is extremely difficult to perceive. It is better to place the picture on a separate slide, adding text information to it below. In this case, the image will look solid and not overloaded.
- Photos and drawings used must be High Quality and the required size. Please note that when stretched, images lose their sharpness, which can ruin the effect of the entire presentation.
Step 7: Insert Musical Accompaniment!
For some presentations, it is appropriate and even desirable to use audio. How to insert music or sound? This is not difficult to do: you need to go to the “media clips” tab and stop at the “sound” item. A list of commands will appear in which you need to select “sound from file”. A standard dialog box will appear where you will need to specify the folder from which sound or music will be inserted. The type of audio file is also indicated. After this, we indicate the method of playing the sound. It can be automatic or by command - a mouse click. To select, go to the “sound options” menu and specify the required settings.

Important!
- Watch the sound volume! Your speech must be heard. Perfect option— take into account the acoustic features of the room where your performance will take place.
- Choose calm, neutral music. It is better to give preference to instrumental or classical music that will not irritate or distract listeners from your performance. Avoid rhythmic, intrusive melodies, although there are situations when just such a musical background is appropriate.
Step 8. Show and interest!
The introduction of animation effects that can be added to one or several slides will help diversify your presentation. You can add animation if you select the tab with the appropriate name and go to the “animation” group, and then open the “animation settings” menu. After this, you should click on the object (text, diagram, graphic or photo) to which you want to add an animation effect using the “add effect” button. You then need to follow the steps to insert animation effects, and the effects will appear in the Animation Setup list in the order they will appear in the presentation. You can change the speed, order and direction of effects in “change effect”.

Important!
- Don't overload your presentation with irrelevant special effects. A large number of moving objects, extraneous sounds, animations irritate listeners and distract from your presentation. It is better to limit yourself to 1-2 special effects that will emphasize the significance of the information presented.
- You should not use animation effects “just like that” or “for beauty.” They must carry a meaning that is understandable to the audience.
Using animated special effects, it is good to highlight the key points of the presentation, draw conclusions, and summarize. Animation based on text selection has the best effect different colors. On the contrary, moving letters are perceived worse by listeners.
Step 9. Interesting slide transition!
Transitions from slide to slide make the presentation more cohesive and of higher quality. To add transitions, you need to select the “transitions” tab, where you click on the slide thumbnail. Here you can select your favorite effect for changing slides.

The slide changing speed is set in the “transition to next slide” group using the “transition speed” button, where the optimal speed is selected. Also in the “slide change” group, the change order is set: automatically or manually by clicking. The change of slides can be accompanied by a sound effect. To do this, click on the “animation” tab and select the “transition to next slide” group. There, you will see a “transition sound” button, by clicking which you will be able to select a sound file to accompany the process of changing slides.
Important!
- Don't make the slide transition sound too intrusive or loud.
- Take advantage of the click-to-slide transition feature. Sometimes this is convenient - the presentation completely corresponds to your speech, does not “run” forward and does not lag behind.
- In the text of your speech, be sure to note the moment when you need to change the slide.
- If the slide show is being led by technical staff, make a copy of the talk with notes for them.
Step 10. Let's get acquainted with what happened!
The presentation has been created! To see what you got, you need to click the “show slides” button. If during viewing you decide that one or more slides require adjustments, you can do this by pressing “Esc“. After making changes, you should save the latest version.
Important! Remember that a presentation is a tool that illustrates your speech, but does not replace it. Overloading a presentation with bright colors, music, sound effects, and animation can ruin even the most thoughtful and interesting speech, distracting listeners from it.
Conclusion
Now you can easily make your own presentation using PowerPoint. After completing all 10 steps, you will learn the basics of creating a presentation, but every time you take on new project, remember that you still have many more features to discover in this program from Microsoft.
We invite you to watch a short video tutorial on how to create a presentation in PowerPoint.
- Platforms: Windows, macOS, web, Android and iOS.
- Price: from 3,400 rubles per year as part of a package Office programs 365, web version is available for free.
This program is so popular that its name has become a household name. When it comes to presentation software, PowerPoint is the first thing that comes to mind for most users.
It is worth noting that this popularity is well deserved. PowerPoint offers all the features you need to create stylish, interactive presentations. A large number of editing tools, backgrounds, templates and fonts, the ability to work in a team over the Internet, insert video, audio, tables and graphs - all this and much more is in PowerPoint.
In truth, there are so many functions and settings that this abundance can confuse a novice user. But for authors who create complex, professional presentations, PowerPoint is ideal.
- Platforms: macOS, web and iOS.
- Price: for free.

Apple Keynote is another heavyweight from the world of software that can easily compete with Microsoft Power Point on equal terms. Keynote contains a rich set for professional design of your ideas: beautiful effects, themes, fonts and versatile text editing tools. The project allows you to work collaboratively via the Internet and is compatible with PowerPoint formats.
The main differences between the two products include the cost and number of supported platforms. Thus, Apple Keynote does not have versions for Windows (although it is available through the website) and Android, but is offered free of charge to all owners of iOS devices and Mac.
- Platforms: Web, Chrome, Android and iOS.
- Price: for free.

Google Slides service has attracted great amount users working in teams. This is because the developers placed special emphasis on collaborative editing of presentations, having worked best on the online part of the project. You can make edits to slides together with colleagues in real time. Changes made by each user are recorded in a special log.
However, you can edit and save presentations offline. All you need to do is install the browser extension. You'll find most of the basic slide design features found in PowerPoint. In addition, Google's service works great with PowerPoint formats, is very easy to learn and is available for free.
- Platforms: Windows, macOS, Linux, Android and iOS.
- Price: for free.

Impress is a simplified alternative to PowerPoint and other professional presentation software. This program lacks a beautiful interface, some design features and online functions for working in teams. In addition, Impress applications for mobile devices received greatly reduced opportunities.
On the other hand, unlike many competitors, the program is absolutely free, is available on all platforms and is compatible even with older versions of OS like Windows XP.
5.Prezi
- Platforms: Windows, macOS, Android and iOS.
- Price: Free or from $15 per month for the offline version.

Among other programs on the list, Prezi stands out. The creators of this project abandoned the usual slide format. Your presentation looks like one big map on which you can place text, videos, pictures and other information. During display, the image does not move from slide to slide, but from one section of the map to another. At the same time, the desired areas are enlarged using beautiful effects.
Prezi can be used for business presentations, but it's best suited for creative presentations. Even without design skills, you can create a dynamic, non-linear presentation that can present absolutely any topic in an engaging way. There are plenty of design features in Prezi. There is also the opportunity to work with colleagues online.
Do you want to create a beautiful advertisement for your company or give an object lesson, but don’t know what program to use for the presentation? Then you should read this article. Considering the fact that today one of the most common types of advertising a product, service, or presentation of material is a presentation, we can also assume that programs for creating it will become very popular.

Many people wonder which program is more convenient and easier to make a presentation. Since nowadays there are quite a lot of different software, with which you can create numerous graphic files, the same presentations, choosing something of the highest quality, understandable and simple will not be difficult. Among the many such programs, the most common and in demand are considered software development from Microsoft Corporation. The most famous products of this company for creating presentations are the following: Power Point and, of course, Movie Maker.
Which program is easier to make a presentation through - Power Point or Movie Maker? These types of software are designed to create colorful presentations and videos of both educational and advertising nature. Each of these software products is convenient in its own way and has unique features, which may not be available in another program. For example, Power Point provides the ability to work with an expanded list of different animation effects, which can quite well decorate the presentation being created, while Movie Maker can please the user with an expanded list of tools that can simplify the process of arranging musical accompaniment.
As everyone knows, when creating a presentation, one of the most important points affecting the quality and colorfulness is considered to be the correct design of animated transitions and decorative design slides. Many people are interested in which program to make a presentation in will not only be easier, but also more convenient. Most users prefer Power Point, some prefer Movie Maker, but given the variety of tools in these programs, they are both excellent for performing the most complex tasks.

The same answer can be given to the question of which program is the fastest to make a presentation in. It all depends on the complexity and goals of the task. If, for example, the first priority is the colorful design of slides using beautiful text captions, as well as beautiful special effects, then it would be best to use Power Point. If you only need to create a presentation that will be played as a video accompanied by music or voice comments, then it is best to use Movie Maker.
And yet, which program is better for making a presentation? You can get the answer to this question only after fully familiarizing yourself with all the capabilities of the two programs described above. Good luck to you!
Be able to present your work competently - high art. That's why it's so important to know the intricacies of creating a presentation on a computer. But if you have never encountered this “beast” before, we will tell you in detail and show you how to make a presentation in Word (as well as in Powerpoint) with step-by-step instructions.
What kind of presentation can you make yourself?
In an office package (namely Microsoft Power Point), which most students have most likely already mastered, you can make a very decent presentation - from several sheets (slides), with sound effects, with graphs and diagrams.
But before you start, you’ll have to stock up on the essentials—those without which no presentation will work:
- high-quality text - it is better to write it yourself, taking into account the characteristics of the audience to whom you will give your presentation. A little humor (the main thing is not to overdo it) and beautiful design– and the presentation will go off with a bang!
- high-quality pictures, graphs, diagrams, diagrams - it is best to use private photos or drawings. But if there are none, feel free to use stock images with good resolution. If you don’t know which program is best for making drawings for presentation on a computer, use graph - it does an excellent job of creating graphs. If all this is too complicated for you, ok: take a piece of paper and a pen, draw it yourself, take a photo and paste it into a presentation as a drawing!
- video (if necessary). If you don't know how to shoot high quality videos, then it is better not to use them at all. In addition to filming, you also need to be able to process the footage well. However, long live youtube, where you can find a lot of useful things that have already been filmed by someone.
And of course, the most important thing you need to create a powerpoint presentation is a plan! No matter how beautiful your own presentation may seem to you in your thoughts, without a plan and a logical sequence of thoughts, it will be just a set of text, pictures and graphs. Carefully consider your target audience, as well as the time you will have to meet it.
Invaluable instructions on how to make a presentation in powerpoint

Here you can create and delete slides, change their places if necessary, and give them titles.
If you're not happy with the default presentation look, play around with the slide layout options. Just right-click on the slide on the slide itself. An action will appear on the left where you select the “layout\...” setting. 
Now is the time to work on the appearance of your powerpoint presentation. You can select a theme by opening themes - find the “Design” button in the toolbar and select “Themes” there. 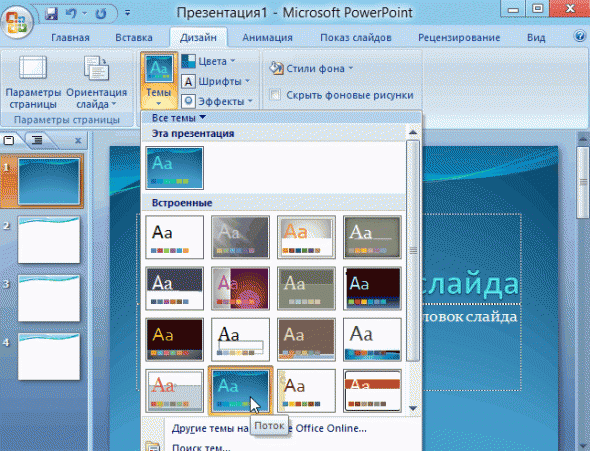
By the way! For our readers there is now a 10% discount on
Do you see how the presentation has immediately changed? Now let's move on to the content of the slides.

After you have chosen desired type diagrams, the program will open a window for you in which you will need to enter the main indicators to be displayed in the presentation. This is what it will look like: 
It’s also easy to work with tables - in the tools, select “Insert/Tables”, immediately select required quantity rows and columns (everything is like in Word) and fill it out to your health! 


We agree to the condition of the program that while viewing the slide, the video will play automatically and that’s it.
You can also play with different types animation, framing and other “tricks”, but we are looking at the basic creation, so some other time.
- Presentation directly. To start viewing your presentation, just launch it and press F5. Another way is to start the presentation, click “Slide Show” and select “Start Show Over”.

So you have created the simplest, but quite attractive presentation that will help you achieve the desired effect. If you don’t have the opportunity (well, let’s say, a computer) or the time to write it in Power Point yourself, you can always turn to !