DIY wooden candlestick. Wooden candlesticks: ideas for your inspiration How to make a beautiful wooden candlestick
Any interior looks more interesting and cozy if it is filled with various accessories and details. These could be paintings, candles, decorative pillows. If you decide to decorate a room with candles, you cannot do without candlesticks. In this article we will tell you how to make a wooden candlestick with your own hands.
Materials and tools for making a candlestick:
- cuttings of timber 50×50 mm of different lengths (the cross-section of the timber may be different)
- shells or any other decor (buttons, pebbles)
- wood glue
- hot glue gun
- sea green paint
- feather drill, the diameter of which matches the diameter of your candles
- drill
- clamps

How to make a stylish candlestick
Select timber scraps of different lengths, or cut solid timber into pieces. Try to arrange them so as to get an interesting shape.

Glue the blocks with wood glue, tighten them with a clamp and let dry.

Drill holes for candles on the upper edges of the bars. In our case, the diameter of the holes is 22 mm, the depth is about 25-30 mm.

Treat all surfaces, corners and edges sandpaper. Paint the candlestick. We chose marine theme, so we used turquoise paint. You can choose the paint at your discretion.

Cover the lower part of the candlestick with shells or other decorative elements. For this, it is best to use a hot glue gun.

Insert the candles into the holes. A stylish wooden candlestick is ready.

Original article in English.
Candlesticks and candles today are, first of all, an element modern decor, helping to bring a festive, calm or romantic atmosphere to the interior of the house. Individuality is especially valued in this matter. You can make candlesticks with your own hands from any available materials: plastic, glass bottles and jars, wood and thick branches, plaster or crystal glasses. Our detailed master classes that accompany step by step instructions, high quality photos and video materials will help you make unique and beautiful products.
DIY candlesticks made from glasses
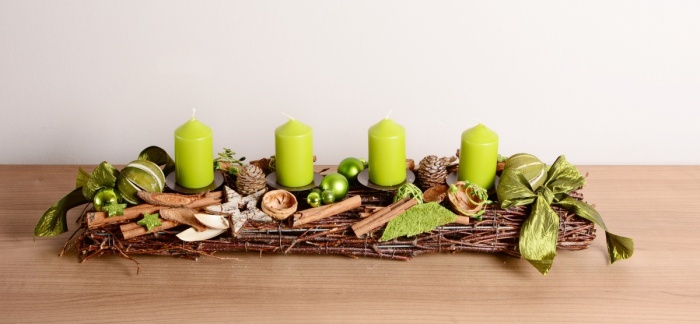
Today, there are many techniques that allow you to turn an ordinary glass (not necessarily crystal) glass into a luxurious candlestick. The main thing is the desire to create and some free time. The easiest option is to install a candle on flat base its legs or pour mother-of-pearl beads into a bowl and place a long candle. With a little imagination, you can make a more mobile candlestick, decorated various details: beads, beads, ikebana, balls, cones, small Christmas decorations or spruce branches, as in the photo.
Very elegant interior accessories emerge from inverted glasses, where the bowl contains the main decorative elements compositions.

To create a New Year's themed candlestick from an inverted glass, you will need the following materials:
- glass goblet;
- decor (beads, pine cone, cotton wool, sparkles, any New Year's toy characters);
- glue;
- a piece of foam rubber;
- cardboard;
- candles.
- Using cardboard scissors, cut a circle whose diameter is equal to the circumference of the glass bowl.
- Using foam rubber, apply glue to the edges and glue to it a small piece of cotton wool, beads, glitter and other things that you have prepared for work.
- “Place” the pine cone on the glue in the center of the cut out circle.
- Glue a small layer of cotton wool and toy characters on the sides. Apply glue to the edges.
- Place the bowl of the glass on the composition. Place a candle at the base of the leg.
Such a candlestick can be made not only with a New Year theme. For interior decoration, designed in nautical style, New Year's accessories are replaced with a variety of shells or small pebbles. For the Provence style, a candlestick decorated with dry herbs and ribbon is suitable.

A candlestick made from a glass, shaped like a lamp, the lampshade of which is decorated with perforations, rhinestones, braid, appliqués or flowers, will help to add a touch of romance to an ordinary dinner. Nicely tie a ribbon on the leg.
Making a lampshade is quite easy: make a cone out of paper, fasten the edges with glue and cut off the top. After completing all decorative works, place the lampshade on a glass, inside of which there is a small candle-tablet, and place it on the table.
Attention! Don't forget about your own safety. Paper is a highly flammable material.
DIY wooden candlesticks
Wood is a noble material. Thanks to this, all products made from it, including candlesticks, look aesthetically pleasing in any interior and beyond, for example, in the garden. In addition, it is not necessary to “spoil” some expensive wood. In your work you can use saw cuts, logs, various branches or snags. The more crooked and knotty the wooden blank is, the more interesting the result will be.
Even a person far from wood carving can make a candlestick. For a product made from branches you will need:
- a drill with a furniture pen attachment (the diameter of the attachment should be at least 5 mm wider than the candle);
- dry branches are slightly wider in diameter than a candle;
- glue;
- decor at your discretion (for a product in natural style will suit purely natural decor: pine cones, brown ribbon, ikebana, etc.)

- Cut dry branches into pieces of the required length (usually 10-15 cm).
- Use a drill and a pen to make a notch.
- Squeeze a little glue into the center and place the candle on it.
- Attach the decor prepared for work to the branch using glue.
- Place it on a table, windowsill or shelf and light a candle.
In the same way, you can cut several small indentations in a piece of driftwood or sawn wood, and place a tablet candle in the center.
For a bachelorette party or a wedding ceremony in nature, a white birch candlestick is suitable. An excellent decorative element for such a wooden candlestick can be “windows” in the shape of hearts.
Candlesticks made from glass jars
It's very easy to make a candle holder from jars. Decor is placed inside the glass container and a candle is installed. Jars from under baby food, mayonnaise and half-liter jars. And if the container is also decorated with some kind of perforation, then all that remains is to complement it with a harmonious decoration and the candlestick is ready to fulfill its purpose.
As decorative finishing you can use: lace, ribbons, ropes, all kinds of beads. Decoupage or enamel coating in the form of a fancy pattern applied to the inner surface of the jar looks beautiful. They can be placed on a shelf, table or hung on a wire from a tree in the garden.

To make a romantic-style candlestick with a heart-shaped window, you will need the following materials:
- any small jars (up to one and a half liters);
- masking adhesive tape;
- ribbons for decoration;
- sharp knife;
- matte paint in light or red tones;
- corrector pencil;
- small candle.
- Apply mounting tape to the jar. Draw a heart on it and cut it out with a knife. Remove excess pieces of tape from the surface of the jar so that the heart remains in place.
- Paint the outside surface. Let dry.
- Peel off the heart. Using a corrector, draw strokes or a beautiful pattern on the surface of the paint. Tie a ribbon around the neck.
- Place a candle inside the jar and light it.
Attention! Painting the inside will look completely different.
The original effect of the candlestick is given by ordinary coarse table salt. To make the product you will need:
- glass jars;
- varnish in the form of a spray in a can;
- silicate glue (transparent);
- sea (bath) or table salt;
- brush;
- alcohol;
- candle tablet.

- The first thing to do is degrease the jar. Apply alcohol to a cloth and wipe the glass surface.
- Using a brush, cover the outside, bottom and edges of the neck of the jar with a thick layer of glue.
- Sprinkle or roll in salt and let dry for at least 3 hours. To give the candlestick some shade, mix salt with suitable food coloring.
- Cover everything with a layer of varnish and dry at room temperature within 2-3 hours. After this time, apply a second layer and dry again, but for 2-3 days. If desired, a third layer can be applied.
- Drop a little wax into the center of the jar and glue the candle.

An unusual “snowy” effect can be achieved by sprinkling the workpiece with salt.
Candlesticks made of plaster or polymer clay
You can sculpt the shape of candlesticks from plaster or polymer clay yourself. Made in an abstract manner, this decor will fit perfectly into an interior designed in high-tech, art deco or minimalist style.
For work, take the following materials:
- gypsum (mix it with water in advance in the required proportion);
- sandpaper;
- candles.

- Roll the prepared plaster into a ball.
- Use a candle to make a hole in it (should be slightly wider than the candle itself).
- Use a knife to shape the candlestick into the desired shape.
- Wet your hands with water and smooth the surface of the product.
- Let it dry for a day. If you use polymer clay, dry it in the oven.
- Sand the surface of the finished candlestick with sandpaper. If desired, paint the product in the color you like.
Candlesticks made from bottles
With a little imagination and effort, simple bottles from wine or beer will turn into original decor Houses. Before you start decorating the bottle, you need to carefully cut off or knock off its neck.
Attention! If a bottle is accidentally chipped, treat it with sandpaper or fill it with silicone to avoid injuries and cuts during work.
A candlestick made from a bottle, decorated with mosaics, looks original. To do this, cover the inner surface with glue and place small pieces of glass, for example, from another bottle, in random order.
The easiest way is using special tools cut off the bottom of the bottle and cover the candle with the top part.
Simple, but at the same time, a candlestick made from plastic bottle. To work you should prepare:
- plastic bottle 1.5-2 l;
- scissors;
- glue moment.

- Cut off the neck and bottom of the bottle.
- Using a hot knife, make a hole the size of the neck in the bottom.
- Apply glue to the neck and connect the two parts. Let it dry.
- Paint the surface of the finished candlestick, place it on top and light the candle.
Whatever technique you choose to make a candlestick, homemade decor always looks new, original, and individual.
DIY candlesticks: video
Original do-it-yourself candlesticks: photo


Content
In this article we will look at several interesting options creating a candlestick from wood. Wood gives the house warmth, comfort, and fills it with positive energy. In combination with a bright flame, the tree will become a real talisman for your home.
Candlestick options
From tree roots
Every time you go for a walk or a picnic, pay attention to the snags and old tree roots. Many of them are suitable for creating a candlestick. To do this, you just need to clear the driftwood from the bark, rub it with sandpaper, and use a tool to make a small indentation to secure the candle.

Or you can use the tree bark itself or part of a large trunk; you might end up with something like the one in the photo:

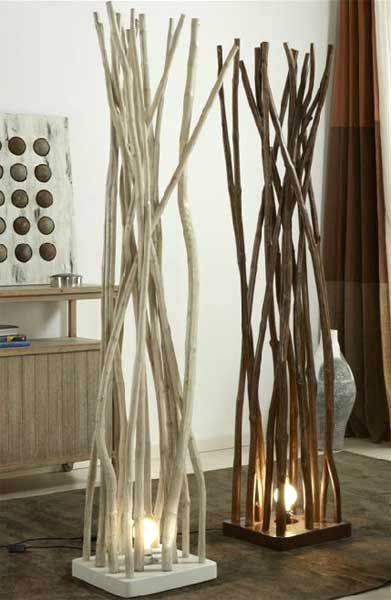
A good option would come from numerous twigs of wood. To do this on wooden stand you need to secure many branches in a chaotic order various thicknesses, but approximately the same length.
From logs
You can make wooden candlesticks with your own hands using ordinary logs. If you are at the dacha or visiting the village, ask for several round wooden firewood to create beauty. You will need bars 10-15 centimeters long. Use a drill to make a hole for the tablet candle. Be sure to sand the edges. Now all that's left to do is install the candle and find a place for the new eco-friendly candle holder.

But this is what can happen if you use a log sawn in half. Also make several holes in the bark and install candles.

The candlestick will be even more original if you use non-ideal shaped driftwood.

From timber
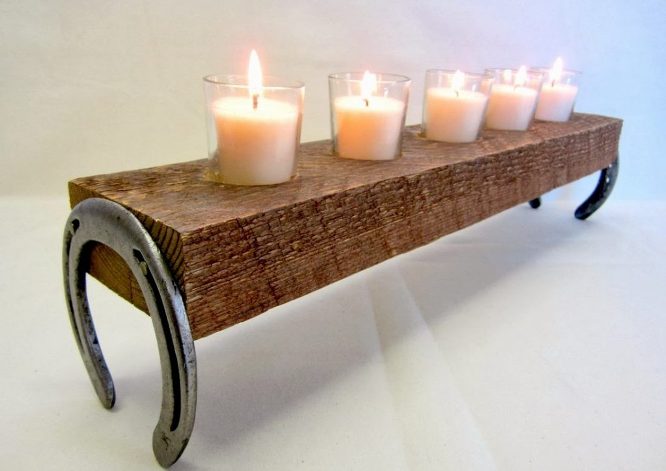
In this regard, wood can be disposed of as we please. Let's take for example ordinary timber. The most basic option is to not treat the timber in any way, attach horseshoes on both sides and install small lamps made from glass jars on top. As picture:
The timber will also be needed to create a whole candelabra. Yes, you will need several wooden blanks, they can be the same width, but different lengths. In each of the bars you need to make a hole for a candle. Then the beams are connected to each other using glue. They can be painted and decorated, or they can be left in their original form so that the texture of the wood is visible.

DIY wooden candlesticks are the most soulful, because wood retains the energy and warmth of your hands.

With wax
For example, a candlestick can be made from wood using a cut of it. You will need to melt in a water bath sufficient quantity wax, prepare several wicks, and then pour the wax into the cut. You can use some kind of metal substrate or wooden plank as the bottom.

Wooden branches as decoration
Wooden branches, well cleaned and well selected, can become a decorative finish for the glass base of a candlestick. Each branch can be glued to the base using a glue gun, or carefully applied to glass containers and tie it with thread. You need to carry out this procedure with each of the branches, it will turn out very original.

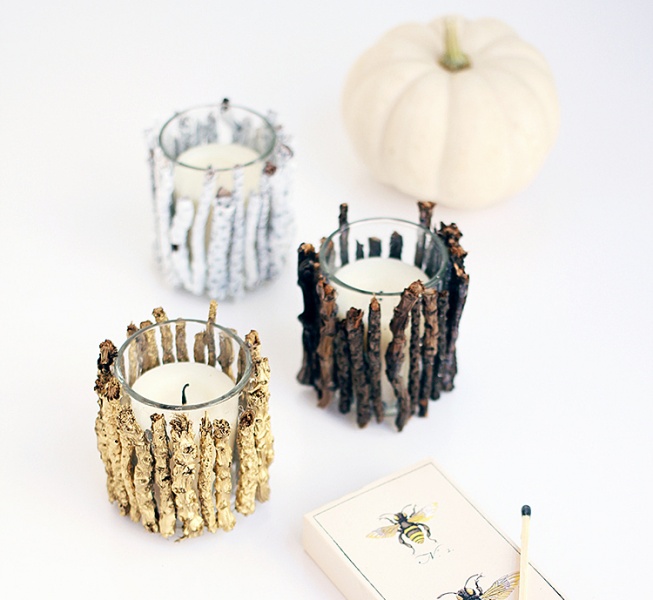
But such candlesticks can compete with any piece of modern art. They can be installed in a room designed in a high-tech style or in a country style; they will also fit well into classic or modern.
From clothespins
Wooden clothespins? Wooden! This means that the candlestick from them will also turn out to be wooden. You can use it as a base tin can from under the pate. Then the clothespins can simply be strung onto the jar. And if you use a glass goblet or glass, then it is better to attach the clothespins with glue.
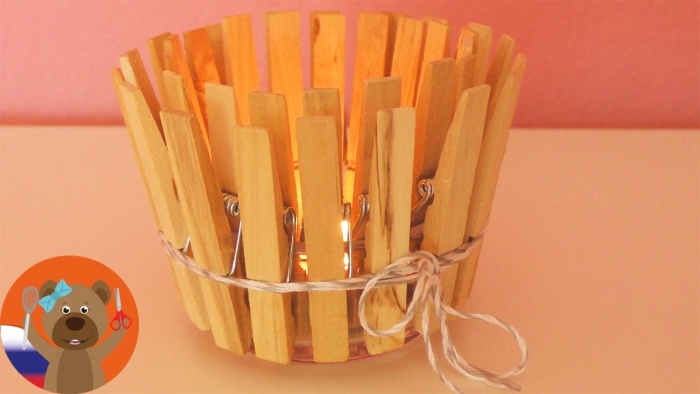
Such a candlestick can always be additionally decorated with dried flowers, stones, twigs and ribbons.
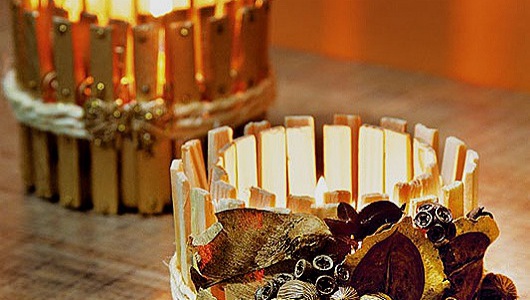
Something similar can be done by using small strips of bark.

Compositions using candles and wood
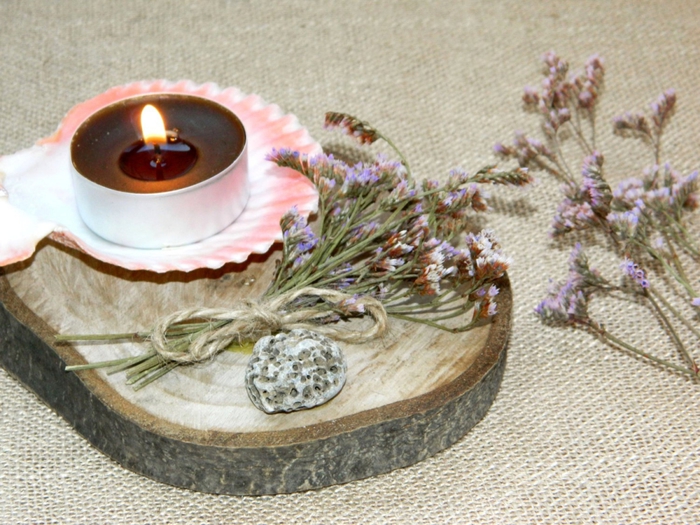
After all, it is not necessary and not always that candles should be wrapped in some kind of special shell. On glass coffee table you have the right to create a composition from a cut tree, aromatic herbs and candles.
There can be any number of options. This could be an interesting piece of driftwood, some scattered sand, shells, pebbles and candles.
This can be a composition from different cuts different trees, roots, cones and moss. Just make sure that there is no direct contact of materials with fire to avoid fire.
You can also decorate a vase or large glass with peeled driftwood, flowers, and dried citrus slices.


Other decorative elements
This means that you can use all derivatives of the tree and everything that is connected with it and can resemble it. For example, a large wide candle can be decorated with small cones, secured directly to the candle itself. Or you can use cones to decorate the vessel in which the candle is placed.
You can use corks in the same way, placing them beautifully around the vessel.


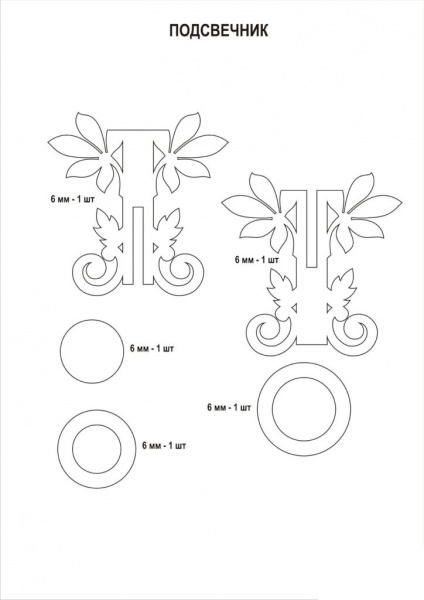
Candlesticks can also be made from plywood. This will require a little more effort and time. What you will need:
- plywood sheet;
- jigsaw;
- sandpaper;
- sketch template;
- old ballpoint pen.
Of course, this work also requires special skills, especially when working with power tools.
First you need to rub the plywood well. Then transfer the stencil using a non-writing pen. This will be easy to do because the plywood will leave marks when pressed. You can also use special paper to transfer the sketch.
Now you need to cut out holes in the parts themselves, decorative holes. First of all, they are cut out, and then the details of the candelabra themselves are cut out.
After the parts are ready, they need to be cleaned. Now they are assembled, glued and varnished. Burning or other techniques can be used as additional decor.
We offer you a sketch of the future candlestick, as well as a photo of its finished appearance.

Such a candlestick will certainly come in handy around the house and will become nice addition any interior.
We invite you to watch the video master class, get inspired, come up with something of your own, bring it to life and enjoy the beauty:
Post Views: 94
A piece of birch and a candle: DIY wooden candlesticks
Elements of nature in these DIY wooden candle holders. They can be made from logs, sticks, branches. Simple idea will add warmth to any room when it’s bitterly cold outside. Let's see which style you like best!
From birch
Perhaps one of the most simple ways transform a short candle into something elegant and cozy. You need to go into the forest and find a decent-sized birch tree (preferably already broken). Then you need to drill small holes for the candle.

Ready-made candlesticks
A little gold
This work is similar to the project above. However, here you can use any breed you like. Neatly decorated gilded wooden candlesticks – great idea for the upcoming holidays!

Gold-plated wooden candlesticks from Etsy
Glass and branches
If you can't find logs for candlesticks, then just use branches. You can take a regular glass large enough to hold a candle, pick some branches and paste it over it. You can verify the elegance of this technique by looking at the photo below.

Yellow and pink

Easy to create handmade
Sawn birch log
The final appearance of such mastery is like a birch branch falling from a tree. These candlesticks would look chic on the table. Look how the guys from Make+Haus dealt with this.

Oblong candlestick

Birch decorates the table
Mysterious piece of wood
Driftwood comes in different shapes and sizes. However, these factors only contribute to new experiments with candlesticks. You can drill at different levels of the wood surface. You can make this craft to your taste.

10 candles in one driftwood

Modest and beautiful
Heart cutouts
If you're handy with power tools, you can say goodbye to regular wood and get to woodworking. You can hollow out various shapes, and then place a candle there to suit your taste. For greater effect, you can add glass.

Candlesticks with heart-shaped patterns

Enlarged version
Logs across and in half
Cool idea for those who don't have a fireplace. Just take a regular log and cut it down the middle. After this, drill small pockets and place candles there. Externally it is comparable to small fireplace. You can even turn it over, and the pockets will be located on the reverse side.

Candles from the inside

Candles from the bark side
Candelabra on driftwood
Maybe you're looking for something more sophisticated, but at the same time warm and cozy? If so, then you need to check out the candle holders made from driftwood from Drifting Concepts. There are snags different forms and sizes.


Supplement your inspiration with our ideas, and unnecessary wooden scraps, branches or driftwood found in the forest will turn into stylish and original candlesticks. We present a series of projects made using scrap materials and simple tools.
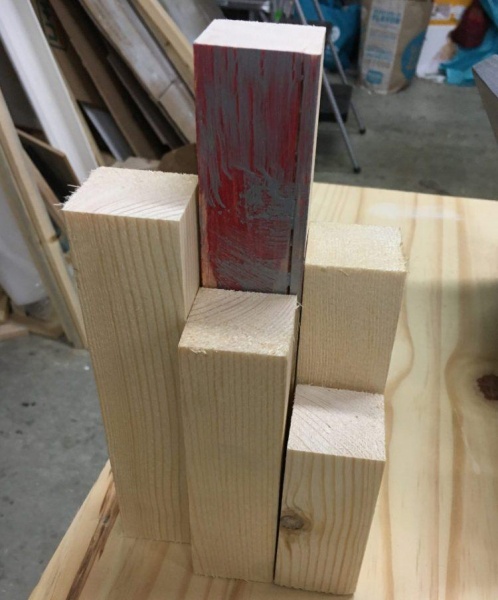
This set of simple and elegant candlesticks will not be difficult to make with your own hands, having at your disposal scraps wooden beam and a minimum set of tools. Their simple and at the same time expressive design will organically fit into any interior and bring its own special charm to it.


Measure and cut the timber into three pieces of a given length (photo 1). Mark the center (2) on the end of each of them. Drill a hole with a diameter of 40 mm in which the replacement spark plug will be located (3); For this, it is convenient to use a Forstner drill or a feather drill, which will provide a clean and neat hole without chips. Using a plane or regular sanding block, chamfer the top edges (4).
As for the choice of decorative finishing, in this matter each master is given complete freedom of creativity. The wooden candlesticks in the photo were decorated with pigmented white, and if you decide to use others finishing compounds, the product will look no less attractive. You can familiarize yourself with the intricacies of applying, or, the use of which is also appropriate in this project, in our articles.

The technique for making wooden candlesticks, described in the previous master class, can become the basis for more original projects. Having at our disposal band saw, jigsaw or even a regular hacksaw, you can easily turn unnecessary scraps into creative paired wooden candlesticks.


Those who enjoy jigsaw cutting will certainly appreciate the elegance of this small, prefabricated candle holder. Elements that are simple to make can be easily made on a jigsaw or with the help of using the proposed scheme.


Coming up with original ideas to create wooden candlesticks, do not forget that your best collaborator is nature itself. The next series of projects – the best for that confirmation.


