Do-it-yourself ceiling finishing with plastic panels: step-by-step instructions. Do-it-yourself plastic ceiling: how to do it right, step-by-step process for installing plastic panels Plastic suspended ceiling
Reading time ≈ 9 minutes
Ceiling repair is a fascinating and labor-intensive process, but sometimes it takes a lot of time and effort. It’s always a shame when a plastered ceiling begins to crumble and become covered with cracks over time. For changing this species finishing comes with polymer surfaces. Plastic panels are very popular today among both experienced builders, and among newcomers.
The modern market is crowded various types finishing materials. Buyers especially appreciate the simplicity and efficiency of installation, as well as quality and reliability. The ceiling finish meets all these requirements. PVC panels, with which you can easily cover the ceiling surface in any room. With them you can forget about thorough preparation of the base and leveling. Let's look at in this article how to make plastic panels independently, without much experience in repair work.

Features of the material
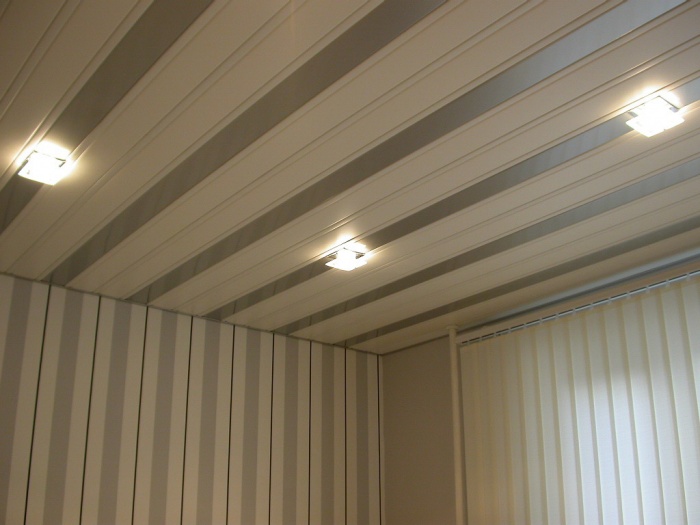
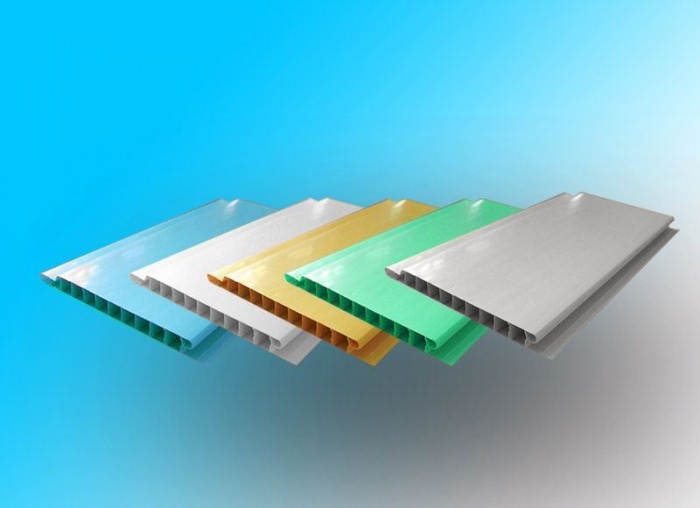
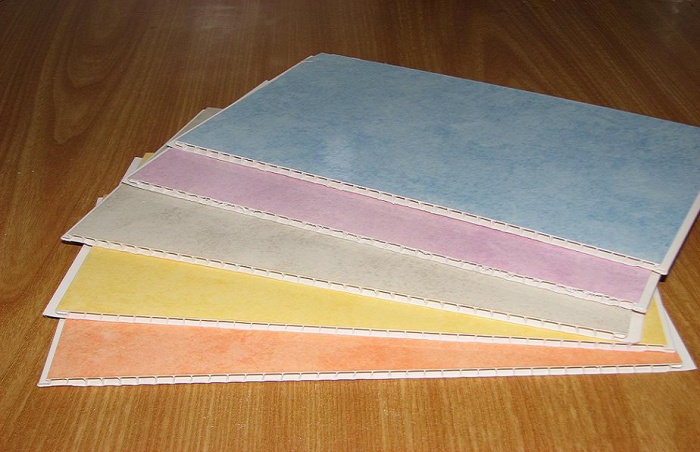
Today, construction stores offer a huge selection of PVC panel models; they can differ in size, shape, manufacturing technique (matte, glossy, varnished) and decor (wood, stone). However, it is very important not to confuse them with wall ones. Ceiling panels are lighter and softer than wall panels, weigh less and are more fragile. They are easy to install, but require careful handling, so a dent can be made by hand.
Plastic panels have a number of advantages:

What are PVC panels
Plastic sheets are lightweight, porous products made from polyvinyl chloride. They are smooth and flat; on the cut of the long end, internal locks are visible for fixation during assembly, like a laminate. The panels consist of two sheets connected to each other by plastic ribs.  How to lay out a ceiling made of plastic panels is shown in the video below.
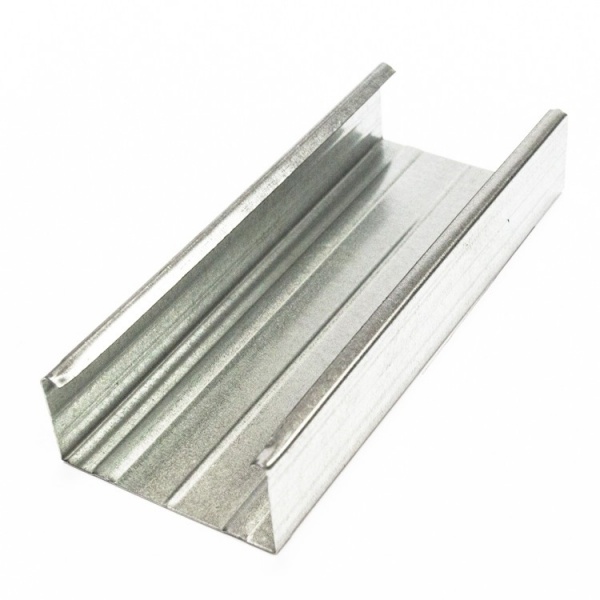
Installation of PVC sheets is possible on a frame made of wood or metal, and for cladding it is necessary to use several types of profiles.

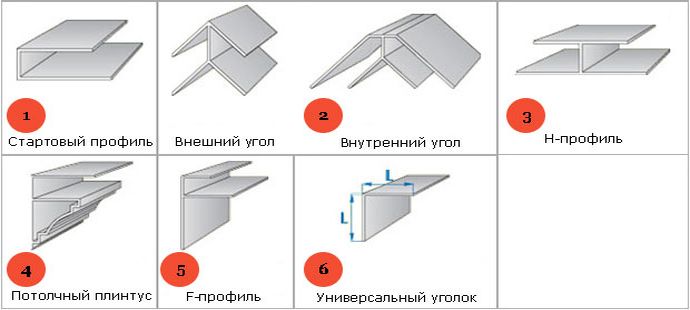
Types of profiles:
- Starters. They are used most often to cover the ends of the sheets along the perimeter of the ceiling.
- F-profiles. They also hide the outer ends of the panels.
- H-profiles. This connecting view profiles to increase length.
- Corners made of plastic (external and internal). Hides external and internal ends.
- Plastic plinth for ceiling.
- Corner made of plastic universal type. Suitable for all angles.
The disadvantage of a PVC suspended ceiling is the limited choice of shapes and the impossibility of assembly multi-level design. And also the presence of joints between plastic sheets is always noticeable. It's better not to buy cheap panels, as it will ruin general form ceiling, because low-quality sheets can show through lighting.
It is important to note that there are two technologies for installing plastic ceiling panels:
- For glue.
- On the profile sheathing.
Choosing the right one
What are the criteria for choosing PVC sheets:

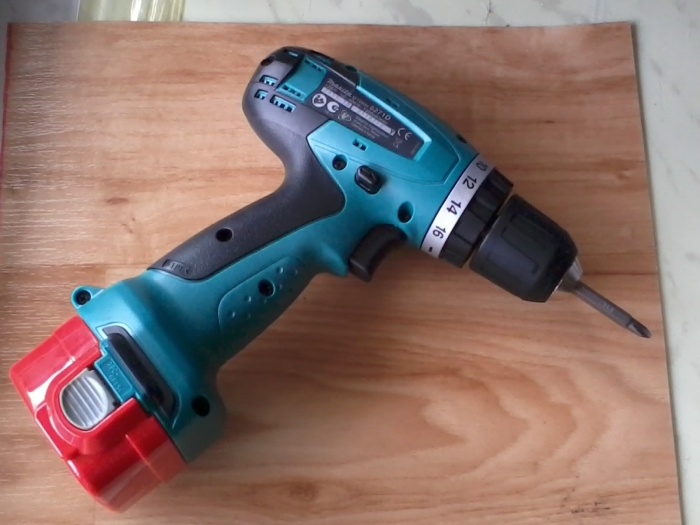
The tools we will need are:
- Drill (slow-speed) or hammer drill.
- Screwdriver.
- Roulette.
- Sharp knife and metal scissors.
- Hacksaw.
- Miter box for cutting.
- Hammer.
- Water and bubble level.
- Steel plumbs (for a frame made of plastic or metal).

Types of PVC sheets:
- Suture. The joints on such panels are immediately noticeable.
- Seamless. The junctions of the strips on the ceiling are practically invisible.
- Glossy. They reflect light well and can visually enlarge and expand the space.
- Matte texture. More a budget option, can imitate finishing with white paint.
- Plain.
- With drawings and other decor.
Finishing the ceiling with plastic panels is shown step by step in this video.
Let's start installation
All work on installing a suspended ceiling made of PVC panels can be divided into several stages:
- Preparatory stage.
- Installation of the frame (made of metal, plastic or wood).
- Installation of the panels themselves.
- Finishing the ceiling.
Preparation stage
The ceiling surface must be prepared for repair work. Although it will not be visible, the ceiling must be cleaned of dust, dirt, traces old paint, plasters, whitewash or putty. Then we prime the surface and wait for it to dry completely.
Now we begin marking for the future frame: on all the walls in the room we draw a line using a laser and water level, which determines the level of our future suspended ceiling. In this case, you can use twine that has been pre-colored with brightly colored chalk. Lightly press the string against the wall so that the chalk remains on it. For wiring from lamps or fixtures, leave gaps from the frame to the ceiling up to 2 centimeters in size.

After we have finished outlining the perimeter, we begin marking the frame. The frame profiles should be positioned strictly perpendicular to the PVC sheets at a distance of 40-60 centimeters. How to properly make a ceiling from plastic panels is shown in this video.
Frame installation
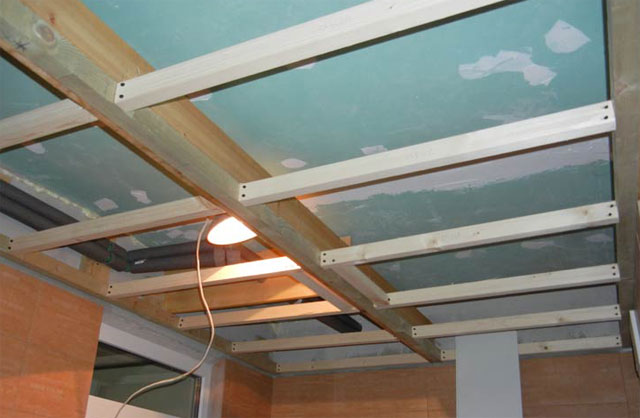
Wood
Using dowels, we mount wooden slats into the ceiling, screwing in screws every 60 centimeters. Wooden pads can be placed between the beams and the ceiling for leveling. The disadvantage of a frame made of of this material can be considered the possibility of deformation when wood gets wet and dries during operation.

Plastic
We make this frame from U-shaped plastic guides. We install suspensions in the ceiling in increments of up to 60 centimeters, and profile guides in increments of 50 centimeters. We attach the starting profile to the guides using self-tapping screws at a distance of 50 centimeters from each other.  The lower border of the frame should follow the line drawn at the marking stage. To join the profiles in the corners, use a miter box or carefully cut with a hacksaw. The disadvantage of this type of frame is its inability to withstand heavy loads.

Metal
This frame is considered the most reliable, since it cannot be deformed and serves as the basis for a perfectly flat plane. The galvanized metal frame has the most complex installation technology, but the same U-shaped profiles are used (every 60-80 centimeters). After lines are drawn on the surface to determine the level of the future ceiling, we make marks for installing plumb lines. How to cover a ceiling with plastic panels with a metal frame is shown in the video below.
Using a hammer drill, we make holes on the walls and ceiling for the placement of plastic dowels. We mount the supporting guides of the profile to the wall, and the suspensions to the ceiling. IN load-bearing installations We mount the transverse profiles, and then level their horizontal position using a building level.
Once the frame is installed, don't forget about the wiring to ensure future operation of the lighting equipment.

Cladding with PVC panels
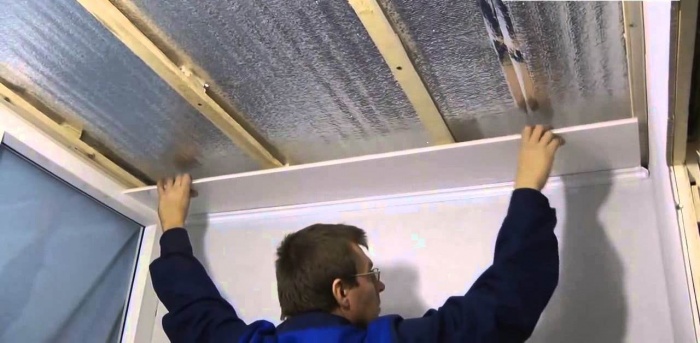
We mount plastic sheets across the installed profiles. The first sheet must be cut so that it is 5 mm shorter than the width of the room. Using a jigsaw, grinder or hacksaw, cut off the excess material. We sand the edges. 
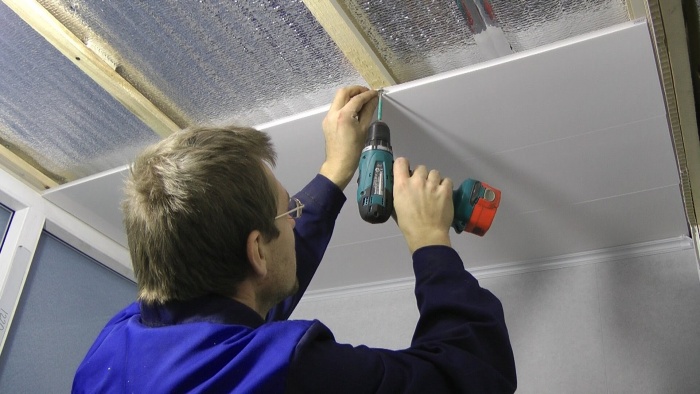
We push the finished first sheet into the starting U-shaped profile, making sure that the panel falls into place. Now we fix it using clips, self-tapping screws or screws to all support profiles on the frame. 
The second and subsequent sheets are mounted in the same way, except for the last one. We cut the finishing panel along a length 1 mm less than the distance from the wall to the starting guide profile of the opposite wall. We push the strip all the way in the very corner of the ceiling towards the profile. We push the other end out a little from the first corner and also insert it until it stops.

A small gap may form between the last two sheets, which can be easily eliminated using masking tape. Apply tape across the finishing panel and move it in the direction of the second to last one.  Suspended ceiling ready from plastic panels. Now you can start finishing surfaces. Holes for lamps can be cut at any stage, as shown in the video.
Assembling a suspended ceiling from PVC sheets with your own hands is not at all difficult. The main thing is to take into account the characteristics of the material and strictly follow the instructions.
From time to time it becomes necessary to repair the ceilings in an apartment. An inexpensive and practical option is PVC panels for the ceiling. This type of design is ideal for rooms with high humidity(kitchen, bathroom, hallway). Installation is quite simple and can be easily carried out even by someone far from construction, if they have the right tools.
Costs of installing a suspended ceiling made of PVC panels with your own hands, compared to other types of finishing ceiling surface, significantly lower. The process of finishing the ceiling with PVC panels includes several stages, some of which can be divided into several more points. Let's take a closer look at each of them.

Preparatory stage
It can be roughly divided into three points:
Purchasing the necessary materials
The selection of panels is a rather serious process, since there are many types of these products and they all differ in size, design, and texture. When choosing, you should pay attention Special attention to the width of the product. For small rooms, panels with a width of no more than 250 mm are suitable, for large premises It is advisable to choose options with a width of more than 250 mm.
For advice, it is better to contact the sellers of a specialized store; as a rule, they are well trained and can provide high-quality advice on the choice of materials for mounting a ceiling made of PVC panels.
The bars must have a cross-section of at least 30*30 mm.
As ceiling plinth In the construction of a PVC ceiling, you can use plastic, specially made for this purpose, which has a groove for installing panels into it. It is worth taking skirting boards with a small margin of about 1 m more than the perimeter of the ceiling, because during the installation process it will have to be cut at an angle and a mistake may be made.

If you plan to make a metal frame, you will need to purchase:
Tool
In work with PVC ceilings required:
- Roulette
- Pencil or thin marker
- Construction level
- Construction corner
- Lace
- Metal scissors
- Miter box
- Electric jigsaw or wood saw
- Grinder with a disc no more than 2 mm.
- Impact drill or hammer drill with drilling function (for concrete ceiling)
- Screwdriver
- Extension
Tip: For ease of use, the extension cord should have several sockets, this will allow you not to switch the power tool during operation.
Preparing the surface for installation

For installation, it is necessary to free the ceiling from anything that could interfere with its implementation. Remove old lamps and chandeliers. It is worth determining in advance where they are taking place. electric wires and mark these places with a marker or pencil. Clean the surface from dirt and dust.
Frame making
The frame can be made of wooden blocks or metal profiles 60*27 mm. For wet rooms, it is advisable to use a metal structure, since it is less susceptible to corrosion under the influence of moisture. Also, the metal frame installation system is ideal for leveling the ceiling, because it uses hangers that allow the frame to be lowered by 3 - 4 cm.
It is advisable to use wooden blocks in a dry room and with a fairly even rough ceiling. A combination of these two methods is also possible; for this, fastening with metal hangers is used in a system of wooden blocks. The method is impractical, because you have to use bars with a cross-section of at least 5*5 cm and perfectly flat.
Metal carcass
The metal profile frame must be installed at a distance of no more than 4 cm from the rough ceiling.

It is convenient to hide the wiring in the resulting gap.

First, a starting profile 27*28 is attached to the wall along the perimeter of the entire ceiling, at a distance of 3 - 4 cm, so that later the main profile 60*27 can be inserted into it. Depending on the material of the walls, fastening is carried out using self-tapping screws or dowels - nails. When installing on a dowel - nails, you will need to drill a hole in the profile and in the wall and, pressing tightly, hammer the dowel into the nail.
Important: Dowel - nails used to install the starting profile must have a cylindrical skirt. Only in this case is it possible to use through-mounting technology.
The starting profile is mounted strictly level, starting from any corner of the room and moving along the entire perimeter. If the profile is installed accurately, the starting and ending points should converge and thereby close the perimeter.
The next stage is the placement of metal hangers. To do this, you need to mark the places where the main profiles will pass. It is convenient to use a cord for marking. The main profile is attached at a distance of 40 - 60 cm from each other, strictly parallel. Suspensions should be installed at a distance of 80 cm from each other. The hangers are mounted using self-tapping screws or dowels - nails in the holes provided for this purpose, and are immediately bent to facilitate installation of the main profile in them.
The last stage is installing the main profile. To do this, the profile is cut to the required length with a gap of 5 mm on each side, inserted into the starting profile and secured with self-tapping screws with a press washer to the hangers. The level controls its horizontal position, as well as its strictly rectilinear position.

Advice: When attaching the starting profile, do not neglect its horizontal position, since in the future this will lead to incorrect positioning of the main profile and, as a result, you will have to start the installation again from the very beginning.
Frame made of wooden blocks
It is installed by analogy with metal, with the difference that the bars are fastened using the method of through installation without the use of hangers. To level the plane, it is permissible to place wood chips under the bars. First of all, the outer bars are installed, then the middle is filled at a distance of 40 - 60 cm from each other.

Panel installation
First of all, the ceiling plinths are measured and sawed at an angle of 45 degrees. Their fastening can be carried out using 13 mm PSh self-tapping screws or using liquid nails. Skirting boards are installed around the entire perimeter in such a way that subsequently installed panels fit exactly into their groove.

Installation of PVC panels on the ceiling begins with determining the length of the workpiece. To do this, measure the distance from one wall to another, then subtract 2 cm from this distance and draw a strictly perpendicular line on the panel using a pencil and a construction corner.
Then they cut it using a grinder. Next, install the first panel into the grooves of the ceiling plinth and push it all the way to the wall. As a result, it should turn out that the first panel fits into the grooves of the ceiling plinth on three sides. Only after this can the panel be attached to the bars or profile.
Tip: There are two ways to attach PVC panels to the ceiling when making a wooden frame. The first is with self-tapping screws and a press washer, the second is with a stapler and with staples. Both methods are equally effective, but fastening with a stapler is more convenient and faster.
Subsequent panels are cut to size and installed so that the ends are in the grooves of the baseboards and each subsequent panel fits into the lock of the previous one. The last panel must be cut to length and then, having measured the required distance, cut to width and then installed.
You can learn more about the installation process by watching a video description of the process.
Until recently, there were not many ways to decorate the ceiling. Whitewash, paint with water-based emulsion. The brave souls still dared to wallpaper the ceiling - and that was it. And today there are suspended ceilings, suspended ceilings, mirrored ceilings, stained glass ceilings, etc.
Covering the ceiling with plastic panels is the simplest, most economical and quick way finishing.
Today, one of the most popular, especially among those who like to do everything around the house with their own hands, is a plastic ceiling. This popularity is due to the fact that making a plastic ceiling is quite simple, especially for those who have had to deal with the installation of suspended ceilings, and it will cost only a little more than a plasterboard ceiling.
Familiar Stranger
Strictly speaking, a plastic ceiling is a suspended ceiling.
It is attached to the main ceiling using special hangers on a frame made of metal profiles or wooden slats. Only the material for the panels, instead of drywall, is polyvinyl chloride, one of the safest and healthiest types of plastic. Suffice it to say that in addition to wall and ceiling panels, food containers are made from PVC.
You can easily make such a ceiling with your own hands, giving it an attractive appearance. It won't be visible panel seams, besides, it will serve you much longer than its plasterboard counterpart, and it requires very minimal personal care - remove dust from the plastic from time to time. This is easy to do with a damp cloth, since plastic is absolutely not afraid of water.
When choosing panels, it is important not to confuse and not buy wall panels instead of ceiling ones. Although they are made from the same material, they differ significantly. Wall panels are much heavier compared to ceiling panels, which makes a huge difference.
If you mount such panels on the ceiling, you will get a significant load on its frame. And this is fraught: one fine day the frame may simply not hold up, and the ceiling will collapse. And if you install ceiling panels on the wall, they deform over time, since their mechanical strength is much lower.
Return to contents
Preparing the base ceiling

Making such a plastic ceiling with your own hands is no more difficult than a regular suspended ceiling made of plasterboard. Installation of any suspended ceiling, incl. and plastic, you should start by preparing the base ceiling. Its surface must be thoroughly cleaned of exfoliated lime or plaster and treated with an antifungal solution.
Then you need to take care of the electrical wiring running along the ceiling. Indeed, in most cases, lamps and chandeliers will be mounted on the ceiling. Before installing the ceiling, you need to secure the wires and at least lead them to the switch. The wires must be reliably insulated. Joking with electricity is dangerous, so if you do not have sufficient experience in this matter, it is better to seek help from a specialist.
To install a plastic ceiling yourself, you will need the following tools:

- hammer drill or electric drill with a pobedit drill bit;
- hacksaw for metal;
- construction knife;
- roulette;
- square;
- break paint cord;
- water level;
- screwdriver
Don't forget to purchase the following materials:
- antifungal solution;
- pendants;
- dowels (you must take the same diameter as the drill you will use to drill the holes);
- plastic panels;
- ceiling profiles;
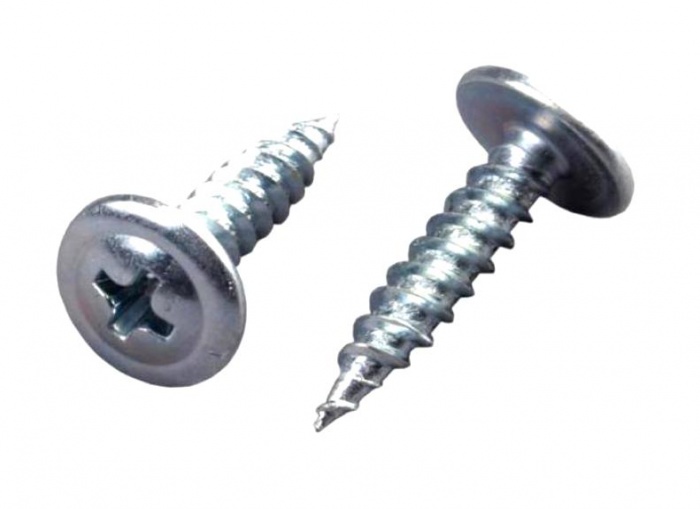
- self-tapping screws
Return to contents
Sheathing device

The frame for a plastic ceiling can be made from either wooden slats or a metal guide profile. The second option is still preferable, since the metal is less susceptible to changing its dimensions under the influence of temperature and humidity.
You need to decide in advance how far you will lower the panels. At the same time, you need to take into account the depth of your lamps - mainly from 5 to 10 cm. Having decided on the height, you need to install and fix the profile guides strictly horizontally. It’s better not to rush here and double-check everything several times. Otherwise, if you rush and install the profile incorrectly, you will be left with no other choice but to make the ceiling slanted, which will immediately catch your eye.
From the base ceiling at the corners of one of the walls, the required distance is measured down. It is important that the marked marks are at the same level, so be sure to check their location using a water level. Then these two marks are connected into one horizontal line using a cord.
Taking the measured horizontal line as a guide, you need to draw the same lines along the entire perimeter of the room, checking them with a level. This will be the horizontal plane so that .
The next step in installation will be the installation of metal guide profiles along the marked boundary. The profiles are attached directly to the wall by drilling holes in it with a puncher or drill, using plastic dowels and galvanized screws for fastening.
In order not to disturb the horizontal position when attaching profiles, the end of the unattached profile is placed at the end of the attached one, then its other end is laid strictly according to the markings, and the profile along its entire length is attached to the wall.
Having finished installing the profile on the walls, you need to install the profile on the ceiling itself. To do this, on the ceiling along the direction of installation ceiling profile you need to fasten straight hangers in increments of 50-60 cm. The hangers need to be fastened strictly along a straight line, beating it off with a paint cord. Ceiling profiles are attached to these suspensions, and the ends of the guide profiles fixed to the walls are laid. With such a suspended ceiling design, there is no danger that one day it will fall on your head.
Application of plastic for interior decoration premises is becoming widespread. It is used for both walls and ceilings. will solve many problems associated with the quality of the ceiling.
Plastic panels have excellent performance characteristics and attractive appearance.
Plastic panels have many positive qualities. They are quite technologically advanced and beautiful. From a huge assortment you can always choose what you like. A do-it-yourself suspended ceiling made of plastic is convenient, fast and practical.
Features of material selection
The suspended ceiling can be made from different materials(wood, chipboard, foam, etc.). One of the most common designs is a suspended ceiling made of plastic. Such a surface has a number of advantages: ease of installation, light weight, wide range of colors, low cost. The most important thing is that the plastic ceiling has high moisture resistance. It can be easily washed with water. Plastic does not deform due to changes in humidity and temperature.
Most optimal material for plastic ceilings is polyvinyl chloride. It can be used in the form of tiles or panels. Most Applications find long PVC panels. They are made in two types - seamless and embossed. Seamless panels have a continuous, flat surface, and smooth edges allow the panels to be seamlessly joined together.

In a relief panel, the edge on one side ends with a groove, and the other edge has a longitudinal tenon. When joining the panels, the tenon fits into the groove, and an even rectangular groove is formed along the joint.
The panel is made in the form of two layers of plastic, between which stiffening ribs are formed, which ensures sufficient mechanical strength. The front surface of the panel is polished (varnished). Standard PVC panels are sold in widths of 25 cm and lengths of 2.7 or 3 m.
Return to contents
Choosing a ceiling design
Plastic ceiling can have two main designs - suspended and tensioned. Stretch plastic ceilings are made from vinyl film. During installation of such a ceiling, the film must be heated to 70º, which requires the use of special heat guns. Installation suspended ceilings, as a rule, are produced by professionals.
Most suitable for installing a plastic ceiling with your own hands suspended structure from PVC panels. A suspended ceiling is a horizontal surface formed from a glossy layer of PVC panels, installed on metal frame. In this case, the frame is fixed to the wall and ceiling, at a certain distance from the surface ceiling.

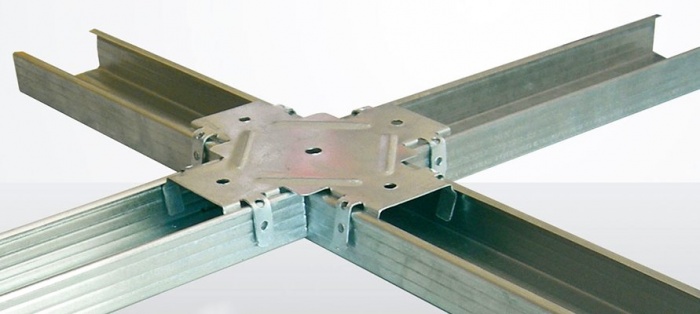
The frame is a firmly connected mounting structure in the form of a lattice. The frame is made from metal profiles. The frame is attached to the wall using a U-shaped guide profile. Typically, a profile of type PN 28x27, 28 mm wide and 27 mm high, is used. The main one is the ceiling profile, which has C-shape. The profile type PS60x27 is used. A lattice frame structure is created from this profile.
The frame is attached to the ceiling using hangers, which secure the profiles to the ceiling. For cross-shaped connection of profiles, a “crab” fastening is used. The ceiling profiles are connected to each other using a U-shaped connector with a length of 30-40 mm.
At PVC installation The panels are connected along the length using a plastic joining profile (H-shaped molding). In addition, when completing the installation of plastic, they can be used to hide the initial gaps. plastic skirting boards, starting profiles, cornice profiles, corners (external and internal), clamps.
Return to contents
Preparatory work

After installing the suspended ceiling, the main ceiling will be hidden from prying eyes, so no increased demands are placed on its surface. However, it must not be allowed to crumble, and most importantly, traces of mold or mildew remain on it after flooding. The surface of the ceiling should be primed and plastered so that there are no cracks or chips left on it. Areas with mold must first be treated with an antiseptic, for example, a solution of copper sulfate.
Return to contents
Surface marking
Important preparatory stage, which affects the quality of the entire suspended ceiling, is the marking. First, the true height of the main ceiling at different points in the room is clarified. To do this, the height of the wall is measured with a tape measure at at least three points - in the corners and in the center. In the corner with the lowest wall height, a mark is made at the height of the frame profile suspension, that is, at a distance of 5-10 cm from the ceiling. The distance is determined by the need for communications.
If it is planned to install built-in (spot) lamps or run pipes along the ceiling, then this distance is 8-10 cm; if nothing extra is planned, then 5-6 cm is enough. Then a mark is made on the wall in another corner, but taking into account the actual height of the wall. The suspended ceiling should be parallel to the floor. A straight line is struck through the marks in the corners using a well-stretched and pre-painted construction cord. The opposite wall is marked in the same way. The lines are connected to each other by marking other walls. Thus, a line is drawn along the entire perimeter of the room - it is the lower boundary of the frame guide profile.

Marking of ceiling profiles is carried out on the ceiling surface. To do this, first, parallel lines are broken off in the longitudinal direction with a cord. The first and last lines are drawn at a distance of 15-20 cm from the wall. Parallel lines are drawn between them in increments of 30-40 cm. Lines are marked in the transverse direction in the same way. A grid must be applied to the ceiling, which indicates the location of the center line of the ceiling profiles. The installation of hangers is marked along these lines. The first marks are made at a distance of 25-30 cm from each wall, and all subsequent marks are made in increments of 50-60 cm. The marks should not coincide with the crosshairs of the lines - they must be offset by at least 5 cm from the crosshairs.
Return to contents
Installation of the guide profile
Installation of the suspended ceiling frame begins with the installation of a U-shaped profile on the wall along the marking line. First, holes are drilled at the base of the profiles for fastening to the wall: the first at a distance of 10-15 cm from the edge, the subsequent ones at 30-40 cm from each other. Then it is applied to the wall and marks are made on it. Using the marks, holes with a diameter of 8 mm are made in the wall using a hammer drill or electric drill. Plastic dowels are inserted into the holes. The PN profile is attached to dowels with screws. In this way, guides are installed around the entire perimeter of the room. The horizontal installation should be checked with a level.
Return to contents
Installation of ceiling profiles and installation of communications

First, profiles are installed that are directed along the short wall. These profiles should extend from wall to wall. If it is not possible to choose a profile of the required length, then it is joined from two segments. The connection must be reliable and rigid - using a U-shaped standard fastener or a metal strip. Installation of PS profiles is carried out in accordance with the markings on the ceiling. The ends are attached inside a guide profile fixed to the wall. The profiles are positioned bottom down. PS profiles in the perpendicular direction are mounted from segments whose length is equal to the distance between installed profiles PS. They are attached using a “crab” fastening.
The PS profiles are secured to the ceiling using hangers. The pendants bend to form a U-shape. The height of the side rack must strictly correspond to the distance from the ceiling to the PS profile. The suspension platform is fastened with screws into dowels on the main ceiling in the marked places. The suspension legs are attached to the sides of the profile with self-tapping screws.
Before attaching the plastic panels, it is necessary to place the entire communication system inside the frame (if necessary). First of all, this concerns electrical wires– for a chandelier or system spotlights. The wires must be collected in a bundle and placed inside a corrugated hose. Wiring is carried out to the mounting location of the lighting equipment. The wires are carefully attached to the frame profiles.
If just a few decades ago the decoration of ceilings in most cases was limited to whitewashing or wallpapering, today the base can be sheathed with rather unusual materials, for example, plastic. We'll figure out how to install plastic panels on the ceiling below.
Advantages and disadvantages of ceilings made of plastic panels

Finishing the ceiling surface with polyvinyl chloride has many advantages:
- Masking unevenness. Not required for installation perfect alignment base coat. The panels will hide all defects.
- Convenient installation of communications. Pipes, wires and ventilation ducts fit freely in the ceiling space.
- Various lighting options. You can install it in a ceiling made of plastic panels with your own hands original lamps or backlight.
- Easy to install. It is much easier to equip a PVC structure than suspended or suspended ceilings.
- Light weight. The lightness of the material allows it to be mounted on a longitudinal frame, which significantly reduces the cost of profiles.
- Possibility of additional insulation. During the installation process, hydro-, sound- and heat-insulating material can be placed in the inter-ceiling space.
- Reuse. If necessary, the panels can be dismantled and reinstalled.
- Moisture resistance. The material is absolutely not afraid of water, and therefore it does not warp, does not become moldy, and does not deform when exposed to moisture. Because of this, it is chosen for the installation of ceilings made of plastic panels in the bathroom, kitchen, balcony and loggia.
- Easy to care for. Plastic is resistant to most detergents without abrasives, so it can be easily cleaned from almost any contaminant.
- Relative cheapness. PVC panels are relatively low in cost and will cost significantly less than plasterboard or tensioned analogues.
- Durability. At correct operation plastic will last about 15 years.
- Simple view. The ceiling made of plastic panels looks quite budget-friendly.
- Limited types of structures. Using PVC, you can only make a single-level structure without bends.
- Reducing the height of the room. A suspended ceiling made of plastic will make the room lower by at least the width of the profile.
- Interpanel seams. Even with correct installation seamless plastic lining the panel joints will still be visible.
Types of plastic ceiling panels

Today this material is so widespread in the construction industry that it is used for cladding different surfaces.
According to the type of purpose the panels are:
- Wall. They are denser and heavier.
- Ceiling. They are characterized by relatively low weight and lower strength characteristics.
- Seamless. The joints of such panels are visible only from a close distance.
- Embossed. The surface looks as if it is lined with clapboard.
- With chamfer (rust). They are similar to seamless models, but have a decorative hole at the ends.
- Lining - 300*10/300*12.5 cm;
- Seamless with a length of 260-300 cm and a width of 15-50 cm;
- Squares (rectangles) - 30*30 - 100*100 cm;
- Leafy with a width of 80-203 cm, a length of 150-405 cm.
- Glossy. Varnish treatment makes the surface mirror-like.
- Matte. No additional processing. A budget option.
- Colored. In cheaper models, the design is applied by transferring from thermal film, in expensive ones - by direct printing.
To install a ceiling made of plastic panels, ceiling, seamless, and sheet models are most often used.

It’s very easy to get confused among the variety of PVC panels available on the market, so you need to know the rules for choosing a quality material:
- The panel must be geometric correct form, with a clearly applied pattern and a smooth surface.
- WITH outside No stiffening ribs should be visible. Please note that the strength of the structure directly depends on their number.
- When choosing panels, take two pieces and fit them together. High-quality products should fit tightly to each other, fit easily and not form gaps at the joints.
- Try pressing or bending the material. Even though they are light and thin, ceiling panels should not be too fragile.
- Smell the material. A quality product does not emit a strong odor.
To do right choice Among the widest range of textures and colors, consider the following nuances:
- You can visually increase the height of the room by installing a light ceiling. Dark coating, on the contrary, will reduce the height.
- The glossy surface visually deepens the ceiling, making it more distant and the room voluminous.
- Do not overload the interior by using more than three colors in the ceiling decoration.
- Imitation of wood or stone on plastic looks primitive (especially if the seams are visible), so it is better to avoid textured designs.
At this stage, think about the type of lamps used and the method of masking the extreme ends of the panels.
DIY ceiling installation from plastic panels
The structure consists of a frame fixed to the base surface and covered with PVC. To do the work yourself, you need to prepare the ceiling, make markings, draw up a drawing, calculate the quantity required material, build a frame and fix the panels on it. At each stage there are many things to consider technological nuances and it is important to approach each process responsibly in order to ultimately be satisfied with the work.
Preparatory work before installing a ceiling made of plastic panels

Significant preparation or leveling of the base ceiling is not required for this type of finishing, but some work is still worth doing:
- We clear the room of large-sized furniture, remove curtains, cornices, paintings and a chandelier, insulating the ends of the wires.
- Lay it on the floor plastic film and close the doorway with it.
- We remove the ceiling trim and dismantle the old wiring if necessary.
- We putty large cracks and holes.
- We prime the surface with an antifungal compound.
Calculation of material for ceilings made of plastic panels

During the work we will need panels and components directly. Materials must be purchased with a reserve so that in case unforeseen circumstances The installation process was not delayed. In order to correctly determine the exact number of fasteners, components and panels, we first measure the length of all four walls. Please note that opposite walls also need to be measured separately as they may not be level.
We carry out calculations taking into account the following rules:
- Divide the ceiling area by the area of one panel, add 15-20% to the result and round up. This figure will be an indicator required quantity PVC panels.
- When calculating the number of ceiling profiles and hangers, keep in mind that it is mounted in increments of 0.5-0.6 meters.
- The length of the required starting profile is equal to the perimeter of the room plus 10 cm.
- The number of dowels will be needed based on 1 piece/0.5 meter of profile, and self-tapping screws - 1 piece/0.5 meter of panel length.
- To calculate the quantity plastic profile divide the perimeter of the room into three ( standard length products) and round up.
In residential premises, the lathing can also be made from wood, but for installing a ceiling made of plastic panels in the kitchen, balcony or bathroom, it is better to use galvanized metal ones.
Marking the ceiling before installing plastic panels

To make the work easier, prepare a tape measure, paint cord and hydraulic level in advance.
We carry out the markings in this order:
- We measure the height of all corners and the center of the room.
- In the lowest corner from the base ceiling we measure the height of the inter-ceiling space.
- Using a level, we make marks in the same plane at all corners, and screw temporary screws into them.
- We stretch the paint cord between the two temporary fasteners and mark the line for the location of the plastic covering. We repeat the procedure for all walls.
- On opposite walls near the ceiling we make marks in increments of 0.5 meters.
- We stretch the paint cord between the marked points and beat off the fastening lines of the supporting profiles.
- We mark the places where the hangers are attached.
If a hemming technique is proposed for fastening the panels, then markings are not made on the wall, and the base ceiling is pre-leveled.
How to make a ceiling frame from plastic panels

When installing the frame for hanging mount We use metal hangers for the ceiling. Before starting work, you must ensure that there is no hidden wiring in places where holes are drilled. To do this, you need to invite an electrician or use special detectors. Otherwise, the power supply may be damaged and you may even be injured.
We carry out the work according to the following instructions:
- We attach the guide profile according to the marking level on the wall. It must be fixed on all walls except the one where the last part will be installed. This is necessary for ease of joining and fitting.
- At the marked places we attach the hangers to the dowels and bend their ends.
- We insert the ceiling profile into the guide and fix it to the hangers with self-tapping screws.
- We align each element along a stretched nylon thread.
- We attach the supporting profile along the marked lines on the ceiling. During the process, it is necessary to ensure that the parts fit as tightly as possible to the wall. However, if the coating was previously leveled, then no cracks should form.
- We attach the L-shaped profile to the walls around the perimeter of the room at the level of the ceiling profiles fixed to the ceiling.
- We attach the corners at the joints.
Please note that with hemming mounting, the inter-ceiling space is not enough to install spotlights.
How to cover a ceiling with plastic panels

Plastic panels must be fastened across the location of the profiles; installation is carried out as follows:
- If necessary, cut the part to the required length 0.5 cm less than the width of the room. To do this, you can use a jigsaw, a fine-toothed hacksaw, or a sharp knife.
- Sanding the edges sandpaper and remove the film from the panel.
- We insert one side into the starting profile, bend it slightly and insert the second edge.
- We move the element close to the wall. As a result, the first panel will be fixed in three profiles.
- We attach the remaining side with wide-headed screws to the sheathing in the groove.
- We insert the second part in the same way into opposite guides and move it tightly to the previous panel.
- We cover the entire ceiling using this method. The end element will need to be cut to the appropriate width before installation.
- Install decorative skirting boards to the starting profile around the perimeter of the room. In the place where the last panel is attached, it can be glued with liquid nails.
- Using a drill bit with a crown, we cut holes for mounting the lamps.
This ceiling finishing can be done at any stage of repair, both before and after finishing the walls and floor, since this work is not “dirty”.
To make the design aesthetically attractive, strong and durable, we recommend taking into account the following recommendations during the process:
- Plastic panels are fixed to the longitudinal frame, but if you plan to hang a chandelier, then at the place where it is installed you will need to reinforce the lathing with jumpers and secure it to the base ceiling in advance anchor hook. The lintels must be cut from the ceiling profile and attached with crab connectors.
- To ensure beautiful joining of the skirting boards at the corners, they must be cut at an angle of 45 degrees. For convenience, you can use a miter box.
- If small gaps remain after installing the last panel, they can be filled with acrylic-based sealant.
- On uneven walls it is better to mount a foam baseboard, because plastic products will form gaps.
- The highest quality products made from polyvinyl chloride are produced Italian producers. The warranty period for such panels is almost doubled, and the cost is 20-25% higher.
- Plastic is not flammable, but is influenced by high temperatures(80-90 degrees) can melt, so it is better not to install high-power lighting fixtures in these ceilings. The best option- LED lightening.
- Glue panels liquid nails It is strictly forbidden to go to the ceiling. Firstly, this is not a reliable enough fixation, and secondly, there must be a ventilation gap between the base surface and the plastic coating.
How to make a ceiling from plastic panels - watch the video:
Plastic ceilings - optimal solution for bathrooms, kitchens and other rooms in which practicality and functionality of finishing come first. Our recommendations will help you understand the question of how to make a ceiling from plastic panels. By following the instructions, you will complete all the work yourself, from preparing the base surface to installing decorative skirting boards.