How orchids reproduce at home. Features of propagation of orchids using roots at home and further care of the plant
The tenderness and elegance of orchid flowers have conquered many women's hearts. So unusual and sophisticated, they attract the attention of many gardeners, and their exotic origin requires increased care, including propagation. You can buy a ready-made flower, but their prices are inflated and not everyone can afford them, so propagating them at home will be the most economical, but labor-intensive process. In addition, if you are the owner of one of the types of orchids, you will definitely want to replenish the collection with new specimens and plant existing ones. We’ll look at how to do this correctly in this article.
General information about the plant
The most common considered a variety of orchid phalaenopsis. It is not so capricious and practically unpretentious in care, it is easy to plant and reproduce. In nature, as a wild-growing representative, the orchid is found in the territory South-East Asia and on the islands between Indian and Pacific Oceans(Philippines, Indonesia, Malay Archipelago and others).
 The plant grows up to 50−70 cm from the main root rosette, forming 4−6 oblong leaves with rounded ends. Peduncles stretch up to 50-75 cm, forming thin bare branches. Flowers with a diameter of 2 to 12−15 cm are formed at the ends of the branches. The inflorescences are collected in racemes or panicles. The flowering period is long from 2 to 6 months.
The palette is dominated by pastel colors (pink, yellow, peach, cream, with veins and splashes); the flowers, with their delicate petals, resemble exotic butterflies. Flowering is accompanied by a delicate, barely perceptible aroma.
At home, the plant blooms 2 times a year - spring and autumn, may bloom a third time, but when ideal conditions. Propagated vegetatively and by seeds. When grown by seeds, varietal qualities are lost and difficulties arise in germination; this is done exclusively in special laboratories. Let's figure out how to propagate an orchid at home.
Orchid propagation at home
An exotic beauty can be propagated and grown from a small leaf, root shoot or by dividing the cuttings. When buying a “firstborn”, it is important to check with the seller what type your beauty is.
Orchids are divided into:
- Sympodial, which tend to form several growth points. Basically, rosettes are formed on horizontal shoots in the form of pseudobulbs.
- Monopodial. Baby buds form on dormant flower buds.
 Phalaenopsis belongs to the monopodial type; it has few root buds, which presents some difficulty in reproduction.
Before the procedure, you need to prepare the tools that will be needed during the work:
- Secateurs or scissors
- Spatula
- Prepared soil for orchids
- Pot or container for planting
- Drainage
All tools are thoroughly disinfected with alcohol and a strong solution of manganese to remove all foreign microorganisms and not infect the plant. To quickly heal wounds, sections of the plant are treated with wood ash, activated carbon or sprinkled with chalk.
Transplantation and division of the plant is carried out in the spring before the formation of buds - in March, February. A flower suitable for propagation is one that 3−4 years old, not affected by disease and fungi, with a healthy and strong root system.
Prepare the soil in advance. It must contain the following components:
- Shredded pine bark
- Sphagnum moss
- Coconut fiber
- Peat crumb
- Charcoal
Such a composition can hardly be called primer, but for exotic plant he is the best.
 Babies are small bores that appear on shoots or buds. They have small aerial roots, leaves and a trunk. Children grow up quickly grow leaves and roots, which can reach 10 cm. The optimal option for reproduction would be a baby that develops for 5-7 months; in such a sprout the roots will reach 5 cm, will be thick and strong, and will quickly adapt after separation.
The grown baby is cut off using a sharp knife or scissors treated with antiseptic drugs or alcohol. The cut site is sprinkled with charcoal or activated carbon and the sprout is left to dry for 2-3 hours, after which it is planted in moist soil.
To speed it up, use the greenhouse effect by covering the bore with a plastic disposable glass, jar or bottle with the top cut off. This method is suitable for germinating many plants and even seeds. Inside the glass creates a warm, humid environment, encouraging the flower to form roots and leaves. The cap is removed from time to time for ventilation, but no more than 5-10 minutes; if confident growth of the plant is observed, the ventilation is extended, and then removed completely.
Water the young seedling once every 2 days, moderately moistening the soil around the edges. With active and confident growth, the greenhouse is removed and the seedling is cared for as usual.
Seedlings by root division
 Adult flowers tend to grow from the root, forming a large number of small shoots that quickly turn into a full-fledged bush, blocking the light of their “parent”. Such shoots require personal space and are excellent material for reproduction. Sprouts separated from the root quickly take root and rarely get sick after transplantation.
For planting, the rhizome is freed from the soil and soaked in water at a temperature of 30−35 0 C for 20−30 minutes. Then the roots are carefully spread with your hands and, using a knife, cut into bushes with 3-4 pseudobulbs.
The cut areas on the mother and child roots are sprinkled with charcoal and left to dry for 2-3 hours. During this time, the delicate skin of the plant will dry out and the “wound” will close, and the sprout will take root faster. After this procedure, the seedlings are planted in moist soil and are not watered for 2-3 days, when the roots have adapted and the soil is completely dry, the seedlings are cared for as usual.
Orchid cuttings
In addition to the options listed above, there is another way to propagate an orchid - cuttings. The method is quite labor-intensive and time-consuming; it is used to germinate many varieties of flowers. Both the trunk itself and the peduncle can be divided and rooted.
To do this, use a healthy plant with a large number of shoots. One cutting must have at least 2-4 internodes on the sides. The selected parts are cut off and cuts are treated with charcoal, the cutting is allowed to “rest” for 2 hours, after which it is laid out on damp soil and covered with cling film or glass. During germination, it is necessary to monitor the temperature of the greenhouse; it must adhere to the norm - 30 0 C. As in the case of a plastic cap, the film over the cuttings is slightly opened for ventilation and removal of condensation. Watering is carried out once every 2-3 days.
Propagation of orchids by cuttings at home (video):
To germinate cuttings, you need a low but wide baking tray, ready to accommodate a cutting length of up to 15-20 cm. This method is used for germinating peduncles.
After the appearance roots measuring 3−4 cm You can divide the cuttings into parts and root them in separate pots.
With proper and proper care you will receive big family exotic beauty, which you can gift to your loved ones or start a small home business of growing orchids.
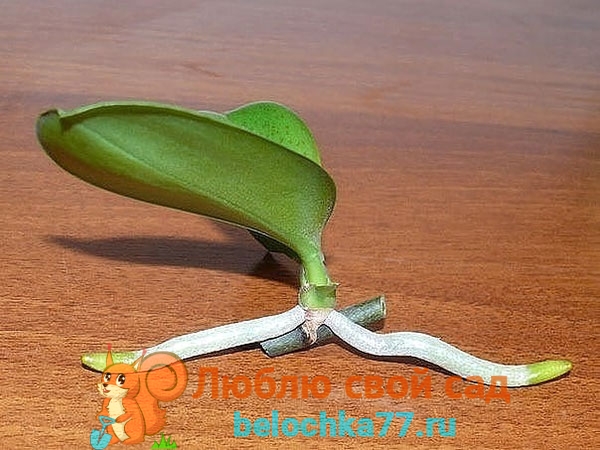
Unfortunately, it happens that our beloved orchids are left without roots. The reasons for this are very different: systematic overwatering and, as a consequence, root rotting, infections, pests or etc. If the plant has lost its roots, do not rush to throw it away. Try to revive it, that is, grow roots. I have already written about resuscitation in vermiculite and a greenhouse with moss and bark. Today I’ll tell you about growing roots above water.
How to root an orchid above water?
- We clean out everything rotten and dry. To do this, we disinfect the blade, knife or scissors, cut off the rotten and dry roots, and remove the blackness from the neck. After careful processing, the plant should become clean.
- We treat with a fungicide to prevent rotting. We treat all cut areas with crushed activated carbon.
- Dry the orchid so that the wounds heal. You can leave it overnight.
- Pour clean, settled or filtered water into a glass, jar, bottle or other transparent container.
- Place the orchid on the vessel with its neck down. The water level should be such that there is 1-2 centimeters to the neck. Remember that it should NOT touch the water.
- We place the plant in a dark, warm place.
- The leaves will most likely lose turgor and become soft, limp, and wrinkled. This is quite normal for such a situation, since they lack nutrition due to the lack of roots. Every day we wipe them with a solution of succinic acid. Its benefits are described in the section INFORMATION .
How to dilute succinic acid: 0.5 tablets per 50 grams of water.
Where to buy succinic acid: at the pharmacy.
We dilute a fresh solution every other day. We carry out manipulations with a soft cotton pad on both sides. - Once a month you can spray with Epin.

As practice shows, within a month the first signs of new roots appear. Sometimes during this period the first fresh leaf pecks. It all depends on the condition of the plant.

When is it convenient to use orchid resuscitation above water?
Growing roots in a greenhouse in damp moss and bark requires regular ventilation. Otherwise, the moss quickly rots, mold forms, and the plant begins to rot. If there is no time to carry out these manipulations, it is more convenient to place the orchid above the water.
Have you had any experience growing roots above water? Share it in the comments!
From my point of view, Phalaenopsis is the easiest orchid to care for, and if you have even the slightest skill indoor floriculture, That this type It will bloom gratefully on your windowsill all year round. But we are all prone to making mistakes. And sometimes our negligence can result in the death of our beloved plant. Watching a fading flower, most people throw it in the trash, but often the life of a plant is worth fighting for.
To find errors in care, let's look into the very tropics of the orchid paradise and first try to understand how the epiphytic world works. In nature, orchids live in warm, humid climates, where there is often thick fog and periodic heavy tropical downpours. In the tropics, even during the dry season, the roots are able to take care of the plant and obtain moisture thanks to morning dew and high environmental humidity.

Epiphytes do not need abundant watering; their roots are covered with multilayer tissue that has the ability long time retain nutrients and accumulated moisture, so it is strongly recommended to allow a little drying between waterings.

The main principle when watering is to ensure the roots of orchids required quantity moisture. However, overmoistening the substrate is strictly unacceptable, since the roots, which are constantly in a wet state, may die after some time. From excessive watering velamen - cover tissue, which protects the roots from negative factors, including mechanical damage, gradually rots. The putrefactive process inside the roots can develop over a long period of time or instantly. The consequence of the latter is that the plant is disassembled into parts, like a construction set, root system completely dies, and a couple of leaves may remain from the upper part at the growing point. As a result, acquaintance with the orchid ends with its resuscitation.
How to save an orchid without roots. Orchid resuscitation.
Most unusual way resuscitation of Phalaenopsis orchids - grow roots from the neck of the plant in a vessel above water.


So, to resuscitate the Phalaenopsis orchid we will need:
- boiled chilled water,
- The upper part of the reanimated plant with a growing point is carefully cut off with a sharp, clean blade.
Before you begin rescue manipulations with our ward, you need to wait until the cutting site is a little delayed; for this, it is enough to leave the plant in a warm, shady place for several hours. If you notice symptoms of rot, treat with a fungicidal preparation, then dry.
Then pour boiled cooled water into a convenient vessel and place the plant above the water. It is advisable to place the container with the top part of the orchid under diffused lighting in a well-circulated warm place, the recommended temperature is 23-25C.


Periodically, the orchid leaves should be wiped with a sponge soaked in a solution of succinic acid, this will help the weakened plant gain strength and energy. Or dilute the drug Doctor Foley vitamin (containing succinic acid) in a reduced concentration (three times) and treat the leaves.
Over time, the moisture in the vessel with the plant will evaporate, so you need to keep an eye on this and add as needed boiled water room temperature.
After two months, the roots of the reanimated Phalaenopsis will grow noticeably and as soon as they reach a length of 5-7 cm, the orchid can be transplanted into the substrate (photo No. 7).


It must be taken into account that in this case the plant has adapted to an unusual way of existence, so the soil must be selected accordingly. Referring to personal experience, in the first few months I would recommend planting the plant in sphagnum moss. This type of moss has long been used as one of the main components of the substrate, and many orchid growers even grow in it most your collection.
This substrate has many positive factors. Firstly, it is breathable, environmentally friendly and natural material, secondly, it is light in weight, which is important if there are a lot of plants on one rack, thirdly, it is much cheaper than other substrate components, and you can assemble it yourself and still enjoy a walk in the spring forest.
After the plant has adapted and the roots have grown sufficiently, the Phalaenopsis orchid can be transplanted into pine bark or another soil mixture that is convenient and familiar to you. You can see the result of a successful experiment in photo No. 8,9. Stories like these prove that it is possible to save an orchid even without roots!


Resuscitation of an orchid using the greenhouse method after insufficient watering.
We considered one of the options for the death of an orchid due to excess moisture. I probably won’t discover America if I tell you that an orchid can perish from both over-watering and lack of moisture. How to save an orchid in this case?
Once I had to be absent from work for a long time and the employees forgot about my orchid, standing alone on the windowsill; no one watered it for about a month.
Back on workplace, I was horrified to see that the Phalaenopsis leaves were hanging like “spaniel ears.” Through transparent pot it was clear that the root system of the orchid was completely dehydrated and looked like the skin of a reptile that had dried out after molting. No matter how I tried to water the half-living plant, the leaves stubbornly did not restore turgor; the orchid needed resuscitation.
Then I decided to shake the flower out of the pot and arrange something like a greenhouse for it. The materials at hand were a plastic bag with a horizontal zipper and sphagnum moss (photo No. 10,11).


Before placing the ward in the greenhouse, he needs to be properly prepared. To begin with, you need to purchase any B vitamins at the pharmacy and dilute them in a ratio of 1 ml per 1 liter of water, then dip the plant along with the leaves into the vitamin solution we have prepared for half an hour or an hour; you can also use succinic acid as a stimulant (also a ready-made solution Doctor Foley Vitamin is suitable; it contains both vitamins and succinic acid, you can simply spray the plant with it).
After the orchid has absorbed required quantity life-giving moisture, extract it from the liquid, and place sphagnum moss in the same solution for a couple of minutes. Moss can be used either freshly collected or pre-dried; the antiseptic property of moss will prevent putrefactive processes, but only if the greenhouse is ventilated daily. Then we let the moss drain thoroughly so that it is not wet, but slightly damp, and we cover the bottom of the greenhouse bag with it, and place the orchid prepared for resuscitation on top of the moss. If you are using Dr. Foley vitamin, the moss should be sprayed with this solution until it is slightly damp.
The bag can be hung in a place convenient for you, but you must choose partial shade or slightly diffused lighting so that the plant inside the greenhouse does not cook, comfortable temperature 22-25C.
Condensation will appear on the walls of the bag and saturate the orchid with moisture in the process of restoring turgor and growing roots. Be sure to open the bag several times a day for at least half an hour for ventilation and make sure that the moisture does not completely evaporate.

In a month or two, the plant will regain its previous turgor, grow new roots, and it will be possible to transplant it to free crops. The first time after the transplant, our “patient” will need to be gradually accustomed to the dry air of the room.
As a new greenhouse, you can use any transparent bag or cut off the top of a 3-liter plastic bottle, depending on the height and size of the one being protected. The bag or lower part of the bottle will need to be placed on the plant for 5-6 hours so that there is a distance of at least 10 cm from the tips of the leaves to the bottom of the greenhouse bottle. Several weeks of this procedure is enough for the plant to adapt to the new environment.
We are very grateful to the Kyiv Orchid Lovers Club for their help in preparing the material!
Phalaenopsis orchid – herbaceous plant orchid family. IN wildlife This plant lives in humid, warm forests. Phalaenopsis is represented by 3-6 wide leaves, arranged alternately, between which grows a peduncle, represented by a flexible long branch.
The number of flowers depends on the care and variety of the plant; flowers can have any color, spots and stripes.
Even an inexperienced gardener can propagate phalaenopsis.
Breeding conditions
To obtain positive results in the propagation of orchids, a number of rules must be followed. Choose the right landing time and follow temperature regime, humidity and choose the right plant from which we will take planting material.
Time
It is best to propagate phalaenopsis orchids when the plant is approaching the end of its flowering phase– then the flower’s resources will be directed to reproduction.
Humidity
The ideal humidity for a phalaenopsis orchid is 50-80%. Humidity of 25-85% is possible, but optimal humidity is important for healthy reproduction.
Temperature
Excellent for propagating phalaenopsis temperature from 28 to 30 degrees, temperatures above normal are acceptable, but below are not recommended.
General condition of the orchid
Suitable for reproduction only individuals without diseases. A diseased plant may have black, mucus-covered or yellowish leaves of an unnatural color; if you see any of the signs, postpone propagation until the plant recovers.
Methods of propagation of the Phalaenopsis orchid
In order to propagate the Phalaenopsis orchid, there are several ways; below we will consider each of them in detail.
Stem division (peduncle cuttings)
One of the common methods of propagating the Phalaenopsis orchid is vegetative propagation, or cuttings - dividing the stem of a peduncle into parts. The optimal season for this is late spring - early summer.
We take cuttings from the trunk

You can learn more about cuttings from an orchid peduncle from the video below:
How to grow in water?
Phalaenopsis orchids can be propagated by cutting off the peduncle. This method is suitable when the mother plant is very sick and cannot be saved.
How to propagate phalaenopsis in water?

Important conditions for caring for cut peduncles
- The temperature should not exceed 25 and not exceed 28 degrees; under other conditions, not a baby, but a peduncle will grow from the bud.
- In a bottle with clean water besides activated carbon can add mineral fertilizer in a concentration of 1:4 from the usual one.
- Separate the baby when you young plant 3-4 leaves and roots of at least 3-6 cm will appear. Just cut it off along with part of the peduncle, plant it in a transparent pot filled with bark and do not allow direct sunlight.
How to drop off children
 It is important that the plant has already left the flowering phase, is absolutely healthy and has a peduncle no older than 1.5-2 years.
The baby itself looks like a bud located on a peduncle.
Important terms:
- It is advisable to begin stimulating bud growth in February. The flower should be placed on the western or eastern side, shading the leaves and allowing the sun's rays to fall only on the peduncle.
- The temperature during the day should reach 27 degrees, and at night it should be around 16-17 degrees.
- It is advisable to reduce watering of phalaenopsis to a minimum.
- No fertilizing should be done until the bud wakes up. After about a month of such care, the dormant kidney wakes up.
After the kidney wakes up you need:
- Move the plant to a warm but shaded place. Do not expose your baby to direct sunlight.
- Normalize your plant's watering schedule.
- Bring in foliar feeding, that is, on the leaves. When the plant has developed sufficiently, you can begin to add roots.
After about six months, the baby will have 2-3 leaves and roots longer than 2-3 cm; you will need to carefully separate it from the mother plant and replant it in a pot.
You can learn more about the propagation of Phalaenopsis orchids by children from the video below:
How to propagate using cytokinin paste?
The method of propagating the phalaenopsis orchid using cytokinin paste is one of the simplest and most rewarding. It is better to use this method at the end of winter or spring, when the plant has the most vitality and energy.
Attention! Cytokinin paste can only be stored in the refrigerator!
So, to start growing a bud on a peduncle stem using paste, you need to follow the instructions below.
- Using a sterile knife or needle, scratch the surface of the peduncle.
- Apply approximately 1.5-2.3 millimeters of paste to the scratch area. After about 10 days, the bud will begin to emerge. The best option– Apply the paste using a toothpick. Apply a little more when insufficient quantities cytokinin paste will produce a new peduncle, not a bud.
- To awaken a nascent bud, cut off the scales protecting it and apply the same amount of paste to the bud.
- After 10-20 days, the bud will awaken, let it grow two to three leaves and 3-5 cm roots and plant the baby in a pot. Do not expose to sun.

Propagation by seeds with photos at home
Propagation by seeds is one of the most complicated ways, previously this was considered impossible.
The main reasons why this method is not used very often and takes so much time and effort:
- Orchid seeds are very small and it is almost impossible to see them with the naked eye.
- They have endosperm is missing. Endosperm is the tissue that surrounds the embryo, nourishes it and prevents harmful environmental influences from damaging the embryo.
- Any interaction with environment, diseases and deviations from care standards lead to the death of the plant.
How to grow a phalaenopsis orchid from seeds, step by step instructions?
To get orchid seeds yourself, you need to carefully pollinate the flower with a toothpick, as in the photo below. Or you can buy ready-made seeds.

After successful pollination, the orchid capsules begin to grow.

After 6 months, the pods with Phalaenopsis orchid seeds ripen.


To take the next step you need to prepare a nutrient medium for the plant. There are several recipes for preparing a nutritional mixture.
Recipe 1
You will need 10-20 grams of agar-agar powder, 10 grams of fructose, the same amount of glucose, a little phosphoric acid, calcium carbonate, and about 200 ml of purified water. let the agar-agar swell in water, pour the jelly you received into boiling water and add fructose with glucose, calcium carbonate and acid. Stir until you get a homogeneous substance without crystals.
Recipe 2
Another recipe for a growing medium. We need:
- 400 ml distilled water;
- 100 ml tomato juice;
- 20 grams of sugar;
- 40 grams of banana;
- 0.5 ml fertilizer for orchids;
- 2 tablets of activated carbon;
- 0.5 g honey.
You need to grow orchids in glass tubes with sealed stoppers. If you don't have such test tubes, use small jars with very tight-fitting lids. Thoroughly sterilize the jars, pour in 30-50 ml of the nutrient mixture.
Attention! It is very important to make the environment sterile, otherwise the plants in the mixture will grow mold and the plants will not germinate.
Re-sterilize the jars by pouring the resulting solution into them in a water bath and leave for 3-6 days to make sure that the disinfection was successful. If mold appears, this solution cannot be used!
 Cover the seeds with a 1% chlorine lime solution and leave for 15-20 minutes. During this time, actively shake the container 3-5 times.
 Take a small saucepan with boiling water, cover it with a grid with cells in which you can secure flasks or jars with nutrient medium. The lids should also be kept nearby for disinfection.
Gently remove the seeds from the bleach solution and place them in the growing medium using a sterile syringe. Carefully close the containers and place them in the greenhouse.
 After six months, carefully open the containers. If the seeds germinate successfully, you will see sprouts in the jar as in the photo below.
Pour in 40-60 ml warm water shake until dissolved. Pour the resulting substance into a wide bowl and add 2-5 drops of 1% Furnadzol solution. Now leave your sprouted seeds for 15-20 minutes.
 Now, using the smallest, thinnest and softest brush, plant the germinated seeds one at a time in pots with nutritious soil made of bark and moss. Add crushed fern roots and several crushed activated carbon tablets to the soil.
 After about six months, it will be possible to transplant the seedlings into soil intended for adult plants. Unfortunately, flowering of orchids grown in this way should not be expected earlier than after 4-7 years.
How do Phalaenopsis reproduce by roots?
Even a beginner can propagate an orchid by roots.
- Lift the plant above the pot and carefully remove the soil.
- Cut the rhizome with a sterile knife or pruning shears, leaving 2-3 pseudobulbs per sprout.
- Sprinkle the cuts with powder charcoal.
- Plant each separated part in a separate pot with fresh soil, spray twice a day until real leaves and good roots appear. After some time you will have a healthy plant!
 Possible errors during reproduction
Important mistakes when propagating phalaenopsis orchids are:
- Using a diseased plant for propagation. It is important to remember that a plant with unhealthy leaf color, black roots covered with mucus is an important sign indicating that such a plant should not be used for propagation.
- The only propagation method that can be used with a diseased plant is propagation in water.
- Important remember to sterilize sections, regular watering.
- Do not expose plants to direct sunlight, this is harmful and dangerous for the plant in the process of reproduction.
- It is necessary to give the plant optimal temperature, lighting and humidity; deviation from the norm may end in failure.
Child care
 In order not only to get a baby, but also to raise her into a healthy and beautiful plant, it is important not to forget about proper care.
- Small plants should be planted in the same pots as adult plants: transparent, with many holes. You can also add soil taken from the pot of the mother plant to fresh soil in a 1:1 ratio.
- It is important that young phalaenopsis plants receive optimal conditions: Temperature and humidity need to be ideal, and do not allow the sprouts to be exposed to direct rays of the sun.
- Fertilizing should be applied depending on the method of reproduction.
Useful video
You can learn more about Phalaenopsis propagation from the video below:
Instead of a conclusion
In fact, even a completely inexperienced beginner can have one or two more orchids in his home by propagating them at home, the main thing is to follow the instructions and not lose faith in yourself!
In contact with
Orchid propagation can take place different ways. Sometimes it happens urgent need. When the bush has grown too much, for example, or a baby has appeared on the mother plant. It happens that you want to get another one of the same plant to give it to relatives or friends. Let's consider how you can get new specimens of various orchids.
An orchid for propagation must be adult, mature and fairly healthy. This procedure is not used during difficult times for orchids - autumn and winter. This is best done in the spring months or immediately after flowering has ended. The survival rate of young plants depends on these conditions.
Sometimes the orchid itself decides that it is time for it to reproduce and forms a baby on the peduncle. All you have to do is wait for the small orchid to develop its own roots and plant it in a separate container.
Methods for propagating orchids at home
The method you choose to propagate an orchid is determined by its type. Existing options suggest: cuttings, dividing the bush, propagation by children and seeds.
This method is suitable for propagating Phalaenopsis orchids and is not particularly difficult.
- After flowering, the remaining green peduncle is cut into pieces 3-4 cm in size, each having one dormant bud. The bud should be located approximately in the middle of the cutting.
- All cuts are processed with crushed charcoal.
- After this, the cuttings are placed in damp sphagnum moss, covered with glass or film on top and placed in a warm place with a temperature of 25-28.
- It is recommended to moisten the moss periodically.
- After some time, roots form; after the leaves appear, the young plants are planted in small pots.
You can do it differently. The faded peduncle is placed in water with added fertilizer. The container with the peduncle is placed in a very warm, bright place and periodically treated with Dr. Foley fertilizer. This promotes the awakening of dormant buds and the appearance of children on the peduncle. When they are sufficiently formed, they are cut and transplanted into pots.
Growing an orchid from a peduncle: video

Orchid babies can appear spontaneously simultaneously with flowering on a peduncle or from a dormant root bud. For their appearance it is necessary very heat(above 28°C) and high humidity air. In this case, there is a high probability that a baby will begin to form from the dormant bud. Some phalaenopsis hybrids are more prone to this, others less.
Attention! The birth of babies can be stimulated using a special cytokinin paste. This hormonal drug, which promotes the awakening of dormant buds and the emergence of new plants. Before applying the stimulating drug, it is necessary to remove the scale covering the bud.
It takes up to six months for a baby to grow its own roots. Only after this is it cut and planted separately. By this moment, the plant should have 3-4 leaves and up to 5 roots of its own, 4-5 cm long. The cut is made with a sharp knife, leaving a small piece of the peduncle on the plant. The sections are treated with crushed coal (and on the mother plant too).
In dendrobium, calanthe, tunia, catazetum, children are called side shoots. To stimulate their appearance, use a complex mineral fertilizer based on potassium, phosphorus and nitrogen with the addition of minerals and amino acids. After the shoots grow a little, all you have to do is cut them with a sharp knife and plant them in a separate container.
Separation of babies from the mother orchid plant: video

Propagation by cuttings is used for mnopoidal orchids, such as Vanda, Dendrobium, Epidendrum. This manipulation is carried out in the spring so that over the summer the plant can get stronger and take root well. To do this, do the following:
- Use a knife to cut off the top of an old stem or a new young shoot with two or more aerial roots.
- The sections are treated with a fungicide and sprinkled with crushed coal to prevent infection. After this, they must be covered with garden varnish.
- The cut cuttings are planted in moss in a greenhouse. Grow a new plant in a warm place with plenty of light. The moss is kept moist.
Direct Sun rays Contraindicated for rooted cuttings. Provide them with light shade.
How to propagate orchid cuttings: video

Sympoidal species are propagated in this way: Dendrobium, Cymbidium, Miltonia, Cattleya, Odontoglossum, Oncidium. For this method of propagation, only an adult bush is suitable; at least 4 pseudobulbs should remain on each of the divisions. With less of them, you risk destroying the plant. We recommend combining the division of the bush with replanting, dividing the plant into 2-3 parts.
The procedure is carried out as follows:
- The substrate is moistened to make it easier to remove the plant from the pot.
- Then you need to pull the base of the stem and carefully remove the orchid.
- Clear the roots of the soil so that you can better see where to divide.
- Using a sharp knife, divide the main large onion into 2-3 parts so that at least 4 pseudobulbs remain on each of them.
- Powder the cuts with cinnamon or crushed charcoal. Air dry a little.
- Plant each division in a separate pot filled with a mixture of moss and nutrient substrate.
Thanks to the pseudobulbs, the orchid receives nutrition that will help it recover after division. If the seedling looks weak, it can be rooted in a plastic bag filled with damp moss. In conditions high humidity It will be easier for the plant to grow roots. Such a package should be located in a warm place - this necessary condition for rooting cuttings.
If you do not want to divide an adult bulb, so as not to worsen appearance mother plant, you will have to wait until the young shoots form their own bulb and enter the dormant phase. This moment will be the most favorable for their separation. They are planted in separate pots and cared for like other orchids during the rest period. Coming out of this phase, the plants will begin to grow, develop roots and continue to successfully form into adult specimens.
By dividing the bush, adult Phalaenopsis can also be propagated. As a rule, this is done with plants that have a lot aerial roots and leaves. The rosette is cut into 2 halves so that the leaves and roots remain on each part of the plant. Then proceed as usual. The sections are powdered with charcoal and dried. The lower part can be left in the old pot. The upper part is planted in a new container, tucking aerial roots into the soil. The stump dries out after a while, forming a basal baby. This way you get two plants.
Orchid propagation by dividing a bush: video

Propagation of orchids by seeds is considered difficult and is used only by enthusiasts, since everything takes a long time and with certain difficulties. Orchid seeds are like dust and have no supply nutrients. They can germinate only under conditions of absolute sterility and sufficient quantity nutrition. Nutrient mixtures are made on the basis of agar-agar and can be purchased at a specialty store. It will take a whole year for a sprout to appear, so few people use this method of propagation at home.
On a note! IN industrial scale Special laboratories are engaged in growing orchids from seeds.
Sterilized seeds are placed in test tubes with a nutrient solution. Changes can be noticed after a week. The seeds form small green balls, on which suction hairs first form and only then leaves. Plants are transplanted into the ground at one year of age.
Nutrient medium for sowing orchid seeds: video

It takes 3-4 years for an adult orchid to fully form. Until this time, young plants are kept in a pot of suitable size. It must fully correspond to the size of the root system. There should be a large amount in the pots drainage holes so that moisture does not stagnate at the roots.
It is advisable to place drainage made of expanded clay or brick chips at the bottom. Some people use pieces of foam. This is especially true for those who have cold window sills, since polystyrene foam is an excellent heat-insulating material.
The substrate itself is prepared from small pieces of pine bark, sphagnum and charcoal. You can add a little high-moor peat; it will populate the substrate with favorable microflora and prevent it from drying out quickly. If a young orchid has some of its roots sticking up, do not try to force them into the pot. The roots of children are very fragile and easily damaged. It is advisable to periodically spray the roots left exposed to the air. warm water so that they do not dry out, or cover with moss.
Caring for young plants is almost no different from caring for an adult specimen. Unless watering needs to be done more often due to the small volume of the pot. At first, you can add growth stimulants and special fertilizers for orchids to the water for irrigation - then the plant will grow stronger faster. The kids need good lighting And optimal temperature. If all the rules are followed, in due time the orchid will give you its first flowering.
Propagating orchids at home is a fascinating activity. This is a completely creative process that will allow you to observe the changes taking place and gain satisfaction from the final result. The young orchid can then be given to someone as a gift or even sold - it’s up to you to decide.