How to lay laminate flooring with your own hands: methods and diagrams. ⚠ How to lay laminate flooring with your own hands: step-by-step instructions and nuances of performing the work Tools and auxiliary materials
DIY laminate installation guide. Step-by-step instructions with a video detailing the main stages of creating a coating.
Laminate is one of the most popular types of flooring. Panels made from fibreboards polymer based, in terms of performance characteristics they are not inferior traditional materials.

After studying the simple instructions, you can lay the laminate flooring yourself
Laminate occupies an intermediate niche between linoleum and natural parquet, successfully combining the cheapness of the first and the undeniable advantages of the second. Displacing these players from the market, laminate also has its eyes on, although they seem to have different niches!
Laying laminate flooring with your own hands is not an easy task, but knowing certain secrets and tricks, anyone can cope with it.
Lock connection options
All versions of modern panels are attached using one of three methods:
- Adhesive - based on the tongue-and-groove system. The installation technology is similar to that used when laying parquet board.

Laying laminate flooring with glue
- “Click” - with this system, the spikes are flat hooks. They are inserted into grooves equipped with a platform for engagement with a hook, which can be made at an angle of 30°.

Click laying system
- “Lok” - this type of lock looks like a tenon with a locking comb, which is inserted into a milled groove in the adjacent panel.

Lok laying system
Glue method allows for increased strength of seams. But due to the use of glue, the structure becomes non-removable, which greatly complicates its dismantling.
Lok panels are installed by driving a tenon into a groove until it fits tightly.
Compact the lamellas with a mallet or metal hammer. To avoid damaging the panels, a short piece of timber or a small wooden block is first placed at their end. The disadvantage of the system is that under load, the joint combs wear out, which is often accompanied by the appearance of cracks.
Assembling the Click panels is not difficult, so you can lay the laminate yourself, assembling and disassembling the flooring up to six times if necessary. Having connected the grooves with the tenons, the joints are pressed to the floor until the hook engages with the groove area, which is confirmed by a characteristic click.

Diagram: comparison of laminate laying systems
Securely fixed panels do not move apart even under heavy loads during operation, maintaining the integrity of the canvas.
Tip: Regardless of the type of lock, the connection system is essentially the weakest point in the design. To extend the service life of joints, it is recommended to treat them with hermetic impregnations.
Options for panel laying schemes
When laying lamellas, craftsmen recommend adhering to the principle that they should be placed parallel to the direction of light. Then the light falling from the window onto the floor will not create shadows on the seams, thereby achieving the effect of an ideal surface.
But starting from the layout and constructive solution In a room, the installation of lamellas can be done using one of three options:
- In the direction of the world.
- Perpendicular luminous flux.
- Diagonally.

Laminate installation options
By choosing one or another installation scheme, you can advantageously emphasize the originality of the coating design and even visually modify the geometry of the room, expanding or, conversely, narrowing the space.
The slats are always placed “staggered”, laying out the elements of each subsequent row with a slight shift to the side by 15-20 cm relative to the previous one.
Step-by-step instructions for laying laminate flooring
Regardless of the chosen type of material and method of laying the panels, when planning to lay the flooring with your own hands, you can follow the universal step-by-step instructions, the main points of which will be discussed below.
Preparing the necessary tools
When planning to lay laminate flooring yourself, you should prepare the following tools in advance:
- Construction tape;
- Metal square;
- Hacksaw with fine teeth;
- Jigsaw;
- Hammer;
- Wooden or rubber mallet;
- Marker for marking;
- Tamping block;
- Dies 12-15 mm thick.

Tools needed to install laminate flooring yourself
If you don't have a wooden mallet, you can use a regular hammer. Wooden dies can be purchased at a hardware store, or you can make them yourself from pieces of timber.
Performing a calculation
The determining factor when calculating the required number of panels is the method of their installation.
When choosing the classic option, which is considered the most economical of those listed, the calculation is made as follows: determine the area of the room by multiplying its width by its length, and add a margin of 10% to the resulting value.
This ten percent reserve will compensate for the consumption of panels if they need to be trimmed to fit in accordance with the room plan. When planning to place panels diagonally, the supply of lamellas should be increased by 20%.

Before purchasing, make accurate calculations of the required amount of laminate
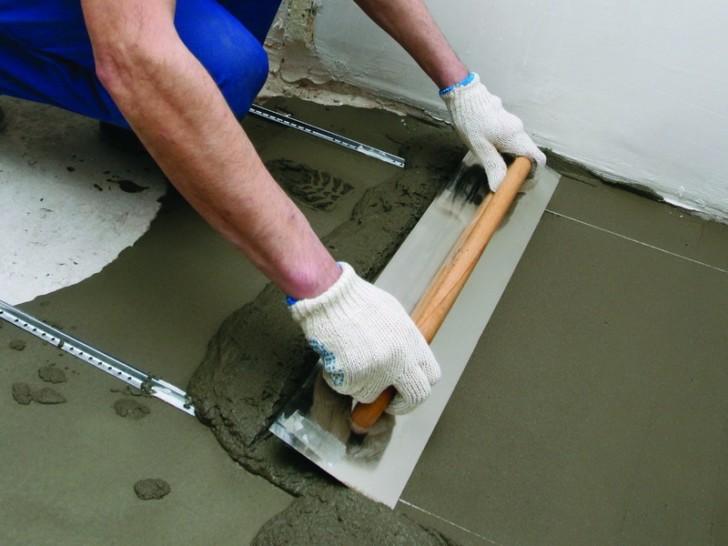
Preparing the base
One of the prerequisites for the reliability and durability of the coating is its installation on a perfectly leveled surface. And laminate is the most demanding in this regard.

Clean the floor surface before laying laminate flooring
- Tile and linoleum - they must fit snugly to the floor and be firmly fixed.
The concrete screed must sit for at least one and a half months before applying the coating. Otherwise, the perspiration released by it will provoke rotting of the coating.
When working with a wooden base floor, you can level the surface by laying chipboard sheets on top of the boards and placing them in a checkerboard pattern.
Although laminate is known as a universal coating, there are a number of limitations when working with it, the main ones being:
- It is not recommended to install it in rooms where the humidity reaches 70% or more.

If laying is carried out on a concrete screed, it must be leveled
- Use as a finishing coating when installing electric heated floors.
- Attach to carpets.
Attention! Before laying the laminate with your own hands, the panels should be brought into the room for acclimatization and, without unpacking, laid out in a stack on a flat floor, leaving for 1.5-2 days.
If you plan to use or, then it is advisable to use laminate of classes 31-33. When choosing this laminate, pay attention to the presence of special symbols, as well as the safety level, it should be E1 or E0 ( Minimal amount harmful substances released by the board when heated).
Arrangement of the substrate
The substrate is designed to perform three functions: absorb noise, prevent the penetration of moisture and act as a shock absorber.
Before laying the coating, the concrete base is first lined with a vapor barrier layer of foamed polyethylene foam or polystyrene. The canvases are laid with an overlap of 20 cm, not forgetting to make overlaps on the walls of 12-15 cm.
Substrate thickness concrete screed should be 3 mm. If the surface of the concrete base is made of a “dry” screed, the insulation does not need to be lined, since this layer is already provided for.

Laying laminate on a substrate
On wooden boards The vapor barrier layer may not be laid out. But it is imperative to make a soundproofing substrate made of balsa wood or foamed polypropylene, the thickness of which is 2 mm.
When arranging it, the strips are laid out in the direction from the window to the door, fixing the joint to the joint with construction tape. Linoleum and tile they do not need a vapor barrier. The lamellas can be laid directly on the substrate.
Video: subtleties of arranging the substrate
Laying panels
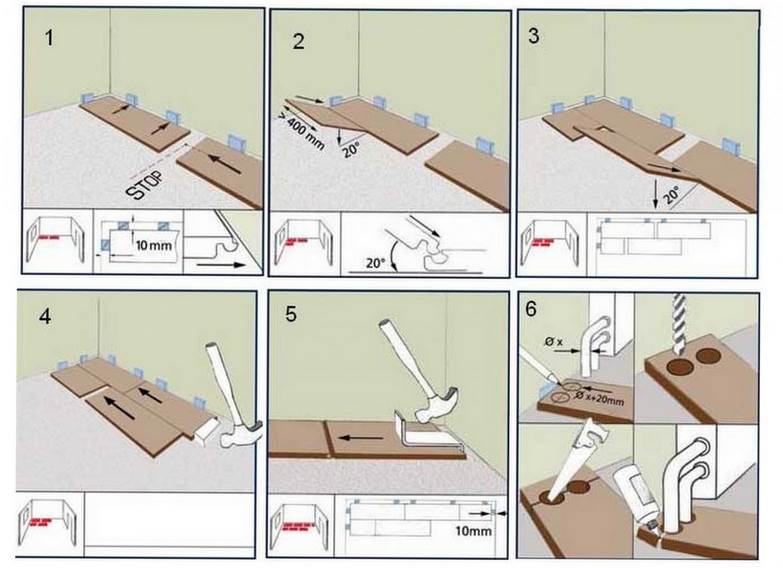
When laying panels with your own hands, you most often choose the traditional method (direct placement), which is the simplest and waste-free.
The first row of the future covering is laid entirely, starting from the far corner of the room. The strip is moved towards the wall and wedged with small spacers on three sides.
The wedges are designed to provide 15mm clearances to accommodate linear expansions flooring. An expansion joint must be provided around the entire perimeter of the room; after installing the baseboard, it will be invisible.

Laminate laying diagram
When installing slats in a doorway, the gap is made a little smaller. Subsequently, it will be covered with the door frame. If this condition is not met, you should be prepared for the fact that when expanding due to heating or increased humidity, the lamellas may bend in an arc.
The second and subsequent strips are installed in the end lock of the previous one and laid on the floor, not forgetting to place wedges at the ends. To ensure that the panels are placed staggered, the beginning of each next row is laid out with the remaining section of the previous one.
Tip: It is better to install from the corner where the pipes are located heating system and a radiator was installed, thereby making the installation process easier.
If it is necessary to frame the risers, the panels falling on them are trimmed. Ideally, if a joint of panels is formed opposite the riser, then it is much easier to cut a hole along the edge.

Panel joining diagram
If it is necessary to cut a whole panel, then several holes are pre-drilled at the intended point. Cut the panel, focusing on the hole, drawing a cut line clearly in the middle. When attaching these panels, glue is used.
The last strip, if necessary, is trimmed taking into account custom sizes. To do this, turn it face down and apply it to the wall. end side. The cut line is drawn with a marker, focusing on the last plate. The cuts are made along the intended contour.
To install the last panel you will need a special lever with a hook. In the absence of one, you can use a crowbar. After installation is complete, the wedges are carefully removed.
Fastening of decorative thresholds and skirting boards
You can do without thresholds only if the covering is laid in several rooms, creating single canvas. Wooden panels are joined to tiles by installing aluminum thresholds.
Their rounded surface conceals slight differences in height. To install them, holes are drilled along the edges of both coverings every 100 mm into which dowels are driven. Having applied the threshold, distribute the nails over the holes and fix them by lightly tapping them with a hammer.
Attention! When installing thresholds, a gap should be left between the coating and the hidden part of this element.
Video guide for installing the threshold:
A decent frame for the floor covering can be skirting boards made of plastic, MDF or natural wood. To ensure uniform pressing of the panels to the floor, it is better to fasten the skirting boards to special clamps.
Skirting boards begin to be laid out from the corner of the room, moving clockwise. After installing the planks, install the connecting elements and plugs.
Floor laid using lock method, can be used on the same day. If you use glue to fasten panels, you must wait the time specified by the manufacturer in the instructions.
Do-it-yourself laminate installation: video
Laying laminate: photo


Beautiful and high-quality flooring is the key to positive emotions. In this article we will look in detail at how to lay laminate flooring with your own hands, from preparatory work and advice on choosing tools, to advice on “getting around” obstacles during installation.
We save on the work of a master!
Laminate - although a noble coating, its installation can be done with your own hands without much difficulty. In this article we will tell you in detail what's what.
If the floor surface is uneven, then the laminate laid on it will be subject to unwanted deflections. This can lead to failure of the coating, which will be especially noticeable on joint surfaces. Therefore, before laying, the surface to be coated is inspected to identify its unevenness. For these purposes, use a regular level. If there are significant differences in floor height, it must be leveled. Besides, wooden floors are carefully examined to identify boards that have become unusable. Rotten elements are removed and new ones are installed in their place. A wooden floor can be leveled by placing wooden blocks under the boards, which adjust the position of the boards. At the same time, the thickness of the flooring does not increase, which is especially critical for rooms with low ceilings. If it is not possible to adjust the position of the boards, then you can build another layer of plywood or OSB sheets directly over the existing one. At the same time, it must be carefully leveled using the same linings.
In addition to boards, you can use sheet plywood or special wood-fiber floor boards on the floor. These materials also need to be leveled.

Is the floor level?
Leveling the floor with plywood or OSB boards- a mandatory stage. Laminate is a rather fragile coating, demanding on the base.
In some types of residential buildings, wooden floors have ventilation holes to protect them from the harmful effects of various organisms and dampness. When laying an additional leveling layer on such a surface, care must be taken to ensure that these holes remain open. After laying the leveling layer, it is necessary to treat it with an antiseptic. The concrete surface is leveled using a screed. Before pouring it, level beacons are installed. Their height is calculated based on the minimum height from the floor to the ceiling of the room. The more beacons are installed, the smoother the surface will be after pouring. To reduce thermal conductivity, you can cover the concrete floor with plywood, having previously laid a layer of waterproofing underneath it.
If the concrete pier has only small irregularities, then it will be sufficient to make a so-called “self-leveling” screed.
Materials and tools used
In addition to the laminated board itself, for carrying out work you will need the following materials:
- Foamed polyethylene backing;
- Waterproofing film for concrete pavement;
- Wedges to ensure clearances;
- Construction pencil;
- Skirting board and fastenings for it;
- Glue;
- Masking tape.
The following tools will be needed:
- Wood saw or electric jigsaw;
- Measuring devices (tape measure, square);
- Mallet;
- Hammer.
The list of everything you need is not so long, all the tools are ordinary and will probably be available at home handyman. Instead of wedges, you can use wooden blocks or scraps of the same laminated board if you do not want to purchase special devices.
Selection of material and technology
Before starting work, you should calculate the number of boards needed. The calculation is based on the area of the room. Wherein you need to take a reserve of about 10% for unforeseen expenses, especially if laminate coating is being done for the first time. In case of floor installation diagonally the number of lamellas increases by another 20%. The underlay placed under the board provides the necessary sound insulation. In addition, for concrete coverings You should purchase a substrate with increased thermal insulation properties, and also provide a layer of waterproofing. It can be done from a regular polyethylene film, laying it with an overlap of at least 20 centimeters.
 Before laying the substrate, it is necessary to carefully prepare the floor surface, clearing it of dirt and dust. The substrate is not laid over the entire surface at once, but over the area on which the board is directly laid, thus protecting it from excessive contamination. When laying, it is necessary to apply a backing to the walls to a height of approximately 2 - 3 cm. Individual strips of material are butted together and secured with tape.
DIY laminate installation
 The figure shows how to properly connect laminate panels
 Thanks to our step-by-step instructions, you can install the coating yourself without any problems. There are two main types of laminate locks - " Lock" And " Click" The first type has a tenon on one board and a groove on the other, which are joined together by driving with a mallet or hammer. The second type is easier to install, since the boards are connected by inserting a hook on one side of the panel into a groove on the other at an angle and lowering the inserted board to a horizontal position with a characteristic sound, from which the name of the type of connection comes. " Click" refers to modern technology laminate assemblies.
 Regardless of the type of lock, installation of a laminate floor begins with the first row. It starts from the window. Wedges are installed near the walls to provide the required clearance. Before laying the row its length is measured to calculate the size of the last board. If it is less than 5 cm, then the first board is cut so that its length and the length of the last approximately coincide. Then they lay out a row, connecting the ends of adjacent boards depending on the type of connection - driving them in with a mallet or a hammer with a block, or snapping them into place.
 The second row is marked so that the ends of the boards do not coincide with the ends of the boards of the first row. For example, if the first row started with a whole board, then the second row starts with a trimmed one no less than 30 - 40 centimeters. Thus, a staggered order of lamellas is obtained, ensuring uniform load on the panels. Laminate cutting is done using a hacksaw or jigsaw, which significantly speeds up the process.
 Connecting rows when using " Click"- the lock can be made in two ways. You can first completely lay out the second row without connecting it to the first. Then lift it a little and insert the hooks into the grooves and snap the entire row into place. You can also insert the first board of the second row into the lock with the boards of the first, and insert subsequent panels at some distance from the end of each other, then driving them into the lock using a mallet. In the same way we connect “ Lock" - locks. We connect the last panel of the row to the penultimate one using a clamp, having previously measured its length taking into account the gap to the wall.
 The last row of covering may require trimming along the long side. If the lock is being installed " Cry"In the first way, then no additional tricks are needed. When assembling the Lock locks using the second method, you will have to use the clamp again, as when laying the last lamellas of the row. The installation of adhesive laminate stands apart. Its main advantage is its use in rooms with increased complexity (for example, in the kitchen) and increased reliability and longer service life compared to conventional laminated floors. The installation of such a floor is based on the same principles and methods as the assembly of laminate flooring into a “Lock” lock, only the additionally connected surfaces are covered with a special glue. The laminate is assembled in stages - every 3 rows there is a break to dry the glue. It is recommended to use such floors after complete drying, after about 10 hours. The disadvantage of such a coating is the impossibility of subsequent disassembly without destroying the structural elements.
Avoiding obstacles during installation
The main obstacles when laying laminate flooring are heating pipes and various wall protrusions and depressions. The geometric delights of the walls are avoided by cutting the boards, taking into account the necessary technological gaps.
When bypassing heating pipes, you have to use additional tools.
First, find the position of the passage of the pipe on the board. Then, using a special drill, for example, a feather or Forstner, a hole is made in the board, which should be slightly larger in diameter than the pipe. After this, the board is cut in the transverse direction in the center of the hole into two halves. One half is installed from the wall to the pipe, and the second to the rest of the row.

Laying diagonally
This option for installing a laminated floor visually expands the area of the room. Its only significant drawback is the increased consumption of material. Laying is done from the corner near the window. The first board of the first row is cut from the end at the wall at an angle of 45 degrees. Next, the entire row is laid out, running diagonally across the room. Then two rows are docked to it on each side. The initial and final boards are cut along the wall with the geometry required for installation and with the calculation of gaps.
To simplify the task, first stretch a diagonal of fishing line, which serves as a guide. You can lay out whole boards first, and only then start trimming about wall panels. This way things will go much faster.
After installation is completed, all wedges are dismantled. The protruding edges of the substrate are cut off, leaving the required overlap on the wall. A plinth is installed around the perimeter of the room. Its elements are attached to the walls, and in no case to the laminate. Doorways are equipped with thresholds, for example, made of metal. To make the laminate last longer, should be protected from water. This floor is washed with a damp cloth, after which it is advisable to wipe its surface dry. To protect the material from the harmful effects of water, you can treat the joints with a sealant when laying. If there is heavy furniture installed in a room with laminated flooring, then care must be taken to ensure that the outer layer of the floor is not destroyed when moving it. You should also avoid contact of the laminate with sharp, heavy objects. Damaged boards lose their aesthetic appeal and their technological properties.
 It is not recommended to install laminated boards on a warm electric floor. Maximum temperature The bottom surface of the laminate is 27 degrees Celsius. If it is exceeded, the panels will begin to dry out and the floor will deform. Installation work on laminate flooring equipment is carried out in rooms with a temperature not higher than 30 and not lower than 15 degrees. Relative humidity should be between 40 - 70%. When calculating thermal gaps, it is necessary to proceed from the following calculation formula: for each meter of coating length, the technological distance to the wall is 1.5 mm.
If you are unsure of covering a laminate floor with your own hands, you can entrust this work to professionals. The cost of specialist services is approximately 200 - 250 rubles per square meter.
So, the choice in favor of a laminate floor has been made, the material is the right quantity purchased and delivered to the installation site.
All that remains is to invite a team of craftsmen and wait for the work to be completed. Is it really necessary to pay extra money for installation of the coating?
A good owner is quite capable of coping with such a task, of course, if he has certain basic skills and the proper level of accuracy and attentiveness.
The technology of laying laminate flooring cannot be rushed. So that the laying of the coating itself does not cause difficulties, and that the resulting floor lasts a long time without losing its operational and decorative qualities, it is necessary to carry out thorough preparation for work.
Assessing the condition of the floor surface
 Usually, even before deciding to purchase a laminate, the condition of the “subfloor” is assessed and appropriate repair and restoration work is carried out.
By by and large, laminate flooring can be laid on any surface subject to the main condition - it must be smooth, durable, and free from areas of dynamic deformation.
Otherwise, “weak” places will inevitably appear on the new coating, where surface integrity may be damaged, joints may diverge, and squeaks may appear.
Ideally, the floor should be strictly horizontal, with permissible differences of no more than 1-2 mm per linear meter.
- must not have significant cracks, gouges, peeling or crumbling areas. If it is impossible to correct the existing defects, installation on an uneven floor cannot be carried out. You'll have to update the screed - or. You can start laying the laminate only after the coating has completely hardened, in accordance with established technology concrete works deadlines.
- If it is expected, its entire surface must be carefully checked. If areas of “playing” or creaking boards are identified, they must be repaired or replaced. Possible irregularities can be processed with a plane or sanding machine, and existing cavities can be filled with wood putty.
- You can lay laminate, provided that there are no holes or bumps, delamination of joints, through wear, or areas of destruction of the concrete base. This coating cannot be repaired; it will be easier to remove the linoleum and carefully prepare the base for the laminate.
If funds allow, the ideal option would be to cover the entire floor surface with 10-12 mm, having previously laid them underneath with plastic film for water vapor barrier. The process of laying laminate flooring will be significantly simplified, and the sound and thermal insulation qualities of the floor will increase significantly.
We prepare the necessary materials and tools
Good advice to all novice craftsmen - before laying the laminate, after it is delivered from the store, it is worth unpacking the panels and letting them rest for 2-3 days in the room where the flooring will be carried out.
Equalizing the temperature and humidity levels of the material and the room will facilitate the installation process and eliminate the risk of warping of the laid coating.
This time can be devoted to preparation necessary tools and materials.
First of all, you need to have it in stock required amount, regardless of the type of base.
The underlay not only has a good insulating effect - it has a shock-absorbing effect and prevents friction between the laminate board and the rigid base, which ensures the longevity of the floor covering.
 The substrate can be polystyrene or polyurethane foam, with or without a foil heat-reflecting coating, produced in rolls or in the form of rectangular panels.
More expensive, but very quality option – .
- creeps lining material end-to-end, without overlaps, so to securely fix it to the floor you will need double-sided tape. You can also use regular adhesive tape to secure the rows of backing along the seams.
- It is worth immediately preparing a set of wooden wedges, 10-12 mm thick, for laying the laminate at the required distance from the walls of the room.
- You can cut laminated panels to the required size with a regular hacksaw or jigsaw.
- For high-quality joining of seams, you will need a hammer, preferably a rubber or wooden one (mallet). You can also use metal, but only through wooden spacers (bars).
- To install sections of the coating located near the walls, you need to have a small mount, or you can make a lever from a steel strip with a hook and a shoulder protruding upward, through which the force of the hammer can be transmitted.
In principle, the materials and tools for installation are ready. However, there are a few other things to consider before you get started.
How to avoid unwanted mistakes
It is best to precede the installation by drawing up a plan carefully drawn to scale - the required visibility and clarity will appear in further actions.
What is important to consider:

- When answering the question: how to lay laminate along or across, the following is important: the direction of the longitudinal joints should be parallel to the direction of the rays from the main source of natural light (windows) - in this case, the seams will be practically invisible.
- The laying direction is usually from the far left corner, straight. For the panels of the first row adjacent to the wall, the groove must be outward, and the tenon must be cut so that a smooth end is obtained. Longitudinal cutting of panels is best done using a circular or vertical hand-held power saw.
- On the plan, be sure to take into account that the last strip that completes the installation must have a width of at least 100 mm. If this does not work, you will have to reduce the width of the first row. The same should be taken into account if there are any internal corners in the room.
- The thickness of the laid coating should not interfere with the free opening of the doors. Sometimes you have to remove and trim the door leaf from below in advance.
- When planning, do not forget about the pipes passing through the thickness of the floor. To cut shaped grooves for them, you will definitely need a jigsaw.
After thinking through all the theoretical issues, you can proceed directly to installation.
Laminate installation process
Laminated floor panels are available in interlocking or adhesive versions. In turn, locks can be one of several systems - “Click”, “Lock”, “5G”.
How to lay laminate flooring correctly?
Each type of laminate has its own installation features.
Features of laying laminate flooring with the “Click” system
 Currently, this is the most common locking system among laminate manufacturers and popular among craftsmen.
Its main difference from others is that you can insert a figured tenon into a complex groove only at a certain angle - at different manufacturers– from 25 to 45 degrees.
When the two panels are rotated in one plane, the lock securely snaps into place.
Another convenience is that disassembling the covering is also not difficult; when you turn the panel, the lock will “open.”
- Work begins with the assembly of the first row of panels. It is laid along the wall and wedged on both sides with 10-12 mm dies. This gap is necessary to compensate for the thermal expansion of the laminate flooring. The assembly process is simple - insert the tenon at the desired angle, accurately aligning the edges, lower the panel down until it clicks into place.
- The second row is assembled to ensure displacement transverse seams half the length of the panels (allowed 30-40 cm). The strip along its entire length is assembled completely, and only then is it connected to the first row. This will most likely require an assistant. After fixing the second row, it is also wedged from the walls with blocks at both ends.
- Then the work continues in the same order until the room is completely covered.
It is imperative to monitor the cleanliness of the grooves so that no sawdust or other debris remains there.
If the material fits well, you most likely won't even need a hammer.
Features of laying laminate flooring with the “Lock” system
 This type of lock system is gradually falling out of use, although inexpensive models laminates can also be produced with it.
The connection between the tenon and the groove occurs strictly in one plane, and the engagement occurs due to special protrusions and grooves.
The joint turns out to be much less durable, although disassembly, if necessary, is not easy - the tenon may be damaged.
- When assembling the first row, after connecting the end sides of the panels, to ensure that the tenon is completely inserted into the groove, tapping with a hammer is carried out through a wooden spacer. Wedging the row away from the wall is done in the same way as in the case of the “Click” system.
- The second row is assembled gradually, one panel at a time (also taking into account the displacement of the transverse seam by half the length of the board). The first panel is inserted into the groove of the first row, tapped with a hammer until it is completely connected, and then wedged away from the wall.
- The second panel is tapped on both the long and short sides for reliable fastening of the longitudinal and transverse lock. Further work continues in the same order.
- The most difficult thing is installing the last panel of the row adjacent to the wall. This will require either a pry bar or a curved lever.
Work is carried out in rows or “ladders”, to the end of the room. The last row is also carefully mounted with power transmitted through a lever.
It is very important to correctly measure the force of the hammer blow or the force on the lever so as not to damage the surface of the laminate or break the lock's tenons.
Features of laying adhesive laminate
Although such laminated panels are equipped with a tongue-and-groove system, they do not have a locking connection. Thus, the strength of the joint is ensured only by gluing.
Such floors are distinguished by good solidity and moisture resistance, but it will no longer be possible to dismantle or repair a separate section of the covering.
The installation process is more labor-intensive, and you will also need to purchase special glue. It is not recommended to use the usual PVA.
- The technology for laying laminate is generally similar to the “Lock” system - the sequence is the same. The difference is that each groove is generously coated with glue (in accordance with the instructions included with it). Excess glue that appears after the panels are joined is immediately removed with a clean, damp cloth.
- After laying the first three rows, be sure to take a break of at least 2 hours so that the glue has time to set. The same rule applies in the future, until the entire laminate is completely installed.
Master class on laying laminate flooring in video format
A video about how to properly lay laminate flooring, showing installation technology and preparatory work.
Let's finish the job
After the entire floor surface is covered with laminate, the spacer wedges at the walls are removed. The final stage will be the installation of skirting boards that will hide the expansion gaps.
It is important to remember that in no case are the skirting boards screwed to the laminated covering - only to the wall.
The transition to another coating at the junction of adjacent rooms can be closed decorative overlay or use .
In fact, installation work finished - you can move on to cleaning the room and decorating the interior of the room. As you can see, there is nothing overly complicated. The main thing is maximum attention, thoughtfulness of every action and the highest accuracy. Everything should work out!
The popularity of flooring with laminated panels is easily explained a successful combination good wear resistance, attractive appearance and ease of installation. More precisely, laying laminate flooring with your own hands is not work, but a pleasure that you don’t want to give to anyone.
In our particular case, based on the above, it was decided to cover the floor with laminate in the living room and guest rooms. At the same time, ceramic tiles turned out to be more practical for the bathroom, kitchen and hallway; the office and children's room received more expensive and less stable, but prestigious and natural parquet boards; the bedroom and gym got carpet, and the storage rooms had enough linoleum.
High-quality and attractive material cannot but rejoiceThe design of the laminate and the requirements for the base for its installation
Most often, laminated panels have a length of 1260-1380 mm and a width of 185-195 mm. The thickness of the laminate can be 6-12 mm, and the most popular is 8 mm.
The structure of laminated panels may vary slightly depending on the manufacturer, however standard board consists of 4 layers:

Thus, laminated flooring is assembled from individual sheets, which are joined using locks. This is where the requirement of manufacturers of this type of product for the base arises, which is that it should not have unevenness of more than 2-3 mm per linear meter. Obviously, the base must be sufficiently elastic and not shift under the influence of corresponding operational loads.
 It’s so easy to check the quality of the laminate base
 Wherein prerequisite Installation of laminated slats requires preliminary laying of a special substrate. Only if the listed rules are observed can one hope for a long service life of the flooring without destruction of locks and the appearance of creaks and crevices in which debris collects.
The need to level the floor when laying laminate flooring
In our particular case, the floor was previously screeded on the floor slabs, which is an ideal case for laying laminated flooring. How to do this correctly, read the article In a situation where there is already concrete base with minor unevenness, it is convenient to perform leveling using self-leveling floor technology.
It is noticeably more difficult to provide quality basis for laminated panels in case of existing ones wooden floors. In the case where the existing board flooring bends and creaks, there is an assumption that the joists are lying unstable, the best solution it will be dismantled. Then leveling the base should be done using a cement screed or self-leveling floor.
 Cement floor screed
 This option is also interesting because it is possible to install a heated floor. Of course, the type of laminated flooring should be selected based on the possibility of heating it. So, in the example under consideration for the Krono Castello laminate, the manufacturer allows the use of water-heated floors with an operating temperature of up to 27°, but does not allow the use of an electric heating option.
If it has been decided to leave wooden floors as the base, they should be thoroughly prepared and leveled. The decking may need to be temporarily removed to place leveling pads between the supports and sagging joists and to securely secure the latter. In any case, the boards should be well fixed and better - with self-tapping screws.
Theoretically, it is possible to achieve the required evenness of the base of no more than 2-3 mm per linear meter using an electric planer or a grinder. However, in practice it is more convenient to correct an uneven floor using sheets of plywood.
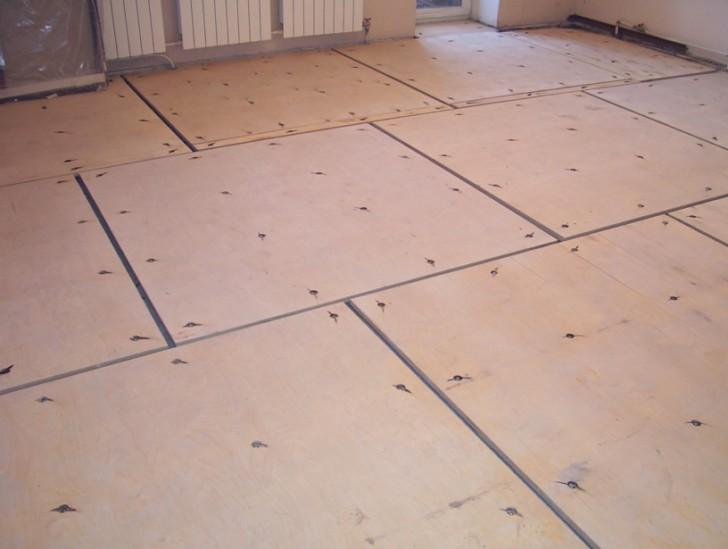 An example of leveling a floor with plywood
 The latter are laid on wooden boards with the rows offset relative to each other. In this case, it is necessary to leave a gap of about several millimeters between the sheets, which compensates for changes in the size of the flooring at different humidity levels. Fastening the plywood to the boards must be done with self-tapping screws, the heads of which should not protrude above its surface. Of course, when performing work, you should control the level of unevenness using a rule.
In some specific cases, the question may arise: is it possible to lay laminate flooring over linoleum or existing laminated flooring? Of course, it is possible if the already stated conditions are met: the size of the irregularities should not be more than 2-3 mm, and the existing coating should be reliable and immovable.
In this case, the laminate does not lie directly on the linoleum properly, and the use of a backing is mandatory. An uneven floor in the form of damage to linoleum will have to be corrected by replacing individual sections with new ones using “ cold welding" The laying of laminated panels on the laminate is perpendicular to the old flooring.
About choosing a laminated coating
When starting to choose a laminate, we decided to first consult with those who already have a similar floor. Very soon, cases emerged where laminated flooring had an unsightly appearance after several years of use. As a result, the idea arose to return to the good old linoleum, which was successfully destroyed by the flooring store salesman.
It turned out that laminated panels last a long time if you purchase high-quality products and install the panels according to all the rules. So read and accept correct solution.
 Laminate with and without chamfer
 Please note that chamfered laminated panels are available. This product is more expensive, and we did not purchase it for fear that dust would accumulate in the recesses between the plates. In the future, we had to make sure that this problem did not arise, but such a coating was made with clearly defined individual elements and seemed more prestigious. In contrast, regular laminate flooring has subtle joints that look different depending on the lighting and creates a mixed perception of the quality of the flooring.
How to choose and lay the substrate correctly
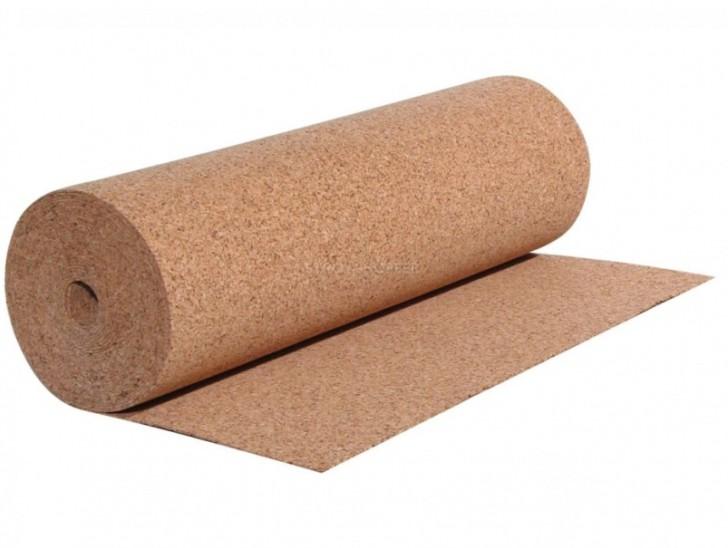 Expensive and durable cork backing
 The underlay under the laminated panels is necessary to compensate for unevenness of the base, provide some cushioning and distribute the load on the coating on top, and also protect the laminated panels from moisture from below. In addition, it helps improve sound insulation and thermal insulation of the floor. To install a laminate with a thickness of 8 mm, a substrate with a thickness of 2 mm is usually chosen.
The most expensive and durable substrate is made of cork, the recommended service life of which reaches 20 years. Being made from cork chips, it has good properties heat and sound insulation. However, this material is afraid high temperatures and does not provide waterproofing. That is, its use is limited to living rooms with unheated floors.
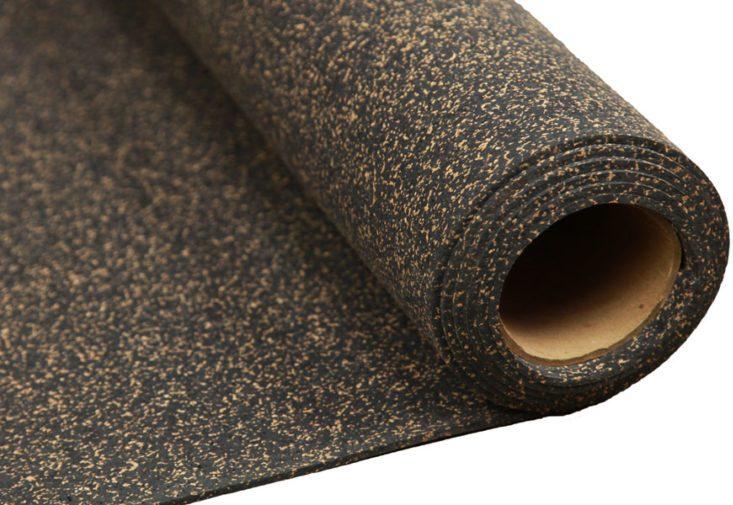 Practical bitumen-cork underlay
 Bitumen-cork underlayment is somewhat cheaper and can be used in combination with heated floors. Structure of this material consists of a layer of cellulose impregnated with bitumen, covered with cork crumbs.
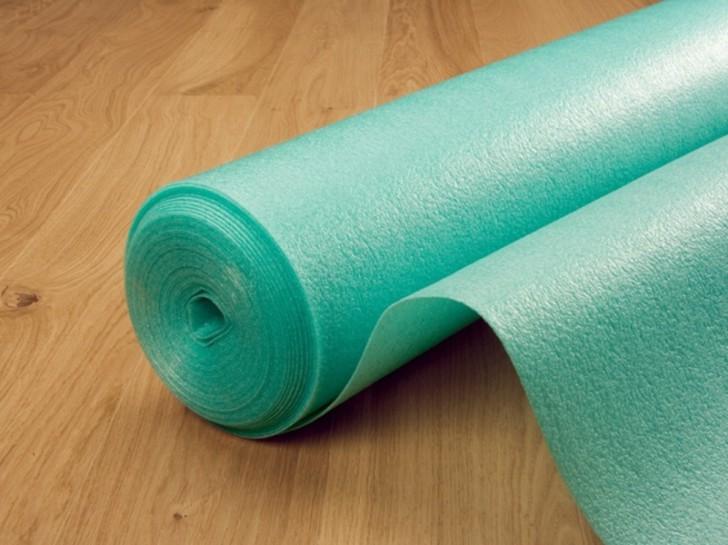 The most budget-friendly, but short-lived polyethylene foam backing
 Polyethylene foam backing is the cheapest and is available in rolls, like the two previous options. The material tolerates well high humidity, is resistant to fungus and chemicals, and also provides additional thermal insulation. At the same time, this type of substrate has a recommended service life of 2-3 years and has no better sound insulation and does not provide waterproofing.
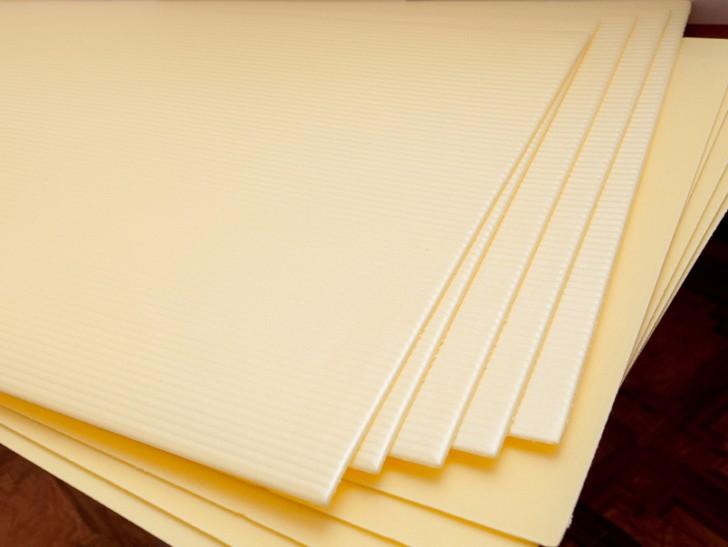 The polystyrene foam backing has average characteristics
  Polyurethane foil backing universal application
 Expanded polystyrene backing has an average price and is available in sheets and also in rolls. The material has a relatively high density and retains its shape well, providing good heat and sound insulation. However, the use of expanded polystyrene in a scheme with a heated floor is not allowed.
 Modern three-layer substrate TUPLEX PROFESSIONAL
 Foil-coated polyurethane has the best characteristics at a correspondingly high price and is suitable for use when installing heated floors. It probably makes sense to lay the material in tandem with expensive laminated flooring.
Relatively recently, a three-layer TUPLEX PROFESSIONAL substrate appeared on the market: a layer of polystyrene foam balls is placed between two film sheets. In this case, the lower film has micro-perforation and allows moisture to pass into the middle of the material. The top film provides waterproofing and prevents moisture from penetrating the laminated coating.
The balls are responsible for sound insulation and allow moisture to escape from the end of the three-layer material. As a result, this substrate prevents the accumulation of moisture and the formation of fungus and mold under the coating, and the use of an additional layer of waterproofing is not required. The recommended service life of the material is 15 years.
Before laying the substrate, ensure a level, dry and clean base.
The last operation is most conveniently performed with a vacuum cleaner. The manufacturer of laminated flooring, Krono Castello, requires checking the moisture content of the substrate, which should be no more than 2.0 CM% for a cement-based surface and no more than 0.5 CM% for a calcium sulfate surface. In addition, to protect laminated panels from moisture, before installing them, you should lay a moisture-proof film, for example, polyethylene, with a thickness of at least 0.2 mm in case of installing the boards on a mineral base or a stone base.  Plastic Film Layering Process
In other words, when using a cork substrate, which allows moisture to pass through, polyethylene must first be laid over the cement base to protect the laminated panels from damage. The film is laid out with an overlap of at least 15 cm and glued with tape. If a moisture-proof underlay is used, additional waterproofing is not necessary. There is a third option: when using a laminate with a built-in sound absorption system, a substrate is not required, but waterproofing is necessary.
 Laying and fixing the substrate
 The first strip of substrate is laid along the wall from which installation of the laminate will begin, and along the entire length of the room. There is no need to lay out the next part of the material until the first one is covered with laminated flooring: this technique will protect it from damage. As necessary, you need to lay the next sheet. This recommendation also applies to polyethylene waterproofing, which should also not be walked on in street shoes to avoid damage. Adjacent backing sheets are tightly combined and secured with tape.
Schemes for laying laminate boards
To understand how to lay laminate flooring yourself and without mistakes, you should study possible options placement of panels. Most often, laminate is laid in such a way that the light from the windows falls along the boards, and in this case the joints of the panels are less visible. Nothing prevents you from laying the covering perpendicular to the direction of light, then the seams stand out more and the room seems visually wider. There is an option and diagonal laying. This method is considered more interesting appearance, and the room visually appears larger. However, such installation is noticeably more complicated, and there are more scraps. 
Even before going to the store, it is useful to draw up a laminate layout diagram, which will allow you to correctly determine the required amount of material, as well as avoid mistakes when installing the panels. The sketch should be drawn up taking into account all corners and protrusions, which will ensure the most accurate calculations.
In this case, you should be guided by the basic rule of placing boards with offset transverse seams. In the standard case, its value should be at least 0.4 m, but some manufacturers of quality products allow a minimum displacement of up to 0.15 m. In the most simple circuits layouts take its value equal to 1/2 or 1/3 of the board. 
The most rational laying scheme is presented above and is obtained by using trimming from the previous row to start the next one. Of course, pieces less than 0.4 m in length end up as unusable waste. Note that in this case you will have to cut the laminated panels the least.
In practice, when purchasing material, it is purchased 5-7% more than the calculated quantity when laid along the walls and 10-15% more when placed diagonally.
Options for interlocking connections of laminated coverings
Manufacturers of laminated panels offer various designs connections between panels. This involves slightly different laminate assembly options. The packaging of the material must indicate the technology of their installation in the form of pictograms and a brief description. 
Yes, castle CLICK systems and LOCK are fundamentally different in that in the first case, the installation of the panel begins at an angle, and then it is rotated and fixed in place with a double lock after a characteristic click. A variant of the LOCK locking system involves horizontal laying of the board and further connection of the panels when striking the side surfaces.

Systems for joining laminate sheets are constantly being improved, and today we offer TARKETT brand products with movable plastic lock. This design allows installation one sheet at a time, sequentially engaging first the long and then the short side of the board without much effort. There are other schemes lock connections, in which either the short or long side is joined first. It is also possible for the sheet to slide into place when moved horizontally.
A few notes before installing the coating
Before starting work, you need to prepare a tool and some auxiliary materials. In general, you can get by with a simple set. Additionally, you may need a grinder and a jigsaw for tools, and glue and sealant for materials.

Before installation, the laminate is kept in the room where it will be installed for at least 48 hours at room temperature, not removed from packaging. It happens that panels from different batches have different shades, so some specialists prefer to review all the material before starting work in order to solve possible problems “onshore”.
At the same time, each sheet should be carefully inspected before installation so as not to use damaged material.
Quite often, small protruding fragments are found on the edges of the board, which can cause noticeable damage, which means they need to be removed.
Before laying laminated boards, you need to prepare the base, as well as provide waterproofing and sound insulation, as indicated above. Let's look at how to lay laminate flooring with your own hands using the example of the material "Krono Castello" class 32 with a thickness of 8 mm and dimensions of 1380x155 mm. 
The manufacturer of the mentioned brand suggests using glue when installing the most loaded areas. However, there is a practice of using glue to strengthen all joints. In this case, the moisture resistance of the flooring increases noticeably, while the speed of operation decreases significantly, and it is subsequently impossible to replace failed panels.
In the case under consideration, a special sealant was used to seal the seams, which provides good protection from water, but does not prevent disassembly of the flooring. Full-scale tests were carried out by a curious cat, who knocked over a vase of flowers, and about 2 liters of water fell on the floor of the Krono Castello. After the water was collected, there were no traces left on the coating at all.
Step-by-step instructions for assembling a laminate floor with a CLICK lock yourself
Installation of the flooring begins from the wall opposite the doorway. The sheets are laid with the protruding part of the lock against the wall and sequentially joined at the ends, forming a strip of flooring.

To do this, each subsequent sheet is carefully and accurately inserted into the lock of the previous one at an angle of 15º to the floor, and then turned down until the connection is activated, which is confirmed by the absence of a gap. In our example, sealant was first applied to the protruding elements of the locks with a strip 2-3 mm wide.
During operation, laminated flooring may vary in size due to changes in ambient humidity. For this reason, when laying it, gaps are provided, which are ensured by installing wooden or plastic liners with a thickness of about 12-15 mm between the walls and panels, including at its ends. There are special plastic wedges on sale that are inserted in pairs, which allows you to quickly select gaps of different sizes.
In this case, the walls may be so uneven that the plinth will not close the increased gap. To avoid mistakes, it is better to have a piece of the planned plinth on hand and control the correct installation. If the gap is too large, the panels will have to be cut in places with the smallest gap.

The last sheet of the flooring strip must be cut according to the distance to the wall. To do this, it is turned 180º and laid through the liner to the wall parallel to the penultimate sheet. The cutting line is marked in accordance with the end work surface the previous board, increasing the length of the required piece of lamella by the size of the protruding part of the lock.
You can cut the laminate with a hacksaw, jigsaw or grinder. It may happen that the last sheet of the mounted row turns out to be too small, then you will have to shorten the very first sheet to required size. In practice, when laying laminate flooring, panels up to 200 mm long are used if they are located in places where there will definitely not be a large load on the floor.

A piece of at least 400 mm in length is used to begin laying the next row. The flooring manufacturer Krono Castello offers to assemble the flooring in rows. In this case, the second row is assembled with its ends into a tape, like the first, and is preliminarily laid out with the protruding part of the side lock onto the groove of the first row. Then several people lift the outer side of the panels by 3-4 cm, insert the protrusions of the second strip into the grooves of the first, and then lower it until the connection is fixed.

In this way, installation of the coating occurs quite quickly. In this case, you will not be able to install the flooring yourself - assistants are needed to complete the work. In addition, it is difficult to use quickly hardening sealant, so in our case the assembly was carried out in separate panels. With this choice, we go back to the two photos of the above step-by-step instructions and move further according to the following scheme.

In the example under consideration, before installing the first panel of the next row, sealant was first applied to the protrusion of its side lock with a strip of 2-3 mm wide. The board was then inserted at an angle into the lock of the first row, turned down and laid in place. Next, the sealant is applied to the end protrusion of the lock of the installed panel and the sidewall of the next one. The sealant that protrudes from the seam dries and is easily collected with a rag.
The next panel is mounted in place in the same way as the previous one, but a small gap is left between the end locks. A wooden block is applied to the end of the panel being installed, and the sheet is moved into place by lightly hitting the block with a mallet. In this case, the block is applied to the end of the board above the protrusion of the lock. To do this, it must have clear edges, or better yet, a specially cut protrusion.

When installing the last board of a row, it is convenient to use a curved crowbar, like a lever, which rests its lower end against the end of the panel, and its middle against the wall. When the lever is pressed, the board slides into place. In the standard version, you need to have a special tool that works together with a hammer.

To install the last board against the wall, it must be cut lengthwise. To do this, it is turned 180º and laid through the liners to the wall. The cutting line is marked in accordance with the angle of the working surface of the previous board, increasing the width of the desired piece of lamella by the size of the protruding part of the lock.
Difficult places and finishing operations
In practice, when installing laminate flooring with your own hands, problems arise. various situations, which are best resolved wisely. Thus, the manufacturer of laminated flooring “Krono Castello” suggests providing an installation gap of about 12-15 mm when laying panels up to 8 m in length and width. In other words, if the total size of adjacent rooms does not exceed the specified value, the doorway between them can be equipped with a continuous layer, no thresholds.
 Option for laying laminate flooring without thresholds and expansion joint design
 In the case where the size of the room is more than 8 m, it is necessary to arrange intermediate seams, which are closed with a joining strip. Accordingly, if a certain room size is noticeably smaller than the specified value, it is possible to get by with a noticeably smaller gap in this direction. The photo above shows the installation of laminate flooring without thresholds, as well as a diagram of the arrangement of the intermediate seam.

When installing laminate flooring doorways their boxes will need to be trimmed slightly to provide clearance for the laminate to move as humidity changes. The work is done with a hacksaw in place, using a board turned face down as a template.

For the same purpose, the holes for the heating system pipes are marked 20-30 mm larger than their diameter. First, holes are drilled in the board, and then it is cut along the axis of the holes. The sawn part is then attached to the board using wood glue. Similarly, when installing a door stop on the floor, it is also necessary to drill a hole of increased diameter so as not to fix the panels to the base.

Once the laminate flooring is complete, you can begin installing door frames and baseboards. The easiest way to install is inexpensive plastic skirting board, which agrees well with budget options floor covering. If the floor imitates the structure well natural wood, it is better to use a plinth from valuable species tree. In our example, the option made of pine covered with beech veneer worked well.
How to lay laminate flooring with a LOCK lock and other installation options
Note that the technology for laying laminate with a chamfer is no different from installing a conventional coating. When using this type of material, the contours of individual panels are clearly defined, so that when laying out the lamellas in a herringbone pattern, you can get an interesting pattern.
 Options for laying laminate in a herringbone and diagonal pattern
 Figured installation is noticeably more complicated, and in this case it starts not from the long, but from the short wall of the room and carefully monitors the adherence to the even line of laying the “herringbone”. It is comparatively easier to lay lamellas diagonally. In this case, installation begins from the corner of the room, and the boards are placed at an angle of 45º to the wall.
 Pictograms for laying coverings with a LOCK lock
 As mentioned above, laying laminate flooring with locking system LOCK differs in the way the panels are installed. The above brief instructions demonstrate the installation features in full.
Care of laminate floors
After laying the laminate floor is completed, you can admire the result of the work with your own hands. Now you need to think about ensuring that the quality of the coating does not suffer for as long as possible. To achieve this goal, laminate manufacturers recommend wiping the flooring only with a well-wrung out cloth and not using parquet wax or other products based on petroleum components when cleaning.
 Elements of laminate floor care
 Felt pads should be placed on furniture legs and a rug should be provided. front door. When vacuuming, use an attachment designed for hard surfaces.
As you know, it is better to see once than to hear a hundred times. In practice, you have to spend a lot of time to find a video with useful information. Now you can do this quickly, thanks to short announcements of the videos we have already watched.
Very sensibly and with good diction about seven mistakes when laying, but the mistakes are very simple and not relevant for everyone. Someone will be interested.
Inexpensive laminate, inexpensive underlay, simple and short instructions for installation and cutting. The main points are shown, but not all issues are addressed. It is not told how to work door frames, install thresholds and baseboards.
A long story with a lot of useful information and advertising. However, there is almost nothing about how to lay the boards directly.
Laying TARKETT 2-Lock laminate with a “plastic” lock: “silent movie”, after which a number of unclear points remain. But it is short, clear and without “water”.
(7 rated at 4,29 from 5 )