Insulating the walls of a wooden house from the inside with your own. How to insulate walls in a wooden house from the inside? Fastening the sheathing and insulation
Wood has been used in construction since ancient times. This material is valued for its availability and thermal conductivity properties. A house made of timber requires proper care, then it will always be comfortable. Many have noticed that two or three years after construction the house becomes noticeably colder. This is due to the fact that all the walls of the building are in constant motion.
The position of the beams changes slightly and gaps appear along the seams, even correctly installed windows Over time, drafts begin to pass through. Construction flaws can also manifest themselves. In fact, it is not difficult to correct all these reasons even with your own hands. If you don't want to spoil appearance at home, we will tell you how to insulate a log house from the inside.
Why inside wooden house Cold:
- Walls. Small cracks in the seams of a wooden house - the most common reason for the lack of heat in the premises.
- Windows and doors. Eternal sources of drafts and heat losses in any home.
- Ceiling. From physics course we know that warm air rises. If the upper part of a timber house is not insulated enough, the heat simply escapes outside.
- First floor floor. In any house it has a large area. Cold from the ground can greatly cool the air in your home.
Let's consider in order what you can do with your own hands for each of these reasons.
First, the walls of the house need to be caulked. For this purpose it is used special tool- caulk. If it is not there, use a hard spatula or a wide screwdriver. Tow, hemp, felt or jute rope. It’s not difficult to do this with your own hands, the main thing is to follow the sequence of actions correctly.
You need to start caulking from the bottom seam around the entire perimeter of the house, only then move on to the next one.
The insulation needs to be hammered into the cracks of the timber as tightly and deeply as possible. You need to understand that after finishing the work, the ceiling height will increase by several centimeters. Therefore, if you caulk each part of the house separately, one of the walls may collapse - the timber will simply jump out of the groove. Another way is to apply acrylic or silicone sealant at the joint of the timber.

If you are not satisfied with the achieved result, experts advise additional insulation of the walls with thermal insulation. To do this, a guide beam is attached vertically to the wall; its height should be equal to the thickness insulating material. The entire surface is covered with a layer of waterproofing. Insulation is placed tightly between the guides, without gaps. Any sheet material. After this, all that remains is to do the decorative wall covering.
Windows and doors - how to get rid of the cold
The two main causes of cold from entrance doors and windows are drafts and insufficient thermal insulation. Very often the cold from openings is confused with drafts. To determine the cause of a heat leak, you just need to make sure whether the doors and windows are actually blowing or not. To do this, you need to hold a burning lighter at a short distance along the perimeter of the frame and sashes.
If there is a draft coming from the sashes, all joints need to be sealed. To do this, it will be enough to glue the silicone seal with your own hands. You can also use foam rubber, but it has a short service life. You can also seal the windows with construction tape for the winter.

If there is a leak around the perimeter of the frame, you need to remove the trim and window sill to get to the opening between the wall and the frame. Then the opening is covered with waterproofing and insulated. Any material can be used as thermal insulation roll insulation or polyurethane foam. The top of the insulation must be covered with aluminum or reinforced tape, after which the platbands are put in place.
If there is a cold draft from the door, but there is no draft, you need to check the thermal insulation of the door. To do this, experts advise simply tapping on the canvas. The structure, which is hollow from the inside, will have to be changed. A single-glazed window may freeze during the cold season. In this case, you will have to install new windows.
Insulation of the roof and ceiling of a wooden house
Many people do not consider heat loss through the roof and ceiling to be significant. In fact, there are often gaps through which the log house simply heats the street. Also, the roof surface can heat up due to poor thermal insulation of the ceiling. By getting rid of these losses, you can save up to 60% of heating costs.
Before you begin to insulate the upper part of a wooden house, you should seal the entire seam of the upper beam of the wall and the roof structure.
If the attic in the house is uninhabited, insulating the ceiling with your own hands is very simple. To do this, a layer of thermal insulation of about forty centimeters is laid there. You need to understand that the insulation for the ceiling should be light. Typically, sawdust, polystyrene foam, mineral wool and other lightweight materials are used for this purpose.

If the ceiling is a roof vault, insulation is a little more complicated. To begin with, the entire surface of the roof from the inside needs to be covered with a layer of waterproofing so that moisture does not get on the insulation. Thermal insulation of the roof is done in two ways:
- Sheet insulation is laid tightly to each other. At the same time, you need to pay attention Special attention the absence of gaps between the sheets, because between them the heat will still escape out.
- Sheet insulation is laid overlapping from top to bottom. This is done for additional protection from moisture, it will simply flow down the thermal insulation sheets.
After this, it remains to refine the surface decorative cladding. Lining is perfect for this purpose.
Solving the cold floor problem
Heating a home will not work efficiently if the floors in the house are cold. They cool the room and prevent the air from warming up.
It is very easy to insulate a wooden floor; to do this, you need to remove the floor covering. In order not to confuse the order in which the boards were laid, it is better to mark them in advance. This will save a lot of time during assembly. Then the entire surface between the joists is covered with waterproofing so that the insulation does not absorb moisture from the soil.

Thermal insulation material is laid on it in such a way that there are no slightest cracks across the entire surface of the floor. Any insulation that is not afraid of moisture can be used. You need to lay another layer of waterproofing on top, because when cleaning the premises, water can get in there and accumulate inside. After this, the floor boards will need to be laid in the reverse order.
Cement floors are insulated in two ways. If the height of the premises allows, logs made of wooden beams are laid on the floor. Insulation is laid between them, which is covered with waterproofing on top. Then the floor is covered with boards.
If the ceiling height does not allow you to raise the floor level, you need to remove cement screed and remove the floor backfill by about half a meter. After this, the pit is waterproofed and insulation is filled in. Expanded clay is usually used for this. A layer of polystyrene foam or other dense material is placed on top of it. A new screed is made on top.
Wooden houses are traditional for Russian cities and villages - they reliably serve their owners according to a lot decades and even often cross the century mark. But sooner or later the time comes when insulating a wooden house from the outside becomes a necessary measure, since, being under the influence of wind, moisture and ultraviolet rays, the parts of the walls dry out and become covered with cracks, through which cold easily enters the rooms. To reduce heating costs, you need to invest in wall insulation, and this will pay off in the first winter.
By carrying out the exterior work, the homeowner will solve three problems at once - make the house warm, reduce the penetration of street noise into the rooms and update the external design of the building.
But, before you buy material and start working, you need to find out which one modern insulation materials is better suited for a wooden building, and in what sequence should it be installed.
Currently the most popular materials for insulation are wooden buildings the outside is polystyrene foam in panels and different types of mineral wool, made in the form of mats or rolls. But besides them, in last years sprayed ones are increasingly being used insulating compounds, such as penoizol or ecowool, as well as thermal panels, which include not only an insulating layer, but also a decorative finish.
Expanded polystyrene
Expanded polystyrene is the most affordable material for insulation. He has good performance characteristics, provides the opportunity for significant savings on heating.

Produce expanded polystyrene panels various thicknesses, sizes 1 × 1 and 1 × 0.5 m, density from 15 to 40 kg/m³. For external insulation work, medium-sized material is usually used. density - order 25kg/m³ and thickness from 50 mm. It must be remembered that the higher the density of the insulation, the lower its thermal insulation qualities, but the higher the resistance to stress. Therefore, high-density polystyrene foam is used mainly for floor insulation.
Expanded polystyrene is lightweight, as it consists of a foamed mass filled with air, so it becomes a good barrier to both cold and sound waves. Expanded polystyrene has low thermal conductivity and therefore guarantees long-term preservation of the heat accumulated in the room.
It is easy to cut and attach to the wall. It is resistant to temperature changes and ultraviolet radiation, and also almost does not absorb moisture, so it has a fairly long service life.
But, in addition to numerous advantages, polystyrene foam also has its significant disadvantages:
- low mechanical strength– the material breaks and crumbles quite easily, so after fixing it to the wall it will require protection with mesh reinforcement and decorative coating;
- ordinary polystyrene foam cannot be called non-flammable, and when exposed to high temperatures it turns into a fluid burning mass and emits hazardous substances. human body substances. Only extruded polystyrene foam is considered non-flammable, or rather self-extinguishing, and it is recommended to use it for insulating wooden buildings.
- if you plan to attach the boards with glue, you need to find out in advance whether it is suitable for use with expanded polystyrene, since some substances destroy this material.
Rating of expanded polystyrene for facade
| Photo | Name | Rating | Price | |
|---|---|---|---|---|
| #1 |
|
⭐ 100 / 100 | ||
| #2 |
|
⭐ 99 / 100 1 - vote | ||
| #3 |
|
⭐ 98 / 100 | ||
| #4 |
|
⭐ 96 / 100 | ||
| #5 |
|
⭐ 95 / 100 | ||


Foamed polystyrene foam (EPS) KNAUF Therm DACHA
Foamed polystyrene foam (EPS) KNAUF Therm DACHACharacteristic:
- quantity per package 10 pcs;
- dimensions 100×120 cm;
- thickness 100 mm;
- area of one sheet 1.2 m²;
- packaged area 12 m²;
- applies
- thermal conductivity coefficient 0.048 W/(m⋅K).
Foamed polystyrene foam (EPS) KNAUF Therm DACHA
Extruded polystyrene foam (XPS) URSA XPS N-III-G4
Extruded polystyrene foam (XPS) URSA XPS N-III-G4Characteristic:
- quantity per package 7 pcs;
- dimensions 118x60 cm;
- thickness 50 mm;
- area of one sheet 0.7 m²;
- packaged area 4.9 m²;
- for internal and external works;
- tongue and groove slab;
- minimum operating temperature -50 °C;
- maximum operating temperature 75 °C.
Extruded polystyrene foam (XPS) URSA XPS N-III-G4
Extruded polystyrene foam (XPS) RAVATHERM XPS STANDARD
Extruded polystyrene foam (XPS) RAVATHERM XPS STANDARDXcharacteristics:
- material - extruded polystyrene foam (XPS);
- quantity per package 8 pcs;
- dimensions 118.5×58.5 cm;
- thickness 50 mm;
- area of one sheet 0.7 m²;
- packaged area 5.6 m²;
- for internal and external works;
- scope of application: for floors, for walls, for ceilings, for roofs;
- tongue and groove slab;
Extruded polystyrene foam (XPS) RAVATHERM XPS STANDARD
Extruded polystyrene foam (XPS) PENOPLEX 45
Extruded polystyrene foam (XPS) PENOPLEX 45Characteristic:
- material - extruded polystyrene foam (XPS);
- quantity per package 8 pcs;
- dimensions 240×60 cm;
- thickness 50 mm;
- area of one sheet 1.4 m²;
- packaged area 11.2 m²;
- for external work;
- scope of application: for floors, for roofs;
- tongue and groove slab;
- maximum operating temperature 75 °C;
- thermal conductivity coefficient 0.033 W/(m⋅K).
Extruded polystyrene foam (XPS) PENOPLEX 45
Extruded polystyrene foam (XPS) Technoplex
Extruded polystyrene foam (XPS) TechnoplexCharacteristic:
- material - extruded polystyrene foam (XPS);
- quantity per package 20 pcs;
- dimensions 120×60 cm;
- thickness 20 mm;
- area of one sheet 0.7 m²;
- packaged area 14 m²;
- for internal and external works;
- minimum operating temperature -70 °C;
- maximum operating temperature 75 °C;
- thermal conductivity coefficient 0.032 W/(m⋅K).
Extruded polystyrene foam (XPS) Technoplex
Installation of polystyrene foam insulation
The panels are attached to the surface in two ways - on the lathing or directly on the plane of the walls using glue and “umbrella” (“fungi”) fasteners. The choice of technique depends on the surface on which it will be mounted.
If the house is built from timber and its walls have smooth surfaces, you can use both options, but it’s easier to get by with glue.
- Before installing insulation, the surface must be inspected for cracks and cracks. If any are found, then they need to be repaired. The process can be carried out different ways- this is plugging the cracks with tow, treated with lime, or sealing with modern materials, such as sealant or construction foam.
- After that wooden surface must be treated - it will protect it from harmful insects and the formation of moss or mold stains.
- When the antiseptic has dried, you can begin installing the insulation. To ensure that it sticks well to the wall, you can lightly walk over its surface with an iron brush.
- Installation of insulation begins from the bottom corner of the wall. For ease of fastening and evenness of the first row of panels, it is recommended to install a special profile in this place. It should have a width corresponding to the thickness of the material.

- The slabs are coated with a solution of special construction adhesive, pointwise and along the edges, and then applied and pressed against the wall. They should be pressed tightly against each other, creating a single surface. If gaps have formed between the panels, then after the glue has dried and secured to the wall, they must be sealed with polyurethane foam.

- After the first row has been removed, subsequent rows are attached according to the system brickwork, in a dressing.
- After waiting 3-4 days after installing the slabs to the wall, they must be secured using “fungi” fasteners. Each slab must be secured 5-6 similar elements. The fastenings should have a leg length several centimeters greater than the thickness of the insulation, for example, if the insulation is 50 mm thick, then the “fungus” should be selected with a 100 mm leg. When driving, the cap should enter the polystyrene foam plate flush with its surface.
 Fixing the fastening - “fungus”
 - When all the insulation has been installed, you can begin to reinforce the polystyrene foam - this is done using fiberglass mesh.

- At all corners of the building you need to install special corners with a mesh attached to them; they are secured with glue.
 Corner reinforcing mesh - serpyanka
 - A wide mesh is fixed to the remaining surface, which is sold in rolls. It is laid with an overlap of 70-100 mm, also on the adhesive mass. The serpyanka should seem to drown in glue. Having fixed it on the surface of polystyrene foam, they go over it with a spatula from the center to the edges - according to the herringbone system, removing excess glue.
- When the glue on the reinforcing layer dries, the wall needs to be covered with a primer mixture - decorative plaster will fit well on it.
In this case, you can only make decorative plaster finishing - siding or there will simply be nothing to secure the lining to. But on plastered walls you can attach a lightweight finishing material, for example, plastic tiles to look like brick or stone.
find out detailed information with instructions on how to do it from our new article.
Since installation work according to the second option (on the lathing) is carried out in the same way as when insulating with mineral wool, they will be discussed below.
 Why is it worth insulating your house?
 Mineral wool
Mineral wool is not new insulation material, it is time-tested, as it has been used for decades, and during this period it has not lost any of its popularity.
 One of the best insulation materials- mineral wool
 Mineral wool consists of numerous fibers bonded together with special compounds. Three different types of mineral wool are produced, and they differ in the base material of manufacture - this stone wool, glass wool and slag wool.
Of course, they have other differences - moisture resistance, thermal conductivity, resistance to certain external influence, as well as the thickness and length of the fibers.
Slag
This material is made from blast furnace slag, which, after processing, is drawn into fibers with a length of 10 to 20 mm and a thickness of up to 10 microns.
When choosing insulation for a facade, you should immediately abandon this option, since it is hydroscopic. If moisture gets on it, it can cause mold to grow inside the material. In addition, if it is located next to a metal profile, an oxidation reaction may occur, since the slag contains residual acidity.

Slag wool has a fairly high thermal conductivity for insulation, and according to this characteristic it is also not entirely suitable for insulating the walls of private housing.
Glass wool
Glass wool is made by melting glass melt, the length of the fibers of the material is from 15 to 45 mm, and the thickness is no more than 12-15 microns. This insulation is well suited for protecting walls from the cold outside - glass wool is heat-resistant and non-hygroscopic. In addition, it is light in weight and has good elasticity. Glass wool is produced in mats or rolls, and due to its elasticity, the packaging does not have excessively large volumes, since the material is easily compressed.
Glass wool made in mats is denser and stronger. It not only insulates the walls well, but also provides excellent protection from the wind, and, in addition, it is much easier to install between the sheathing bars.

The disadvantage is that when installing it, you need to carefully protect your eyes, face and hands, and respiratory organs, since thin glass fibers, if they come into contact with fabrics, can injure them or cause severe irritation. Therefore, when working with this material, it is necessary to wear a respirator, goggles, gloves and a protective suit.
Stone wool
Basalt rocks serve as raw materials for the production of stone wool. It, like other types of insulation, consists of fibers, has low thermal conductivity and high hydrophobicity, as well as the ability to withstand high temperatures, therefore it can be called a heat-resistant material. This type of wool is not so elastic, so its shape and volume are quite stable. Thanks to all my positive characteristics, it is excellent for insulating facades.
 Basalt (stone) wool is a material with virtually no disadvantages
 Basalt wool is available in the form of rolls or slabs; it can be denser or softer, but for walls it is necessary to choose the most dense material.
All of the above types mineral wool have a hardness classification. This indicator needs to be clarified, since not all brands are suitable for insulating facades. For similar works you need to choose material grade PZh-175 - this is a rigid plate, or PPZh -200, which means increased rigidity of the plate.
Thermal insulation of walls with mineral wool
- Installation of the insulating layer of mineral wool is carried out with lathing installed on the wall - this method can also be used for insulation with polystyrene foam. It is suitable for both flat and log surfaces.
- In this case, a lathing made of timber or galvanized metal profiles is installed on the walls, between which slab or roll insulation is fixed.

- In order to achieve a better insulation effect and keep the walls safe from moisture, it is recommended to pre-fix a vapor barrier material under the sheathing.
- It must be remembered that the sheathing bars are installed at a distance from each other, which should be 5 cm less than the width of the insulation. This is required so that it fits tightly between two adjacent guides. If the material will be installed in two layers, then it is necessary to provide for the thickness of the installed bars - it must correspond to two layers of insulation.

- There are several ways to secure the sheathing, and which one to choose is up to the owner of the house, depending on the quality of the insulation and the evenness of the wall.
- After installing the sheathing beams, insulation mats are laid between them, starting from the bottom row. To prevent them from slipping, you can connect all the bars from below with a supporting rail.

- In the event that it is used roll material, installation begins from the top, securing the top edge to the “fungi”. The remaining fastening elements will be installed later.
- Then, the laid insulation is covered with a vapor barrier film. It is often used to completely cover the entire wall, securing it to the bars with staples. Sometimes it is laid only on insulation, but the first option is preferable.

- Next, all the insulation material, together with the vapor barrier, is secured with “fungi” to the wall.
- Fixed on top of the sheathing decorative finishing- this can be siding or lining. The rules for installing such finishing are discussed separately in other publications.
 Mounted on top of the sheathing decorative coating- siding, block house or other materials
 - If the sheathing is installed vertically, then the sheathing will be horizontal and vice versa. This point must be taken into account when installing bars or profiles. It also happens differently - with two layers of insulation. First, the first sheathing is made horizontally, then, after laying the first layer of insulation, a second sheathing is mounted along the beams, perpendicular to the first. After laying the second layer of mineral wool, everything is the same as described above.
Video - Example of wall insulation with mineral wool
Prices for mineral wool
Mineral wool
Sprayed insulation
In addition to materials in the form of mats and rolls, in Lately began to be used liquid insulation, which are sprayed onto the walls. These include such as ecowool and polyurethane. When choosing such insulation materials, you should pay attention to their characteristics - they can become an excellent alternative mineral wool or rigid polystyrene foam.
Polyurethane foam
Wooden house covered with polyurethane foam, on long years can be considered protected from the negative processes of mold, exposure to dampness, wind, low and high temperatures.
 Modern way thermal insulation - spraying polyurethane foam
 However, this spraying method is not often used, since it requires special equipment and good skills, and inviting a professional with special equipment is quite expensive. However, it must be taken into account that the service life of this material reaches up to fifty years, while other insulation materials become unusable after a shorter period. Therefore, having spent once on insulation, you can forget about repairing the facade for many years.
After covering the walls with polyurethane foam, they acquire properties such as hydrophobicity, low thermal conductivity, and resistance to almost any external influences.
The advantages of this technology also include the following qualities:
- excellent adhesion when applied;
- lack of fastening elements;
- the material penetrates into all small holes and cracks in the wall, preventing cold air from penetrating inside the building;
- compatibility with any materials;
- formation on the surface seamless coating, which is very important for the heat-saving effect;
- the coating does not require repair or renewal for many years;
- mold does not appear on it and it is not damaged by rodents.
Application of polyurethane foam
Any surface for installation of sprayed materials must be prepared. In particular, bars of the same size as the thickness of the spray layer planned to be installed are nailed onto its surface - these will become a kind of beacons. Using these guidelines, protruding frozen sections of foam material will be cut off.

When applying insulation, the device operates under high pressure- more than 100 atmospheres. Master using air gun sprays material on the wall surface. Once on the surface, the polyurethane foams in 2-3 seconds. The setting and beginning of hardening of polyurethane foam occurs almost immediately.
To achieve the necessary heat and sound insulation effects, the coating must be sprayed in three layers.
Sprayed polyurethane is divided into materials for internal and external use. For external application, use “Ecotermix 300”, “HEATLOK SOY”
For example, the video shows the application of polyurethane to wooden walls from the inside of a house. The spraying process on the outside is practically no different.
Video - Spraying polyurethane foam thermal insulation
Ecowool
Ecowool is an insulating and soundproofing material, also applied by spraying. The raw material for its production is recycled cellulose with the addition of borax and boric acid, which are non-toxic and non-volatile. The insulation looks like gray powder.
 Another method of thermal insulation of walls is spraying ecowool
 The environmental cleanliness of the material is confirmed by the fact that it does not contain synthetic compounds, petroleum products, or other substances that can emit fumes hazardous to human health.
When the material is applied to the surface, it fills all holes and voids, forming a monolithic insulating layer without joints.
Additives from borax and boric acid are excellent antiseptics for insulation, preventing any forms of biological life from growing in its thickness.
An important positive quality of ecowool for wooden buildings is its heat resistance - material smolders, but does not ignite with an open flame.
Application of an insulating layer of ecowool
The wooden surface for spraying must be prepared - the sheathing is fixed to it the right size— it will regulate the thickness of the spraying. In addition, it will play the role of supporting elements so that the not completely hardened material does not slide out under its own weight.

To spray ecowool on walls, you need a special installation, the hopper of which is filled with dry material. There it is loosened and moistened, and applied to the surface through a special gun under pressure. The process itself is quite simple, but it cannot be carried out without a special apparatus.
Video - Technological process of spraying ecowool on wooden walls
In addition to the materials and technologies described above, to date There are many other insulation materials. Therefore, if the goal is to make the house warm and save family money on energy bills every day, then you can always find a material that meets all the criteria.
How to determine the required insulation thickness?
The thickness of the thermal insulation layer depends on the thickness of the wooden walls and climatic features region of residence.
Know required thickness insulation is important. Excessive “coat” can only damage a wooden house, while insufficient coat will not allow creating comfortable conditions accommodation. In addition, this parameter directly affects the design of the frame - it is important to know how far away from the wall its guides should be placed under the external one. Carrying out independent calculations is not so difficult, especially if you use the proposed calculation method.
The point is What total heat transfer resistance multilayer wall designs R should not be less than calculated for a specific climatic region of the country. For convenience, these values are plotted on a map of the Russian Federation. In this case, we are interested in the upper value (purple numbers) - for the walls.

The wall is not only the frame itself, but also the interior decoration (if there is one or is planned, a layer of thermal insulation and external finishing facade (important - external finishing made according to the principle of a ventilated facade is not taken into account). For each layer, its thermal resistance index is calculated.
For example, the following diagram can be given:

1 – wooden wall (timber or log). There is a nuance - thickness log wall(right) may be slightly smaller than from timber. It is worth paying attention to this when taking measurements and further calculations.
2 – walls, if any. Often, in log houses, the walls in the premises are left unlined - so as not to lose the naturalness of the coating. But they can easily be covered with plasterboard (for painting or finishing with wallpaper), plywood, natural lining or wood composite panels, OSB sheets, etc.
3 - Thermal insulation layer - it is its thickness that must be determined.
The structure may have several layers. So, if the outside is provided with cladding without a ventilated gap, close to the insulation material (for example, using natural boards or lining). then it will also need to be taken into account.
The figure also shows:
4 — vapor permeable diffuse membrane.
5 – frame details (lathing).
6 – siding or lining, mounted according to the principle of a ventilated facade, with a gap (7). This is the finishing, as already mentioned, no matter what material it is made of, there is no noticeable contribution to the overall thermal resistance wall structure will not contribute, and we do not take it into account.
So, to determine required thickness insulation, you need to know the thickness of each layer and their thermal conductivity coefficient.
Rn = Hn / λn
- Hn— thickness of a specific layer.
- λn— thermal conductivity coefficient of the material from which the layer is made.
As a result, the calculation formula takes the following form:
Hу = (R– H1/ λ1 – H2/ λ2 – H3/ λ3 … ) × λу
- Well– thickness of insulation.
- λу– thermal conductivity coefficient of the selected thermal insulation material.
Find odds for various materials It’s easy to find reference books – there’s a lot of it posted on the Internet. Measuring the thickness of existing layers is also not difficult.
Despite the development modern technologies in construction, wooden houses are still often found in holiday villages, villages and villages. At the same time, one of the main issues when building such a house is proper organization of wall insulation.
Made with high quality, using the most the best materials, in accordance with regulations, thermal insulation helps maintain optimal temperature in the house in the summer, and with the onset of the long, harsh Russian winter.
As is known wood is extremely susceptible to mold development and the service life of a wooden structure directly depends on the degree of preservation of the structural elements. With the onset of winter and the first frosts, the heating season begins.
We strive to provide comfortable temperature indoors, and meanwhile the logs and wooden beams from which the walls are made are subjected to a real test. Warm on one side, they come into contact with cold outside air on the other., and the result of this is a constantly formed, condensation that is harmful to wood.
The main goals of thermal insulation are to reduce heat loss in winter and maintain important elements in good condition.
Conventionally, wall insulation can be divided into two types:
- walls of a wooden house;
- insulation of house walls.
There are many skeptics who condemn this or that method, but each of them has its own pros and cons. The choice of a certain insulation method is due to a number of reasons and factors, but with strict adherence to technology and proper execution of work, selection of appropriate materials, any of them turns out to be effective.
The main difference between these two methods of insulation is essentially that on which side of the load-bearing walls of a wooden house will the insulation be carried out?, and, as a result, how effective it will be in terms of heat conservation and benefits for the entire structure.
Owners and owners resort to insulation from the inside wooden houses, who do not want to close unique ones, beautiful facades buildings made in original ways masonry or facades of architectural value. Such insulation will not be noticeable from the outside, and the appearance of the building will not change.

External insulation
The goal of external insulation is maximum efficiency.. It involves the creation of an insulating structure with outside load-bearing wooden walls and is more aimed at extending the life of the building, preserving all its important elements made of wood, protecting them from the destructive forces of nature and surrounding weather conditions.
External wall insulation remains quite common, often used in construction and renovation. And this is confirmed by a number of advantages:
- all temperature fluctuations, all the vagaries of the weather are taken over by a layer of insulation and finishing, respectively service life wooden elements home increases significantly;
- the opportunity to insulate a long-built house. Often such houses are purchased ready-made in holiday villages along with plots, and it can be financially difficult to immediately rebuild a new house.;
- the interior of the house remains untouched, which is convenient from the point of view of living and organizing everyday life;
- the opportunity to choose a new look for your home due to the finishing
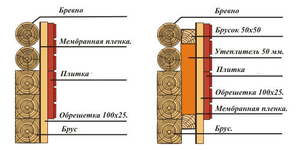
Pie wall
In other words - composition and order of all insulation elements. When insulating a wooden house from the inside, the so-called “pie” can be represented as follows:
- bearing wall;
- sheathing;
- insulation - mineral wool;
- vapor barrier film;
- finishing layer.

wall pie
Which insulation to choose?
When choosing insulation for the walls of a house, first of all should be addressed  attention to the ability of the material to pass steam and air while retaining heat.
The severity of the climate of the region of residence should also be taken into account.
Insulation materials include:
- interventional insulation materials used during the construction stage;
- and insulation materials used for insulation from the outside or inside.
Inter-crown insulation is used in laying inter-crown joints. Such insulation can be synthetic or natural (from jute, moss, flax, hemp). The main property of these materials is low thermal conductivity and the ability to accumulate and release the resulting moisture. The most common today are insulation made from flax and jute fiber.
Basalt (mineral) wool is widely used to insulate walls from the outside or inside., or fiberglass wool in the form of rolls or mats, with a density of 80-120 kg/m3. In addition, it is an environmentally friendly material.
It is not recommended to use polystyrene foam or penoplex as an element of the pie., since these materials are vapor- and moisture-proof and prevent air exchange between the house and the outside environment.
The following materials may be suitable for insulation:

Mineral wool - best option insulation
Sealing seams and joints of forming elements
This method is internal insulation walls, aimed at sealing joints and cracks in logs. In this case, various sealants are used (silicone, latex, acrylic, linen rope, tow). This method is convenient because it can be easily done with your own hands and does not require special skills, it does not interfere with the release of steam and is the most economically profitable.
Technically it is carried out as follows:
- the edges of joints and cracks are cleaned,
- cavities are filled with rope, foam rubber;
- a layer of sealant is applied on top;
- the sealant is smoothed with a brush until a smooth surface is formed;
- Remains of sealant are removed with a rag.

Sealing with sealant

Sealing seams with fabric
Sheathing preparation and installation
When installing the sheathing, you should rely on the thickness of the insulation. The thickness of the bars will be chosen the same. Most often the timber is chosen 10-50 mm thick and 100 mm wide.
Install the sheathing transversely to the laying of logs with a step between the bars equal to the width of the heat-insulating mats with minus 3 centimeters for a tight fit. The height of the sheathing is individual for individual rooms.
Parallel to the laying of logs, the lathing is also installed in the same way (the so-called “counter-lattice”). To install the sheathing, you should choose high-quality material without signs of rotting. Before installation, all wooden parts and surfaces should be treated with an antiseptic.
NOTE!
Do not use thin boards for lathing, since it simultaneously serves as a place for attaching finishing coatings.

Lathing
Do-it-yourself insulation of walls from the inside of a wooden house
 Insulation of walls inside a wooden house using mineral wool. When using this method, glass wool, slag fiber, or mineral fiber mats are used.
This material is the most effective in terms of thermal insulation and sound insulation, and is environmentally friendly. However, due to its structure, mineral wool allows steam to pass through and is capable of accumulating water.
For this reason, when using it in insulation, layers of hydro- and vapor insulation must be used.
Mineral wool is available to customers in the form of rolls and mats. When insulating, it is most convenient to use mats by simply inserting them between the profiles of the sheathing made. In this case, the gaps between the mats should be no more than 2 mm. Such gaps are subsequently sealed with adhesive tape - preferably foil, or plumber's tape.
Step-by-step installation:
- being prepared required quantity mineral wool mats, based on calculations of the square footage of the walls of the premises;
- mineral wool is tightly inserted between the sheathing beams;
- the top mats are trimmed to height;
- Gaps and seams between mats are taped with mounting tape.
Some builders use foam plastic when insulating walls indoors. However, the main criterion for choosing in its favor is its low cost. From the point of view of efficiency, polystyrene foam does not have the property of transmitting steam, and the result of its use in the absence proper organization vapor and hydro insulation, will become the so-called “ Greenhouse effect "and the inevitable development of mold in rooms with such walls.

Laying mineral wool

Installation of insulation
Vapor barrier and waterproofing of walls
Insulation of wooden houses begins with waterproofing. This is the closest to load-bearing walls a layer of special film, the main task of which is to ensure air circulation and protection of the insulation layer from getting wet and freezing, preventing its destruction and preserving the tree from the development of mold bacteria.
Waterproofing is one of the the most important moments in wall insulation.

Waterproofing membrane
In the process of work, anti-condensation membranes, diffuse breathable films, polymer multilayer films, and vapor barrier membranes are used. When waterproofing, it is important to maintain complete tightness. To do this, the film is overlapped and nailed down using a stapler and staples, and the seams are sealed with mounting tape.
Vapor barrier is a finishing coating that is laid on top of mineral wool and serves to protect against the penetration of water vapor into the insulation structure.
The fastening is similar to the installation of waterproofing.

Vapor barrier
Conclusion
In this way, responsibly organized wall insulation timber house can play a big role in the long and reliable operation of a wooden house. It will help reduce heat loss and also protect load-bearing elements buildings from all kinds of weather conditions.
However, the preparation of such an event should be approached responsibly. The service life of your home depends on how well it is carried out.
Useful video
Tips for insulating a wooden house from the inside:
In contact with
Insulate a house that does not yet have any interior decoration much easier than doing this in an already fully furnished and landscaped house. Don't rush into any internal works until every room in the house is properly insulated. Thanks to modern materials, you can do this yourself. Any room will be cozy and comfortable if you approach the matter competently and carefully read the technology for insulating the ceiling, walls and floor.
Insulation of the ceiling of a wooden house
As a rule, ceiling insulation is not treated responsibly. Many people believe that there is no need to insulate it, but this is far from true. The air that people try so hard to heat in winter rises up and goes through the ceiling to the street. Making a serious mistake - leaving the ceiling uninsulated, many people unknowingly lose half the heat, they senselessly waste money on warmth disappearing into the unknown.
Ceiling insulation material:
- Mineral wool. This material is not expensive, but reliable and easy to install. It is one of the few insulation materials with which you can work independently, without calling on other workers for help and, most importantly, without paying them money.
- Glassine. Used as a waterproofing material.
For structures and frame cladding you will need:
- Edged board.
- Nails, glue, polyurethane foam.
- Drywall.
Tools for ceiling insulation:
- Hammer.
- Hacksaw.
- Screwdriver.
- Electric jigsaw.
- Tile adhesive.
Stages of ceiling insulation:
- From edged boards we make a frame, you need to be prepared for the fact that this will reduce the height of the room. The distance between the frame boards should be no more than 1 meter.
- Between the frame boards it is necessary glue the glassine, without leaving empty spaces, in order for the material to stick well, it needs to be coated a little with tile adhesive.
- On top of glassine laying insulation- mineral wool. Do not leave holes between the insulation. If the material does not adhere, use tile adhesive in small quantities.
- The last stage is plasterboard ceiling covering. Using a screwdriver, screw the sheets of drywall to the wooden frame.
It is necessary to insulate the ceiling from the inside in the warm season and not earlier than 1 year after the construction of the house. Only in this case will the insulation be carried out correctly and last for many years.
 If you decide to insulate the walls of a wooden house from the inside, you need to know what may be on the walls in this case. condensation will form. This is especially true in the northern parts of the world, where it is very cold in winter and the rooms are warm. This happens due to the effect of temperature changes, during which the dew point moves into the layers of insulation. This situation can be corrected film, which is used together with insulation, or provide good ventilation.
Necessary equipment
- Jigsaw, hammer drill, screwdriver, mallet, tape measure, level, plumb lines, chisel, screwdriver, hammer.
- Wooden beams.
- Felt, foam or tow.
- Material for wall insulation, for example, glass wool.
- Drywall.
- Putty.
Modern materials for thermal insulation of walls
- Ecowool- this material perfectly fills all existing cracks and voids in the walls, at the same time preventing walls from blowing through. It prevents moisture from penetrating inside, thereby preventing the occurrence of fungal infections. One of the few breathable materials.
- Glass wool- having chosen this material for insulation, you should take care of the thermal insulation in the room, since glass wool allows a small amount of moisture to pass through, as a result, the thermal insulation qualities deteriorate.
- Expanded polystyrene- one of the most common materials for wall insulation in wooden houses. First of all attracts with its cheapness. Also positive qualities are elasticity and lightness. The material has heat and sound insulating qualities.
Wall insulation technology
 All cracks in the wall must be sealed foam, linen felt or tow. You can choose any material that is more convenient to work with. We make the sheathing from wooden beams. We place a place for installing the outermost elements of the sheathing. Special attention should be paid to this How evenly I will attach the next ones depends on the first beams, so use a level and plumb lines to verify.
If the definition of the first beam is completed, it should be secured with screws and dowels. Should be fixed every 25-30 cm. Then we measure 1 meter from the first beam and fasten the second one exactly parallel to the first, etc. until the complete perimeter of the sheathing is formed on the entire wall. If you meet on the way window openings, they should be covered with bars in a circle.
Each beam must be treated with antiseptics to prevent rotting and fungi. The sheathing is ready. Insulation should be laid between the bars. There is no need to use glue; the material will stick tightly between the sheathing and the wall.
Making insulation. Used for vapor barrier film or polyethylene, it is applied over the insulation with small allowances along the edges.
The last stage is finishing. We cover the walls with plasterboard, we screw it to the sheathing of beams, it is important that the slabs fit tightly to each other. If cracks appear, they should be filled with putty.
Insulation of the floor of a wooden house
Tools and materials for work:
- Hammer, drill, saw, electric jigsaw.
- Nails, tape measure, pencil, knife.
- Level, plane.
- Mineral wool.
A concrete floor in a private wooden house necessarily requires insulation. It is worth noting that the process of floor insulation is not easy, but you can carry it out yourself by spending personal time and effort. Let's consider the method - "raised floor", it will raise the floor by at least 6 cm, but makes the room much warmer.

Mineral wool for floor insulation
Mineral wool has been a inexpensive but effective material.
Advantages mineral wool:
- This material soundproofing and heat-insulating.
- Excellent characteristics and reviews.
- Duration service life.
- Low density.
- Does not deform almost under no circumstances.
- The price is always available for any citizens.
- Available in 2 types: flexible mats or hard slabs.
The only competitor to mineral wool is polystyrene foam; it boasts of its practicality and ease of installation.
Insulation of a wooden house should be carried out completely; it is necessary to insulate ceiling, walls and floor. If the ceiling is insulated but the walls are not, warm air will still leave the room through microcracks and then all the work will be in vain. On modern market you can buy a lot thermal insulation coatings and tools for home insulation. If you approach the matter competently, even an old wooden house will be cozy and warm in the coldest winters.
Video of insulating a wooden house
This type of work, such as insulating the walls of a wooden house from the inside, is carried out according to various reasons: when certain factors do not allow the house to be insulated from the outside, the building has a complex structure, the owner wants to leave the wood exposed so that one can admire its natural appearance. And in such a situation, the issue of materials is resolved taking into account the requirements that the internal structure of the premises must satisfy.
Most often, few owners decide to insulate their houses from the inside for the reason that this step leads to a reduction in the living space of the room. Also, not everyone has sufficient skills in this matter, which is why they do not want to take risks, since in case of an error it could disrupt the microclimate in the house.
However, there are situations when insulating a house from the inside cannot be avoided. Then the owner must make every effort so that this work is done very efficiently. And to do this, he will have to solve many issues, including understanding how to insulate a wooden house from the inside. It is worth noting that in terms of device technology and installation, such a procedure is almost similar to external insulation.
In many wooden houses, heat often does not last long. The following factors can be considered favorable to this:
- the installation of thermal insulation was carried out in violation of the requirements or the wrong material was used;
- Gaps appeared between the beams, which was caused by non-compliance with the rules of laying, drying, etc.
To understand how to insulate a house from the inside, you need to know the sequence in which individual operations are performed. Here it is necessary observe the following order:
Preparatory stage
Before you start insulating walls, you should make sure you have necessary materials and tools:
- emulsion against insects and fungi;
- jute fiber;
- timber 10.0x5.0 cm, 5.0x5.0 cm;
- thermal insulation (mineral fiber);
- lining;
- saw;
- building level;
- roulette;
- construction stapler;
- chisel.
However, at the very beginning you need to pay attention to the surface of the walls, removing dirt and dust from it. After this, the cleaned surface is coated with a special emulsion, which will help prevent the appearance of insects. It is also treated with a compound that provides protection against rotting.
When insulating the inside of a wooden house, you need do the internal wiring as well. It is often located on the surface, although it can be buried in decorative casings. In this case, all you need to do is separate it from the wall.
 After completing the work of cleaning and treating the walls, it is time to caulk the cracks. If you have to deal with a log house in which no one has lived, then due to shrinkage it is carried out again after a year. If we are talking about a wooden house that began to be used immediately after construction, the next caulking should be done after 2-3 years.
The most common material used to caulk cracks is jute fiber. With this material you need to eliminate the existing cracks using a wide chisel. It is possible that during the inspection of the walls large gaps will be discovered. In such situations, it makes sense to use tape tow, which is sold in the form of rollers.
Regardless of what starting point was chosen for caulking the walls, all cracks must be sealed completely - meaning that there should be no free space for a new portion of fiber. Don't worry about the jute sticking out in certain places. There is no need to change anything here.
Installation of vapor barrier
 To ensure high-quality insulation of a wooden house from the inside, you should keep in mind that wooden walls will located between heat insulators. The logical consequence of this procedure will be an increase in humidity inside the house, due to which it will lose its breathability, creating a thermos effect.
Solve the problem of high humidity is possible only by creating forced ventilation. In this case, it is necessary to ensure that there is no dampness, otherwise this will lead to rotting of the walls.
To avoid dampness in the house, installation must be completed before installing the insulation. vapor barrier film. It must be positioned in such a way that rough side was directed towards the surface of the beam. In this case, the tree will not be afraid wet air, the walls will still breathe, regulating the humidity level in the house.
Lathing and its installation on load-bearing walls
The main purpose of the lathing is in mineral fiber retention. The material for it is usually a wooden beam.
Sometimes it is allowed to use for it and metallic profile provided that the interior wall cladding will be done using plasterboard.
In ordinary situations wooden walls retain their original appearance. Finishing work is carried out using lining or plank.
So that the angles have correct form, you should make corner posts before starting work. After the height of the room has been determined, they begin to create a blank from the timber - after cutting it should have a cross-section of 5.0 × 10.0 cm.
Next, you need to measure its length and, based on the results obtained, saw off another similar block, which should have a cross section of 5.0×5.0 cm. A thin block must be fixed to the edge of a 5.0×10.0 cm beam, using self-tapping screws as fasteners. As a result, the design should look like a rack made in the shape of the letter “L”.
There should be four such racks in total - one for each corner of the room. Their installation is carried out in the corner using self-tapping screws. To make sure that verticality is maintained everywhere, use a level or self-tapping screw.
Next, 5.0x5.0 cm bars are installed between them at a distance of 50-60 cm from each other. Even before you start insulating the house from the inside, the prepared wood should be protected from rotting and burning by applying a special composition to it.
 After the sheathing is ready, it’s time for laying mineral wool. The roll needs to be unrolled, after which the strip of material is divided into parts according to height. It is important that the strip of mineral wool exceeds in width the distance at which the vertical bars are removed from each other, by approximately 1-2 cm.
The prepared strip must be inserted between the bars, and for fixation to the wall, anchors with large round caps are used. It is advisable to carry out this work with an assistant: one will hold the cotton wool, and the other will fasten it.
When the insulator is laid and securely fixed between the sheathing elements, an additional layer of film should be placed on top of the wool, which will improve the quality of thermal insulation. The technology for attaching it is completely similar to the previous case: it must be positioned in such a way that the rough side faces the cotton wool. Beneficial features This film is not limited to vapor and waterproofing. It also prevents the penetration of small particles of mineral fiber into the air.
How to make a ventilation system correctly
I would like to repeat once again that the inevitable result of proper insulation of a house from the inside is an increase in air humidity. In order to maintain a favorable microclimate in each room, care should be taken to create ventilation.
The use of direct external hoods should be avoided. It is best if all the air ducts are combined into a single chain through the attic. For air injection it is allowed to use any axial type fan, capable of providing low to medium power.
To keep the humidity in the room at an acceptable level, it is enough to run the fan for 20-30 minutes daily.
After laying the second layer of vapor barrier film, it is time to finish the interior walls. Installation of the film is carried out to the bars, for which a construction stapler is used. Using such a device, it is enough to simply fix a beam with a cross-section of 3.0×4.0 cm on the film. Typically, beams of this size are offered in any hardware store.
Subsequently, a lining with a clearly defined structure is attached to the beam. This is what completes the insulation of the house from the inside. Its use will help preserve the original appearance of the interior.
It is also allowed to carry out Finishing work and using planken. Its installation is carried out horizontally. This material itself looks like medium sized timber.
What material can be used to insulate walls?
Despite the fact that many materials are available today for wall insulation, most often owners use the following for this purpose: plaster and polystyrene foam.
Insulating a house with plaster
 Among all the methods by which you can insulate a house from the inside, plaster seems to be the most preferable in terms of ease of implementation. First, the walls are prepared for work, for which the surface must be cleaned of old plaster. To increase the adhesive properties of the solution, you need to fasten the fabric to the walls. It can also solve the problem of insulation, although if necessary, you can also use special material, let's say metallic profile.
First, the walls should be sprayed. This is the name of a special solution used to eliminate cracks, which gives the wall a more even and smooth appearance. When applying the layer, it is important to maintain the thickness, which should not be more than 9 mm. Subsequently, new layers will be applied to it.
After this, they begin to create a primer layer. If you want to insulate your walls according to all the rules, then this must be done. Please note that its thickness should not exceed 30 mm. This layer is necessary to level the surface of the walls. Lastly, the abscess is applied. When applying this layer, remember that its thickness should not exceed 4 mm. To create this solution, fine sand is used, which must be sifted in advance.
Insulation from the inside with foam plastic
 Many owners often decide to insulate the walls of their home using a material such as polystyrene foam. Before you start working, please the slabs should be prepared. It is important that they have a certain density and rigidity.
There are people who think that granulated polystyrene foam and polystyrene are the same thing. It's a delusion. It is not recommended to insulate walls using this material, since it tends to crumble. It also has a number of other disadvantages - moisture permeability and low rigidity.
But polystyrene foam is free from these disadvantages. Due to the fact that it is highly resistant to moisture and has low thermal conductivity, experts recommend using this material to insulate wooden walls.
At the same time, this material does not cope well with the effects of temperature fluctuations. For this reason, before insulating walls, you should protect foam from fire. You should also pay attention to the walls, which are cleaned of dirt and dust.
Before insulating the walls, it is necessary to remove all irregularities. The need for this is due to the fact that if there is a flat surface, it will be possible to ensure a tight fit of the insulator to the surface. During insulation, you should great attention pay attention to cracks and gaps. If they are not eliminated and the walls begin to be insulated, they will subsequently lead to heat loss and drafts. Apply to the surface of the walls adhesive composition. The slabs will be mounted to it.
Having completed all the above operations, you can proceed to installing the foam on the wall. To avoid having to insulate the walls again, you should wait the time required for the slabs to set to the surface. In order to increase the reliability of fastening, it is allowed to strengthen it using plastic dowels with wide hats. If this is not done and you continue to insulate the walls, then in the future this will lead to displacement of the slabs, and deflections will occur at the attachment points, which will negatively affect the quality of insulation.
After laying the foam plastic, they proceed to creating protective coating. Putty is most suitable for this purpose, since it will be much easier to insulate the walls. Installation is already carried out on the foam itself reinforced mesh based on fiberglass, which is covered with putty in two layers. When completing the insulation of the walls, they are covered with plaster, paint, or drywall is installed.
If this is possible, polystyrene foam can be replaced with extruded polystyrene foam. Its important advantage is the ability to save living space, which is associated with its small thickness.