Insulating gates: step-by-step instructions. We insulate garage doors from the inside - proven methods How to insulate iron gates in a garage
Everyone knows that metal garage doors winter period freeze and become covered with a whole coat of frost. You've probably heard that you can use grease or another product to lubricate the inside of a garage door. Then supposedly there will be no ice. Much fewer people understand why this happens and how it relates to the need for insulation garage doors.
Each of us studied thermal conductivity at school. If the garage is made entirely of metal, then the garage doors are not afraid of frost. The entire perimeter of the garage will freeze evenly. And in capital garages(where only the gates are metal), it is the gates that freeze, because they are the most heat-conducting element.
Even though the garage door will be frozen, the walls will be fine. In this case, the gate in winter acts as a cooled coil in the moonshine still. They condense moisture from inside the room and turn it into ice.
The temperature in the garage affects the condition of your vehicle. And first of all - on its rubber technical elements. The higher the room temperature, the more comfortable it will be for you to use your car inside in winter. Temperature also sets the microclimatic conditions inside basement(if there is one) under the garage. To retain heat inside the garage, you need to insulate it very carefully. This article will talk about how to insulate.
To determine whether you need to insulate your garage door yourself, you need to understand one important point. Without even considering winter cold, the usual thermal fluctuations during daylight and warm hours can cause the formation of condensation inside the garage. Constantly high humidity has a bad effect not only on the condition of objects, but also on the car body: the metal surface may rust, electrical wiring may rot. Fungus and mold often appear in the corners of the garage.
After condensation freezes, it will crack from excess moisture. finishing material. But there is great news - it would seem that serious problem can be resolved. Just choose the right insulation material, and then insulate the doors and garage gates. Upon completion of work, the temperature will not drop below 5 °C.
So, insulating the gate will solve the problem with:
- metal corrosion ( metal gates garage, metal products located in the garage itself);
- “rotting” of a car in the garage, which drives there while still “warm”. And if there is a considerable amount of cold ice in a closed room, then condensation will form on every metal item. That’s why cars “rot” in garages;
- ice, which appears even with a sharp change in outside temperature (not necessarily sub-zero). It makes it impossible to open the gate.
How to insulate garage doors? Let's look at this.
Preparing for insulation work
There are several ways to insulate your garage door. You can initially buy and install high-quality garage doors that already have insulation material. You can also insulate existing gates with your own hands. The last option will cost you less. By the way, the process itself will not take much time. And for insulation you do not need to have special skills in construction.
Before installing the insulation, measurements are taken of the area of the gate structure so that it can be determined overall volume insulation surfaces. Where does insulation of garage doors begin? Since the metal surface is cleaned of dust, dirt and other contaminants. Wash your garage door and dry it. Next, all holes and cracks are sealed using polyurethane foam. When it has completely hardened, its protruding remains are removed using a knife.
How to mark insulation material?
The marking of the selected type of insulation is done depending on the structure and area of the garage door structure. Perfect option markings are when all the insulation sheets are fully used, except for the seams and joints between the plates. But how to proceed to insulating garage doors from the inside without leaving any excess material? To achieve this goal, entire sheets of insulation are immediately used. And the space that remains is sealed with pieces of foam plastic.
When cutting the insulation, the stiffening ribs of the door are taken into account, because it happens that the corners of the insulation material protrude greatly above the door leaf. The selected insulation is cut at an angle to the required thickness.
How is the insulation attached?
Polyurethane adhesive foam is used as fastening material. If you have never used such foam before, then working with it will bring you delight, since installation with it is reliable, quick and easy. The main advantage of this glue is the quality of the polyurethane foam.
Adhesive foam is applied to the insulation. After five minutes, the sheet with the material applied to it must be glued to the cleaned surface of the gate.
Experts recommend starting installation of sheets from the bottom of the gate. The first sheet is glued without pressing firmly to the surface, otherwise the foam structure may be destroyed. After the first sheet has been installed, subsequent ones must be glued with a standard gap of about a centimeter.
Sealant or polyurethane foam is used to fill the seams that appear between the sheets of insulation. After an hour, when the adhesive foam has completely dried, the joints and seams between the insulation sheets can be sealed with foam. Excess foam can be removed with a knife. To ensure that the insulation of metal garage doors has an attractive appearance, the installed insulation is finished with clapboard.
Selection of insulating material
Before you insulate your garage door, you should understand the following. The insulation process directly depends on whether you managed to choose the right insulation material. When choosing, consider its quality and properties. Among the choice of insulation (and there are many varieties), pay attention to the three most popular options:
- on mineral wool;
- polyurethane foam;
- extruded polystyrene foam (foam).

Each of them has a lot of advantages, but one cannot ignore the disadvantages. For example, the fire resistance of polystyrene foam leaves much to be desired. But at the same time it has high moisture resistance and low thermal conductivity. U mineral wool, vice versa, high level fire resistance, but minimal moisture resistance.
Polyurethane foam is the latest technology for insulating a garage from the inside. Spraying is quite effective and completely fulfills the task. It is different:
- seamless installation;
- low weight of insulation;
- low thermal conductivity;
- high fire resistance;
- resistance to temperature changes, chemical and biological aggressors;
- durability;
- strength;
- the ability to use any finish for the sprayed surface.
Mineral wool is a material in the form of fibers, which is produced by processing special rock. The material has low thermal insulation, but thanks to it the room is well insulated. Cotton wool is produced in rolls and slabs.
Extruded polystyrene foam is considered a more expensive finishing option. It differs from other materials in the method of installation and gluing. Installation begins with the construction of a sheathing and stretching of a film designed to protect against moisture and vapor barrier. You can see how all this is done here:
Note! When insulating garage doors, you need to understand that their surface should heat up quickly, allow heat to pass in well, and also slowly release it out. Do not forget to measure the area you are going to insulate in advance in order to purchase required quantity materials and other important elements(glue or fasteners).
When choosing insulation, pay attention not only to thermal conductivity, but also to the presence of thermal inertia.
Lathing for insulating garage doors
Thermal insulation using any materials involves the use of lathing for the construction of the gate leaf, which will secure the insulation. The gate lining will then be attached to it. To make the lathing, use wooden blocks with a cross-section of 4 x 4 cm or 5 x 5 cm (depending on the design of the gate). The lathing must be attached to the load-bearing frame of the gate leaf: to a corner or profile steel pipe.
To make a wooden sheathing, you need:
- prepare in advance required amount wooden blocks. When purchasing, give preference exclusively to dry wood;
- treat the bars twice with an antiseptic composition (to prevent them from rotting under difficult conditions of temperature changes and high humidity);
- A block is attached to each power element of the gate. Use a screw for this. To do this, mark the places where the holes will be, and then use a drill to make through holes. The diameter of the drill must match the screw. When you attach the bars, do not forget to make holes in them in advance using a thin drill. Then the screws being screwed in will not split them;
- If there is a ventilation hole on the gate, it is surrounded by lathing around the perimeter. This also applies to locks;
- if there are no steel strength elements on the central part of the gate, then the bars can be attached to one another in any way: using corners, at the end, etc.
What types of garage doors can and should be insulated? About swing gates

Most garage doors swing design, which undoubtedly needs to be insulated. The base of the gate is a frame made of profile pipes and a sheet of steel that plays the role exterior finishing. It is known that steel has high thermal conductivity, so many people know that uninsulated gates made of of this material are not a barrier to heat leakage from the room. It is important that in swing gates Oh, there was a gate that significantly reduced heat loss during frequent movements of people. Therefore, if you are still building a garage, then you should order gates that are already insulated and have a wicket.
Nowadays sectional and up and over gates. The sections or web of this product are a sandwich of sheet steel panels with outside, as well as foamed polyurethane on the inside. This design already has the necessary thermal insulation properties. And additional insulation measures are not required in this case. These types of gates, if you want, can also be equipped with a wicket. This is something that absolutely needs to be done.
Handicraft up-and-over gates are also sold. However, garage door insulation does not have such models. fundamental differences from swing gates, because it is based on the same frame and sheet of steel.
Rolling gates are not insulated at all due to their special device. And they cannot always be called garage doors, since in terms of thermal insulation and anti-vandal characteristics they are much worse than all other types.
If the garage for your car is located in garage cooperative, then its arrangement consists of insulating the gate. As mentioned earlier, this will significantly reduce heat loss. Accordingly, holding this event is mandatory. The question is which materials to choose. We have already discussed what is best suited for what.
To ensure that the gate material does not suffer from corrosion due to condensation accumulating between the insulation layer and the metal, swing metal gates are waterproofed. Self-adhesive isolon can cope with this function. It can be used as additional or basic thermal insulation. In this case, its thickness decides everything.
If the isolon is not thick enough, then polystyrene foam in sheets is glued to it. At the same time they use tile adhesive or polyurethane foam.
Additional methods of insulation
In addition to installing insulation, there are other options for insulating garage doors that reduce the amount of warm air escaping outside. Thanks to this action, it is possible to create comfortable conditions in the room.
- The use of ordinary curtains, but not those used in apartments, but made of dense materials that perfectly hold back the cold and do not let it immediately into the room. They are done without unnecessary hassle: first, a steel thread or thin rope is pulled. You can attach a canvas to it using rings that are well attached to a dense material (for example, to a tarpaulin). This method insulation is suitable for those who are forced to often open the gate or, due to certain circumstances, one gate leaf always remains open.
- In the first stages of building a garage or many car owners forget to take into account the fact that through a small hole a less heat than when the gate is fully or partially opened. It turns out that it is better to make a small one doorway at the gate. Then there is no need to open the entire garage to simply take tools such as, for example, hammers for hammering nails. Therefore, when ordering gates, ask them to make separate doors for you.
- The joints between the wall and the gate, too, as you already know, are subject to additional insulation. You can also install thresholds to reduce the waste of heat that will escape through the cracks. To ensure the insulation function they use vinyl material with appropriate dimensions and thickness. Vinyl tape is attached along the edges of the joints where there are gaps. To fasten the tape use nails or assembly adhesive. This is an additional barrier to heat loss.
Why is it important to insulate your garage door?
First of all, insulating your garage door is about taking care of your “iron horse.” If you can really create good conditions for your car, it will serve you well for a long time. After all, it turns out that cars can also “catch a cold” and “get sick” in an overly damp or cold room. And, like every patient, such a car needs special “treatment”, which, believe me, will cost you a lot Money. For this reason, as they say, prevention is always cheaper than cure.
In addition, many people use the garage not only as a place to park their car, but also as a warehouse for old things or even a man’s personal space. Often it is in the garage that a small workshop is organized in which sets are stored different instruments, useful in the process of creating various things or carrying out repair “work”.
Note
You can also turn a garage into a recreation room for spending leisure time with friends. Therefore, pay close attention to the insulation of this type of room. Make sure your garage feels “warm” in winter and cool in summer. To do this, you “should” try to create comfortable conditions for being inside the garage.
7313 1 0
Insulating garage doors with simple and accessible ways
Most car owners who are lucky enough to acquire a cherished home for their four-wheeled friend quickly begin to understand that without decent insulation It's just a canopy that protects the car from the rain. Plus, a garage is not only a home for a car, for our man it is a workshop, a banquet hall and a club of interests all rolled into one. Insulating the garage door is the first and perhaps the most important thing that should be done to achieve comfort. Today we will talk about how to insulate a garage door with your own hands using affordable methods.
If we turn to the regulatory documents, in this case it is SNiP 21.02-99, in order for the car body not to rust and the engine to start without warming up, it is enough constant temperature 5ºС. Therefore, insulating garage doors does not require excessive effort and fancy materials.
What kind of gates are there?
It is no secret that it is better to take into account any nuances at the stage of building the premises. But most owners, when building or choosing a garage, are primarily interested in the reliability of the locks, leaving insulation for later. This is not entirely true.
For security, there are alarms and other similar systems. And, in the end, everyone knows that if they want to steal, they will steal. But having become acquainted with modern designs With a gate, you can solve the insulation problem before it even arises. Moreover, as a rule, there is no need to radically increase the budget.
Lift-and-swivel models
In our country, this design appeared in the nineties and immediately gained popularity. The entrance opening here is closed by one solid leaf, which, using a mechanical drive, rises up and gently slides into a horizontal plane parallel to the ceiling, that is, changes its position by 90º.

This model is produced both industrially and by many home craftsmen. Factory insulated overhead gates are a one-piece sandwich panel made of sheet steel and filled with polyurethane foam. The thickness of such a sash usually fluctuates around 45 mm, which is quite sufficient even for the harsh conditions of the north.
Every motorist knows how important it is to maintain optimal temperature regime in the garage. The condition of the car body and its technical systems. In addition, during the cold period it will be much more comfortable to use for your needs. Thus, the car will not need to warm up the engine for a long time every day before the upcoming trip. This saves you time and fuel costs.
Many car enthusiasts do not know where to start and, therefore, do not take into account many details. For example, the most common mistake is to heat an uninsulated or poorly insulated garage. In such a situation you lose a large number of resources without receiving the proper amount of heat. In order to prevent such a situation from arising, first of all it is necessary, and only then, to plan the heating system.
First of all, you need to insulate your garage door. We will answer the most current issues about thermal insulation:
Vehicle owners do not always approach vehicle storage issues with due attention. Many people believe that if you have a garage, then you don’t need to worry about anything anymore, because in any case it is warmer in winter than outside. So why insulate?
The fact is that the temperature during the day and at night quite often differs significantly. Such temperature changes, which are familiar to us, can cause condensation to form in the garage. Periodic increases in humidity have an adverse effect not only on vehicle, but also on the condition of the room itself (mold appears, deteriorates, etc.). In such conditions, the car body quickly begins to rust, the operation of electronic systems is disrupted, and this, in turn, becomes unsafe for the driver. At temperatures below freezing, condensation freezes and expands, causing damage. This causes damage to absolutely everything where moisture reaches.
It is also worth paying attention to the fact that garage doors need insulation more than walls. There are several reasons for this:
- Metal is known to have high thermal conductivity. This means that the cold from outside will penetrate inside thanks to the iron gates.
- If the metal is not thick enough, then it will cool much faster, thereby cooling the room.
- When installing gates, gaps often remain; because of them, air from the street enters the garage, which contributes to the formation of condensation and temperature changes inside.
Thus, it becomes completely obvious that garage doors absolutely require insulation, and the room itself needs seasonal heating. This will extend the life of your car and help keep your garage area dry.
Materials for insulating garage doors
Insulating garage doors is not particularly difficult, so it is not necessary to resort to specialized help. The main question that should be resolved before starting work: what material to choose for insulation? In any construction supermarket you will find a huge range of materials for thermal insulation. If you have never had to deal with insulation issues before, then it will be extremely difficult to choose something specific. Therefore, we tried to consider the most popular materials that are used for thermal insulation.
Foam insulation
Foam insulation is one of the most economical options. Polystyrene foam is inexpensive, yet has a lot of positive qualities. Firstly, it is very easy to install. It weighs little and is attached to surfaces using plastic dowels or polyurethane foam. Secondly, the material is resistant to impacts and does not require additional coatings. On modern production A fire retardant is added to the material, a substance that prevents combustion and has self-extinguishing properties. The main disadvantage of polystyrene foam is its fragility, so during installation you should be especially careful.

Mineral wool
Mineral wool is an insulation material with a fibrous structure that is made from recycled basalt rocks or industrial metallurgical waste. The material consists of thin threads woven together and rolled into a roll or layer. Mineral wool has low thermal conductivity, which provides good thermal insulation insulated room. Installing such insulation is also not difficult. The disadvantage of the insulating material is its high hygroscopicity - it collects and holds moisture. Therefore, it needs additional waterproofing.

Polyurethane foam
Polyurethane foam is rightfully considered the highest quality and most practical insulation material. Even despite its rather high price. The following advantages of polyurethane foam insulation can be highlighted:
- easy to install and light weight, and does not leave joints or seams during installation;
- can be applied to any surface without prior preparation;
- low thermal conductivity and high fire resistance;
- long service life;
- possibility of any external finishing after installation.
Polyurethane foam is installed using a spray gun, which provides maximum insulation. The only disadvantage we can note is the high cost, but it is quite justified.

Tools and materials
Although polyurethane foam has a lot of advantages, due to its high cost and installation features, it is not used so often. Therefore, we will consider an example of foam insulation. This material is most often used for thermal insulation of houses, garages and other premises.
In order to correctly calculate the required materials, it is enough to know the exact dimensions of the gate and the parameters of the materials used. However, in practice it should always be taken into account that in the process of work problems may arise. different nuances. Therefore, it is always better to buy consumables with a small reserve.
Necessary materials:
- insulation;
- material for sheathing (wooden beams);
- internal cladding (plywood, plastic, lining, chipboard - your choice);
- polyurethane foam;
- self-tapping screws;
- primer for metal;
- waterproofing for foam plastic (isolon, vapor barrier membrane);
- antiseptic for wood processing.
The necessary set of tools, as a rule, is not a problem for the car owner. But if something is missing, then it is better to get it in advance.
Equipment required for installation:
- electric drill;
- screwdriver or set of screwdrivers;
- electric jigsaw or hacksaw;
- sandpaper;
- drills designed for wood and metal;
- clamps;
- iron brush;
- roulette;
- hammer.
Insulating gates: step-by-step instructions
Before you start, make sure you have everything necessary materials and equipment. Also, think about safety and personal protection measures.
1. Surface preparation.
First of all, you should process everything wooden elements special antiseptic. This will protect the wooden beam from moisture and mold. Apply with a brush in several layers. The inner surface of the gate also needs to be prepared: remove traces of rust (if any), treat sandpaper to improve adhesion and prime thoroughly. It is recommended to apply the anti-corrosion primer in two layers: along and across.
2. Waterproofing
Foam insulation is not the most hygroscopic material, but still requires additional protection from moisture. For this purpose, the door leaf is carefully insulated. The material is not of fundamental importance, the main thing is that it fulfills its function.
3. Installation of sheathing
This stage is very important, because installing the sheathing is not the most simple task. It is important to carry out everything according to plan. Wooden beam needs to be cut into pieces the right size. Holes are made in the gate for fastening the timber, after which the sheathing is installed.

4. Laying insulation
Pre-cut foam insulation is placed in the voids between the sheathing beams. It should fit as tightly as possible to the sheathing. The foam is attached using polyurethane foam or liquid nails.
After laying the insulation, be sure to fill all cracks and voids with foam. You can move on to the next stage only after it has completely dried.
5. Sheathing
The first step is to cut out the material for the sheathing. It is important to try to maintain maximum integrity of the coating. The joints of the slabs should be located on the beams. Cutting must be done carefully and accurately so that there are no gaps between the sheets. The sheathing is attached to the sheathing using screws. This is the simplest and most reliable way.
If desired, the sheathing can be treated for a more aesthetic appearance, for example, painted or primed with stain.
Do-it-yourself garage door insulation is complete. This thermal insulation is durable and does not require additional care. Now, your car is not so afraid of frosts and temperature changes. Warm air will not escape through the cracks and metal gates will not cool the room. Thanks to insulation, maintaining optimal temperature conditions will become much easier.
A garage is a specific room that simultaneously performs many different functions. Regular car storage is the main one, but not the most important one. The garage is a workshop, a storage place for winter supplies, a warehouse for necessary but rarely used things. For many, the garage serves as a kind of club, a residence for real men, where meetings with friends and like-minded people take place. They require creation comfortable conditions, especially in winter. Heating a garage is a certain difficulty, since the mode is not constant, and the walls have minimum thickness. But the main problem area is the gate, without insulation of which it is impossible to ensure a normal microclimate.
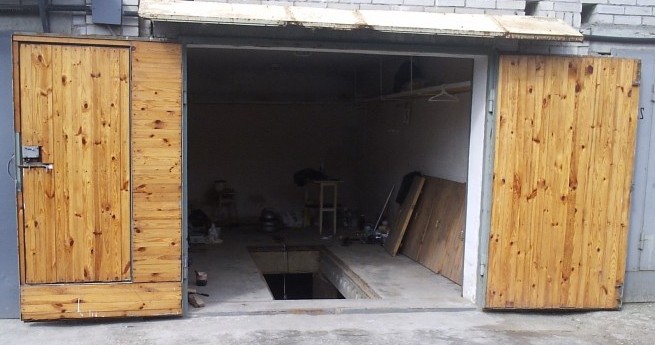
This is the disappointing picture that a garage owner may face in winter if he does not insulate the gate
Garage doors are made of metal. From the point of view of heat conservation, this material is completely useless. During the cold season, drops of water or frost are constantly present on the surface of metal doors. In the summer, under the scorching rays of the sun, the gates heat up, making staying in the garage unbearable.
If we take into account the area of the gate, which is practically one of the walls, the magnitude of the problem becomes clear and requires an immediate solution. If you do not pay attention to the inconvenience, the result will be rust. The process will progress quickly, and one day the hinges will collapse, the lock will fail, or the door leaf will become leaky, which is completely unacceptable.
The solution to the problem is insulation - installation on all open metal surfaces a layer of heat insulator that cuts off contact of metal with moist internal air. The procedure is not too complicated, but it requires an understanding of the meaning of all actions.
Human breathing saturates the air with water vapor. After some time spent inside the garage, the air receives a fairly large amount of moisture. Even when there are no people in the garage, the humidity is increased due to the secretions of vegetables stored in the cellar, which is typical for the vast majority of garages. This moisture can be removed using a high-quality ventilation system, but then the temperature inside will become equal to the outside, which is undesirable for storing a car. Therefore the only rational decision The problem is the insulation of the gates.
The most common insulation options

There are plenty of garage door insulation options on the market.
The insulation process involves tightly installing a heat insulator on the surface of the sashes. The insulation layer cuts off the contact of warmer internal air with the cold surface of the metal gate, thereby eliminating the possibility of condensation. In the hot season, the insulation works in reverse side, preventing the heated metal plane from giving off thermal energy internal air and providing comfortable temperature inside the garage. The availability of options is due to the difference in the properties of insulating materials.
Exist different types insulation:
- Slab. Rigid and fairly durable materials that have convenient form with clearly defined dimensions. The main types are polystyrene foam and extruded polyurethane foam (penoplex). Convenient for installation, well processed, and have excellent performance.
- Rolled. They are distinguished by a soft texture, which allows the material to be installed on curved surfaces. They have a lot of varieties that have different properties and demanding own technology installation Exist suitable options for almost any conditions and surfaces.
- Sprayable. The most famous representatives of this group of materials are liquid polyurethane foam and ecowool. They differ from each other in all respects, the only unifying factor is the method of application. The main advantage of sprayed insulators is the ability to install them on any surface with a large number of small elements, uneven or curved. Application requires the use of special equipment, which complicates and limits use.
A confident leader among all types of insulators is polystyrene foam.. The reason for this popularity is its low price - it is much cheaper than any alternative option. Mineral wool and liquid polyurethane foam, which have good heat-saving qualities and a lot of their own advantages, are also common.
The insulation method is generally the same and consists of the following steps:
- Preparation of the gate surface;
- Installation of sheathing;
- Installation of insulation;
- Installation of sheathing;
- Decorative finishing.
This sequence is maintained in any case, the differences are only in the “installation of heat insulator” item. They are determined by the specifics of the material and are known in advance. The user's task is to choose the most suitable option for himself. Let us consider the main stages of work in more detail.
Surface preparation and lathing creation
The first step is to prepare the surfaces for installation of materials. To do this you need:
- Free the sashes from all foreign objects - brackets, hangers, and other elements that are often installed on the sashes. Only the upper and lower latches of the fixed sash and the lock are not removed, which in any case are attached directly to the metal and cannot be moved;
- The surface of the gate is cleaned of old paint, peeling or crumbling areas. It is most convenient to use a drill with attachments - wire brush or an emery wheel;
- Detected cracks or deep corrosive potholes are repaired by welding. IN difficult cases patches are welded in, after which the seams are carefully cleaned flush with the main surface;
- The prepared surface is covered protective layer bitumen mastic using a brush. The coating is applied in 2 layers in the transverse direction.
After the protective layer has dried, they proceed to installing the sheathing. It is a system of wooden bars installed around the perimeter of each door with several lintels inside.

Installation of sheathing - important stage in the process of insulating garage doors
The sheathing serves as a support system for installing the sheathing, which protects the heat insulator and gives the sashes a neat appearance. After finishing Gates from the inside can look much more impressive than from the outside.
To install the sheathing, a reinforcing corner is used, welded along the perimeter of the sashes, in which holes are drilled for self-tapping screws. In some cases, you have to make holes directly in the sashes, which is acceptable, but undesirable.
- The bars under the sheathing must have a thickness no less than the selected heat insulator. This is important because after installing the material, the sheathing will need to be attached to the bars. The internal cavity formed by the sheathing and sheathing must be sealed and not allow air to pass through, so the sheathing must be equal to or even slightly thicker than the insulator.
- When installing the sheathing, it is necessary to leave the upper and lower latches with a lock and bolt free. These elements are subsequently provided with their own protective covers that cut off contact with warm air.
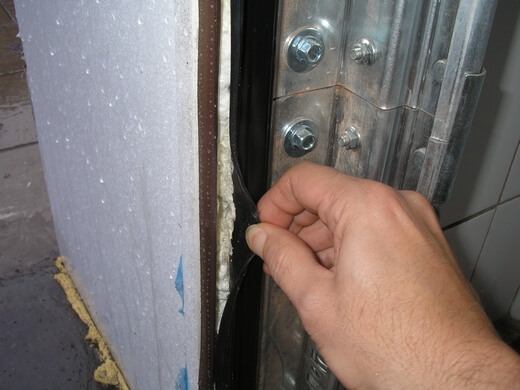
- The sides of the bars adjacent to the sashes must be covered with a strip of polyurethane foam before direct fastening. This will ensure the tightness of the sheathing and prevent the formation of cold bridges. All joints between the bars are also insulated with polyurethane foam.
- The finished sheathing should completely cover the perimeter of each sash. Inside, the lintels are installed based on the area of the sash and the degree of rigidity of the cladding. Sometimes one jumper is enough, but usually several bars are used. It must be taken into account that installing strips too frequently reduces the effectiveness of insulation and makes work more difficult.
After installing the sheathing, installation of the heat insulator begins.
Insulation options
The method of installing insulation is determined by its type and physical characteristics. Let's look at the installation technique for the most common types of material.

Polystyrene foam is cheap and flexible, but you need to work with it carefully so as not to break it
Polystyrene foam is the most popular insulator. It is cheap, has a smooth surface and uniform thickness. It is well processed, allows you to cut a piece of any shape and insert it into the slot of the sheathing quite tightly. The material is practically neutral to moisture, having a slight ability of capillary absorption into the smallest spaces between granules. The disadvantage of polystyrene foam is its fragility; sometimes it crumbles, which forces cracks and gaps to be filled with additional pieces or other material.
The optimal way to install the material is to cut it into pieces that correspond in shape to the slots of the sheathing, apply polyurethane foam to the back side and gluing it to the surface of the sashes.
Instead of polyurethane foam, you can use any suitable adhesive, but foam is needed in any case, so it’s easier to use it. To fix the panels, it is recommended to temporarily strengthen the pieces using thin wire stretched between nails driven into the sheathing strips. After installing all the fragments and hardening of the mounting foam, the wire and nails are removed, all joints and gaps are carefully filled with mounting foam, the excess of which is subsequently cut off with a sharp knife.

Gate insulation with polyurethane foam can only be done using special equipment
The material is sold in liquid form and requires the use of special equipment for application.
This circumstance significantly complicates the work and limits the use of the material. In addition, liquid polyurethane foam is quite expensive, which also serves as a deterrent. At the same time, the material allows you to create an absolutely water-tight sealing layer of insulation. Surface imperfections, the presence of small elements or complex surface configurations are not an obstacle.
The insulator is applied to the surface, foams in air and forms a layer of a certain thickness. If necessary, the procedure can be repeated to obtain a thicker layer. After setting, you can begin installing the sheathing.

If your choice falls on mineral wool, be sure to install a layer of waterproofing on top of the material
Mineral wool is one of the most common materials. It has a successful set of performance qualities, does not burn, does not rot, does not burden supporting structures, and is much cheaper liquid polyurethane foam. The only drawback of the material is its hygroscopicity. In some cases, this property is useful, as it allows the insulated surface to dry, but in the case of indoor installation, this is a serious drawback. If moisture from the air begins to penetrate the material, it will completely lose its working qualities. Therefore, the installation of mineral wool is carried out with the obligatory installation of a layer of waterproofing on top of it (ordinary polyethylene film will do).
Pieces of insulator are cut to the shape of the sheathing nests and tightly inserted into them.
The resulting joints and cracks are filled with polyurethane foam. The vapor barrier is attached to the sheathing strips using a stapler. The film is installed in horizontal layers from below. The rows overlap 10-15 cm. The joints are taped to ensure tightness.
Final cladding
After installation of the insulation is completed, the sheathing is installed. Are used sheet materials- Chipboard, plywood, OSB, etc.

The final stage is the final cladding of the gate
As an option, lining or wall panels are suitable.

Lining is a reliable and popular option
Some owners finish the gates with vinyl leatherette with quilting, which looks solid, although somewhat unnecessary.

Vinyl leather will give the gate a richer look
The sheathing is attached to the sheathing strips. It is recommended to first apply a strip of polyurethane foam around the perimeter to ensure the tightness of the entire system. After installation, the material is painted and covered with various coatings. There are many finishing options, but most owners do not see the point in decorating a garage door too pompously. Functionality is considered the main task; additional procedures are not important for everyone.
Video: insulating garage doors
How to extend the service life of insulated gates
The service life of insulated gates depends on careful operation. Any violation of the tightness leads to the formation of cold bridges with the appearance of condensation, the onset of corrosion and other destructive processes. Therefore, it is necessary to monitor the surface of the skin and try not to create conditions for dents or holes in the skin. They may appear when performing any work, carelessly entering or leaving the garage and other circumstances. Attention and accuracy are the two main ways to maximize service life.
Insulating garage doors is a necessary procedure to ensure the integrity of the door, normal work constipations and locks, no drizzle on the metal. This event should not be postponed, since it will still have to be done. Wait for the lock to fail or be destroyed metal parts unreasonable, it is better to eliminate the possibility of problems occurring than to deal with their consequences.
Often, car owners’ concern for their four-wheeled pet is expressed even more strongly than for themselves. And the construction of a well-equipped and high-quality insulated garage is one of the manifestations of such careful care. The issue of insulating the garage from the inside comes first here. And since the main source of leakage of such precious heat is the garage door leaf, the need arises to decide how to properly insulate garage doors.
It doesn’t matter what the garage space is used for: parking a car, storing things, a workshop, or anything else. The important thing is that it always remains warm. In this publication, we will tell you exactly how to keep the garage warm by insulating its doors. And let's start, perhaps, with a description of the main mistakes that many car enthusiasts make when they acquire a garage and equip it.
- Ventilation. Availability of good ventilation system necessary in any room, and the garage is no exception. Alas, not everyone realizes this. Many people think like this: ventilation holes are an extra source of heat leaving the garage. In essence, this is true. However, their presence is necessary to avoid excess dampness in this room.
- Metal gate design. Many owners of a car home (which, in essence, is a garage), when setting up a garage, install gate leaves of a solid structure, without a gate. Meanwhile, the gate will allow you to achieve less heat loss during the cold season. Whether it’s the case, when we want to get into the garage in winter, we open a small gate for a few seconds, or we have to open a large gate to do this. The difference, as you can see, is obvious. True, these doors will also have to be insulated. Their insulation is carried out similarly to the insulation of the door leaf.
- Insulation. When deciding how to insulate a garage door, many owners, in an effort to save on insulation, use porous insulation. An example of such an insulating material is mineral wool. The reason why such materials should not be used is the following: most often garage doors are iron frame with the same canvas. Moreover, the thickness of the latter does not exceed a few millimeters. Because of this, during the cold season, condensation may form on the inner surface of the canvas due to temperature differences. Porous insulation absorbs this condensate quite well, as a result of which they lose their main qualities.

Materials
Now let's look at the question of how to insulate garage doors to ensure maximum thermal insulation. Actually, 4 materials are most often used for these purposes:
- Mineral wool;
- Extruded foam;
- Polyurethane foam;
- Styrofoam.
Each of these 4 materials has its own advantages and disadvantages. As for mineral wool, as we already wrote above, it is not particularly suitable for insulating garage doors. Polyurethane foam is quite expensive, and not everyone wants to spend a lot of money on a garage. Extruded foam, although it costs less than polyurethane foam, is still not affordable for everyone.
Based on this, we will consider insulating garage doors using polystyrene foam. Although he is quite afraid of fire, taking into account the ratio of the area of the garage door to the area of the rest of the surface of the garage, insulating the garage door with polystyrene foam is quite acceptable.
Preparing for insulation
To insulate a garage door with polystyrene foam, you must complete the following steps:
Before you insulate your garage door, its inside surface must be cleaned. This is done using an iron brush. Particularly large and deep areas of metal corrosion on garage doors can be cleaned using a brush attachment on a drill. After which you need to seal and, if necessary, weld all the cracks and holes on the surface of the gate.

To prevent further formation of corrosion foci, it is necessary to treat the cleaned surface of the gate with some kind of anti-corrosion agent or antiseptic. For these purposes it is quite suitable means is heated drying oil, or even better bitumen mastic. It is applied with a regular wide paint brush in two layers, perpendicular to one another.

After the anti-corrosion coating has dried, it is necessary to create a paving sheathing. It will become the basis for laying and securing insulation from foam boards. This lathing is made from bars with a cross section of 40x40 or 50x50 millimeters. The cross-section of the sheathing bars depends on the width of the end corners of the gate.

It is desirable that the bars are solid. The dimensions of the sheathing cells should be selected in such a way that they correspond as much as possible. The sheathing must be attached to the end corners of the gate. To do this, holes of 4 mm diameter are pre-drilled in the latter. The pitch between such holes should not exceed 200-250 millimeters. Next, the sheathing bars are fastened through the drilled holes with self-tapping screws.
If the design of the garage door is such that it does not imply the possibility of removing the gate from the hinges, a slight problem may arise with attaching the sheathing bar to the lower end corner due to the inability to reach there with a screwdriver or even an ordinary screwdriver. In this case, the block must be secured exclusively at the end. By the way, it is also better to treat the bars with some kind of antiseptic before fixing them. If the gate or wicket has locks, bolts or a ventilation hole, the sheathing must bypass these elements.
When the inner surface of the gate is cleaned, treated with anti-corrosion and antiseptics, and the sheathing is securely fastened, you can begin insulating the garage door with your own hands using polystyrene foam. What does it mean to insulate a garage door with foam? This means covering as much of the gate's surface area as possible with foam. If the dimensions of the sheathing cells do not correspond to the dimensions of the foam plastic slabs, then these same slabs must be adjusted to the size of the cells, using a penknife or an ordinary, but thoroughly sharpened knife along a ruler.

The slabs are cut into pieces based on the width of the cell plus 2-3 millimeters. The same goes for heights. This is done so that the foam boards fit into the cells of the sheathing as tightly as possible.
This installation system will help solve two problems:
- The foam insulation will be securely clamped between the sheathing bars, which will eliminate the possibility of it sagging and falling out. In this case, no additional seal for the garage door will be needed.
- Thanks to such a dense laying of the foam, the insulating effect increases significantly. In this case, no additional sealing is required either.
For additional fixation of foam boards, you can use polyurethane foam as glue. However, insulating gates with polyurethane foam is a very risky business. Why is that? Let us explain: when drying, polyurethane foam tends to expand, creating pressure on foam board and pushing it out of the sheathing cell. Therefore, for more convenient and comfortable fixation, we recommend using specially designed for such purposes.
As for polyurethane foam, you also cannot do without it. This product is ideal for sealing gaps between the sheathing and the insulation, if any. This is where its expansion properties come in handy. In this case, the foam, expanding, not only presses the insulation against the sheathing frame, but this also achieves better sealing of the insulated surface, for example, swing gates. After drying, excess foam must be trimmed flush (level) with the sheathing frame.
As an additional insulation measure, you can install a seal for the garage door. This, in fact, rubber or silicone gasket is attached to the ends between the gate leaves. This ensures a tighter fit of the ends of the garage doors to each other, which prevents the penetration of cold air masses into the garage. Such seals are attached using a perforated metal strip and self-tapping screws.
The final stage of insulating garage doors with your own hands is their surface cladding.

To cover the gate, you can use OSB sheets, plastic or wooden lining or profiled sheet. Each of the data facing materials have both their plus and minus. Let's take a brief look at them, and at the same time decide what is better to sheathe garage doors.
- Wooden lining. Is one of the most beautiful and practical solutions for facing the door leaf. However, they require pre-treatment with some kind of fire retardant and antiseptic.
- Oriented Strand Board (OSB). Beautiful looking, durable and rot-resistant material. Can be painted or glued.
- Plastic lining. Easy to install and looks attractive. But the strength of this cladding material leaves much to be desired.
- Profile iron sheet. Durable, practical and durable material. However, as experienced garage owners assure, it is better not to cover the door leaf with a profile sheet. The reason for this is a fairly high probability of condensation forming on the side where the insulation is located.
As you can see, of the above facing materials, OSB is the most optimal. Therefore, if you are deciding how and how to insulate garage doors from the inside with your own hands and what to cover them with, oriented strand boards are the optimal material for this.
The optimal board for cladding gates is OSB.
In conclusion of all of the above, we would like to once again point out the importance of the fact that you need to approach the question of how to insulate a garage door with your own hands with full responsibility. A high-quality and reliably insulated garage door with your own hands is a guarantee of a constant acceptable temperature, and therefore the longevity of your mobile vehicle.