How to install a heating radiator independently in the house. Installing a heating radiator do it yourself
The question of replacing radiators of heating sooner or later rises before many owners of apartments and private houses. In apartments, old cast-iron batteries, which have remained since the construction of the building, most often change. In autonomous systems, leaks or other reasons for installing a new heating appliance periodically appear. In this article we will tell how to make installation of the radiator with your own hands in accordance with the regulations of the SNIP, without resorting to the help of third-party specialists.
Preparation for work
In order to remove the old and install a new radiator, it is necessary to turn off the flow of coolant. If at each heating point you have valves and fittings installed, then it is enough just to close the corresponding valves. If the layout of your system involves connecting radiators directly to the highway, then you will need to block the entire riser completely.
For an autonomous heating system in a private house, you can independently determine the most convenient time for this operation, here all the inconveniences due to idle heating will fall on you.
If you live in a city high-rise building, many of your housemates will remain without heat during work. Therefore, before you install, you need to:
- calculate the duration of work as accurately as possible;
- pre-purchase all the necessary equipment and components;
- prepare a complete set of tools;
- agree with the service company or the ECD to turn off the heating for a specific period of time. Keep in mind that this is usually a paid service, it is better to clarify in advance how much it costs in your case;
- at the specified time, make sure that the riser is really blocked, that is, you can begin installation.
This brief instruction will be relevant if you replace the batteries during the heating period, since your actions will bring some inconvenience to others. In the summer, most often there is no coolant in the system; you just need to make sure of this by asking the plumber serving your home. Therefore, the installation with your own hands is better to plan for the warm season, unless of course the installation is not forced due to an unexpected breakdown.
What else you need for editing, see the video:
Marking the installation site of the radiator
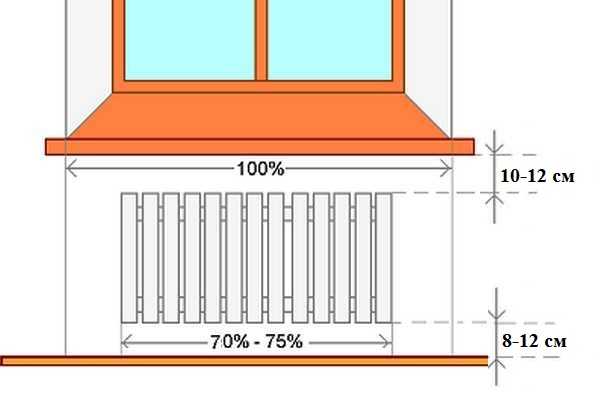
Suppose that all difficulties with shutdowns of risers are overcome, and the old battery has been successfully dismantled. Now it is necessary to determine the place where the new radiator will hang. Hang it "about the same" as the old can not be - in the SNIP clearly defines the rules that must comply with the installation of radiators:
- distance to the floor and to the window sill - not less than 10 cm;
- distance from the wall - not less than 5 cm;
- the radiator must be mounted with a slight slope so that air does not accumulate in its upper part.
If the installation does not comply with these rules, the heat transfer efficiency of the radiators will be seriously reduced.
Brackets must be set to the level, slightly raising one edge
Radiator assembly
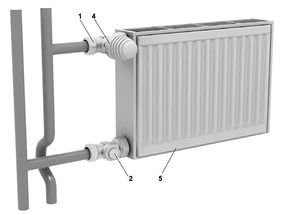
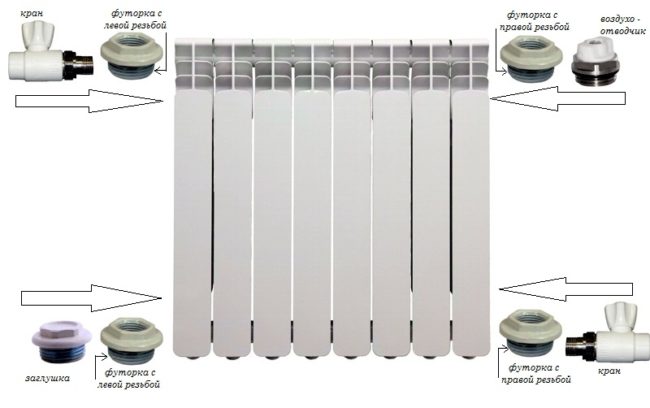
Most radiators come with four holes located at the corners of the case. Depending on the scheme used, two of them are used to connect the direct and reverse heating mains, while the rest are closed with plugs or air vent valves.
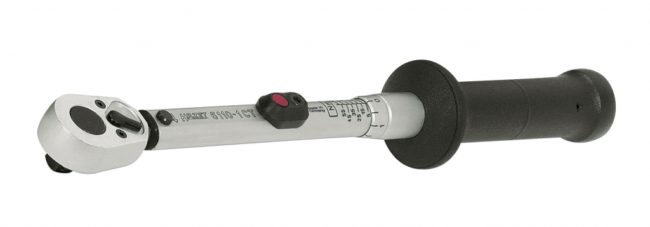
Usually, the adapters on the radiator are first screwed in, which come bundled, and the necessary communications are already connected to them. All elements mounted on the thread are first wound with the hands, and then tightened with the necessary moment. Instructions on the used fittings usually contain the amount of force sufficient to achieve tightness. Therefore, it is better to tighten the threaded connections with a torque wrench.
Installing ball valves at the radiator inlet and outlet will help to further repair and maintain their own hands without turning off the heating in other places. However, it should be borne in mind that this is not possible with all schemes for connecting radiators. In apartment buildings, the installation of batteries with valves and fittings must be coordinated with local supervisory authorities.
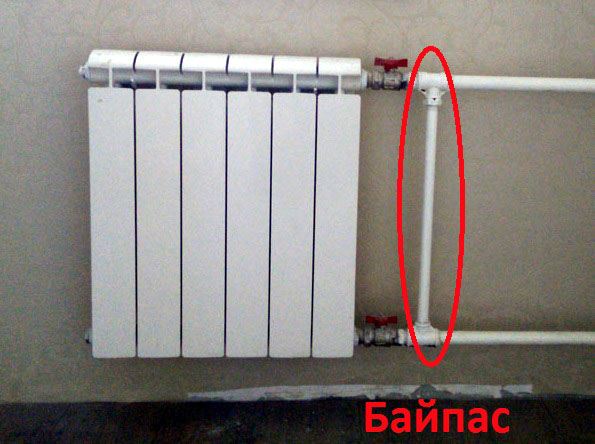
In accordance with the SNIP, the installation of any devices capable of changing the flow rate is not allowed on the locking sections in one-pipe systems. In these cases, it is necessary to organize a bypass.
For batteries which, by virtue of their design, tend to air the internal cavities, the installation of Mayevsky cranes is required. Usually they are placed on a free upper collector.
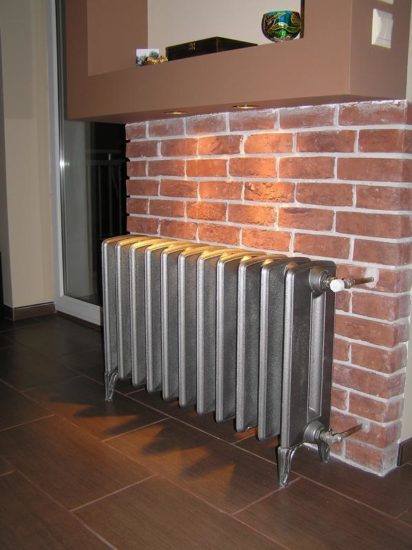
Features of the installation of cast iron batteries
If you are planning to do the installation of a cast iron battery yourself, especially domestically produced, before you start work, you must necessarily disassemble it into sections, stretch all the nipples and then assemble everything in the reverse order.
The installation of a cast-iron radiator must be made taking into account its weight and wall material:
- If the wall on which you plan to hang the radiator is made of brick or concrete, then you need to pick up the appropriate hardware, designed for the full weight of the battery filled with water. SNIP recommends using at least three wall brackets.
- It is impossible to hang heavy heating units on wooden or plasterboard walls, they can not withstand the load. Therefore, in such situations, the radiator is usually mounted on floor stands, and the wall mount is used only to support it in an upright position.
Installation of aluminum radiators
Installation of radiators with their own hands should be made taking into account the characteristics of the material from which they are made. On the example of cast iron radiators, we have seen that their main feature is weight. For aluminum products, the opposite is true: they are light and fragile. Therefore, their installation must be carried out carefully, without removing the packaging.
It is very important not to damage the surface of the battery. It can be deformed even from a small blow by hands or any tool.
Aluminum radiators are equipped with their brackets, which are installed. Here, the instruction does not contain any special requirements for surface quality - the aluminum radiator is easily fixed on any wall.
SNIP makes the use of Mayevsky cranes or any similar devices that allow air to escape from the inner surface as a prerequisite for the use of aluminum batteries. The fact is that aluminum has its own characteristics, which often lead to intensive formation of hydrogen as a result of chemical reactions occurring inside its body. If it is not released in time, the radiator may break.
Otherwise, the installation of aluminum radiator is performed according to the general procedure.
The final stage of installation
If the radiator is assembled and hung, then it remains only to connect it to the heating main. This is done in a standard way, with the use of brackets and connecting sleeves. Details of the process can be seen on our video.
All threaded connections must be sealed with appropriate materials. It is better to use sanitary flax, fum tape for such work is less reliable.
Flax needs to be wound along the thread, i.e., clockwise for the right thread and in the opposite direction for the left.
About how many turns need to do, there are different opinions. Most experts argue that for tight connection there is no need to wind all threads, four or five turns are enough. For reliability, the compound can be treated with any sealant, for example, Unilock paste.
As can be seen from our review, the installation of radiators with their own hands should not cause any particular difficulties. After all the procedures described, the battery should be painted if necessary, and then it can be put into operation.
In general, the installation of heating in the house is quite an expensive event, people involved in this professionally earn good money. If you still dare to do the layout yourself in your house and have already understood that soldering polypropylene pipes is not difficult, then this article is for you. She will tell in details about how to install a heating radiator yourself. At the same time, by and large, it is absolutely unimportant that you will install a metal or aluminum radiator. Actions are about the same.
It may seem to professionals that there are “a lot of unnecessary movements”, but for a beginner, the main thing is not haste, but thoroughness of execution.
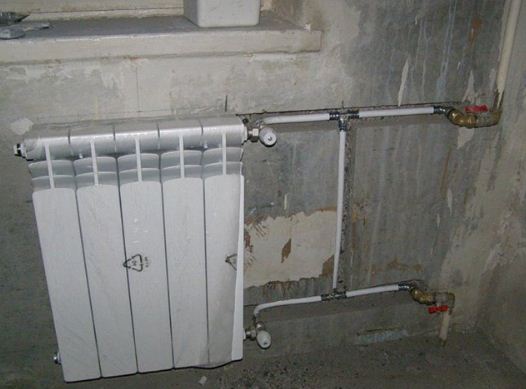
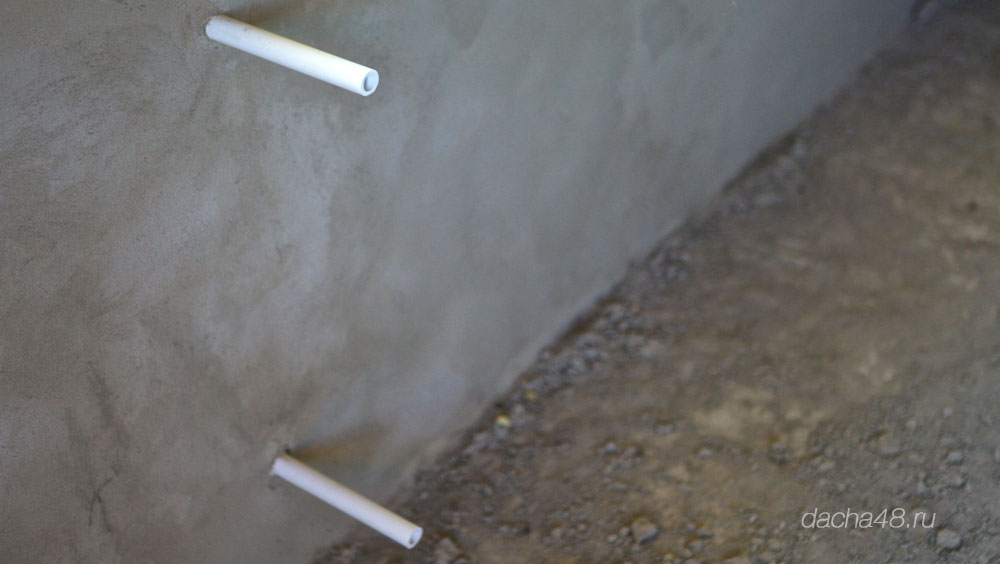
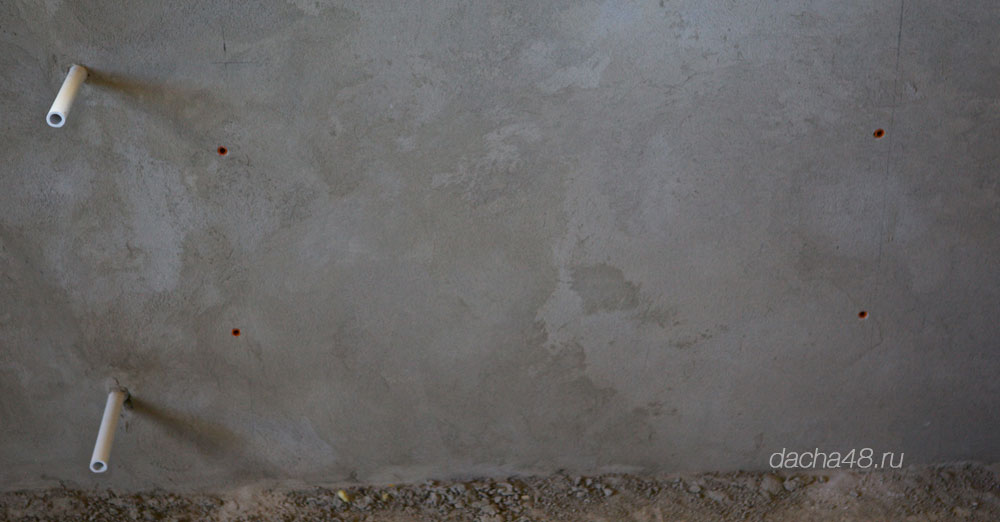
To begin with, he himself first took up the soldering iron for the first time at his facility and literally over 3 days off collected a two-pipe heating system in his house, the matter turned out to be not difficult, the spouse as an assistant was quite enough. Unfortunately, there are no photos left, and there is nothing special to photograph there, the lion's share of time is taken up by the wall breaking for pipe laying. Pipes were selected with a diameter of 25 mm, and taps for connecting 20 mm batteries through tees of corresponding diameters. After the pipes were laid, the walls were plastered and there was no access to the pipes, and the hope that the leakage would not be given by the Russian “accident”.
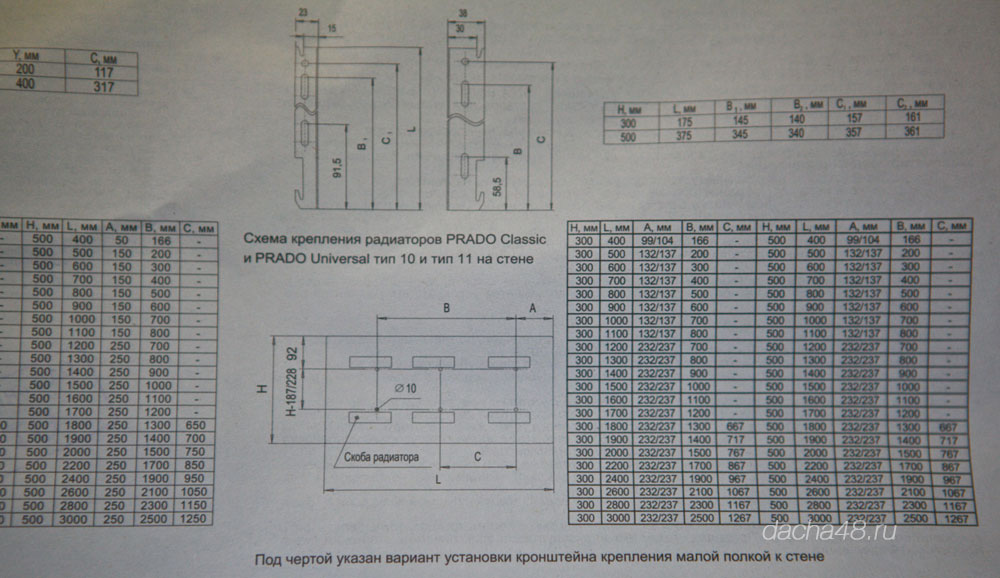
This is a piece of shtaketina with drilled holes of 20 mm, with strictly observed distances between the centers. This distance should correspond to the axial distance at the entrances and exits of the radiators. In my case, it was 45 cm. The distance on the radiators can either be measured or viewed in the documentation for the batteries.
Installation instructions for radiator
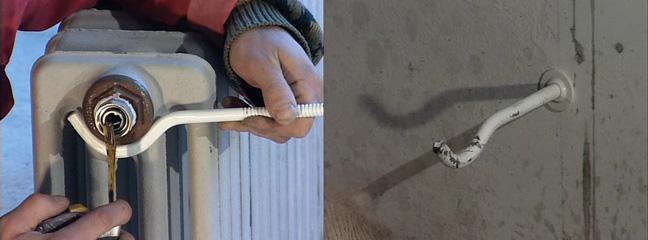
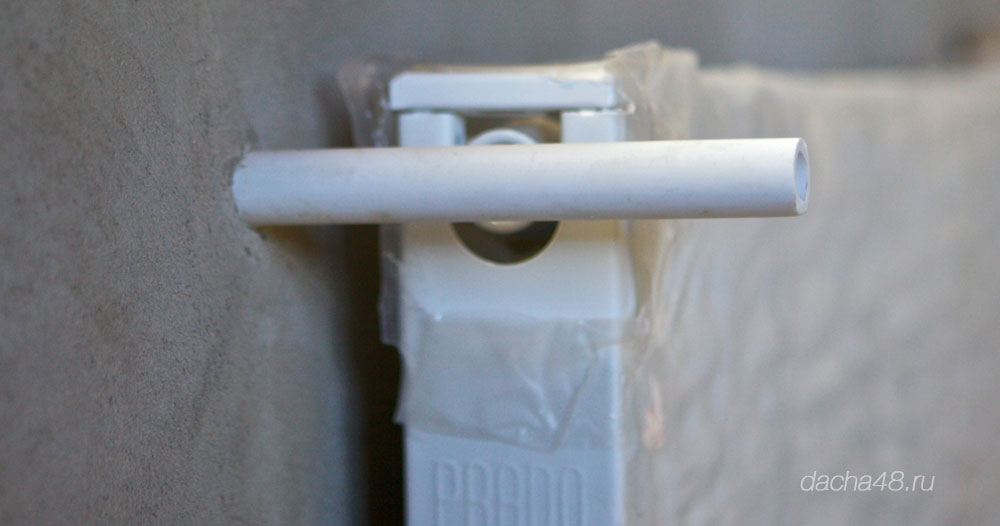
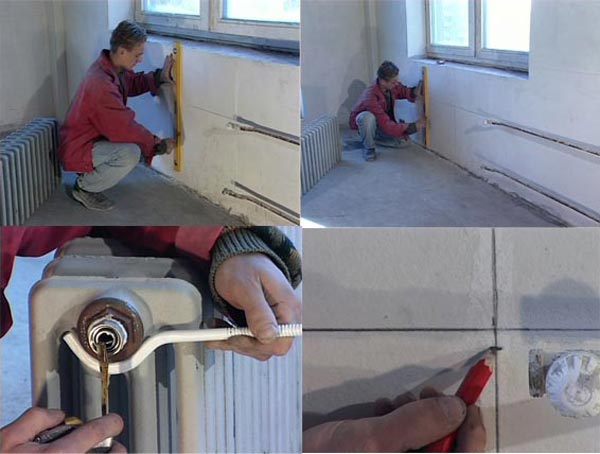
After plastering, two branches sticking out of the wall, wrapped with molar tape.
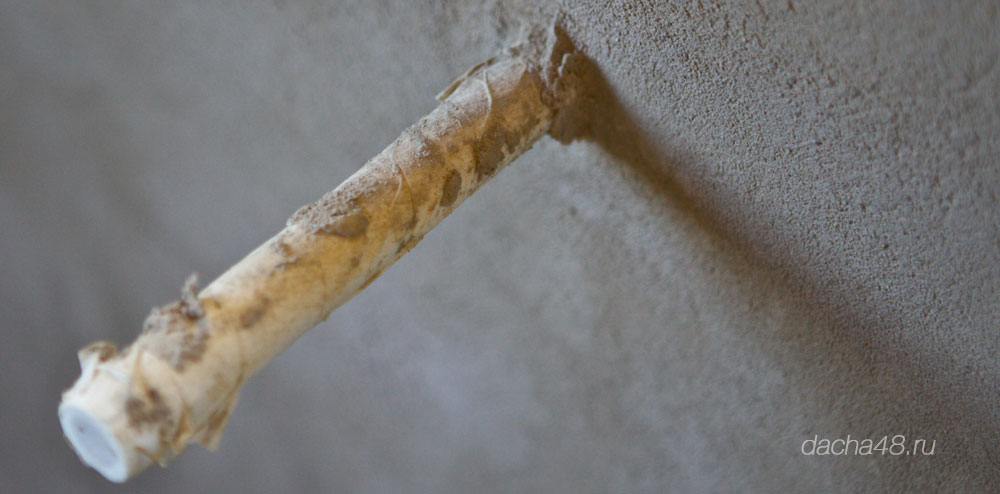
To begin with, it is necessary to remove the adhesive tape from the pipes and clean the plaster against the wall so that there are no growths.
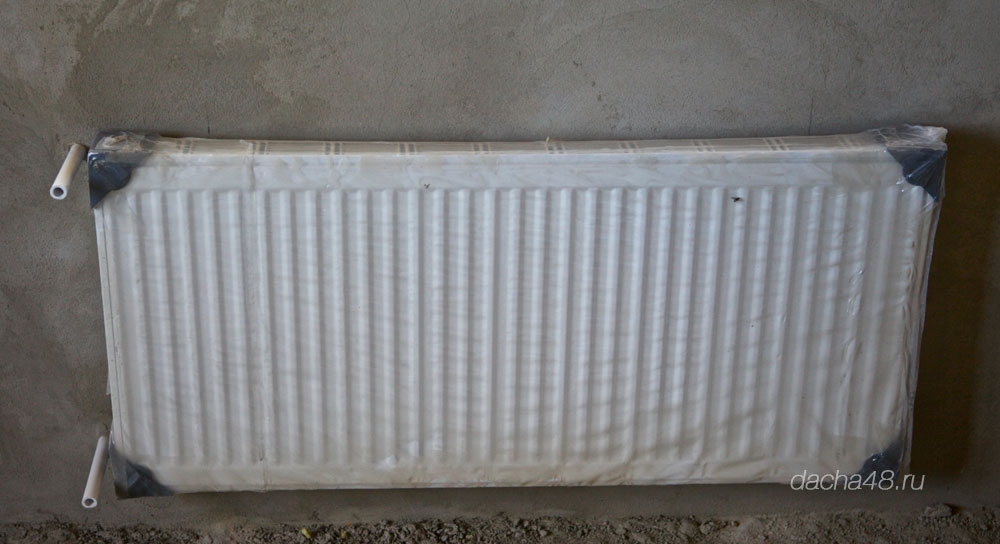
We turn to the radiator. The kit includes:
- Radiator;
- Two strips for fastening to the wall;
- Two "grouse";
- Two dowels;
- Mayevsky's crane;
- Stub.
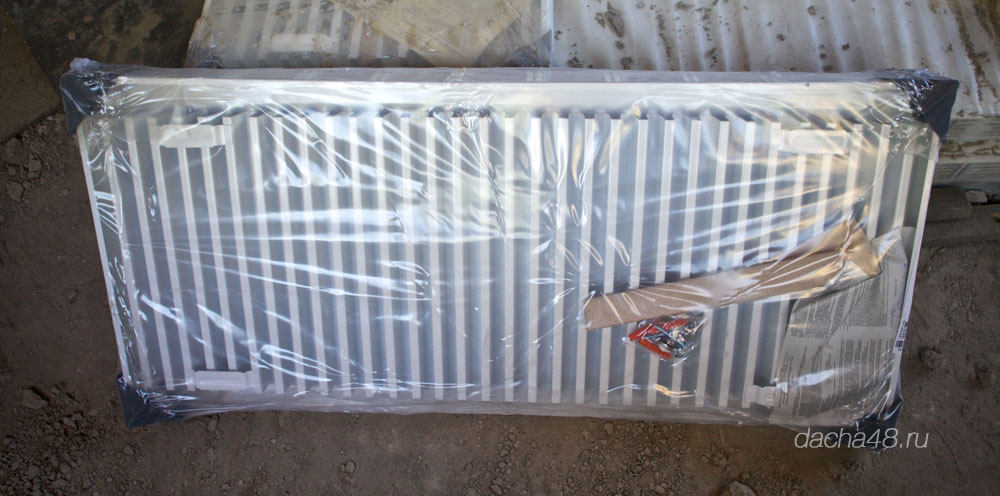
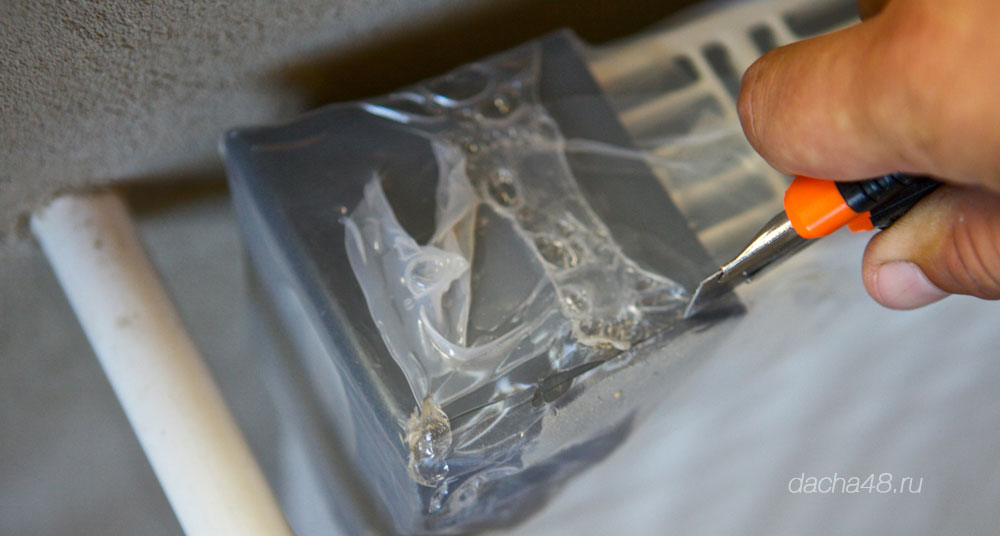
We open the film with a stationery knife, but not completely, but only to get the slats and a bag with bolts and plugs. Also release the fasteners for which the radiator is attached to the slats. They are quite large and allow you to shift the radiator 3-4 centimeters from the center. The rest of the film can be left, it will help to keep the radiator safe and sound until the end of the repair.
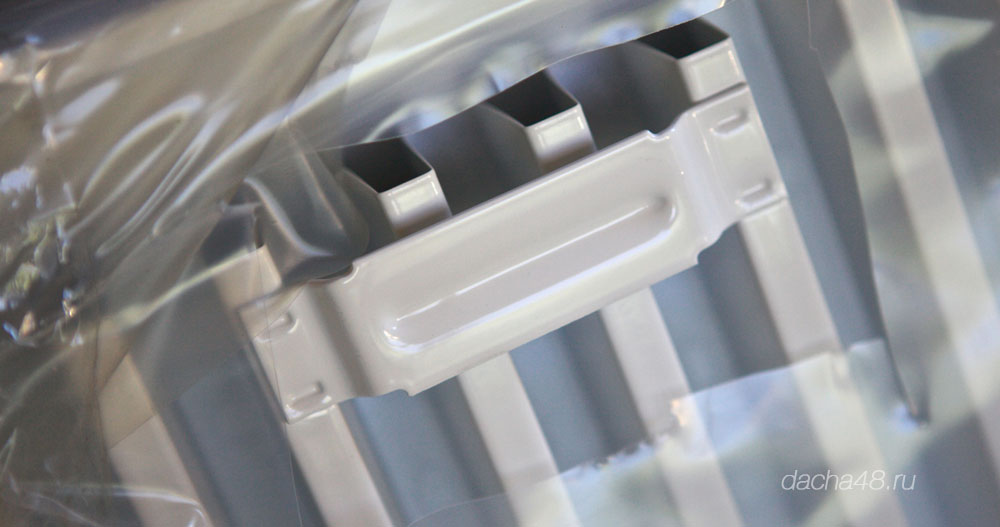
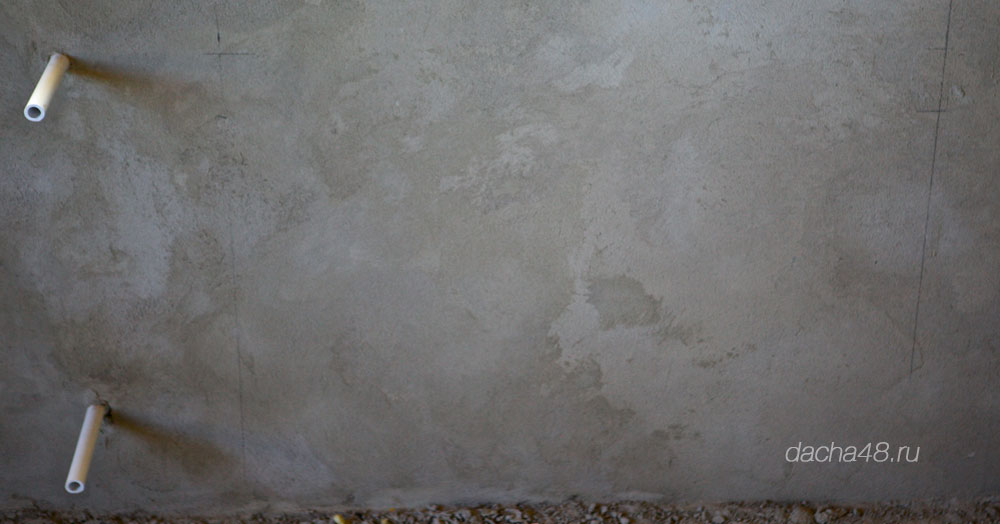
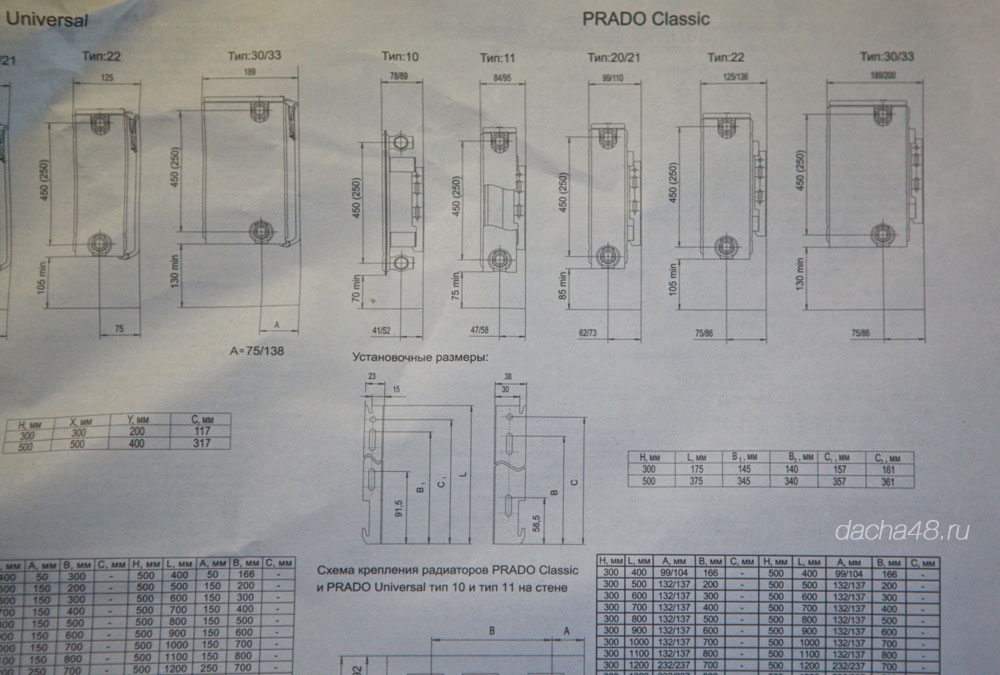
After this, it is necessary to mark the places of the holes for fastening the two bars on which the radiator is hung. We are talking about the domestic Prado radiators made by Izhevsk, but I understand that they are very similar to imported counterparts. I drew a horizontal line, putting one end of the level on the top tube, then measured the distance where the centers of the lugs at the batteries were, added about 3 cm to the taps. He retreated 6 cm down the vertical, attached the strips and marked the centers for drilling. I agree, it's messy, but it was. The main thing here is not to mark out so as to drill a freshly laid pipe under plaster. About it you should always remember. More about the wiring do not forget)))
In general, it turns out like this.
By the way, just in case, I took the documentation for radiators, it may be useful to someone.
Hammering dowels in holes
Set the strips and check the level of the horizon.

If necessary, we adjust. After that, we hang a radiator on the slats and remove the protective plastic corner. Again, the instruction is not for the pros, so I shot all the protection successively, because I didn’t shoot and hang the battery more than once.
In theory, if you have correctly marked everything out, then the holes on the radiator will be opposite the tubes sticking out of the wall. If you see a clear misalignment, then you need to remove the radiator and move the fastening strips up or down, the design of the slat allows you to do this. Do not forget to check the level horizon again.
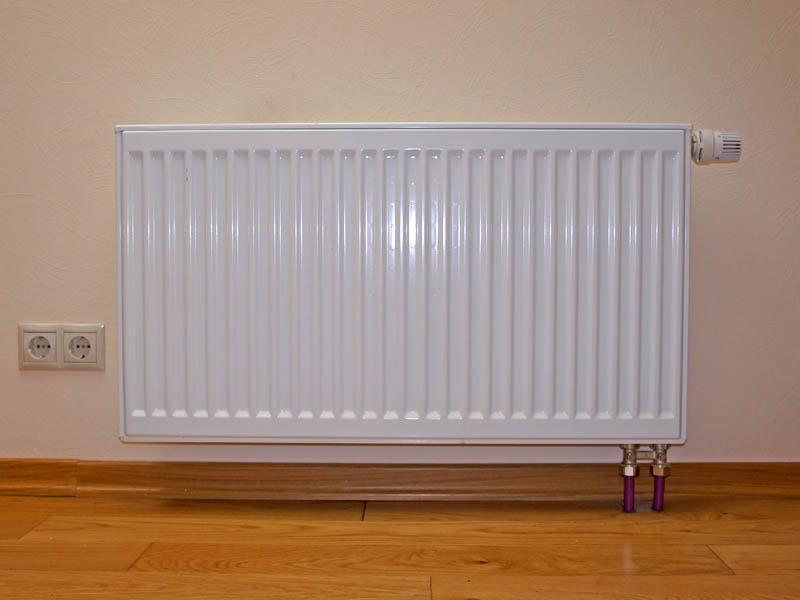
As soon as everything works out, it will look something like this.
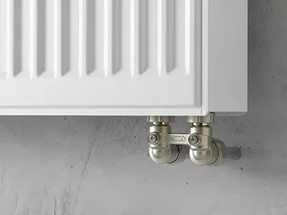
In order to properly connect the heating radiator to the system, a kit is needed for the installation of heating radiators. It consists of two special straight or angle cranes. Using the installation kit, you can completely shut off the flow of coolant to the radiator, this allows you to disconnect it while the system is running.
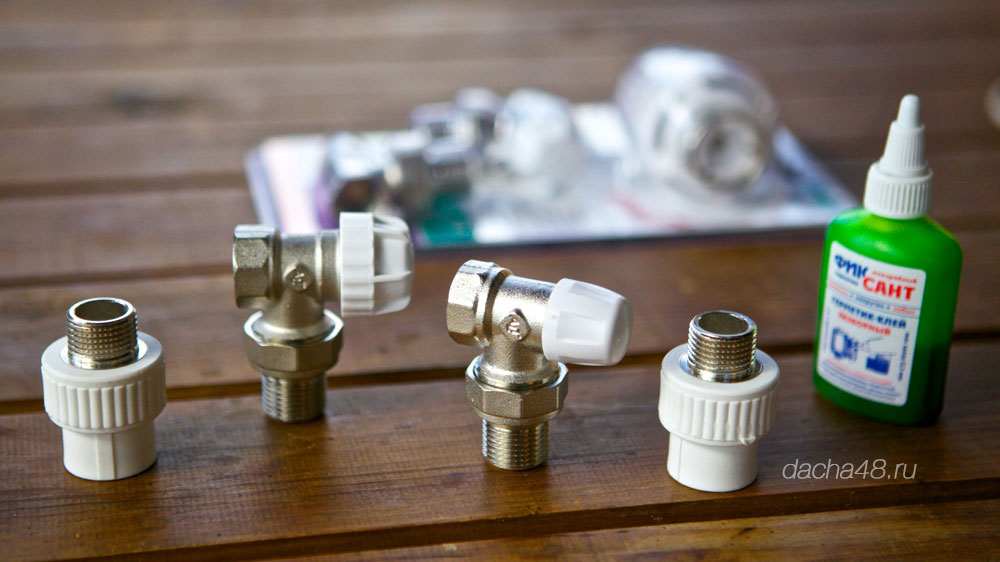
For sealing threaded connections used collapsible adhesive sealant. Before that, I had to use it. I liked everything very much, conveniently, quickly and without leakage. The instructions say "put glue on one turn of the thread," but how can we)))
It will not be worse!
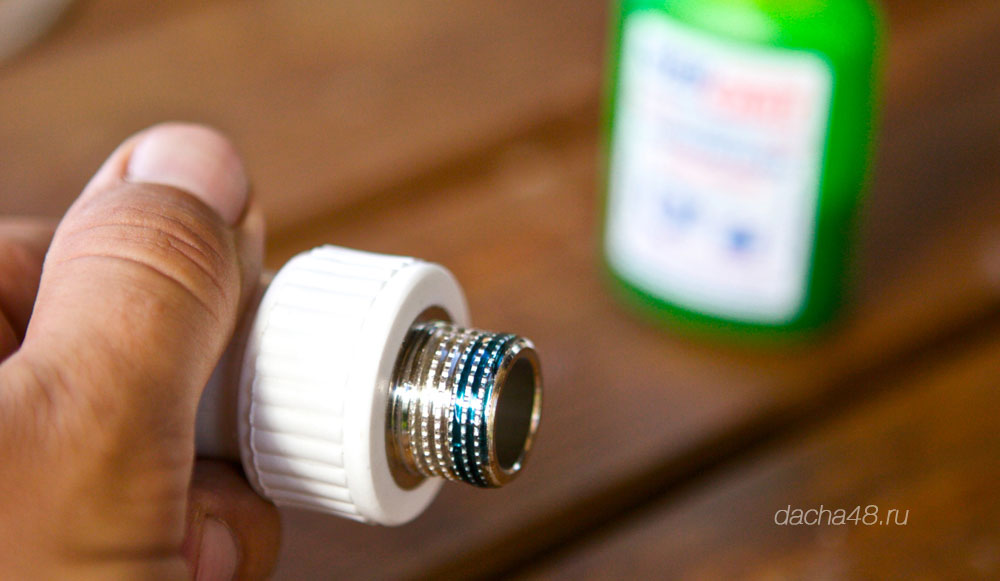
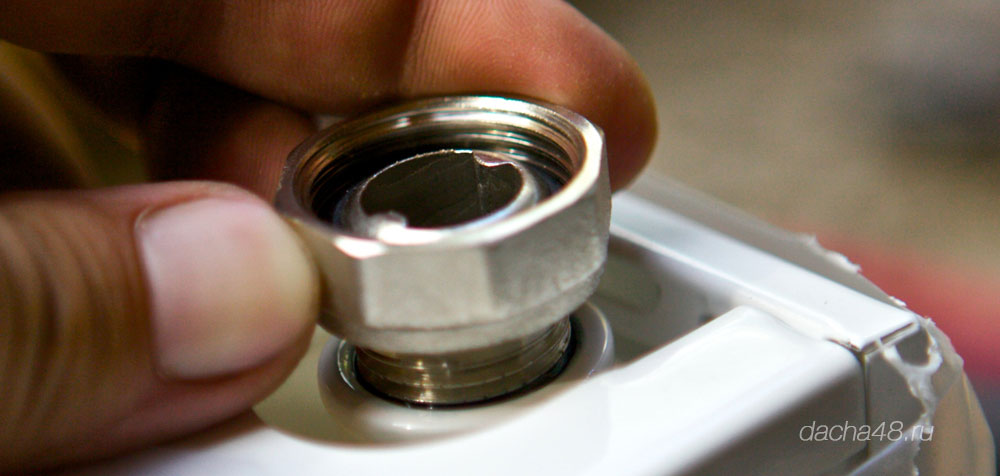
Twist with a transition coupling and measure the distance to the center. It turned out 58 mm, this is exactly the distance specified in the documentation for the radiator. Look above PRADO Classic Type 11.

Indicated 47/58 is the distance from the wall to the center. The first number indicates the distance if the fastening plate is fastened to the wall with a wide shelf, the second is narrow. Accordingly, in order for the battery to stand correctly, it is necessary that the adapter sleeve actually touches the wall.
To do this, cut off all unnecessary, leave 10-11 mm

Great, cut off, now it would be good to install everything without deviations along the axes and angles. At random, I did not want to let it go, so I set the laser level. On it you can clearly install the crane.
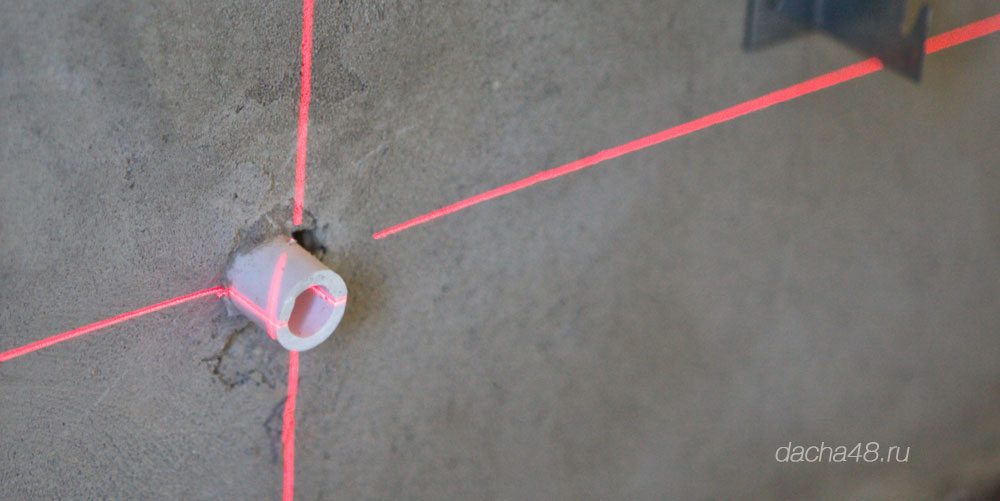
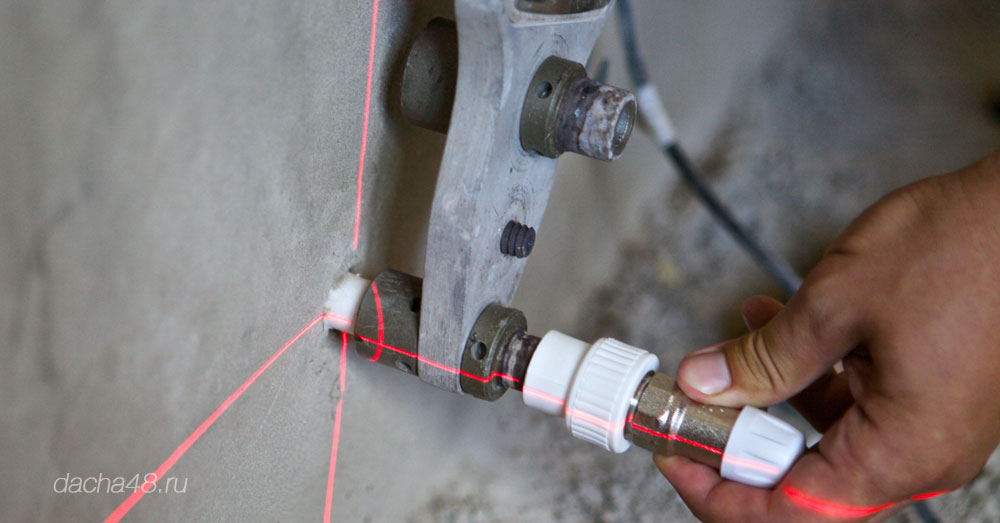
As a result, we have two cranes installed, which should ideally go to the battery. The crane consists of two parts, one we glued, and the second, with a nut, should be screwed to the battery. It's time to unscrew the nut and screw a small part of the valve into the hole in the radiator. Do not forget about the sealant.
Threads should be twisted in the same way, unless you intentionally need to adjust something. You can twist with the help of pliers, they are straightforwardly created for this, it is not as usual, but by inserting closed pliers into the hole of the tube. They cling to the brink.
Wait for 5 minutes until the sealant dries out and put the radiator in place. Everything should be the same.
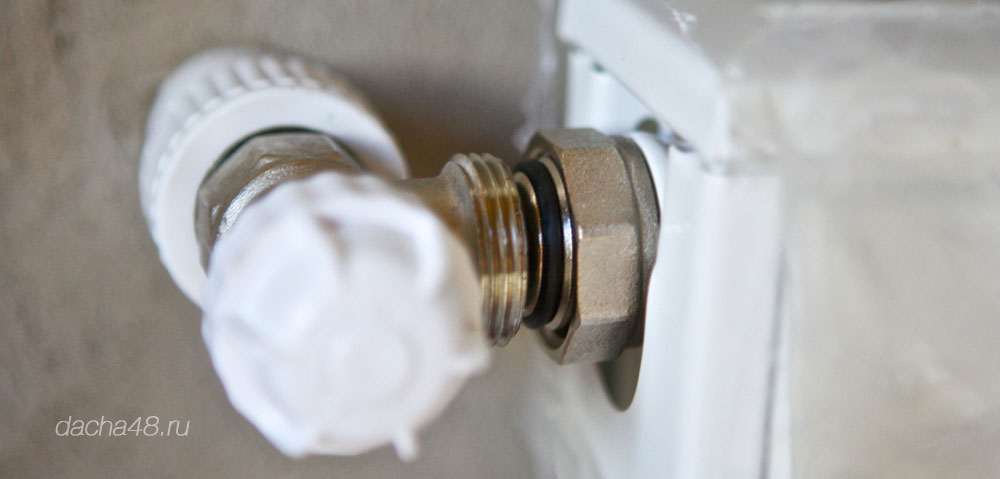
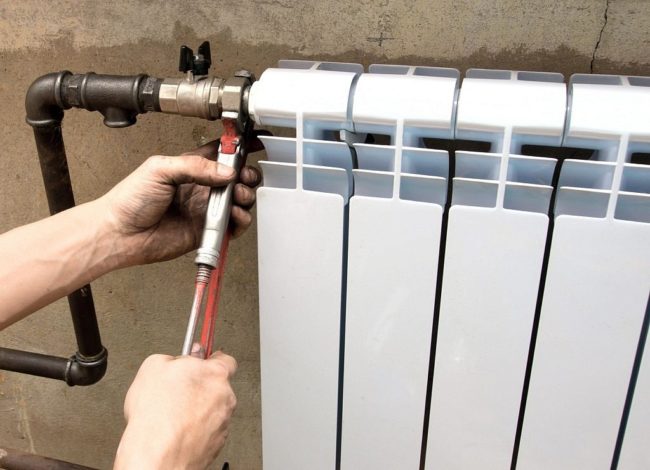
We tighten the nut, the key is quite tricky, so we have to use the gas one.
Now it remains on the other side of the battery to screw the Mayevsky crane on top,
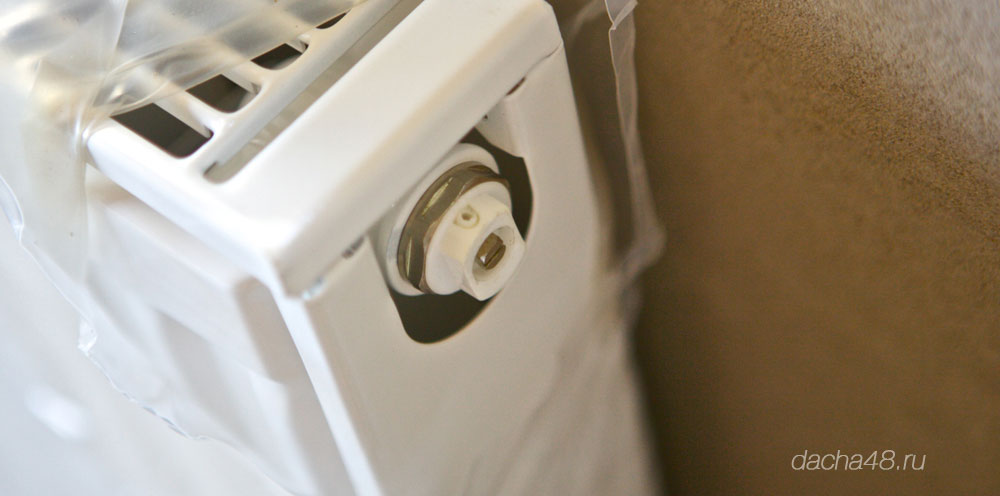
And the bottom cap.
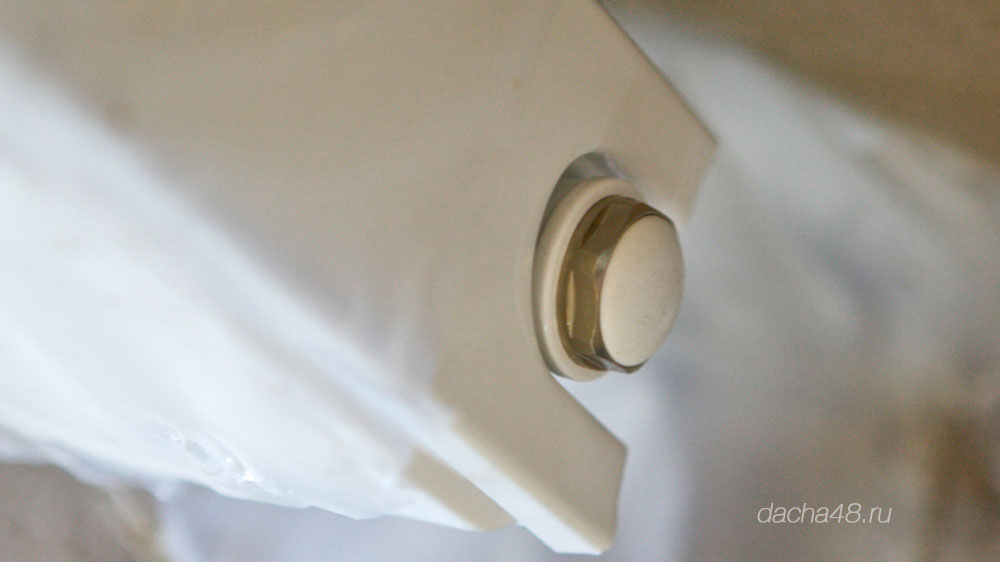
The result is like this.
![]()
Thus, we install all radiators in the house. If the radiator differs from Type 11, then the distance from the wall to the center of the radiator is greater. Pay attention to this and do not cut immediately.
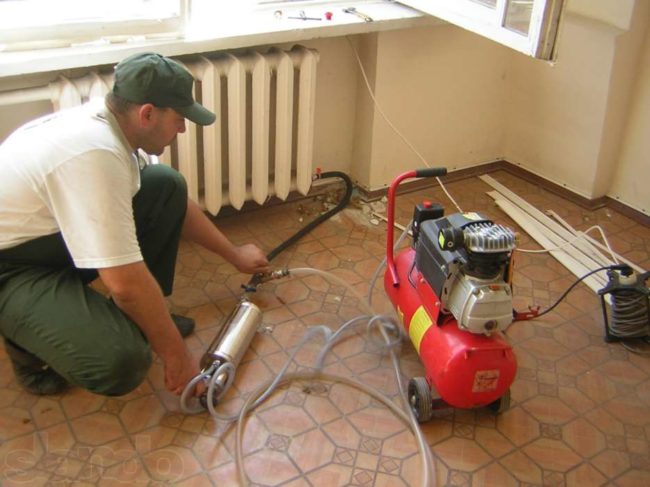
After everything is installed, it is necessary to press the system. You can do it with a well pump, it gives out about 6 atm, and inspection of leaks at this time gives a surge of adrenaline which I do not know what to measure)))))
When pressure testing I did not flow out either from under the plaster or from threaded connections. I hope you will succeed too.
As the famous proverb says: “Prepare a cart in the winter, and sleighs and radiators in the summer.” Everybody faces the need to change batteries sooner or later, and, of course, this should be done during the inter-heating season.
Before we proceed to the detailed step-by-step instructions on how to install radiators with your own hands, let's look at the technical characteristics of the main types. After all, the installation process depends on the design features. Therefore, it is necessary to choose the right radiator, based on the area of the room, operational properties of the heating system, etc.
Types of radiators:
- Cast iron.
- Steel.
- Aluminum.
- Bimetallic.
Cast Iron Radiators
Cast-iron radiators, perhaps, are the real "long-livers" in the market. A few decades ago, such batteries were in almost every house and apartment. But today, despite the technical progress and the emergence of newer modern radiators, cast iron products are very popular among our compatriots. Why are they so good?
It should be immediately noted that today these heating systems have been significantly modified and technically improved. Therefore, speaking of the advantages and disadvantages, we will focus on those radiators that are on the market today. One of the main advantages of such batteries is their long life. Manufacturers give a guarantee of at least 50 years, but with proper care, this period can be doubled.
Due to the massiveness and high heat capacity of cast iron, these radiators are able to maintain a high temperature for a long time after switching off the coolant. They are fairly resistant to pressure drops and corrosive environments. But because of its massiveness and heavy weight, the installation of cast iron batteries is quite a long and laborious process. In addition, they are not too distinguished by their beautiful appearance, unless, of course, the cast-iron construction is a “highlight” of the style concept of the interior.
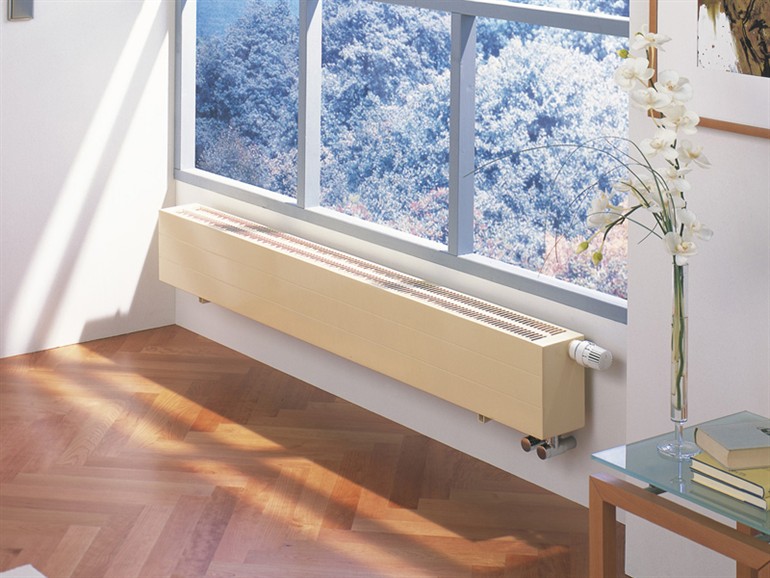
Steel radiators
Steel radiator
These products belong to the new generation of batteries and there are two types: tubular panel.
Steel radiators are characterized by high heat dissipation, high level of energy saving, high efficiency. The design consists of two steel plates interconnected by welding. These products are made with two types of connection: side and bottom. The choice depends on the initial location of the heating circuit. Their high popularity in the market causes light weight, ease of installation and attractive appearance. When buying, be sure to carefully study the coating, as this affects the further operation.
Tubular radiators are a structure consisting of several sections fastened together by welding. Depending on the area of the room and the heating effect, it is necessary to calculate the power of the finished module and select the optimal size. For tubular steel batteries characterized by excellent heat dissipation, a high level of performance technical characteristics and low price.
Aluminum radiators

They are made of aluminum alloy and painted in powder enamel. Due to the high heat transfer capacity, such batteries quickly and efficiently heat the room. Smooth, aesthetically attractive and light, they are very popular on the market today, but they have some drawbacks.
The connection of individual sections is carried out using a threaded coupling method, which allows you to quickly install the battery. High tightness of aluminum batteries is achieved through the casting method. Each section is molded in a separate form, and then combined into one common structure.
Due to the chemical properties of the metal, aluminum radiators are not able to withstand a lot of pressure, which is often created in central heating systems. Therefore, for installation in an apartment with a central heating system, it is better not to use these thin batteries.
Bimetallic radiators
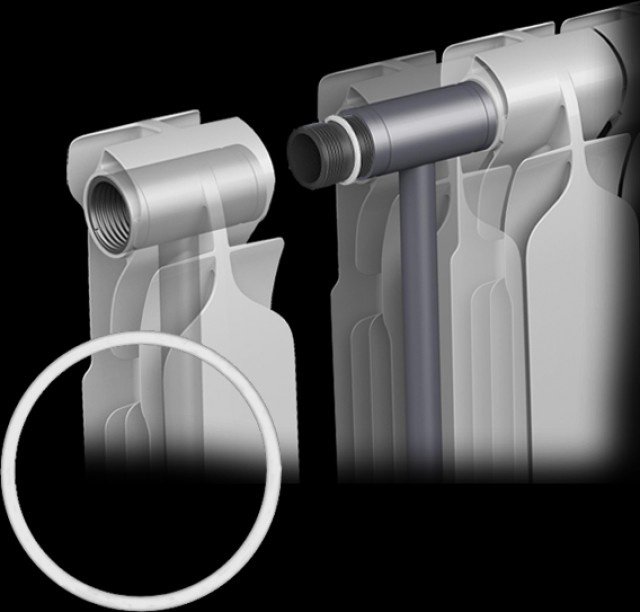
Bimetallic radiator device
These products today occupy one of the leading positions in the market. Made from high quality alloys, they are a double construction. The outer layer of the panel is made of aluminum, which provides lightness, great appearance and high heat transfer. And the core of the design is made of an alloy of metals that are resistant to corrosion and high pressure drops.
Thus, bimetallic batteries combined the best technical solutions from steel and aluminum radiators. The only drawback of these products is their high cost, which, however, is justified by long-term operation and an excellent energy-saving factor.
High technical properties and attractive appearance allow them to be used as an easily controlled and efficient heating system for an apartment.
How many sections are needed?
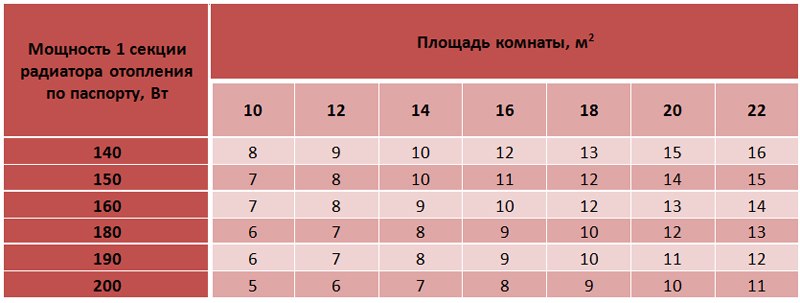
Table calculate the number of battery sections.
Once you have decided on the choice of radiator, you need to correctly calculate its size. After all, even the most efficient radiator will not provide heat indoors if its dimensions are not capable of heating the room.
The base value for calculating the size of the radiator and the number of sections is the area of the room. We offer a simplified (household) version of the calculation of the number of radiator sections.
Standardly, to provide the necessary heat in the room, 100 watts per square meter of space is enough. In a simple mathematical way we calculate:
Q = S * 100, where:
Q - the required heat transfer radiator.
S is the area of the room.
This formula will tell you how much radiator power to use to heat the room if the radiator is a solid, non-separable design. If his scheme involves building up additional sections, then add one more parameter to these calculations:
N - the required number of sections of the radiator.
Qus - specific thermal power of one section.
To make the calculations correctly, no higher technical education is required. It is enough to pick up a tape measure and measure the area of the room. This formula is suitable for a standard apartment with a ceiling height of 2.7 meters.
Where will we post?
Usually radiators are placed where the greatest heat loss is expected in an apartment. As a rule, this is the area under the window or on the side of the corner wall of the house. Even if the apartment is located in a well-insulated house and is equipped with double-glazed windows, the window is the place where in the cold season there will be the lowest air temperature.
If you do not put the radiator under the window, then the cold air, penetrating from the outside, will gradually fall down and spread across the floor. From the lessons of physics, we know that the warm air moves upwards. Hence, moving away from the battery and rising to the ceiling, it will create a kind of barrier to the cold flow from the street. According to the recommendations of the SNiP, the battery size should occupy at least 70% of the window, otherwise the warm air will not create the desired barrier.
With too short batteries, a situation may occur when cold zones will form on the sides. As a result, the room temperature will be low even with a powerful radiator. As you can see, not always the power of the battery provides a comfortable microclimate in the apartment.
Features of installation: we are defined with system of distributing
First you need to decide on the layout of the heating system for the apartment: one-pipe or two-pipe.
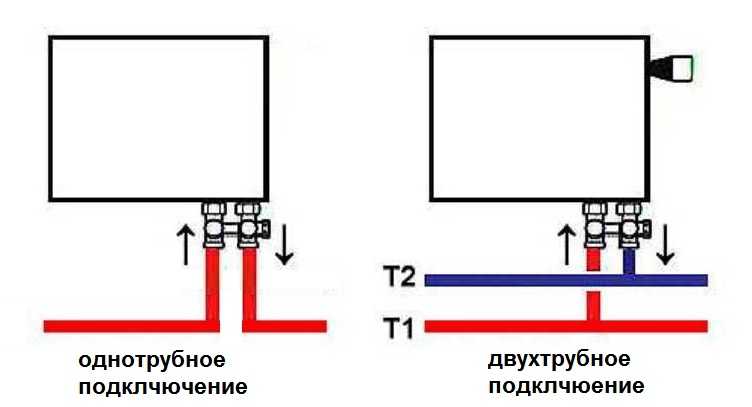
Single pipe serial circuit. This is the most simple option that allows you to quickly understand the wiring diagram of the radiator. The coolant flows sequentially through the pipe, passes through the design of the radiator, and then comes back again.
The two-pipe variant is popularly called the “return pipe”. This is a parallel connection when the coolant passes through one pipe and returns, already cooled, back. Although this option will cause some difficulties for beginners, it has a lot of advantages: the room warms up evenly and the thermostat can set the required temperature for each radiator separately.
Choose the type of connection
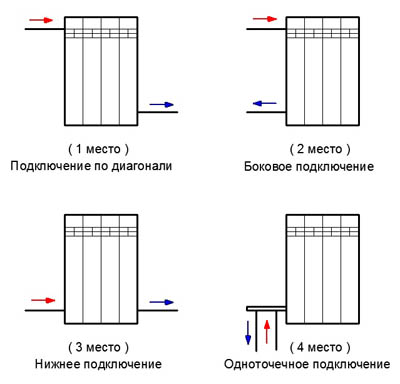
No less important is the type of connection: side, bottom or diagonal.
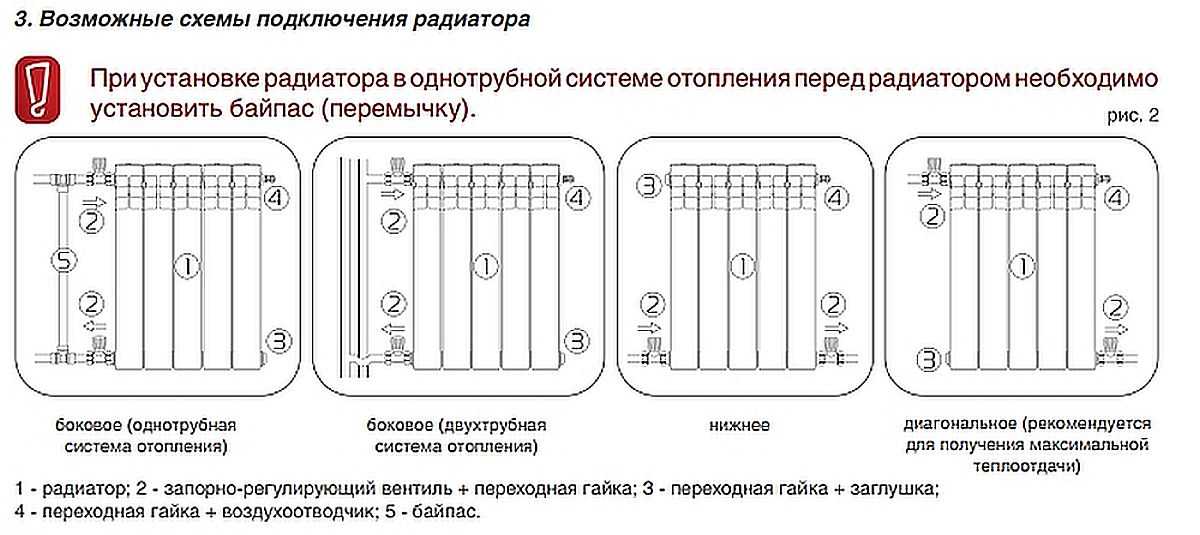
Typically, the type of connection is selected depending on the layout and features of the apartment.
| One of the most common options is a side connection, which has good heat dissipation, but if a long radiator is installed in an apartment, it may not warm up from the edge. |
| It is advisable to choose the lower connection if the pipes run under the floor or are hidden under the plinth. The connections are directed downwards, which does not violate the aesthetic appearance of the battery. However, with this type of connection heat loss can reach 15%. |
Diagonal connection - the most effective | Diagonal connection should be used if the length of the radiator is at least 12 sections. Here the pipe is connected to one end of the battery, the coolant passes through the whole structure, and the other pipe is returned back. Heat loss with a diagonal connection usually does not exceed 5%. |
When the choice is made, and you have decided on the type of radiator and the type of its connection, you can proceed to the installation work. Today, the most popular among heating devices for apartments with a central heating system, are iron and bimetallic batteries.
We suggest to get acquainted with the instruction of each of these options, which have a number of technical features.
Before starting the installation for apartments with a central heating system, it is necessary to obtain permission from the relevant authority to carry out installation work. You will have to drain the water from the batteries, which means you must first turn off the entire riser. This is a prerequisite, the failure of which threatens with a serious administrative fine. After you fill out all the documents, a mechanic will come to you at the appointed time to flush the water. Of course, the dismantling and installation of batteries should be carried out in the inter-heating season.
Installing bimetallic radiators: step by step instructions
There is a wide variety of bimetallic radiators on the market today, which differ not only in shape, size, but also in the type of connection: dock and bottom. We suggest to familiarize with the detailed instruction of installation of a bimetallic radiator with standard lateral connection.
The order of operations when measuring the heating system in the apartment. (When installing batteries in a new building, then the dismantling step can be skipped).
- Removing old batteries.
- Mounting brackets.
- Radiator assembly and installation.
- Connection to the heating system.
- Test for strength and flow.
To install bimetallic batteries, we need the following tools and materials.
Materials:
- Battery pack.
- Brake cleaner and brush (for cleaning radiator threads).
- Brackets, which are selected depending on the material of the wall. Their number is calculated depending on the size of the radiator itself. On a standard radiator, consisting of 6-8 sections, you need to take 3-4 attachment.
- Sgony or adapters. These elements will allow the radiator to be connected to the heating circuit pipe without welding.
- Fittings (valves, adapters, couplings).
- Mayevsky's crane - with the help of this part, if necessary, you can remove air from the pipes.
- Thermostat Allows you to control the flow of hot water into the radiator, which allows you to independently set the microclimate in the house. You can, of course, get along with the usual half-turn tap, but then you have to manually adjust the opening degree of the tap once a day in order to avoid temperature jumps. And this, you see, is not entirely comfortable.
- Tow, sealing tape.
| Bimetal Battery Mounting Tools | |
|---|---|
|
|


Installation of bimetallic batteries must be made in the original packaging (film). The upper layer of the radiator consists of high-quality aluminum, and this material is quite fragile. It is easy to damage during the installation work tool, so open only those areas to which you will connect the pipes and adapters.
| Installation Instructions for Bimetallic Batteries | |
|---|---|
| Before dismantling the old battery, make sure that the water is drained, otherwise an accident cannot be avoided. Not everyone has a battery charger. If you make the dismantling of an electric tool, it is easy to predict the result. |
| Choose a place to install the radiator. It depends on the type of connection, its length. Determine the distance of the battery from the floor and from the wall.
|
| Make a markup on the wall with a pencil, where the radiator itself will be placed. And we do not by eye, but strictly according to the level. Radiators in the same room must be installed at the same level. It is advisable to do in terms of efficiency and aesthetics. Now mark up the point where the brackets will be installed. We drill holes in the wall, in which we insert dowels. Screw fasteners (brackets). Some models already come with a set of fasteners included. Depending on the length of the radiator, they can be 2 or 4. |
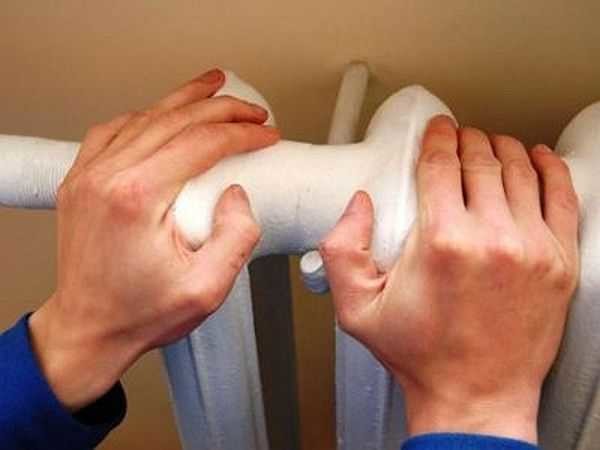
| Build a radiator.
|
| We hang the assembled design of the battery on the brackets so that it is tightly supported at all points. On the back of the radiator there are already special brackets, so it is not difficult. Check again the degree of slope of the building level. If necessary, adjust the tilt of the structure. |
| Connect the radiator to the supply and discharge pipeline. We make sealing using flax (tow or compactor). |
| We make a design test pressure. You can, of course, perform professional pressure testing. But for this you have to call a specialist with the tool or buy the most expensive device. And you can do it in a simpler way. Slowly open the taps to the radiator filled with water. If this is done abruptly, then a powerful water hammer can occur, which will destroy the integrity of the structure. We check every joint, connection for leakage. |

We invite you to familiarize yourself with the detailed video instructions for installing a steel or bimetallic radiator in the apartment.
Video. Installation of a radiator.
Installation of cast iron batteries: step by step instructions
Installation of cast iron radiators has a number of distinctive features. First of all, this is due to the heavy weight of products that can not be installed alone.
The method of connecting the battery to the tube will also differ. If we connect steel and aluminum pipes with a thread, gas welding will be used here. Before proceeding with the installation, it is necessary to stock up with the necessary set of tools and materials.
Materials:
- a set of batteries of the right size;
- sealant (flax or tape FUM);
- fittings (plugs, tees);
- mayevsky's crane;
- thermostat;
- fasteners (brackets).
| Installation Instructions for Cast Iron Batteries | |
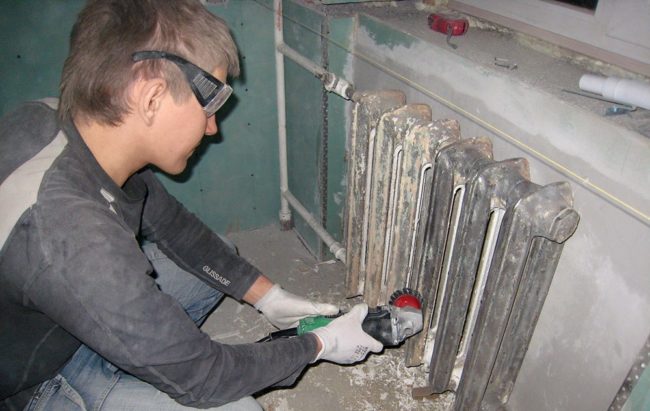
| We are dismantling the old battery. With the help of the grinder, we carefully disconnect the cast-iron construction, making sure that the entire system is turned off, and the remaining water from the pipes is drained. |
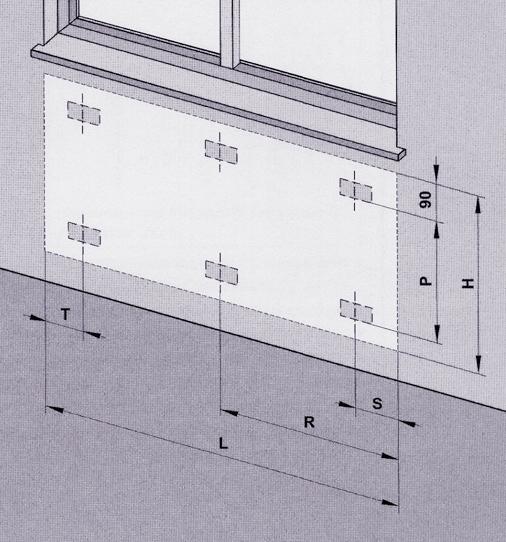
Before installation, you must perform a markup for mounting the battery
General layout for radiator brackets | We determine on the wall the location of the battery in the room. Having installed the radiator clearly in the center of the window, we will achieve normal and natural air circulation in the room.
|
Mount the brackets and install the battery on them | Install the brackets into the wall.
|
| We are starting to connect the radiator to the heating system.
|
| We carry out installation testing. Gradually unscrew the tap and run the water. This should be done slowly, not allowing a powerful stream of water to immediately fill the radiator, in order to avoid water hammer. |
In conclusion, we want to offer you a detailed review of the video installation instructions for radiators, so that you can clearly see some of the installation features.
Proper installation of the radiator in the apartment with your own hands is the key to effective work of the heating system and comfort in the house. Therefore, strictly follow all the rules of this manual and you all must succeed.